Photo by Jeff Carlson
What APFS Does for You, and What You Can Do with APFS
When Apple released macOS 10.13 High Sierra in 2017, one of its most notable features was nearly invisible. Installing the update on a Mac with a solid-state drive (SSD)—but not a Fusion drive—automatically switched the underlying file system from Mac OS Extended (also known as HFS+) to APFS (Apple File System).
The file system is the bedrock-level technology that specifies where data is stored—not just in terms of how files and folders are represented in the operating system, but where individual bits are physically stored in the cells of an SSD chip or on the magnetic surfaces of the spinning platters in a mechanical hard disk drive.
There are any number of ways the switch to APFS could have gone wrong, but for most people the shift was seamless—if a bit more time consuming than most macOS upgrades. You may not even have noticed that your Mac is now running APFS. To find out, open Disk Utility, click your startup disk in the sidebar, and look under the disk name.
High Sierra converted my 2016 MacBook Pro when I upgraded and, since nothing blew up, I filed APFS away as another technology shift that Apple managed efficiently. But in the process of writing my just-released book Take Control of Your Digital Storage, I learned why Apple went to all the trouble. APFS offers a few notable automatic benefits and some useful things you can do directly.
What Does APFS Do for Me?
Let’s start with why Apple made the switch from Mac OS Extended to APFS in the first place. Although mechanical hard disk drives are still widely used and offer the best price per gigabyte, solid-state storage media is the future. (In fact, APFS is the file system used by iOS devices, Apple Watches, and Apple TVs—all of which store data in solid-state memory.) An SSD provides much faster performance because it doesn’t suffer from the lag between macOS asking for data and a mechanical disk’s armature skipping to the correct positions on the platters to read it. An SSD also has no moving parts, so the likelihood of mechanical failure is extremely low.
However, the file system in use before APFS, Mac OS Extended, isn’t as efficient when working with SSDs. It was designed—many years ago—with magnetic disks in mind, where a file is preferably written in a long stretch across the surface. In reality, most files are split up into many tiny pieces, which is why we used to optimize performance by “defragmenting” disks, a practice largely unneeded these days except in rare circumstances.
On an SSD, data is written to cells regardless of where they are located in relation to one another. But there’s a catch: data can be written to the cells only a finite number of times, so APFS efficiently shuffles data around to manage SSD wear. Also, if you duplicate a file on an SSD, APFS uses the stored data of the original file and writes just the changes rather than writing an entirely new file. In terms of performance that you can see, duplicating that file—or folder, or hundreds of files—happens nearly instantaneously because APFS makes metadata links to the originals.
So, underneath the surface, APFS handles data more efficiently. That said, Apple is still working on APFS, making it a moving target for developers of backup and disk utility software and limiting the compatibility of the file system. APFS currently works only with SSDs, although Apple says that full support for mechanical hard disks and Fusion drives is coming in macOS 10.14 Mojave. It’s possible to format a hard disk drive as APFS, but you’re likely to experience a performance hit compared to it formatted with Mac OS Extended. It will be interesting to see how Apple addresses that in Mojave.
APFS also isn’t supported on Time Machine drives. Even if your startup disk is an SSD, your Time Machine drive needs to remain in Mac OS Extended format for the time being.
What Can I Do with APFS?
That’s all behind-the-scenes stuff, but what does APFS enable you to do? One of its most powerful user-facing features is how it enables you to create multiple, resizable volumes on your drive. Sometimes people want to split a drive into multiple virtual volumes to separate data such as files for work and files for home or to encrypt one for storing sensitive data and leave the other unencrypted.
To explain how Mac OS Extended and APFS each handle that task, imagine the drive is a factory that builds rockets. I could instead use an office building as a metaphor, but wouldn’t you rather visualize spaceships?
On a drive formatted as Mac OS Extended, the factory is a giant open space where the rockets can be assembled and parts can be stacked. The factory floor is the free space on the drive.
(There’s also a secret door to a hidden room of emergency equipment that nobody pays attention to unless something goes wrong on the factory floor. That room represents macOS Recovery, the invisible startup partition that runs a scaled-down version of the operating system when you need to repair your main macOS installation.)
Now, let’s say you want to partition the drive into two volumes or, in our example, to split the factory into two sections to build two rockets simultaneously. Under Mac OS Extended, you’d erect a permanent wall between the sections, creating two separate rooms. (The hidden macOS Recovery room is still there, too. Safety first, people.)
Soon your rocket business is growing quickly, and you realize you need to build a larger rocket that will get a spacecraft to Mars. The problem is, this new rocket won’t fit into either of the two rooms. So, to make way for it, you have to take everything out of the factory (back up all the data and erase the volume), smash the wall (reformat the drive), build a brand-new wall that allocates enough space for the large rocket and leaves a smaller second room for the first rocket design and components (repartition the drive), and put everything back (restore the data from backup).
(Technically, there’s another option. If one of the rooms (partitions) is empty, Mac OS Extended enables engineers to move the wall, resizing the partition non-destructively. But when there’s equipment (data) in each room, the wall has to come down first.)
If, instead, you decide to go back to the one-room layout, you need to take everything out of both rooms and start over (back up all the data, erase the entire drive, and restore the data).
Now, let’s look at an APFS-powered rocket factory.
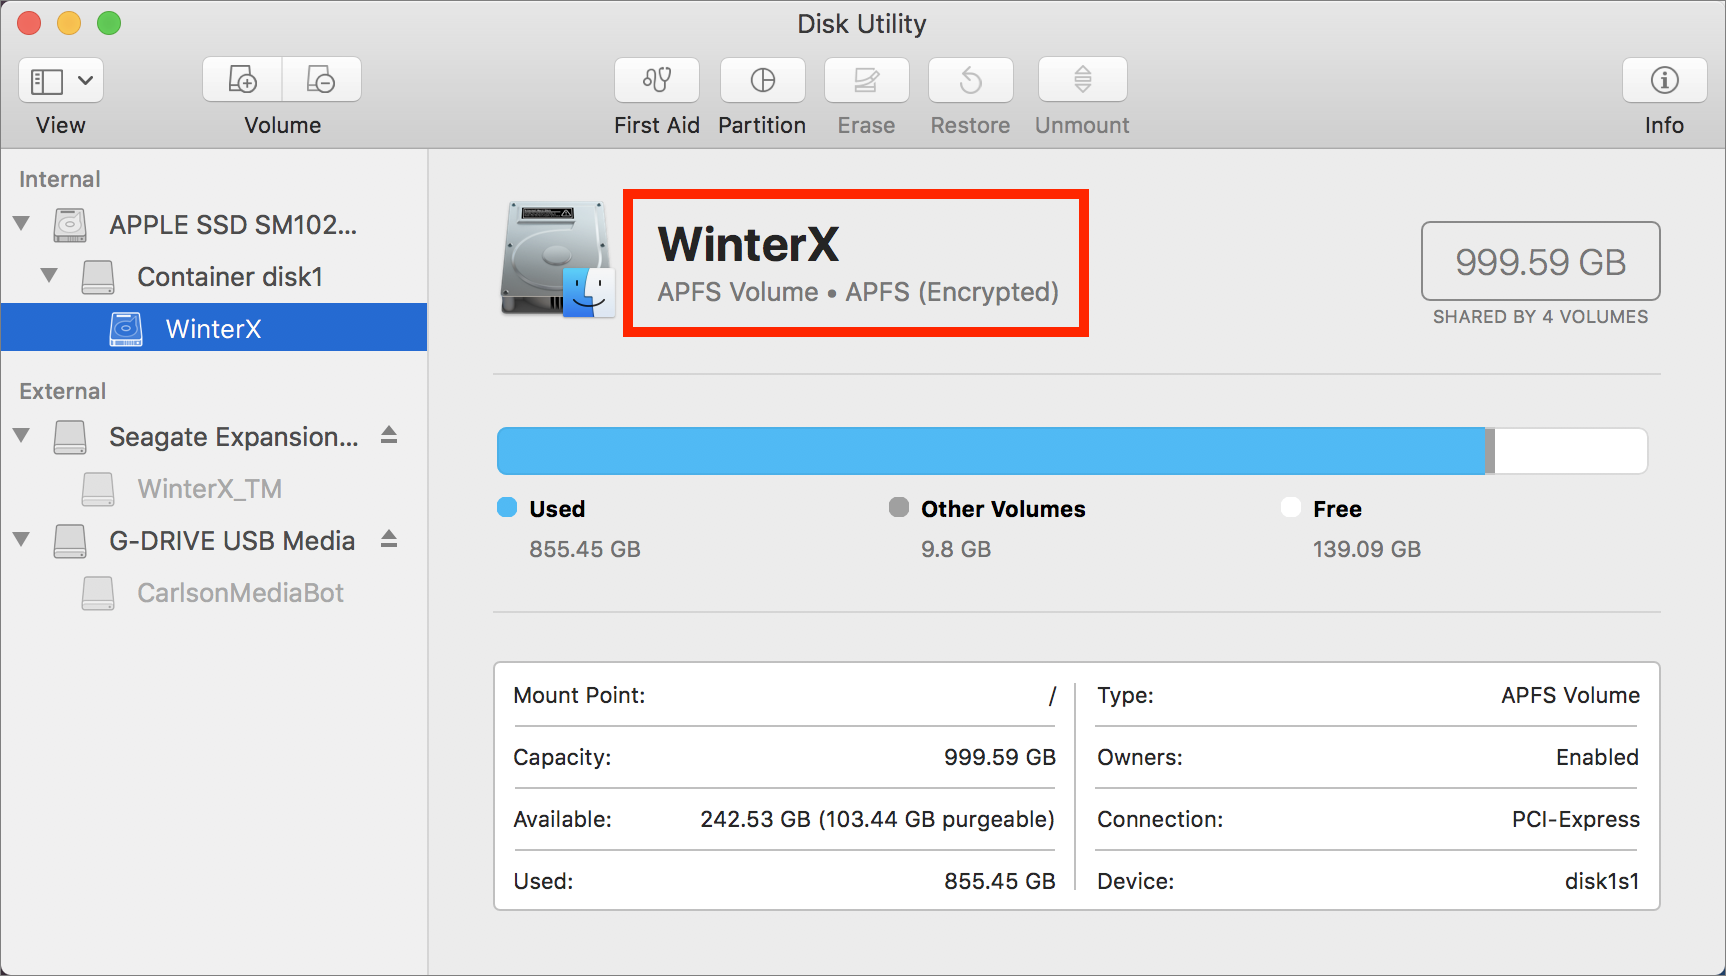
In terms of how space is allocated when formatting or partitioning a drive, APFS creates containers that include volumes, which can be dynamically adjusted as needed.
In our rocket factory analogy, APFS starts as a large open building, but even before a single piece of machinery is installed, a border of bright yellow-and-black tape is put onto the floor to indicate the active work area. That’s the container, and it encompasses nearly all of the factory area. That large area is also a single volume.
(If the drive is a startup disk, there are two other small areas taped off, one for the macOS Recovery room, and one for virtual memory, basically a small spot to store equipment—data—for short periods of time to make it easier to access.)
In this scheme, all the space in the volume is available for use, just as in the Mac OS Extended factory, but the factory manager is better about positioning tools and equipment near each other for a more efficient workflow.
As production ramps up and the factory floor needs to split into two sections, the APFS factory doesn’t build a physical wall. Instead, the manager merely moves the tape to indicate that there are now two work areas: adding a new volume and making the original volume smaller. The equipment in the area that becomes the second work area moves as needed—rather than being removed (erased) to create the volume. (You can also set minimum and maximum size limits for a container when you create it.) In the Finder, you see two volumes.
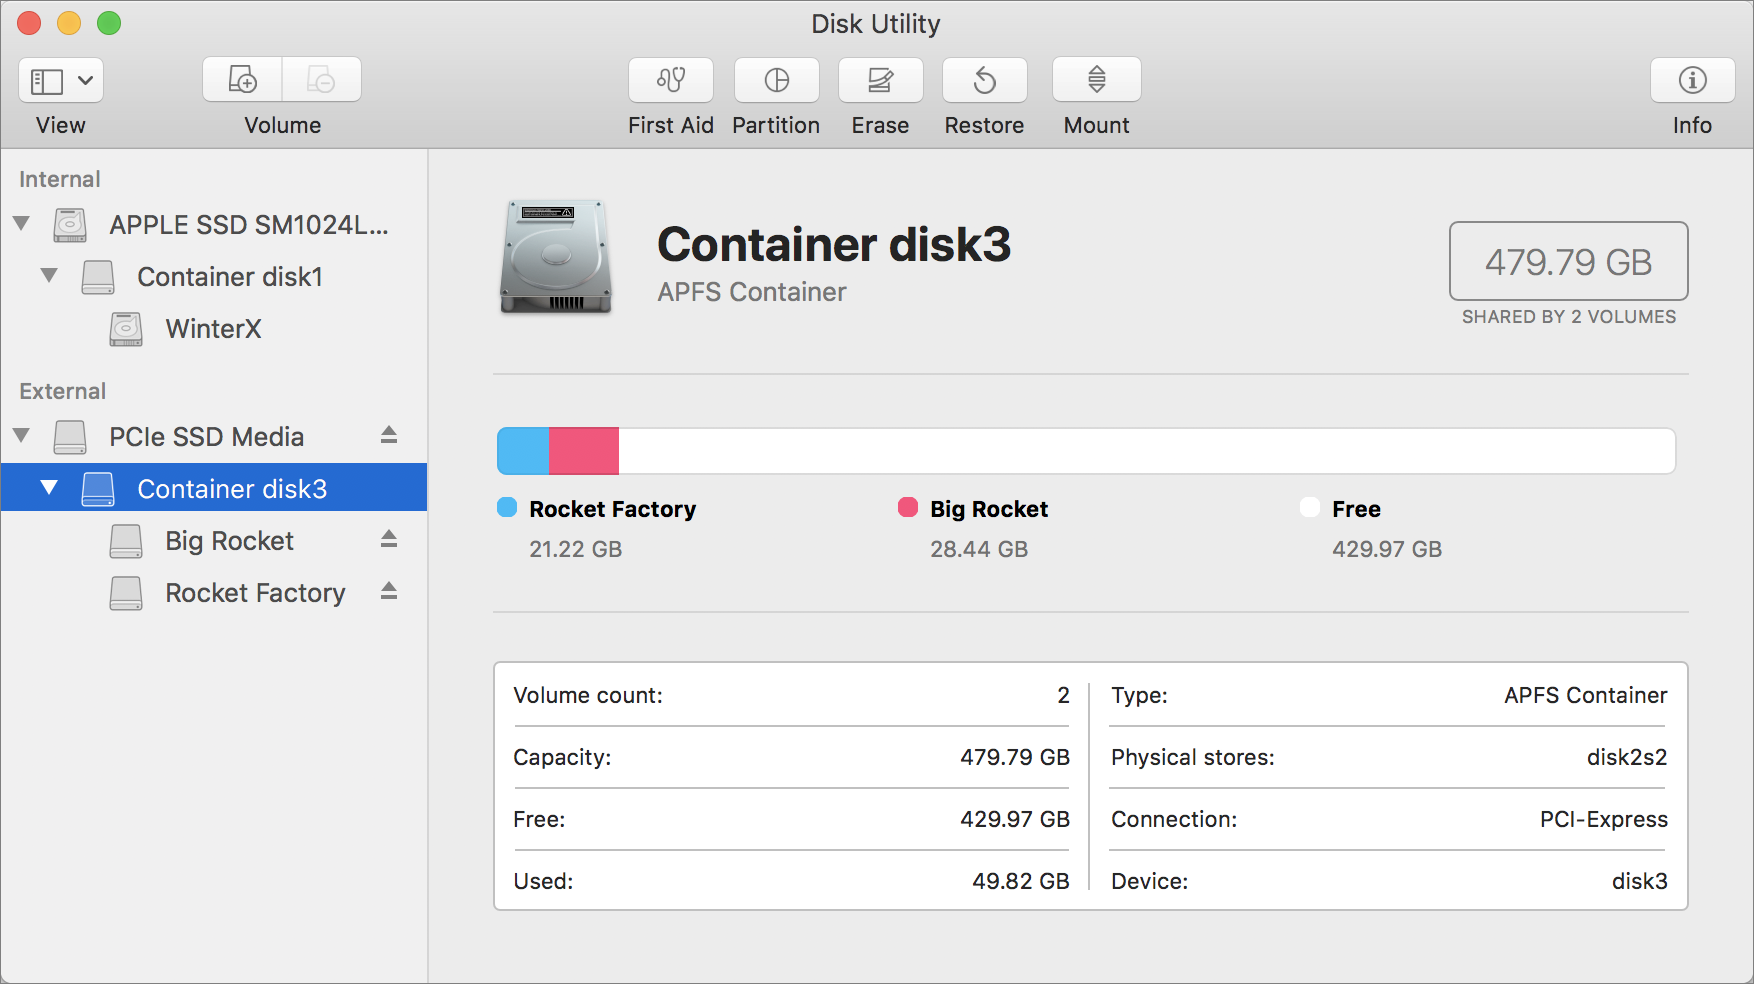
When the order comes in to start manufacturing bigger rockets, the volume that needs the extra space automatically grows as needed: redrawing the taped area and taking space from the second volume dynamically. No walls need to be torn down; no volumes need to be erased and then restored.
(Note that it is possible to partition an APFS drive, which gives you multiple immovable containers, but then they have the same limitations as Mac OS Extended partitions. So there isn’t much point.)
APFS Snapshots
Another major benefit to APFS is its support for snapshots, which are a record of a drive’s state at a point in time. When you apply a system update, macOS automatically creates a new snapshot, so if anything goes wrong, you can roll the Mac back to the exact state it was in before the update. A snapshot is also created once every hour. These snapshots also enable you to retrieve deleted files or to go back to an earlier version of a file.
Sound familiar? Except for the automatic pre-update backup, that’s how Time Machine works. In fact, to access snapshots, you use the Time Machine interface (even if you haven’t yet set up Time Machine). But two separate things are going on behind the scenes.
When a Time Machine drive is connected, macOS makes regular Time Machine backups, not APFS snapshots, to that drive. Since a Time Machine drive must be formatted as Mac OS Extended, macOS copies to the drive any files that were changed since the last backup.
If the Time Machine drive is not connected—let’s say you’re traveling with your MacBook Pro—macOS creates APFS snapshots every hour and stores them on the startup disk or any APFS-formatted SSD directly connected to the Mac. The snapshots don’t take up much extra space, because they only contain metadata describing the states and locations of every file, plus data that’s been removed or replaced. Snapshots also age out after 24 hours and are automatically deleted.
On Macs running macOS versions earlier than High Sierra or those with hard disk drives or Fusion drives still formatted as Mac OS Extended, Time Machine creates similar local “mobile Time Machine” snapshots when the Time Machine drive is disconnected. But because the drive isn’t formatted as APFS, those local snapshots are not the same as APFS snapshots.
On a drive formatted as APFS, you can see how many snapshots are present by opening the Terminal app and typing:
tmutil listlocalsnapshots /
You can also create a snapshot at any time by typing:
tmutil snapshot
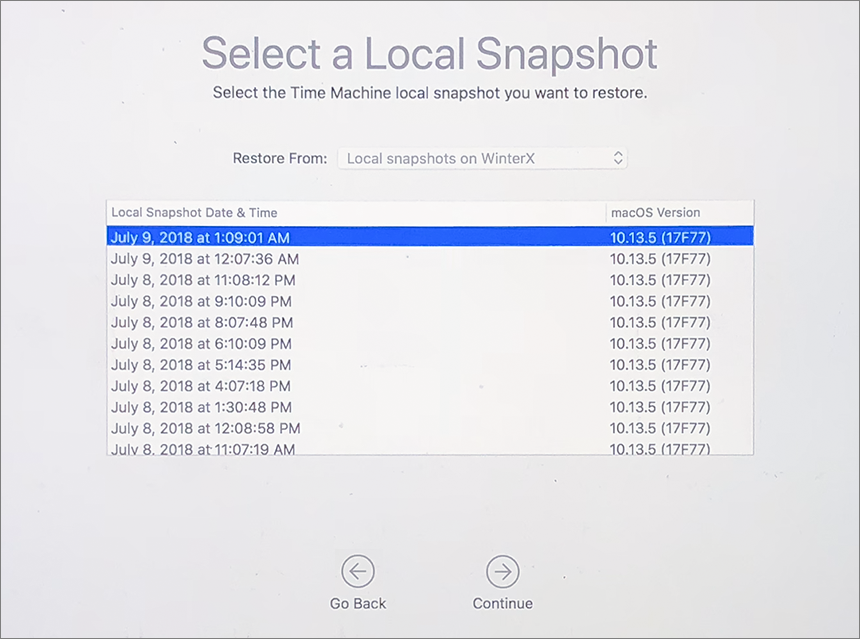
If you need to restore deleted files or go back to an earlier version of a file, you use the Time Machine interface to do it. Click the Time Machine icon in the Dock or choose Enter Time Machine from the Time Machine menu bar icon, and then use the timeline on the right to navigate to the version of the file you want.

Should you need to restore the entire startup disk to a previous state, restart into macOS Recovery (hold Command-R at startup until you see the macOS Utilities screen), and choose Restore from Time Machine. You’ll be given the option to select one of the local snapshots.
(Speaking of macOS Recovery, if you open Disk Utility and run First Aid on the startup disk, it also checks all the snapshots. So if you have a lot, be prepared to wait quite some time for First Aid to complete.)
You may never need to take advantage of snapshots, but it’s comforting to know that macOS has a built-in data protection mechanism in place at the file-system level.
Take Control of Your Digital Storage
APFS is just one part of our modern storage picture. In Take Control of Your Digital Storage, I also investigate the other acronyms that bedevil us when contemplating adding capacity: what to look for when buying a NAS (Network-Attached Storage), understanding the difference between HDDs (hard disk drives) and SSDs (solid-state drives), and explaining RAID (Redundant Array of Independent Disks) and, related to RAID, possibly my favorite acronym ever, JBOD (just a bunch of disks). You’ll also learn more about creating partitions and volumes, using Disk Utility and First Aid, encrypting drives and data, and more.
The book is available now for $12.99 at the Take Control bookstore.
Are you sure that the default is that snapshots are created each hour? I have no snapshots on my disk (well, I didn’t until I manually created one), and other Internet sources seem to indicate that they are only automatically created before major system updates.
I was hoping this article would clarify the somewhat annoying behavior I’ve encountered. I purchased a (spinning platter) external drive and reformatted it as APFS (not knowing that might not be a good idea). In the process I partitioned it into two partitions. Now both partitions show up on my desktop and seem to work fine and show the capacity I intended for each - but the original volume also shows up on my desktop, still showing the full capacity of the unpartitioned original drive. I’m concerned that I’ll accidentally copy something to that original volume and in the process screw up my partitions - is there a way to make that original drive go away (at least not appear on the desktop)?
It’s much less than not a good idea, it’s unsupported by Apple and severely limits what the drive can be used for.
Paragon provides a lossless converter. Have not tried it myself, but they have a solid reputation.
https://www.paragon-software.com/home/apfs-hfs-converter/
-Al-
Good question, Jim. There’s some confusion about this. I was looking at this Apple Support article that reads:
" Your Time Machine backup disk might not always be available, so Time Machine also stores some of its backups on your built-in startup drive and other local drives. These backups are called local snapshots. One snapshot is saved every hour. If you’re using macOS High Sierra, another snapshot is saved before installing any macOS update."
However, looking at it again, it sounds like that’s just for the HFS+ local Time Machine backups, not APFS local snapshots.
Right now I’m not seeing anything other details, though a tickle in the back of my mind says I did see something more specific at some point. As it is, if I use
tmutil listlocalsnapshots /on my machine right now, I see:com.apple.TimeMachine.2018-07-23-014427com.apple.TimeMachine.2018-07-23-031655com.apple.TimeMachine.2018-07-23-113908com.apple.TimeMachine.2018-07-23-123820com.apple.TimeMachine.2018-07-23-143901I haven’t done any system update checks today (unless maybe those were done in the background, but that seems quite aggressive).
Snapshots also depend on how much free space you have. Also, in the Time Machine pref pane, do you have Back Up Automatically selected? I wonder if that could also trigger the snapshots.
Steve, I’d say the best approach would be to make a duplicate of those partitions, then format the HDD as Mac OS Extended with new partitions and restore the data. Then you won’t have to wonder.
But your question points to one of the things that inspired this article and my book in the first place. There’s been a jumble of info out there about APFS. And I know that Apple still hasn’t documented everything sufficiently for developers.
You can install High Sierra on an HDD without the automatic conversion to APFS that you get with an SSD. However, I’ve been test driving the macOS 10.14 Mojave beta and it does automatically convert an HDD to APSF, without asking permission. On a clone of my Sierra system on a HFS+ hard drive Mojave runs slow as snot and often fails to start up at all. I’ve twice been obliged to reinstall the beta just to get it to upgrade to the latest version and then clone it back to an HFS+ partition, at which point it (sometimes) runs better. If it fails one more time I’ll give it up as a bad deal.
As for the destination between partitions and containers, that’s just too complex for this tired old brain to handle.
Before the launch of HS, there were kinda promises that APFS WOULD work on SSD based RAID arrays. Not a peep from Cupertino since then and try as I might to find out ANY information, nobody seems to know anything, not even speculation! Dummy that I can be at times, never thought to come here…
Been leary to even try and take my Sierra up to HS because I was concerned I’d complete trash my setup in the process… although the theory was that I SHOULD be able to go HS with it not trying to convert to APFS. As time went by, I figured that why not go from to Mohave… so the question remains will Mohave legitimately support arrays (and/or spinning drives), will it try to force convert to APFS and trash my array, or will it give me a choice?
Does anyone know if Apple has any plans to enable checksums for user data, as opposed to only Apple’s system metadata? Bit rot on user data does need to be addressed.
Blessings, and thank you!
This is the best description of APFS I’ve seen so far. The factory analogy does the trick. Thanks.
FYI: I’m testing the 10.14 Mojave beta. It automatically converted the partition on the external drive I’m using to APFS as Mojave was installed. It runs like a slug on my HDD. So I copied it to an HFS+ partition and it runs somewhat better. So Apple has not perfected APFS for hard drives yet in Mojave. The upside, however, is that it worked on one partition and didn’t affect the other partitions on the 3TB drive I’m using, which remained in HFS+ format.
No, I do not have Back Up Automatically selected; everything on this Mac is duplicated elsewhere.
I think I read in an article about APFS that one of it’s advantages is that it enables checksums on data, but I don’t know where I saw it. You might Google APFS-checksums to see what turns up.
Thanks for the reply, but I have researched it extensively. The only reports I have found are of Apple allowing checksums for their own data only, and not allowing checksums for user data. But thank you! ; - )
I recently had a problem with an external disk and APFS that I still cannot figure out.
I have some encrypted 1TB disk drives that use Thunderbolt connections. I have several of these and have used the Finder level Encryption (with Left click - encrypt). I found one of the new disks I had formatted could not be repaired with Disk Warrior and looked and it had container on it. I looked at the setting and it was formatted in APFS.
As I had heard that format was not optimized for hard drives, I decided to change it back. I do a lot of file copying to it and like to use Disk Warrior and other utilities to keep an eye on things and fix it up. Having it APFS left me with fewer options. So I copied the files over to a separate disk and reformatted the drive. I looked at some ways online to do that, but did not use the terminal to change the drive, just Disk Utility. I verified that it was the Apple Extended and then copied the files back and encrypted it again.
A few days later I looked at it again, and it was APFS again! Is there a way of changing it that it is permanent, or does the OS do this automatically? I am on High Sierra.
The thing that’s doing it is encrypting the disk in the Finder. I ran into this in my testing, and included it in my book:
Not sure how hard drive optimization plays into your thinking here. Although you are correct about Disk Warrior, all the other drive utilities are at least mostly able to repair APFS issues, should they ever arise. I’ve been using several APFS external drives since the format first showed up in testing and none have suffered any damage to date that required repair. Seem to be at least somewhat more reliable.
As already stated, FileVault is responsible for both CoreStorage and APFS formatting, so you will need to start out with an encrypted partition to avoid APFS. I’m not certain you can avoid CoreStorage by doing that, but Disk Warrior can still handle that.
-Al-
Thunderbolt it is. I have a hybrid drive, so my startup disk is not APFS.
I was able to use Disk Utility to make an encrypted disk and all looks fine. Thanks all.
I experienced the APFS the hard way. After upgrading to High Siera the time machine stopped working with the dreadful message “Time Machine completed a verification of your backups. To improve reliability Time Machine must complete a new backup for you.” Obviously pressing the OK button, not knowing that “a new backup” really means wiping out everything and starting fresh. Numerous error messages after that pointing that the time capsule was corrupted. After hours sitting at the genius bar fighting off the support staff convincing me that the only solution was to buy a new AirPort Time Capsule somehow we managed to mount the ATC. We manually deleted the backups and the snapshots and finally it worked at the end. I lost the history but the Capsule was saved. Apparently the issue was with the new APFS between the upgraded Sierra files on the MBP and the previous backup.
To the second point, your doubts are correct. After noticing a dramatic reduction in free space on my local SSD I realised that the local snapshots have taken out about 90GB. After deleting them through the terminal and disabling the automatic backup have managed to reclaim back the lost 90GB. Now I run only manual backups. As soon as you turn on the automatic backup the local snapshots are getting created taking up massive space.
I’m erasing the disk and reinstalling MacOS on an older (~2013) iMac which is already running High Sierra. When I erase, I’m asked to choose between APFS and MacOS Extended. The disk system is currently Journaled HFS+. Can I switch to APFS during the erase? According to step 6 in this article, Disk Utility is supposed to show a recommended format but it doesn’t have anything recommended.
If you install a version of macOS that wants APFS, it will do the reformat during installation, so it doesn’t really matter what you do before. It’s easiest and safest to stick with HFS+. In particular, if the Mac in question has a hard drive, HFS+ offers better performance (although Catalina will still reformat to APFS; Mojave will leave spinning disk drives at HFS+). With an SSD, APFS is somewhat better than HFS+, but again, let the macOS installer do the conversion if it wants to.
What is the earliest OS that will force you to APFS?
Diane
Catalina for all drives. I believe Mojave for SSD’s, but I would recommend using APFS for High Sierra SSD’s but not a Fusion drive.
When I installed an SSD on an aging MacBook running High Sierra it automatically formatted the SSD as APFS.
When I replaced the optical drive in that same MacBook with an SSD it left the formatting choice to me. After doing some online searching to gain opinions/advice on how best to format a drive used to replace an optical drive I was unable to find solid advice one way or another. In the end I opted to format that SSD as APFS as well and so far have not come up against anything suggesting that was a poor choice.
Thanks - I need to upgrade my 2015 MBPr to HS for TurboTax, so that’s a SSD. Will there be issues with files if I do that? How about my external drives that are not SSD?
(I had started a thread on this the other day but got no responses, feel free to respond there if you think it’s more appropriate.
Thanks!
Diane
Not at all. Files are exactly the same no matter how the drive is formatted.
No impact. Time Machine drives must be HFS+, regardless of whether they are spinners or SSDs.