
Photo by StockSnap on Pixabay
TipBITS: Make iMovie Output Full-Resolution Video
We’ve been trying to incorporate screencasts into more of our articles here at TidBITS—there are times when a short video conveys some point better than any number of screenshots. As far as tools go, ScreenFlow is the gold standard, but QuickTime Player can record screen actions and iMovie is a decent video editor. And both come with all Macs for free, so that’s where we’re starting.
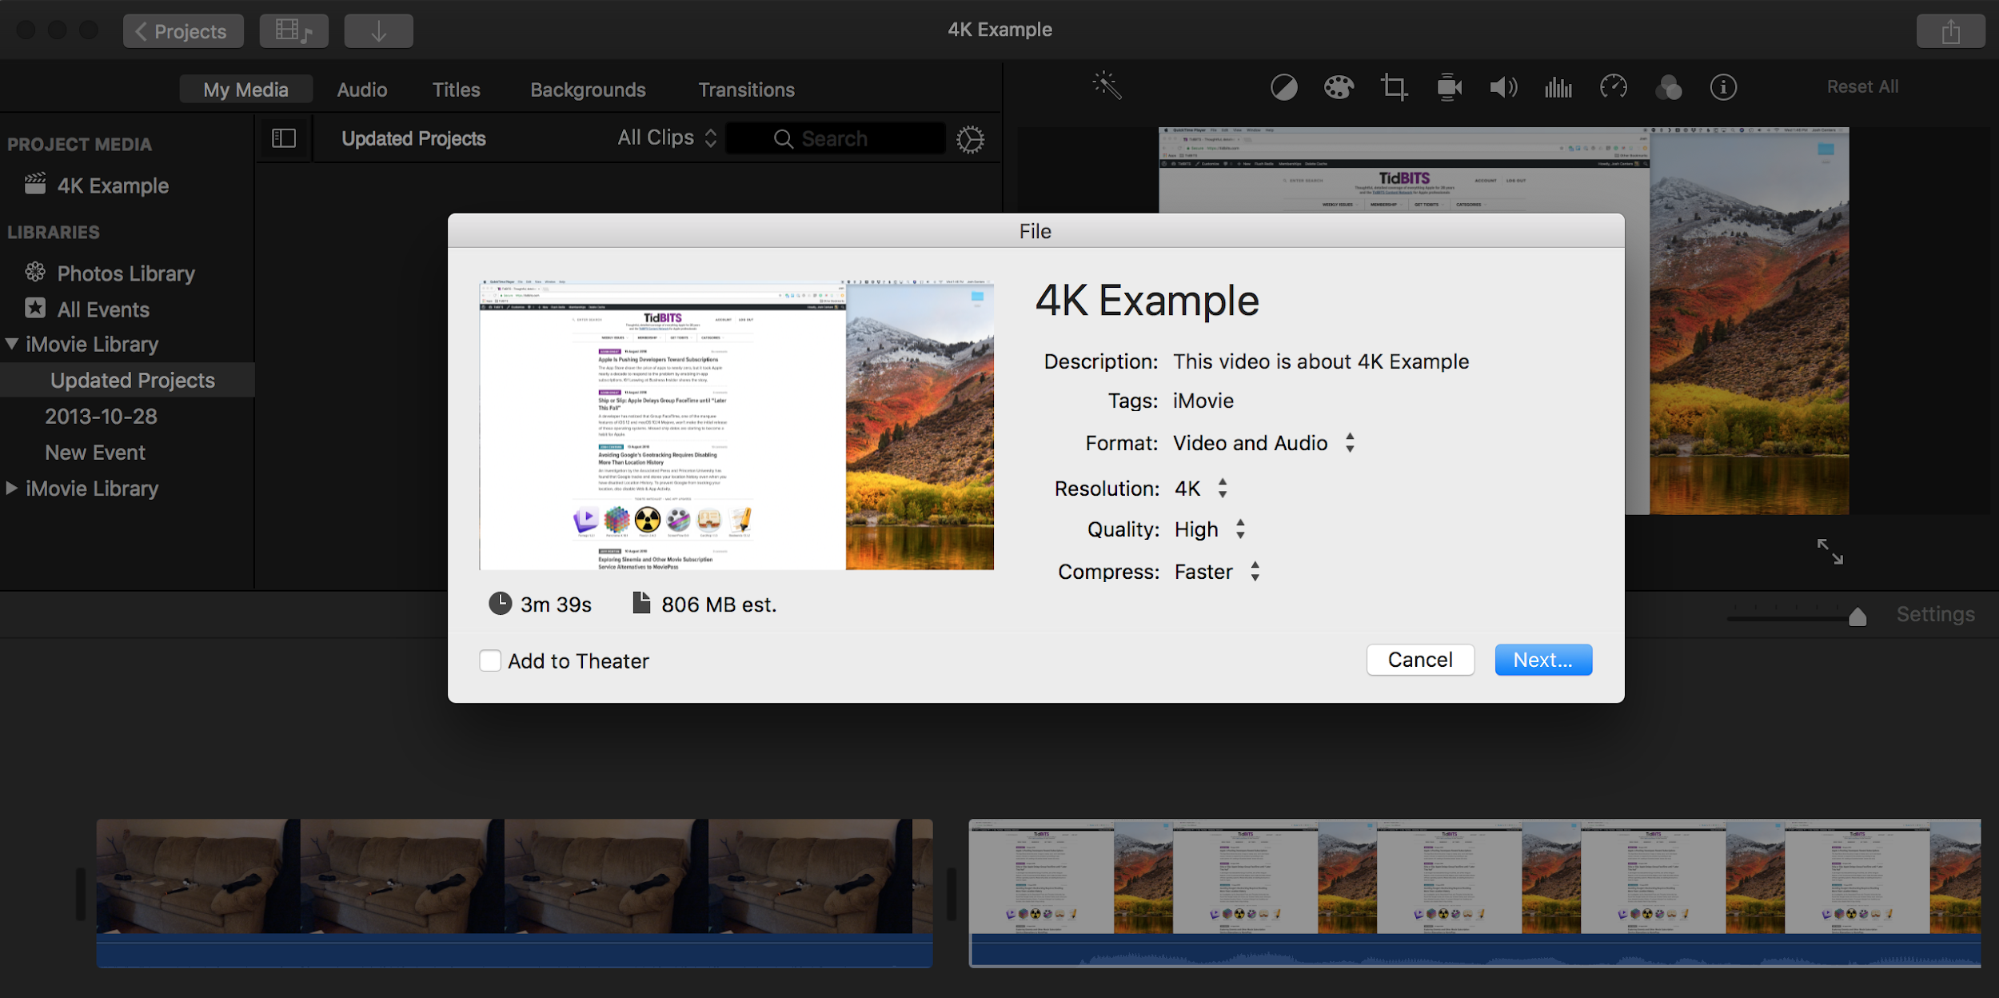
But I recently stumbled across an infuriating problem: no matter what I did with my original screen recordings, I couldn’t use File > Share > File in iMovie to save a video file at a resolution higher than 720p. That’s not optimal for how-to videos with a lot of text, which are best viewed when zoomed to full-screen anyway. It’s also just the principle of the thing: I put in high-resolution 4096-by-2304 video, which is what QuickTime Player captured from my 27-inch iMac with 5K Retina display, and I expect to be able to export a 4K version of the file in the end. Your eyes will thank me!

The problem is that iMovie doesn’t let you set a project’s resolution manually—for that you seemingly need the $300 Final Cut Pro X—and on the Mac, it fixes the project’s resolution based on the first clip you insert.
This problem has stymied many people, and there are numerous YouTube videos suggesting that you create a new project and drop a high-resolution photo at the beginning of the timeline to set the project to a higher resolution. That trick didn’t work for me. But I figured out a different way of convincing iMovie to allow me to export a 4K file.
First, using your iPhone, record a video at 1080p or 4K, whichever is the max for your device. Set the resolution in Settings > Camera > Record Video.
The length and subject matter of the video are irrelevant, as long as it’s at the correct resolution, so just record a few seconds of your foot to get a small file. Transfer this seeding video to your Mac however you like, such as letting iCloud Photo Library move it to the Mac, after which it appeared in iMovie’s Photos Library.
In iMovie, click Create New to create a new project. Drag the seeding clip you recorded into the new project’s timeline. Then drag in the screencast clips you want to edit.
If you are already working on a project that’s stuck at 720p, open it, click in the timeline, and press Command-A followed by Command-C to select and copy all the clips. Then switch back to your new project and paste those clips into the timeline after the seeding clip.
If you click Settings on the right side of the window, you’ll see the resolution is 1080p or 4K, whatever your iPhone recorded. And if you choose File > Share > File, you will see those resolutions as options in the Resolution pop-up menu. Once the resolution is correct, delete your seeding clip and continue to work on the project.
After figuring this out on my own, I stumbled across Apple’s official confirmation that the resolution of the first clip determines how you can export. But here’s the weird bit. Now that I’ve made iMovie export a screen recording as 4K, when I create a new iMovie project and add a screen recording to it as the only clip, iMovie lets me export in 4K, as opposed to the 720p limit I initially saw—no seeding clip necessary. Your mileage may vary, but it’s possible this trick needs to be performed only once to convince iMovie to allow screen recordings to be exported at 4K.
I don’t want to sound ungrateful, since iMovie is an impressive tool for the price, but hacks like this shouldn’t be necessary.
Great tip, Josh. And it’s sad that the Apple Support article is a year and ½ old, implying that no one one the iMovie team has been tasked with actually giving iMovie a more user friendly way of enabling 4K iMovie output!
These days Apple software people are focussed on doing emojis and the like. There’s probably nobody in the iMovie team these days.
This really sounds like a preference that is being stashed somewhere. I’ve scoured my Mac for a likely candidate and, so far, can’t find it. I did notice that in the iMovie Library, for each project there is a “Render Files” folder. In the “High Quality Media”, if you tunnel down, there is an “Info.plist” file that contains these lines:
That was the resolution at which I shared my test file, which I seeded as you described. That number could be purely coincidental.
I did get a pop-up menu in the Sharing dialog that gave me a choice of three resolutions (480, 720, 1024); which it sounds like you weren’t seeing, Josh. I’m using iMovie 10.1.8, which I believe is the latest version that will run on Sierra.
It does seem like this is one of those areas where Apple went out of their way to hide functionality that they want to reserve for upselling to FCP. I use the latter 90% of the time, but find iMovie handy for that crazy-useful Map effect.
Update: I just opened the iMovie Help (who reads an app’s Help? I do) and found this:
Seems like this item, buried at the bottom of the Create a New Movie topic, should really be called out better. And there should be a “Modify Project Settings” command that gives you more than this one-shot control over this sort of thing. (Note that there is a Project Settings popup hidden under the word “Settings” at the far right of the timeline, beneath the viewing panel [down a flight of stairs, high up on a bulletin board, behind a sign that says “Beware of the leopard!"], but you can’t change a project’s resolution and frame rate with it.)
At least Apple put the information into the built-in Help, for those few folk who delve into it.
Take a look at the plist file ~/Library/Containers/com.apple.iMovieApp/Data/Library/Preferences/com.apple.iMovieApp.plist, key CEProjectSettings. After doing the 4K video seed thing, it has three values:
Also, maybe the reason an iMac 5K screen capture doesn’t work as a seed, even if you export it as 4K, is that it is a Retina video. The 4K export is actually 3840x2180.