
Photo by Apple
How to Take Photos and Scan Documents with Continuity Camera in Mojave
One of the cool things about living in the Apple ecosystem is how your various Apple devices can interact with each other through Continuity, which includes features like auto-unlocking your Mac by wearing your Apple Watch, automatically moving copied text across devices, sharing files via AirDrop, and taking calls anywhere with Wi-Fi Calling.
In macOS 10.14 Mojave, Apple has expanded these capabilities with Continuity Camera, a new feature that lets you take pictures or scan documents with an iOS 12 device and have them immediately show up on your Mac—either on the Desktop or in a document. If you’ve ever been working on your Mac and needed to email someone a scan of a receipt that’s sitting on your desk, you’re going to love Continuity Camera.
Requirements and Controls
As with many system-level features, Continuity Camera requires explicit support in apps. Unsurprisingly, many of Apple’s apps offer Continuity Camera in Mojave, including the Finder, Mail, Messages, Notes, TextEdit, Pages, Keynote, and Numbers. I haven’t yet heard of any third-party apps that have added support, but let us know in the comments if you run across any.
Continuity Camera has a few basic requirements: the Mac and iOS device need to be on the same Wi-Fi network, have Bluetooth turned on, and they must be logged in to the same Apple ID, which must be set up with two-factor authentication. Check the Apple ID on your Mac in System Preferences > iCloud and in iOS under Settings > Your Name.
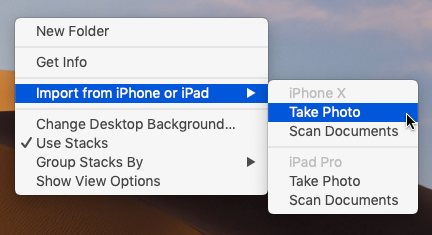
How you access Continuity Camera varies somewhat by app, but the most common way is to Control- or right-click where you want the photo or scanned document to appear. If you have only one device, you will see a subhead for the device, like iPhone X, above commands for Take Photo and Scan Documents. If you have multiple devices, you’ll see an “Import from iPhone or iPad” submenu, under which those commands will be replicated for each device.
In many of Apple’s apps, you’ll also see Import from iPhone as a submenu in the File menu, although that submenu moves to the Insert menu in Pages, Keynote, and Numbers. Plus, in Mail composition windows, there’s a drop-down menu on the right side of the toolbar that includes the Take Photo and Scan Documents commands.
For simplicity’s sake, I’m going to focus on importing images to the Desktop, but the process is the same regardless of whether you’re in the Finder or some other app. If you’d like to watch a quick visual guide to Continuity Camera, check out my short video that explains how to use it.
Take Photos with Continuity Camera
Here’s how to take a photo with Continuity Camera:
- Control-click the Desktop, and in the contextual menu, choose Import from iPhone > Take Photo.
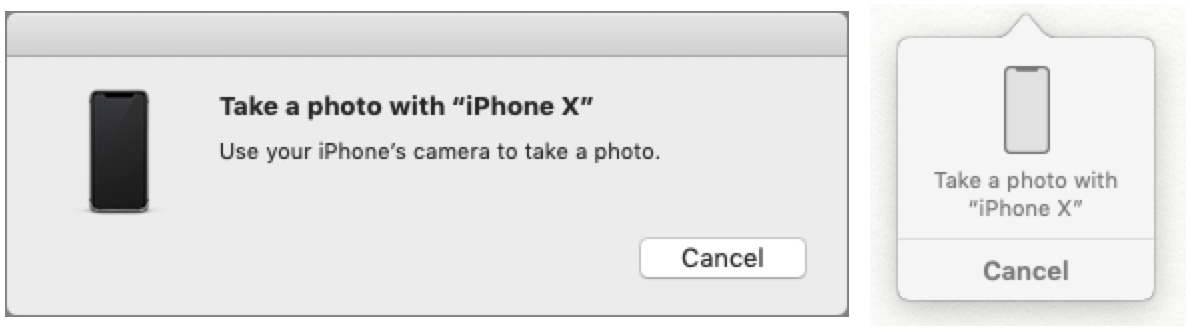
- A dialog or popover (the latter in apps) appears on the Mac screen, and a simplified version of the Camera app opens on your iPhone. You don’t get many options, but you can switch between the front- and rear-facing cameras, and tap the flash
 icon to turn the flash on or off, or set it to auto (the default). You can also pinch out to zoom or tap the 2x button on an iPhone with two rear-facing cameras.
- Frame your subject in the viewfinder, and tap the shutter button.
- Tap Use Photo to save the photo to the Mac’s Desktop as a JPEG. Or if the photo isn’t to your liking, tap Retake to try again. Note that the photo won’t appear in Photos on your iPhone.
Scan Documents with Continuity Camera
For most people, document scanning with Continuity Camera is more useful than taking photos, since you’re unlikely to need a one-off photo that you can take while sitting near a Mac. Be sure to have your document ready on a well-lit surface, and then follow these steps:
-
- Control-click the Desktop, and in the contextual menu, choose Import from iPhone > Scan Documents.
- You see a dialog or popover, and a Camera app variant opens on your iPhone. This one offers a few more options than Take Photo:
- Flash: Tapping the flash icon lets you lock the flash on or off. The default is auto.
- Filters: Tap the Filters
 icon to choose which sort of scan to take: color, grayscale, black-and-white, or photo. The default is color.
 - Auto: By default, the scanner will snap a picture automatically when it detects a document, but tapping Auto lets you change that to manual.
- Flash: Tapping the flash
- Once your options are set, center the document in the viewfinder, and if Auto is enabled, the iPhone will capture the image automatically.
- If you’re capturing the document manually, tap the shutter button. Drag the four circles to adjust the corners if necessary.
- If the scanner captured an image you didn’t want (as happened in my video), tap Retake to go back.
- Tap Keep Scan to add the scan to your queue.
- For a multi-page document, you can continue scanning subsequent pages. Each additional scan is added as an extra page to the document. When you’re done, tap Save to transfer your scans to your Mac as a PDF. The scanned document is not saved on the iPhone.
It’s tempting to import directly into apps, and for a quick photo or single-page scan, that should work well. However, you might prefer to import photos and scans to the Desktop first, and then drag them to their eventual destination. That approach gives you another copy of the file, which may provide more flexibility or security—you never know when you’ll need a photo or scan again.
As with many Continuity features, Continuity Camera can be fussy. Its contextual menu commands sometimes disappear, presumably due to communication lapses. Once when I was scanning, tapping the Save button did nothing—this might have been an indication of a communication failure. And another time, it just threw up its hands.

Nonetheless, we’ve found Continuity Camera to be among the most useful features of Mojave. Although we’re still recommending that most people hold off on upgrading to Mojave, once you take the leap, be sure to give Continuity Camera a try!
One of those features that feels like the 21st Century.
Thanks for that great summary, Josh. Sounds like an absolutely great feature!
I really look forward to Mojave and iOS 12 after reading that. The latter seems a no-brainer on my iPhone 6 and iPad mini 2. Mojave on my work Mac might take a bit more time though.
This looks handy (though perhaps using the excellent Scanbot app to create a PDF in Dropbox is actually a more practical way to scan documents).
However, it’s not currently working for my 2015 MBP and iPhone SE. The camera app doesn’t launch, and the dialog on the Mac times out.
If the iPhone screen is asleep, the Mac says: “Wi-Fi is not enabled on the device” – hardly the most useful error message. Roll on 10.14.1.