Photo by Sharon Zardetto
macOS Hidden Treasures: The Mac’s Hidden Markup Tools
[Editor’s note: This comprehensive article was published as a bonus for TidBITS members for a month; it’s now available for everyone.]
Have you ever had an image that just begged for a speech balloon with a snarky comment coming from your spouse (or baby), or needed a villainous Snidely Whiplash handlebar mustache added to your boss (or baby)? Ever wanted to highlight or magnify part of an image for special attention, or simply crop a screenshot or other image?
You don’t have to open the image in Preview to avail yourself of its special markup tools, and then copy or otherwise use the altered version. While Apple’s productivity apps (Pages, Numbers, and Keynote) have a plethora of native markup-like tools, the company’s other apps that can contain images—Photos, Mail, TextEdit, Stickies, Notes, and even (in macOS 10.14 Mojave only) Messages—can now employ markup tools. As if that’s not enough, Mojave also incorporates these tools throughout the Finder and even within its new screenshot interface.
Enable the Mac’s Markup Tools
Extensions are little plug-in utilities that add functionality to programs. Back in 2014, Apple added the Markup extension in 10.10 Yosemite, along with the Extensions preference pane; neither got the attention it deserved.
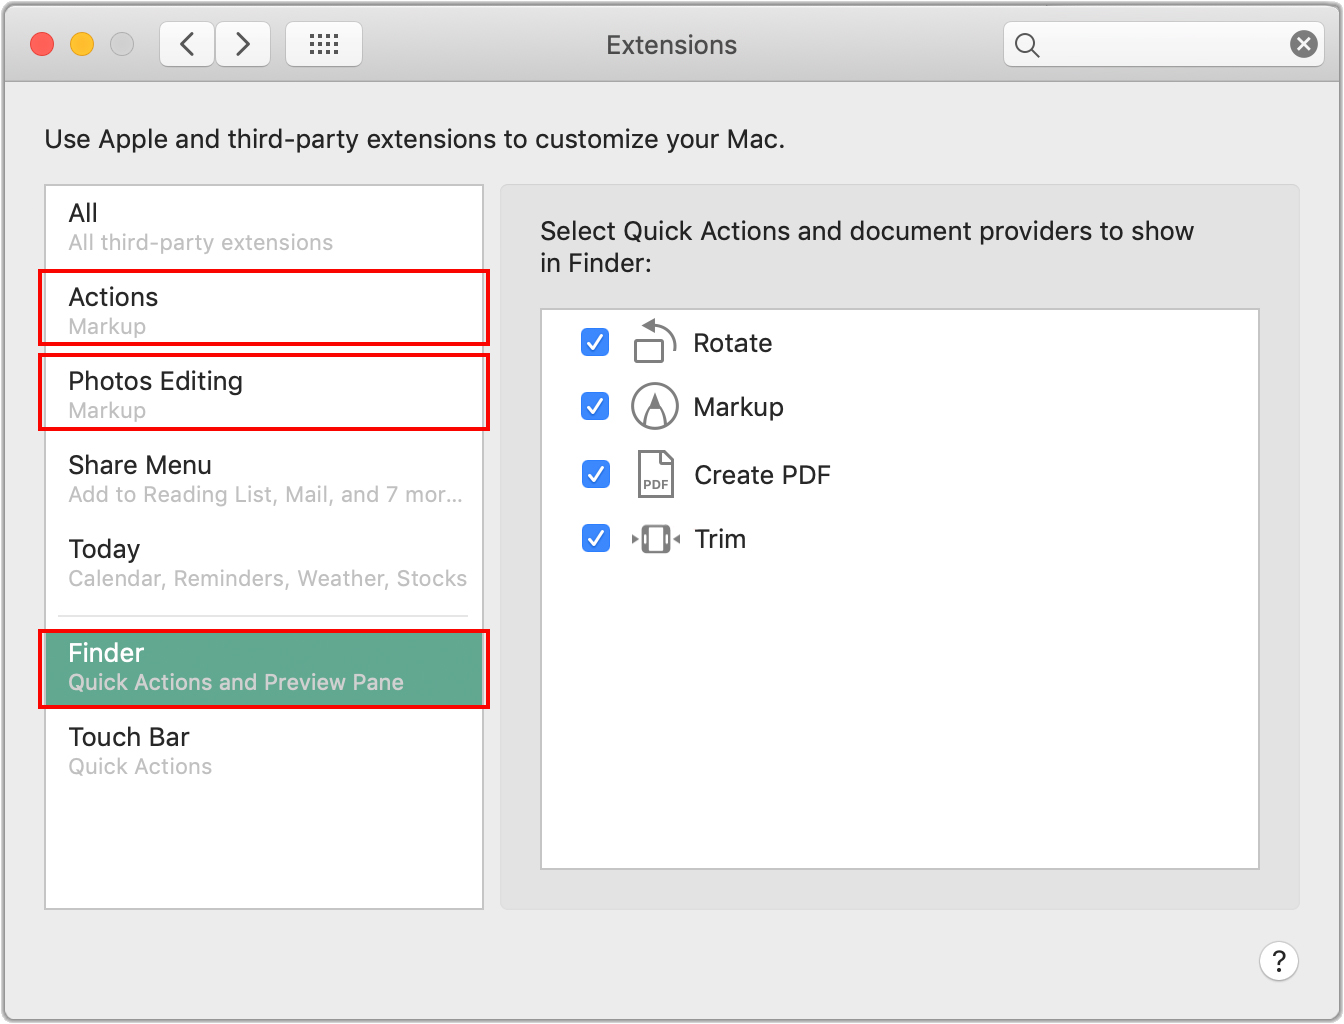
Enable markup capability in System Preferences for three areas in Mojave:
- Go to System Preferences > Extensions.
- Select Actions in the list, and check Markup in the panel.
- Select Photos Editing and check Markup.
- Select Finder and check Markup. (You should also check the other three items, but I’m not covering their usage in this article, except for one, in passing, in “Quick Tips.”)
In High Sierra’s Extensions preference pane, activate Markup for Actions and Photos—there’s no Finder option.
Access the Markup Tools
How you get to your markup tools depends on where you’re working:
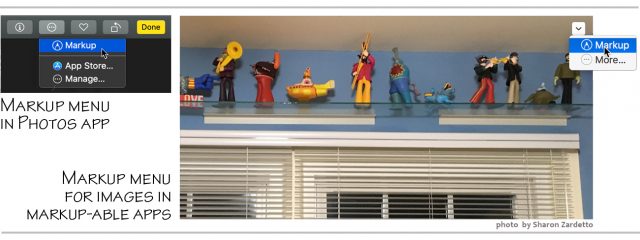
- In Photos: In Photos, you can access the markup tools when an image is in Edit mode. (Zoom a thumbnail with a double-click and then click Edit in the upper right, or just select a photo and press Return.) Click the More ••• button in the toolbar and choose Markup from its menu; the Adjust pane disappears from the right of the window, and your markup icons are displayed along the top of the image.
- In other Markup-savvy apps from Apple: In apps such as TextEdit, place an image in the document and then hover over its upper-right corner until you see a down-arrow button; click it, and choose Markup from its menu to open the markup window.
- In the Finder: Mojave lets you use markup tools right in the Finder, where you can access them in many ways.
- Quick Look windows: Quick Look? It’s not Apple’s fault if you’ve ignored this handy Finder feature that 10.8 Mountain Lion introduced back in 2012—macOS provides five ways to peek at a selected document in the Finder. You can:
-
- Press the Spacebar.
- Choose File > Quick Look.
- Choose Quick Look from the Action
 menu in a window’s toolbar.
 - Use the Quick Look
 button if you’ve added it to the toolbar.
 - For Force Touch trackpads: a light touch selects the file, a little pressure enlarges the icon a bit, and a full press opens the Quick Look window.
Whichever method you use, you get a window with a full-size version of the selected file (screen real estate permitting). Click the Markup button in the window’s toolbar for the markup tools.
-
- Quick Look windows: Quick Look? It’s not Apple’s fault if you’ve ignored this handy Finder feature that 10.8 Mountain Lion introduced back in 2012—macOS provides five ways to peek at a selected document in the Finder. You can:

-
- Column-view windows: The final column of a window set to Columns shows the item chosen in the previous column. When it’s a markup-able item, a markup
 button appears at the bottom of the pane.
 - A window’s Preview pane: No matter what view you set for a Finder window—Icons, List, Columns, or (new in Mojave) Gallery—you can add a pane to the right side of the menu so you can see a large version of a selected item: choose View > Show Preview. This preview is more than just a big icon; you can, for instance, flip through a multi-page document. When the pane displays a markup-able document, there’s a markup button beneath the image.
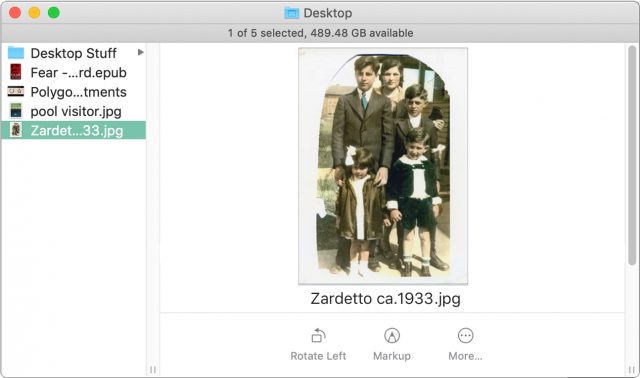
Yes, that’s my family: my grandparents, father (the older boy), uncle, and aunt; the little girl is my Aunt Doris, who just celebrated her 90th birthday. - Any image file anywhere: Control-click any image file in the Finder and choose Quick Actions > Markup.
- On the floating thumbnail: In Mojave, when you save a screenshot as a file, it first appears as a thumbnail in the lower right of the screen. Double-click the thumbnail to open it in a markup window. But avoid this approach unless you’re doing a quick-and-dirty markup and sending it on its way (say, in Mail) for someone to see—because, as with other Finder-based markups, once you close the window, the markups “flatten”—they become part of the file and can’t be edited. But this mark-up-and-send approach is obviously what Apple expects you to do here, because a Share
 button appears on the markup toolbar, and I’ve not seen that anywhere else.
- Column-view windows: The final column of a window set to Columns shows the item chosen in the previous column. When it’s a markup-able item, a markup

Regardless of how you invoke the markup tools, you’ll get a toolbar across the top of the Markup window that displays six basic markup tools (one inoperable—the highlighter tool to the right of the text tool), a menu that offers a further ten, four formatting menus, two Rotate tools, and a Crop tool. (High Sierra lacks the Rotate and Crop tools, although it has cropping capability.)

To leave markup mode if you’re working in Photos, click either the Save Changes button or the Cancel button. You’ll be returned to the standard Photos Edit window, which you can exit by clicking Done or pressing Return. In other apps, the saving part is automatic; use the Done or Cancel button to close the Markup window.
The Sketch Tool
This tool is more magical than its pencil icon might indicate. Draw a line or a shape with the Sketch tool, and Markup attempts to smooth it out, even joining close-together ends. So, for instance, you can draw an almost-circle and get an actual one.
A little drop-down menu that appears from the tool icon offers two or three final-sketch options. One is to leave the item as you drew it, although it’s not always selected by default. If the freeform item resembles a shape, or a combination of shapes (like the “lollipop” in the figure below), that will be another choice; I’ve also occasionally seen two shape choices in the menu. A final option offers a super-smoothed-out version of your sketch. Leave your artwork as-is by dismissing the menu with a click of its close button; otherwise, click a suggested option.
In each case, you get blue resize handles on your sketch so you can alter its size; depending on the shape, you may also get green feature handles to change some contours, as in the second and third shapes here.

In the initial version of Mojave, pressing Return when the dropdown is active occasionally confirmed the highlighted choice, usually deleted the selected squiggle, and once made the TextEdit document I was drawing in just blink into non-existence. So, click your menu choice, and avoid the keyboard for this until you’ve tested it thoroughly in your environment.
The Draw Tool
The Draw tool is available only if you have a Force Touch trackpad; if you do, you’ll want to doodle with it because as you change the pressure on the trackpad, the line thickness changes. With some patience and practice, you can draw rather elegant swashes or the previously mentioned mustaches. When the Draw tool is selected, the line thickness choices in the Shape Style menu change from the standard offerings to special ones that define the thickness “range” you’ll be working with.
I found that in High Sierra, once I finished a squiggle, it often shrank noticeably as soon as it was done, but that glitch has disappeared in Mojave.

The Shapes Menu: Lines and Arrows
The Shapes menu provides six shapes: line, arrow, rectangle, rounded rectangle, ellipse, speech balloon, star, and hexagon. It also has two special tools, described separately ahead.
Line and arrow shapes are somewhat fluid, as you can draw a line and then apply a “shape style” that has an arrowhead, or draw an arrow and later apply a non-arrowhead style to it. Format the line/arrow shape with line thickness, line style, arrowhead placement, and even drop shadow choices from the Shape Style menu (detailed ahead). You can attach text to lines and arrows, as described later in “Tackle Text.”
A selected line or arrow shape has blue resize handles on each end with which you can change the length of the shaft (the size of the arrowhead is determined by the line thickness), as well as alter its orientation. The green mid-line feature handle changes the curve of the line; you can also slide the handle along the length of the line to reposition the farthest point of the arc.
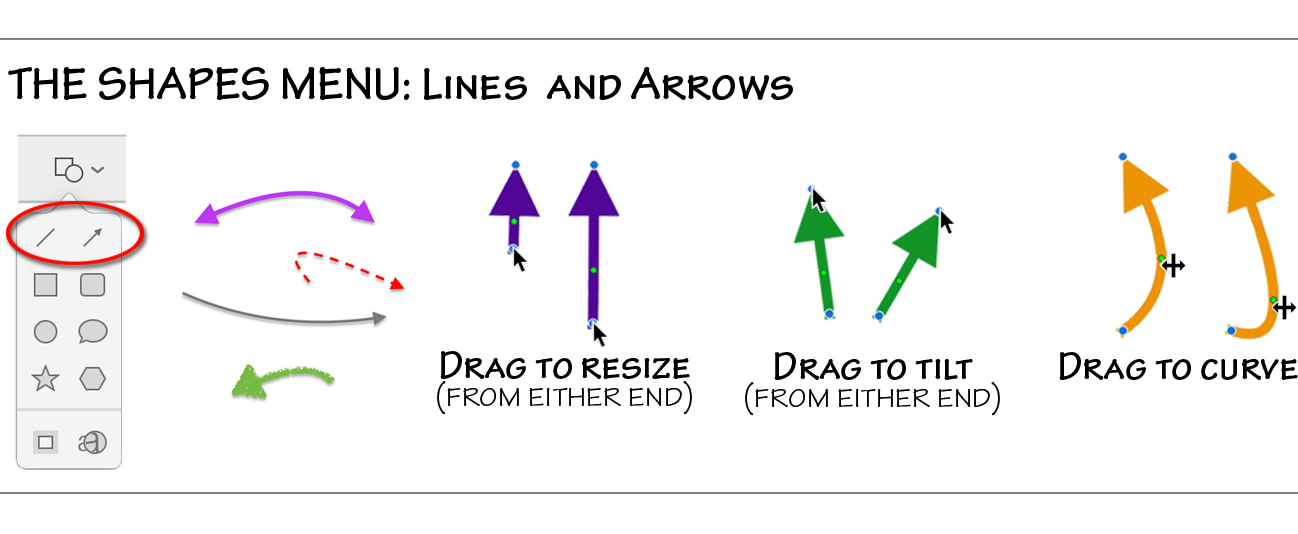 When you drag either end of a line/arrow to change its orientation, pressing Shift after you start dragging snaps the object to a horizontal, vertical, or 45-degree position.
The Shapes Menu: Standard Shapes
The rectangle, rounded rectangle, ellipse, and speech balloon tools have much in common, and working with them is intuitive. A selected shape has blue resize handles on each of its sides and at its four corners; for ellipses and speech balloons, the handles live at the corners of their bounding rectangles. (Note that any of these shapes can also be a text container, as described later in “Tackle Text.”)
The speech balloon’s tail has green feature handles at its point and base that let you adjust its length, as well as the width and position of its base along the balloon edge. As with line objects, if you press Shift after you start dragging the tail to change its position, it will snap to a horizontal, vertical, or 45-degree angle.
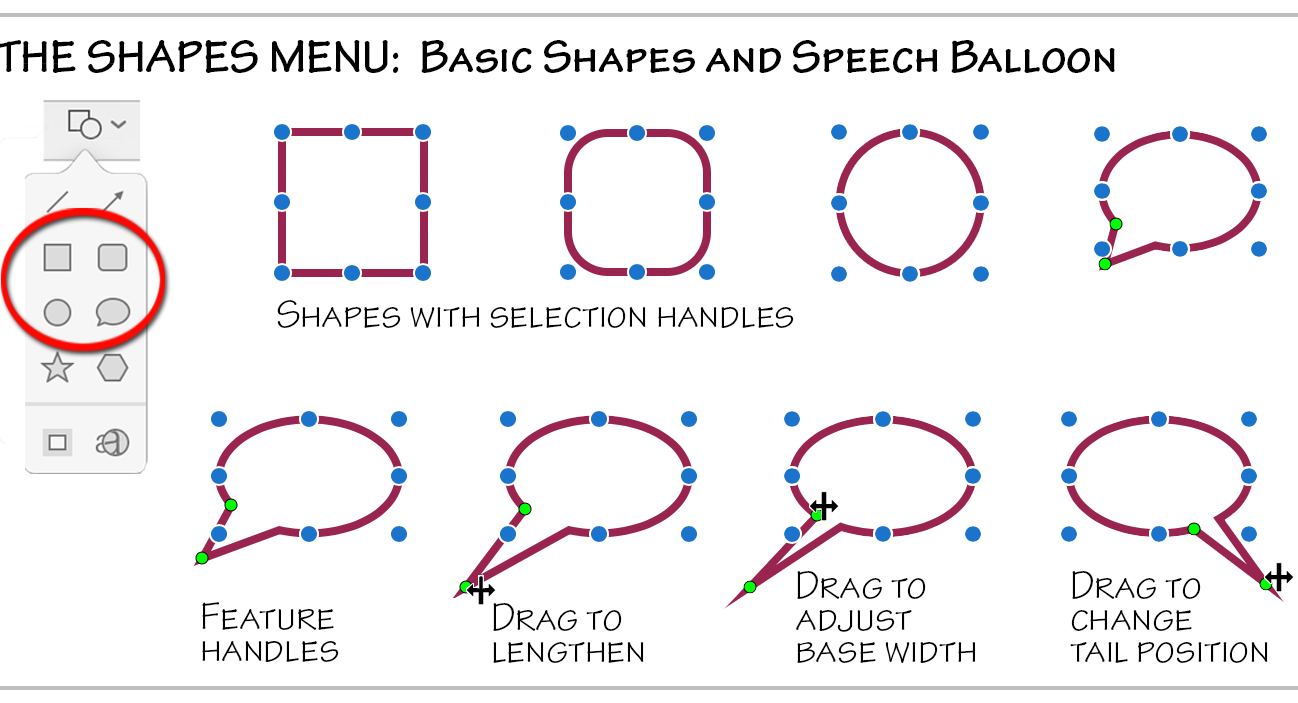
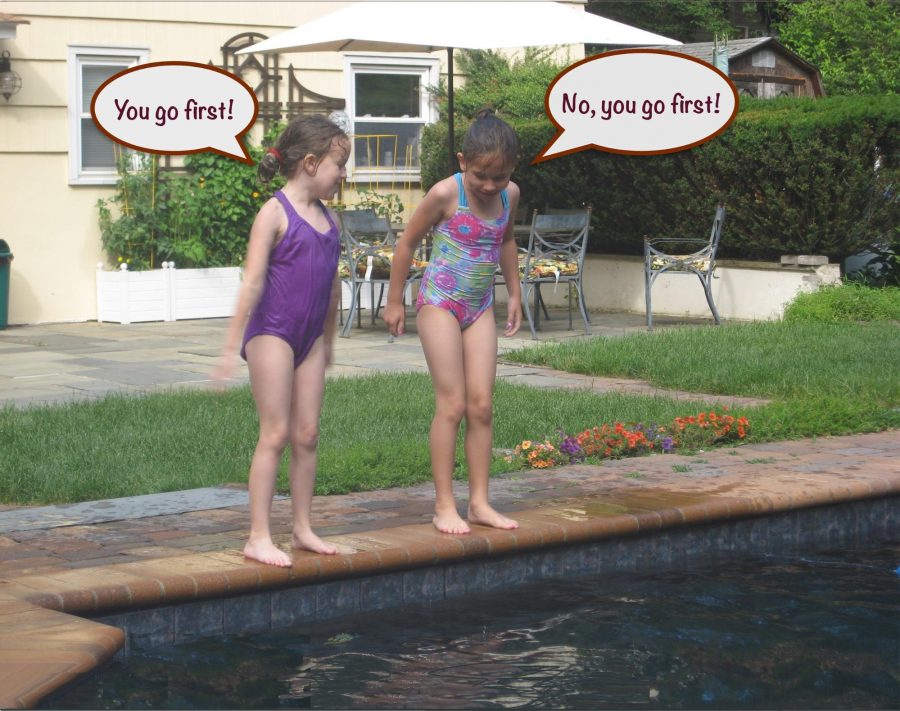
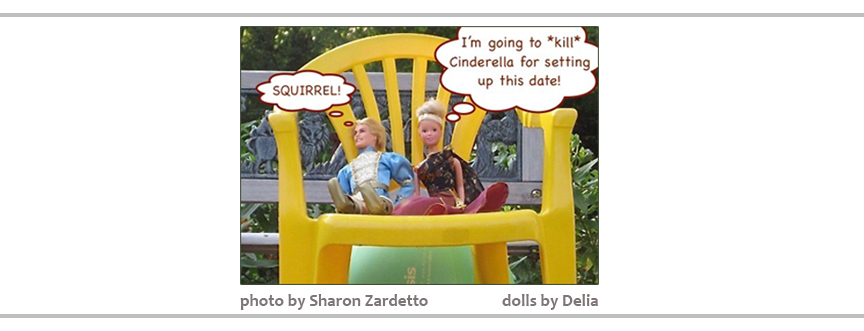
Do you need thought balloons instead? There’s no special tool for that, but there is a special, hidden technique described in “Quick Tips” at the end of this article.
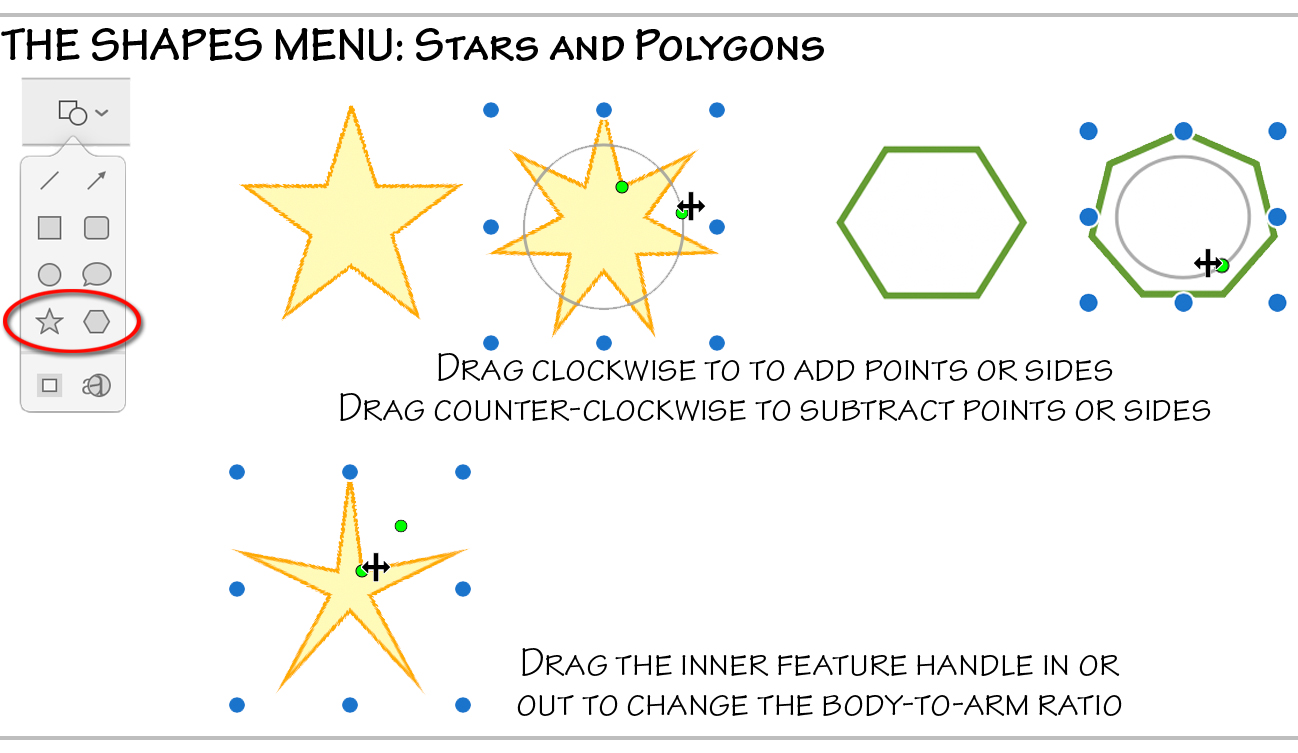
The Shapes Menu: Stars and Polygons
In addition to basic resize handles, star and polygon shapes have green feature handles that let you change the number of points/sides in the object. Select the object to get the handles (for a star, use the outer of the two). Drag the dot around the perimeter of the circle that appears; clockwise deletes points/sides, and counterclockwise adds them. A star can have up to twenty points, while a polygon can go to the twelve-sided dodecagon. Stars have a second feature handle that defines the inner perimeter of the star (and therefore the length of the points). As with other shapes, these can accommodate text, as described later in “Tackle Text.”
The Shapes Menu: Highlight Tool
This tool at the bottom of the Shapes menu works not by actually highlighting part of an image (which would alter the part of a photo you most want to emphasize) but by dimming everything else. It’s a cinch to use: draw a rectangle around the area you want to emphasize and press Return.
Resize the highlight rectangle by first clicking anywhere on the dimmed area, which puts resize handles around the highlight. But to move it, grab and drag outside the rectangle. It’s not intuitive, but think of the “highlight” as a semiopaque sheet with a cutout—which is pretty much what its tiny icon in the Shapes menu represents. Delete the highlight by clicking it and pressing Delete.

This everything-else-is-covered approach means you can’t move any already-created object, or draw new ones, in the dimmed area of the image. So, do all your other markups first, or get rid of the highlight, make your edits, and then redo it.
The Shapes Menu: Loupe Tool
Also at the bottom of the Shapes menu, this wonderful little magnifier (named for a jeweler’s loupe) lets you enlarge one or more specific parts of an image. Click the tool for a magnifying circle to appear on the image. Reposition it by dragging, and use the blue resize handle to change the size and the green feature handle to change the magnification power.

You can also:
- Assign a color to the loupe’s rim by selecting from the Border Color menu and change its thickness and style using the Shape Style menu.
- Put more than one loupe on an image.
- Overlap loupe circles to increase the total magnifying power.
The Sign Tool
This signature-affixing tool is available in Markup for embedded images, except in the Photos app. The method is the same as for Markup signatures elsewhere in macOS; for detailed setup and usage instructions, check this Apple support page, which describes using the Sign feature in Preview.
The Crop Tool
Mojave’s Markup added a specific tool for cropping; previously, it was a baked-in capability that didn’t need a tool. And, unlike in High Sierra, Mojave’s markup cropping is available in Photos.
When you click the tool, a Crop button shows up at the right side of the Markup toolbar, and white cropping corners appear on the image. There are also hair-thin lines all around the perimeter; they’re hard to see, but not so difficult to grab—just trust that they’re there. As you adjust the crop lines, gridlines appear so you can center something in the cropped image or perhaps use the Rule of Thirds. Click the Crop button when you’re done; if you have immediate second thoughts, just click the Crop tool again and adjust the lines.
High Sierra has no explicit markup tool for cropping because it’s a baked-in, point-and-drag capability, except in Photos, which has native cropping capability. Just drag the blue corner or midpoint lines at the picture’s edges. Crop an image that you’re marking up in one of Apple’s apps by hovering at any corner or side midpoint to see the blue cropping guides, and drag them to define the crop area. The part of the image outside the crop marks won’t disappear until you click Done or Save Changes.
The Shape Style Menu
I started out thinking of the Shape Style menu as something that simply controls line thickness, but, as its name implies, it’s not that limited. In fact, it’s a bit of a Swiss Army knife, and, except for the arrowhead options, its settings also define shape borders. You can make your formatting choices before you use a tool, or afterward on selected objects.
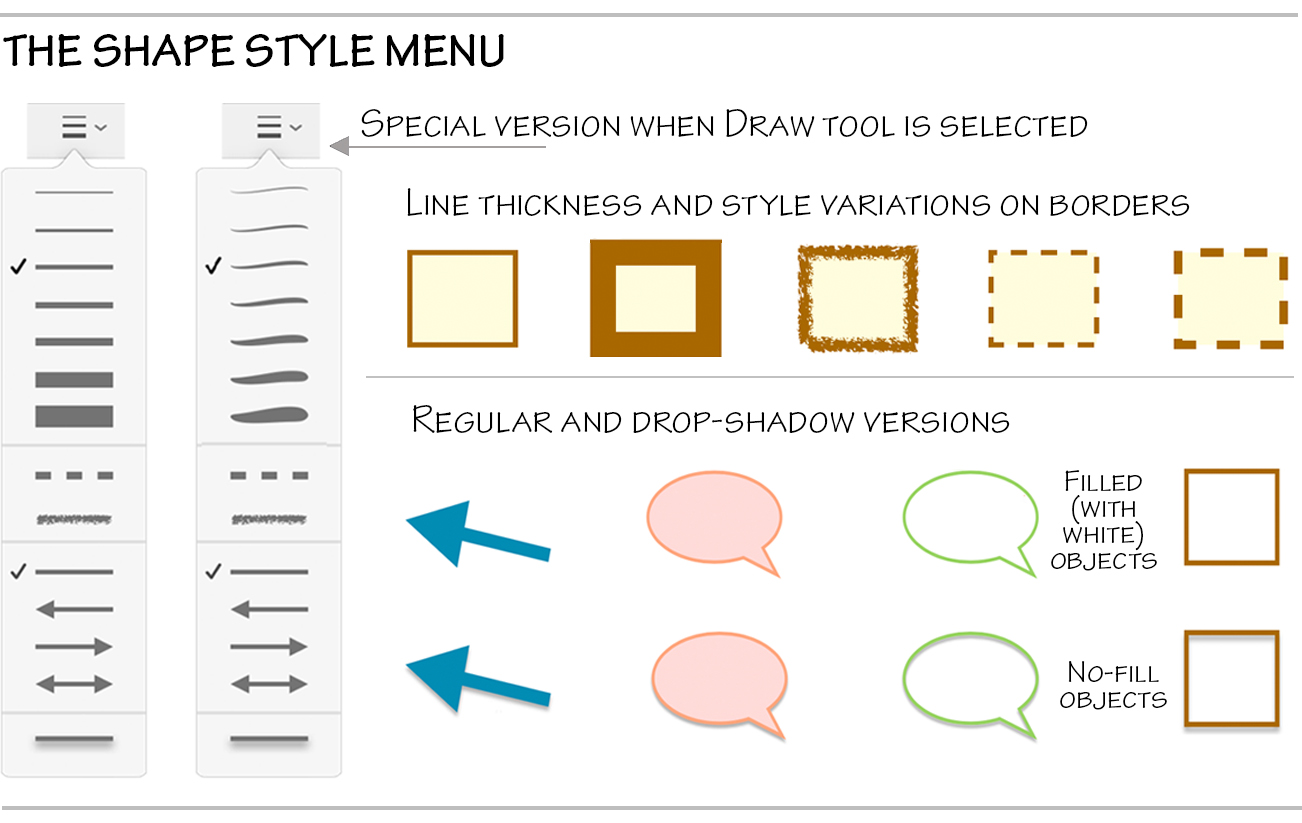
Use the choices in its four sections to:
- Control line/border thickness. As described earlier, if you have a Force Touch trackpad and the Draw tool selected, the line-thickness choices show the two extremes of the widths with which you’d be working.
- Choose a special style for the line/border: dashed or “dry brush.” To use neither, you have to click on the already selected one to deselect it.
- Set a line to be plain or have an arrowhead on either or both ends.
- Add a discrete drop shadow to a selected object. If the object has no fill, there’s a shadow inside for its upper region.
Border and Fill Colors
These menus, whose icons indicate the currently selected colors, display identical palettes of colors in various shades. There’s a strip of basic (intense) colors along the top, and a Show Colors button at the bottom that opens the system Colors window for when the standard colors just won’t do.

Tackle Text
Adding and formatting text for an image title, a label, or a speech balloon (finally, a valid use for Comic Sans!) is simple. You can start with the dedicated text box, or use almost any object as a text container.
The basics for text boxes are a cinch: click the Text button to create a text box, and start typing. I didn’t notice this in High Sierra, but in Mojave, you must click the “drawn” part of the icon to activate—not the empty space between the box and the letter (in High Sierra, the Crop tool had the same problem).
The initial placeholder Text is overwritten when you type, without your having to explicitly select it; the text box expands as you type. You can resize only the width of a text box; when you drag a blue resize side handle, its height changes to accommodate the text exactly: no more, no less.
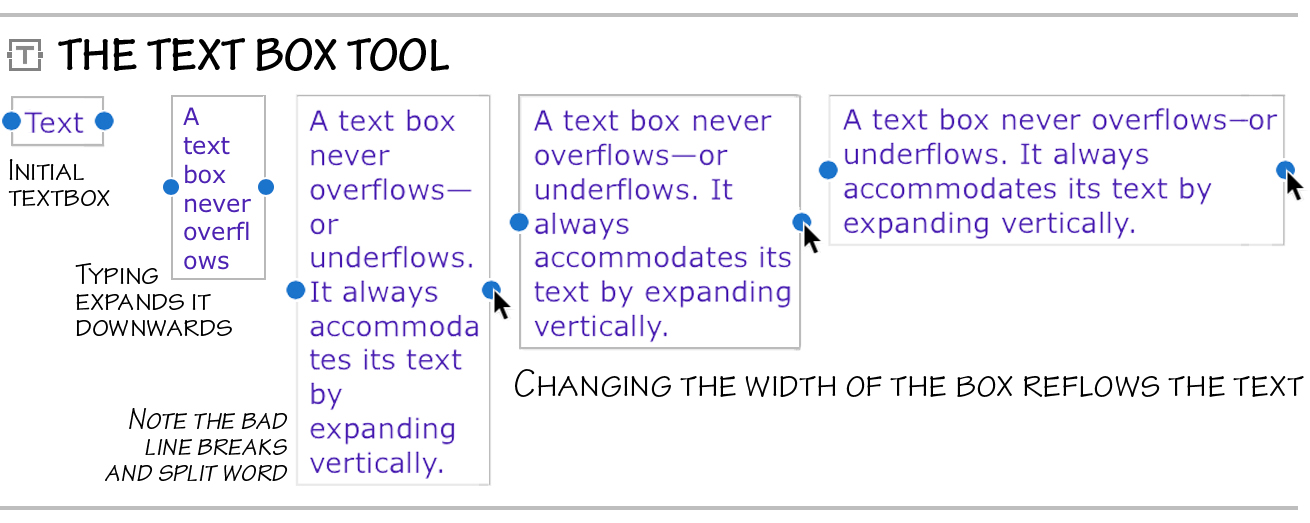
To reposition an inactive text box, move the pointer over it; the pointer changes to a hand indicating you can grab and move it. If the text box is active, the pointer is a text cursor when it’s over text, so hover over an empty area of the box, or its perimeter, to get the Grab hand.
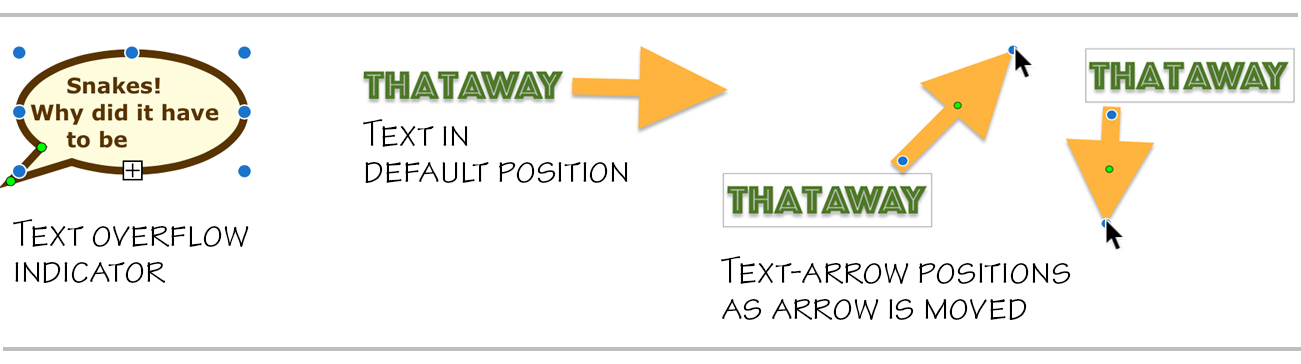
You can instantly add text to any object: just select it and start typing. So, for instance, you don’t have to place a text box within a speech balloon to add the speech. Unlike text boxes, however, shapes don’t automatically expand as you type; you must resize them manually to accommodate the text. If there’s text overflow when you type or resize an enclosed shape, you’ll see a little plus-sign overflow indicator at the bottom of the shape when it’s selected (text boxes aren’t as courteous).
You can even add text to some non-enclosed objects, such as sketched scribbles, or plain or arrowheaded lines. Start typing when the object is selected, and the text appears to the left of a predominantly horizontal object or above a mostly vertical one; the arrowhead stays glued to that end of the object as you reorient it. For arrows, it’s a handy way to label something that you’re (literally) pointing out. Unlike with other shapes, text attached to non-enclosed objects is limited to a single line, albeit a long one; the text area stretches horizontally as long as you type, even if it disappears off the edge of the image area.
To edit text in a text box or shape, click the object to select it, and then click again to place the insertion point. Double-click (faster than two single clicks) an inactive text container to select not only the shape, but also whatever word you clicked.
Apply formatting before or after you type with the myriad options from the Text Style popover; it includes choices for fonts, style, size, color, and paragraph justification. You can apply text formatting whether the text container itself is selected, or while you’re entering or editing text. Formats are applied to the entire block of text, even when only some of the text is selected.
 When working with text, keep in mind:
- That handy initial typing-replaces-default-text-in-a-textbox approach unfortunately applies to a selected text container at any time—hit one or more alphanumeric keys when you’ve selected a container, and its text is immediately replaced. Undo does not revert it while the text is still active.
- You can’t use Undo to change something you’ve mistyped or edited while you’re working in a text container. You must click outside the container and then use Undo—which undoes everything you just did within the container. In all, you’re better off just editing your typos or changes directly.
Manipulate Objects
Every markup item you place on your image is an object. Here’s what you should know about manipulating them:
- Select multiple objects: Click the first item and shift-click the others.
- Duplicate an object: Duplicate an object by Option-dragging it (press Option before you click). This can be a real timesaver when you use, say, multiple arrows or speech balloons: duplicate a formatted version and you won’t have to format each separately.
- Constrain an object’s movement: Restrict a drag to vertical or horizontal movement with the Shift key (press Shift after you’ve clicked the item).
- Resize an object:
- Drag a blue resize handle.
- Press Option while resizing an object by any selection handle, and it resizes, outward or inward, from the center.
- Shift-click a resize handle on a selected object to equalize its height and width.
- Shift-click the midpoint resize handle on the top or bottom of the shape to make all sides equal to the current height. Shift-click a midpoint side handle to make all sides equal to the current width.
- And Shift-clicking a corner handle? It makes equilateral sides that are the average of the length and width measurements. That’s what seemed to be happening when I eyeballed it—and then, because I just couldn’t help myself, I took by-the-pixel measurements of the original shape and the midpoint Shift-click results, and, yup, that’s what’s happening.
- Shift-click near a resize handle to resize an object by just a little bit: click outside the object to make it a little larger, or inside to make it a bit smaller. As with dragging a resize handle, the object changes size in the direction of the clicked spot, while the opposite side or corner of the object remains anchored.
- Option-click a resize handle and nothing happens. Option-clicking near a handle, however, is analogous to Shift-clicking near one, with a just-outside click enlarging the object and just-inside clicking making it smaller. But, because you’re pressing Option, it’s resized from the center. So, Option-clicking near any corner gives identical results, and there’s no difference between Option-clicking near the top or bottom handle, or the left or right side handles.
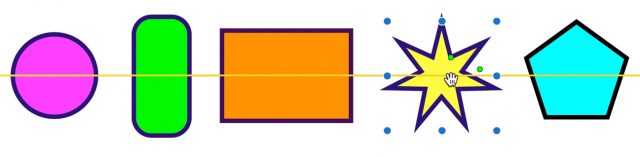
- Align objects: Align a dragged object with others on the screen by using the yellow guide that appears when objects’ vertical or horizontal centers, are aligned. (If you have a Force Touch trackpad, you also get a little tick of feedback against your finger when objects are aligned.)
- Reorder object layers: Every object lives in its own layer, with each new one on top of all the others. To change the layer order when items overlap, Control-click an object and choose from the pop-up menu: Bring to Front and Send to Back move something to the top or bottom of the pile, while Bring Forward and Send Backward move an object one layer.


Undoing Markups
While you’re working in markup, Undo works as you’d expect, undoing your most recent change, then the one before that, and so on, with Redo heading in the other direction.
The Undo and Redo commands for Markup are synergistically related to the app you’re using. While working in Markup, I was hitting Command-Z without thinking about it, but when I paid attention, I realized that it’s the parent app’s Edit menu that’s being activated. But it’s not exactly the app’s Undo command, since, if you look at the Edit menu instead of just hitting Command-Z, you’ll see detailed commands such as Undo Text Change, Undo Remove Rectangle, Undo Change of Annotation Properties, Undo Change of Bounds, and my favorite, Undo Doodle.
But what about after you close the markup window? With embedded images, such as in TextEdit and Stickies, using Undo right after you leave markup mode undoes all the markups you just applied. If you’re working in the Finder, in a Quick Look window or any of the ways I described earlier, once you close the markup window, that’s it—no more undo capability.
The Re-Markable Thing
In Mojave, after you’ve saved a marked-up image, you can usually change your mind, and go back and alter or remove your markups. Because High Sierra was not so kind across the board—and somewhat inconsistent—I tested this in Mojave for Photos, applications that handle embedded images (such as TextEdit and Stickies), and even Mail. Almost no matter where you’ve done the markup, or what you’ve done to the base image in the “host” application—come out of Markup mode, saved and closed the document, quit and reopened the app—I found that markups remained editable. Photos is especially accommodating, providing a special command (File > Export > Export Unmodified Original for Photo) so you don’t have to remove the markups manually for an unadulterated photo.
The big, and very disappointing, exception to this editable approach is the Finder. Work with Markup there, in any of the ways I mentioned earlier, including the screenshot-produced floating thumbnail, and your markups are permanent. (It’s worth noting here that Preview, where markup capabilities were first introduced and which still uses its own set of markup tools, always “flattens” its markups to become a non-editable part of the image.)
So, if you’re working in High Sierra, or in the Finder in Mojave, it would behoove you to work on a duplicate of your image or document if an unadulterated base image is important to you.
Quick Tips
It might seem like I’ve covered every possible option related to the Markup tools, but no! There’s more—these tips just don’t fit into any previous category.
Undo Rotation
You don’t have to worry about whether your markups are editable when it comes to the rotation of an image: just go back into markup and rotate it back to the original orientation. Even more convenient is that Rotate is a Quick Action available in the Finder—if you turn it on in System Preferences, as I described back in “Enable the Mac’s Markup Tools.”
Trackpad Tricks
There are some things you can do in markup only if you have a trackpad. Unlike the Draw tool, which requires a Force Touch trackpad to perform its changing-width trick, these work with any trackpad:
- Zoom In and Out: Zoom your image with a pinch or a spread (outward pinch) of your fingers.
- Rotate Items: A two-finger twist when an object is selected rotates it. (It’s much easier to keep one finger stationary and move the other; even easier is using one finger from each hand, with your dominant hand doing the moving.) Text and its container rotate together unless you put a text box inside a shape, which lets you rotate just one or the other for a special effect.
Editable Markups for PNG Files
When you add markups to a PNG file (screenshots are saved as PNGs) in the Finder, the changes are permanent—but where else can you open it? For editable markups starting with a PNG: Control-click the file, choose Open With > Other from the pop-up, and select the Photos app from the dialog. Photos opens, and the file is added to its collection; access the markup tools as described earlier in this article.
Thought Balloons
I initially wrote a tip about using an oval with circles of varying sizes leading to it, acknowledging that a smooth oval was not quite de rigueur for cartoon thoughts. And then I stumbled upon a delightful little feature. Simply use the Sketch tool to scribble a cloud-ish shape; you don’t even have to close it entirely, as long as you come close. When you’re finished, it turns into a proper thought balloon, leading bubbles and all. And, as with speech balloons, you can reposition the tail around the perimeter of the body, and dragged to be longer (although that simply spreads out the bubbles—it doesn’t add more).

If you sketch something less definite, with edges frilled enough to mildly suggest a cloud but whose overall perimeter does not, the drop-down suggestion menu includes a thought balloon option, just in case that’s what you meant.

And just so you can see thought balloons in a real-world use.
Markup in Received Email
If you want to mark up an image someone emailed to you, you can’t do it in the message you’ve received. Instead, click the Reply button and work on the image in the Reply window.
Note that the image appears in the Reply window only if you have Mail preferences set to include the received message in the reply. Set those preferences in Mail > Preferences > Composing, in the Responding section. If you don’t have Mail’s preferences set to show your received message in the Reply window, you can copy and paste the image from the message to the reply, or just drag the image from one window to the other.
Once you’re in a Reply window with the marked-up image, you can access markup mode through the little down-arrow button in its upper-right corner, as described earlier. In Mojave, you’re not limited to adding your own markups to those made by the sender; you can edit, or even entirely remove, the original markups.
Work on a Blank Canvas
Make a blank canvas if you want to just draw stuff and not edit an existing image. In TextEdit, start a new document and take a screenshot of the main part of the page, avoiding the ruler. Use the default Command-Shift-Control-4 to copy the white block to the Clipboard, and then paste the whiteness onto the page, where it will be treated as an image. Hover over the pasted area, and you’ll see the little down-arrow button that you can click to get the menu that lets you access Markup.
Touch Bar Features
A Touch Bar provides context-sensitive Markup controls. You’ll find handy (fingery?) choices such as: a button for creating a text box; a slider for line thickness; buttons for line styles (solid, dashed, dotted, dry brush); font size and styles (bold, italic, underline); paragraph justification; word completion suggestions (when you’re typing); arrowhead placement on lines; a color strip wherever it’s appropriate; and Cancel and Done buttons for when you have second thoughts or are finished.

A Special Bug in TextEdit
An annoying markup bug that plagued me in High Sierra has survived in Mojave, although it occurs less frequently. When reopening the Markup tools for an embedded image in TextEdit, often only a very truncated, somewhat translucent window opens showing the Markup tools but not the image. The deformed window closes when you click Cancel, but you must save, close, and reopen the document to access the markup layer.

Hi Sharon. Thank you for all those great tips.
I have been using Omnigraffle for object-based drawing for many years and it seems that many features that I Iike are now widely available in Mojave.
I still miss some of the great object-based drawing tools of AmiPro - a word processor first released with run-time Windows in the 1990s. One was the ability to create complex charts from a table of data and then edit any elements of the chart as shapes or text. I suppose there are modern apps to do similar but I haven’t needed the feature enough to go searching. I have managed to keep Amipro going in Windows XP using Parallels on the Mac, but it is too tedious for regular use and outputting in modern formats (pdf) is a bit of a nightmare.
Ah, object-based drawing. I still remember the thrill of the first object-based work I could do: SuperPaint, which had paint and object layers. It made tweaking/faking screenshots so much easier!
I am a member and never received advice this very interesting article was available for me a month ago. What happened?
I posted the article on the Web site on October 19th, but only people with active memberships who were logged into the site could read the full article. I also sent the article in email to all TidBITS members who have opted to receive articles in email as we post them. You can set that in your account profile—just log in and then click Account at the top right…
What I didn’t do, because it felt a little mean, was put something in the issue that goes to everyone, saying that most people couldn’t read it. Maybe I should have been more promotional about it.
Page unavailable?
This article is showing the: “Something Has Gone Wrong” page…?
Sorry about that—I fixed the URL at the top of this topic so it works again. The problem was that I republished the article so the URL changed from what it was originally.
I just updated my Mac Pro Laptop to Mojave (Mac OS 10.14) and I hate the Finder’s Preview ‘Quick Actions’—it’s offering something I don’t want and wasting screen space that previously showed information that I do want.
Is there a universal switch to uncheck ‘Show Quick Actions’, either in a dialog box or as a UNIX command?
Thanks…
Although I haven’t tried this, I see some indication that the setting you’ve found applies on a per-filetype basis, so while you might have to do it a few times, it shouldn’t take too long to eliminate it from most of the files that would have it.
I managed to miss this last year. Glad it’s been bumped up.