How to Connect to Wi-Fi Networks Faster in iOS 13
Alongside all the marquee features, Apple always sneaks in something extra when it updates its operating systems. In iOS 13 and iPadOS 13, the company added yet another way to connect to a nearby Wi-Fi network, and this new method is a little faster to use than the previous best one.
This new connection option brings the total to four! You may have trouble remembering all of them or have found some awkward to invoke. A fourth method isn’t big news, but if you regularly need to connect to new Wi-Fi networks, you might find it more convenient.
I ran across this new Wi-Fi connection method while overhauling my book, Connect and Secure Your iPhone and iPad, for all the many changes in iOS 13 and the split into iPadOS 13, and then updating it again for 13.1. The book now includes these Wi-Fi connection tips, along with a hundred other new and improved elements, like explaining Apple’s latest anti-tracking technology in Safari and using the revamped Find My service. If you need help with networking and security on your iPhone or iPad, please pick up a copy from Take Control. (And feel free to ask me any questions it didn’t answer!)
Let’s look at each of the four ways of connecting to a Wi-Fi network, starting with the newest method.
Use Control Center
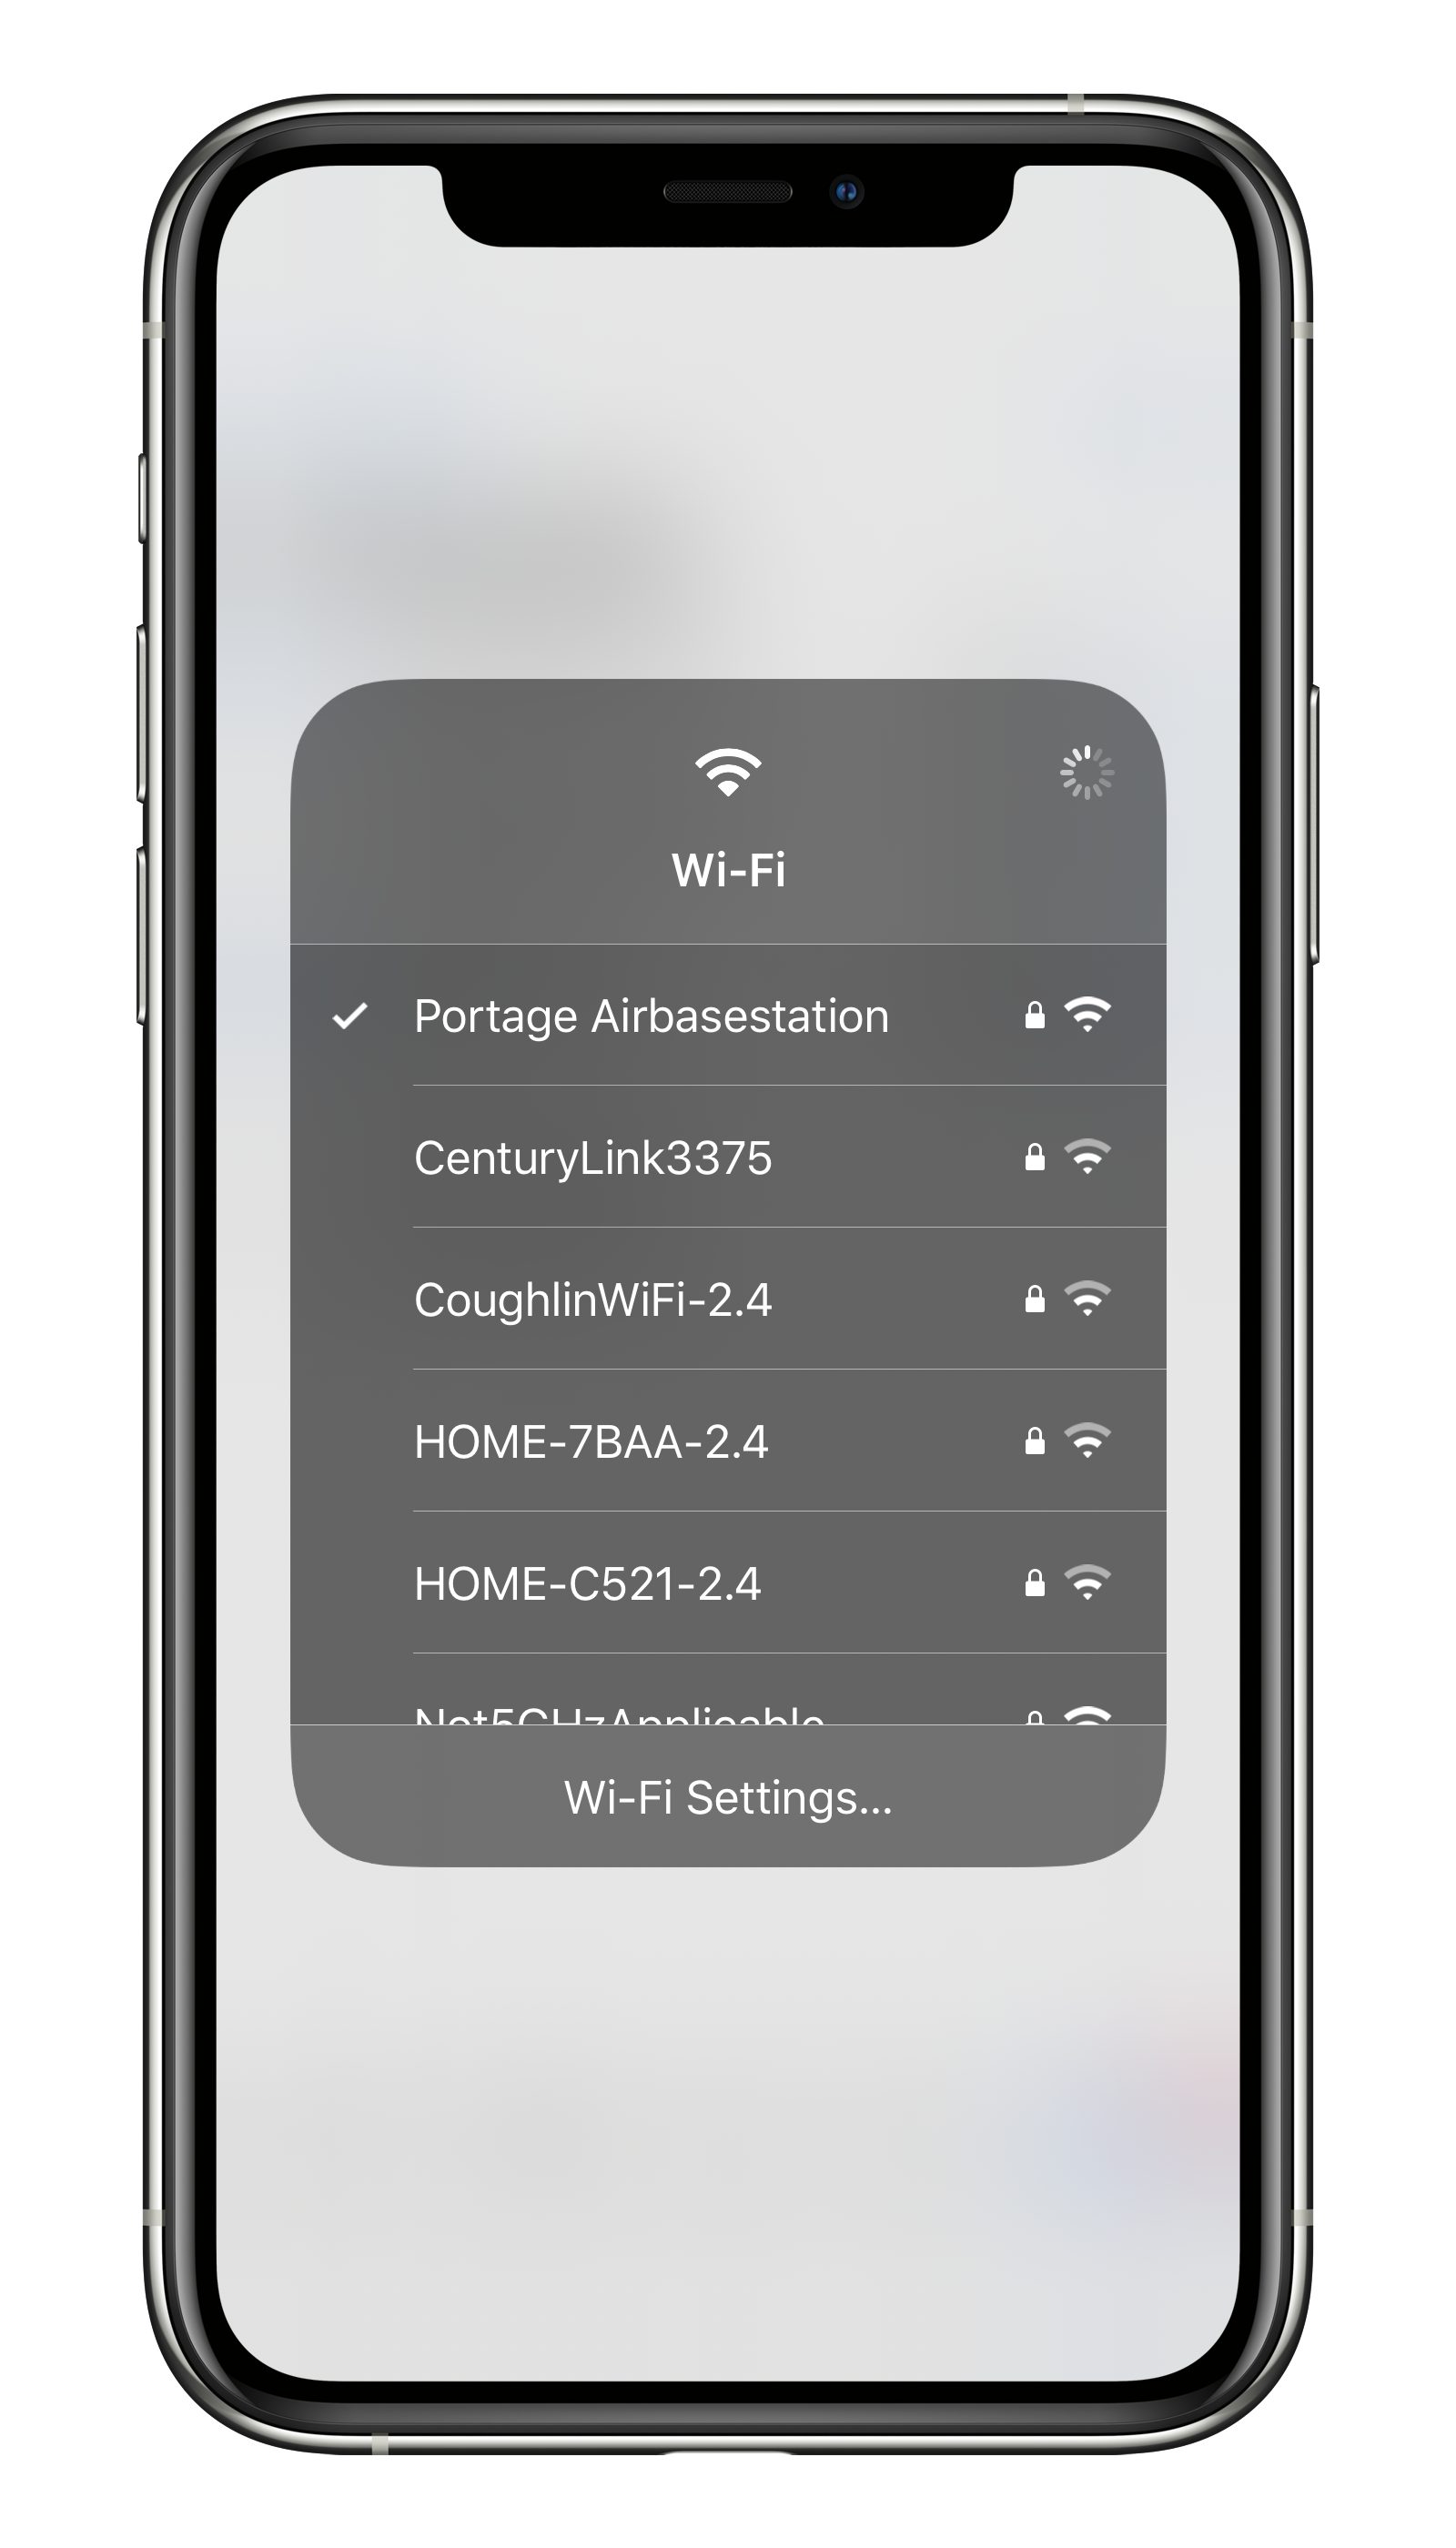
In iOS 13, Apple expanded the capabilities of Control Center to provide a new way to access the list of available Wi-Fi networks. Here’s how to reach the new interface:
- Swipe to reveal Control Center. (On an iPad or an iPhone X or later, swipe down from the top right of the screen; on older iPhones and the iPod touch, swipe up from the bottom of the screen.)
- Tap and hold the network card (the shaded rectangle containing the network buttons) to expand it.
- Tap and hold the Wi-Fi button to bring up a list of networks.
- Tap the network you want to join.
- Enter a password if prompted.
You can also tap Wi-Fi Settings at the bottom to open Settings > Wi-Fi.
This new option isn’t earth-shaking, but it’s definitely easier to get to, especially since you can start from the Lock screen without even unlocking your device.
Use the Settings App
Since the earliest days of iOS, you’ve been able to connect to a Wi-Fi network through the Settings app:
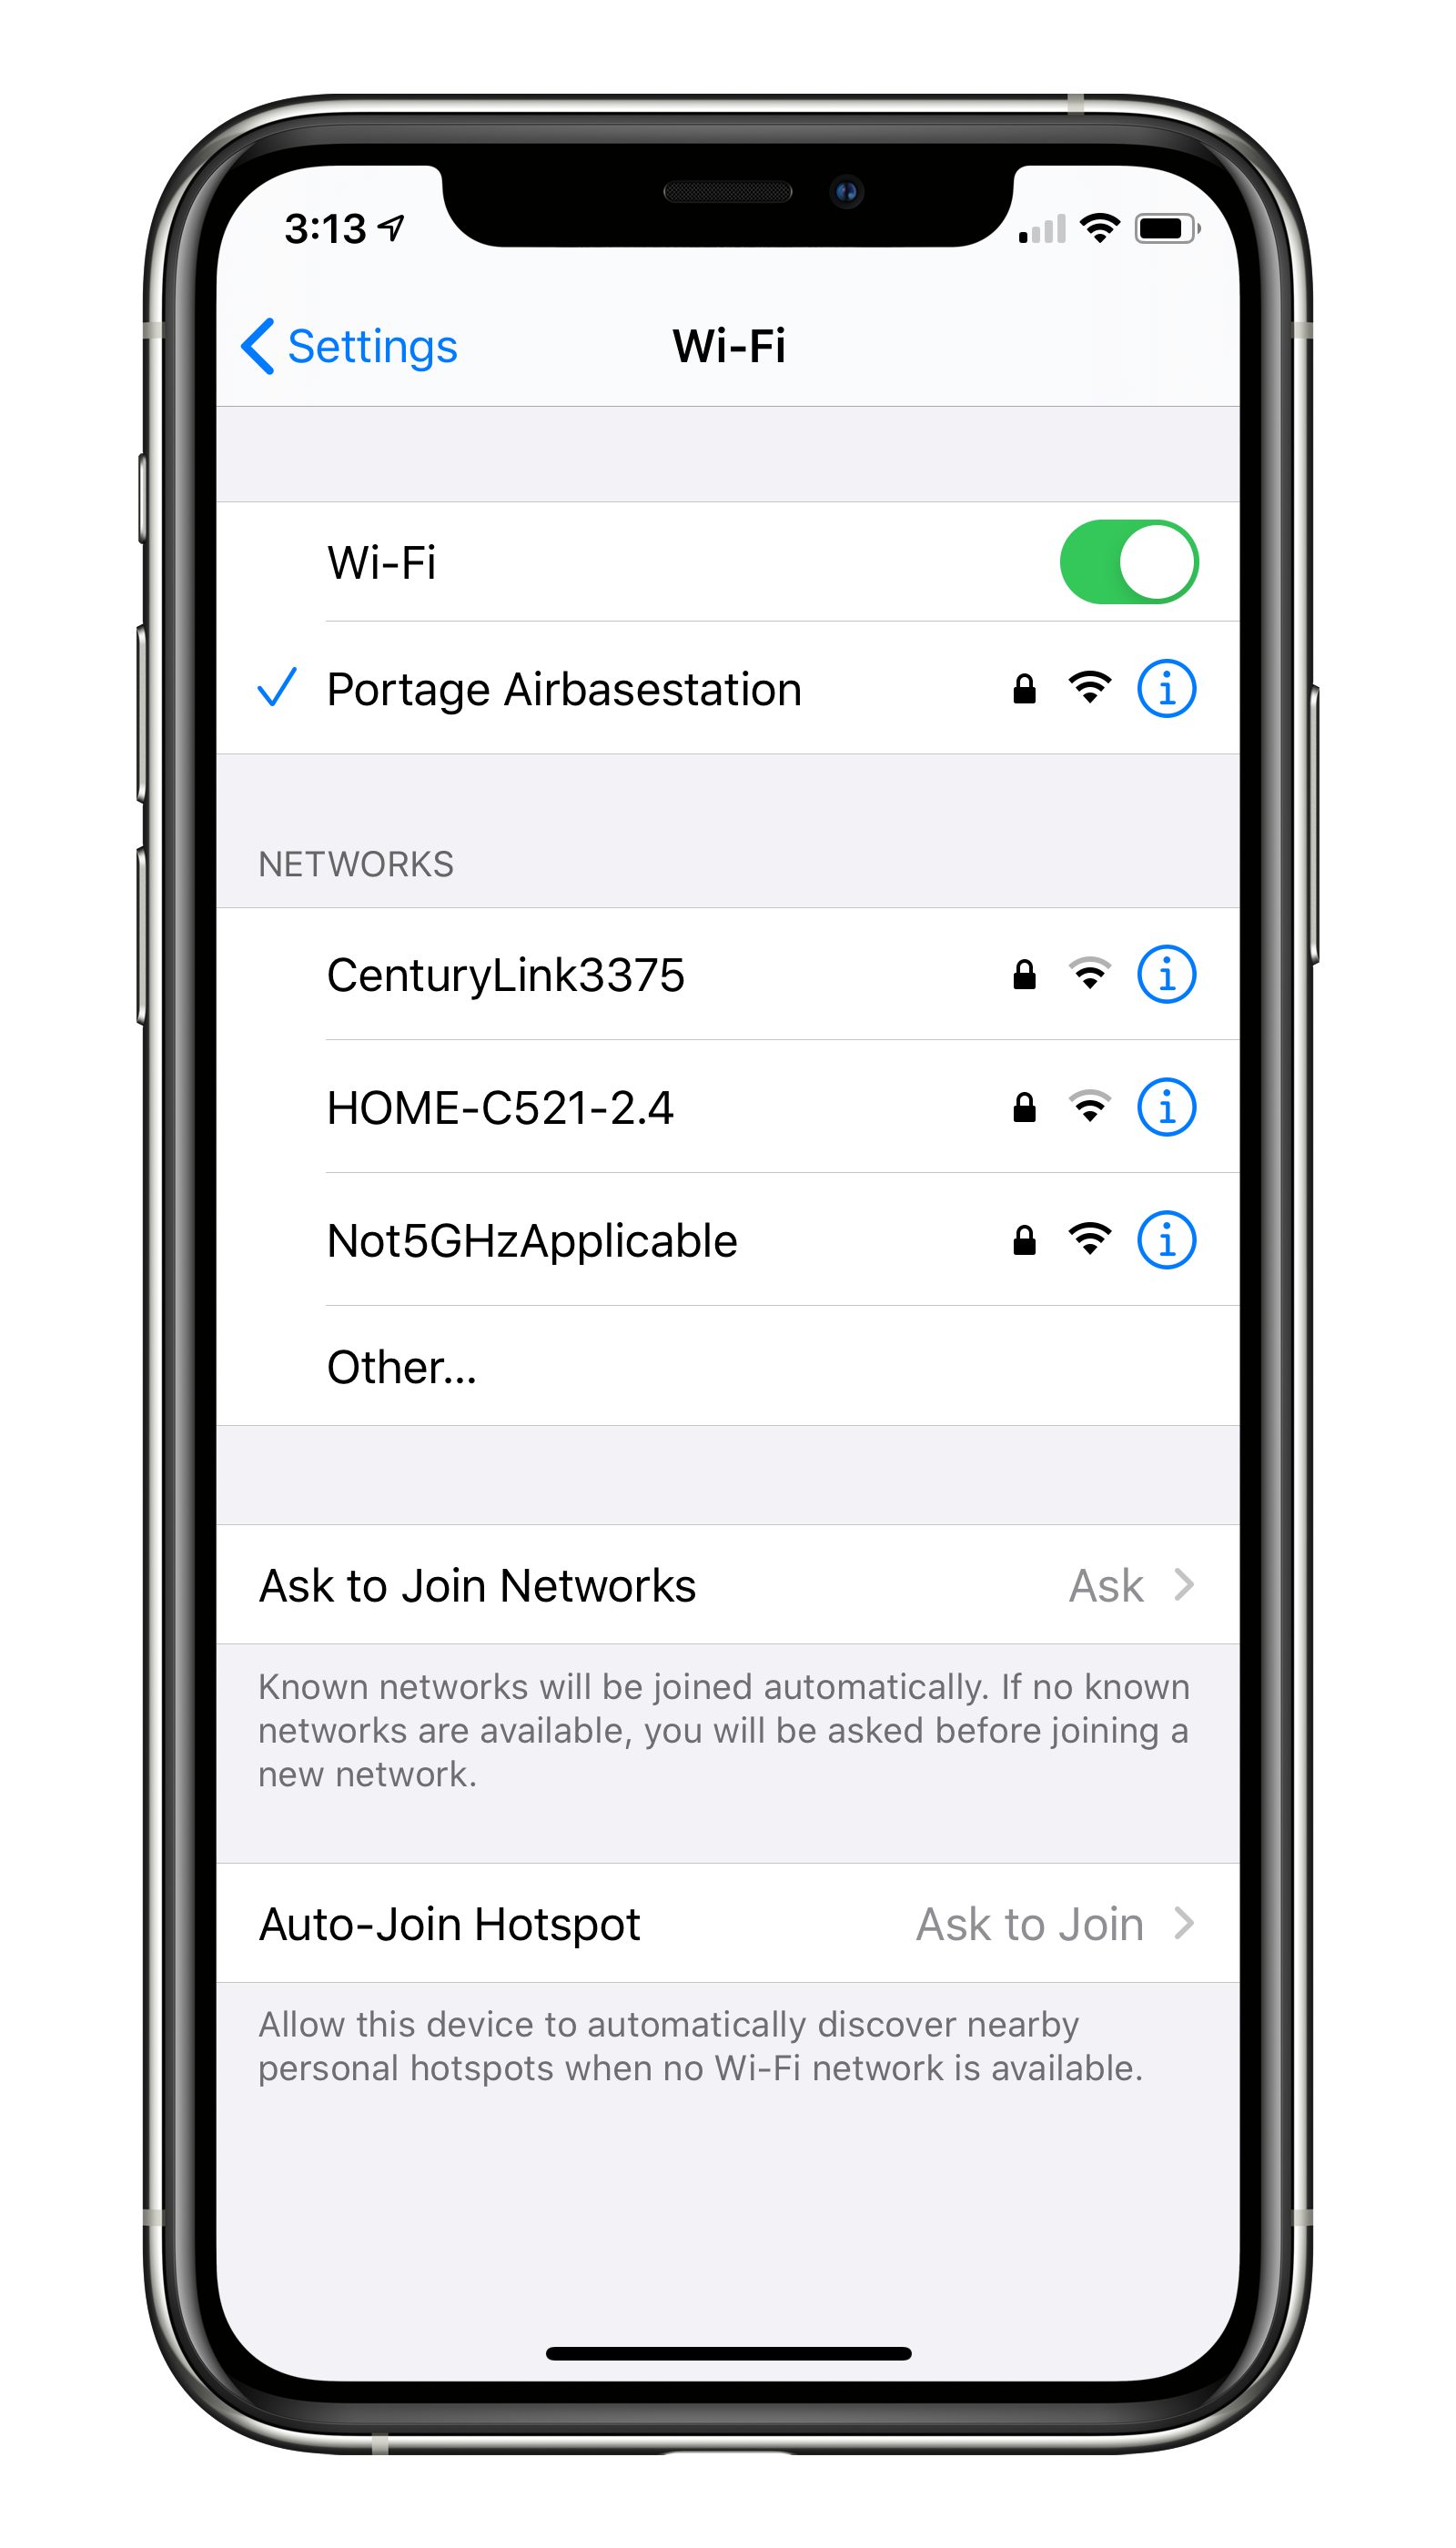
- Open Settings > Wi-Fi.
- Tap a network name under Networks.
- Enter a password if prompted.
If the network you want to connect to doesn’t appear because it’s “closed” or “hidden”—an outdated security-through-obscurity method that some people still use—tap Other and enter the network name and password.
To make this process more automatic, you can set Ask to Join Networks to either Ask or Notify. With either choice, your device will still preferentially connect to a known, stored network. If no known networks are available, however, you’ll be prompted to join another network if Ask is selected. (Apple doesn’t explain the criteria for which one appears.) A list of all networks appears if you have Notify selected.
If you have one or more devices with Personal Hotspot enabled, you’ll get a Personal Hotspots list of networks as well. Plus, iOS 13 may also show a list of Popular Networks. It apparently determines them by passively scanning to see which networks around you other people are already connected to. This approach seems a little invasive, but it is using publicly broadcast information. I haven’t yet been able to make the Popular Networks list appear; it’s an Apple bullet point for the latest operating systems, but the company provides no clear explanation of it.
Apple also added Auto-Join Hotspot, which is a “failover” method. If iOS 13 can’t find a known Wi-Fi network, it will use Personal Hotspot to connect to an iPhone or cellular iPad logged into the same iCloud account. It can even enable Personal Hotspot on the other device if it’s off. (macOS 10.15 Catalina offers a similar option.)
One final tip. Family Sharing can now integrate with Personal Hotspot. If you’re part of a Family Sharing group, tap Settings > Personal Hotspot > Family Sharing. When you enable Family Sharing for Personal Hotspot on that screen, you can then set each member of your family to either have automatic access or be required to ask you for access. This feature could be welcome when traveling as a family.
Join via a Contact
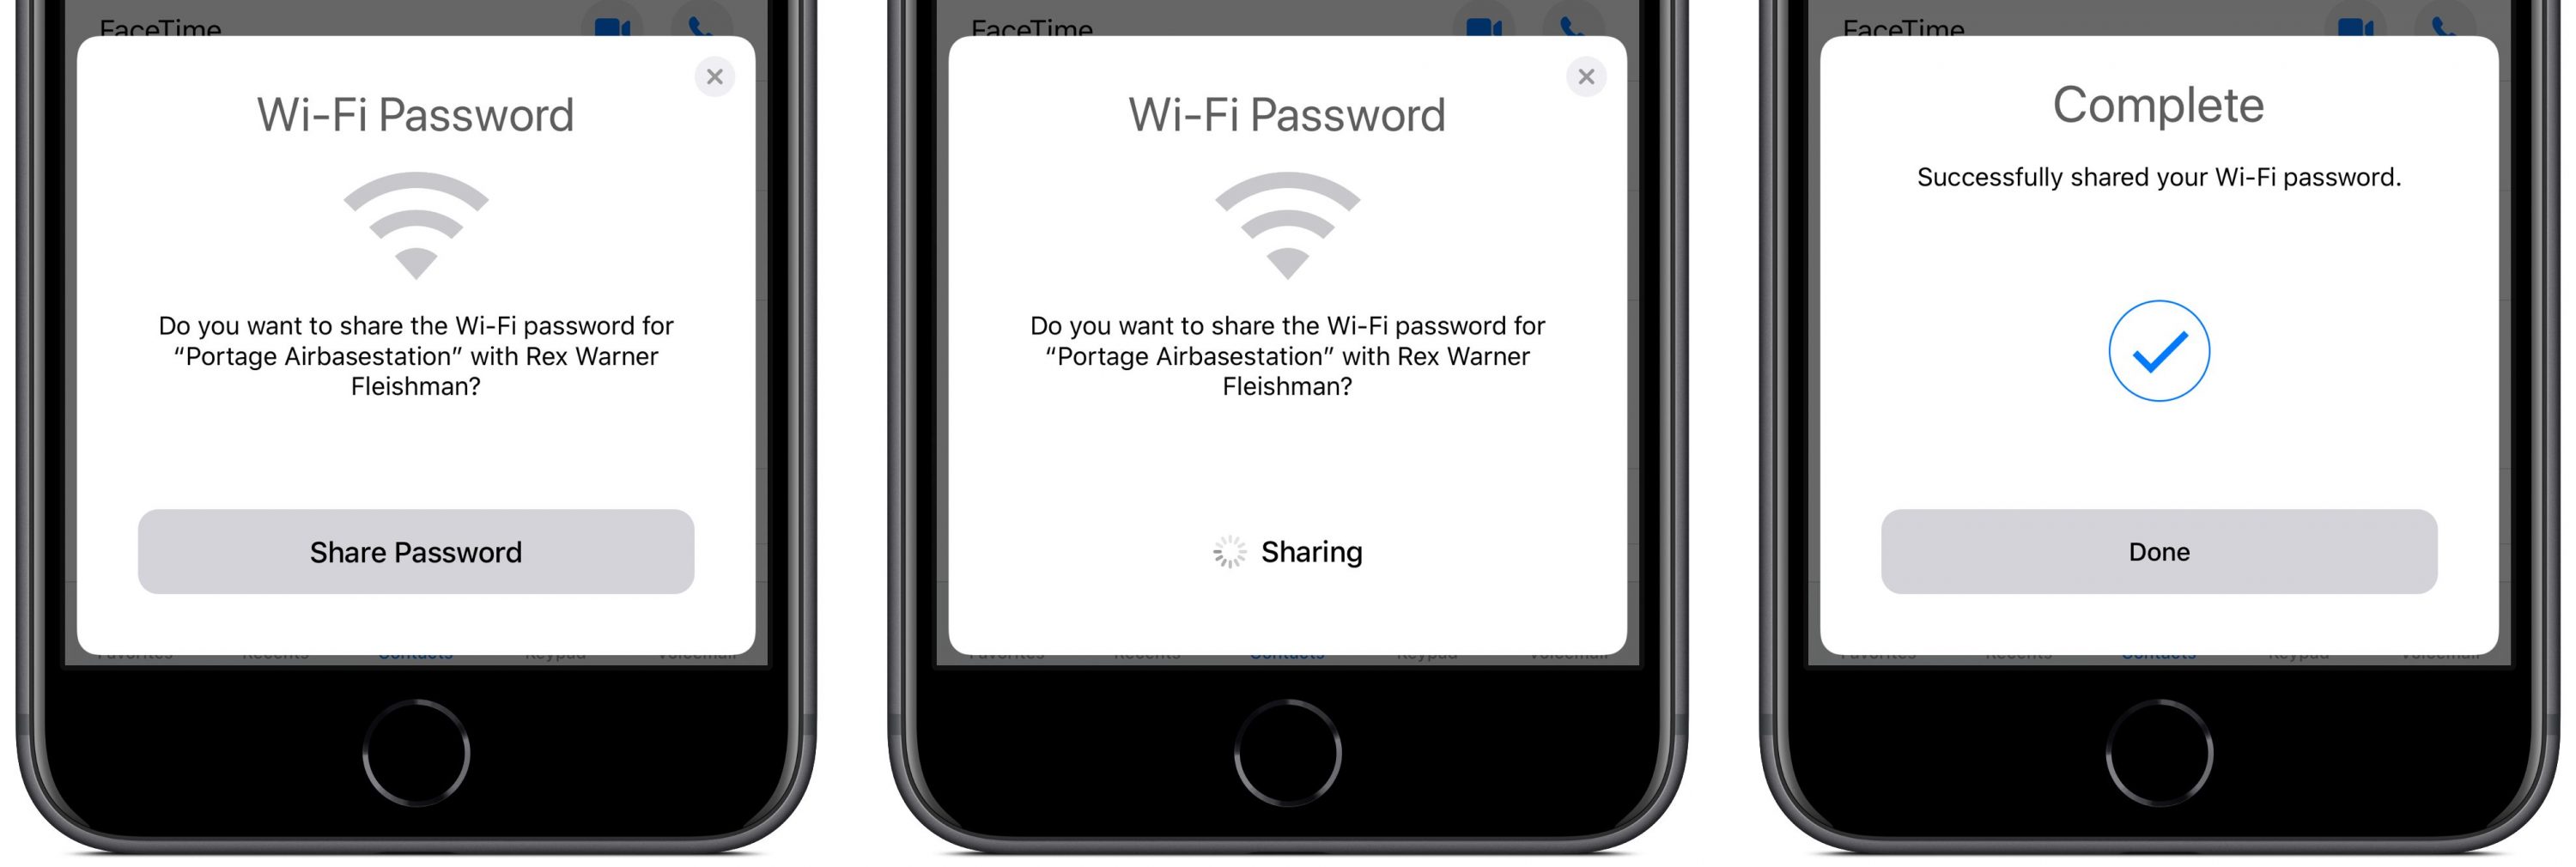
Since iOS 12, you can join a Wi-Fi network if someone near you has you in their contacts and has the password for a network you want to join. This is a handy feature if you’re, say, visiting a friend’s house and want to connect to their Wi-Fi. The key is that your friend’s contact item for you has to contain the email address you use with iCloud. Here’s how to use a friend’s password:
- Make sure your device is near their iPhone, iPad, or Mac—the feature relies on Bluetooth and proximity.
- Tap the network you want to join.
- On your friend’s device, a Wi-Fi Password pop-up appears that explains what network you want to join and your name. They need to tap Share Password.
- The password is sent securely and silently to your device, which joins the network without any prompts.
- Your friend taps Done to dismiss the dialog.
Join via a QR Code
Back in iOS 11, Apple added a nifty visual way to share network details with a minimum of fuss via a QR code that you scan in the Camera app. This hotspot-sharing format, which was developed in the Android world, encodes the network name and its password.
While Wi-Fi–enabling QR codes aren’t found in the wild all that commonly, I have seen them in coffee shops and gathering places, probably placed there by a QR Code aficionado like me. Some conferences also use them to help attendees connect to the conference network. You can also find them on some Wi-Fi routers, letting you make the first connection without finding the default network password.
You can join a network via a QR code simply by pointing your iPhone or iPad camera at it. (Settings > Camera > Scan QR Code has to be turned on, which it is by default.) You can also use a Control Center control improved in iOS 13 and iPadOS 13 that looks just for QR codes. (Go to Settings > Control Center > Customize Controls and add QR Code Reader.)
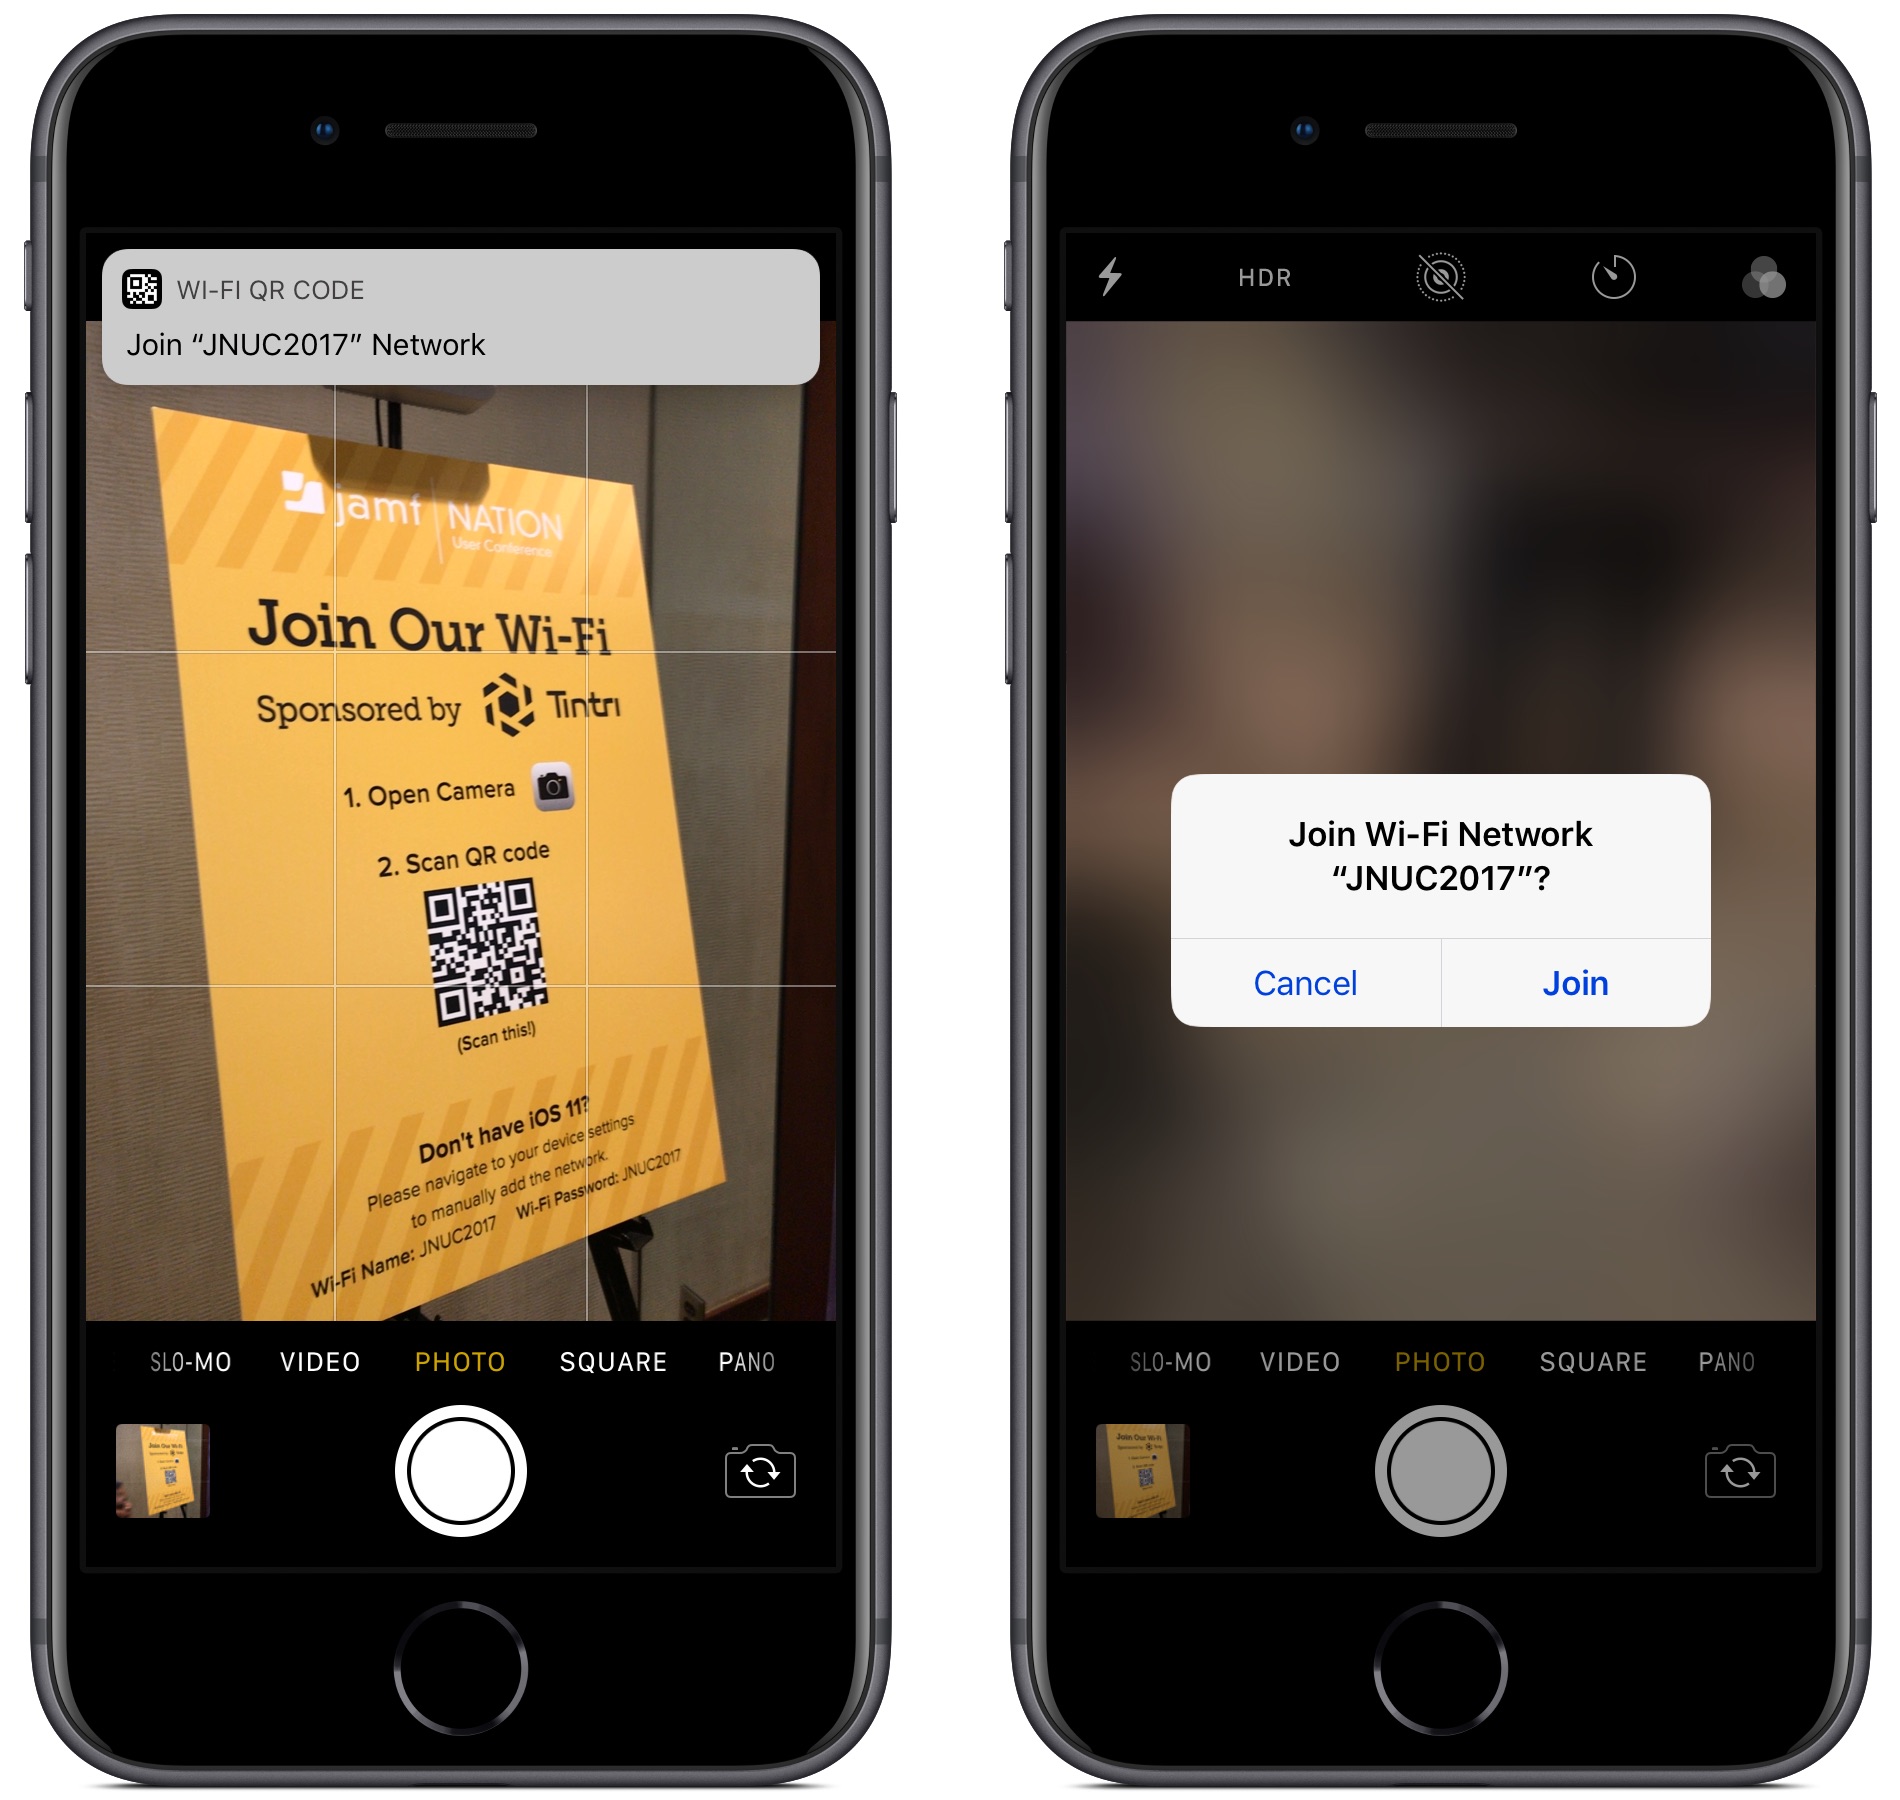
To scan a Wi-Fi network QR code with the Camera app:
- Point your camera at the code so it’s entirely within the screen.
- iOS recognizes the code and displays a Wi-Fi QR Code notification saying Join “Network Name” Network. Tap that notification.
- Tap Join Network.
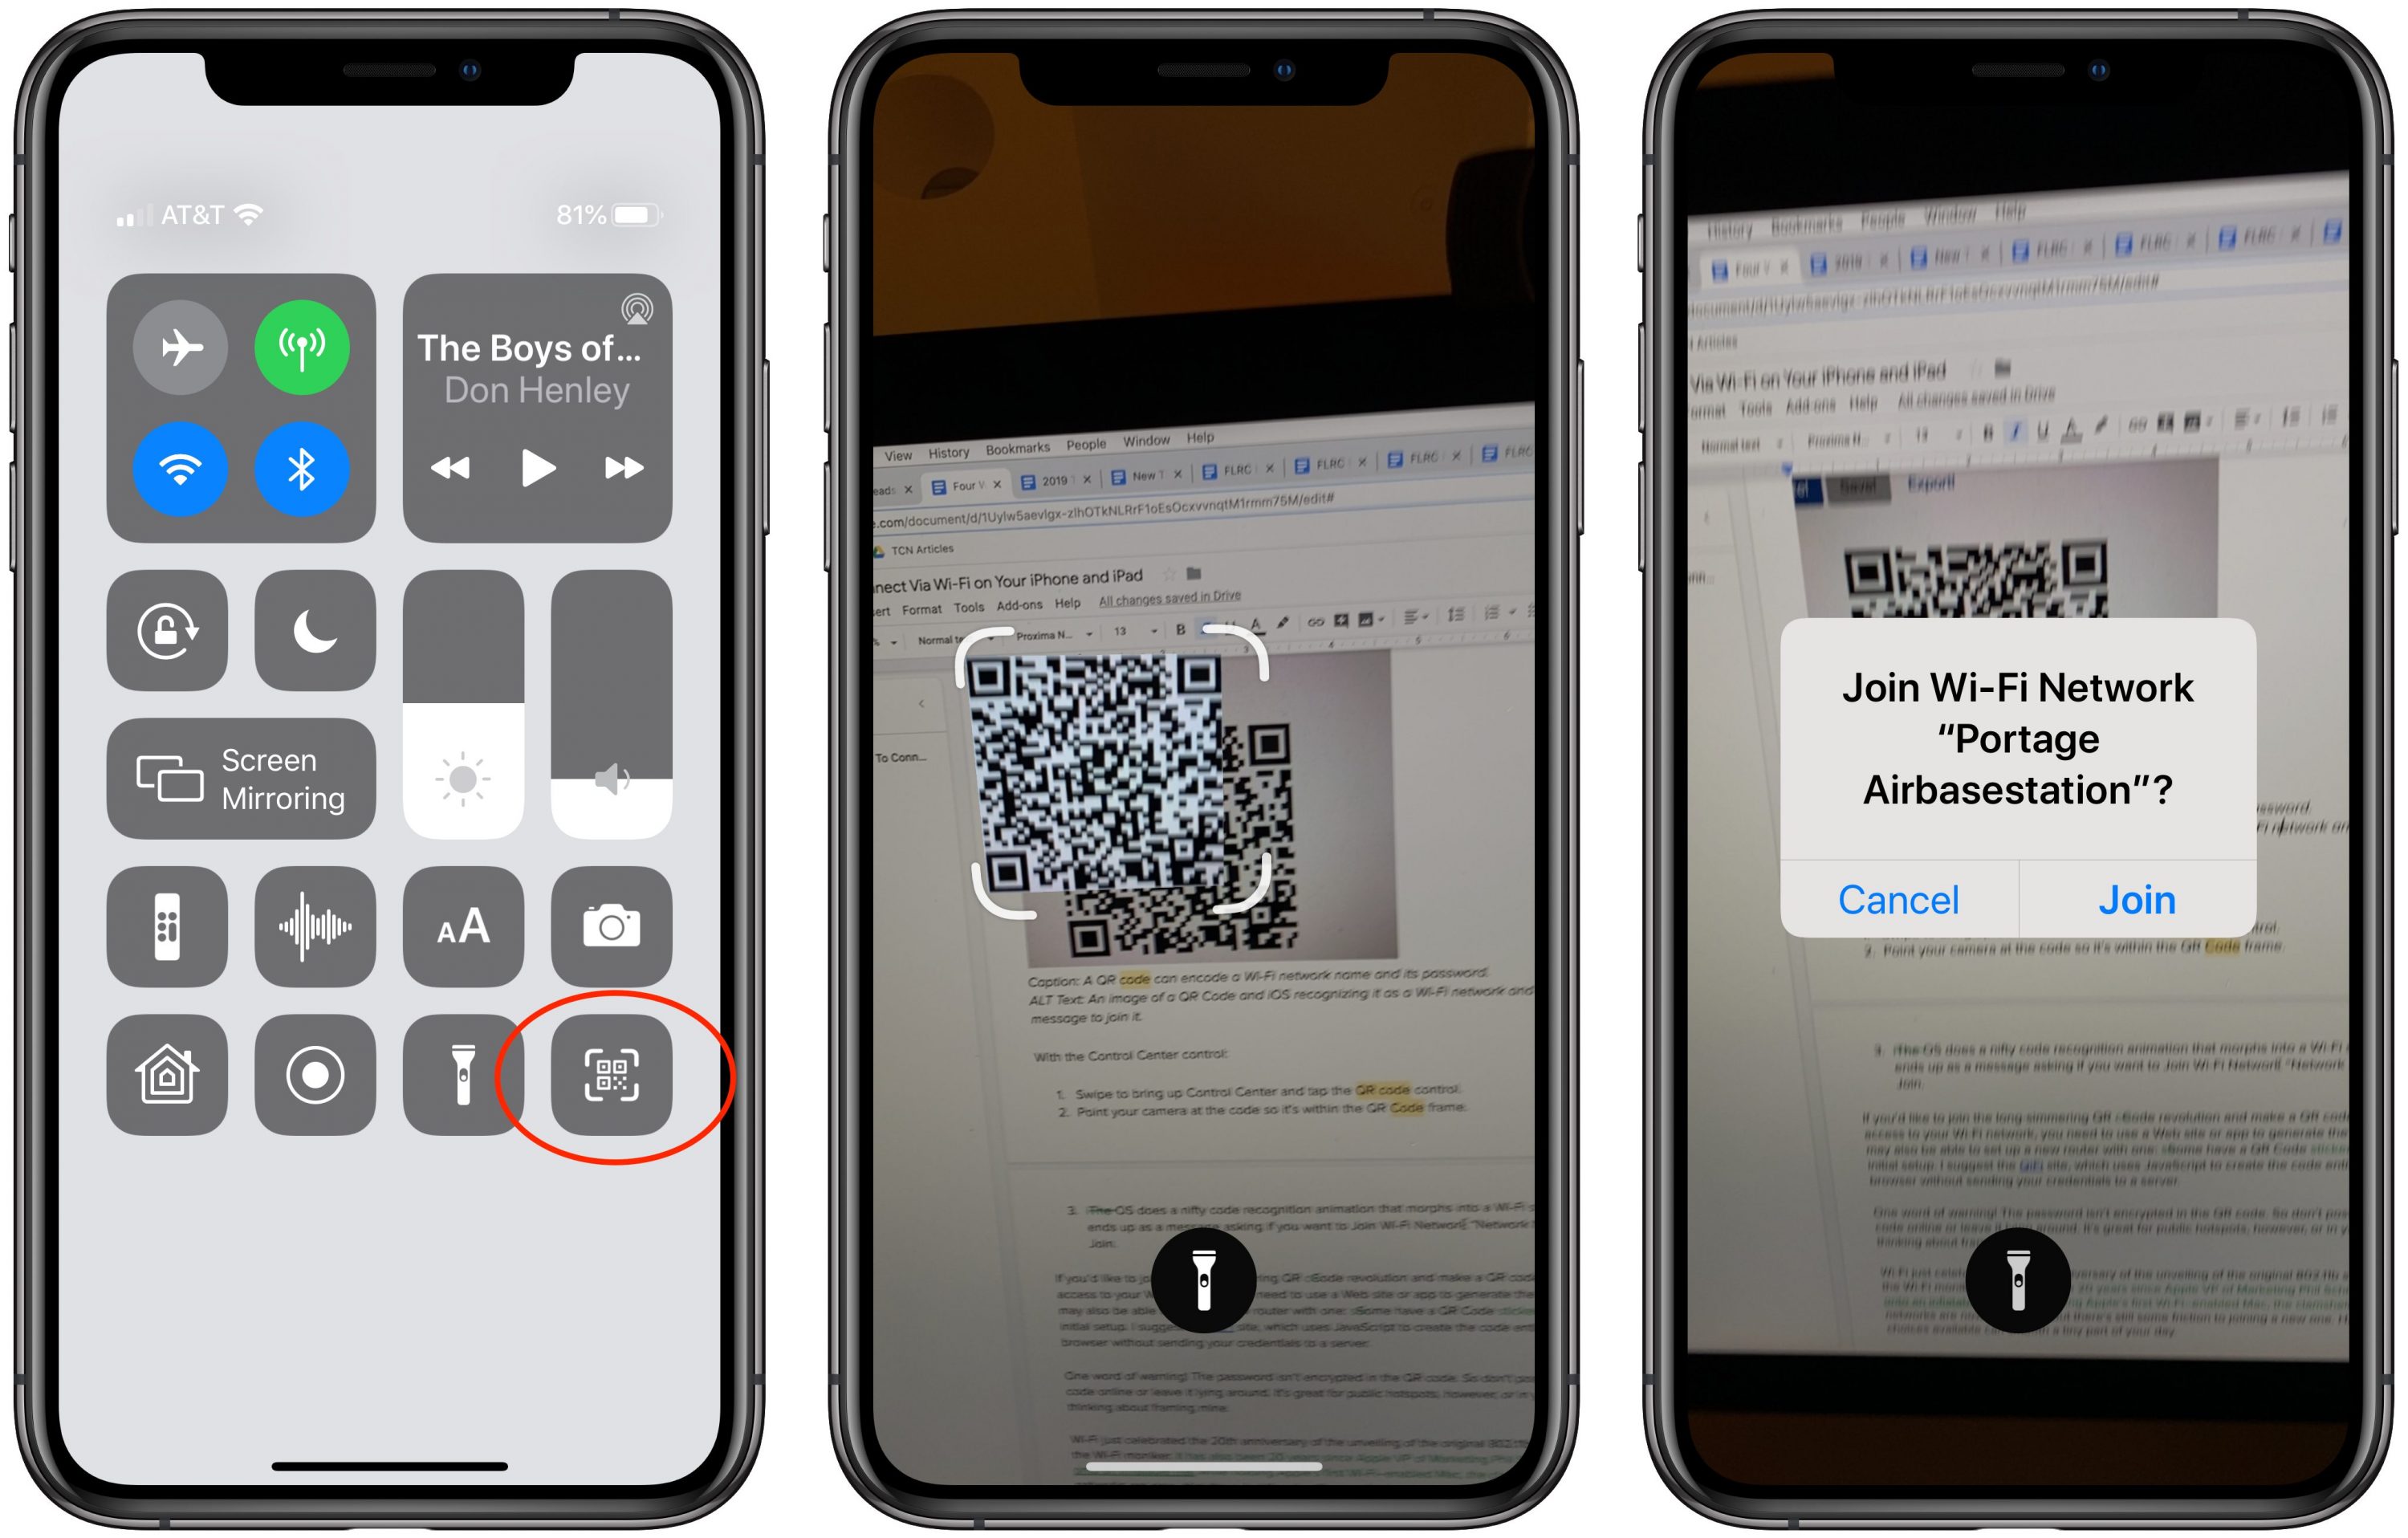
To scan a Wi-Fi network QR code from Control Center:
- Swipe to bring up Control Center and tap the QR Code button.
- Point your camera at the code so it’s within the QR Code frame.
- iOS does a nifty code recognition animation that morphs into a Wi-Fi symbol and ends up as a message asking if you want to Join Wi-Fi Network “Network Name”? Tap Join.
If you’d like to join the long-simmering QR Code revolution and make a QR code that gives access to your Wi-Fi network, you need to use a Web site or app to generate the code. I suggest the QiFi site, which uses JavaScript to create the code entirely in your browser without sending your credentials to a server. And if you get really into QR codes and want to build some automation to create them, check out Charles Edge’s article on the topic.
One word of warning—the Wi-Fi password isn’t encrypted in the QR code! So don’t post such a QR code online or leave it lying around. It’s great for public hotspots, however, or in your home. I’m thinking about framing mine.
Wi-Fi just celebrated the 20th anniversary of the unveiling of the original 802.11b standard and the Wi-Fi moniker. It has also been 20 years since Apple VP of Marketing Phil Schiller took one giant leap for wireless networking by jumping onto an inflatable mat while streaming a video on Apple’s first Wi-Fi–enabled Mac, the clamshell iBook. Wi-Fi networks are now ubiquitous, but there’s still some friction to joining a new one. Having more choices available can smooth a tiny part of your day.
Making a QR code yourself in Shortcuts is even easier without downloading or installing any apps, as explained here.
http://www.hyperinfo.ca/GS.Sunatori/2017-06-09.html#333
I find that keeping a copy of the QR code for my home WiFi network in my “wallet” app to be a useful place to store that information for rapid retrieval when a friend needs access and, for whatever reason, the other automated connection methods fail to operate. I just open my wallet and they grab the code from there.
What is the URL that the code is pointing to? Does it contain the password also? Do you use a desktop program to generate and print the code?
Use the link in the article to generate an image of a special WiFi QR code that includes the SSID and the Key. Remember this is not secure (does indeed contain the password) but if you keep it in your wallet it doesn’t
really need to have its own encryption. Just for convenience really.
Really useful bit about the control centre: I’d found you can long hold to get more info on which network you’re connected to, but didn’t think to long hold again.
But… on iPad it doesn’t show my phone hotspot as an easy choice, so I still have to open Settings for that.
I have finally started to see “popular” network popups. I was at the Apple Store on Sunday, and even though I thought I had already connected, this message appeared. I tapped Join and was connected.
I’ve had something like this pop up on my iPad, offering my iPhone personal hotspot, when no other networks were nearby.
But… it’s erratic in its appearance. It doesn’t always show up.
That’s been my experience too—sometimes I’m offered my personal hotspot, but mostly not.
I have also seen the “popular” network notification at least once now too, I think.
Same here. I saw it once recently. And for the life of me I couldn’t figure out what made it choose exactly that network in that city at that time.
Glenn actually posted a theory about this yesterday on the MacWorld site (https://www.macworld.com/article/3482122/what-the-new-ios-13-wi-fi-message-means-about-nearby-available-networks.html).
Pretty sure this has to be it, after I read through a bunch of possibilities. Everything else involves Apple scanning data packet headers, which seems fairly invasive compared to the probes.