Timing 2 Helps Track and Manage Your Working Hours
Time tracking and planning are the banes of most people’s existence when they try to improve their productivity. Tracking time is cumbersome and requires constant attention to small details—have you spent the last 30 minutes working on that document, or did you check email for 5 minutes? Equally bad, planning time in advance can feel like a straitjacket. But few people are successful if they don’t do either: some people can’t finish their to-do lists, others clear their to-do lists but neglect long-term goals, and those who bill clients by the hour may find themselves on top of their work but without any money in the bank due to poor records. And at the moment, some of us might have good time tracking methods in an office we can’t get to, and need to do something similar on our laptops and home Macs.
I have challenges with both tracking and planning, and in my Take Control of Your Productivity book, I own up to the problem—I can give good advice I have trouble following. But I do follow my advice to try new techniques regularly, and since I’ve started using Daniel Alm’s excellent Timing app for the Mac, I’m attempting major changes to how I approach both sides of the equation.
I’ll walk you briefly through the features of the app, but since Alm provides excellent documentation, including introductory videos by David Sparks and a video training course, I’ll move on quickly to using Timing to implement various productivity techniques. If you want to follow along, Timing has a free 14-day trial, and the Expert version that includes all the bells and whistles (the version I’m reviewing) is available to Setapp subscribers.
A Wizard of Speed and Timing
Timing is easy to explain: it watches to see which window on your Mac is in front and whether you’re doing anything there, and then it notices when you switch to another window or stop using your Mac for a while. You can assign what you’re doing to a task or project before you start, but that’s not necessary, because the app provides sufficient detail to assign all those groupings to your actions later, and can even follow rules you set to do so automatically.
For example, I’m currently tracking the second 15-minute block of time I’ve spent today writing for TidBITS, but I won’t have to set the project in advance during our scheduled conference call in an hour. That event is in my calendar, and it gets added to Timing differently than tracked time.
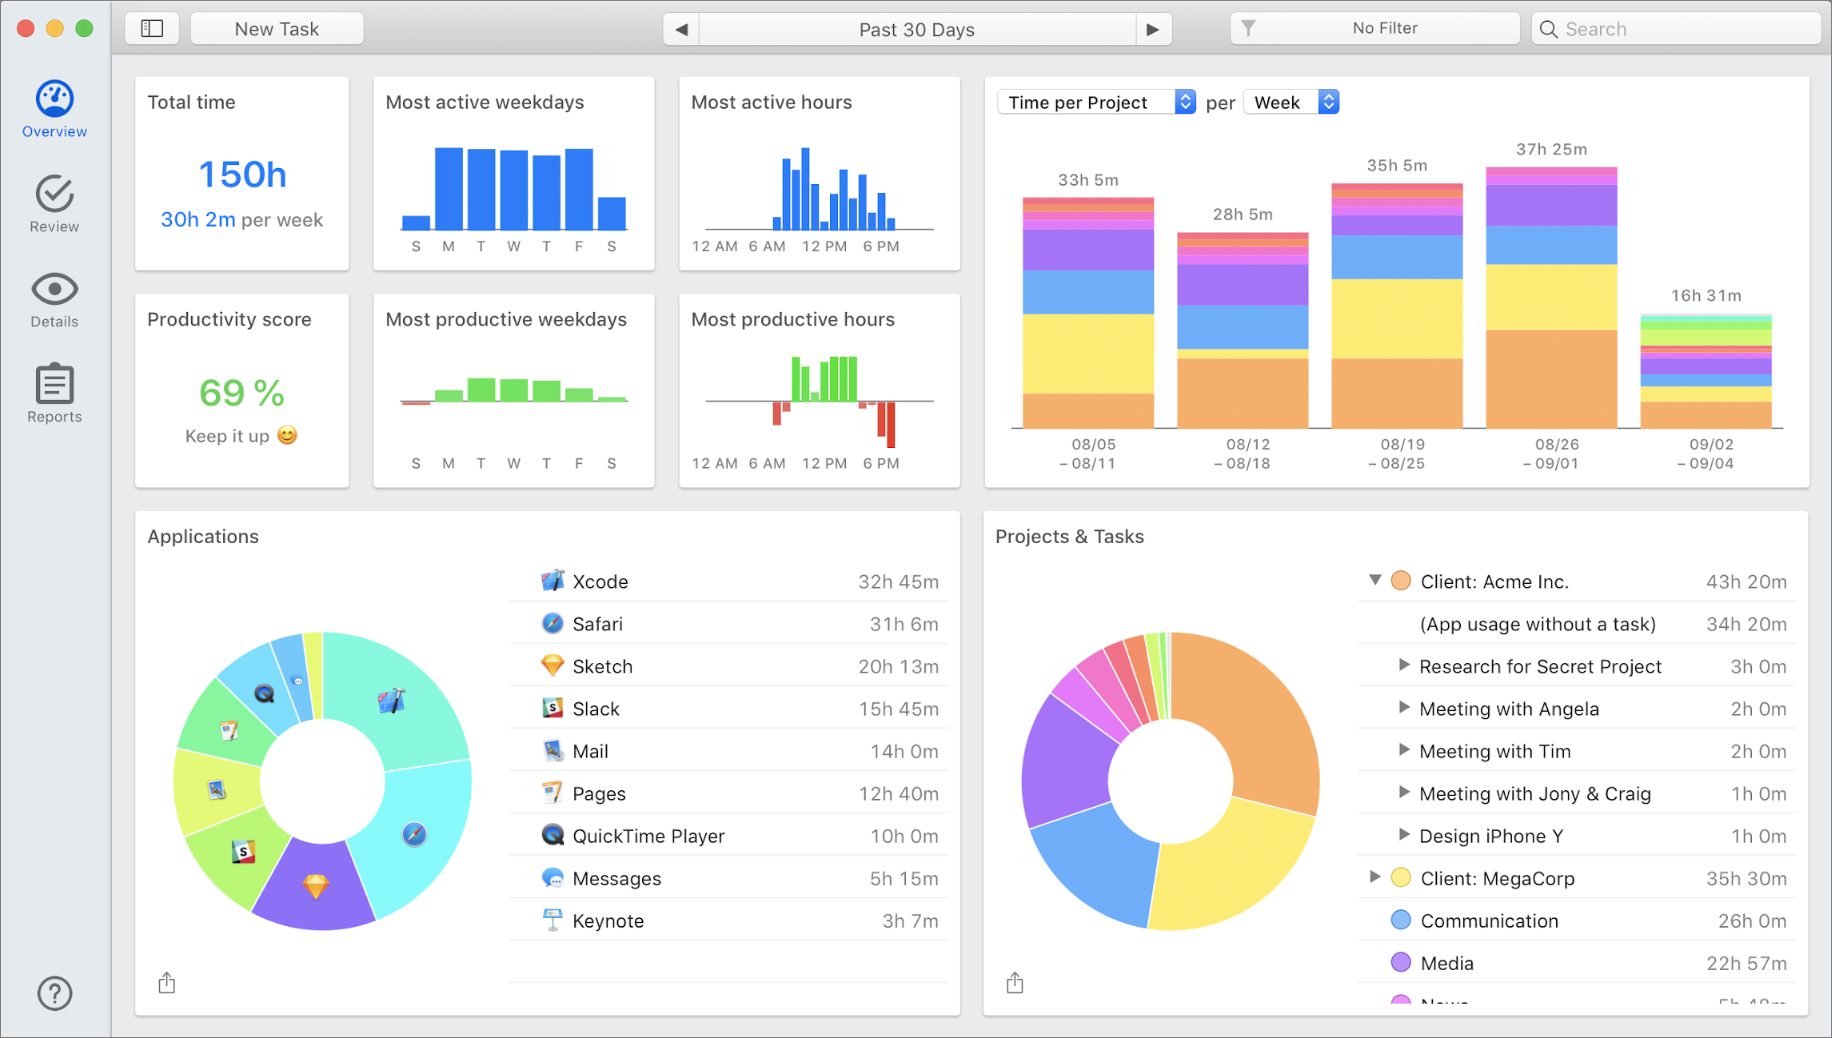
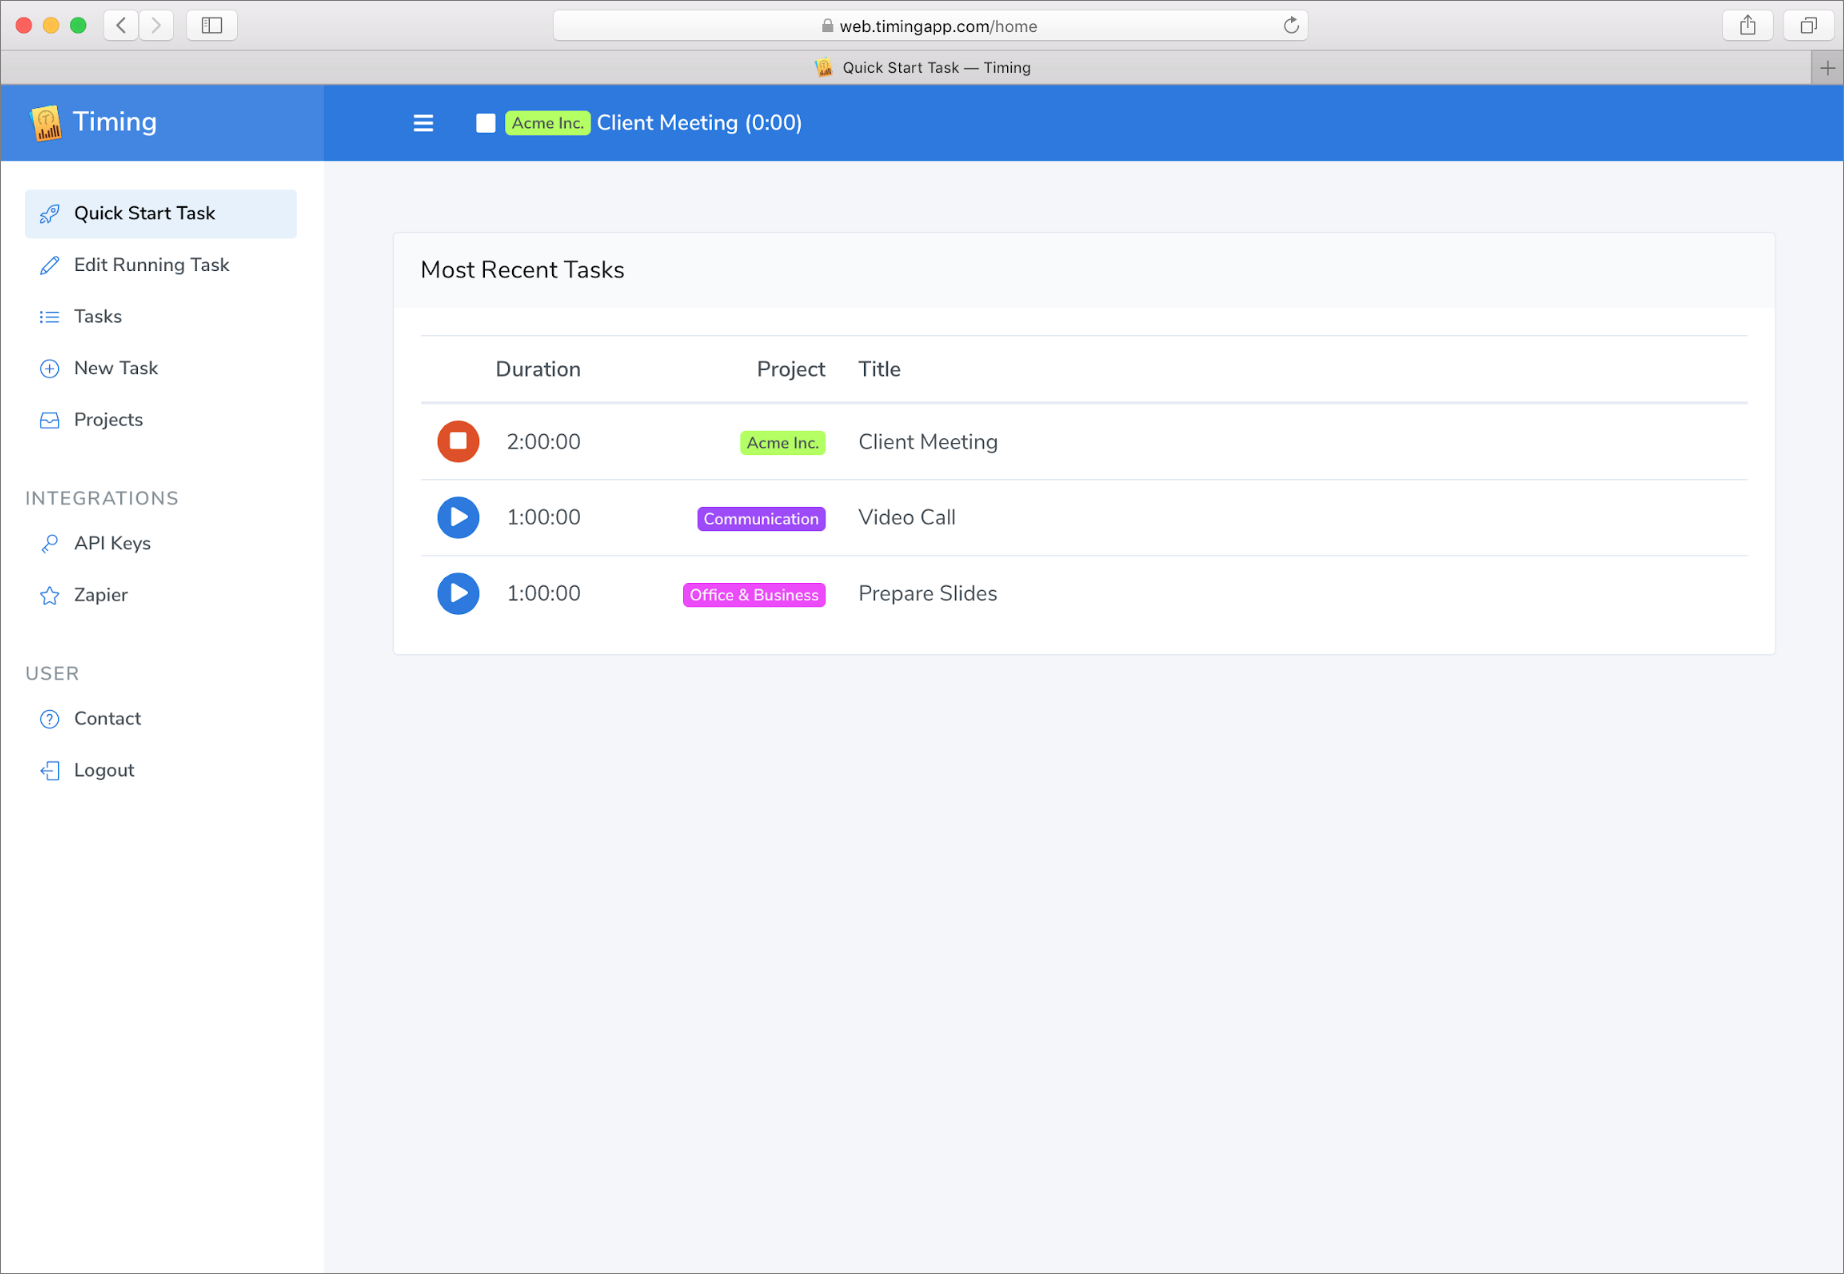
The main Timing app has four sections divided into tabs, but there are actually six major components to the app. When you launch Timing, you begin in the Overview screen, which shows you a heads-up display dashboard of your data in various useful formats. You can select the date range over which this data is displayed and scroll through your data as you wish.
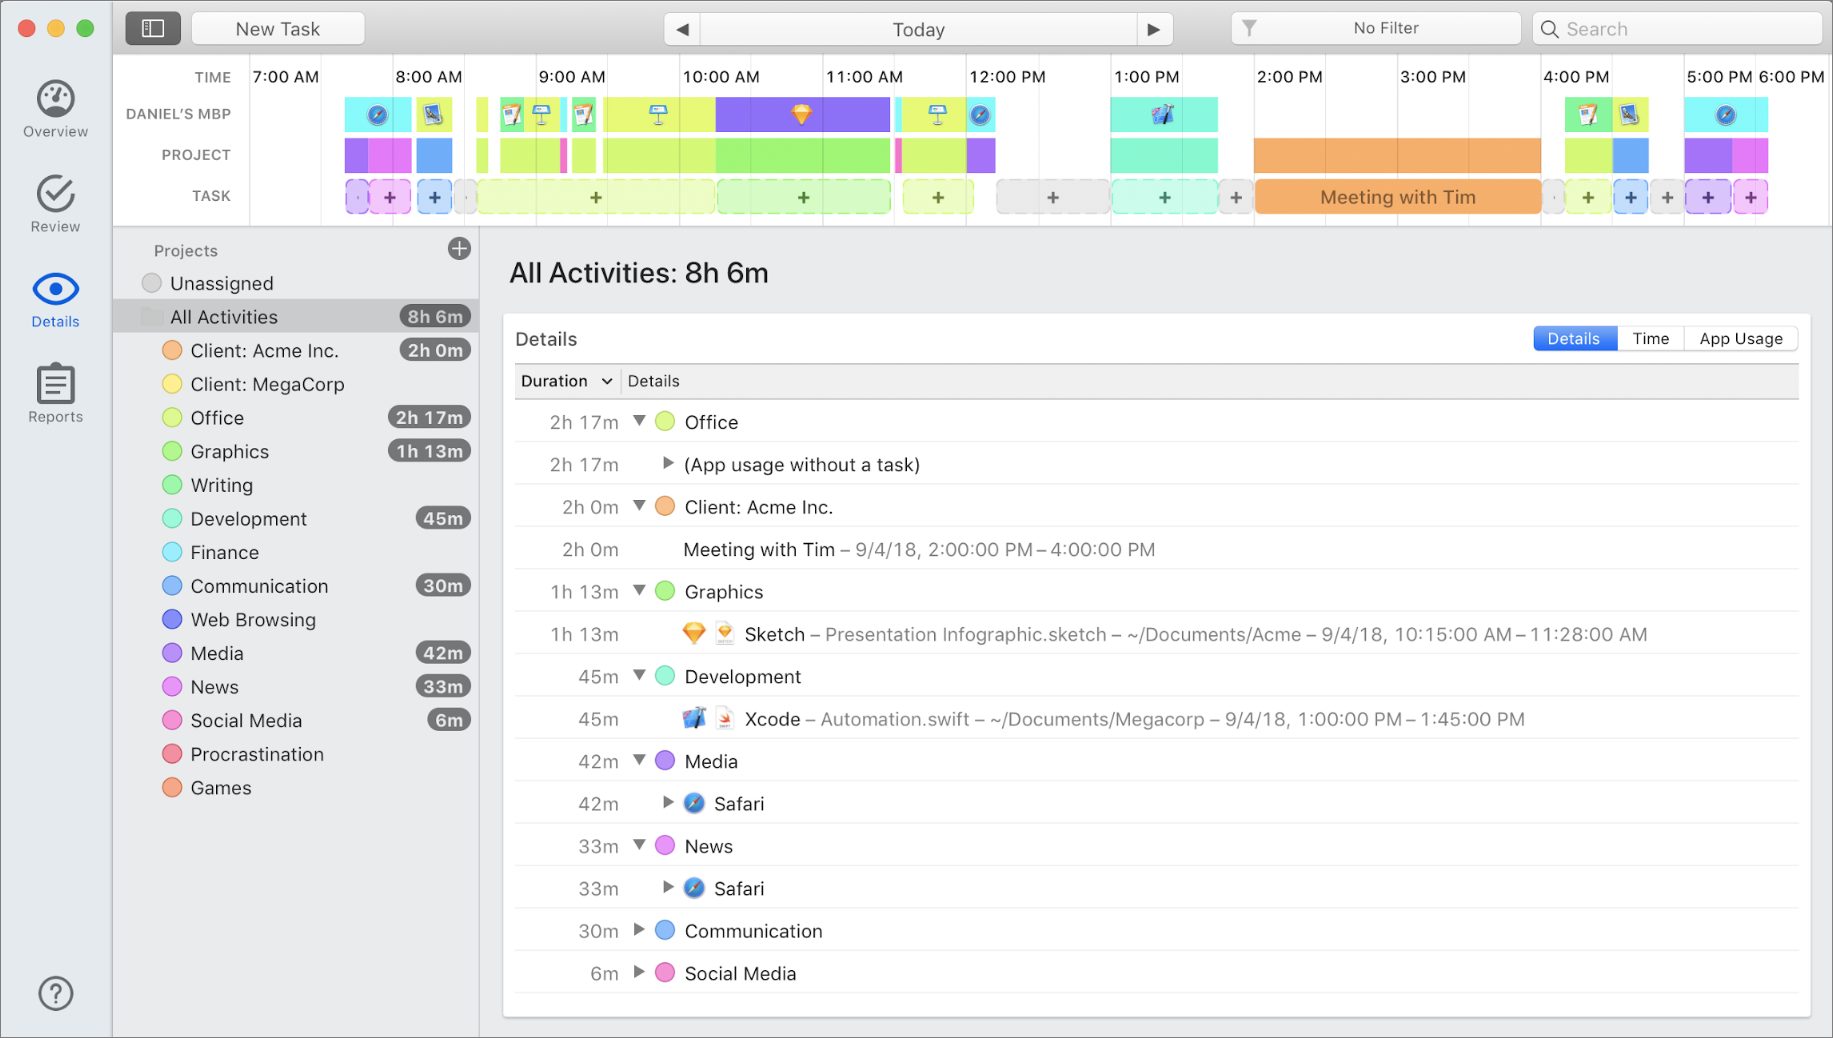
The Review screen shows you your tracked data in a timeline and in various groupings. As displayed in the screenshot below, the icons in the timeline show you which application you were using at a given time. If you scrub the mouse pointer over that block, the pop-up window displays the name of the window at the moment you’re pointing to. This is exceedingly useful when reviewing a block of time during which you had many windows open and were rapidly switching between them, especially if some were related to different tasks. Also helpful is an additional line that appears in the timeline if you have any calendar appointments during the reviewed time period. (It’s omitted in the illustration because this feature is included only in the Expert version of the software.)

In the next Project and Task lines of the timeline, a colored bar indicates that a block of time has already been assigned to a task or a project. As you can see in the left sidebar, each project is assigned its own color, and judicious choices make it simple to see what took up most of the day. When the Task timeline shows a gray bar with a + symbol in it, that’s a time block that Timing is suggesting based on your app usage or a calendar appointment. Click the + to assign a new task to that block. In the screenshot, the user is assigning the task Create Presentation in the Office project to a block. If the time suggestion is incorrect, editing the start or end time is the most precise way to assign more accurate times; any time that’s left over will appear as a (smaller) gray bar in the timeline.
The other parts of this screen are for setting tasks using other methods. If you know that all your Keynote time was for a particular task, clicking on that app selects all the time in that app at once. The same can be done for documents, Web sites (hidden under the New Task pop-up in the screenshot), or the keywords list that Timing automatically populates based on the various window names it has seen during the period you’re reviewing.
While working in other apps, you may want to note which task you’re on in the moment, and it’s distracting to switch to Timing to do so. For this, Timing provides a menu bar app.
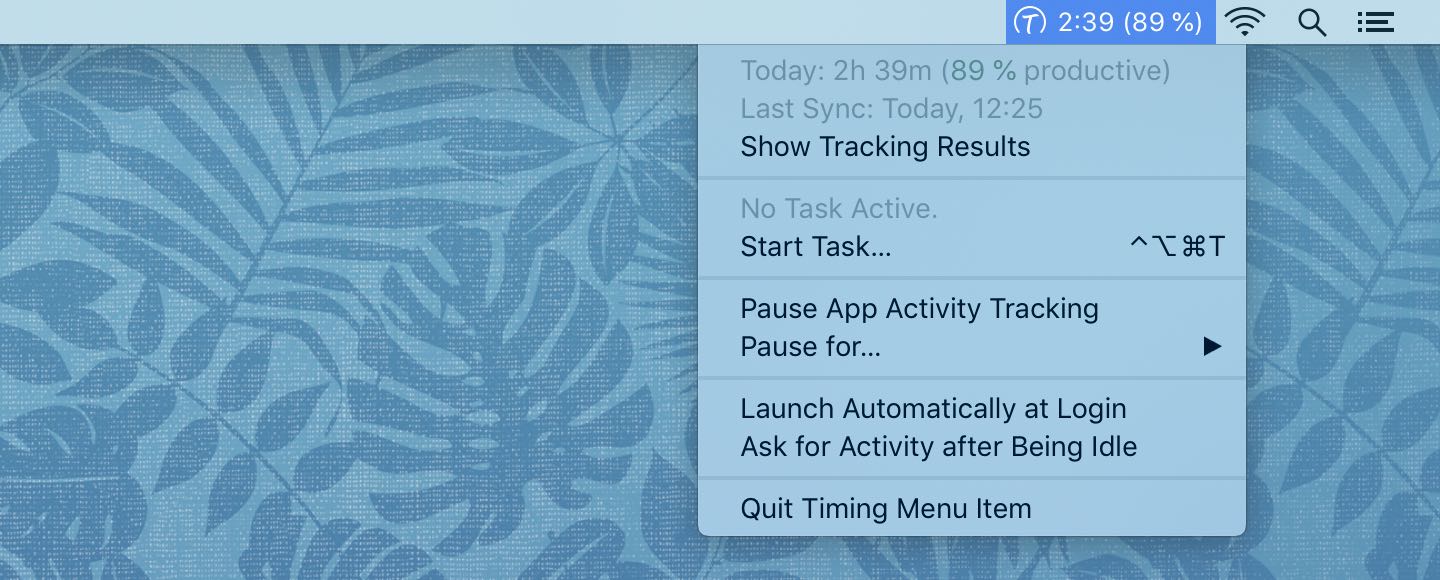
The menu bar app shows either the time on a particular task, or the total time tracked that day for both your tasks and when no task is being recorded. The Timing icon changes to match the color of the project when a task is tracked (although colors can be difficult to discern); if you’re working on a larger monitor, you can also put the name of the task in the menu bar, but this won’t fit on a laptop screen. If you start a new task from the menu bar app, a dialog asks you to set the task and project and intelligently auto-populates suggestions from past tasks, making it a cinch to reuse your task names to track the same work. The five most recent tasks will also show up in a Quick Start section of the menu.
I find that I use the menu bar most often to track what I think of as “conscious work,” a task that I’m setting out to accomplish. As an easily distractible person, the visual reminder of what I’ve chosen to be doing is helpful. For “unconscious” tasks like answering email or reviewing files on my Desktop—the mundane work that keeps me on track—I usually end up assigning after the fact.
Back in the main Timing app, the Details screen shows you aggregated data about your projects and tasks. As in the Review screen, you can assign any unassigned time in the timeline here.
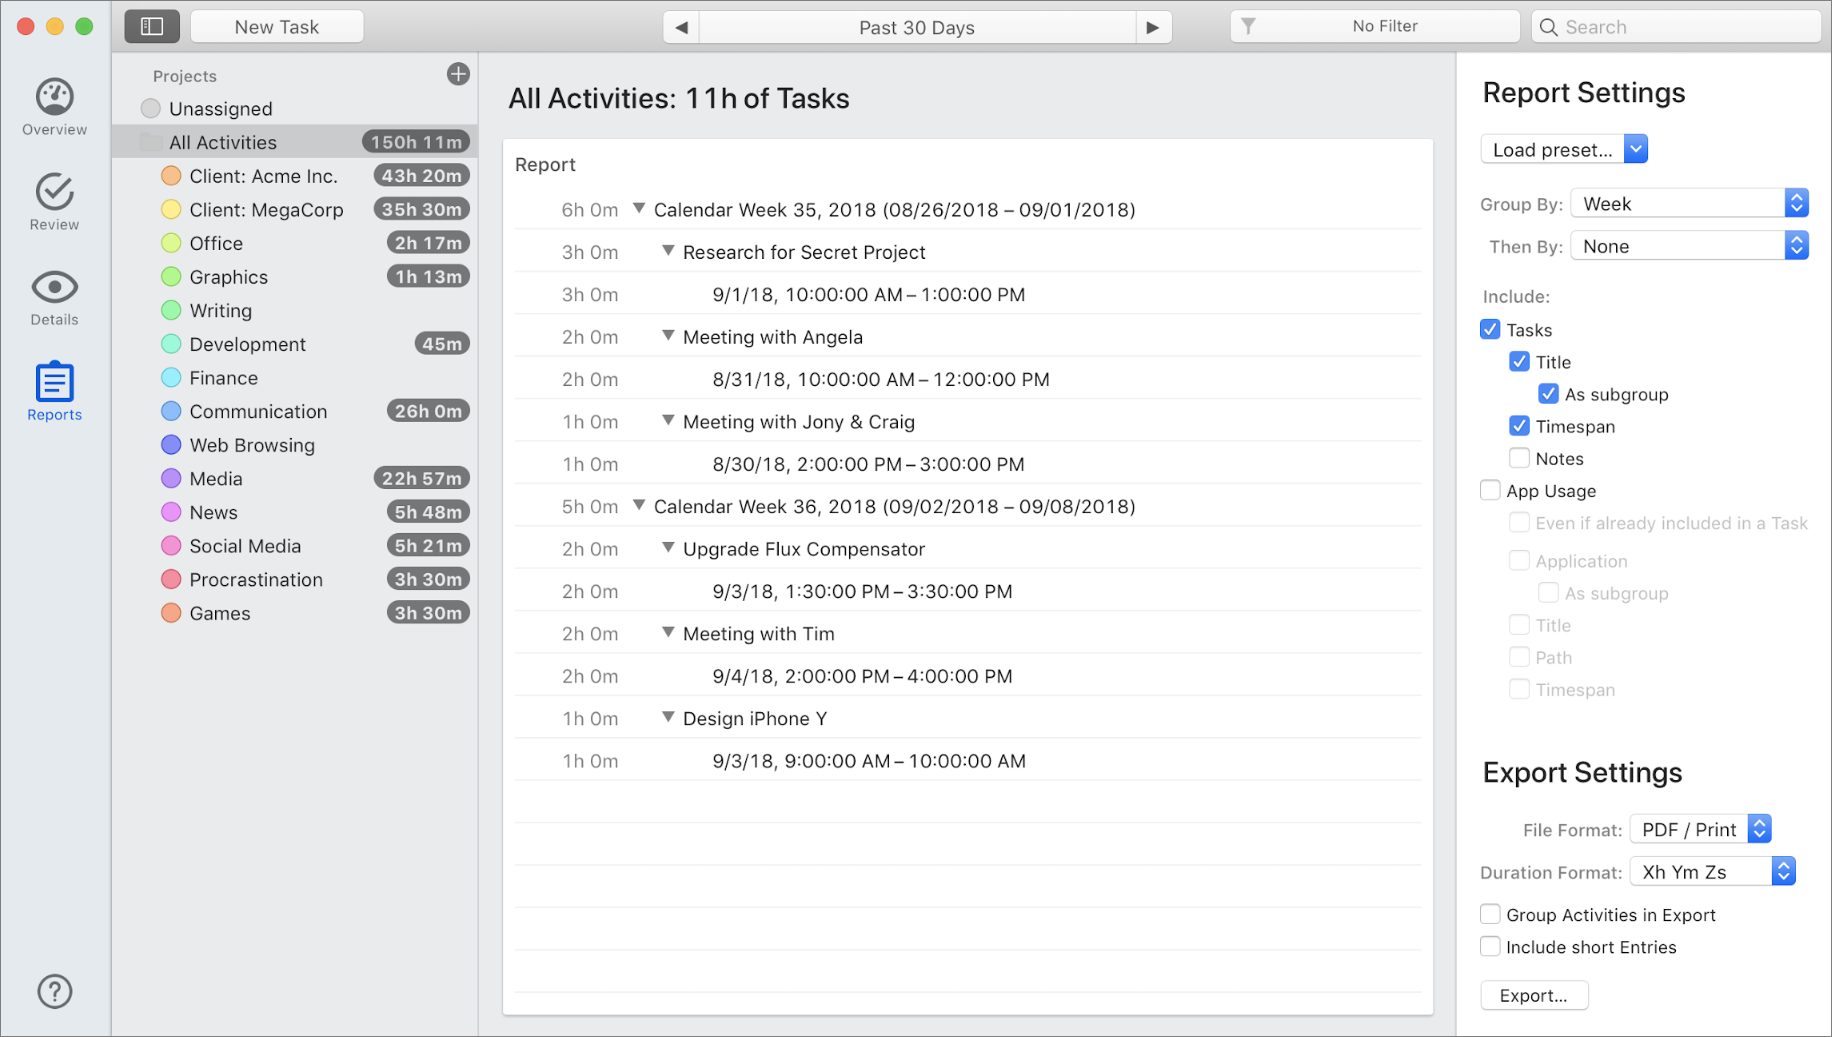
Finally, the Reports tab shows similar data, but in a format that is easily shared with other people or moved to other apps. Here is where you can prepare a PDF or HTML page to show your time to coworkers or clients, or export your data into a spreadsheet for further manipulation.
Tracking Time Away from Your Mac
Unfortunately, most people find they need to spend some time away from their Macs, where billable work and distracting things can both happen. If your favorite kinds of procrastination take place away from your computer, tracking computer time alone is unlikely to make you more productive. And Macs don’t yet have HAL 9000’s ability to figure out what you’re doing from across the room. (Which is probably for the best.) For people using more than one Mac, Timing provides a service that syncs activity on multiple Macs together into a single timeline.
For times away from any Mac, Daniel Alm has added the sixth component of Timing, a simple Web interface that lets you start new tasks and track their time, or manually enter times yourself. The Web interface has nowhere near the number of features even found in Timing’s menu bar, let alone the app—you wouldn’t want to purchase the Timing Mac app to use the Web app on its own—but it serves in a pinch to use your iPhone, iPad, or someone else’s computer to keep your tracking up to date.
The other way to track time is with an app everyone already has: Calendar. When I’m not at my Mac, I enter time into a Time Tracking calendar I’ve set up. Those entries automatically appear in Timing as events with corresponding task suggestions in the gray bar when I review. The title of the event reminds me what that project the time was for, and I can click and assign the project quickly to fill in the missing time from my day.
The problem with this scenario is obvious, and it’s not Alm’s fault. Since many of the tasks you do away from your Mac are on your iPhone or iPad, why not have a dedicated iOS app that tracks that time? You’ll have to ask Apple because only Apple apps can watch what apps you’re using, and the only data Apple is willing to give you back is what’s available in Screen Time. That might be enough for people trying to cut down on Facebook and Angry Birds, but it’s completely inadequate for reconstructing work tasks you have performed recently on an iOS device.
Since Android phones do have such an app, this means my time is nicely watched on half my gadgets, but my iPhone and iPad are nearly black boxes, which I find exceedingly frustrating. (The best workaround I’ve found is to set a timer for 10 or 15 minutes, and every time it goes off, take a screenshot. Review those quickly enough, and you might be able to reconstruct your day from these timestamped reminders.)
Timing sports many more features I’m skipping in order to get to productivity suggestions, so I suggest you check its documentation for a more thorough description. The introductory video provides a quick tour in only 13 minutes.
Decide What to Track
In the Overview tab of your tasks, you see the aggregate statistics of your tasks and app usage, but it’s up to you to determine what you care about in this display. All the displays in the window are affected by the date range displayed on top. Click where it shows Today or another date range, and you can choose a variety of ranges or set a custom one.
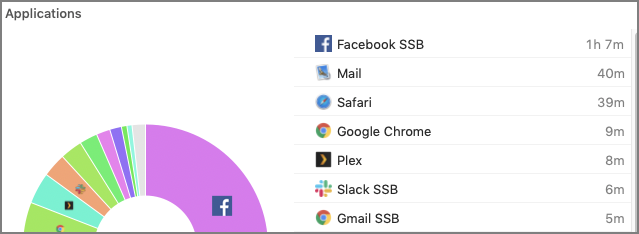
The bar chart in the upper right stacks your time together, so if you assign projects based on different kinds of work (or play), you can quickly determine where you’ve spent your time. The pie charts tell you how large each app and project loomed as a percentage of your overall tracked time, which is useful in some cases but not others. I’m interested in knowing how much time I spend in a word processor, but the Safari wedge combines both my work in a Google Doc and my time on Facebook.
You can track your Web time better if you access frequently used sites with a site-specific browser, which is a standalone app for a particular Web site. You can create these with a utility app such as Fluid 2. I never use Safari for Facebook because I have a “Facebook SSB” Fluid app, which after giving it a custom Facebook icon, appears specifically as Facebook in the Dock and Command-Tab browser. This isn’t necessary for Timing because it can automatically discern the facebook.com URL to break out that time, but this combination of positives inside and outside Timing makes the trouble well worth it.
But it’s the upper left where you have the most flexibility because that’s where you see an overall productivity score. This score is calculated based on a productivity slider that you set for each project.
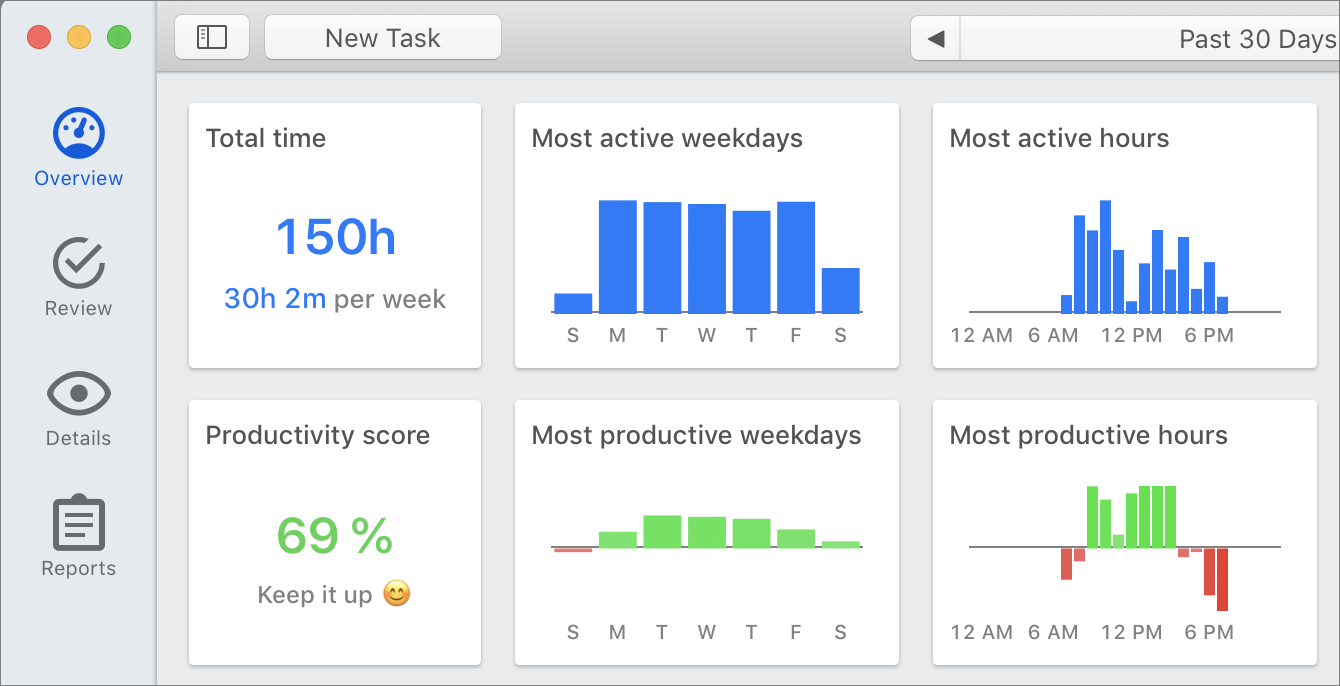
For example, billable time for a consultant like me would obviously be 100% productive, but when you answer your email, you might judge that about half your time is spent dealing with less-than-useful or amusing messages, so you rate that time as only 50% productive. Spend 2 hours on email and 6 hours billed (oh, happy day!), and your productivity score for the day would be (50% × 2 ÷ 8) + (100% × 6 ÷ 8), or 87.5%, which the app would round up to 88%. If you prefer, you can pay more attention to your overall score than to the stacked bar chart. Timing is geared towards this, as your current score for the day can be shown in the menu bar, as shown in the above screenshot.
When I started using Timing, my initial inclination was to replicate the projects I had in OmniFocus (see “OmniFocus 3: What’s New and What’s Blue in Task Management,” 17 January 2019), since the Timing Web site provides an AppleScript to dump that data into Timing. But this was far more trouble than it was worth; I have too many OmniFocus projects to track. So I ended up using projects that tracked only as granularly as I needed in my reports: one project per client, with only those clients who need invoice sub-summaries getting more-detailed listings. To track other time, I use different projects based on their assigned productivity. A few hours of really good cleaning gets the “Home 100” project and 100% productivity, but laundry done while watching movies gets the “Home 25.”
As you can see, I use Timing to track my leisure time and my work time, and you’ll want to decide if you want to do the same, especially if you’re self-employed or are working from home (either normally or temporarily, like most of the rest of the planet). Productivity scores are based on percentages of tracked time, and untracked time is ignored, so you can score a perfect 100% productive rating by tracking 15 minutes of solid work and taking the rest of the day off. That will show up as a smaller number in “total tracked time” and the bar charts, but man, it’ll look great in your menu bar.
Personally, I need more information than that. And furthermore, I need to pay better attention to how I use my time than that. One of the key advantages of using apps like Timing is that they force you to note what you’re doing regularly. That action also makes you accountable, at least to yourself. You may not want to track every waking (and sleeping) hour like I sometimes do, but if you want to form better habits, you need to track the time when your bad habits manifest.
Setting Sane Goals and Tracking Methods
How you use Timing’s productivity measurement depends on what you choose to track and what goals you’re trying to measure. If you’re tracking only work hours, you might decide to shoot for 90% productivity—although seeing as how that only leaves 4 hours a week for meetings and email, which most people don’t think of as 100% productive, that’s probably unrealistic. If you’re using it to track nearly all your time, then asking yourself to hit a high productivity rating is simply nuts. Rudyard Kipling may have wanted to fill the unforgiving minute, but normal people think that an hour spent with family or friends at dinner shouldn’t have a measured deliverable.
The approach I’m taking, which is working passably well, is to track the time I’m most likely to fritter. Most mornings, it takes me a couple of hours before I do anything useful, and I’m trying to cut that back. I’ll never be a morning person, but I can identify 50% productive activities I can complete while my brain is spinning at low RPMs, and try to replace my 0% activities with those. That means I have to track breakfast.
This also means that it’s necessary to set humane targets for my productivity measure. If I spend any tracked time at all on a 50% endeavor, I can’t set a goal of 100% productivity because it’s mathematically impossible. So I suggest that for the first few weeks of using Timing, just record your existing scores, and do your best to modify the productivity ratings of your projects such that they reflect how you feel when you’ve spent time on them. Once you’ve established that baseline, you can say, “my goal is to be 5% higher in 4 weeks.” There’s no point in saying “25% higher;” do you really expect to be one-fourth of the way closer to perfect in a month? You’re battling habits you’ve established for years. Slow and steady wins the race.
I also watch for scores that are too high. When a week ends in 90+%, I’ve put in too many hours, and I’m working at an unsustainable pace. Better to deliberately throttle back than wait for my body to do it for me.
Have the Timing of Your Life
Having used (and tossed) many time-tracking apps over the years, on both my Macs and assorted gizmos, Timing stands head and shoulders above the crowd. The data it collects, and more importantly, the data it doesn’t force you to track manually, make it the lightest impact tracker I’ve ever tried. It’s rare I don’t have sufficient detail to reconstruct my day, even when I’ve been so swamped that I’m neglecting to review regularly.
But it’s not a substitute for the hard work of changing behaviors. You’ll have some beneficial effect because, knowing that Timing is watching you, you’re likely to focus a bit more to get better numbers at the end of the day. But that data is useful only if you apply it. The non-productive behaviors you have now, you have for a reason. An app can only tell you how often you’re resorting to them, not why you do or how to stop.
No matter what habits you’re trying to change, the way to do it is with better attention paid, frictionless tracking, and positive feedback loops. Timing (in conjunction with a good calendar app) isn’t perfect, but it’s easily the best software I’ve ever used for the purpose.
Timing is available either directly from its Web site or through Setapp. The app itself is free, but the non-Setapp version requires a monthly subscription, which is split into three tiers: Productivity for $3.50 per month (billed annually), Professional for $5.50, and Expert for $8. The Productivity tier is limited to two Macs, offers no manual time tracking, and doesn’t allow access to the Web app. The Professional tier adds those and is supported on up to three Macs at a time. Expert includes Calendar integration, AppleScript, Web API, and Zapier integration so it can work with third-party apps, fully customizable reports, and scripting based on Internet events. Setapp subscribers get the Expert version.
As a final note, I hope that this recommendation pays off for Timing’s developer, Daniel Alm. Aside from the high quality of his software, his documentation is preternaturally good (and improved further while I was writing this review), and even his press kit for reviewers is far better than average. I don’t know how he develops this software and still manages to respond to support emails so quickly. My confidence in a new app is usually set by a mixture of the quality of the programming, and my sense of how the company is run—Alm knocks both out of the park.
Back in the 1990’s, I had a side gig as a consultant working for multiple clients. I was able to write off my computer expenses from taxes but had to account for my Mac usage being predominantly for business. As I recall I used a handy little app called “MacInUse” to do the data collection for me. Very bare bones by “Timing 2” standards but got the job done!
One of the limitations that Jeff Porten mentioned in his review of Timing was the lack of an iPhone app. Thanks to the Timing API, such an independent app has now appeared—Zeit.
Daniel Alm wrote:
https://apps.apple.com/app/zeit-for-timing/id1511309209