Six Lessons Learned from Dealing with an iMac’s Dead SSD
There it was, Wednesday evening, and I was working hard to finish something for the day. Then I received an email from Watchman Monitoring, an essential tool used by sysadmins and consultants to keep track of Macs under their care, telling me about disk errors on my 2014 27-inch iMac’s SSD.
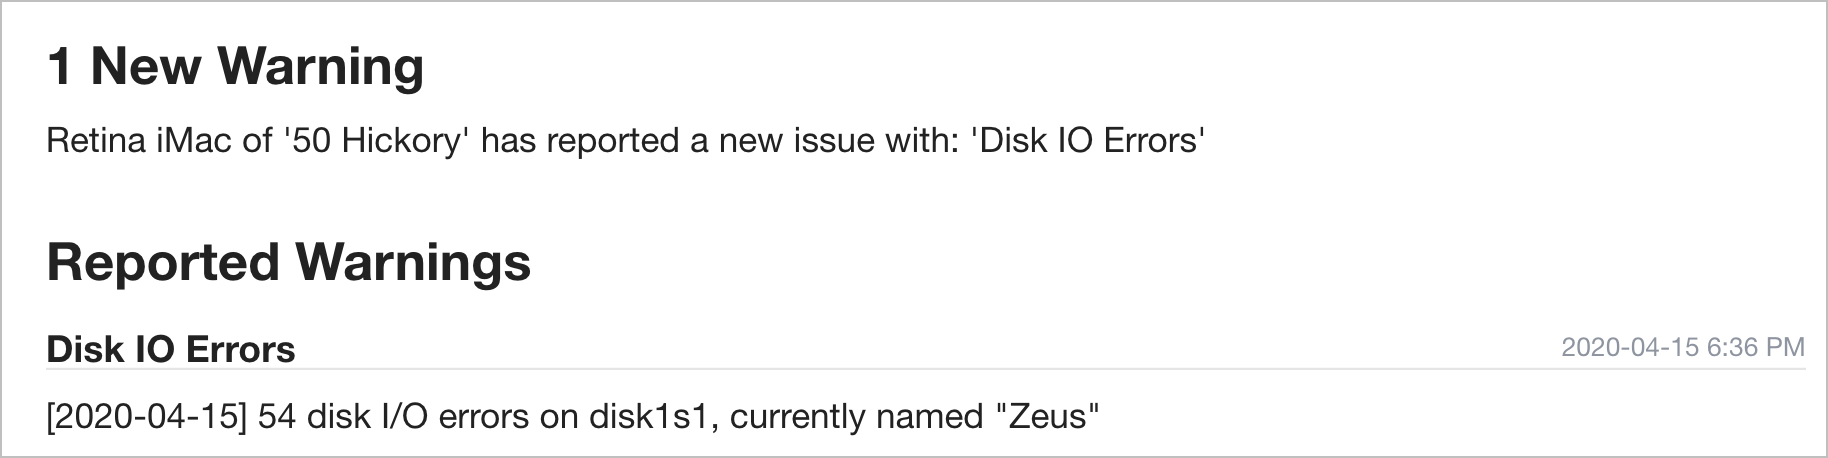
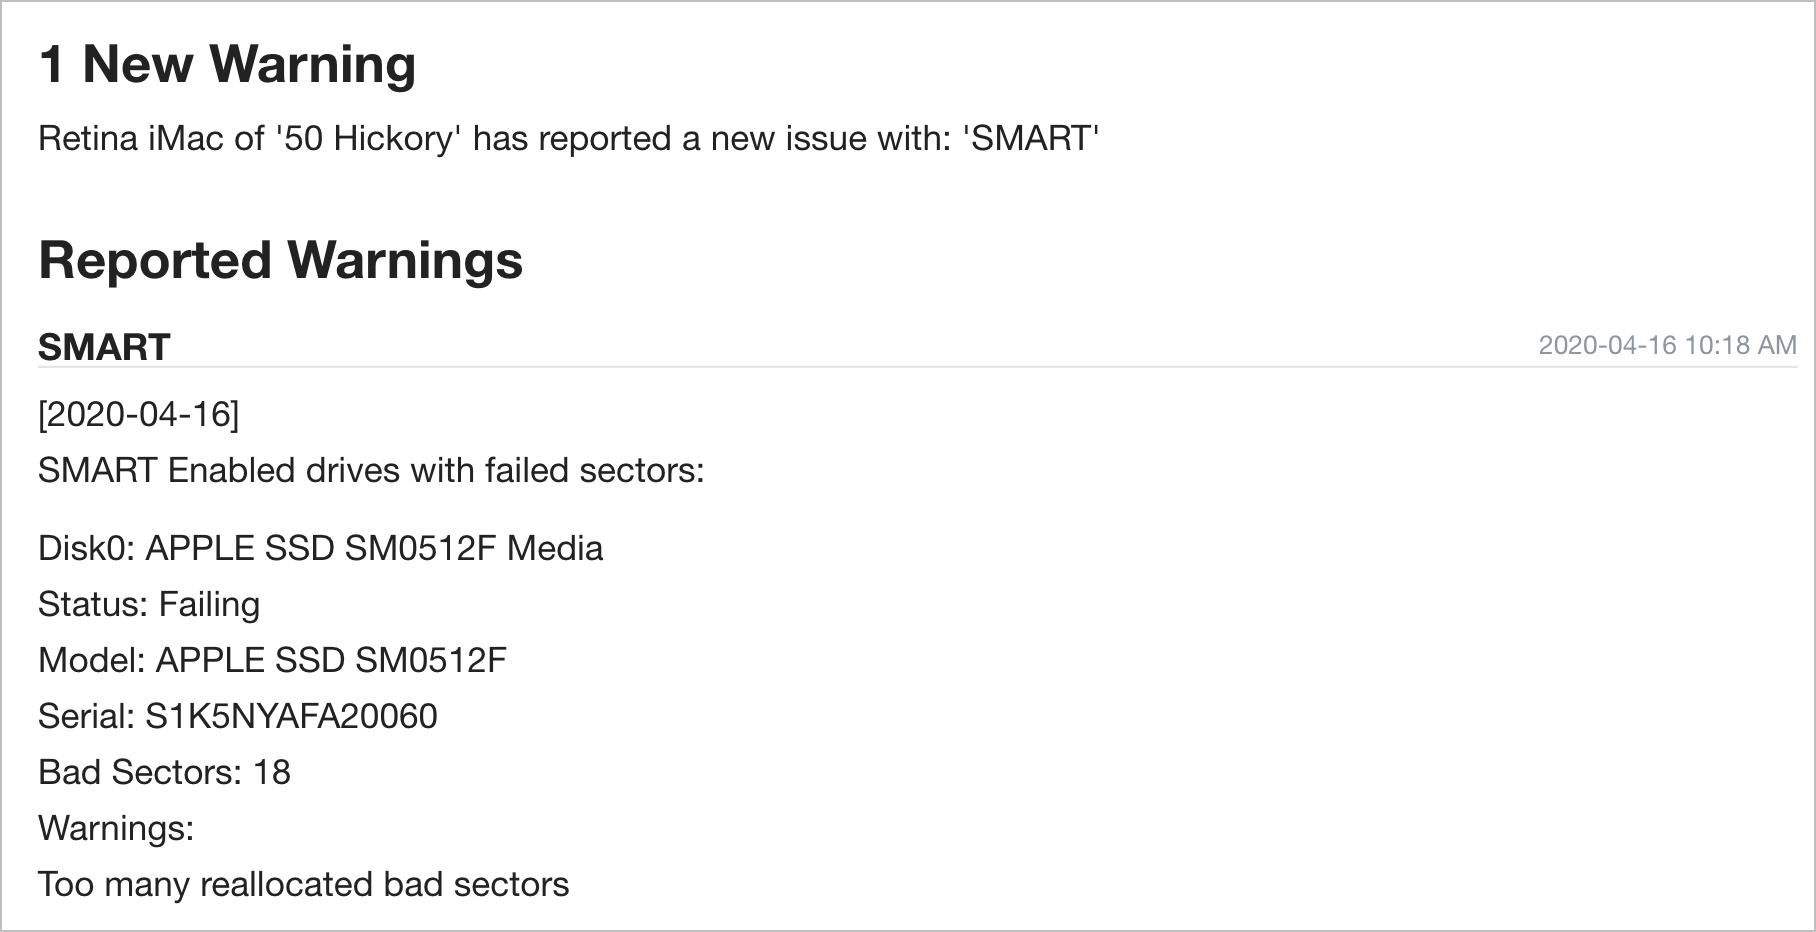
That was concerning, so I finished what I was doing, restarted in macOS Recovery by rebooting while holding down Command-R, launched Disk Utility, started First Aid, went to make dinner, and promptly forgot about it. The next morning, however, I checked the iMac and discovered that First Aid had failed with an error -69842. Another try (which took longer than it should have) failed with the same error. I could find no indication of what that error meant, but Apple’s support documentation was pretty clear about the next step being a reformat and restore. At some point in that process, I booted the iMac successfully again, just long enough for Watchman Monitoring to send an even more ominous warning.
I wasn’t terribly perturbed by all this, since I knew I had both a bootable duplicate from the night before and a Time Machine backup that had been working until I quit for the day, both on an external hard disk, not to mention Backblaze Internet backups. Plus, I could work on my 2012 13-inch MacBook Air during the lengthy restore process. This is the first time I’ve had to reformat an SSD, and I didn’t know if reformatting would map out bad sectors as it does with hard disks, but it seemed worth a try.
But I started to get more worried when Disk Utility threw an error while trying to erase the boot volume (the iMac was running macOS 10.14 Mojave, so it didn’t have 10.15 Catalina’s bifurcated drive structure).
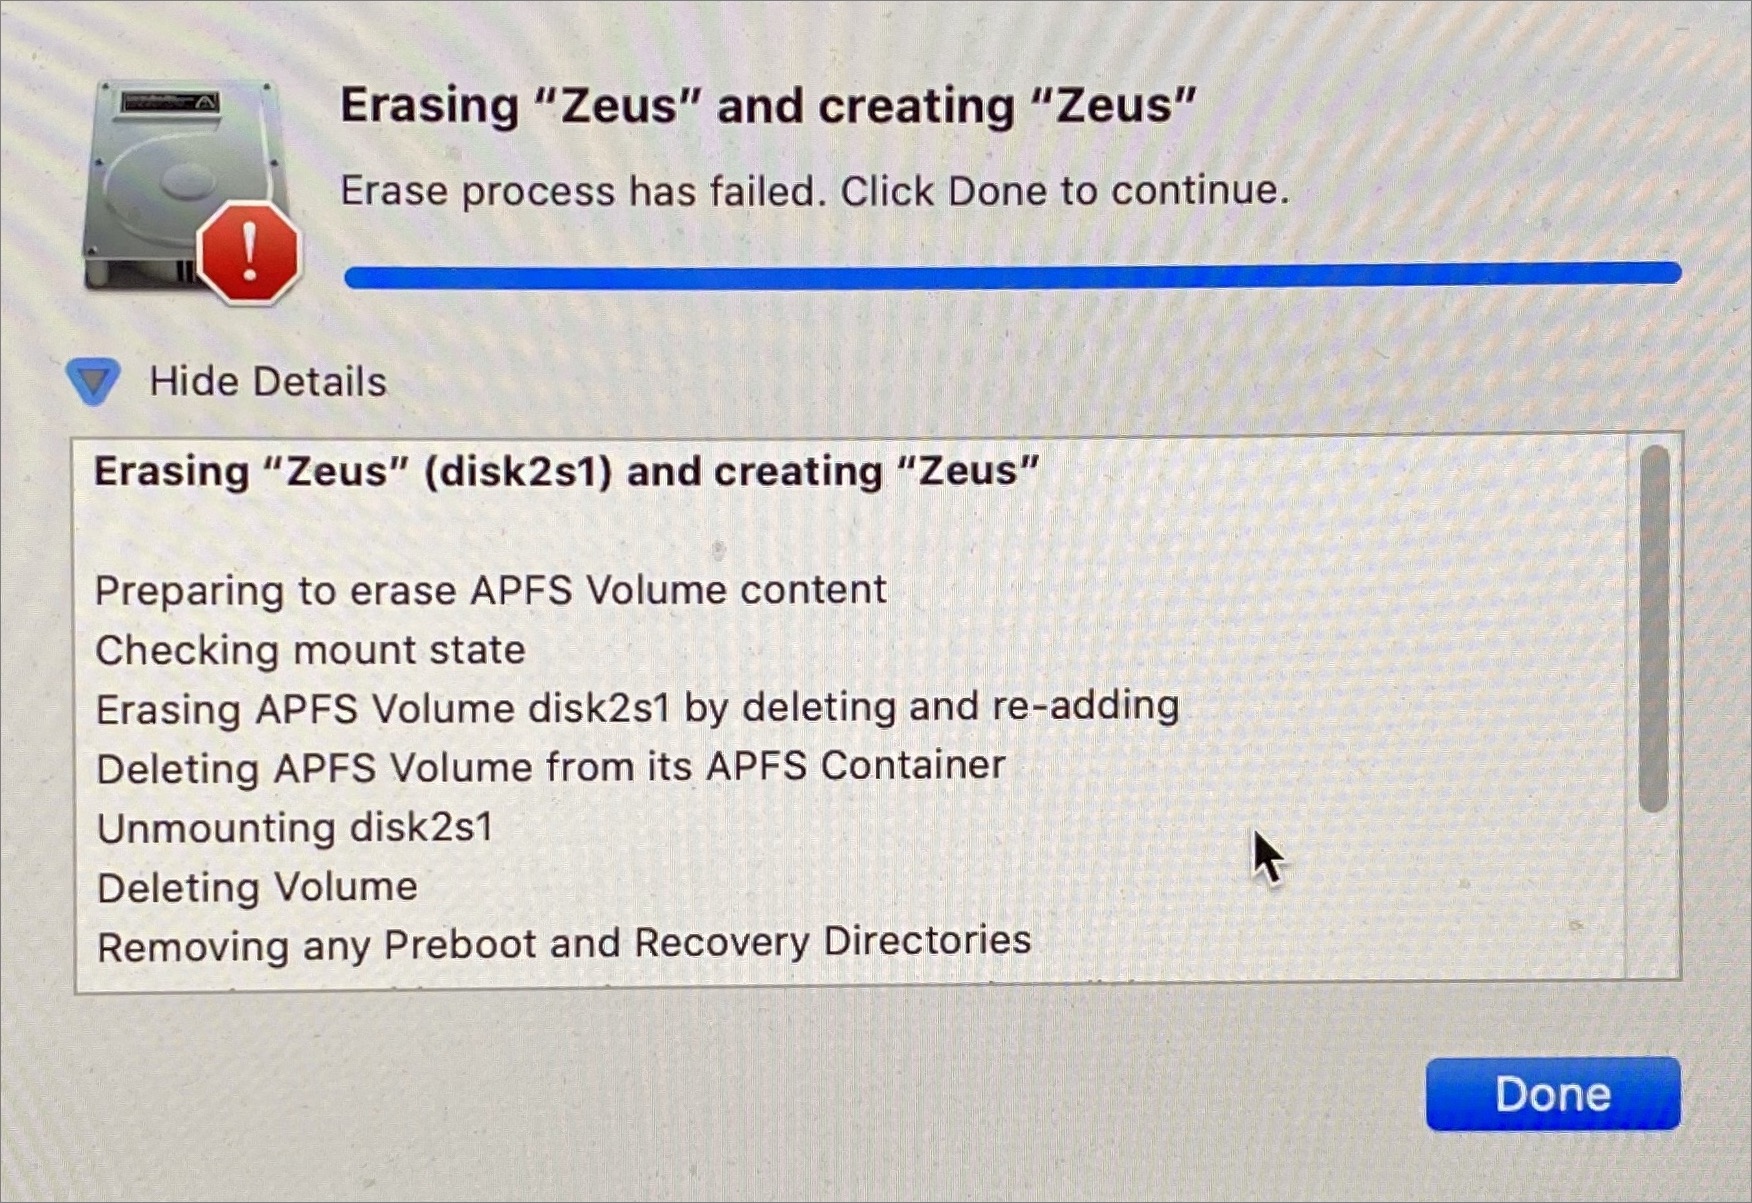
However, when I set the View pop-up menu in Disk Utility to Show All Devices and then erased the actual drive, it succeeded. While still in macOS Recovery, I quit Disk Utility and started to restore from my Time Machine backup. I knew this was going to take a lot of time, and the initial 4-hour estimate kept going up until it was at about 10 hours. After dinner, I checked on it, and it was 61.6% done, which seemed slow, and when I checked several hours later, it was still at 61.6%. Not good.
After I forcibly restarted the Mac, it wouldn’t even boot into macOS Recovery, instead loading Internet Recovery. That was the first suggestion that the SSD was dead, and indeed, once I could look at the setup with Disk Utility again, it was missing entirely and hasn’t shown up since. It’s an ex-parrot.
Because I’m paranoid that way, I booted from my bootable duplicate (which worked, thankfully), and then set it to update yet another bootable duplicate backup I have on yet another hard disk. Then I went to bed—it’s always best to tackle major problems when rested.
The next morning, I pondered my short-, medium-, and long-term options.
The “I need to get my work done” Short-Term Solution
Although I can get my work done on the MacBook Air, its 13-inch screen running at 1440-by-900 pixels is limiting, especially because I’m accustomed to working on the 27-inch iMac next to a 27-inch Thunderbolt Display. My normal desktop is 5120 by 1440 pixels. Plus, while I don’t mind working on a laptop for short periods, the ergonomics of laptop use are horrible, and it’s bad for my body to put in my normal work hours on a laptop.
The obvious solution was to run my iMac from my bootable duplicate. But this proved problematic. The 2014 iMac supports USB 3.0 and Thunderbolt 2, and my Thunderbolt Display adds a FireWire 800 port. The theoretical speeds (in gigabits per second and converted to the common megabytes per seconds for storage devices) on those are:
- Thunderbolt 2: 20 Gbps, which works out to 2500 MBps
- USB 3.0: 5 Gbps, or 625 MBps
- FireWire 800: 800 Mbps, or 100 MBps
My backup drive is a 2.5-inch Seagate 2 TB FireCuda Gaming drive in an OWC Mercury Elite Pro mini external enclosure. The drive supposedly has 128 MB of cache memory, but it’s only 5400 rpm, and while its speed has never been a noticeable problem while making backups, it’s painful beyond belief to use as a boot drive. USB 3.0 might theoretically be capable of 625 MBps, but when I tested the drive in Blackmagic Speed Test, it averaged just 20–25 MBps for both read and write speeds. Ouch. I didn’t think of switching to FireWire at the time, but interestingly, it was slightly better at 25–30 MBps for the same drive. That leads me to:
Lesson #1: A bootable duplicate should be fast enough to use as your boot drive, or it’s essentially a read-only backup like Time Machine.
For comparison, the internal SSD on Tonya’s identical 2014 27-inch iMac laid down read speeds of about 750 MBps and write speeds of about 500 MBps. You can see why the hard disk was unacceptable, given that it was 20 to 30 times slower.
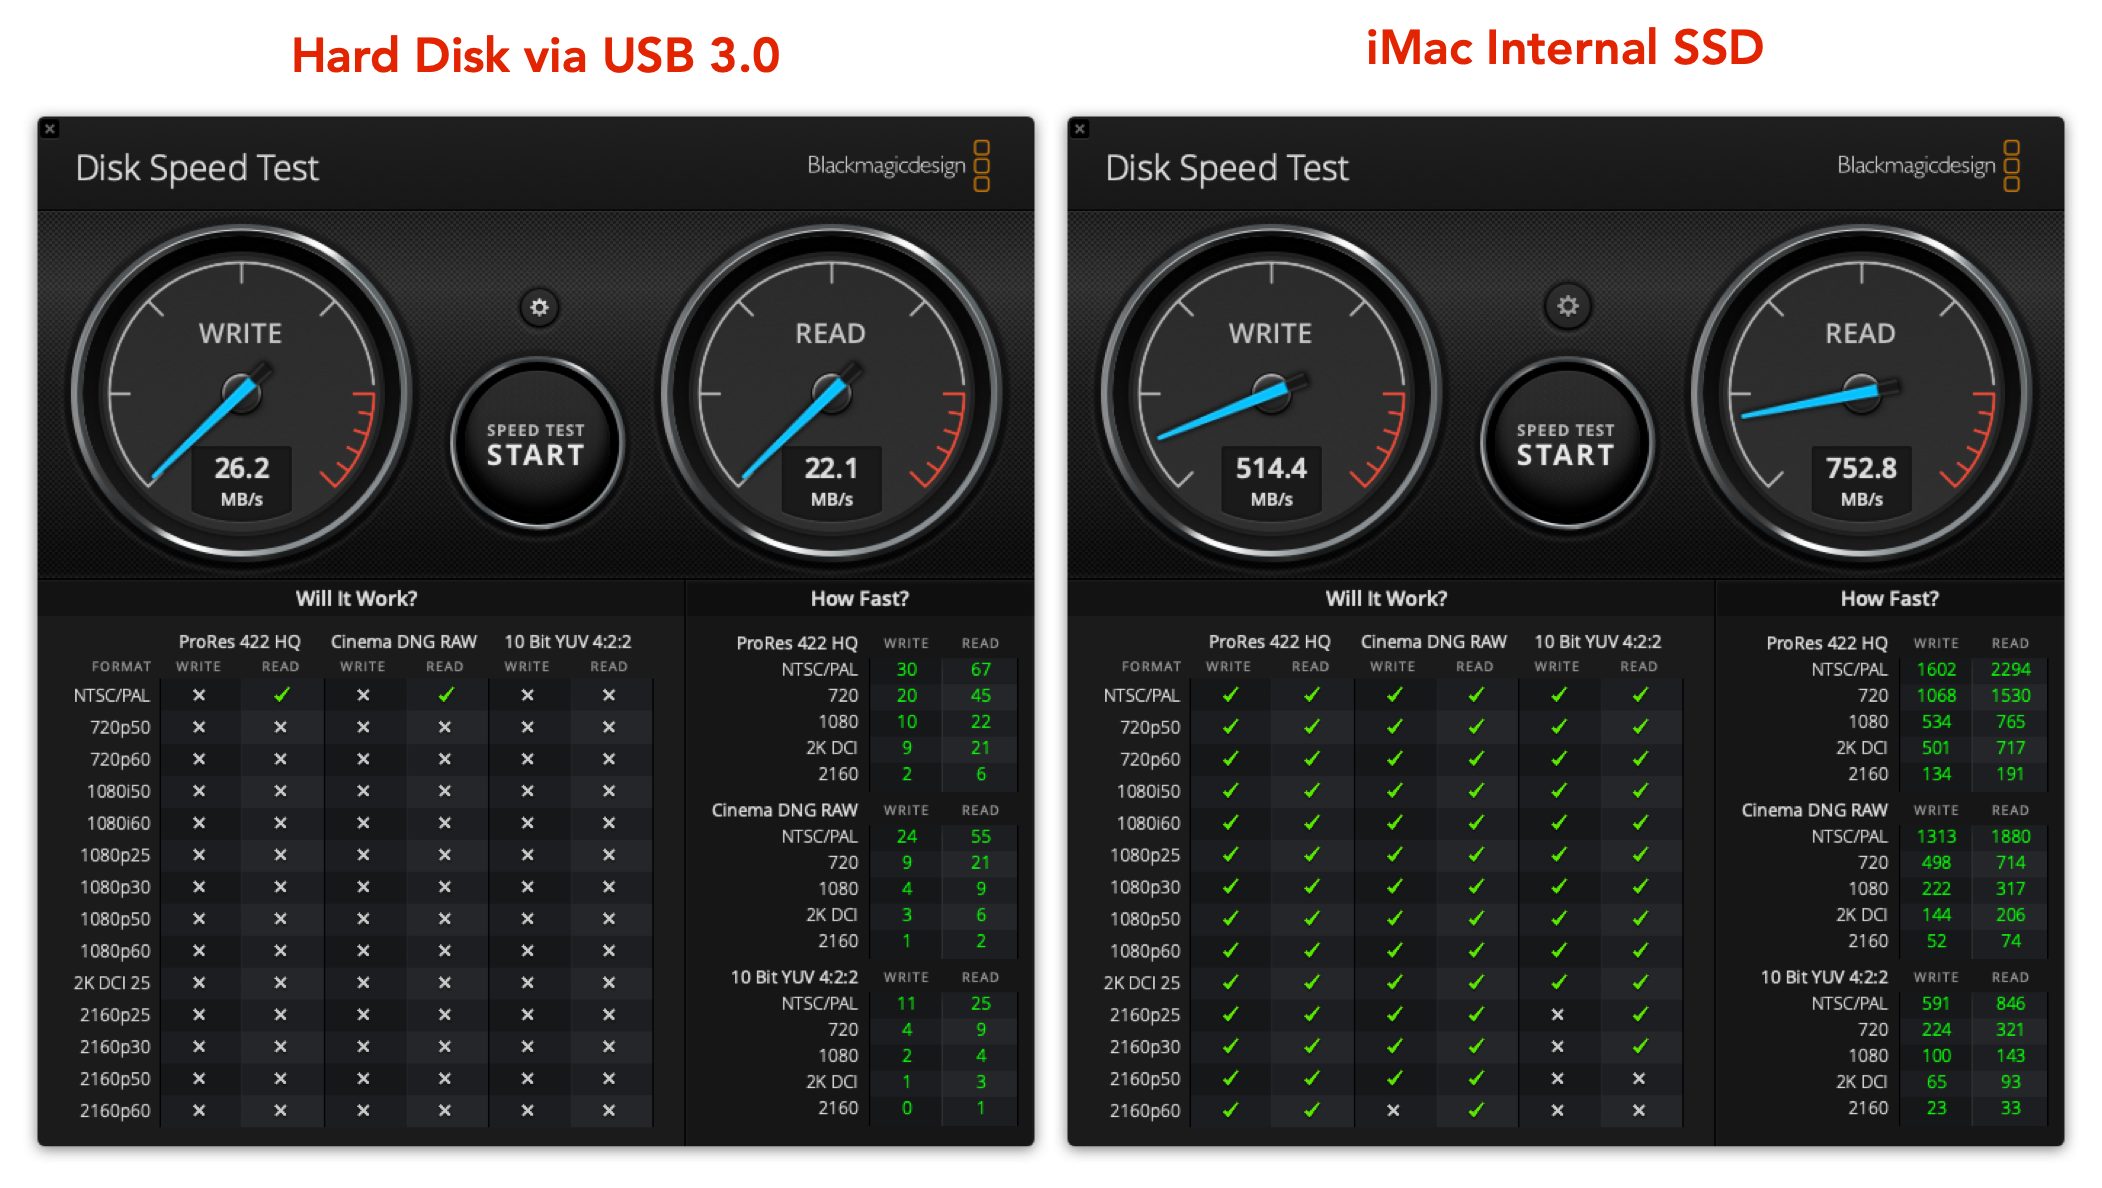
The solution I ended up implementing eliminated the performance problem. I restarted my MacBook Air in Target Disk Mode by holding down the T key at startup, and then I connected it to the iMac using Thunderbolt 2 and booted from it. Startup was slow but acceptable, and once the iMac was running, performance wasn’t noticeably different than normal. Keep in mind that I do very little that stresses the drive. Blackmagic Speed Test showed read and write speeds of about 120 MBps, or 5 to 6 times faster than the hard disk. Interestingly, these numbers were quite a bit below what I got when I eliminated Thunderbolt 2 from the equation and tested the MacBook Air’s SSD on its own. So Thunderbolt 2 must be slower than the MacBook Air’s internal bus.

Although this approach got me up and running, it suffered from a few other problems. Most annoyingly, iCloud and quite a few apps tie their credentials to the internal hardware of the Mac, so switching from it being a standalone MacBook Air to being a boot drive for an iMac caused iCloud and those apps to ask for authentication every time I wanted to move between machines. For reasons I never figured out, even my extensions in Brave disappeared each time I swapped Mac brains underneath the same storage device. Plus, that MacBook Air has been kernel panicking in sleep for some time, something I had previously chalked up to a dodgy Catalina install but that I now realize is related to failing hardware, perhaps with a thermal trigger, since it only happens when the case is closed. I now came up with:
Lesson #2: Target Disk Mode is useful only for occasional troubleshooting and emergency use, not as an everyday driver.
(I had briefly considered replacing my MacBook Air with a new model, which I’ve been planning to do soon anyway, and using it to boot the iMac. But the awkwardness of Target Disk Mode made that unattractive. Worse, a test using Tonya’s 2016 MacBook Pro failed—I could put it into Target Disk Mode, but the iMac never saw it over USB. It might have worked over Thunderbolt, but I didn’t have a Thunderbolt 2 to Thunderbolt 3 adapter.)
Regardless, booting from the MacBook Air in Target Disk Mode meant that I could work effectively on my big screens, and I could even access files and apps that existed only on my bootable duplicate. (My iMac’s SSD was 500 GB, whereas the MacBook Air is only 250 GB, so the two have similar setups in key ways, but they aren’t identical.)
The “I can’t work like this indefinitely” Medium-Term Solution
Between the split personality problem every time I connected or disconnected the MacBook Air, the slightly inadequate setup, and the kernel panics, I needed a better solution for the next few weeks or months.
Once again, there was an obvious solution—replace the internal SSD in the iMac with a new one—and once again, I didn’t take it. It was the cheapest and cleanest solution, but it also came with the most downtime and the most risk. I’m probably capable of cutting the screen off a 27-inch iMac—yes, you have to cut through the adhesive that holds it on—replacing the SSD, and reattaching the screen, but there’s always a chance of making a fatal (to the iMac) mistake. Worse, in the (extremely useful) TidBITS Talk conversation on the topics, my buddy Ron Risley told a story about how he used OWC’s Hard Drive Upgrade Kit to replace the drive in a 27-inch Retina Mac only to have the re-adhered screen fall off.
(I may still go down this path since I’ve now taken over another 2014 27-inch iMac that TidBITS bought for Josh Centers and replaced just a few months ago. He had been having trouble with it—specifically with its Fusion Drive—for some time, so I might open up that iMac and replace its Fusion Drive with an SSD to see if that resolves its problems. If so, I’d know how to do it for my iMac, and then I’d have two restored iMacs!)
There is a local repair shop that’s open and would probably do the work. Still, between not having any experience with them, not wanting to leave the house during New York’s stay-at-home order, the potential for several days of downtime, and the risk that they’d mess something up, I decided against that option too. (Having Apple repair the iMac isn’t an option, since Apple retail stores are closed, and none are within an hour drive anyway. There is an Apple Authorized Service Provider in Ithaca, but they’re doing repairs only for essential businesses, and we haven’t been impressed with them in the past anyway.)
I also eliminated the second-most-obvious solution, which I’ll discuss shortly, and decided instead to buy an external SSD to boot the iMac. Since the MacBook Air’s performance in Target Disk Mode over Thunderbolt 2 was acceptable and still below what USB 3.0 should be able to do, I figured that an external SSD would be as good or better. I could also get a 1 TB model that would relieve the space pressure I had been feeling and would let me move my Photos library back to the SSD from its hard disk exile.
The main question here was how much to spend.
- The cheapest option was to buy a bare SSD and use a toaster case I have around, but it’s sufficiently old that I worried that its controller might not be able to handle the SSD or that its performance might be lousy. It looked like I could get a bare 1 TB SSD for about $100–$150 after tax.
- The “just-right” option was to buy a SATA III SSD in a USB 3.1 Gen 2 case. That variant of USB can theoretically do 10 Gbps, or 1250 MBps, but the SATA III drive interface runs only at 6 Gbps and can provide about 600 MBps of throughput. Prices were around $200 after tax.
- The most expensive option was to buy a PCIe SSD in a Thunderbolt 3 case, which would run $300–$400. I’m a little fuzzy on the details here, but PCIe SSDs rely on a communications interface called NVMe, and the upshot is significantly better performance. With a 40 Gbps Thunderbolt 3 interface, an NVMe SSD can do as much as 2400 MBps read and 1800 MBps write. I’d be limited to half that due to having only Thunderbolt 2, but the bigger problem is that it seems that Apple’s Thunderbolt 2 to Thunderbolt 3 adapter (which costs another $49) doesn’t work with bus-powered Thunderbolt 3 devices. Augh!
Lesson #3: When you keep a Mac as long as possible, you can run into connectivity or performance issues when buying new peripherals. Plan ahead with a full collection of adapters.
As you might guess, I went for the “just-right” option and chose the popular Samsung T5 external SSD. It’s tiny, has a single USB-C port that supports USB 3.1 Gen 2, comes with the necessary cable to attach it to my iMac’s USB-A ports, and costs $200 after tax. I ordered it directly from Samsung to avoid Amazon shipping delays and got it two days later.
The Long Term Solution
Remember the second-most-obvious solution above? That was to slap a new 27-inch iMac on my Apple Card and move on. I’ve been starting to think about replacing my iMac anyway, and while it was tempting to use this hardware failure as an excuse, Apple hasn’t updated the iMac in over a year, which suggests that now is not the best time to buy.
Regardless, at some point before the end of the year, I’ll probably replace the iMac, either with a new 27-inch iMac because I love its 5K Retina screen, or with a Mac mini coupled with a new class of curved 49-inch screens running at 5120-by-1440 pixels from the likes of Dell, Philips, and Samsung. These so-called QHD monitors aren’t as high quality as would be ideal, having a pixel density of only 109 ppi versus the 218 ppi of the iMac’s 5K display and the LG UltraFine 5K Display, but they’re priced similarly to the LG screen for a lot more real estate. Oh, the anticipation!
Restoring Isn’t Always as Easy as It Should Be
I thought I was home free once the Samsung T5 arrived, but more obstacles remained. As I started down the path of restoring my data to the Samsung T5, I found myself in a weird set of interlocking Catch-22s caused by not having kept my hardware and software up with the times. Although my MacBook Air has been running Catalina fine since it was released, I hadn’t yet upgraded the iMac from Mojave.
Why was this a problem? I had reformatted the Samsung T5 from ExFAT to APFS, which is appropriate for Mojave when running on an SSD. I know that the macOS installer creates a Recovery partition during the installation process, but what about when restoring with SuperDuper? I was worried that SuperDuper would have no way to know it should create a Recovery partition when moving an HFS+ drive to an APFS drive.
(That was a guess. When moving 360 GB around, you don’t want to guess wrong and have to waste another day repeating the copy. However, I subsequently talked with Dave Nanian of Shirt Pocket, and he set me straight by pointing me to this blog post from 2017. SuperDuper will back up the Recovery partition whether the source drive is HFS+ or APFS, and whether the backup drive is HFS+ or APFS. When restoring to APFS, SuperDuper does the right thing as well, creating and restoring to the Recovery partition. When restoring to an HFS+ drive, SuperDuper can restore to an existing Recovery partition if one exists, but if not, you have to reinstall macOS so Apple’s installer can create it properly for you. Since I had formatted the Samsung T5 as APFS, all would have been fine. Live and learn!)
Not realizing that SuperDuper would have worked, I decided I needed to reinstall macOS, which is often a good idea anyway. I initially tried to reinstall Mojave, which was what I had been running, but that proved problematic. I had a copy of the Mojave installer available, but when I booted using the MacBook Air in Target Disk Mode, it was running Catalina, and wouldn’t let me install Mojave because it was too old. When I booted using the version of Mojave on the bootable duplicate hard disk, I was told that the Mojave installer was damaged. (I have no reason to believe that’s true, but I couldn’t really argue with it. It could have been related to the expired certificate problem—see “Redownload Archived macOS Installers to Address Expired Certificates,” 28 October 2019). So much for my local installer.

Lesson #4: Check your archived installers periodically; don’t assume they’ll necessarily work.
Back to macOS Recovery. However, because the Recovery partition on the internal SSD was no longer available, booting with Command-R held down put me in Internet Recovery, which could take up to 10–20 minutes. After that wait, using the Reinstall macOS option presented me with 10.10 Yosemite, which was the version of macOS that came with the iMac. For time reasons alone, I didn’t want to install Yosemite and then have to upgrade, and I wasn’t entirely sure how I could upgrade to Mojave anyway, since Software Update would try to give me Catalina.
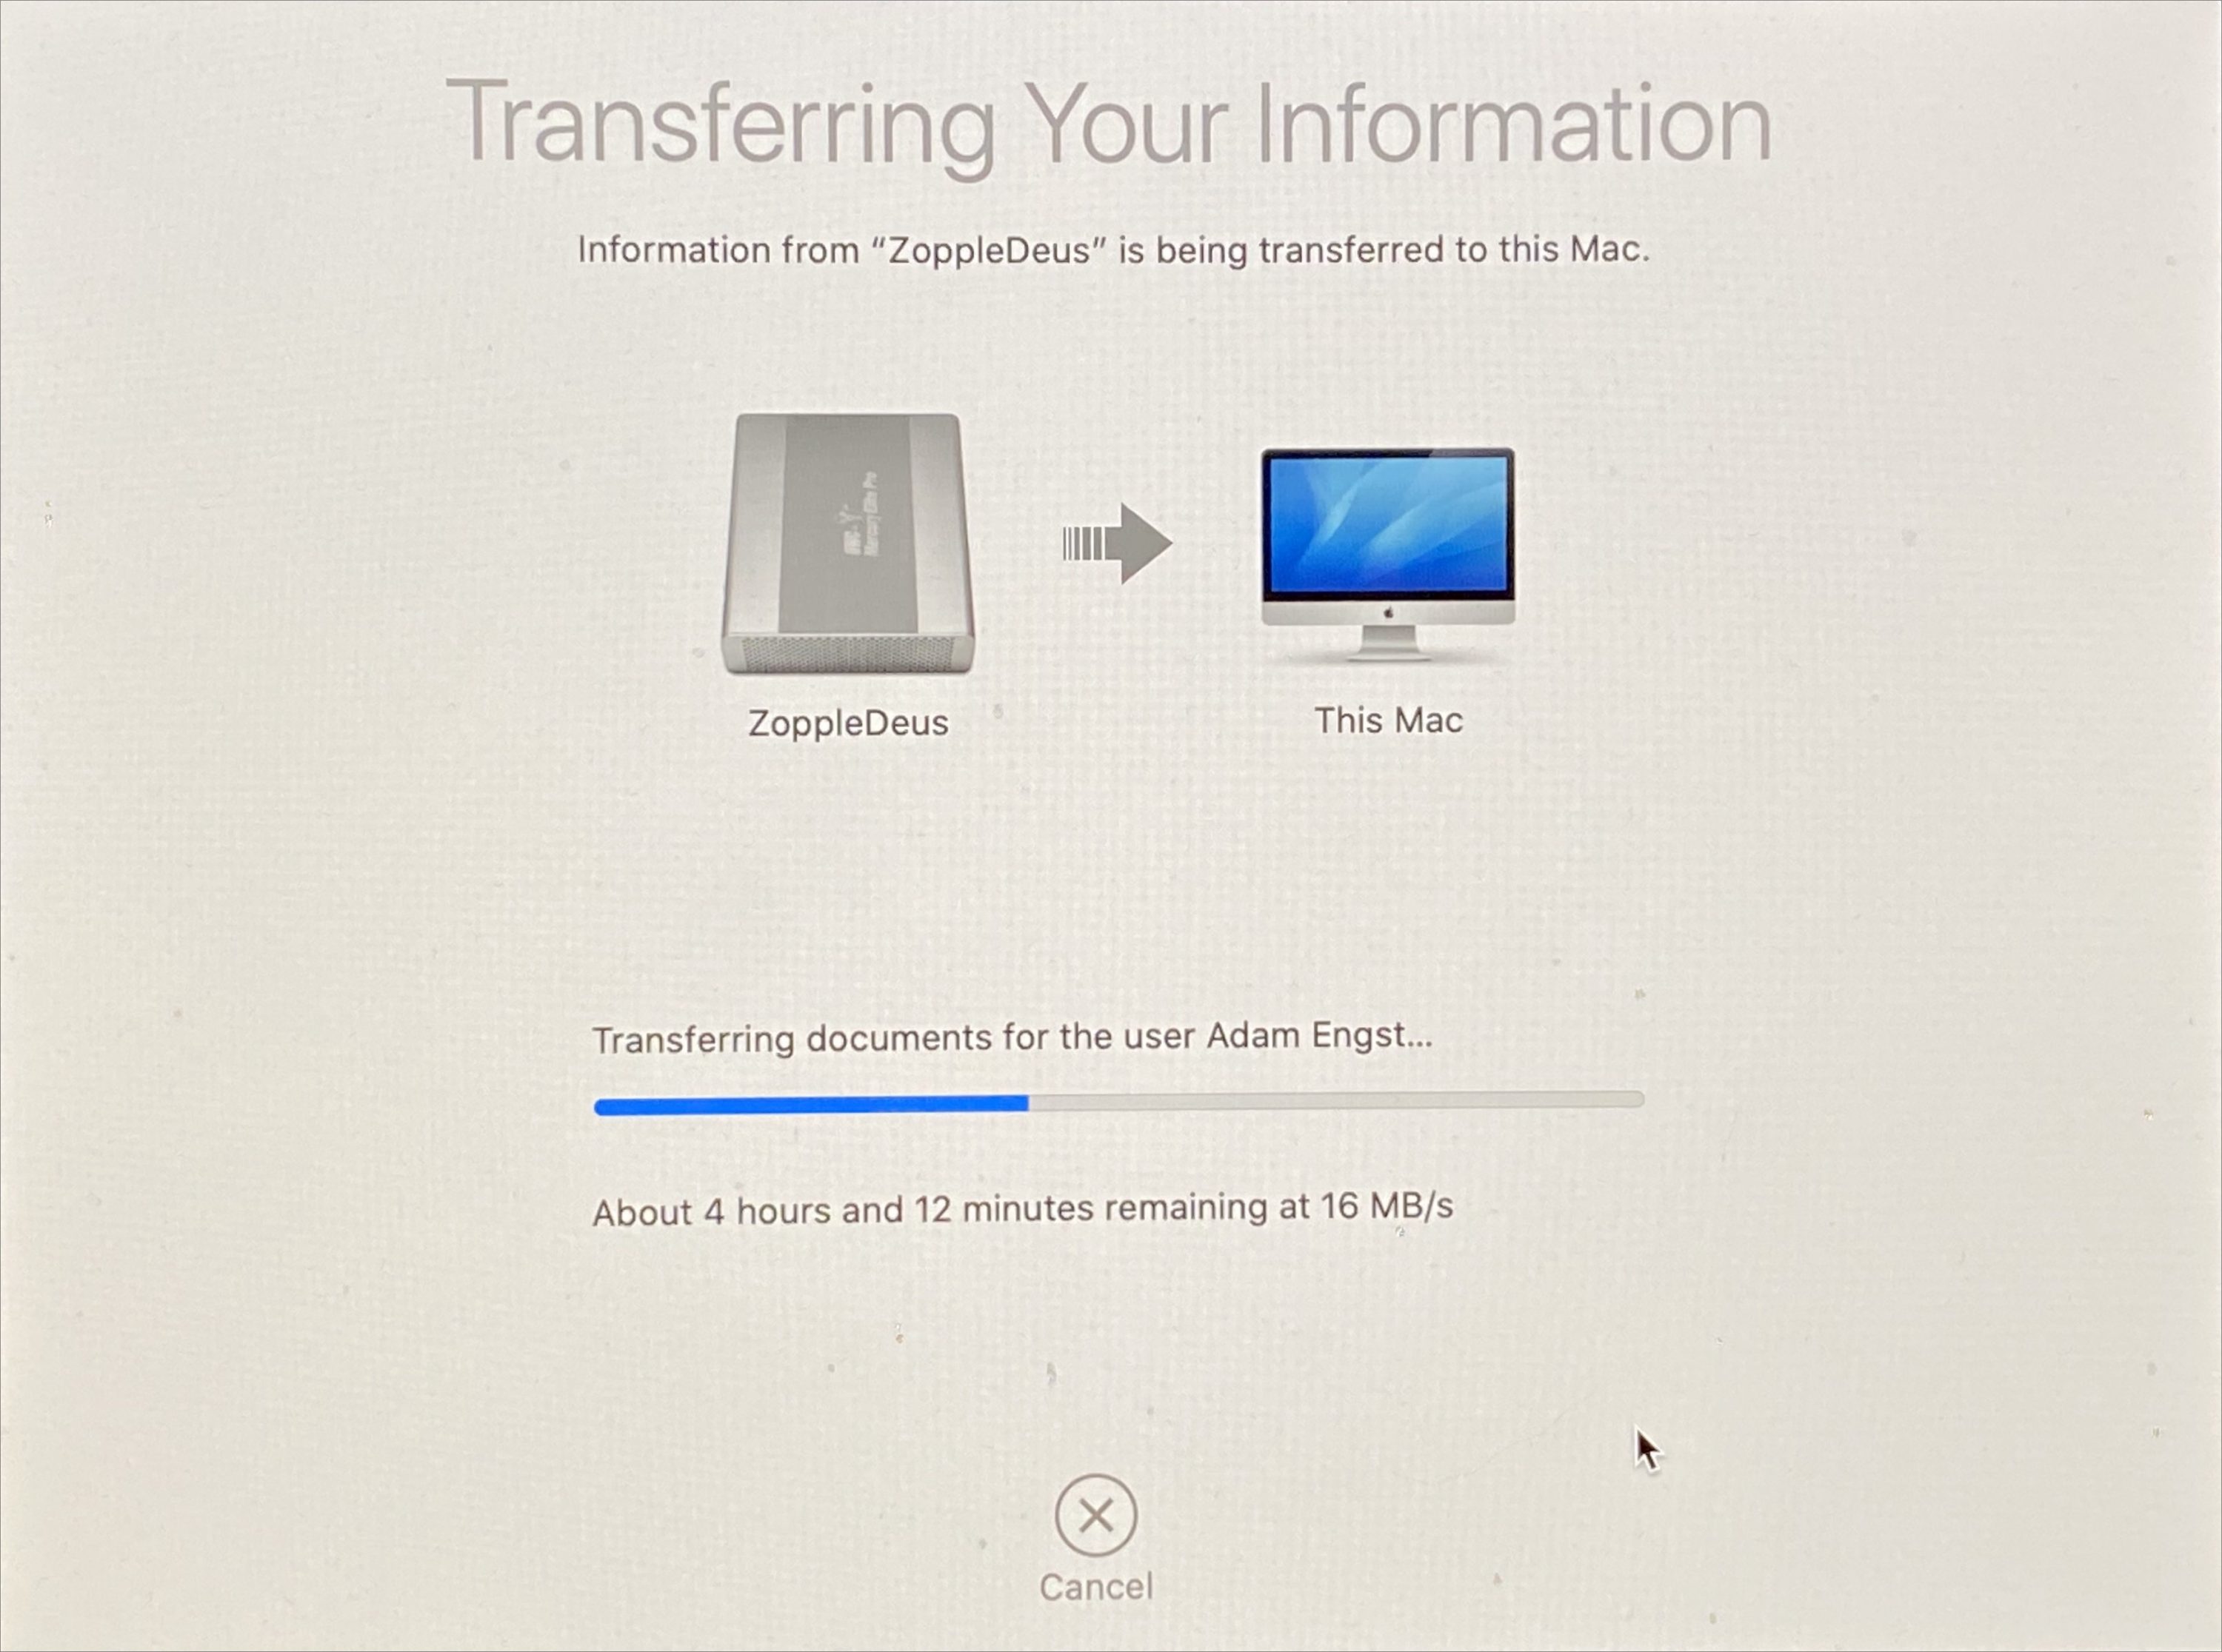
Eventually, I used Command-Option-R to boot into Internet Recovery and get the latest version of macOS for my iMac, which was indeed Catalina. I had been planning to upgrade to Catalina after the release of 10.15.4 anyway and had been putting it off, so being forced into the upgrade didn’t bother me too much. I had been thinking I’d do it separately from the switch to the Samsung T5 to reduce the number of variables if I encountered any problems, but that wasn’t in the cards.
Lesson #5: You can put off macOS upgrades for a while, but something will ultimately force you to upgrade. It’s better to be ready for that eventuality than to pretend that it can be avoided forever.
(What may not be clear from my retelling of the story above is just how maddening this process was, since booting from the MacBook Air brought with it cabling swaps and authentication resets, booting from the hard disk’s bootable duplicate took nearly 6 minutes, and booting from Internet Recovery could take 10–20 minutes. I probably spent several hours just rebooting the iMac repeatedly in an effort to get to the point where I could reinstall macOS.)
In the end, installing Catalina worked as it should, and I was able to restore the entire contents of my bootable duplicate using Setup Assistant. It took hours, although how many I don’t know since I wasn’t watching. One question I was unable to answer, but which I’d be curious to test, was whether it would be significantly faster or slower to restore from Time Machine rather than the bootable duplicate.
After installation, the first few boots were pretty rough because I have quite a few apps that launch at startup. Until I went into Keychain Access, selected my “adam” keychain, and chose File > Make Keychain “adam” Default, I was deluged with dialogs requesting my keychain password. Eventually, though, I managed to log in to every app and get things working again.
Lesson #6: Reinstalling macOS and restoring from a backup may not leave your Mac in an entirely functional state. Be prepared for additional work after restoring.
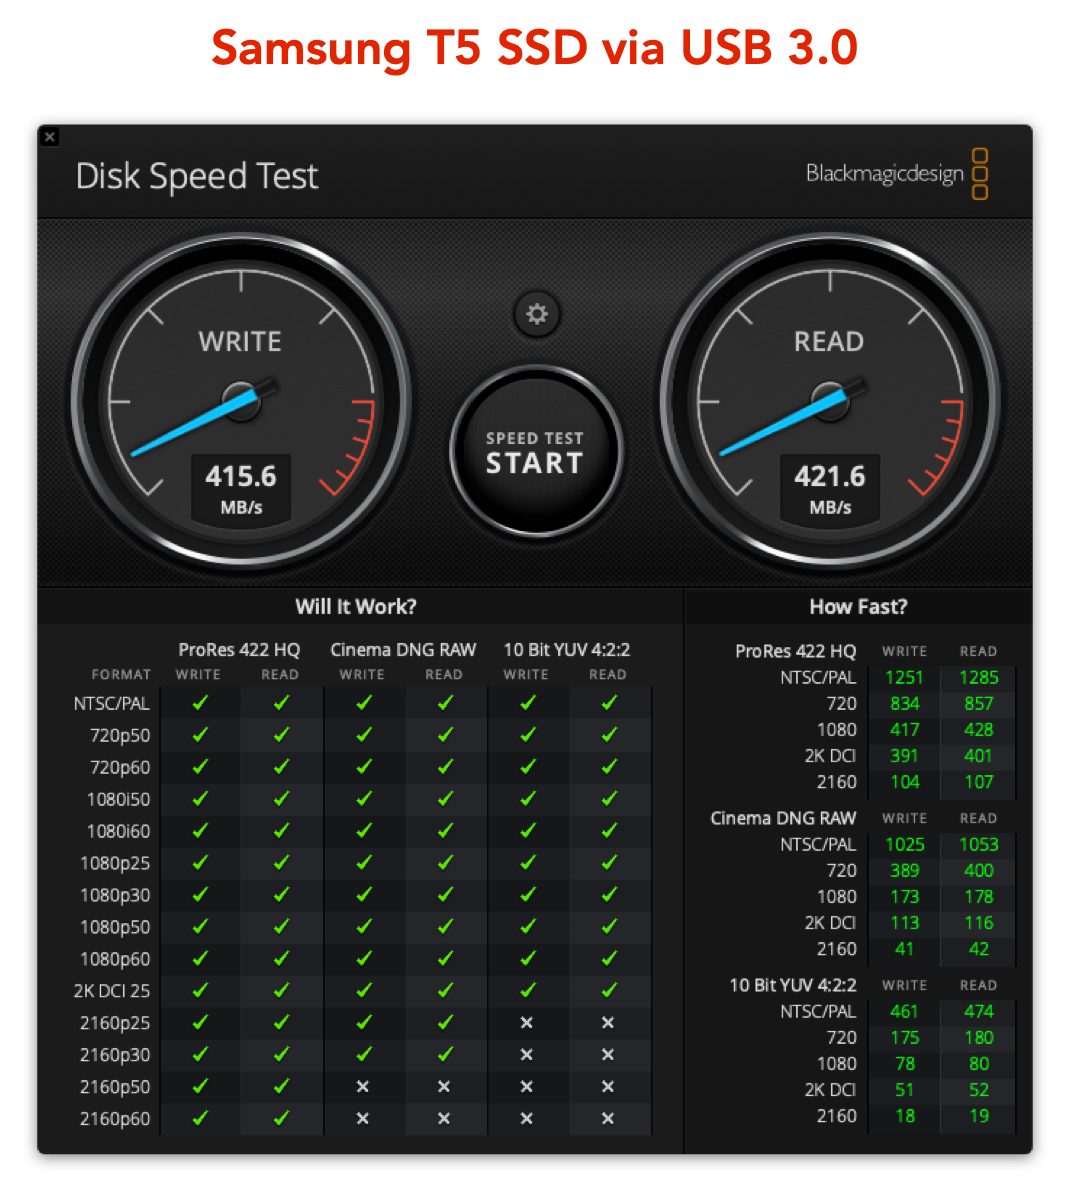 I’ve had only a few days with the Samsung T5 as my boot drive, and while most things seem to be working normally, things aren’t exactly as they were. Starting up and shutting down both take longer than seems reasonable (2–3 minutes for startup). Even booting into macOS Recovery is slower than it should be, taking about 8 minutes. What’s particularly odd about that is that the Samsung T5 has excellent performance over USB 3.0, even better than the MacBook Air over Thunderbolt 2. It’s showing over 400 MBps for both read and write speeds. My best guess right now is that the Mac is still looking for and receiving errors from the internal SSD at startup and shutdown, such that it takes a while for those errors to time out.
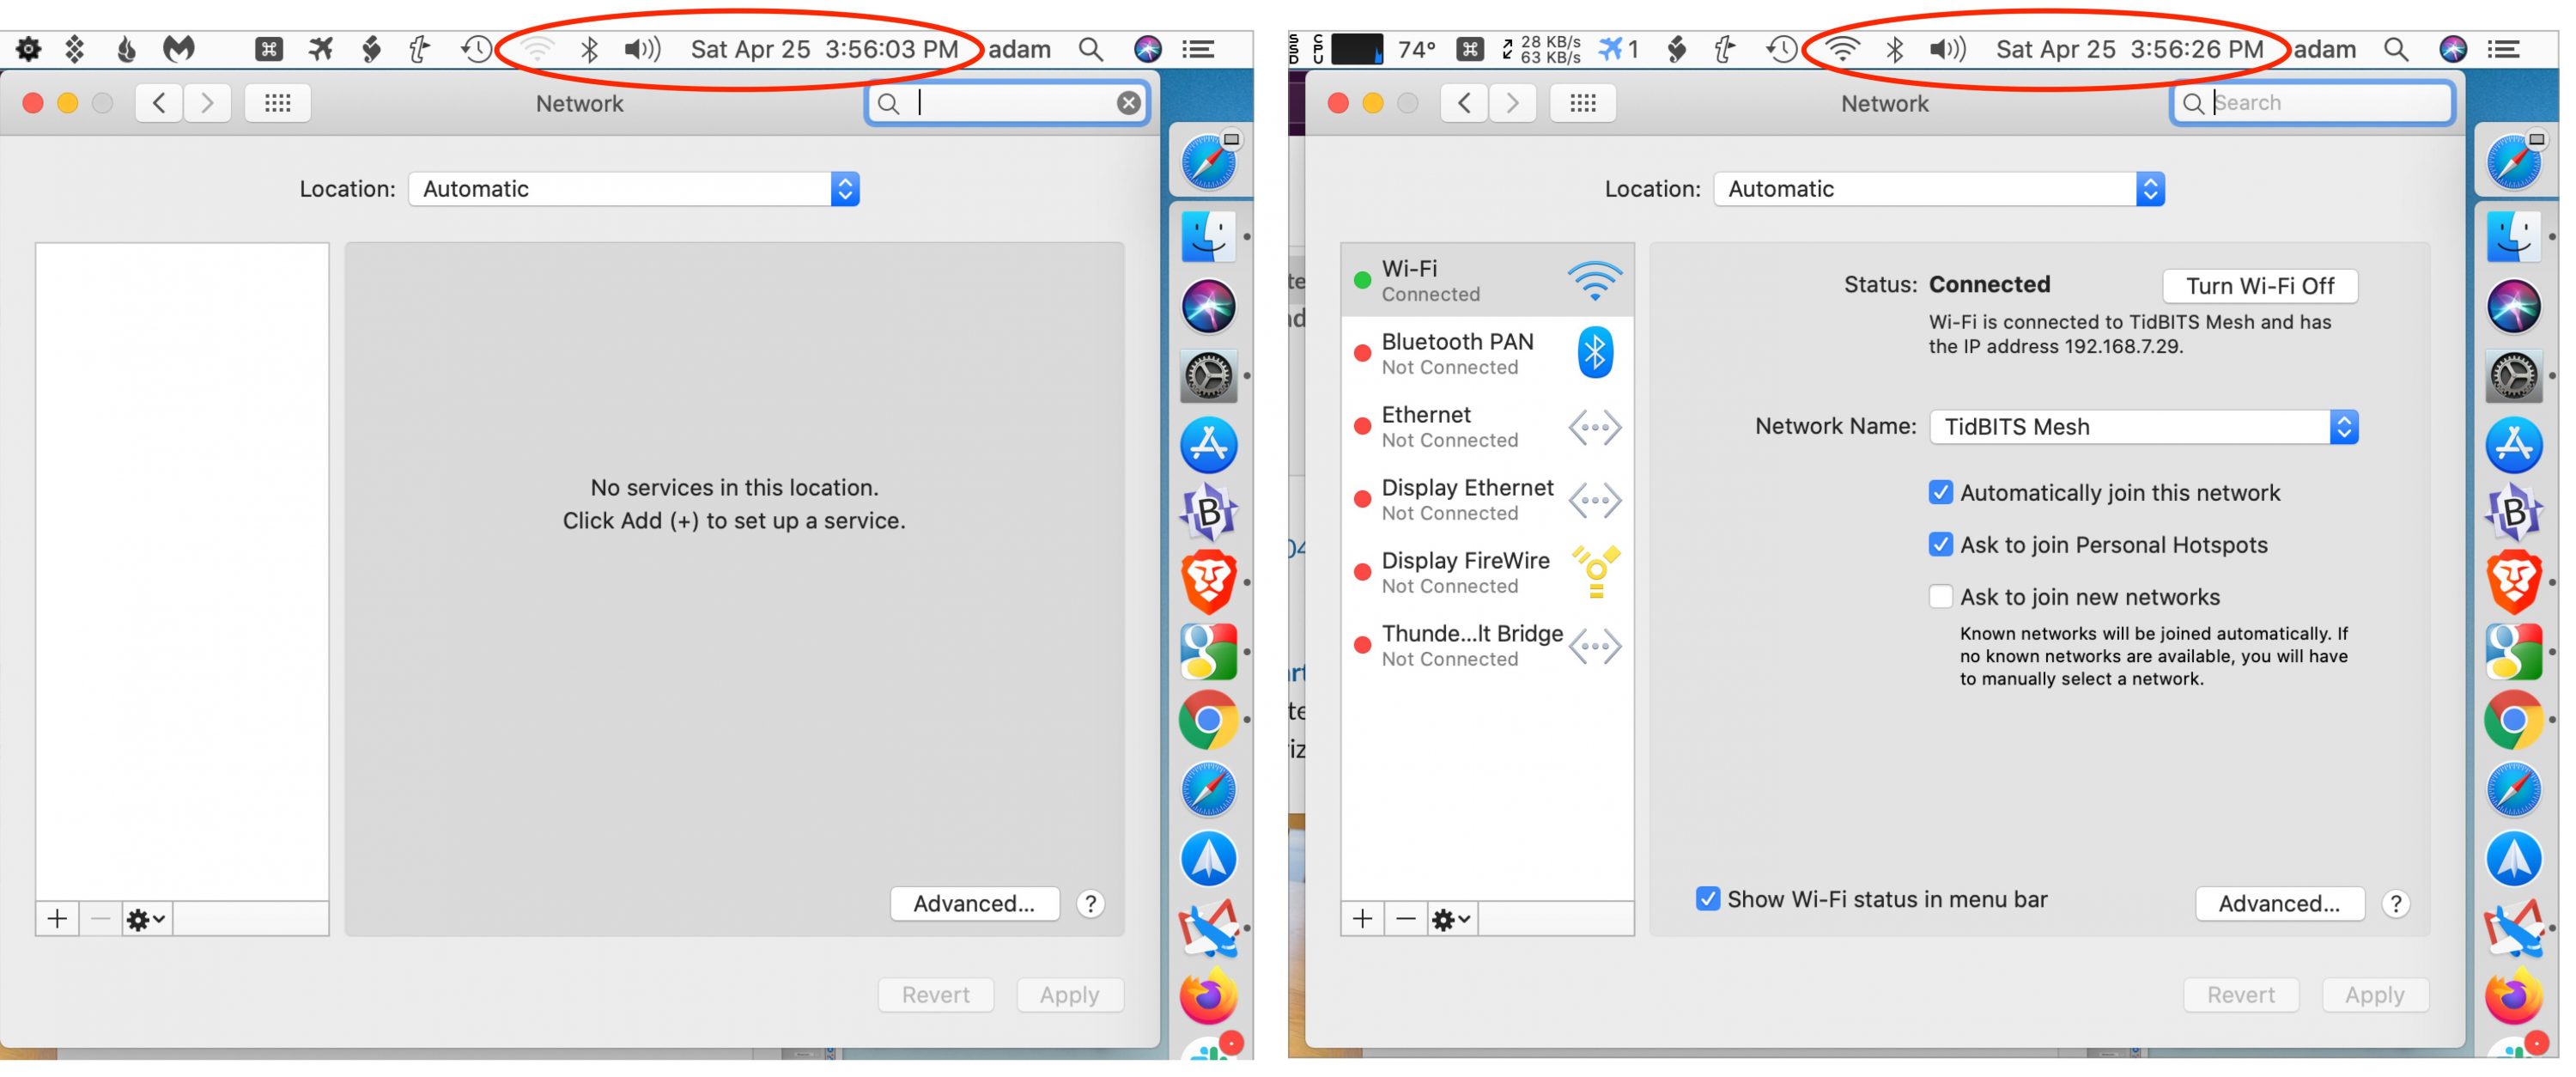
Even stranger, for reasons I still don’t understand, when I restart and log in, Wi-Fi is unavailable for over 2 minutes. And I mean unavailable—clicking the Wi-Fi icon in the menu bar doesn’t give a menu, and no networking services appear in the left sidebar of System Preferences > Networking. Between 2 and 3 minutes after boot, Wi-Fi wakes up, and all is normal. This also happened a few times while booting from the MacBook Air in Target Disk Mode, and I haven’t yet had time to ponder all the variables to figure out what might be going wrong. Freaky stuff.
Happily, I appear to have dodged a virtual memory problem that has plagued some people booting from external SSDs. In some of these scenarios, macOS fails to create virtual memory swap files, seemingly because of an inability to mount the APFS swap volume. There’s a workaround involving complicated scripting, but if I ran into this, I’d start by reformatting the drive and reinstalling macOS from scratch, since I believe the macOS installer would set things up correctly.
I suspect that this saga isn’t yet over, and if I learn any more lessons in the School of Hard Tech Knocks, I’ll be sure to share them. In the meantime, I hope following along with my thinking helps your future troubleshooting and recovery efforts.
Been there, done that. And recently my 2009 iMac completely died and it has everything connected through FireWire 800. My 2016 15" MBP is now my main machine. At some point I’ll want to replace the iMac with something modern and then the salvage operation begins. Will I be able to resuscitate the Fusion Drive I put in there? Oh well, at least I have little or no down time ;-).
Very interesting. Thanks for that extensive write-up, Adam.
I’m for the first time seeing 400 MBps over USB3 on a Mac. :)
Since you mention the odd wifi issue which you seem to encounter on your iMac regardless of boot volume (or version of macOS), I wonder if there might be some kind of hardware issue with your iMac. Is it possible, what’s causing your wifi issues is also what led to the problems with your iMac’s SSD? Maybe it’s not the SSD itself, but rather communications with it that’s the underlying problem.
Have you ever run AHT on your iMac?
Ah yes, I forgot to mention Apple Diagnostics. I did run it, and it reported, unsurprisingly, an error with the storage. It was VDH002, “There may be an issue with a storage device.”
It didn’t at the time report any issues with Wi-Fi, but I should try it again.
As to why this happened now, the only thing I can think apart from coincidence is that I’ve been running Folding@home and thus spiking the CPU and the fans. So perhaps I was running it too hot.
Thanks, Adam. Very interesting to me since I had a fusion drive in my iMac die last September and have been working on a tiny laptop screen since!
I very much wish that Apple would make it easier to crack open an iMac, since I would have fixed it myself months and months ago if it weren’t for the adhesive issue and my worry about damaging the antenna. Surely Apple’s designers could think up something that would include a few screws without ruining the iMac’s lines!
Adam, Thanks for the detailed write up. In my experience it has been significantly faster to restore from a TimeMachine drive rather than TargetDisk mode over Firewire or Thunderbolt. Yes, that is not quite what you were wondering. But close, and perhaps helpful somehow.
I have also chosen the same path you did- Booting an iMac with a dead internal drive with an external SSD. Really works very well. Better over USB3 than USB2, but either will do for a basic office machine. I agree that the apparent price for leaving the dead internal drive in there is suffering through a longer delay at start up. It seems to be looking for the internal drive, and knows something is there, but waiting for an anwer that does not come.
I’ve never liked opening iMacs, and the newer ones that are glued shut are even less fun to repair.
Thanks for all you do,
Dave Nathanson
Mac Medix
Just FYI, I’ve replaced a number of slow 2.5" drives in various “sealed” iMacs in order to speed them up, and I’ve yet to have a screen become unglued. I recommend it to anyone who has an older iMac with the 2.5" hard drives, but if you’re careful, replacing the drive in your machine shouldn’t be all that difficult. Macsales has a nice kit that includes everything you need, or you can get just the screen adhesive strips from a number of sellers on Amazon, and it will come with a plastic gizmo to cut through the existing adhesive. If you’re never seen it, I kid you not, it looks like a miniature pizza cutter.
It’s possible that the bad internal drive is causing timeouts even if it won’t mount far enough for disk utility to show it.
Look in System Information / Hardware / NVMExpress
If it shows anything connected, look for the BSD Name, probably disk0. Dismount that with
sudo diskutil unmount /dev/disk0
If that works and speeds things up, you can create an fstab file with the Volume UUID to stop it mounting (or trying to mount) at boot. Which may or not be easy or effective, I’ve only done it on older HFS+ systems with spinny disks and no SIP. If you don’t care about boot speed, you can just set up a login command for the dismount.
More fun with AFPS and Catalina, if you want to see all of the partitions (Disk Utility doesn’t always show them all)
diskutil info
On my 2012 mini test mac running catalina, I get (lots more than shown because I hov three drives with lots of partitions):
craton@techtonic ~ % diskutil list
/dev/disk0 (internal, physical):
#: TYPE NAME SIZE IDENTIFIER
0: GUID_partition_scheme *500.1 GB disk0
1: EFI EFI 209.7 MB disk0s1
2: Apple_APFS Container disk3 100.3 GB disk0s2
3: Apple_HFS Farallon 99.1 GB disk0s3
4: Apple_Boot Recovery HD 650.0 MB disk0s4
5: Apple_HFS Install macOS Catalina 14.6 GB disk0s5
6: Apple_APFS Container disk1 26.0 GB disk0s6
7: Apple_HFS Untitled 2 8.4 GB disk0s7
8: Apple_APFS Container disk2 49.8 GB disk0s8
9: Apple_HFS Cocos 199.9 GB disk0s9
/dev/disk1 (synthesized):
#: TYPE NAME SIZE IDENTIFIER
0: APFS Container Scheme - +26.0 GB disk1
Physical Store disk0s6
1: APFS Volume Catalina small for V… 4.1 GB disk1s1
2: APFS Volume Preboot 82.3 MB disk1s2
3: APFS Volume Recovery 523.5 MB disk1s3
4: APFS Volume VM 8.6 GB disk1s4
5: APFS Volume Catalina small for VM 10.9 GB disk1s5
Repeat the synthesized section for any other partitions on the physical drive.
Hi, Adam. Glad you’re well.
I’m sure your actions felt clear-headed within that escalating madness, and you do seem to have done lots of smart stuff. But from my vantage point outside the whirlwind, it strikes me as slightly bonkers that you let a late position in the refresh cycle prevent you from simply ordering a new iMac and closing down the pain.
I’m thrifty and calculating, too, but when things go that far south, compounded by stress and narrowed options due to a major public catastrophe, that seems like the time to preserve sanity and throw money at a problem. Especially since this is the mop and bucket for your professional life. So I’d have had that iMac ordered and on the FEDEX truck early in the second day and not even looked back. Stick the broken one in a closet, and deal with it when you deal with it.
Also, I’d be curious to know whether, going forward, you truly make a periodic habit of checking archived installers. That would have to seem sort of Wallace & Gromit, no?
Amazing tech adventure – kept me riveted in my seat to the end. I have had my own misadventures with iMacs, and although none compare, they have been irritating enough that I am very leery of buying another iMac. What I want is a scaled-down version of the new Mac Pro – a MacMIniPro decked out with similar aluminum construction and accessibility but much smaller and less expensive that the Mac Pro. Hopefully the Apple gods are listening to my prayers.
Two things: First, I occasionally boot from external copies of Mojave and El Capitan that are installed on portable SSDs. Both connect to my laptop via USB 3.0 and run just fine. I haven’t noticed any performance slow-down at all compared to running from my internal startup disk, which is also an SSD.
My other comment is that it seems to me that restoring the contents of my startup disk from a SuperDuper clone is much faster than restoring from a Time Machine backup. I don’t know whether this is generally true, but it is definitely true for me.
My 2012 iMac is now running Mojave on an external Samsung T5 formatted as HFS+. Mike Bombich has an excellent article about clone booting which mentions very slow shutdown/boot times with T5 formatted as APFS. The article states that the problem ‘appears’ to be gone in Catalina, but perhaps not, given your experience.
https://bombich.com/kb/ccc5/help-my-clone-wont-boot
Peter Donlevy
This is a shout-out for SuperDuper!
There have been multiple times over the years when SuperDuper! saved my cyber-antipode. It is wonderfully easy to use and, perhaps most important, it makes a truly bootable duplicate of the original OS.
That said, I have found that sometimes I need to use Disk Warrior to fix the root creation date—not necessarily the fault of SuperDuper!
SSDs have become nearly ubiquitous, but if anything, this article is a good reminder that they are not infallible, and when an SSD fails, it quickly becomes a mess. Thanks for posting this, Adam.
Your option 2 is what I did for the 2017 21.5 inch iMac I have at the office. I use a usb 3.1 enclosure and a Samsung EVO 860 in there as the boot drive and store data on the internal fusion drive. Using strictly the fusion drive resulted in many delays and beachballs that it just got frustrating. I will be looking to add another SSD with enclosure as well with a larger SSD or spinny disk and move the data off the internal fusion drive to make sure the data is independent of that computer. I did a similar thing with the 2014 mac mini that had a 5400 rpm drive in it at Church and both work great. I’m sorry about your 2014 imac though, I just wish they engineered things like the 2012 mac mini I have as a desktop at home, disassemble, swap out parts and reaassemble. These days it should have the text like it says on an old clock radio on the outside “NO USER SERVICEABLE PARTS INSIDE”.
Thanks! Alas, nothing showed up there. Would a 2014 iMac have an NVME drive though? When I look in SATA/SATA Express, I see this:
A fair point! I spend a lot of time pondering the optimal solution to various problems, and I considered just buying a new iMac. But because I hold onto these things for years, I didn’t want to end up with something that was non-optimal just because I wasn’t willing to put the effort into a different and potentially better solution. If it had been my MacBook Air that had died and that I needed to get my work done, a 2020 MacBook Air would have been on its way instantly, since I’d already come to the conclusion that replacement was going to happen sooner rather than later. But with the iMac, I couldn’t say that I was being negatively impacted by the 2014 model in any way that the 2018 model would help with.
Plus, the costs were very different. I spent $200 to get up and running with a drive that will immediately be put to a different use once I either fix or replace the iMac. Replacing it with the machine I want would have been more like $3200. If those costs had been closer, I might have made a different decision.
And of course, while I spent a lot of time on this, it was 100% educational professionally. It’s important for me to know what others go through and sort through all the decisions when they actually affect me, rather than just think about what others might do. I wouldn’t necessarily recommend the same course of action to someone else, but know I know a lot more about the underlying situation to inform my recommendations.
I don’t, but that was clearly a mistake, and hence a lesson learned. I thought I’d been archiving old installers properly and I thought I updated that Mojave installer for the certificate problem. But apparently not, and that bit me.
Words a tech writer so seldom gets to hear!
That would be great. Before this iMac, I always bought Apple’s pro desktops because it was the only way to get two monitors, and the consumer models didn’t usually have enough power. The iMac really changed all that, and that gorgeous screen ends up being so cheap in the combination. The only thing that would take me away is a more powerful Mac mini right now, along with one of those 49-inch screens.
That was my intuition too, because SuperDuper can just blindly copy everything from one drive to another. With Time Machine, there must be some logic in following the hard links until you get to the newest versions of everything. But I’d need to run some real tests to say for sure.
Whoa—that’s a seriously useful page—thanks!
A few comments.
When you want to format a disk completely, always use “Show all devices” (cmd-2) in Disk Utlity. Then select the physical disk (uppermost level) and click erase.
When you need to install Mac OS from scratch, download the latest installer from Apple and then use https://support.apple.com/en-us/HT201372 to create a bootable usb installer.
Use the links in these Apple articles to download the latest installers. Look for strings like this “Or use this link to open the macOS Catalina page on the App Store:” to find the download link in the articles.
https://support.apple.com/en-us/HT201475
https://support.apple.com/en-us/HT210190
https://support.apple.com/en-us/HT208969
https://support.apple.com/en-us/HT208202
If you have choices, don’t restore from a Time Machine backup. There have been lots of modifications and links during it’s life span. A CCC or SuperDuper backup is more likely to be correct.
And avoid Target disk mode if possible.
Adam:
Besides COVID-19 closures, your replacement decisions are even more complicated than the article covers.
My experience is that iMacs should be replaced every 5-8 years. Your (and Tonya’s) 2014 iMac models are clearly at that age. And my wife’s 2015 is getting there…
Timeline still unclear as to when an iMac with an ARM processor will be out. You probably do not want to wait that long to replace your main work Mac.
If your normal tasks run at tolerable speed on your current make-shift
solution, the 2019 models still available will be faster. You will get one more year of use before you replace with ARM so it might be less painful. Maybe you will even find them on sale.
–Jim
Another thing to consider is that the drive may be off-line because macOS is doing a detailed check/repair prior to mounting.
I saw this many years ago on a PowerPC Mac. After a system panic, the computer wouldn’t boot - I’d get an Apple logo and then nothing. I assumed that the drive had failed so I bought a replacement and restored a backup.
Later, out of curiosity, I attached the old drive to a USB cable and found that it failed to mount. But I noticed that the drive was extremely busy all during that time, which was very strange. After looking around a bit, I found that there was a fsck process running on that drive. That was very strange, since the drive was formatted with journaling enabled, but clearly something got damaged that made journal-based recovery impossible. I decided to see if the process would complete and left the room for a few hours as it ran. When I came back, the drive had mounted with all its files intact.
I don’t know how often something like this happens, but it is something to look for if you have a drive that seems to work but won’t mount and can’t be accessed by Disk Utility.
Adam, I join others in saying Thank you for your informative article. I especially appreciate your detail explanations linking What and How (for example, “restarted in macOS Recovery by rebooting while holding down Command-R”). Usually this was unnecessary, but I would rather be told something unnecessary a dozen times than be left wondering what detail was omitted once.
Articles like that remind me how much I don’t know, and even how much I don’t know that I don’t know. Thanks for that link.
That’s a great article. Thanks, Peter. :)
I completely agree with @doughogg about the desirability of having an iMac which doesn’t easily allow you access to change a failing SSD (or other component).
I was faced with this decision recently as my existing iMac 5K aged and increasingly looked set to cook its internals (not to mention strained to run things with its ancient graphics chip). I thought about the iMac Pro since it at least has better cooling and might avoid cooking the internals. Or I could chance it with a newer iMac, since they seem to be more thermally efficient - but I’d still be stuck with non-upgradeable components.
In the end I bit the bullet and splashed out for a Mac Pro. I can’t see Apple producing a cheaper Mac Pro for a while (if ever). The cost is a lot more than I’d ideally spend - but at least I now have a machine that should last for a long time and is reasonably easy to fix/upgrade (at least until Apple switch to ARM chips).
Great article @ace! It’s given me a lot to consider. My late-2012 27 inch iMac is even further outside the replacement window that @Jim_Carr recommends. I replaced the failing original 1TB spinner hard drive with a 1TB SSD drive in 2016, and it gave a huge performance boost to the machine. I found that peeling off the monitor and reattaching it worked fine for me, but I am a meticulous and patient worker in that regard.
For compatibility reasons I’m still running under High Sierra. It is still receiving security updates, which surprises me given Apple’s earlier history with the every-year OS rollouts.
The stuff I have to think about: For the last six weeks I have pressed this iMac into heavy-duty video production to support recorded and live online services for my work. That means in my case about 30 minutes of polished video segments using Final Cut Pro and Motion, mixing an 8-voice choir submitting separate audio files using Garageband (because I’m not ready to add Logic to my toolkit yet), and producing many stills with Photoshop and the Affinity suite.
The first week of work flooded the remaining space on the internal SSD, so I asked OWC for a recommendation and added a Thunderbay 4 Mini RAID. It works acceptably well for storage and rendering all those FCP files connected via Thunderbolt, and I anticipate bringing it along to a machine that can run it at Thunderbolt 2 speeds.
So, I’m pushing a nearly-vintage iMac as hard and fast and full as it can go, meantime recalling the previous 2008 iMac that suddenly went black one day and could not be revived, even by techs at my local Apple Store. They handed that one back to me, and had pulled the hard drive in case I wanted to try recovering it. (That was a no-go as well.)
My concerns are:
So, with all of that in front of me, I’m STILL very appreciative of the article. I’ve been thinking of my iMac as an iron warrior, but your experience and the helpful way you’ve related it have brought me to realize I need some backup plans in this environment.
A tip: Split Fusion Drive to get two drives and hopefully the SSD part or both is still alive.
Caution: You will lose all your files and will have to restore the system. The SSD disk is small compared to the spinning disk and the spinn disk is slow.
I would like to share this with you regarding Fusion Drive. My experience is from doing this with 8 different macminis, that we had at work and now functions as home computers for our Graphic Designers. The reason I did it was an experiment because they all were unstable back in 2015 and we replaced them with macminis with standard SSD’s. All split drives are still going strong today.
Boot via Internet Recovery Mode.
Get into the terminal
Write:
diskutil coreStorage list
Copy Logical volume group id at top it’s a long hyphenated string of numbers and letters.
Write:
diskutil coreStorage delete
Quit terminal
Start Disk Utility.
Now you see two disks in Disk Utility. If Disk Utility asks to restore Fusion you can try that, but if things do not work, do the split again. You can now use Disk Utility to check both disks. Use “Get Info” on the disks to see which is SSD (Solid state : Yes) and what the SMART Status is (SMART status : Verified). Do repair on both and restore the system.
My 15" mid 2012 MBP (OS 10.14.6) has suffered very rare but catastrophic failures of the built in 500GB SSD for the at least 4 years. Nobody has been able to identify the cause, only happens about once/year. My solution (apart from multiple clones and Time Machine ) is a very inexpensive 250 GB SSD in a USB3 case: 2 partitions with Sierra in one and Mojave in the other. It is NOT a long term working solution, a bit sluggish on the start up. But very cheap <$50., easy to upgrade, and so far I just re-format the built in SSD, use my clone to re-build + update w TimeMachine, about a 3 hour turn around and I’m good 'till the next crash (I actually suspect a doggy connection someplace on the MBP bus, but it is not replicable, so I cannot be certain). Yes, a new MBP would be nice, an external SSD may solve the problem -or not, but having a reliable alternative start-up disk has gotten me out of a lot of sinkholes and I’d recommend it for anyone whose work depends on a computer. (Earlier I used a 64GB micro chip; that works too, if you do not want to be able to fall back on the previous OS). Just don’t forget to run software update every month or so over-night on your spare start-ups.
Interesting possibility! In this case, I don’t think that’s happening since it appears as Unknown in the SATA section of System Information.
Thanks! I figured that these techniques weren’t necessarily things people did every day, so it was worth a few more words to explain how to do them as well.
Fingers crossed it doesn’t come to that, since Apple doesn’t seem to be doing too well with repairing Mac Pros.
https://appleinsider.com/articles/20/03/12/mac-pro-still-poorly-supported-by-apple-store-genius-bar-months-after-launch
Apple has a policy of supporting the two previous macOS versions, so that would be Mojave and High Sierra. Once the next version of macOS comes out, however, High Sierra will be kicked off the back of the train. Another thing to consider when pondering an upgrade.
In thinking about your situation, I would recommend buying a new iMac right away. Doing that gives you the opportunity to transition to it gently while the old iMac continues to work as you’ve come to expect. Also, it will be loads faster for the exact sort of things you’re doing. In fact, I’d buy the new iMac, start using it immediately, and only rely on the old iMac for parts of the workflow that can’t be transitioned immediately. Those can then be moved over as you have time.
DiskWarrior has long been a great app, but I have to say, I haven’t used it in decades. Mac drives, particularly SSDs in my experience, don’t seem to suffer directory problems nearly as often as they used to. If Disk Utility can’t fix something, I’d prefer to reformat and restore rather than trust that any third-party could do better than Apple’s own engineers, particularly given that APFS documentation is still sparse, as I understand it. I would never recommend holding up an upgrade for DiskWarrior. Just make sure you have great backups.
Interestingly, the old 2014 iMac I got back from @jcenters had a Fusion Drive, and it looks like he split it. The SSD is largely non-functional (the Finder asks to initialize it, but it always fails in Disk Utility) and while the hard drive seems to work, I strongly suspect that the machine’s flakiness is due to having the dead SSD in there.
In another thread, @Simon just shed some light on one of my mysteries—why my Mojave installer claimed it was corrupted.
Since my external SSD was empty, I didn’t even think to copy the Mojave installer to the SSD and install from there. Why would the installer care where it was being launched from?
Just one word of warning from someone who has lived with a dead internal drive (HDD) for years in his iMac 27" late 2012. After the drive failed, it was still mounting, which caused problems at times even when I managed to erase it. I edited fstab to unmount the drive automatically:
UUID=158A8B51-0C4F-490B-9432-FB1767AAAC07 none hfs rw,noauto 0 0 (substitute your own UUID)
This unmounts the drive automatically but you can expect trouble at times, particularly when updating your operating system on your external drive (mine is an SSD connected by USB 3.0). It can take an eternity to complete, and I have at times had to abort the process and retry, so far successfully. I really ought to open the machine up and remove the offending HDD, replacing it with the SSD - I have the tools and the replacement adhesive strips, but have never bitten the bullet.
Yes, maybe it is a bit long in the tooth but it’s still running after seven and a half years, and I don’t think this is the right time to be buying a new iMac with rumours of a new model flying around. Besides, I still use software (Dreamweaver and Audacity to name but two) which won’t run under Catalina.
I am running Audacity 2.3.2 fine with Catalina (10.15.3).
I’m surprised you didn’t just get a 1TB Samsung external SSD and use that as the boot drive. Not really expensive and these drives are fast. I had a base model 21.5 iMac with the world’s slowest HD that my wife used. Doing updates and maintenance on the system was so horribly slow that I finally just got the Samsung SSD and booted off that drive - it made the system much more responsive.
David
That’s exactly what I did, and apart from slow boot and shutdown times, it seems to be working perfectly.
I wonder if you could just delete all of its partitions, so there’s nothing to mount.
But I suspect that would end up causing the Finder and/or Disk Utility to present its “would you like to format a new drive” dialog every time you log in.
I wonder if there may be some other option to make the system ignore the drive.
The “Damaged Installer” results from an expired certificate. It may not always be an option to download a new installer. One solution is to change the date on your Mac to the date that’s on the installer. Get Info on the version of Install macOS xxx and look at the Modified Date. Set the System Date to that date. In Tools select Terminal and in Terminal firstly enter date and you will get the current time and date looking like this: Sat 2 Nov 2019 12:48:47 AEDT. To change it to 14 June 2019 at 12:24, the date I downloaded my last version of Mojave, you would enter: date 061212232019, then return to the Installer and it will work. I have used this trick to install old systems like El Capitan on old hardware and it is reliable.
This isn’t all of the problem.
As @adam pointed out above, I downloaded a fresh Mojave installer from Apple just the other day and while it ran from my internal SSD boot volume, it refused to launch from an external HDD and instead gave me the usual damaged installer error. This is not just an expired certificate / date issue. There’s obviously more to it.
I’ve been pondering this too, but as far as I can imagine, the only way is a physical disconnection. And if you’re going in, you may as well replace the bad drive.
Just a few weeks after I bought my beloved 9600 Mac it was announced that the much anticipated, soon to be released OS X would only run on Intel Macs. Because it ran on RISC chips, for years I was shut out of upgrades and new applications. This became an even bigger bummer when soon after prices on all RISC Macs began to drop dramatically. As good a machine as it was, and it still has a place of honor near my desk, it became almost obsolete shortly after its birth. Although my very ancient MacBook Pro has been slowly but steadily manifesting signs of imminent death and its OS hasn’t been upgradable for years, I’ve been holding out for an A series replacement. My husband is hanging on with his MacBook Pro for the same reasons.
My advice is to stick it out unless you cannot avoid waiting. If you don’t like the A series Macs when they are released, it’s likely you’ll be able to get a better price on a current model.
Samsung literature for the T5 says, “Even when using USB 3.0 connections, T5 may not perform well if your system does not support UASP (USB Attached SCSI Protocol). Please make sure that your system supports UASP.”
I’m reasonably confident that my 2015 MacBook does not support UASP (since I can find no mention of UASP or SCSI in the USB portion of the System Report). How much “not perform well” am I likely to see? (Note that I would be buying a T5 disk for a Macintosh to be named at a later date, but using it with the MacBook until that later date.) Thanks.
Yes, deleting the whole drive might work, and I’ve found a couple of web pages which give instructions on that. The fstab method unmounts the drive at some stage in the boot process but earlier in the process, the drive mounts. I think that’s where the problem occurs when updating the operating system (and sometimes when doing a security update). I think that the request to format the drive would probably come later in the boot process but I can’t be sure of that. I’ll need to think it through - it might be safer to open up the iMac and take out the HDD.
There’s never a right time to buy a new computer, other than when you need one. The fault with mine is not down to Apple (other than a poor choice of supplier) - it’s the Seagate 3.0GB drive which is known to be prone to failure. If it’s any help, I will definitely buy another iMac after this one (it replaced the previous generation of iMac 24 inch) but the design (at least on the exterior) hasn’t changed in over ten years and it must be nearly time for a redesign.
I also installed an SSD kit a year ago in my 2014 27" iMac 5K. Prior to that I used a Samsung T5 as my boot drive for about six months and things felt faster, but nothing compared to what I’m realizing now with the internal SSD.
There are times where I crave a faster iMac, but Python, shell scripts, and Affinity Designer are just fine with the old gal.
I’m lucky to also use a 13" MacBook Pro from work and use Jump Desktop to connect to it from the iMac since I run Windows via Parallels Desktop sometimes.
I honestly feel my iMac has much more value than what I would get if I sold it. The display is pretty cool. I also use Parallels Tools with Switch Resolution in the menu bar and sometimes take advantage of the full 5K when my eyesight is doing well.
By the way, I’m using an older 2010 iMac 27" in Target Display Mode as my second display and that’s a nice setup.
I have never seen this mentioned there either, despite using some of the latest USB3 docks that I know offer support for UASP.
I have been told that in order to really check you have to look under Software > Extensions and check which kernel extension is actually loaded, IOUSBAttachedSCSI or IOUSBMasStorageDriver. If the former is loaded you are using it, if only the latter is loaded you are defaulting back to the old USB MSC. I have only seen the latter on this 2013 MBP so I’m assuming its USB3 is simply too old to support it.
Adam, I also thank you for the detailed write up. Articles like this (and all the comments) are one of the primary reasons I subscribe to Tidbits. And I agree with Doug Hogg – this kept me riveted in my seat to the end.
Some of my interest was generated by trying to update my 2013 MacBook Air to High Sierra. (yeah - I don’t keep up with all the new stuff :-) I was forced into an upgrade after installing a new application which could not run under Sierra. And the Mac App Store wasn’t helpful as it was forcing me to jump straight to Catalina. I did not want that because of some 32-bit apps that would be left behind.
It was quite an effort to find a link to the correct Apple installer. Just wish I’d seen Roland Mansson’s post with all the handy-dandy links right there. Gotta keep a copy of that one! Will likely move on to Mojave now that he has provided the article with its link to the installer.
A quick web search finds this Apple discussion thread from 2014. The procedure described is:
ioregcommand to get the entire USB device tree, capturing its output to a fileIOUSBDeviceandIOUSBAttachedSCSI. These are your UASP devicesIOUSBMassStorageClass(The original version of this post mentioned an
iousbcommand. That was a typo. Sorry.)Thanks, @Simon. I got all excited because IOUSBAttachedSCSI was listed under extensions, then I reread your post and checked if it was loaded. It was not. I don’t suppose there is a way to tell the Mac to load IOUSBAttachedSCSI rather than IOUSBMasStorageDriver (which was listed as loaded)?
Thanks, @Shamino. I thought I was smart enough to do this, but I wasn’t. Terminal disavowed all knowledge of an
iousband I didn’t know where else to run it. Do you have a hint for me? (It probably doesn’t matter, since I assume the Software > Extensions result is conclusive, but I like to learn—even though I expect I’ll promptly forget what I learned.)And another question, for anyone. After getting a System Report from About This Mac, clicking on Software > Extensions, and locating IOUSBAttachedSCSI, I thought to myself, “I’ll print this so I’ll have it later.” But in the Print dialog box available from System Information, I could find no way to print the selection or choose anything other than a page range for printing. Since the report was 102 pages long, it seemed like it would be tedious to find what I wanted, and I gave up. Did I miss some easy way to print just the IOUSBAttachedSCSI section (or any other section or group of sections)?
Also, repeating a question from my earlier post, how much of a performance hit would I suffer by using the Samsung T5 disk without IOUSBAttachedSCSI?
Na, it wil load the kext if it can do it. If it isn’t loaded either the Mac or the bridge or the disk doesn’t support it (the former being the most likely).
The tip @Shamino gave you is just the command line equivalent. Its output is what Sys Profiler is displaying for you in a GUI. If you want to use the CLI, you have to do it using the command (I think he made a typo here)
ioregwhich will dump a whole bunch of stuff so most people usually send it to file as in
ioreg > ~/Desktop/ioreg.txt.However, that’s a huge can of worms so it’s probably easiest to narrow down using something like
ioreg | grep -i iousbor
ioreg | grep -i iousb > ~/Desktop/ioreg.txtif you prefer a text file as output.
That should contain only the relevant parts of the output. You will see that MassStorageDriver shows up instead of USBAttachedSCSI, like what you got from Sys Profiler. If your (or my) Mac supported it, we’d be seeing the other kext listed because that gets loaded for a UASP connection.
To answer your final question, when using UASP with an SSD instead of MSC you should see considerable read/write improvements, but of course you’ll always be limited to below the SATA3 bandwidth of 6 Gbps (which is why Gen2 can still make sense over Gen1 when using USB3 bridges).
By the way, is anybody seeing arrows at the top of this post indicating it was a direct reply to @Will_M? Or does anybody else see any indication at @Will_M’s post that it was replied to below? There used to be such indication on this board, but now at least sporadically, I’m not seeing them on some posts. Is this just me or is it some kind of bug in the latest Discourse version Adam has applied?
Sorry. Typo. The command is
ioreg. I’ll have to go edit my post now…As @Simon wrote, the system profiler shows you the same output. But when you run it from a command line, you can redirect the output to a text file:
Then you can load the file into your favorite text editor or word processor and use its features to search for keywords like
IOUSBAttachedSCSIIt appears that those back-arrow links only appear when all of the following conditions exist:
Bug or feature? That answer is beyond my pay grade.
I’ve been confused about this as well. Weather it’s a bug or not, maybe Discourse should consider upgrading it.
Thanks, @Shamino. Makes sense I guess.
Been there done that and experienced worse trouble. Quite an adventure for sure.
I am surprised you didn’t just use the MacBook Air with Catalina to download the Mojave installer and then burn it to a USB 8GB flash drive and boot that on the iMac then run a Time Machine restore or cleanly install Mojave on the external Samsung T5. Also booting from a flash drive would be a cleaner way to run disk checks on the internal drive as it’s entirely not in use.
In Terminal:
sudo softwareupdate --fetch-full-installer --full-installer-version 10.14.6Then (where MyVolume = USB Flash Disk Name):
sudo /Applications/Install\ macOS\ Mojave.app/Contents/Resources/createinstallmedia --volume /Volumes/MyVolumeThanks for the article. I feel your pain. I recently had an issue with the SSD in my 2010 MacBook Pro. It started having issues shortly after a security update and at first I chalked it up to a corrupted system install.
After servers attempts to reinstall I dug deeper and found signs the SSD was failing. In the end I was fortunate as I had long ago replaced the DVD drive with a second SSD and was able to do a clean install on that drive and then restore my files from a backup.
Restoring all my settings and preferences in a clean install also cleared up a lot of other minor issues, but it was definitely a time consuming process
Good idea! I think it basically fell into the category of too much extra work once it became clear the installer I had wasn’t going to be a help. Plus, I don’t know if I have an 8 GB USB flash drive—I have 20 or 30 of them around, but because I never buy them, they’re all really random sizes.
The physical disk uppermost level is Fusion Drive and selecting this does not offer the erase option. I’ve been trying to recreate my Fusion Drive now for several months including advice from Adam and the gang but all efforts have failed I now run off an external SSD.
Based on the comments in this thread, I think it makes sense for me to format an SSD external drive as HFS+, since I expect to make bootable backups (of Mojave, for the foreseeable future) on it. (Also, Disk Utility does not offer APFS as an option.) I think this means I want to select GUID Partition Map. Is this correct? Thanks.
Why as HFS+? If you’re ever going to be booting from it with Mojave, APFS would make more sense.
The main benefits of HFS+ right now are better performance on external hard drives (not SSDs) and the requirement that Time Machine drives use HFS+.
Do you use or plan to use any disk diagnostic software like DriveDx? I’ve read that these can prevent disasters.
Is it possible SSDs are less reliable than mechanical drives?
I thought I had found at least two and maybe three discussions in favor of HFS+ earlier in this thread, but now my hurried search has turned up only one definite statement.
Less definite, but also nudging me in favor of HFS+, were these.
I’m not sure why I assumed, when I read that last snippet, that you were running APFS.
Anyway, in answer to @countermoon’s question, I do not use any non-Apple diagnostic software and I have no definite plans to do so, but it’s always a possibility.
On a different issue, I said that Disk Utility didn’t offer APFS as an option in the Format dropdown menu when I did a test run. I now see that APFS is an option if I select GUID Partition Map.
So, @ace, based on your query that started this lengthy post, it sounds like I misunderstood about APFS and that is the format scheme I should use, in which case GUID Partition Map is the partition scheme I should use. Yes? Thanks.
In this day and age, you definitely want GUID unless perhaps you still need to be able to boot a PPC Mac from that disk.
Yep, I’d recommend using APFS plus GUID for an SSD.
Of the notes you quoted, the main one that’s of real concern is the slowdowns at startup with a Samsung T5 formatted as APFS. However, the final line of Bombich’s page makes it clear this isn’t optional:
While I feel badly about what APFS has meant for DiskWarrior, I firmly believe at this point in time that no disk repair software other than Disk Utility is worthwhile for everyday users. It’s just so much more sensible to maintain good backups and, in the case of disk problems that Disk Utility can’t fix, to erase and restore. That way you’re never wondering if the repair software might have made a mistake or not known about something that Apple changed in a subtle update, etc. (I say “everyday users” because consultants or techs who fix other people’s drives definitely should be using disk repair software as necessary to get drives to be usable to the point where they can be backed up.)
I’ve now been running from the external T5 for a few weeks, and it has performed well. The startup and shutdown times might be slower, but I restart so infrequently that I haven’t really noticed.
About how long does each take?
Thank you, @ace and @Simon. Adam, I had not absorbed that bit from the Bombich article; thanks for quoting that.
Now, off to reformat the new disk.
There is that. But, OWC currently recommends DiskWarrior for the SoftRAID array I just purchased from them, and it did work to recover my 4-drive array three weeks in.
I’m trying to recall what Disk Utility said about the same array, but as I recall it was on the order of “huh, everything looks fine to me—wait, where did it go?” as it unmounted the array and wouldn’t mount it again.
As for your general advice, Adam, thank you. My current plan is to move the 2012 iMac to one side of my desk, install a 2019 27-inch with faster processor, and use the two of them in tandem. I’m toying with the idea of using the older machine as a Compressor processing station, which might work well or might run into version problems. Worth a try, as I’m generating enough minutes of 720p video every week to make a difference.
The current “see ya” list on a new machine would be the Adobe CS6 suite (which improbably still runs well under High Sierra), a few utilities, and some cruft that has come along from as far back as when OS X was introduced and I was running the whole thing on a Blue Dalmatian iMac that came forward from classic Mac days.
I appreciate the help @ace !
Adam, articles like this always make me review my own backup strategy, which is currently based on a CrashPlan SMB cloud backup, and manual SuperDuper! clone drives, one of which is stored in our office, with more in a bank vault.
That last bit about manual clones is beginning to bother me. A lot.
From the article, it sounds as if your backup strategy relies on these three pillars:
At this point, I’m considering the following changes:
Does that approach raise any red flags for you, Adam (or any other readers here ;) )? Thanks for any suggestion on how to (further) improve what we have in place already.
Don’t have any personal experience with NAS devices, but many many others report issues with these, apparently some manufacturers more than others.
The only issue is that NAS, not because I have any experience with it, but because I’m not sure I trust non-local solutions with Time Machine. It’s just not designed to work over a network—it has no client/server architecture—so interruptions are likely to cause corruption.
Dave Hamilton mentioned a workaround at MacTech Conference last year. If I remember right, the idea was that you could back up via Time Machine to a NAS using the btrfs filesystem, which allows regular snapshots, much like APFS. Then, if you had a Time Machine problem, you could revert the Time Machine backup to a previous snapshot to avoid any potential corruptions problems. I’ve never tested this, or even had a NAS, but it’s worth considering.
I do feel that bootable clones need to be on SSDs now, if you really think you’re going to boot from them and try to get work done.
I create clones on hard drives. I don’t anticipate booting from them. Since my current desktop is using 2.5TB on a 3TB Fusion drive, creating multiple SSD clones would be expensive. When I have needed to fully recover a system in the SSD-Fusion drive age, I have always started with a clean install (either from an installation package or the Recovery mechanism) and then used the clone as a migration source.
Most of the space is occupied by my photo library and video files (mainly recorded shows from my TiVos or directly via Plex). A project I may finally complete during shelter-in-place is to move these libraries onto an external drive and develop a coherent backup strategy for that drive. After doing that, I can get out of the Fusion game.
For anyone wondering, my perception, unbacked by any measurement, is that copying a 500 MB folder with 11 items consistently takes less than a third of the time that it took to copy the same folder to an external spinning disk on the same USB hub.
I do have actual durations, as reported by SuperDuper!, for full backups to bootable clones. Typically, they take 2/3 the time, although the first backup to the T5 took 1/3 the time. (I welcome speculation on why the first backup was so much faster.)
If I assume your spinning disk does roughly 100 MB/s that would indicate you’re getting around 300+ MB/s. That’s not bad, but it’s still low compared to ~500 MB/s you see on even pretty inexpensive consumer grade SSDs. Almost as if there were an old SATA bridge in there (3 Gbps). Highly unlikely. I’m starting to wonder if UASP on Macs is a bigger deal than I thought. OTOH, IIRC a 2015 MBP’s USB3 peak bandwidth is 5 Gbps so maybe you’re just plain bus limited and the only way around that would be a newer MBP that supports 10 Gbps over USB-C (3.1 Gen 2).
5Gbps == 625MBps. Even if there is 20% lost to overhead, that would still be 500MBps.
In my last job, I was happy with Samsung T5s as external boot drives to perform support (i.e. temporary external boot drive) on dozens of Macs and for shuttling files. BlackMagic Disk Speed Test showed the T5 having the expected read and write performance but I didn’t obsess over numbers. I always expect a significant amount of time in transfers is for basically cataloging the new files, that there’s a lot more than creating a new name and pouring data into it.
It’s very hard to find any USB3-attached drive on a Mac that will show real world throughput close to 500 MB/s. I’ve never understood the root cause for this, but I believe it’s safe to assume the overhead must be substantially more than 20%. In fact, the ~300 MB/s @Will_M mentioned I believe is much closer to what most people usually see over USB3 on Macs. Just an observation.
Would you believe that the next time a operating system software update came along, the process stuck part way through and no amount of waiting or retrying would make it complete?
I solved the problem by connecting the external SSD to my wife’s much newer MacBook and choosing it as the boot drive, when the MacBook recognised it and allowed me to boot from it to continue the update. The next time, I did the whole thing from the MacBook.
A follow up: I did end up purchasing a 2019 iMac with the fastest processor, the fastest GPU, twice the RAM of Apple’s stated capacity (128Gb courtesy of Other World Computer). The write-offs were as stated, except that Disk Warrior DOES run under Catalina, as long as it is analyzing an HFS-formatted drive. And the big trade-off was having to run Catalina. I absolutely do not yet comprehend the bifurcated main drive system, though it’s only been a week. It has been driving me nuts asking “Father, may I?” for absolutely everything, especially for each and every application to allow access to the Desktop. Considering stepping “down” to Mojave.
But, my render time for my 30 minute program went from nearly 90 minutes to under 10, and lest we all get caught up in the weeds of endless details, the interface is indisputably a Mac so it’s not jarring after all those hours on my older machine running an older version of the OS.
So, all in all, I win.
I finally got some time to read this article, and I echo other people’s thanks and statements of enjoyment! Last year, the SSD in my 2013 MacBook Air suddenly died (as in screen went blank and from that point on I could never access the drive). I ended up buying a replacement internal Feather SSD from Flexx Memory and it has been a fantastic forced upgrade (I was struggling with 500 GB and now have a nice 1 TB internal drive).
However, I had various trials getting things up and running. I won’t detail them all here, but like Adam, certain things didn’t work as planned/expected (for instance, my Time Machine backup could never successfully complete a restore); and then I also made a mistake or two such as ‘quickly’ starting something running before I headed out the door only to realise I’d reformatted the wrong disk and erased years worth of photos . I eventually got back up and running (all photos saved), and the key lesson for me was that @joe’s and @ace’s (and others’) advice to have multiple, varied backups cannot be understated. Luckily I got on that train some time ago otherwise I would have had a pretty devastating experience – instead, it has actually given my MBA a new lease of life and hugely improved using it! When it comes down to a restore, you never quite know what’s going to work because it is so dependent on the very specific combination of hardware, software, adapters, etc that is in play at that very moment in time.
One follow-up question for @ace: This might be a stupid one, but have you explicitly selected your external SSD as the startup drive in
System Preferences? I wonder if that might eliminate the startup delay (if the system is trying to boot of the internal drive and then falling back to the external when that fails).