Picsew Is Indispensable for Professional iOS Screenshots
When you document technology for a living like we do, you put a lot of thought into screenshots. Even if you don’t write about tech professionally, there are times when screenshots are essential to document bugs, request help, or show a loved one how to do something.
We’ve found the Picsew app for iPhone and iPad invaluable for combining and modifying screenshots, and, most importantly, applying device frames to iPhone, iPad, and Apple Watch screenshots. It’s a free download in the App Store, with a $0.99 in-app-purchase to upgrade to Picsew Standard or $1.99 to upgrade to Picsew Pro. You need Picsew Standard for adding device frames, annotations, high-quality exports, and more, but Picsew Pro is necessary only if you want to make multiple screen screenshots by recording video rather than combining static screenshots.
Picsew offers a lot of tools. Here are the ones we use the most often.
Stitch Pictures Together
We usually like to pair portrait-orientation iPhone screenshots together, because otherwise they’re way taller than they are wide and leave an awkward amount of whitespace to the right. We have a number of different tools to pair images, but Picsew makes it simple.
When you open Picsew, it shows the most recent images in your Camera Roll. You can tap Recents at the top of the screen to switch to another Photos album, like Screenshots.
Whichever view you’re in, tap the images you want to stitch together in the order in which you want them to appear. The thumbnails turn blue and a number appears on them, reflecting the left-to-right order (or top-to-bottom, if you arrange them vertically) in which Picsew will combine them.
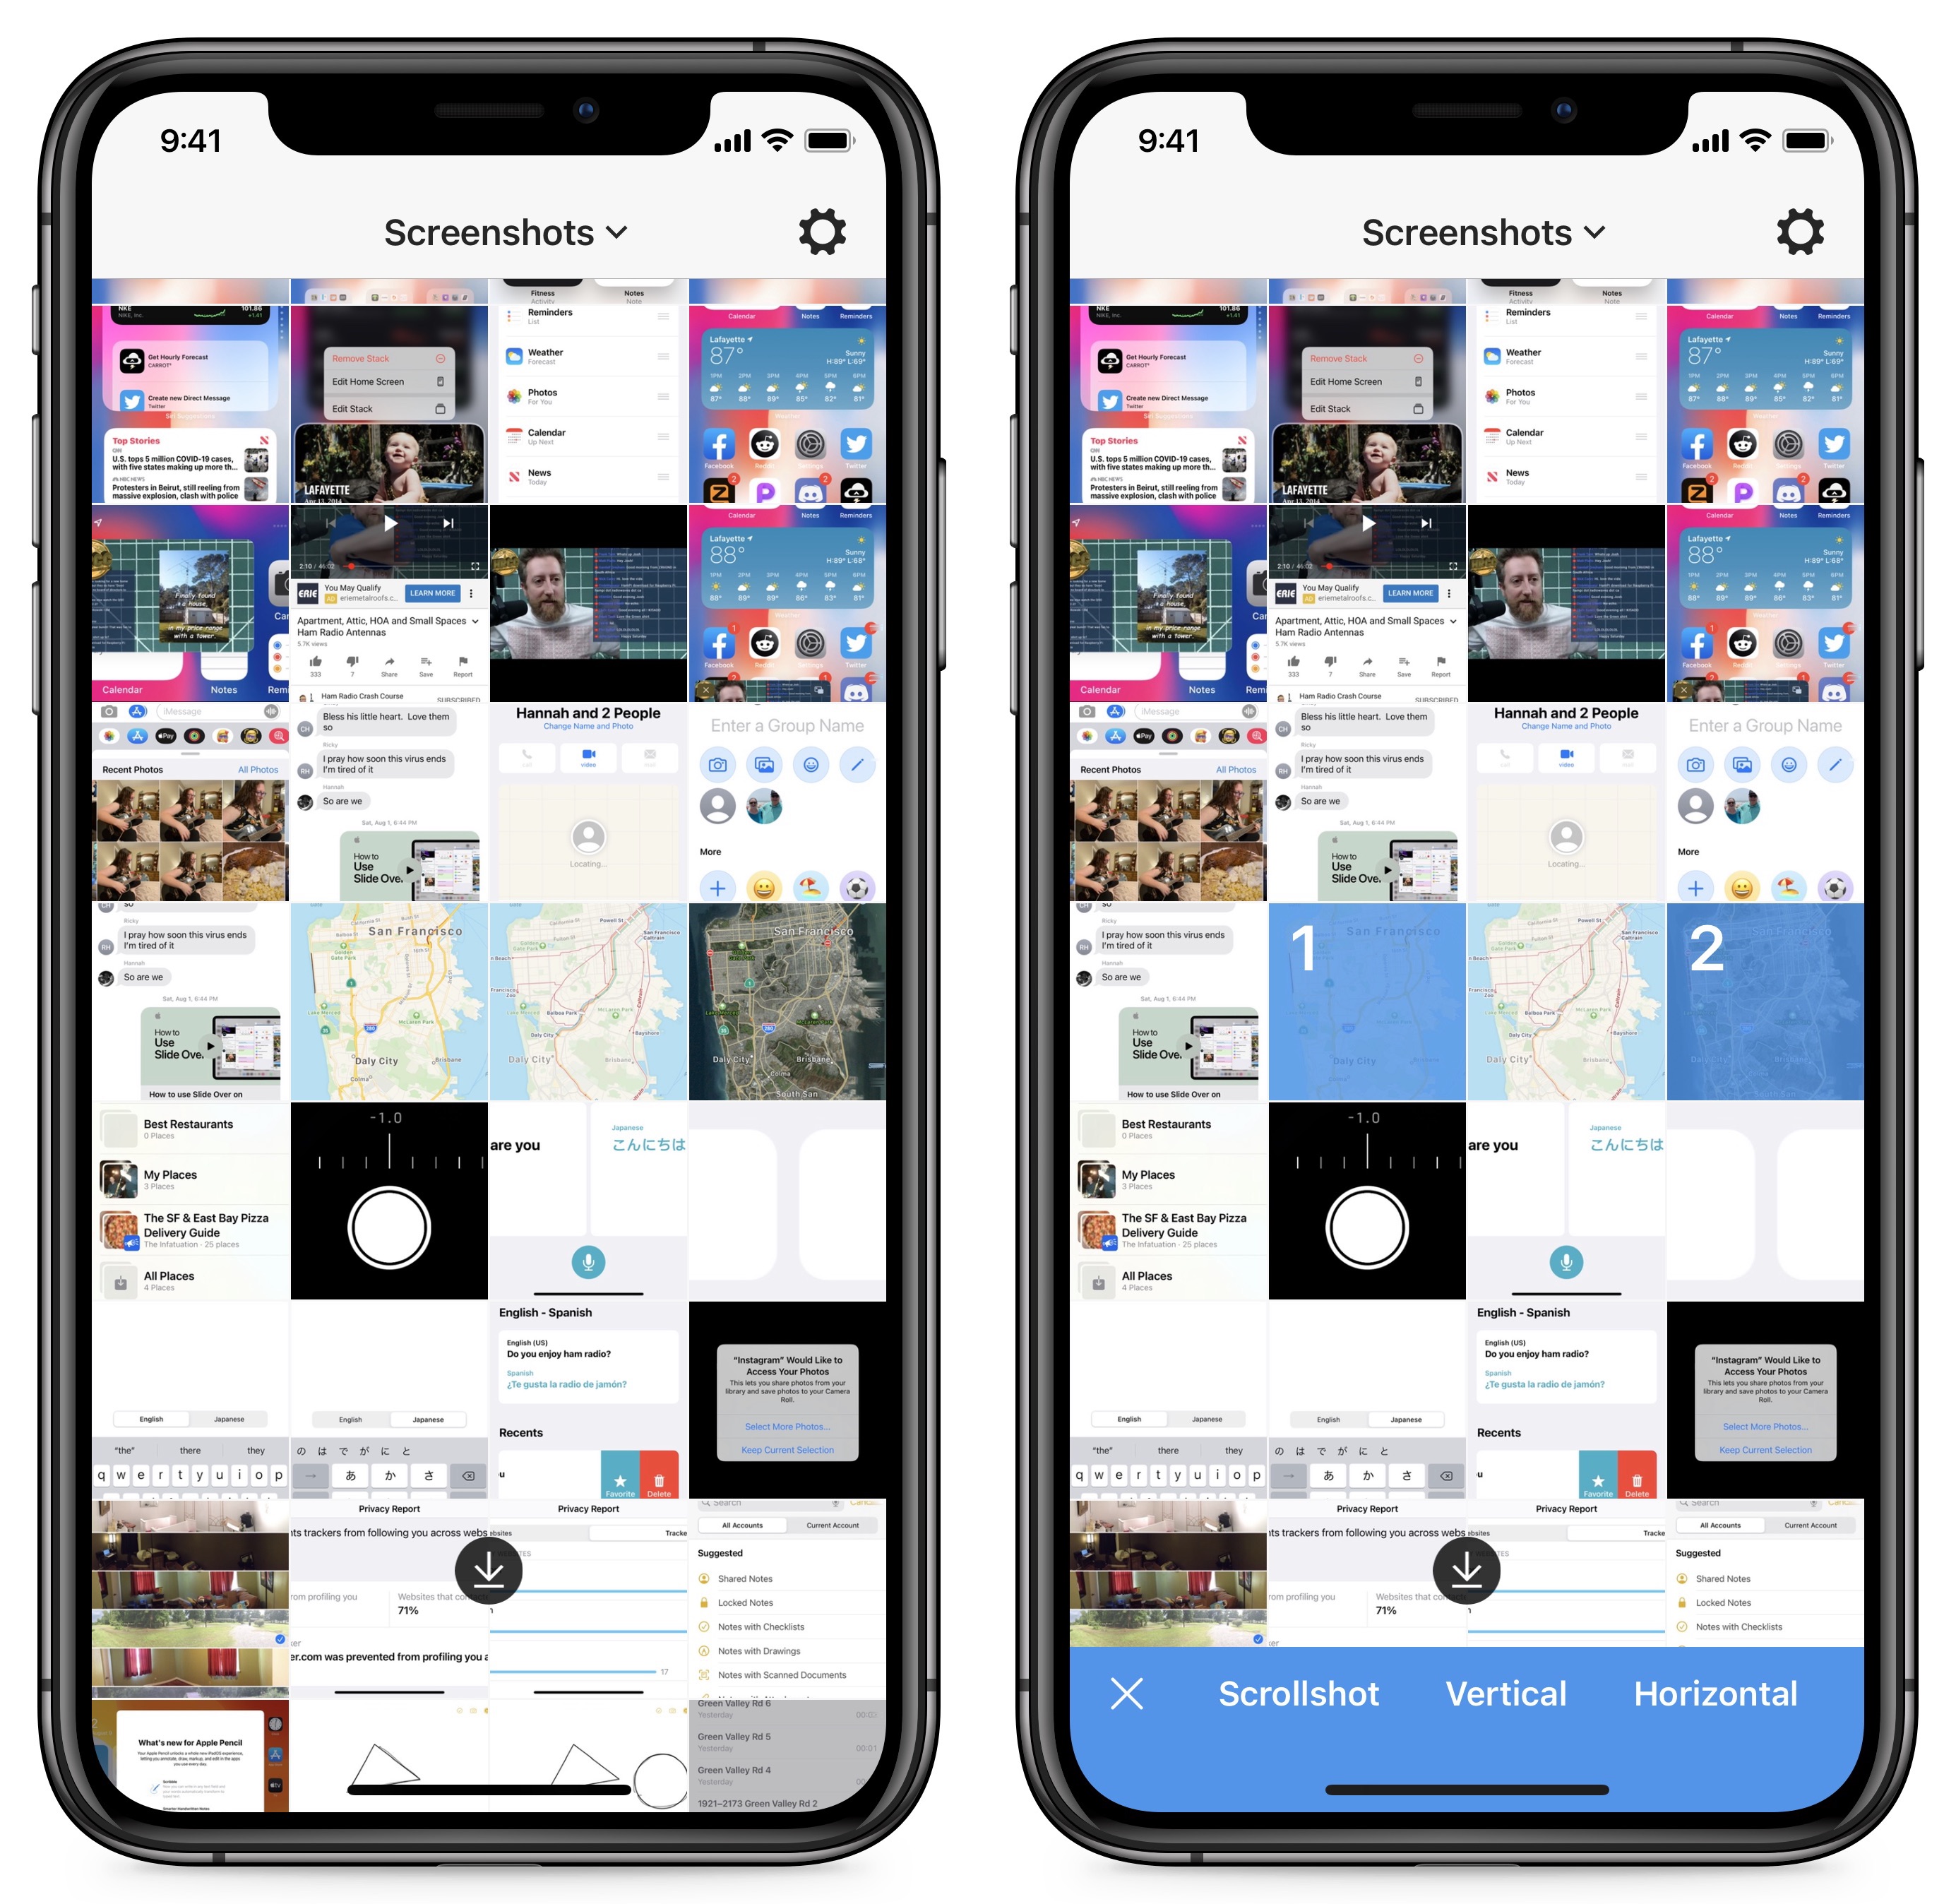
A blue bar also appears at the bottom of the screen with options for how to stitch the photos together:
- Scrollshot: One long, continuous image
- Vertical: Images stacked on top of each other
- Horizontal: Images stacked side by side
We almost always use the horizontal setting, but the others can be useful as well. For instance, a scrollshot could be useful for showing the entire Settings screen, connecting multiple screenshots of a scrolling set of release notes, or stitching together multiple screenshots of a long Web page.
When you select several images and tap Horizontal in the blue bar, Picsew displays the images side by side with little yellow pencil icons on the edges. You don’t need to do anything more—you can tap the Share icon to save or share the combined image—but Picsew provides some ways you can improve the presentation.
Crop Images
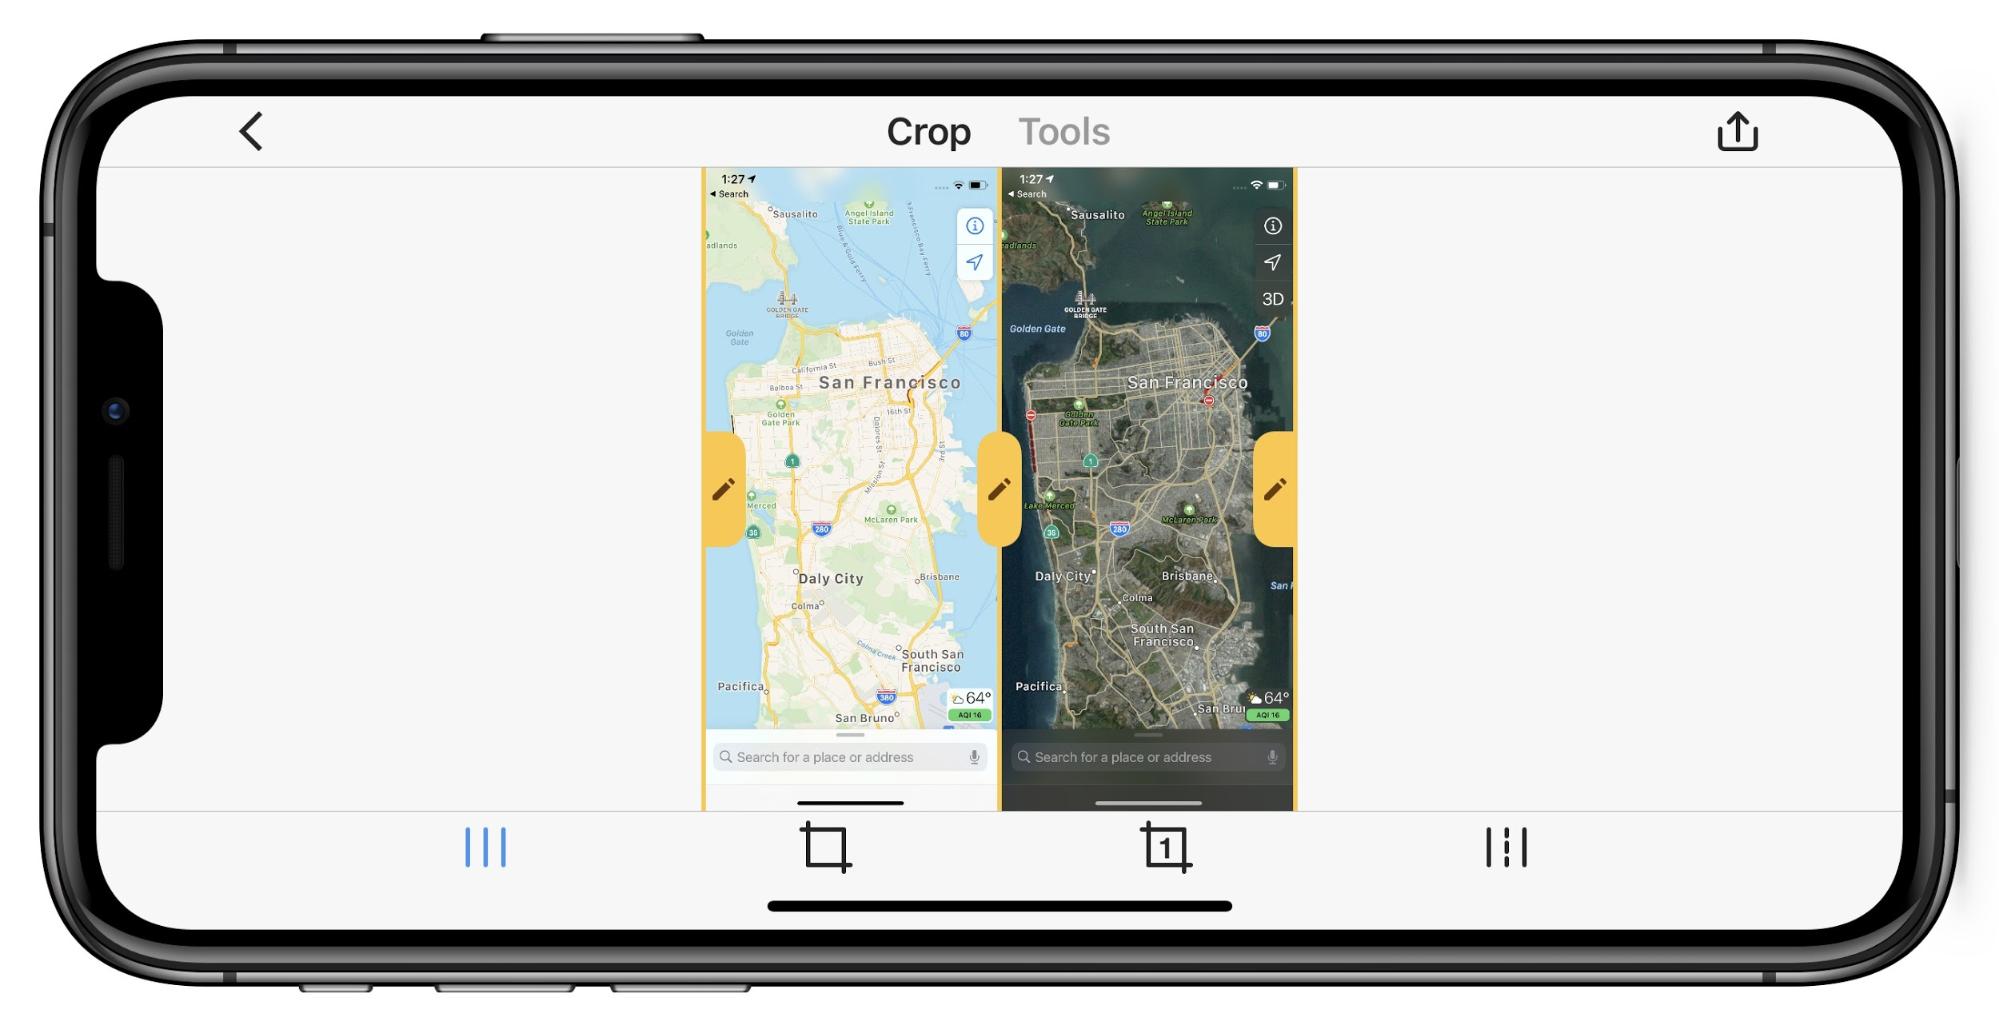
In the process of combining multiple images into a single picture, you might want to do some cropping. To do that, you use the little yellow pencil icons. It took us a while to figure out how Picsew’s cropping works because it’s a bit different than similar tools in most Mac image-editing programs. First, note that Picsew provides four cropping tools at the bottom of the screen. From left to right:
- Axial Crop (crop edges): Use this option to crop the vertical or horizontal edges of the individual images in the set.
- Edge Crop (crop the combined image): This choice lets you crop the edges of the combined image as a whole. We use it the most.
- Single Crop (crop individual images): Select this option to trim one image in the set, which causes the paired images to shrink to stay proportional.
- Split Image: The final choice is hard to understand. It lets you split the image at a particular spot, which duplicates it, and then crop the image at the split point. You can use it to cut out part of the inside of an image, like if you have a screenshot of a Twitter thread and want to trim out some of the replies.
As an example, consider the Edge Crop tool. When you select it, pencil icons appear on all four sides of the combined image. Perhaps you want to crop the top of the image out in order to focus attention on search fields at the bottom. Here’s how you’d do that:
- Tap the pencil icon at the top of the combined screenshot.
- Tap and drag the image toward the pencil icon.
- When you release, the pencil icon turns into a checkmark. Tap it to set the crop.
That’s very different from how cropping works in Preview and Pixelmator on the Mac, where you select an area to keep and crop out the rest. But once you become accustomed to Picsew’s approach, it makes more sense on a small touchscreen than how it usually works on the Mac.
Clean Up Screenshots
One of our favorite features of Picsew is that it can remove scrollbars and clean up the status bar in iOS screenshots. After you crop your image, or even if you don’t, tap Tools at the top of the screen. In Tools view, a number of different tools appear in the toolbar at the bottom. Tap the magic wand to reveal switches for Clean Status Bar and Remove Scrollbar. Enable one or both of the switches to make Picsew apply their effects immediately.

Remove Scrollbar is self-explanatory: if there’s a visible scrollbar in the screenshot, that switch removes it.
Clean Status Bar regularizes the screenshot’s status bar by setting the time to 9:41 (Engadget explains why), the cellular reception bars to full, Wi-Fi reception to full, and battery life to 100%. We like using this when we can’t crop the status bar out entirely, as we feel it makes our screenshots look a bit more professional and prevents things like a weak cellular signal or a low battery gauge from distracting from the content.
Those switches work even if you have multiple screenshots stitched together. You can also set Picsew to apply them automatically. Tap the back arrow to return to the main screen and then tap the gear in the upper-right corner. Then tap Smart Recognition and turn on Auto-Remove Scrollbar and Auto-Clean Status Bar.
Add Borders
When you pair images together, Picsew jams them together without any space in between, which isn’t ideal. However, it’s easy to add a border, and if the border is both between the images and set to the background color of the destination page (usually white), it can provide the desired separation.
In the Tools view’s toolbar, tap the fourth icon from the left, which looks like a window frame. Five more tool icons appear above the toolbar. From left to right:
- Disable Border: No borders are applied. This option is the default.
- Enable Internal Border: Apply borders between images.
- Enable External Border: Apply borders outside the images.
- Enable All Borders: Apply borders both between and outside images.
- Border Settings: Adjust the options for the other tools.
Tap the Border Settings gear icon at the right to change the color and width of the border. You can set different widths for the inside and outside borders, but if you want different colors for the inside and outside borders, you have to set the inside border, save the image, and then add the outside border to the resulting image. Despite the use of purple in the screenshot below for better illustration, we always border our images internally with white.

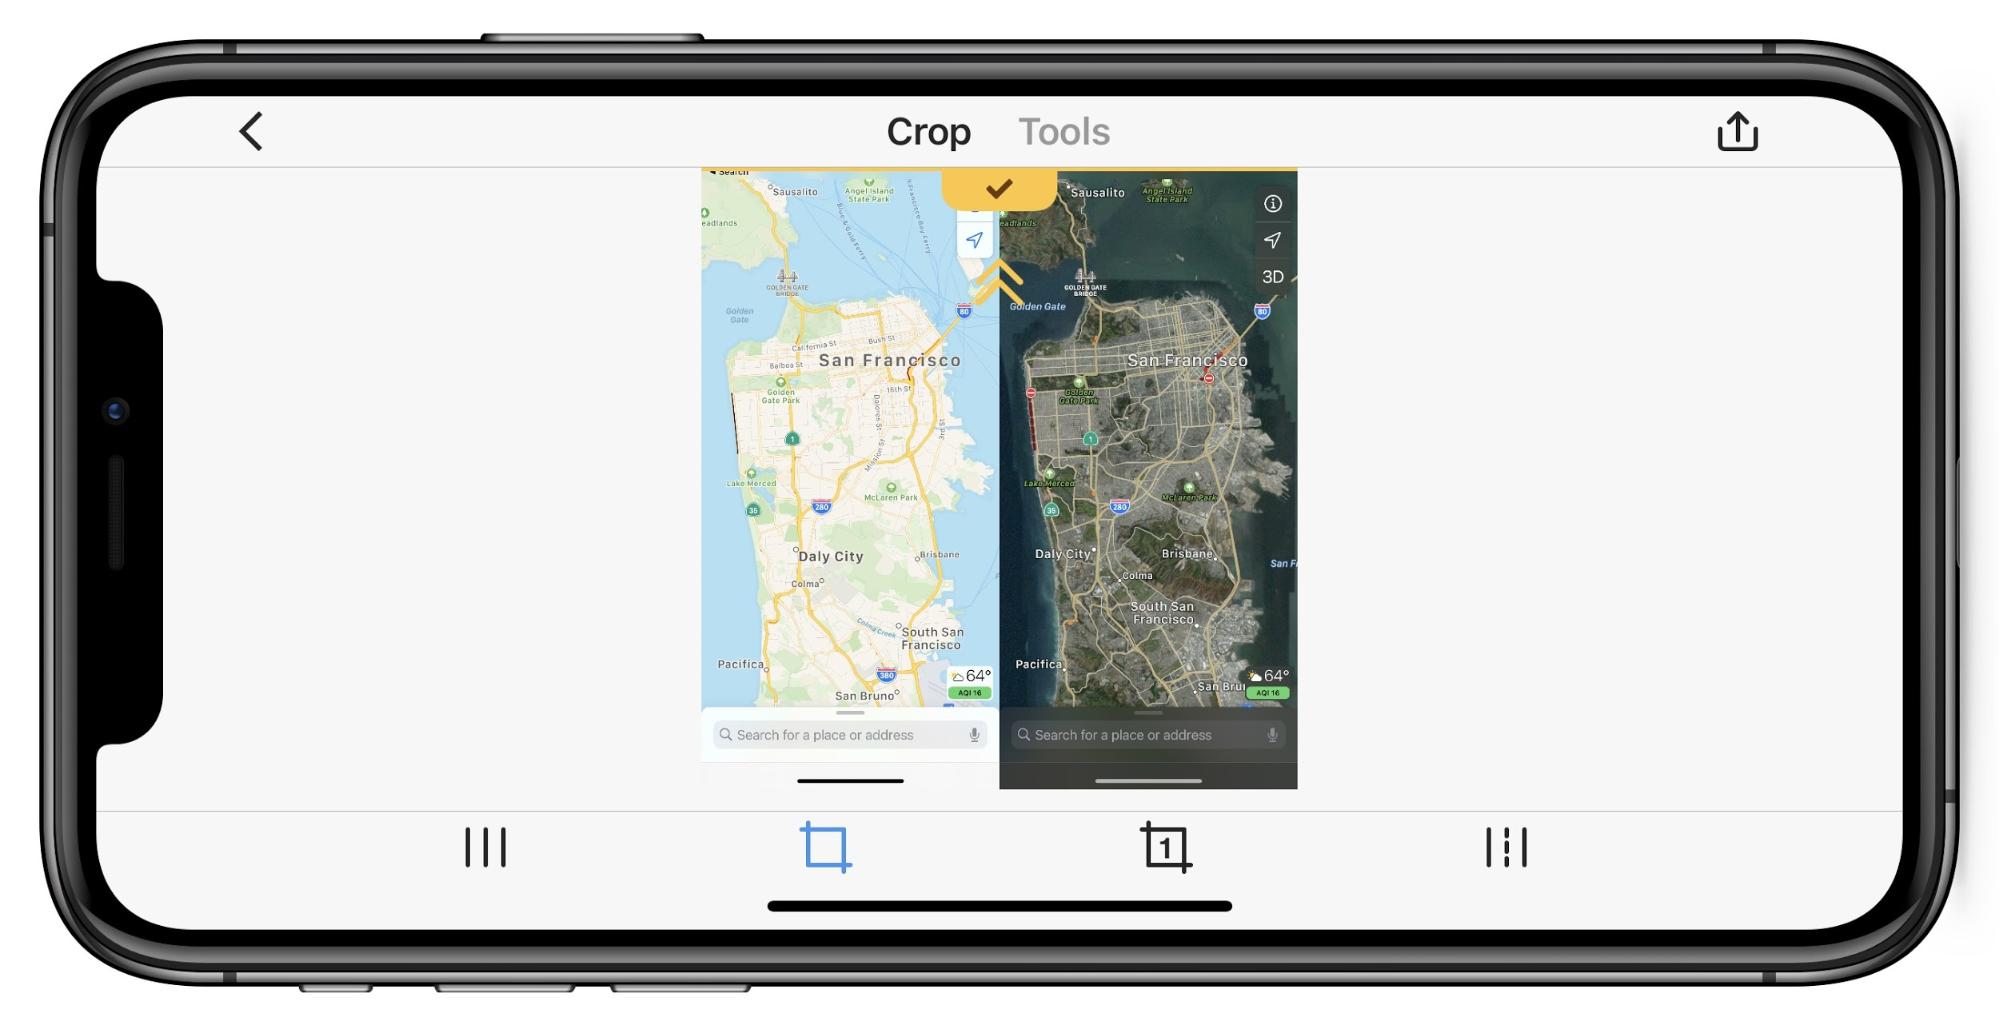
Add Device Frames
Device framing is the feature that brought us to Picsew in the first place. On a Mac, screenshots generally have context—they’re of a window or a menu or a portion of the screen that somehow makes sense. Screenshots of the iPhone, iPad, and Apple Watch, however, are just rectangles, and it’s a help to readers if the screenshot looks like an iPhone, iPad, or Apple Watch.
In the Tools view’s toolbar, tap the Mockup icon (the second one from the left, which looks like an iPhone), and then tap one of the colors in the top toolbar to place a similarly colored frame around your screenshot. Picsew applies the correct frame automatically, whether the screenshot is from an iPhone, iPad, or Apple Watch. It does this by matching the size of the screenshot with possible device frames. If you tap the iPhone icon to the right of the colors in the top toolbar, you can choose from different available frames, even when they’re silly, such as bordering an iPhone 11 Pro screenshot with an Apple Watch frame.
Unfortunately, framing works on only a single image, not if you’re trying to combine multiple images. The workaround is to apply frames to them one at a time and combine later. In Picsew’s photo picker, choose one image, tap Adjust in the blue bar, tap Tools, apply the device frame you want, and repeat that for any other images you want to combine with it. Then, in the photo picker, choose the screenshots you framed and combine them. Happily, the frames include some white space, so you don’t need to add a border between the images manually.
Sending the Result
Once you’re happy with the results, tap the Share icon in the upper-right corner to send the final image to its final destination. Picsew provides options to save the image to Photos or the Files app. Or you can tap Share To to see the standard share sheet.
We usually use AirDrop to send the final image directly to our Macs.
Other Tools
Since we are extremely proficient with Preview on the Mac (we wrote a book about it, Take Control of Preview), we tend to stop there in Picsew and do any additional edits in Preview. However, Picsew offers additional tools that others might find useful:
- Watermark: With Picsew’s Watermark tool, you can apply either a single textual watermark at the bottom of the image or a series of them that slant across the image. You can modify the text color, size, and opacity.
- Redaction: All too often, a screenshot contains information you don’t want to make public. Picsew’s redaction tools let you hide information with rectangles, smears, blurring, or pixelation.
- Text: New in the latest version of Picsew is support for text annotation. You can adjust the size, color, alignment, and style (reversed or not) of your text, and position it anywhere on the image.
- Pen: Picsew’s pen tool lets you draw freeform sketches or rectangles. You can change the stroke width, color, and opacity. There’s an Undo button, but you can’t adjust or reposition a shape once you stop drawing.
The main thing we’d like to see in Picsew is the capability to frame multiple images while combining them—having to do each one independently and then combine the results is tedious. Because of that, we often rely instead on an iOS shortcut created by Federico Viticci of MacStories that both frames and combines screenshots in one step. It’s faster and easier to trigger from Photos, but it doesn’t provide frames for all (or even many) of Apple’s devices, most notably the 10.5-inch iPad Pro that we both use. It’s also essentially impossible to edit; it’s amazing that Federico was able to put up with Shortcuts long enough to create it.
One other feature that Picsew could use is the capability to crop images to specific dimensions. Sometimes you need an image that’s exactly 1280 by 800 pixels, for instance, and that’s not a common feature in iOS apps. However, our friend Khoi Vinh recently created another iOS shortcut that does just this. We haven’t tried it yet, but it’s worth a look if you need such a feature in iOS.
Despite these areas where Picsew could improve, it’s easily worth a dollar to anyone who regularly works with iPhone, iPad, or Apple Watch screenshots.
This is really good! I’ve seen lots of articles for Tailor, Stitch It! or Pic Stitch, and I came across StitchPics. I thought I finally found THE app and wanted to recommend it to you guys until I searched first and found this. Both seems very similar in features and both are released a year ago, but this app has better UI and slightly more features. I’ll be using both to see how they perform but for my needs so far it’s really good!
Thanks for this. I’ve had Picsew on my phone for a long time, but I had no idea it did all this. I’ve only ever used it to vertically combine screenshots.
What did you conclude? Did you decide that Picsew is the best option?
I paid for both and although both are still being updated, I find that picsew has more updates and the UI is more polished. Stitch pics (or aka scrollshot) seems to be done by one man and has email support. For picsew there is actually a telegram for support as well.
For picsew I remembered requesting for a export to PDF option as the other PDF apps I used was buggy when having such a long image in their PDF, and the admin mentioned it was on the roadmap already. To my surprise, sometime later, it was implemented. Stitch pics do not have that export to PDF feature.
Both also has a screen recording feature which I liked as well that I didn’t know about that I don’t think was mentioned in the article (long press the record button in control center to select the app).
However one feature that I like about stitch pics is that for web shots, it allows us to edit the webpage itself. Picsew does not have this option.
Hope the above helps!
Edit: on 31st July 2022 seems like StitchPics updated to add a export to PDF feature as well!
Is something missing from the existing iOS markup tools which are available when capturing a full web page on iOS?
I don’t get what you mean. iOS don’t have the features I’m referring to. If iOS has them why would I not use them For custom apps using a UI web view, it doesn’t have that print whole webpage to PDF option nor you being able to actually delete web elements like advertisements away like you can in the stitch pics app. You can download the apps and try it out for yourself to see what I mean. It’s free to try.