Editing RAW and ProRAW Photos Using RAW Power 3
When I decided to jump from point-and-shoot digital cameras to something more capable, I was faced with a new choice: should I capture images in RAW or JPEG format? Until that point, all my cameras shot JPEG, the imaging standard that can deliver great-looking but heavily compressed photos. RAW was better, I was told, because it encapsulates the raw data captured by the sensor without additional in-camera processing. Plus, since professionals used it (and of course I wanted to be more like the pros), I dove from the high board into deeper photographic waters. (To be clear, RAW is not an acronym; it’s written in uppercase by convention seemingly only to be parallel to JPEG, TIFF, PNG, and other image formats that are acronyms.)
RAW photos can be better—dramatically better, in some cases—than JPEG photos, but it takes some work and know-how to get them there. RAW Power, an app for macOS, iOS, and iPadOS from Gentlemen Coders, is adept at taking advantage of the options that RAW brings to photo editing. It’s also one of the few tools that properly handles the ProRAW format in the iPhone 12 Pro and iPhone 12 Pro Max, more so than even Apple’s own Photos app.
First, a disclaimer: RAW Power developer Nik Bhatt has been a guest on, and an early sponsor of, my podcast PhotoActive. He also contributed an article to TidBITS: “The Ins and Outs of Non-destructive Editing in Photos for Mac and iOS” (14 June 2019).
A JPEG, HEIF, and RAW Primer
To talk about RAW Power requires a quick explanation of RAW formats and how they differ from most of the images your typical point-and-shoot camera captures. JPEG (short for Joint Photographic Experts Group, the organization that developed it) is a file format and compression scheme designed to create good images that are small in size. That was especially important in the past when memory cards were measured in megabytes (MB), compared to today’s multi-gigabyte (GB) cards.
JPEG accomplishes its size reduction by throwing data away, a process known as lossy compression. Its algorithm determines areas of similar colors that won’t be perceived by typical human vision and blends them using fewer colors. The image data is processed in-camera, so the only photo saved is the compressed version. In most cases, because the algorithm works well, we don’t notice the compression or the smaller bit depth, which is why JPEG has remained the dominant digital photo standard for years.
Since iOS 11, the iPhone captures photos in a newer format called HEIF (High Efficiency Image Format), which also applies lossy compression. For the sake of simplicity, I’m lumping JPEG and HEIF into the same group: images processed in-camera and compressed. HEIF images aren’t as compatible as JPEG among the galaxy of image editing software, which is why there’s an option to make the iPhone’s Camera app save images as JPEG (Settings > Camera > Formats > Most Compatible). That said, I leave the option set to High Efficiency and don’t run into compatibility issues in my everyday editing apps in part because iOS usually converts HEIF images to JPEG when you export.
A RAW file, by comparison, contains only the data recorded by the image sensor. A RAW photo isn’t even an image—it’s just the ones and zeros describing the light levels for each pixel on the sensor. A RAW file is much larger than a JPEG; a single image captured with my Fujifilm X-T3 camera is around 56 MB, while the same image recorded as a JPEG is about 12 MB. (The medium-format Fujifilm GFX 100S produces 102-million-pixel RAW images that can be 200 MB each!)
There’s an in-between possibility, too—Apple ProRAW, which combines the dynamic range of RAW images with the computational photography features Apple applies when processing HEIF or JPEG images. They too are larger in size, around 25 MB each.
On the iPhone and iPad, you can shoot RAW images, but only in some third-party apps, such as Halide, Adobe Lightroom, and Manual. Starting with iOS 14.3 on the iPhone 12 Pro and iPhone 12 Pro Max, the Camera app can also optionally shoot in Apple ProRAW format.
It’s in that size difference that RAW images can be better than JPEG images: there’s much more data to work with when editing them.
And with RAW images, you will need to edit.
Editing RAW Images
When you edit a JPEG photo, you’re manipulating the brightness and colors of the pixels. Allow me an oversimplification: increasing the exposure of a dark image can shift black pixels to gray, make dark blue pixels lighter blue, and so on. The editing software uses its tools to change the appearance of those pixels (using smarter algorithms than my example).
In comparison, a RAW file, technically, doesn’t contain any pixels—it includes information about which colors the pixels should be once the image is processed. Much like photographic film that must be run through chemicals to reveal areas exposed to light, the image in a RAW file doesn’t appear until the software “develops” the file by reading the data and assigning colors to each pixel based on the information.
That sounds like a superficial difference because a JPEG and a RAW file both show up as images to us; we never see the RAW file in its native form. When we open it in the Photos app, for instance, we see the photo as colored pixels, but that’s because Photos interprets the RAW data and creates an image to view.
Why is all this important? A RAW file includes more information than just “these pixels are black and these other pixels are blue.” When camera manufacturers create a new camera model, they tailor its raw format to take advantage of, or compensate for, characteristics of the camera or sensor. For example, if they’re using a sensor that exhibits more noise at high ISO settings, the RAW file can include data that an editing app can use to minimize or remove that noise.
So, shooting in RAW provides not only more image data to work with, but also the capability to target some adjustments better than if the image was saved as a JPEG.
It can also lead to lags in even being able to edit those RAW images. Even though each company uses its own format overall—CR2 for Canon, RAF for Fujifilm, NEF for Nikon, and so on—the files generated by each camera model are unique. If you owned a Fujifilm X-E3, for instance, and replaced it with the Fujifilm X-E4, the Photos app can currently edit the X-E3 RAW files but not the X-E4 files, because Apple hasn’t added support for that model to its operating systems.
Particularly unhelpful is the fact that the manufacturers don’t publish the RAW file specifications; developers must reverse engineer each model’s format to support it. As a response, Adobe created the DNG RAW format, which is more open but not adopted by the camera companies. However, Apple’s RAW and ProRAW formats save photos as DNG files.
Editing in RAW Power
Most image editing apps can work with RAW photos, but they take a broad approach in general. For example, the controls for adjusting tone and color take advantage of the expanded dynamic range in a RAW file, but they’re still the same controls, like Exposure and Sharpening, that work with all images.
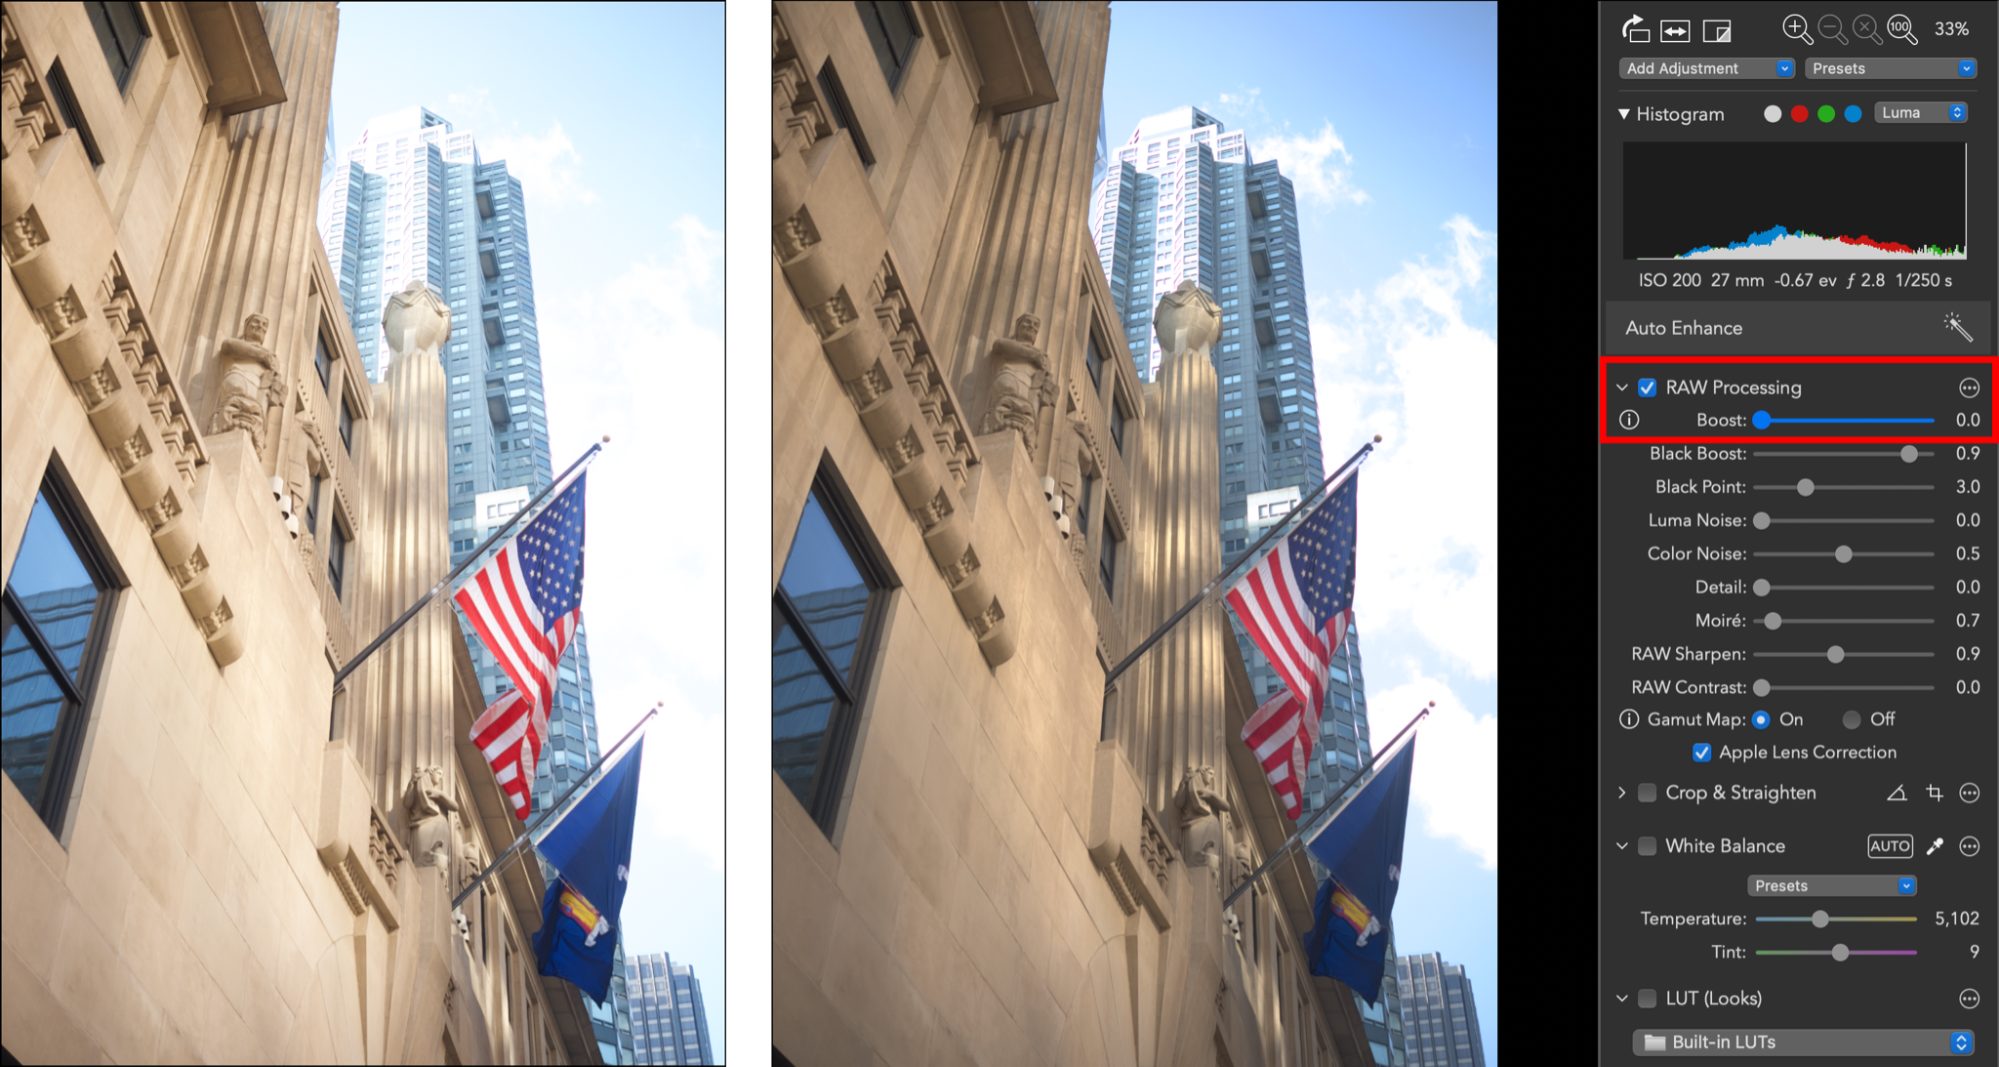
RAW Power adds image editing nuance by including additional controls that target specific RAW settings as part of the RAW decoding process. When you’re editing a RAW image, a set of RAW Processing controls appears. For example, if an image is overexposed, reducing the Boost slider turns down the exposure and recovers some detail. In the following image, it has added texture and variety to the dappled sunlight on the building and given the clouds more definition.
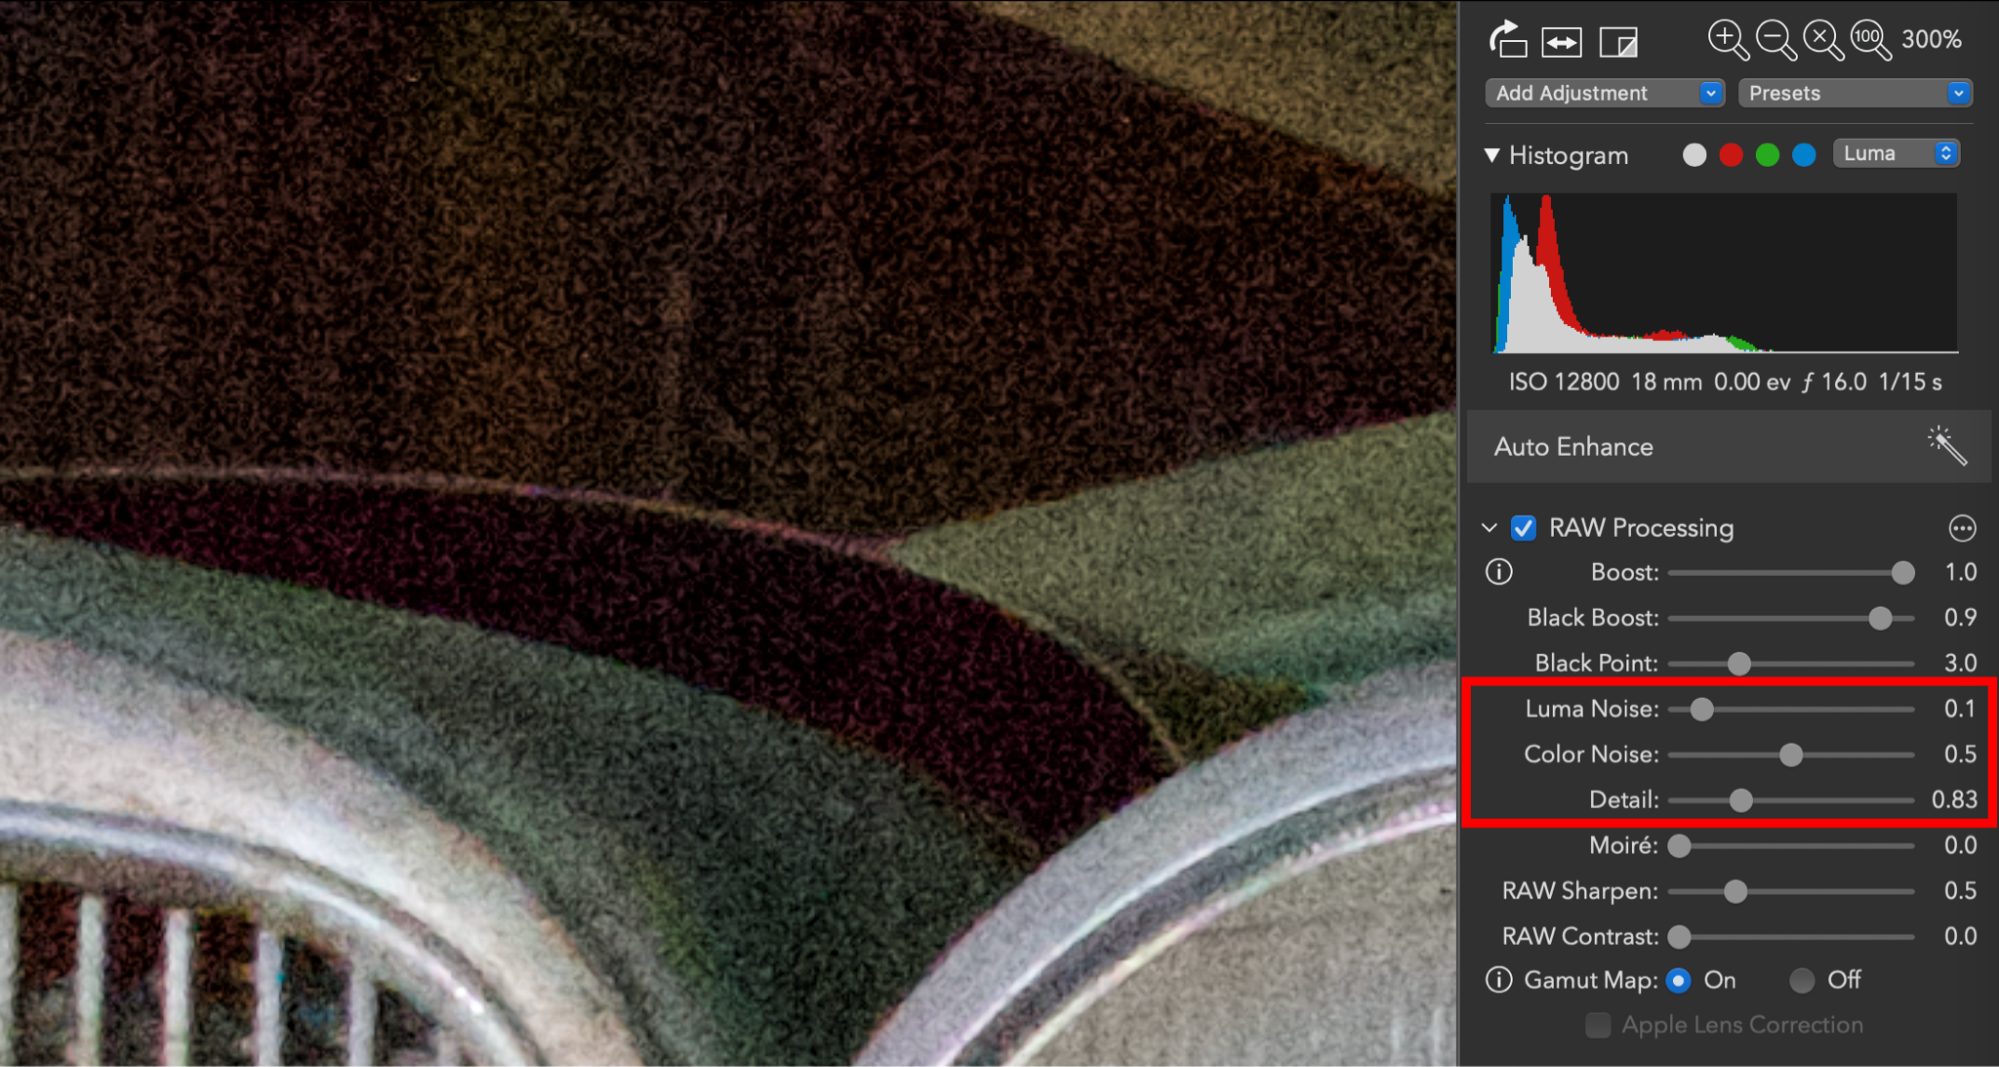
Or, let’s look at a photo that includes a lot of digital noise. This image of an old truck was shot in a dark barn, so I compensated by increasing the ISO to 12,800, which creates noise. (Higher ISO settings boost the power of the sensor’s light sensitivity, so some pixels record the wrong colors.) At 300% zoom, you can see that the photo is grainy from the noise, but take a look at the RAW Processing controls at right: the Luma Noise and Color Noise sliders already have settings, based on what RAW Power has read in the RAW file.
If I reduce the two sliders to 0.0, you get a better idea of what the sensor recorded—it’s an explosion of rainbow colors!
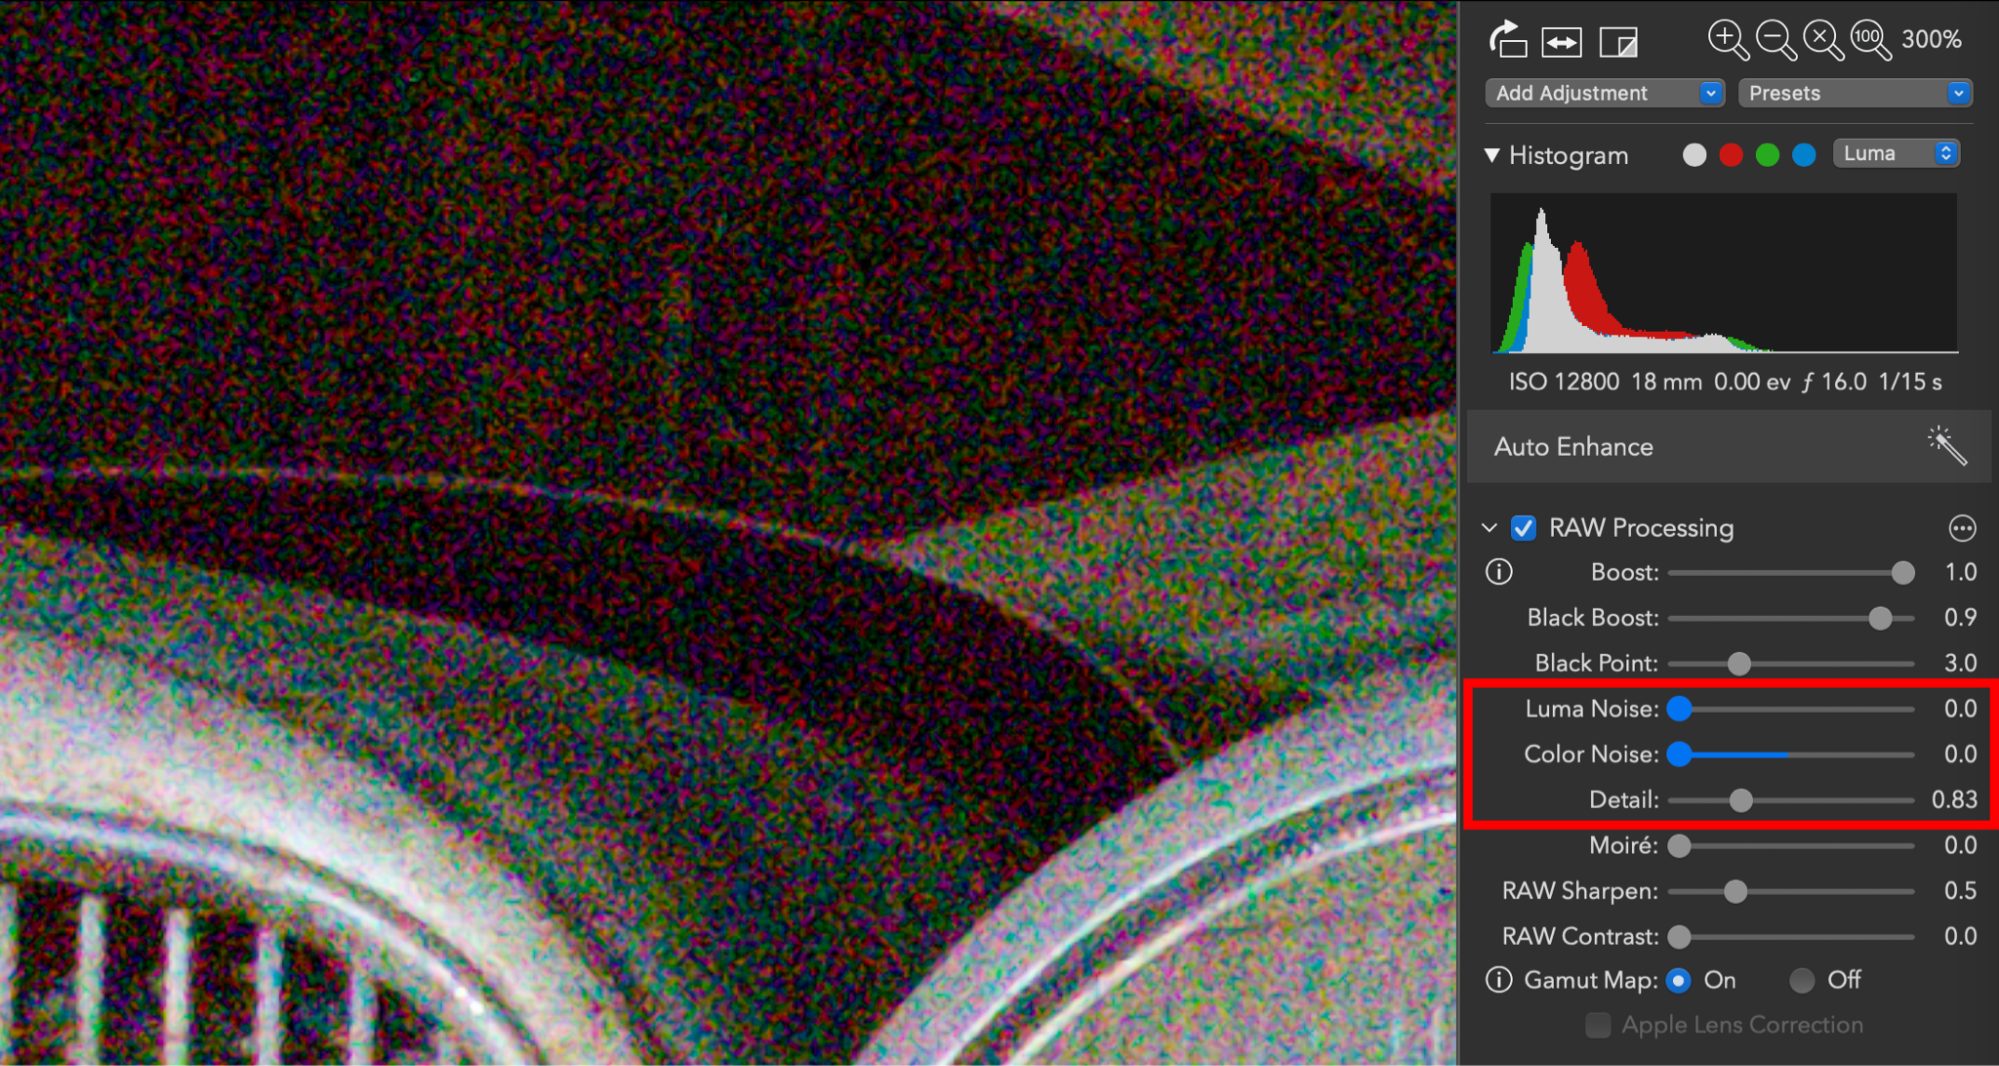
The default Color Noise setting has eliminated that kaleidoscope, but I can increase the Luma Noise slider to minimize a lot of the other noise.

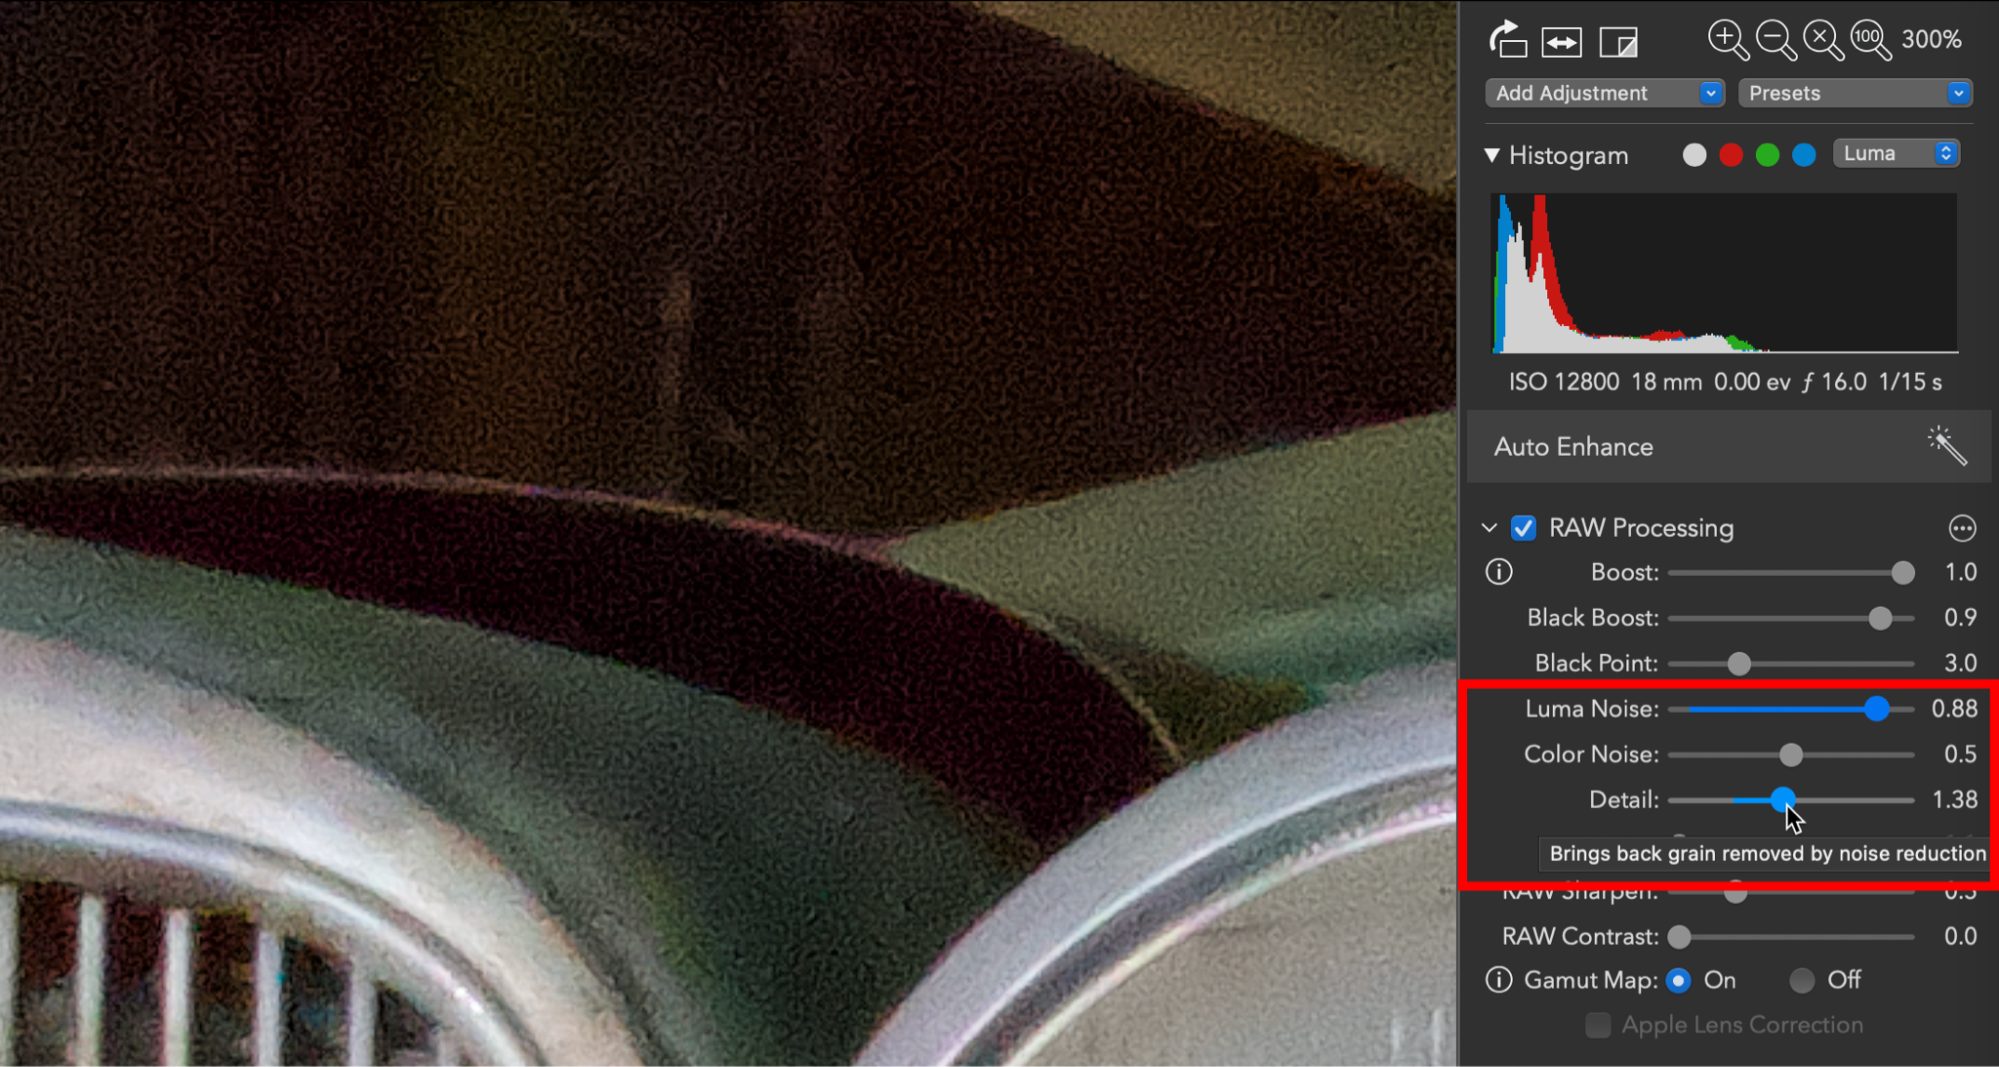
The side effect of noise compensation is that images tend to gain a soft or pastel appearance. This is where it’s important to point out RAW Power’s helpful tooltips, which appear when you hover the pointer over a control. Doing so reveals that the Detail slider “Brings back grain removed by noise reduction,” which wasn’t my first assumption based on the tool’s name. Increasing the Detail amount adds definition (and some noise), but between it and Luma Noise, I can find a good compromise that makes the image look more natural. Granted, this photo is an extreme example of dealing with noise shot with an older camera (a Canon EOS M); more recent cameras do a better job with noise, but you’ll still benefit from these adjustments.
Other RAW Processing controls affect sharpening, contrast, and black levels based on the RAW-specific information in the image file. Practically speaking, they give you more refinement over those adjustments, independent of the Sharpen, Contrast, and Levels or Curves tools, respectively. The Gamut Map option prevents saturated colors from clipping (going to 100% saturation, such as when something bright red appears unnaturally intense).
Apple ProRAW and RAW Power
This brings us to Apple’s ProRAW format. What’s unique about ProRAW is that it incorporates Apple’s computational photography technology into RAW shooting. When you take a normal photo using an iPhone, it captures several exposures within milliseconds and blends them together to create an overall pleasing composition; bright areas that would otherwise be overexposed are balanced with dark areas that retain detail. It helps overcome the difficulties faced by small sensors.
But in that case, there’s no single “source” image that represents what the sensor recorded, in the same way a RAW file is. You end up with a processed patchwork of several shots (which, don’t get me wrong, usually looks great).
Apple ProRAW combines the digital-negative aspect of RAW shooting with computational photography in a clever way. Apple’s iOS and iPadOS devices have been able to shoot RAW photos for several years—albeit only using third-party apps—which are saved in Adobe’s DNG file format. ProRAW builds on that by adding a new feature called local tone mapping to the DNG specification. When you shoot using ProRAW, you get the expanded dynamic range and additional image information of a RAW file as a base, and then the Camera app uses its computational analysis to note changes in selected areas of the image.
(Interestingly, Apple still develops the RAW data—a process called demosaicing—so that base isn’t quite as pure as a RAW image saved by most cameras. Kirk McElhearn covers this in more detail in “Apple’s New ProRAW Photo Format Is Neither Pro nor Raw.”)
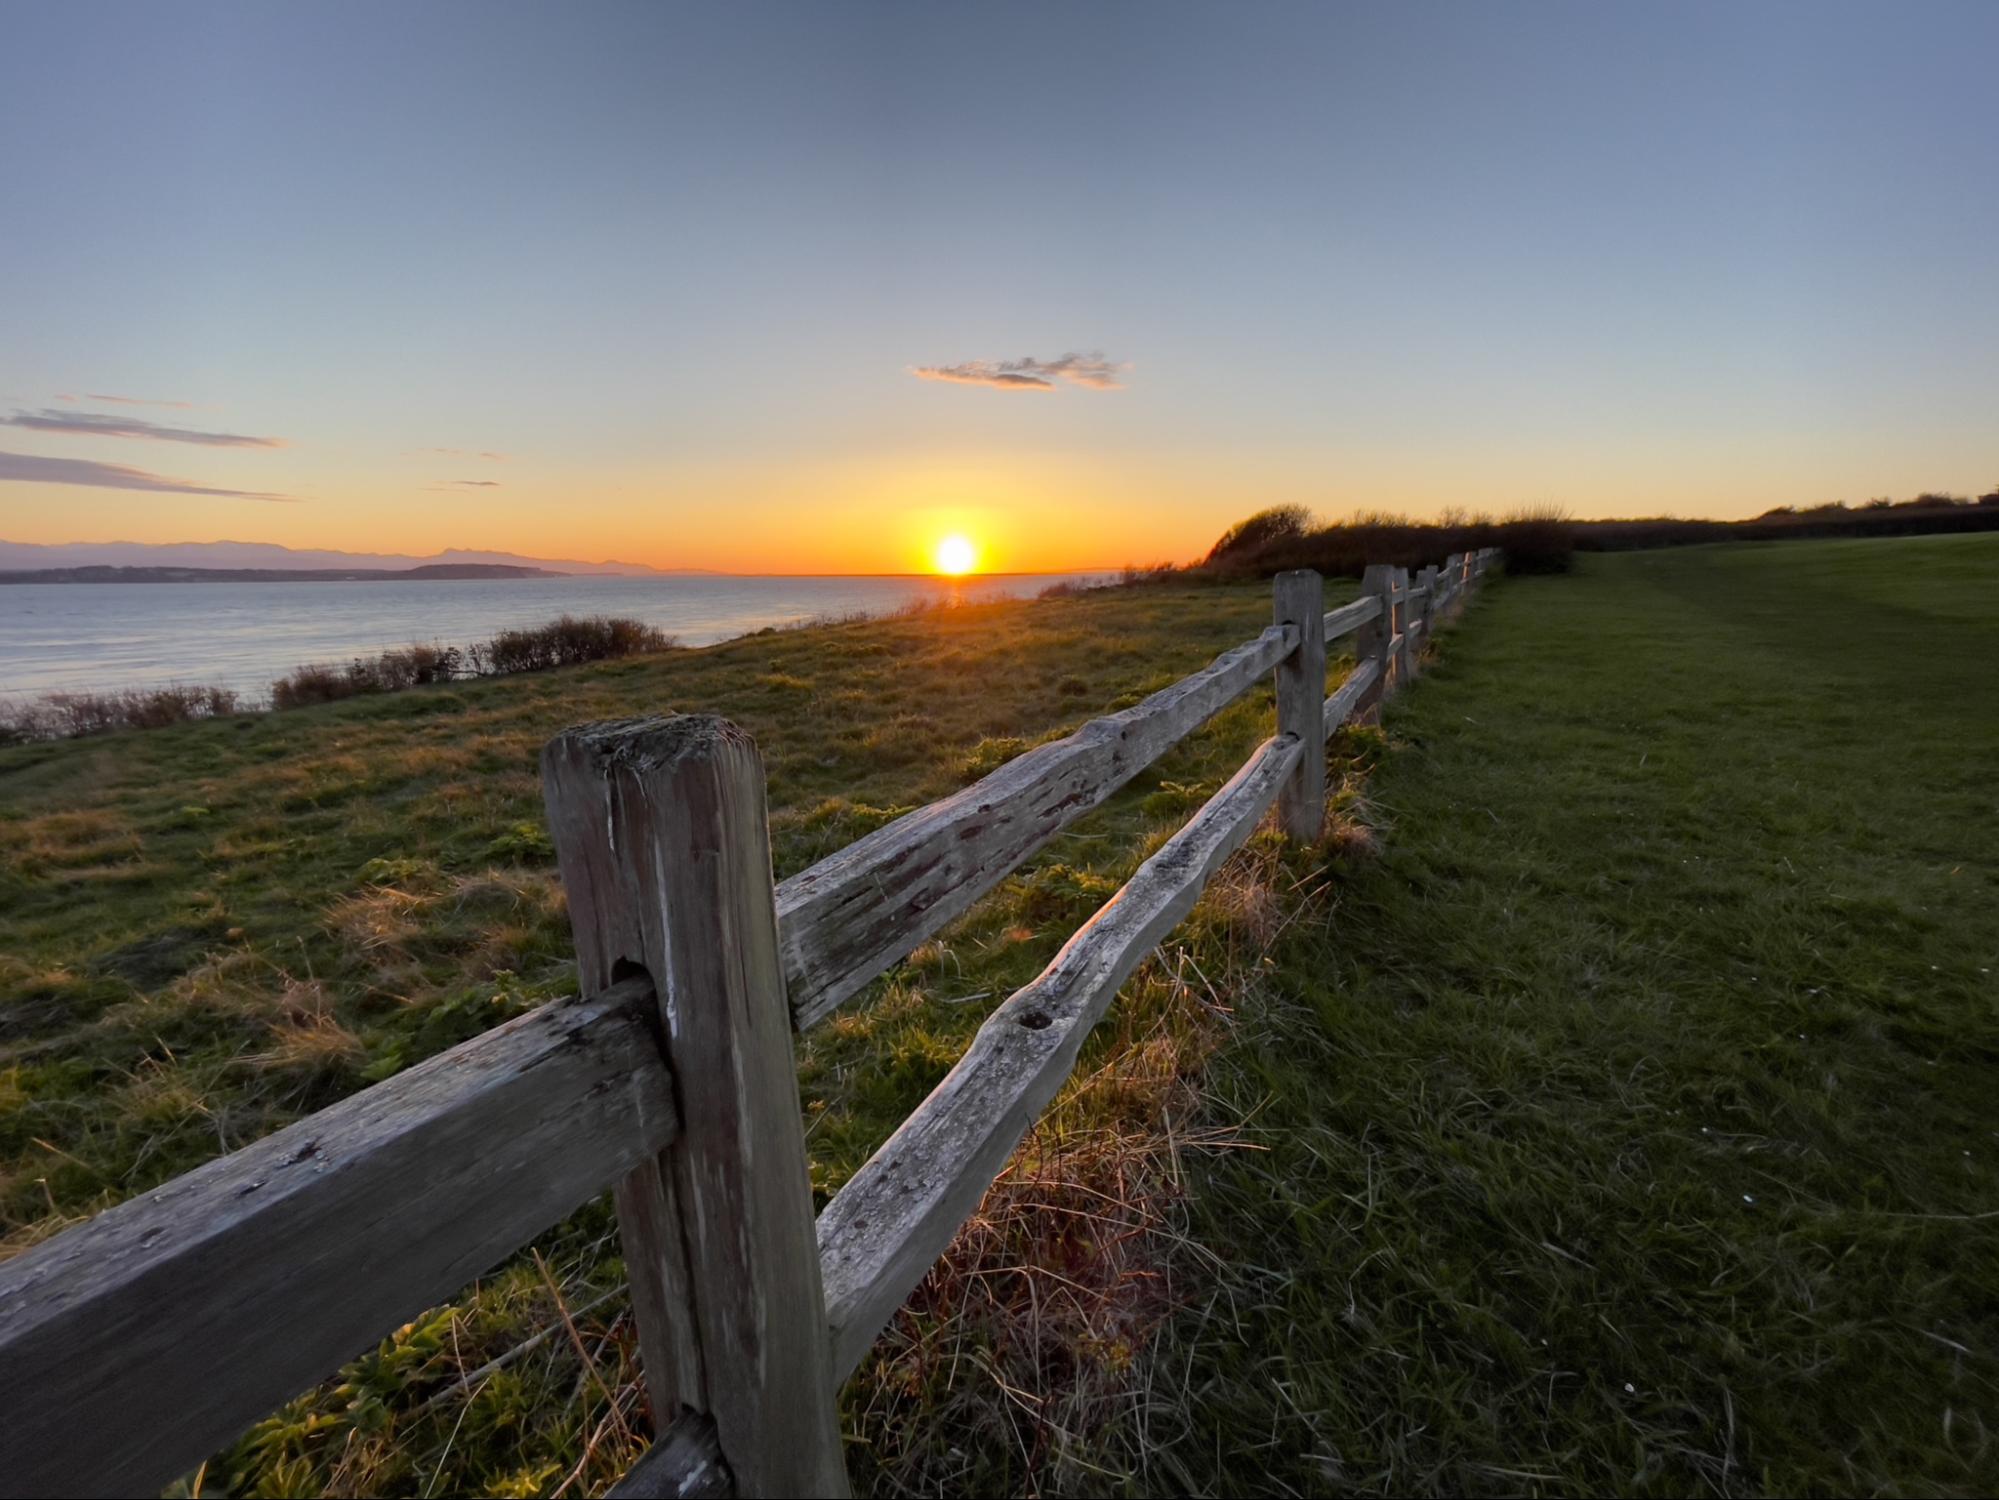
For example, the following photo was captured with an iPhone 12 Pro by enabling the RAW option in the Camera app (which activates ProRAW). It’s a challenging shot for a camera because the lens is pointed at the sun, which is still bright even in the last minutes of sunset, while the foreground is comparatively dark. The iPhone renders it beautifully, maintaining color in the sky and the orange and yellow around the sun.
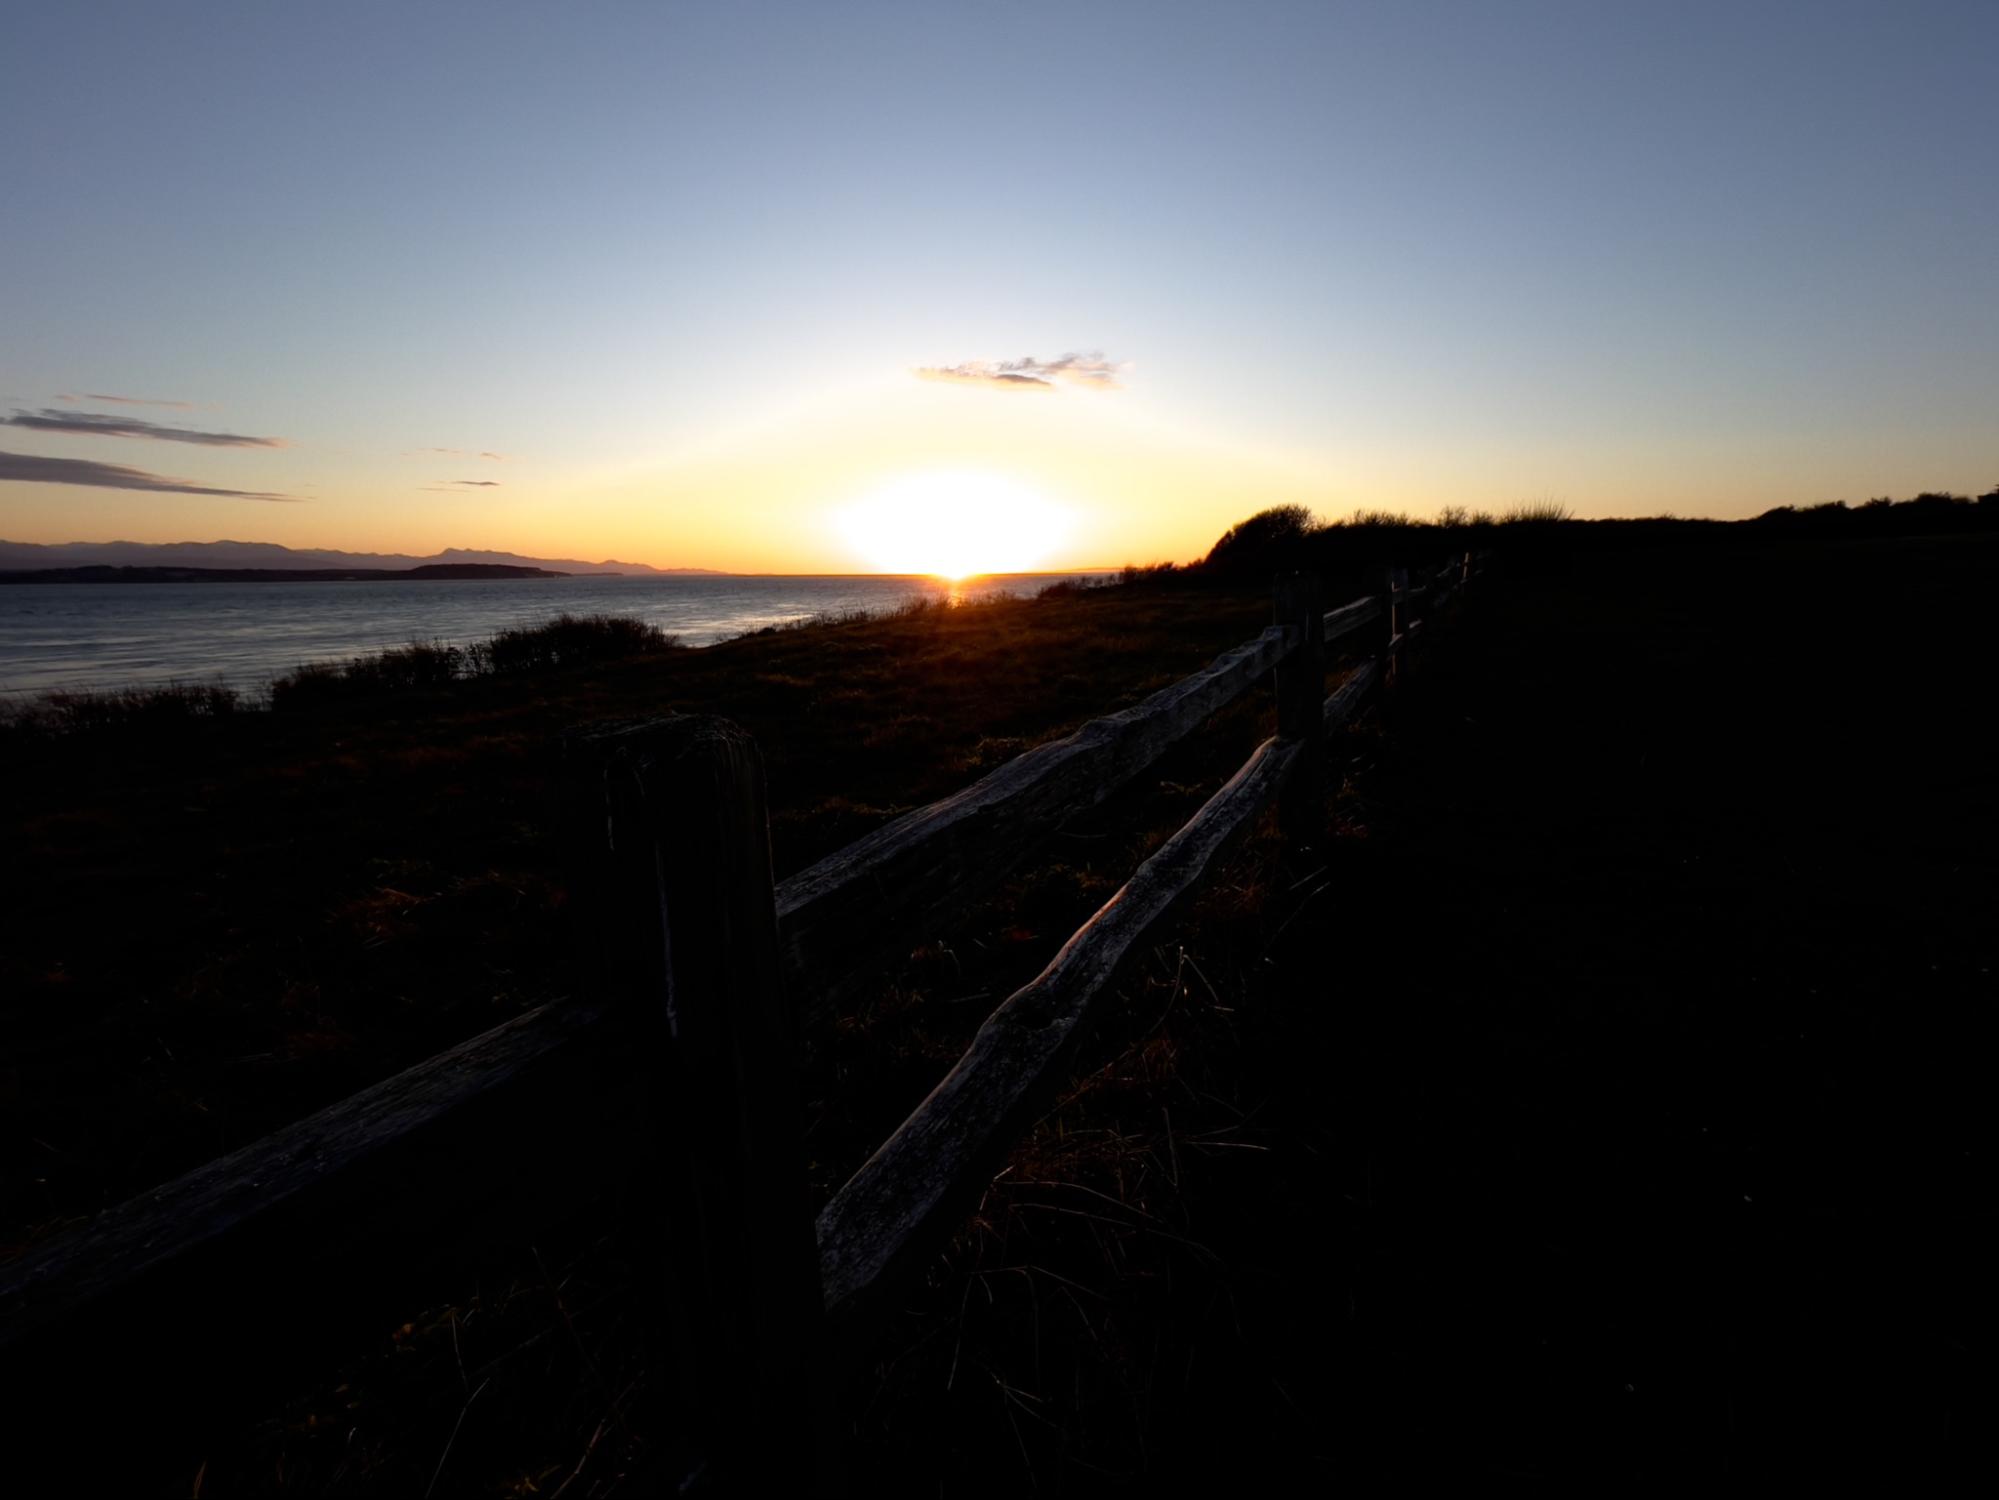
But those details are there because of ProRAW’s local tone mapping. If we view just the base raw image data, the same photo looks dramatically different. In an app that doesn’t yet fully support ProRAW, here’s what you would see—again, this is the same file as the one above.
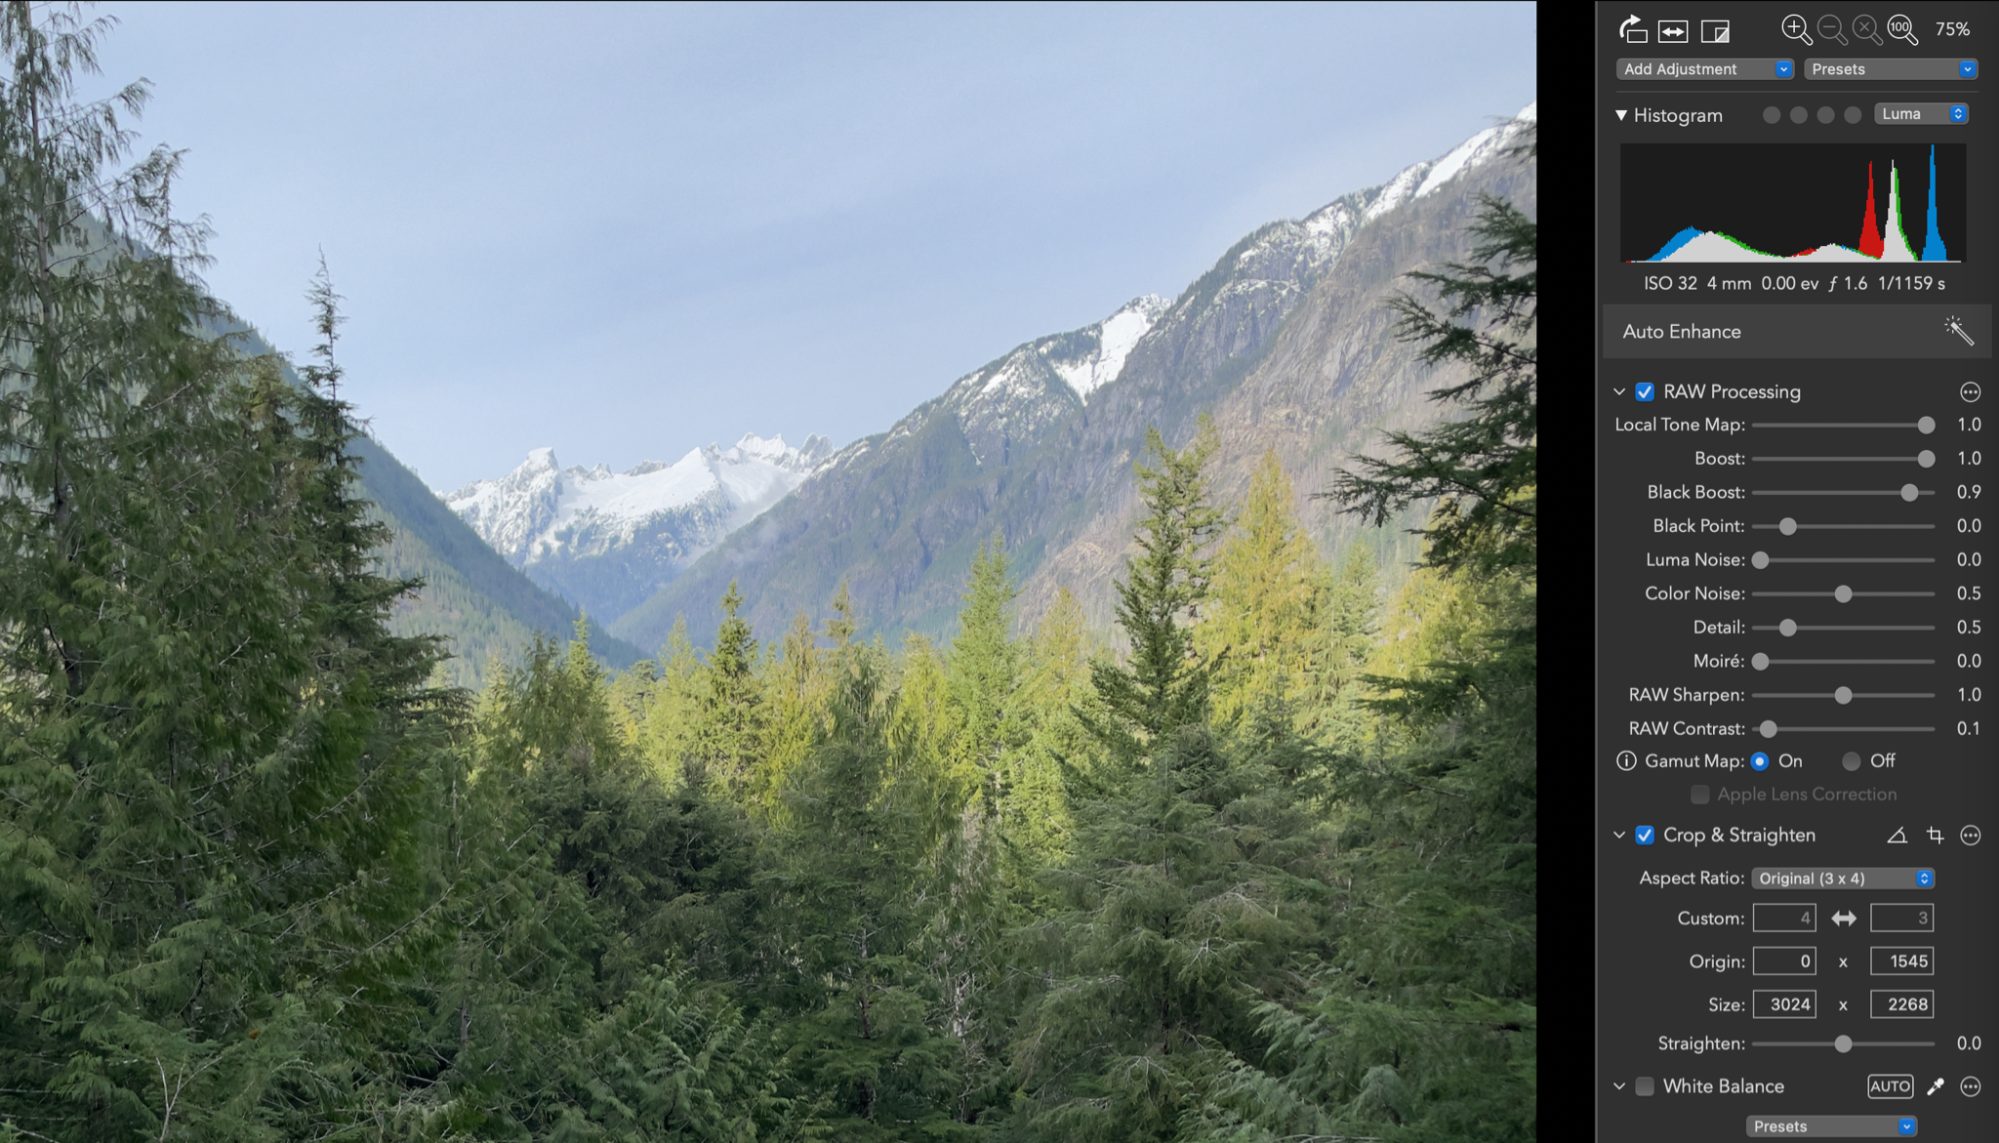
RAW Power was one of the first apps to handle ProRAW files properly, thanks to the addition of a Local Tone Map slider. Apple’s image processing attempts to balance everything as evenly as it can, which sometimes gives a flat look that you may not always want. Local Tone Map reduces the effect. In the following image, the trees in the foreground are well exposed, but I don’t want that much attention paid to them. The snow-capped mountain in the center of the frame is also faded and doesn’t stand out the way I saw it when I took the shot.
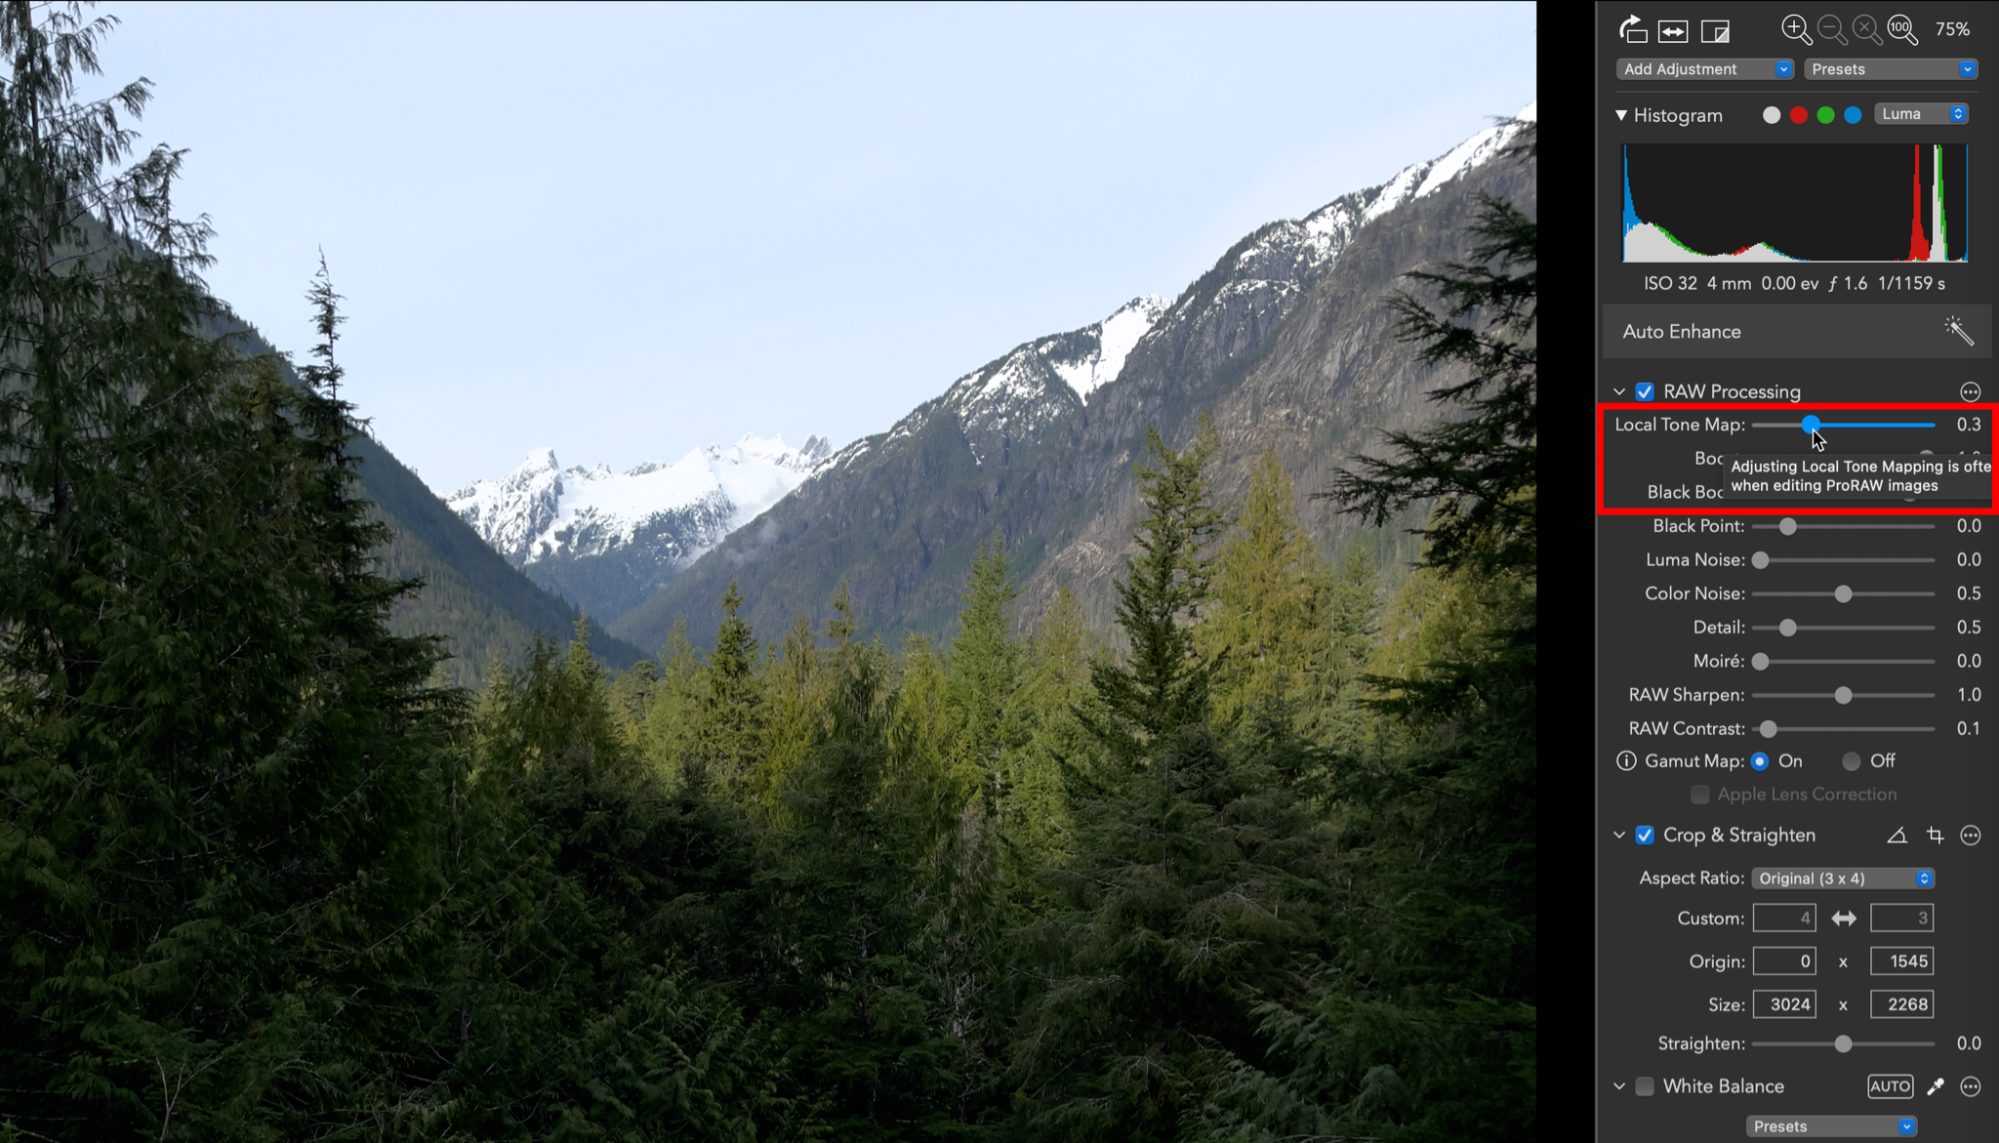
Reducing the Local Tone Map slider from 1.0 to 0.3 darkens the immediate foreground, making the trees more of a framing element for the snowy peak.
Extended RAW Camera Support
Just as important as how RAW Power edits photos is what it edits. I mentioned earlier that camera companies create new RAW file formats for every camera, and to make things annoying, they consider those formats proprietary and don’t share the specifications. If you’ve ever bought a just-released camera and discovered that the majority of photo editors can’t open its RAW files, that’s why: the developers don’t have the information they need to interpret the new formats correctly. It can take weeks or months for new cameras to be supported, a problem that has been getting worse on Apple devices in recent years.
Apple stores the RAW decoding data at the system level, and supporting new cameras has apparently not been a priority for the company. Did you buy a Fujifilm X-E4 when it was released in March? You’re still waiting for Photos to support it. GoPro cameras have never been supported. And because Photos and RAW Power (and many other apps) use Apple’s built-in RAW engine, that’s a bottleneck.
Extended RAW support in RAW Power 3.3 breaks that logjam, adding support for various new Fujifilm, GoPro, Olympus, Pentax, Panasonic, and Sony cameras. The Fujifilm variants also include support for compressed RAW images (so the files don’t occupy as much space on disk).
Apple Photos Library Integration
RAW Power doesn’t try to manage your photo library, as an app like Adobe Lightroom does. Instead, it ties into your existing Photos library. If you use iCloud Photos, that makes your photos available in the RAW Power app running on iOS and iPadOS devices.
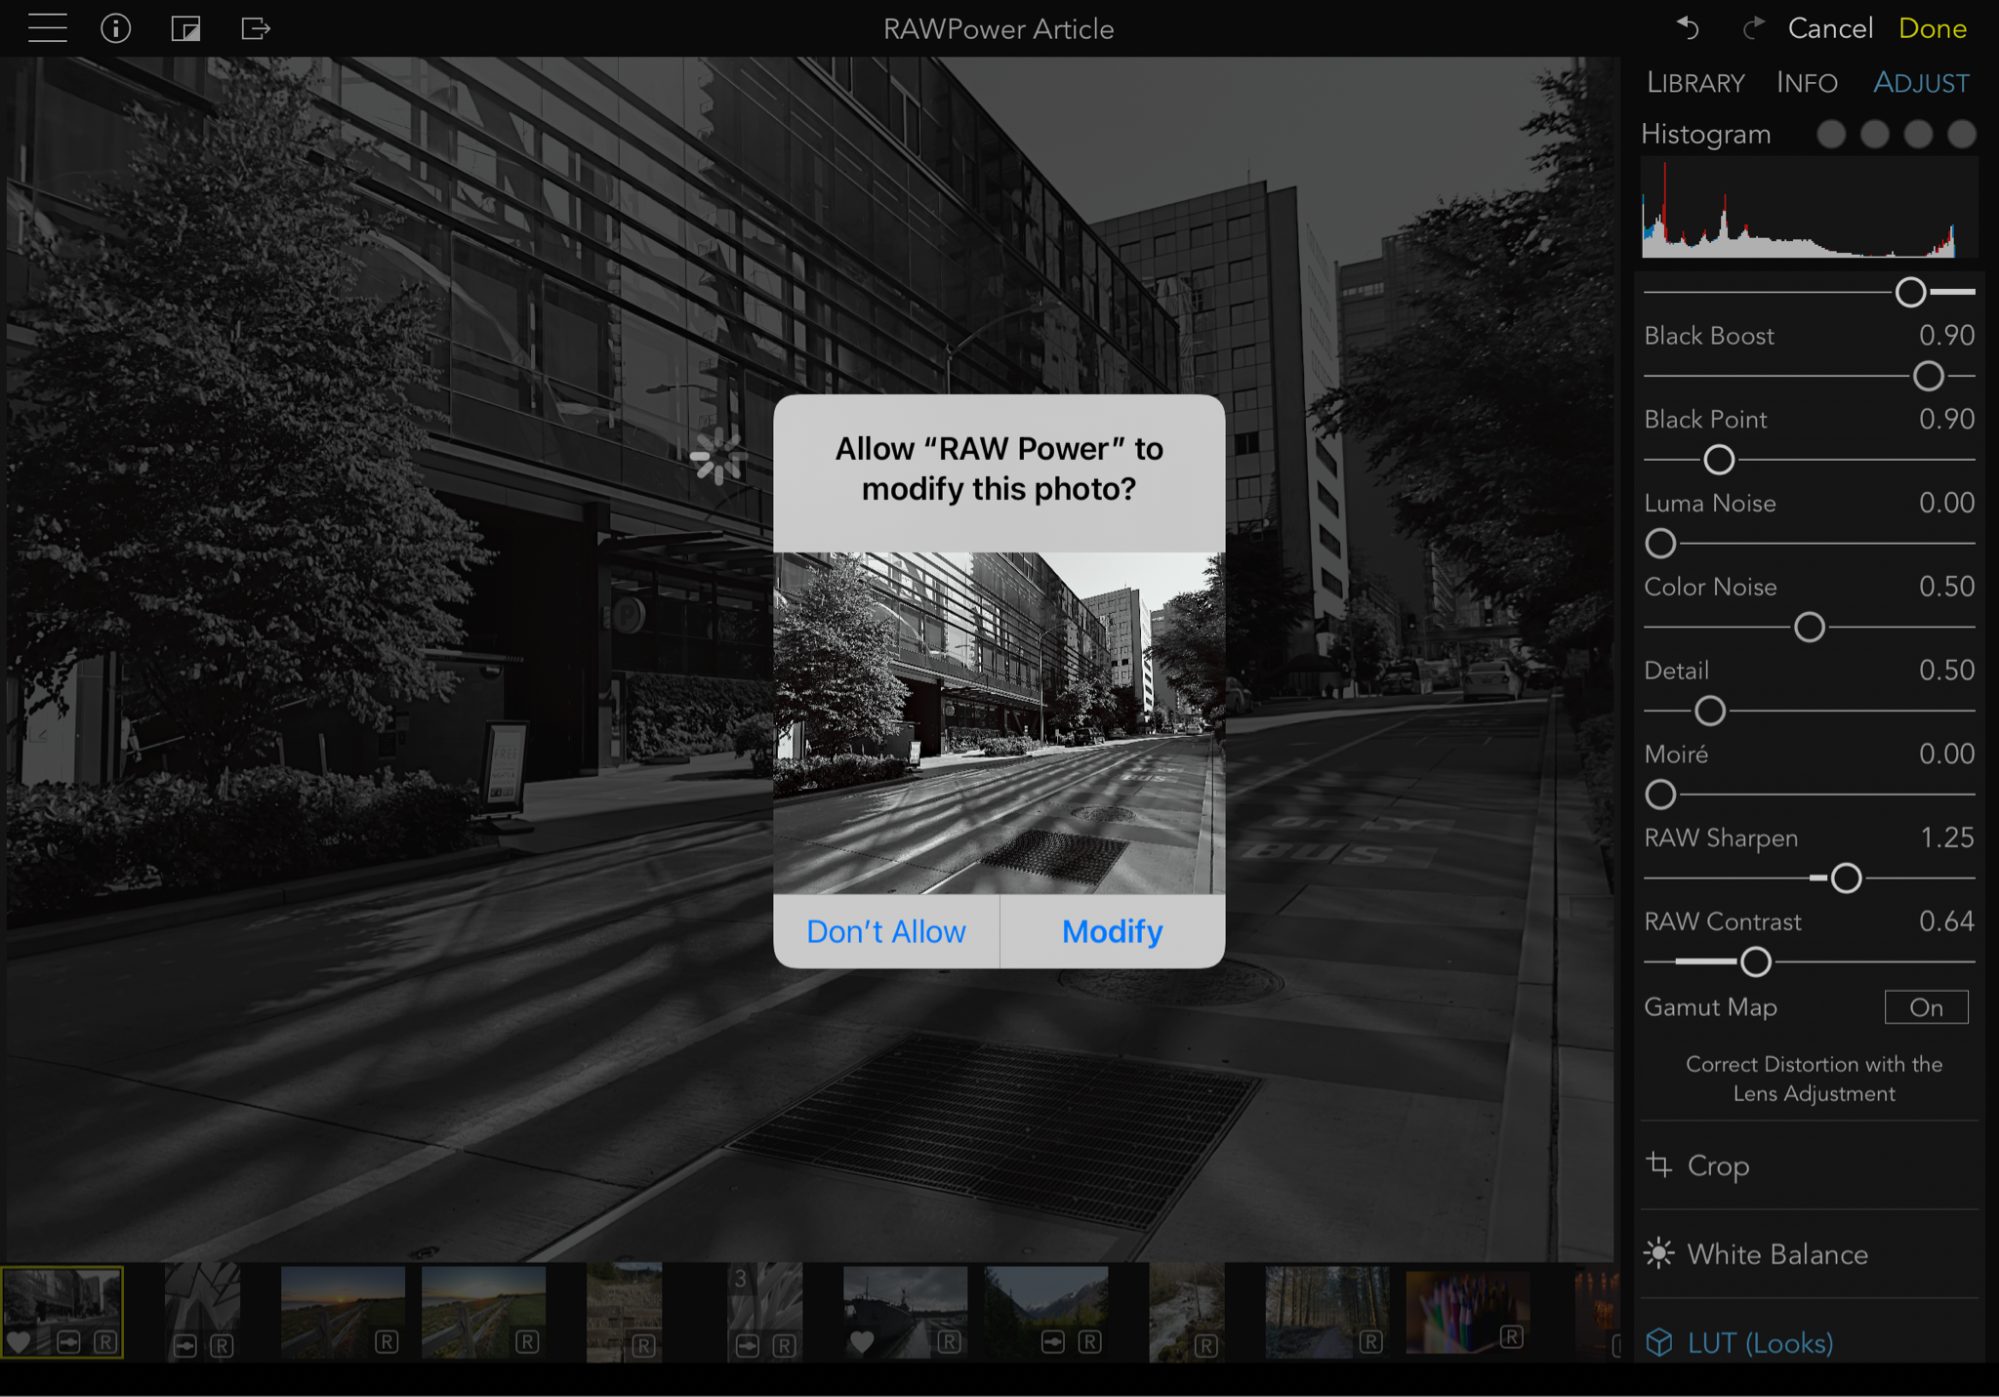
After you edit an image from your Photos library, RAW Power needs your permission to save the modified photo back to the library. You can always revert to the original in Photos if you end up not liking the edited version, but even better, if you re-edit the image in RAW Power, all the edits are saved such that you can go back to where you left off. In the past, Photos would simply save a finished edited version, which meant you had to start over from scratch if you chose to revisit the image. (Some third-party apps still work this way.)
Don’t use Photos? You can open images directly in RAW Power from the Finder in macOS and the Files app in iOS/iPadOS. RAW Power on the iPhone and iPad can also import images directly from an attached SD card, avoiding the old round-trip hassle of saving files to the Camera Roll first.
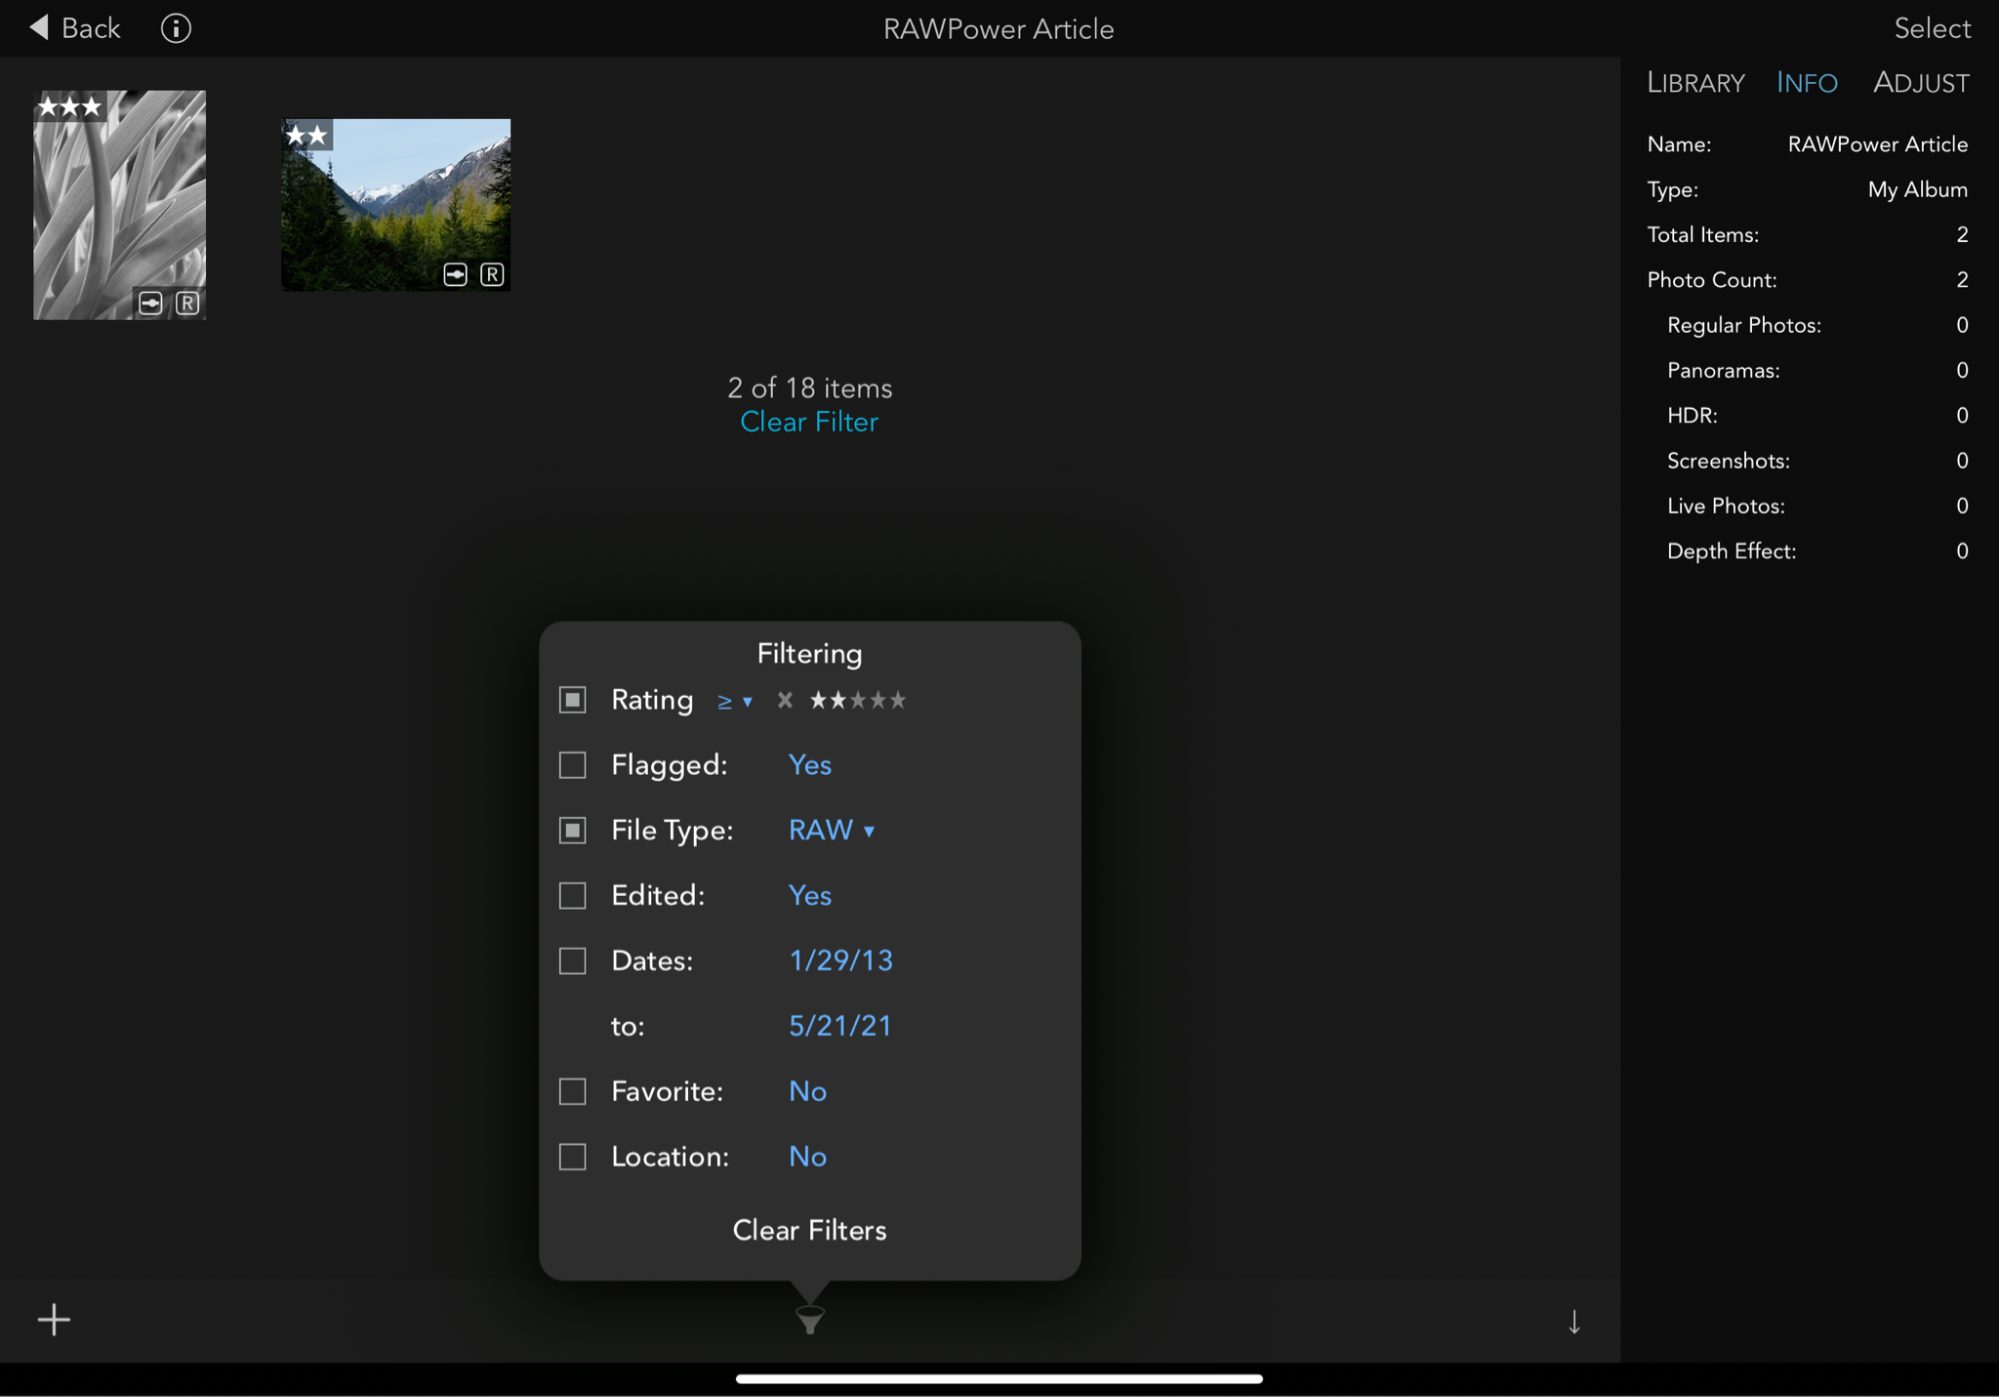
RAW Power’s integration with the Photos library is the most convenient approach, though. Also, the Photos app long ago abandoned star ratings as a way to help you surface which photos are better than others; instead, there’s now just the capability to assign a Favorite flag to images. If you prefer the flexibility of star ratings, RAW Power includes them and syncs them across devices. I’ve always found it to be helpful to be able to filter the library or an album and see, for example, all photos you’ve marked as 2 stars or higher that are RAW files.
More Power to the RAW Power
I’ve focused primarily on the RAW editing features of RAW Power, but those are just part of the entire package. It also includes tools for adjusting levels and curves, manipulating the HSL (hue, saturation, and luminance) of individual colors, black-and-white conversion, cropping, and more. There’s also a set of LUTs (lookup tables) for applying preset looks, including film simulations and exclusive looks from Lutify.me. You can also import other LUTs.
Developer Nik Bhatt actively adds features; the recent 3.3 release introduced a Lens Correction tool for correcting lens distortion and vignetting (as seen often in wide-angle lenses, for instance), which can semi-automatically apply the same adjustment to other photos shot with the same lens at approximately the same focal lengths. A new Split Toning tool adjusts the color of highlights and shadows for creative effects.
It’s also important to note that RAW Power mirrors its features across the macOS, iOS, and iPadOS versions. It’s easy to start an edit on the Mac, save it so Photos syncs the adjustments among devices, and then pick the image up later on an iPad or iPhone.
The macOS version of RAW Power, which is optimized to work on both Intel- and M1-based Macs, costs $39.99 through the Mac App Store. A free trial with a few limitations is also available. The iOS and iPadOS app is available as a free unlimited free trial mode, with some features disabled. Unlocking those costs $9.99.
Thanks for the article, great to get an in-depth look at RAW Power. I’ve been keeping my eye on it for years – I’m still using Aperture (!) and have not settled on what I will migrate to. The power of the RAW tools it provides is very enticing. It’s great that RAW Power 3 has added support for both the Photos Library and file browsing. Photos management is a big part (the main part?) of what I use Aperture for, so I’m hoping that side of RAW Power develops a bit, and then it would be perfect for my needs. The easy to use and powerful editing tools are there. Hierarchical keyword support and comparing images side-by-side for selecting/culling would make it pretty much ideal for me.
Tried the iOS version of RAWpower and it immediately became my favorite photo editing tool on the iOS platforms. I did not hesitate to pay the fee for this app and was glad to see that a single license covers both my iPhone and my iPad.
However - when I looked at the MacOS version I was surprised to find that it requires an additional fee. 30-something bucks won’t drive me to bankruptcy but I already paid for this app - why pay again? Well… That’s not the only app that requires separate payments for iOS and MacOS versions. Same was the case with Fantastical until a little over a year ago when they adopted the (much preferred IMHO) universal-license approach where one pays for a license to use their products across all OS types (they also bundled their contacts management apps into this same license). Notability is another (bad) example as they too charge separately for their iOS and MacOS versions, which is the reason I never purchased their MacOS app.
I’m using the Adobe Photographer’s suite and paying $20 a month for Lightroom and Photoshop plus 1TB storage on adobe cloud. That allows me to use the Adobe tools on all OS types on one license. Though their iOS apps are a far cry from RAWpower, their MacOS tools are great, offer RAW processing, and don’t require an additional license. So I probably won’t be using RAWpower on my Mac, only on my iPad, unless the licensing approach changes.
Yeah, that’s the puzzle of payment models. Developing apps for both platforms requires more work, so it’s not unreasonable to charge for them separately. Adobe’s subscription model works because you just keep paying every month (and because they’re a giant company that can spread around the profits among the various dev teams). So you end up paying more for a subscription model than if you were to just buy RAW Power on the Mac directly.
However, I don’t think there’s a right answer. You may be fine using the iOS versions, and maybe it makes you later decide to get the Mac version. Either way you’ve supported an independent developer, so that’s cool. And, like a lot of us, you’re also supporting Adobe and their development efforts, because there are things that Lightroom and Photoshop do well that RAW Power doesn’t.
Thank you for the article, Jeff. In it you said:
I have noticed that successive iPhones (6 & 12) have difficulty displaying (and I think recording) the intense red of poppies. They seem to lose detail, they are just a red blob. Your comment suggests this might be a gamut issue. Please can you suggest where I could learn more about this in the hope of finding / creating a fix / workaround?