Upgrade Your File Transfer Security with Encryption Keys
One of the oldest still-working protocols on the Internet is FTP (File Transfer Protocol). Designed in the net’s earliest days, FTP never concerned itself with security. Later standards addressed this limitation by adding encryption, although insecure FTP remains in widespread use.
There’s FTP over SSL/TLS, which uses a digital certificate of the same type that secures Web sites—but which is hard to configure unless you run a server and can work through the configuration details at a low level. At one point, WebDAV plus HTTPS seemed like a solution: a WebDAV-enabled Web server allows file transfer and can offer the equivalent of FTP and HTTPS as a solution. But it’s funky to set up and also often requires direct Web server configuration access. (If your Web host provides it, however, consider using it!)

For many of us, SFTP (Secure FTP) turned out to be the best solution for secure file transfer. SFTP is not actually a secure evolution of FTP but is instead part of the SSH (Secure Shell) remote access service. SSH replaced the Telnet remote login service (also unencrypted like FTP) with a more sophisticated, encrypted approach.
SFTP is often used with a password, but it can be set up to work with a pair of stored encryption keys. Making this relatively minor change improves your account security immensely: to log in to your server, someone would need to obtain a private key stored only on your computer. Nothing can be intercepted or extracted from your communications, and you can’t be fooled into revealing the key because you never enter it anywhere like you would a password.
If you have a hosting account that lets you access a Unix home directory for your account for file transfer, you should be able to set up SFTP with a private key without logging in via a terminal or command-line session at all. It’s a little easier to do in a terminal session, so I’ll show you that way too.
While some of the steps required to set up private-key access may seem daunting or technical, this is a one-time setup. Once you’re done, you won’t ever have to mess with it—or have weak security—again. (That said, if you buy a new Mac and don’t migrate your user account to it, you might have to repeat some of these steps; at best, you can just copy a file.)
Why switch from simple passwords to private-key access? Because the Internet is more scary and insecure than ever. Recently, someone broke into my hosted server and installed Bitcoin mining software. With nearly 30 years of experience managing Internet servers, you would think I had learned the necessary security lessons by now. The mistake was that I had long ago set my dad up with an account and password, and he probably reused the password years back on some other site, from which it was stolen. (There are no known hacks for the version of Linux I run or its supporting software that would allow a direct compromise. And only my dad’s account was cracked.)
As a result, I decided to disable all password-based terminal and SFTP sessions. It was an easy decision since I’m the only one who logs into the server remotely, and only a couple of family members need file transfer capability.
The steps to shift to private-key–secured connections are straightforward. I provide all the recipes you need to follow to create a paired set of encryption keys and copy the public key to the correct spot within your home directory on the server. As a bonus, if you log in via a terminal, those SSH sessions will now work password-free, too.
Step 1: Create a Set of Keys
The simplest form of key-based SSH authentication relies on public key cryptography, which creates two linked keys, one public and the other private. You must keep the private key secret, and it should typically never leave your computer. In contrast, you can freely share and even publish the public key. The public key can be used to encrypt messages that only the possessor of the linked private key can decipher, but it can also be used to verify definitively that a message (or file or app) was digitally signed by the private key’s owner.
With SSH, you generate a public/private pair. The private key stays on your Mac; you copy the corresponding public key to your account on a server. When you start an SFTP (or SSH) session, your Mac and the SSH server pass messages back and forth to prove each other’s identity to each other. That includes signing messages with their respective private keys that the other validates with the public key they possess for the other party.
This happens automatically; no management is required except when you first connect to the server, described in the next section. (When using SSH from the terminal, the ssh command-line app automatically tries the public keys first if the server accepts them.)
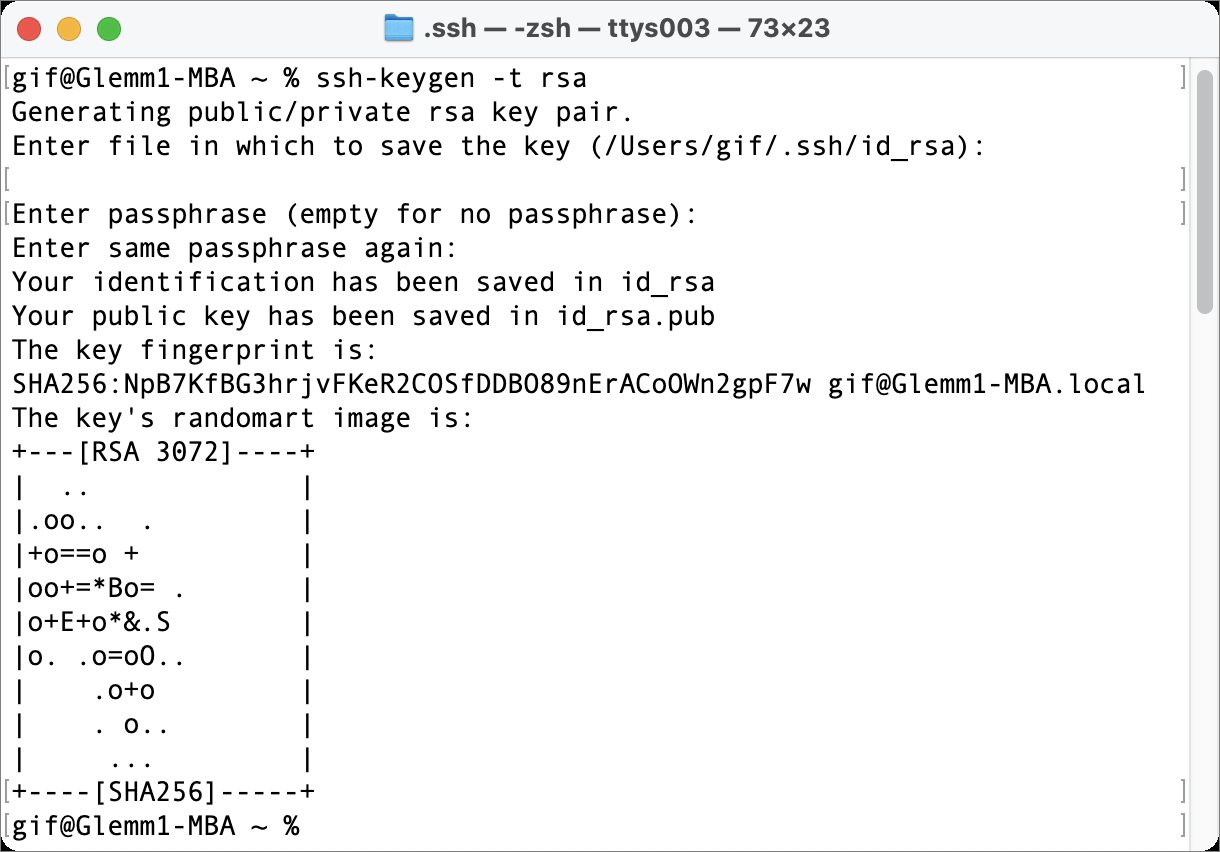
Here’s how to create the keys:
- Launch Terminal on your Mac.
- Type or copy the following exactly and press Return:
ssh-keygen -t rsa. - The
ssh-keygenprogram prompts you for a location to save the file:Enter file in which to save the key (/Users/gif/.ssh/id_rsa):. Press Return to save the file in a hidden.sshdirectory inside your home directory. (You can specify a different path and name, but that’s not necessary unless you’re creating multiple keys.) - The
ssh-keygenprogram prompts you to enter a passphrase. This isn’t needed and won’t interact well with most Mac file transfer apps. Press Return. When prompted to verify, simply press Return again.
A few lines of information appear that are only of interest to people working with others to use these keys; you can ignore them. Your keys are now generated as id_rsa (the private key) and id_rsa.pub (the public key).
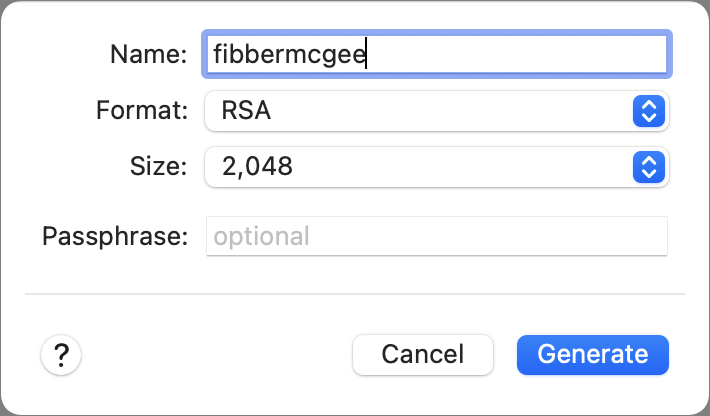
If you use Panic’s Transmit, you can skip the steps above and generate a key directly within the app:
- Launch Transmit and choose Transmit > Preferences > Keys.
- Click the + at the lower-left corner and choose Generate Key.
- Name the key. Leave the format set to RSA. You can optionally increase the Size setting from 2,048 to 4,096 or 8,192. That increases the strength of the encryption, but 2,048 is fine. Don’t enter a passphrase.
- Click Generate.

- Click Copy Public Key for use in both sets of instructions below instead of copying the text from a file stored on your Mac.
If you connect from multiple Macs, you could repeat the procedure above and then copy each Mac’s public key to the server in the next section. However, if all your Macs are under your control, it’s secure enough to use the same key pair across all of them. Simply copy the generated id_rsa and id_rsa.pub keys to each Mac: you can use a USB drive, a network connection, screen sharing, or what have you but never email private keys—email exists in too many places. You may need to create an .ssh folder in /Users/username/ on Macs where you haven’t yet interacted with SSH.
With the keys generated, you can copy them to your server account.
Step 2: Transfer Your Public Key to Your Server Account
In this next operation, you copy the public key to your server. If you have only file transfer access:
- Use your file transfer app to view your home directory on the server, which is usually a path like
/home/glennfor a shortcut like~glennf/. - In that view, create a directory named
.ssh(that’s ssh with a period before it). - Use the app to set permissions on the directory to be owned by your account and only readable, writable, and executable (required to view the contents of a folder in Unix). Group and world permissions should all be off. (If you don’t see the
.sshdirectory, check the setting in your app to show hidden directories and files; items beginning with a period are often hidden in lists.)

- On your Mac, open the
id_rsa.pubfile in your .ssh folder. (In the Finder, you can press Command-G and then enter~/.ssh/to navigate to that folder.) You should be able to open it in a text editor like BBEdit or even TextEdit. - Copy the contents of
id_rsa.pub(an example is below this list) and paste it into a new text file. - Name that second text file
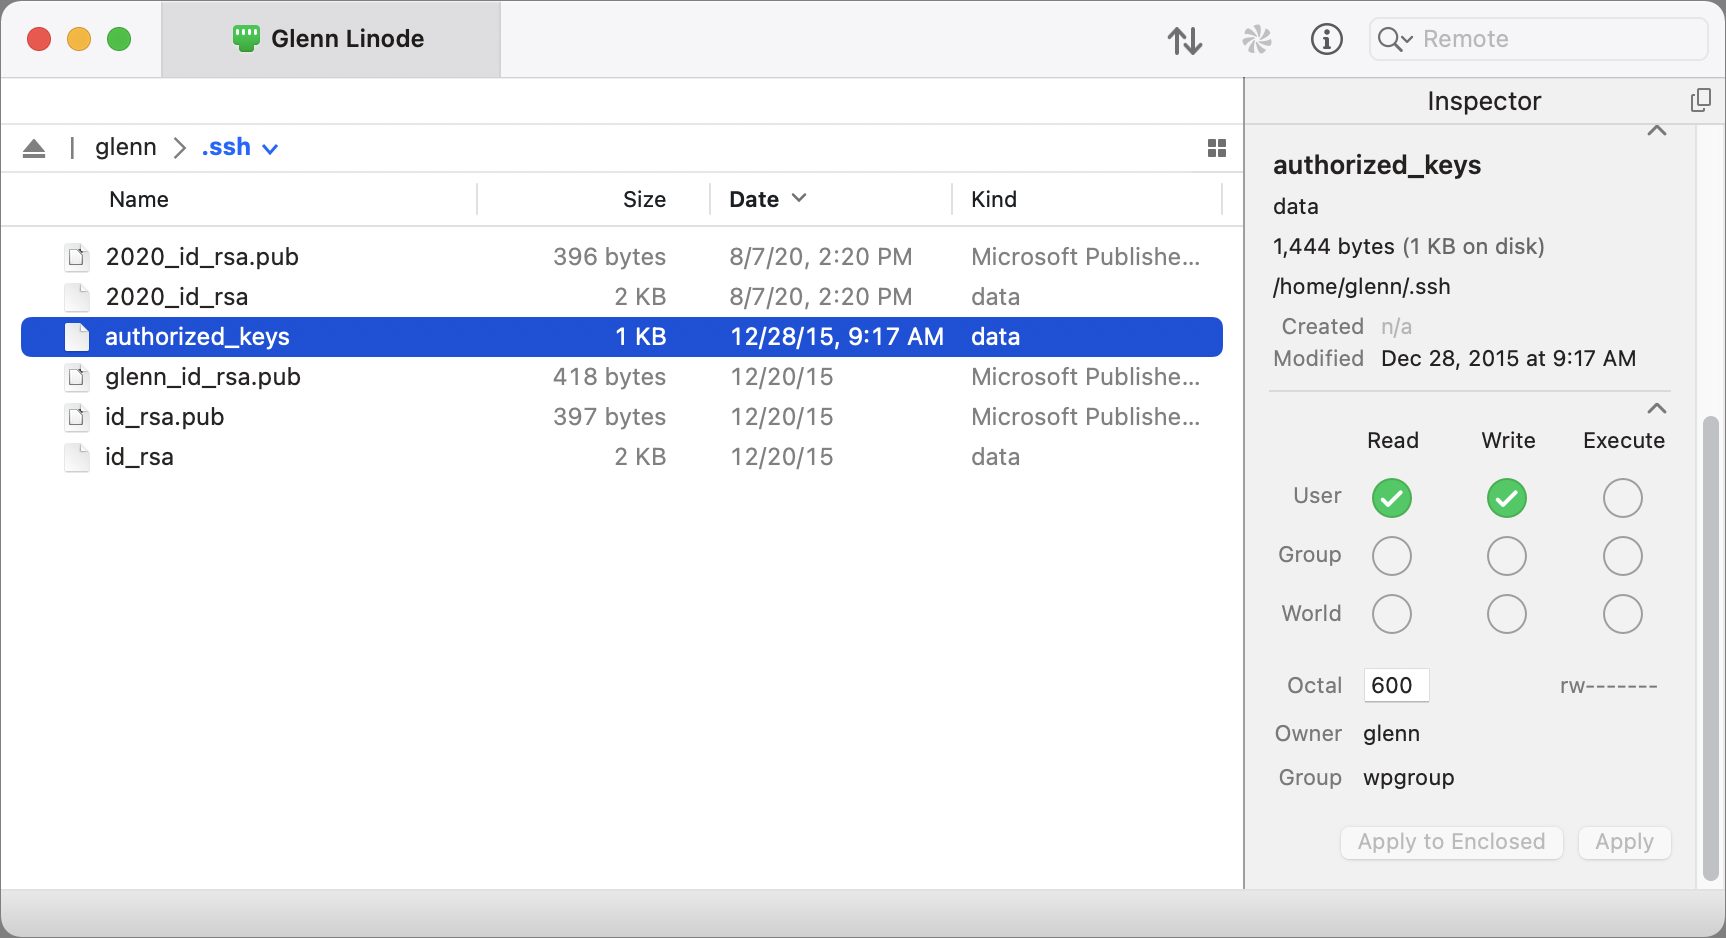
authorized_keys(with no extension) and make sure it’s saved as plain text, not RTF or anything else. - Via your file transfer program, navigate into your account’s
.sshdirectory and uploadauthorized_keysthere. - Set the file permissions for
authorized_keysto read and write by the owner only.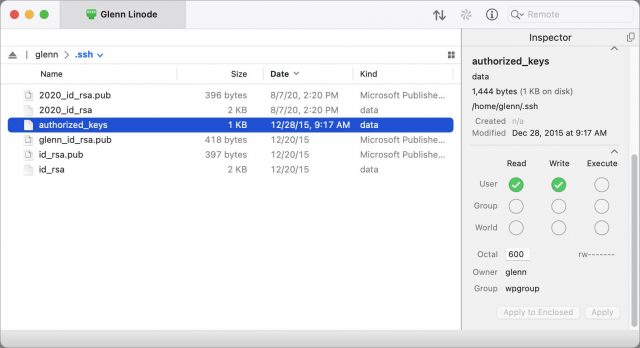
In Transmit, select the authorized_keys file and use the Inspector to set Read and Write permissions to cover just the file’s owner—you.
Here’s what a public key looks like:

If you’re comfortable with the command line, the necessary commands can be a little faster and simpler:
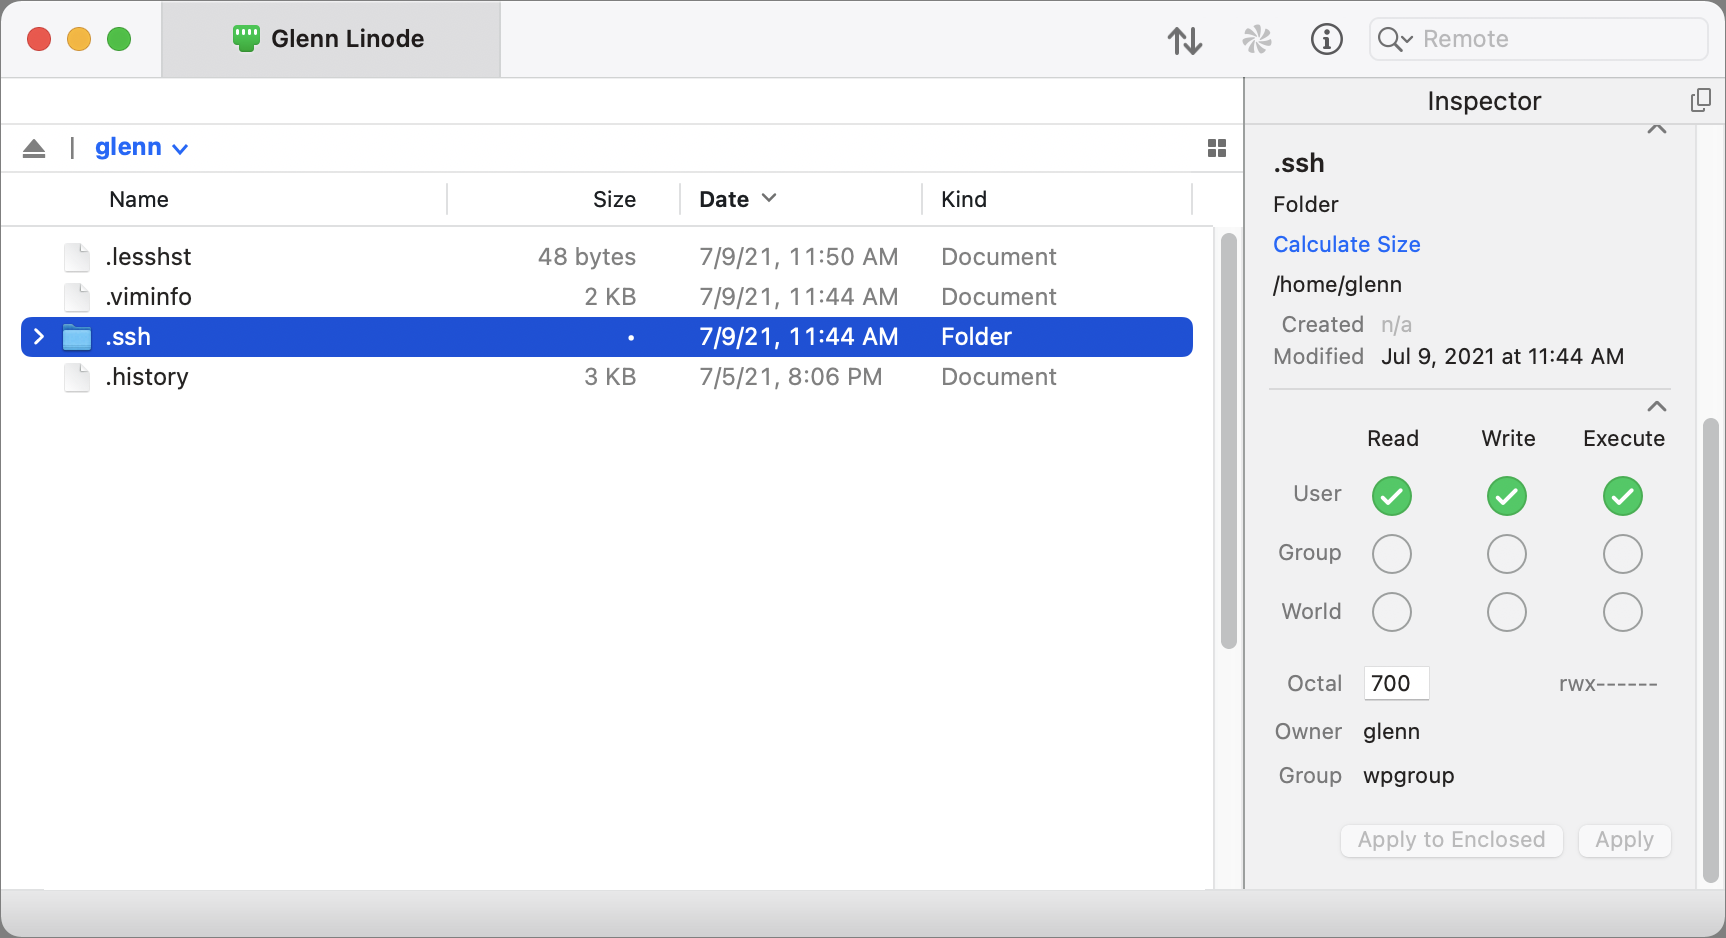
- Via a terminal app connected to the server, navigate to your home directory (
cd ~). - Create an
~/.ssh/directory with the correct permissions (mkdir -m 700 .ssh). - On your Mac, open
~/.ssh/id_rsa.puband copy its contents. - On the server, navigate into the
~/.ssh/directory or use your favorite command-line text editor to open or create a file calledauthorized_keys. - Paste the copied text into that file via the terminal session—since it’s text, it will transfer correctly—and save it.
- Make sure the permissions on authorized_keys are set correctly by entering
chmod 0600 authorized_keys.
That’s the entire setup! Now you have to use a file transfer program that supports SSH public key authentication. But first, a quick aside about validating that the server you connect to is the one it claims to be.
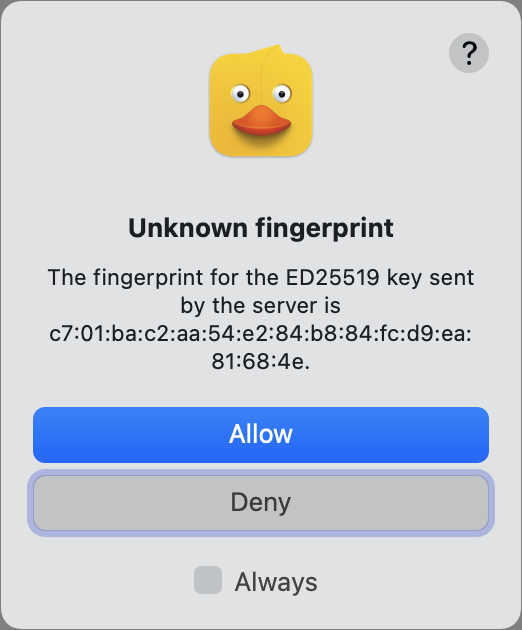
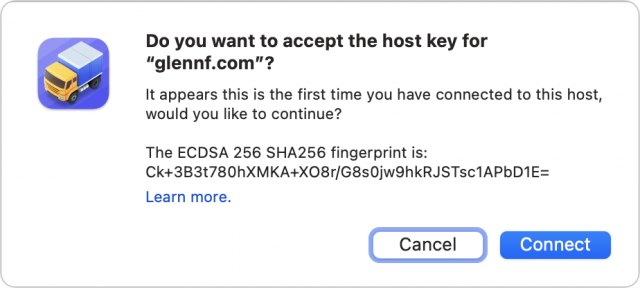
Dust for Digital Fingerprints
When you use any means to connect via SSH, including SFTP, the first time you connect to a new server, you will be asked to verify that its “fingerprint” is accurate. The fingerprint is an encrypted shorthand version (a hash) of the public key part of the server’s public/private keypair. In some apps, including Cyberduck, this abbreviated version displays as 16 sets of two-digit hexadecimal (base 16) numbers separated by colons—an outdated but still-used MD5 hash. It looks like this:
97:a9:54:4d:7c:26:c6:e8:a1:39:6a:59:c0:1e:b9:47
In other apps, such as Transmit, you’ll see what looks like a 43-character mix of text, letters, numbers, and punctuation (the SHA256 hash), another way of representing the same source public key:
/WVPYwFk8GyGE/QuvSsj8MS12ryrV2th4nDKeFvYqis
(Why 43 characters? It’s 256 bits of information, but divided into 6-bit pieces to represent values in a reduced character set—a kind of an simplified ASCII.)
The shorthand is used because the public key is quite long and you’re not trying to check slight differences between digits. You just want to know that the public key on the server you think you’re connecting with is identical to the public key offered by the server you’re connecting to!
On the first connection, your computer has no record of that key. If you agree it’s correct, it’s stored (in the ~/.ssh/known_hosts file) and matched in the future. You’ll only be warned again if it changes, which can be a sign to check that the server wasn’t compromised.
The fingerprint helps you resist man-in-the-middle (MitM) attacks. If someone can redirect your server’s domain name or somehow insert themselves on a network connection between you and the destination, they have a dilemma. They can fake the public key, but then they can’t respond correctly to your software’s handshake because they don’t possess your private key. Your file transfer software will flash alarms or at least note an error.
If the attacker instead generates their own keypair, the fingerprint won’t match, and you have to be alert to notice the error. If you don’t notice it, the MitM can present fake information or a fake file listing and try to convince you to engage in insecure behavior.
However, because the server has your public key stored, the MitM can’t access your account or files on the server: the server will always reject any connection attempt that doesn’t provide the private key that matches the stored public key.
In most cases, it’s not critical to check fingerprints because you’re not at risk of a MitM attack, and the attackers can’t extract your password or gain access to anything in the process except fooling you.
However, if you want to ensure you’re on the straight and narrow with the server:
- If your account is with a hosting service, see if they can provide their hashes (ask for MD5 and SHA256 versions) for their SSH server.
- If you have sufficient access on a hosted server or your own, you can run a command that produces the necessary hashes. It’s obscure but reasonably straightforward; read this article for the recipes.
You can now connect without typing a password!.
Step 3: Configure Your File Transfer App
Many file transfer apps support SFTP connections with SSH keys. These include two popular options: Cyberduck (macOS 10.9 or later, free but donation requested) and Panic’s Transmit (macOS 10.14 or later, $45).
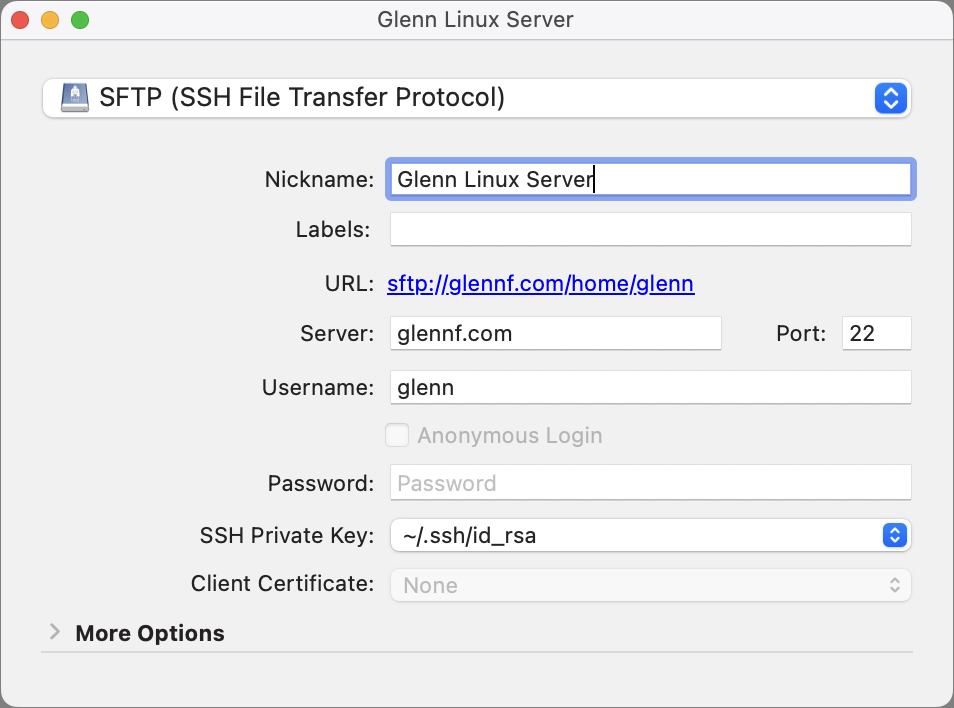
In CyberDuck, here’s how to use a public/private keypair for login:
- Choose Bookmark > New Bookmark.
- Choose SFTP from the pop-up menu at the top.
- Give the bookmark a memorable nickname and enter the server name and your account username.
- From the SSH Private Key pop-up menu, choose your
id_rsakey if it’s not already selected.

- Close the bookmark entry and then double-click it in the bookmarks list to connect.
- You will likely see a fingerprint warning. Click Allow if you’ve checked this key or are comfortable proceeding. Select Always to avoid this alert each time you connect after this while the fingerprint remains unchanged.
In Transmit, the process goes like this:
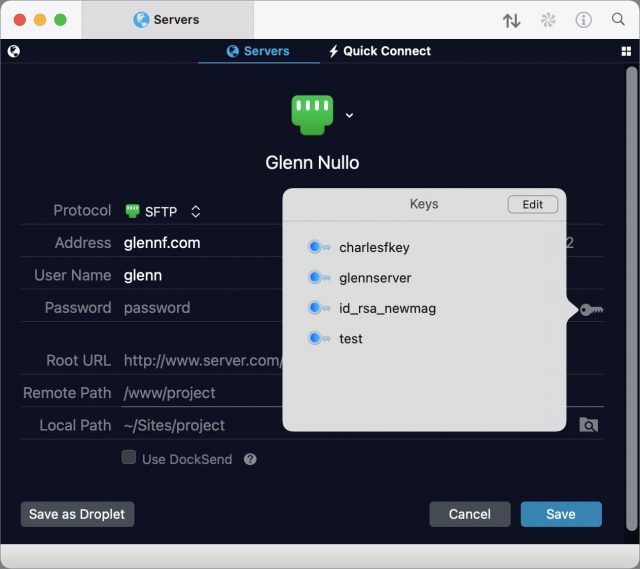
- While in the Servers view in any pane, choose Servers > Add New Server.
- Name the server descriptively, choose SFTP (it may already be chosen by default), and click Next.
- Enter the server name in the Address field and your account username in the User Name field.
- If you’re using a key generated within Transmit, click the key icon to the right of the Password field and select it from the list. If you’re using the default key in the
~/.ssh/directory as described earlier, you don’t need to select anything: Transmit automatically uses any keys in~/.ssh/when connecting.
- Click Save.
- Double-click the entry to connect.
- If a fingerprint prompt appears, examine it and click Connect if it matches your expectation.


That’s it! From now on, all your file transfer connections will be more secure than they would be with a password, and you won’t have to enter or manage a password.
Forward into the Future
Security is a constantly escalating battle, and passwords are increasingly targeted. Upgrading your security for SFTP (and SSH sessions if you use them) reduces a significant potential point of weakness. While SSH isn’t perfect, the use of strong encryption keys improves your security today and into the foreseeable future.
I was wondering why you saved your private key to a directory that contains icons, and then realized
/Users/gifis your home directory.I don’t recommend copying the private keys from machine to machine. However, there’s no issue in sharing the
id_rsa.pubfile. In fact, you can combine the public keys, so all Macs can use sftp to connect to all your other Macs.The biggest advantage of setting up sftp like this is for scripting. You can setup files that copy files back and forth between you machines without logging in. You could do that with ftp with a
.netrcfile, but it was trickier.One disadvantage of sftp, because it’s based upon ssh, is that you can’t setup a separate file system. In ftp, you can setup a special ftp file system. When someone does log into you computer, they’re limited to just the ftp file system. With sftp, they have access to your siren as the signed on user. That makes me nervous.
I’m not sure if I’m looking at the same thing. There are no icons shown and the directory I show in Transmit is on a Linux system—do you mean the preview in Transmit in the top screen captures? Those are mapped by Transmit to extensions.
For people with few specific security concerns—like a risk of being personally, directly attacked—it’s not really an issue if the key is copied only locally or using an end-to-end secured method. If someone has a level of risk great enough that they need to worry about the local method by which they copy a private key, that’s a whole other category than 99.99% of readers.
Yeah. I just saw the directory name
gifand immediately associated with various Unix directories namedgifswhere icons for various programs are sometimes stored.I then saw it was under
/Users/and not/usr. I thought that was a strange place to put a directory of icons because that’s the directory where the Mac stores users’ home directory.I finally realized your name is Glenn Fleishman and that GIF are your initials. Suddenly, it all made sense.
And I pronounce it jiff!
Once you set up the SSH keys you can change sshd so that it only accepts key-based logins, so there’s no more risk of an attacker breaking in by guessing the password.
But the catch is that macOS updates will reset the sshd_config file back to the insecure version. You have to check it after every update and restore your settings. macOS point upgrades always wipe it out, security updates sometimes do.
True. I’ve actually thought about doing this with my colocated Mac mini, but I’m wary about doing it to a computer that I don’t have physical access to, in case something goes kablooey.
I have a shell script that re-enables/reconfigures:
sudovia Touch IDssh_configandsshd_configfilesbecause those 3 get reset by seemingly every update that Apple puts out.
What was really funny was when I ran it on my Mac mini and then realized “Oh, right, I don’t have Touch ID on my Mac mini!”
(¿yet? I keep waiting for Apple to sell the new Magic Keyboard with Touch ID separately from the new M1 iMacs. )
)
I pronounce it Geoff!
Another use of ssh-keys is if you want to edit files on your server. BBEdit uses SFTP to browse and open your files, edit and save. I got hooked on BBEdit many years ago when I was shown how you could change many files in one sweep using search/replace on your remote server.
All of this begs the question of why MacOS ships with a version of curl that doesn’t support sftp:
Same with the version installed with MacPorts:
To get a version of curl that supports sftp you can install via brew:
The version shipped with Raspberry Pi OS supports sftp:
Hello @Ratsima and welcome to the TidBITS forum!
Whenever Apple ships an outdated Un*x utility with macOS, the reason “why” is almost always because that utility is either covered by a license that is incompatible with macOS or which is suspected of being incompatible, and Apple seems to prefer to avoid any controversy.
I fully expect this is why Apple is moving to
zshfor its default login shell (becausezsh’s license is compatible), and why tools likeperlandpythonwill no longer be bundled by default in the future.(This is a pipe-dream, of course, but I have this dream of Apple doing something like hiring all of the
brewand/or MacPorts developers and have them develop something that would prompt users when they first launch Terminal.app that would say “Hey, would like us to download and install a bunch of useful utilities for you?” But I don’t imagine that will ever actually happen. A guy can dream, tho…)When I worked as a network engineer, I used this method for all the servers I was responsible for. It made my life so much easier, being able to securely connect to any server without having to go through a login process. I have always wished that I could use the same method for all of my online accounts, but sadly, no one seems interested in supporting anything other than the login/password type of security. I can only surmise a lack of knowledge and understanding of the advantages, or a belief that it is too complex for the average user to implement.
My ideal scenario is that all my accounts have my public key, new account signups offer an option to enter a public key, and I can designate accounts that require a local authentication on my machine, to access. i.e. financial accounts. I would be interested to hear of any known drawbacks to this scenario.
Where are you storing your private key though? If it’s on your local Mac (as it should be, security-wise), that means you won’t ever be able to sign in on another device. If you have to start copying private keys to your phone, iPad, or elsewhere, I think it quickly gets into risky territory. And it means if you lose your device(s) you are locked out of all your accounts. Maybe permanently?? I’m just not sure this would scale well in terms. It makes sense in certain specific situations (eg ssh) but I don’t think it generalises well to the standard security method for all services for all people.
Well, if I could store my private key in something like 1Password, then it propagates to my other sync’ed devices. This would not be any different than storing login/password in a password app. Anyone else would still need to authenticate to access your private key. If that addresses your objections, what else do you object to?
Ooo, ooo! The Secure Enclave! A lot of iOS apps allow you to log in via Face ID and Touch ID now, so if that API could be extended in a secure way, it really would be the Holy Grail of security combined with ease of use.
I use ~/.ssh/config to control some of this. In the top I have it set to:
I’m sure there was a good reason to turn off ssh agent forwarding… but I don’t recall it at the moment. That will allow you to login from your mac to machine one and then from there to machine two, without doing a new session from your Mac, assuming you have public keys on both.
Further down you can setup nicknames and settings per machine, like:
So I can then do
ssh piand that would be the same as doingssh [email protected].The best part is not needing to remember complicated commands. You can add all sorts of settings in there, so I can do a reverse ssh tunnel with port forwarding … and just do
ssh client123' instead ofssh -f -L 5900:localhost:5900 [email protected]`. In this case the config would be:Thanks go out to various coworkers for these tips, as well as all sorts of websites
As a result of this article I decided to follow up on my long-standing project of dumping my .netrc files and using encryption keys instead. I have five different machines (four Raspberry Pies and one Mac) that periodically upload files to a web host. I had already generated keys and updated the host’s authorized_keys files, so all I had to do was edit a bunch of shell scripts on three local and two remote machines. Tedious and time consuming, but not particularly hard.
And then, suddenly and without warning, it all stopped working. sftp via curl started returning curl error 67:
Logging in to the host via ssh also failed:
The web host’s support staff is clueless and has no idea what is going on.
So, I spent a frantic hour changing all the code back to using passwords instead of encryption keys. Fortunately, I had simply commented out the code using passwords and had yet to delete any of the .netrc files.
So, now I’m conflicted. Theoretically, using encryption keys instead of passwords seems great. Until it fails, that is, when it becomes a huge PITA. At this point I’m not sure I’d go back even if I can get the web host to figure out what’s wrong.
Thanks for a great explanation, Glenn. Does anyone else find that cheap hosting plans often don’t support SFTP, though? At the moment I use one excellent US provider with great support for SSH and SFTP, but also two UK-based companies that don’t provide SSH with their budget plans – and indeed their plain FTP is often flaky. They do offer FTPS, though, so I’ve been experimenting with that today. Is FTPS a good thing? Less good than SFTP?
Two different solutions to the same problem.
FTP, as you know, is not encrypted. Someone snooping your packets can see it all, including your password. Which is why, these days, it is only considered appropriate for anonymous access.
FTPS is a quick-and dirty solution that runs the normal FTP protocol over SSH sockets. So the data is encrypted, but it doesn’t solve other issues people have had with FTP (e.g. use of a second socket for data transfer, which can create problems with some firewalls).
SFTP is a new file transfer protocol designed to work over SSH sockets. It comes bundled with nearly all SSH software packages. Many consider it better, but this is one of those arguments that really has no clear winner.
Here’s some additional information, if you want more detail:
https://www.msp360.com/resources/blog/sftp-vs-ftps/
FWIW, I use SFTP on the servers I set up at home. Mostly because it “just works” after you get SSH working. FTPS requires separate setup and configuration, which is just more work than I care about.
Superb question! I think SSH and SFTP are likely a dwindling option for hosting plans, though I expect many TidBITS readers are using more technically oriented services. (I’m either an outlier or “normal”: I have a VPS at Linode and use Squarespace for my blog and an associated podcast.)
FTPS is entirely secure in the same way that SFTP is. That is, in both cases security information has to be installed at the server, and the connection is end-to-end encrypted with some kind of “out-of-band” validation that there’s no man-in-the-middle attack going on. Arguably, if the host is using a certificate issued by a certificate authority (or an intermediary), then it’s safer than SFTP in that you don’t have to assure your connection is uncorrupted.
It’s quite difficult to set up FTPS for an individual. For a hosting company, trivial.
That said, I recently added FTPS to my Linode server, where I already have an httpd (Apache) server running using Let’s Encrypt’s free SSL/TLS certificates. I was able to use vsftpd, a safe, open-source FTP server that’s widely available, disable all insecure FTP methods, lock logins to a handful of accounts, and reference the same TLS certificate that I use for the same site’s Web server. It took a little mucking about, but got it to work.
Exactly! Some people prefer the old FTP over SSL/TLS because of certain FTP feature and an FTP approach, rather than SFTP, which is not really FTP but has similar functionality so that it can presented in client software (like Transmit) as nearly identical!
Thank you very much, @Shamino and @glennf. All really interesting, including the link David provided. I’m pleased to have discovered FTPS, which will be fine for my purposes on those servers where SSH/SFTP isn’t available.
If you’re ever looking for a new UK-based host that supports SSH, I can recommend Kualo, which I’ve found to be excellent. SSH isn’t enabled by default, but you can raise a support ticket and they’ll turn it on for you. Their support is top notch – respond quickly and are technically competent. Their pricing is competitive, and you can choose a US- or UK-based server. Also, if you are managing hosting for a charity, they offer a free charity hosting account, or if it’s not sufficient for their needs, a 50% discount on their other plans. Sales pitch over – I have no connection with them, just a happy customer of many years so thought it might be of use if you find your current budget plans are too limited.
Thank you @jzw ! Kualo’s offering looks great, including 30 GB of storage on the Startup plan and of course the charity offering. I’ll certainly consider moving to them.
My US host is Reclaim, which costs about $50 a year for a UK registered charity (but I think any non-profit may qualify). Server is in Europe, and from my limited perspective they seem to be very good technically, with SSH out of the box.
Cheap web hosting can be so dreadful that it’s great to hear a recommendation for a good provider.
I like the design of Reclaim Hosting’s website – really nice! I’ll keep the link to them as it’s always useful to have good options for hosting.