The Hidden Trick for Capturing Document-Modal Dialogs in Mac Screenshots
Here at TidBITS, we spend a lot of time on screenshots: composing them, taking them, editing them, bordering them, and more. The goal is always to end up with a screenshot that illustrates something we’re discussing in the text without adding confusion with extraneous information or messing up the article layout with unnecessary drop shadows or white space. For that, we rely heavily on this technique to take a screenshot of a particular user interface element without its drop shadow:
- Press Command-Shift-4.
- Press the Space bar.
- Move the pointer over the desired interface element, which turns blue.
- Option-click to take the screenshot sans drop shadow.
For the last few versions of macOS, we’ve had a problem with dialogs that are attached to a window, technically called “document-modal dialogs” or “sheets,” although Apple prefers they just be called “dialogs” in user-facing text. The built-in macOS screenshot capability can see the window, but it can’t grab the attached dialog as an independent interface element. When the context of the overall window is informative, getting both is fine. At other times, it’s just unnecessary or even awkward.
For instance, look at the dialog that appears when you click the Advanced button in the Software Update preference pane below from macOS 10.14 Mojave (it looks odd because it was captured without the drop shadow that’s necessary to set it off from the Advanced dialog).
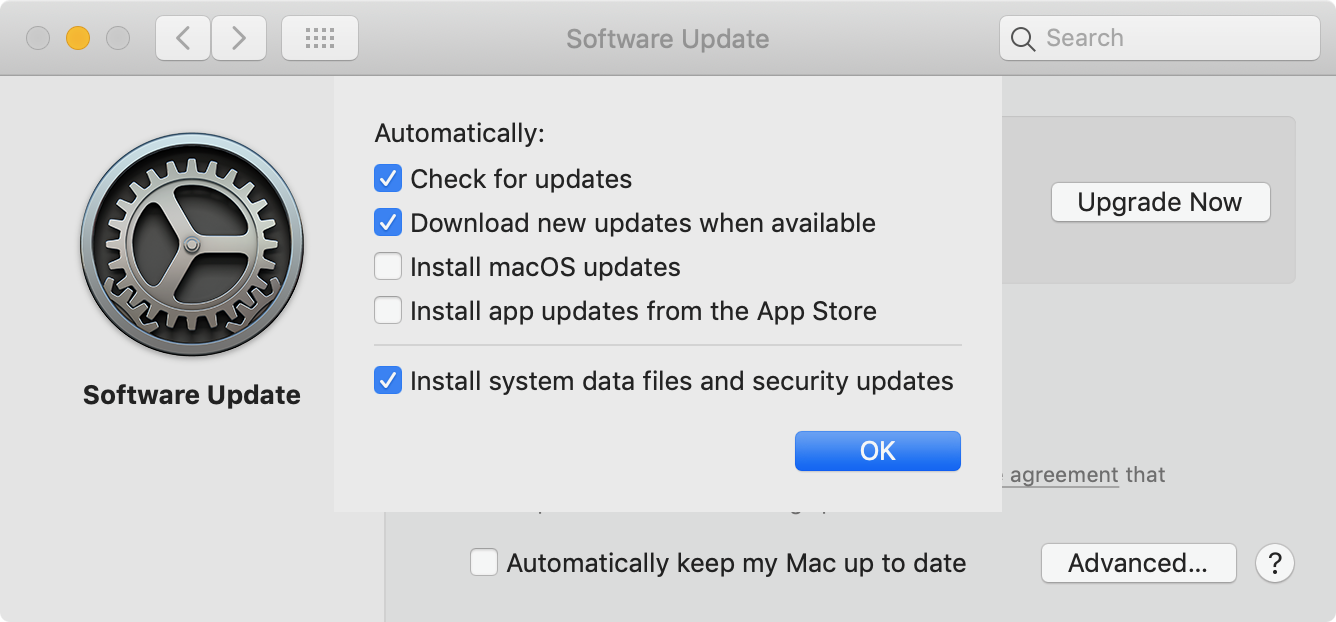
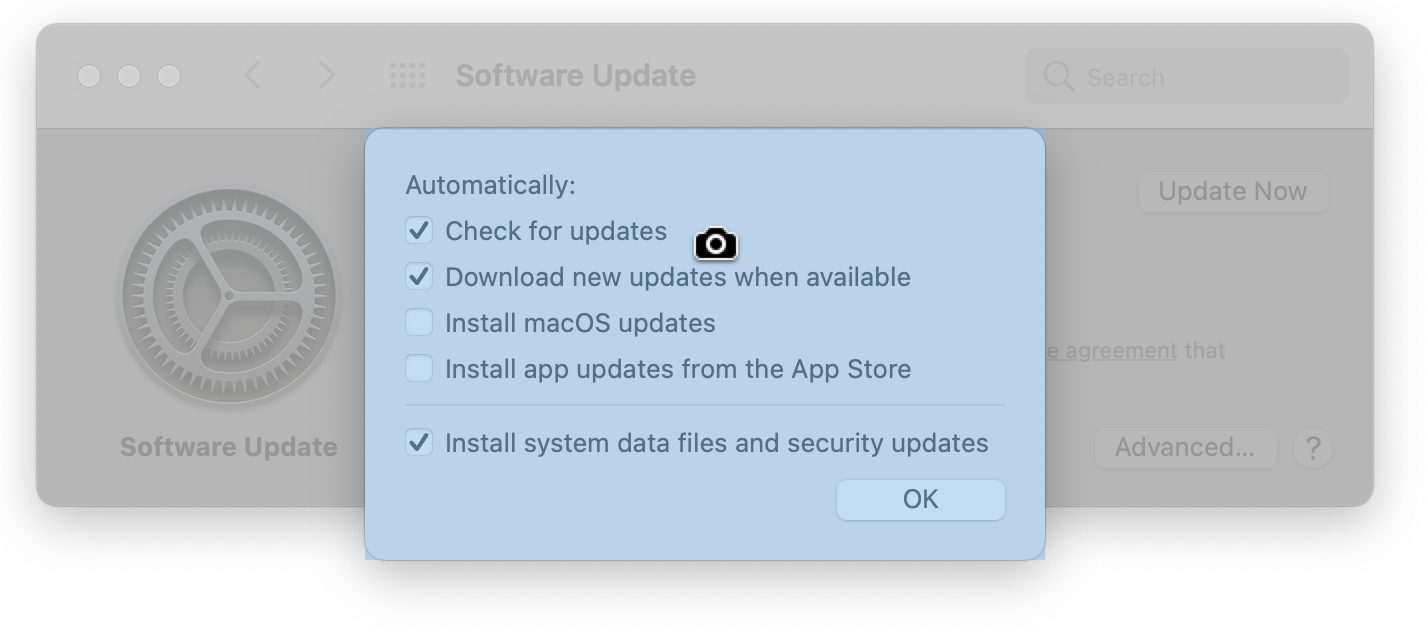
There’s no benefit in showing the Software Update preference pane behind the dialog, so we’ve been cropping such screenshots to focus only on the dialogs and bordering them separately. That wasn’t too hard in Mojave or 10.15 Catalina because they were rectangular. However, in macOS 11 Big Sur, rounded rectangles reign supreme. Here’s that same screenshot in Big Sur.

It actually looks a little better thanks to the contrast between the grayed-out preference pane and the bright dialog, but extracting that dialog out would leave ugly little gray chunks in the top corners. They too could be edited out, but if we wanted to border the dialog as well, it would have a rectangular border rather than one that followed the rounded corners.
The solution—I cannot believe that I didn’t know this existed for all these years!—is to hold down the Command key in Step 3 above and then mouse over the dialog you want. macOS highlights it, as you can see in the action shot below, and clicking the mouse captures just that dialog (Option-click to capture without the drop shadow, as always).
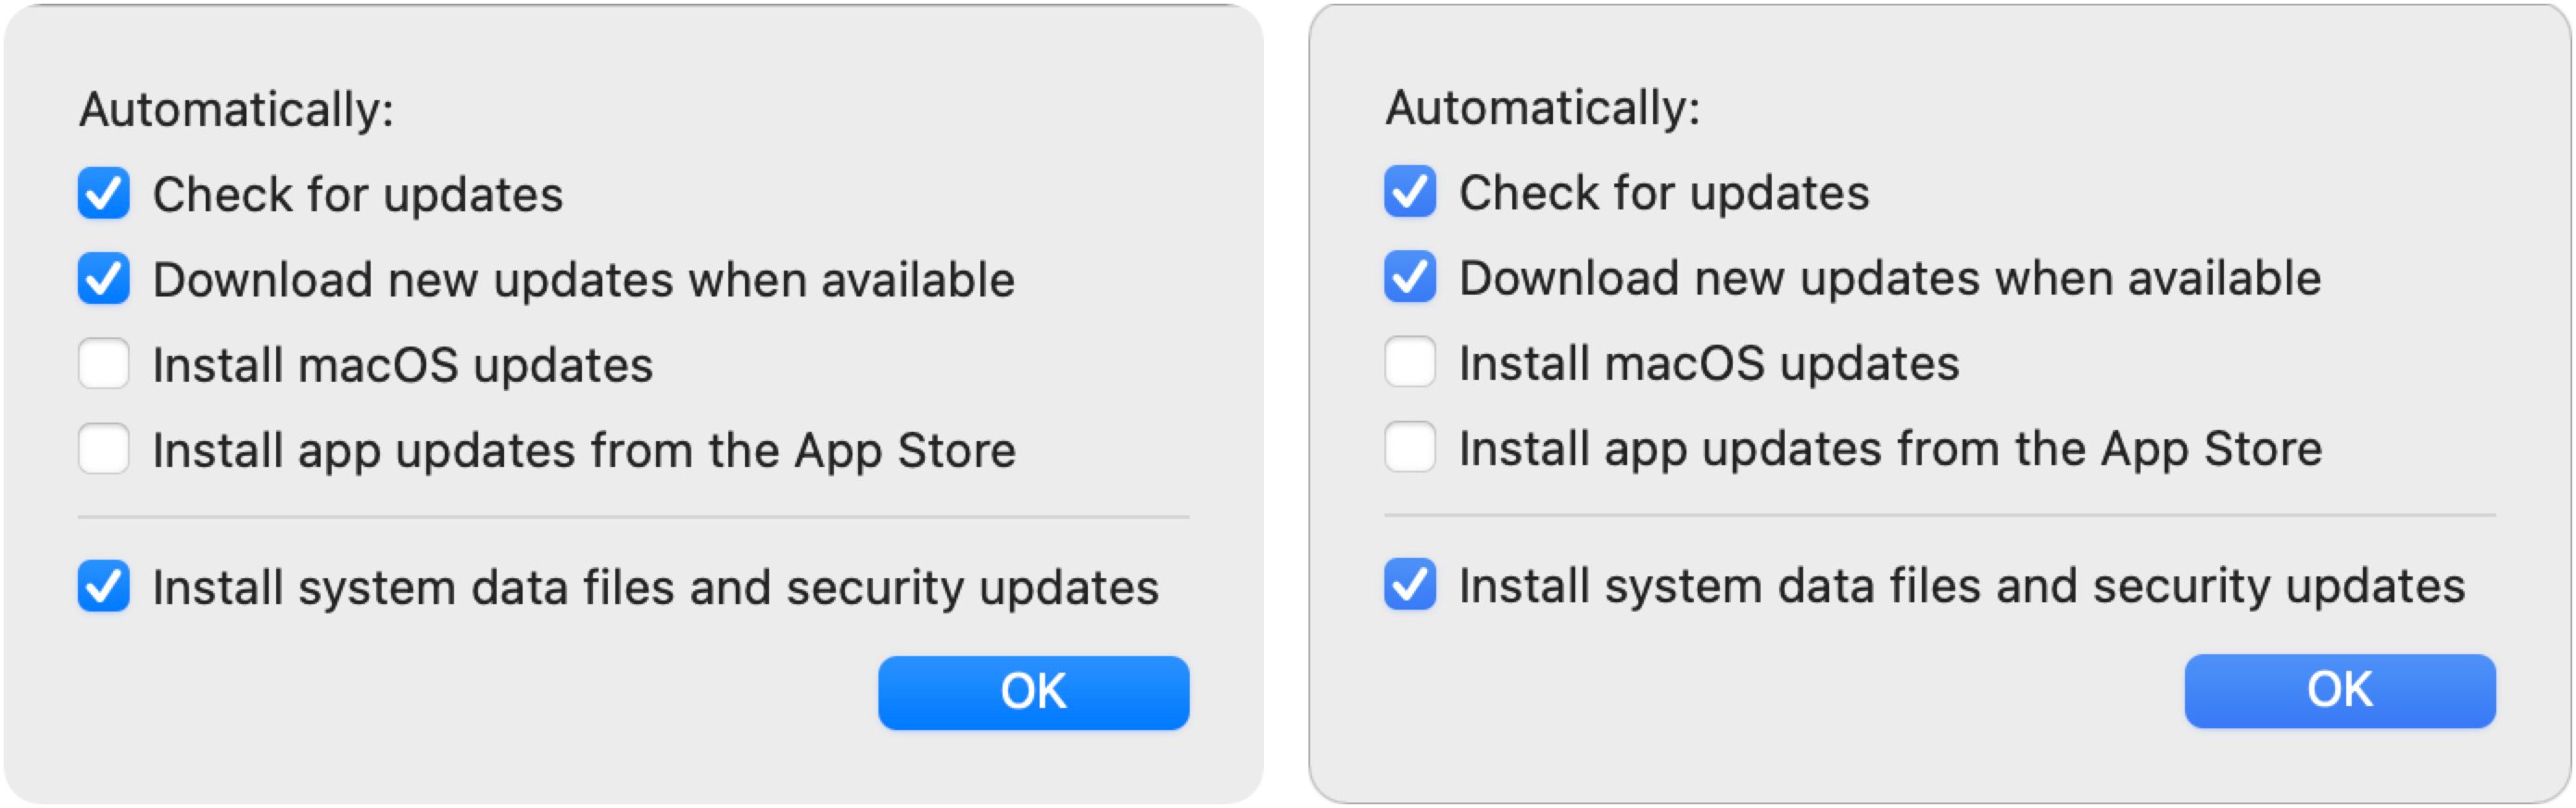
Here’s what that dialog looks like after being captured (left) and after I’ve bordered it (right) with Retrobatch, my new favorite way to border Big Sur screenshots. (This dialog doesn’t absolutely need a border, but many do because of having white elements that bleed into the white page background.) The eagle-eyed among you will notice in the left-hand version that macOS captured a two-pixel black line at the top, which isn’t ideal, so for the right-hand version, I removed it with a quick crop in Preview before bordering with Retrobatch.
This Command key trick has existed since at least Mojave, and a big thumbs up to Ky Leggiero, who turned me onto it recently. Simultaneously, Apple gets a raspberry for failing to document this trick in the otherwise decent support note that explains how to take screenshots.
Whoops, my mistake – I meant you can use ⌘ to capture just the modal.
Here's the signature popover with and without its shadow 😁 pic.twitter.com/IDChyJxozz
— Ky Leggiero 🏳️⚧️🏳️🌈 Anti-NFT ✊🏽 Pro-People (@KyLeggiero) June 28, 2021
I also can’t believe I didn’t know this, as I’m a heavy user of cmd-shift-4 + space. So useful, thanks for writing it up
And thanks for the steer to Retrobatch. Gus Mueller will be getting more of my money…
Yeah, I really need to write more about Retrobatch. I feel a little bad, since I use it only one way, but it’s such a useful one. TidBITS members can save 20% on Retrobatch too.
https://tidbits.com/membership/benefits/
This is best tip I’ve seen on screenshots in MacOS! How many times I’ve needed to show a process, what to click, and check, etc. And Retrobatch…that is news to me!
I highly recommend Xnip as a screen capture utility. Read more here:
https://xnipapp.com (Sorry, the website isn’t great, but the app is great)
Annotation with choice of colors and sizes of text…
Scrolling capture.
Capture just one or two windows.
Lines, arrows, boxes, circles.
Pixelation of sensitive data.
Step Capture
Save to a named file, an automated name with incremental numbering, or save to clipboard.
All for the amazingly low price of $0. It is 100% free. It is great compared to Apple’s primitive system going back over a decade or more.
A few more hidden Tricks. Command-Shift-5 opens up a whole plethora of screen shot tricks including screen recording. It also included the Command-Shift 3 and Command-Shift 4 options. Be sure to check under its Options contextual menu.
I also suggest trying Command-Control-Shift 3. You will hear a click but see nothing happen. Then open a new document with a word processor, even TextEdit and do a paste into the new blank document. Be prepared for a big and pleasant surprise.
It would really be nice if Apple provided full documentation for its features instead of treating them like Easter Eggs.
fogcitynative - thanks for the xnipapp recommendation. I came to this comment section wishing the built-in screen capture had a preference for storing the image as a JPG (which has robust metadata) instead of a PNG file. But even before that I used the occasion of reading this tip to work through saving a Quick Action script to convert a PNG to JPG directly from the Finder menu. However, xnipapp adds annotation capabilities that I’m usually forced to fire up Photoshop for, which is overkill.
I used to use SnapZ to screen capture videos but it went away. Now I use the built-in MacOX Command-Shift-5 to do that. Has that always been there?
The “new” trick (Command over the dialogue) exists as far back as 10.8.
They do.
In any application, open Help (from the Help menu). Type “screenshot” in the search field. Choose “Take screenshots or screen recordings on Mac”.
It’s all spelled out there in plain, lucid english.
(OK, they don’t mention Adam’s modal dialog trick, but everything jweil describes is there.)
In my experience, Apple documents a lot more than they are often given credit for.
What I didn’t know was the Space bar trick to grab just the dialog you want. Very useful! I just tried it!
But all the other combinations mentioned in the article (holding command down while moving the cursor, option-clicking to grab the screenshot) all end up with the same screenshot with or without those actions when I try it.
Still, just knowing about the Space bar part is very useful!
I loathe the drop shadows on screenshots enough to disable them entirely with this Terminal command:
defaults write com.apple.screencapture disable-shadow -bool truekillall SystemUIServerThere’s a Terminal command to do that.
defaults write com.apple.screencapture type JPGThis MacRumors article has the details. It also includes some tips I didn’t know (though the Shift and Option key ones are kind of obvious):
And in case you don’t like terminal commands, TinkerTool allows you to choose from all available formats in a nice little GUI.
The built-in screen capture does have a preference to change the format it captures the image in, but there’s no UI to set it. You can use the Terminal
defaultscommand to set the format, but the easiest way to do this is by using TinkerTool. Make sure to download the version for the MacOS version you’re using:There are some other hidden options as well. In particular, I’m reminded of one that might be useful for @ace (and why when reading the article I didn’t recall shadows being an issue for me). If you don’t want a shadow in your screenshots, you can disable the option
Include shadow when capturing window. For those that don’t want to install a third-party utility, this can also be done in the Terminal – alldefaultskeys for screenshots (and much more!) are listed on the macOS Defaults site: