Improve Your Mac’s Audio by Combining Speakers
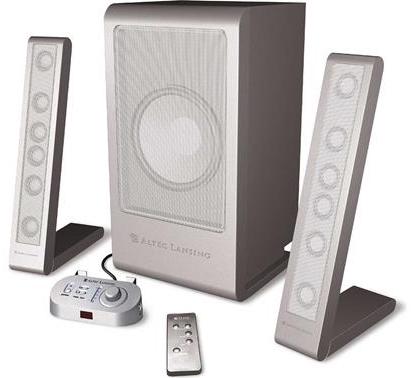 Since 2005 or so, I’ve been listening to music on my Mac through an Altec Lansing FX6021 speaker system with two stereo speakers and a subwoofer. The sound has been excellent, and I have appreciated having a dedicated controller for power and volume—it makes turning the sound off or adjusting the volume easier than using keyboard shortcuts or a graphical interface. Alas, something in the controller failed recently, rendering the controls inoperable and causing the sound to cut out or disappear entirely. After some troubleshooting, I determined that replacement was probably the better part of valor and asked for (and received) recommendations on TidBITS Talk.
However, I still want to listen to music while I’m working through all the suggestions. I work on a 27-inch iMac with a 27-inch Thunderbolt Display, and both have decent stereo speakers. When I tried using either one, however, the sound felt unbalanced. I stand pretty much right between them, so routing audio through the iMac (which sits on the right side of my desk) made it seem to come from my right, whereas sending it through the Thunderbolt Display moved the sound to my left. I wanted to find a way to balance the signal between both pairs of speakers for more accurate stereo sound.
With thoughts of HomePod stereo pairs running through my head, I did a little research and discovered that Apple has long provided a way to combine multiple audio output devices into a single destination. By combining the speakers in my iMac and Thunderbolt Display, I can again have sound emanating equally from both sides of my desk. You could use this capability to play the same audio through your Mac and a set of connected speakers or to configure a 5:1 or 7:1 surround-sound system. Sadly, you can’t include AirPlay speakers like a HomePod in that mix; more on that later.
Create a Multi-Output Device
The trick to performing this combinatorial audio magic is the Audio MIDI Setup app, which you’ll find in the Utilities folder inside the Applications folder. I won’t pretend to understand much of what it does—I’m not an audio guy—but combining multiple audio output devices into a single destination is relatively straightforward, albeit with several gotchas.
(Dear Apple, you might want to update Audio MIDI Setup to sync its interface with your corporate style guide that deprecates the term “master.” Practice what you preach, and all that. Check your Feedback Assistant reports.)
Follow these steps to create a multi-output device:
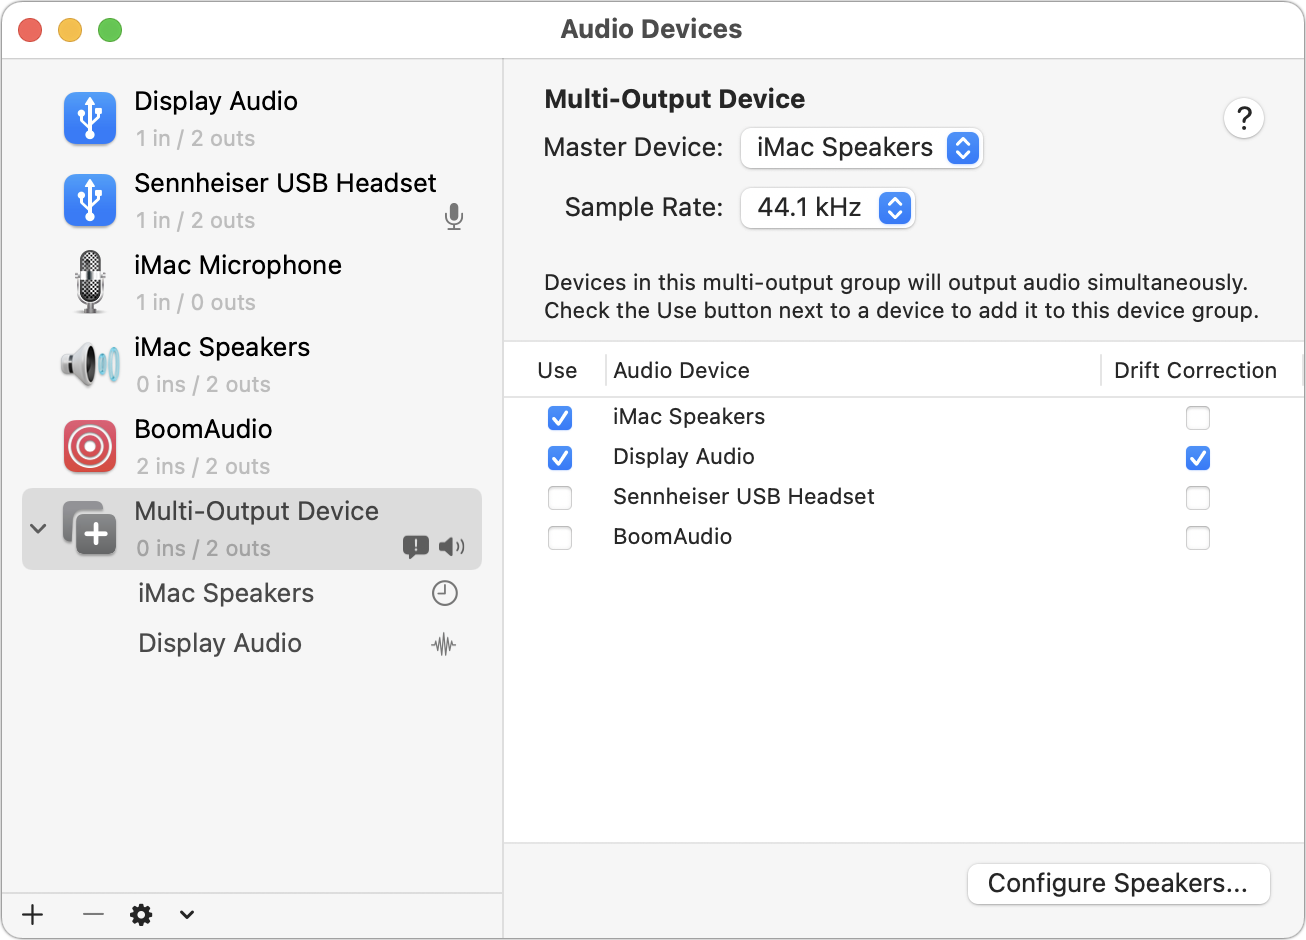
- In Audio MIDI Setup, click the + button under the list of audio devices, and choose Create Multi-Output Device.
- Click the Use checkbox for each of the audio devices you want to combine.
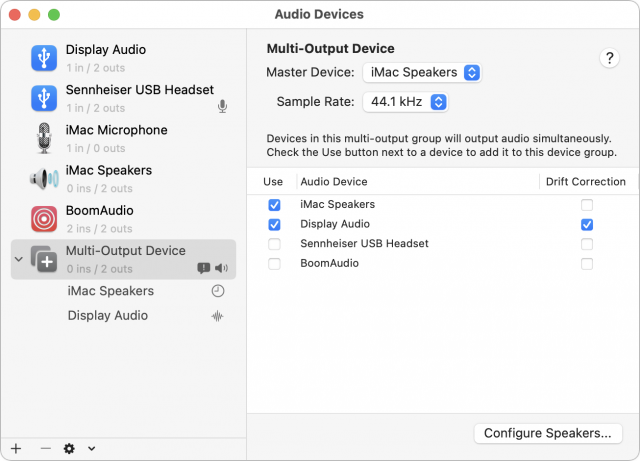
- As far as I can tell, it makes no difference which device is selected in the Master Device pop-up menu, although the Drift Correction checkbox will automatically be selected for devices other than the master device.
- Unless you have a DAC (digital-to-analog converter) that provides higher sample rates, leave the Sample Rate pop-up menu at 44.1 kHz. If you do have a DAC, choose the highest sample rate at which you can hear an audio quality difference.
- You should see a little speaker icon below and to the right of the Multi-Output Device entry in the list. If not, Control-click Multi-Output Device and choose Use This Device For Sound Output. (That has the same effect as selecting it for output in System Preferences > Sound > Output.)
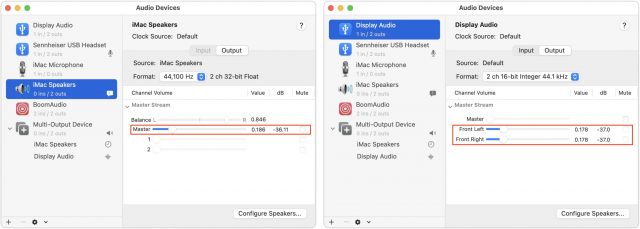
- To ensure that you don’t blast your ears with too-loud music the first time you use your Multi-Output Device, click the entry for your master device in the list and adjust the Master slider in the Channel Volume pane to something fairly low. Repeat the process with your secondary output device—as you can see below, my Thunderbolt Display has separate sliders for Front Left and Front Right.
- Switch to the Music app and start playing a track with which you’re intimately familiar, preferably one with good stereo separation. I always default to the Dire Straits Brothers in Arms album—it was also my first CD back in the late 1980s.
- Back in Audio MIDI Setup, work back and forth between the individual output devices to set the volume to a good level and adjust the left/right balance. How you do that may vary by device. For my iMac’s speakers, there’s a Balance slider that I’ve tweaked to the right to favor its right-hand speaker. For the Thunderbolt Display, there’s no Balance slider, so I had to increase the Front Left volume to favor its left-hand speaker. Because the iMac’s left speaker and the Thunderbolt Display’s right speaker sit right in front of me and work together, I’ve deemphasized them.
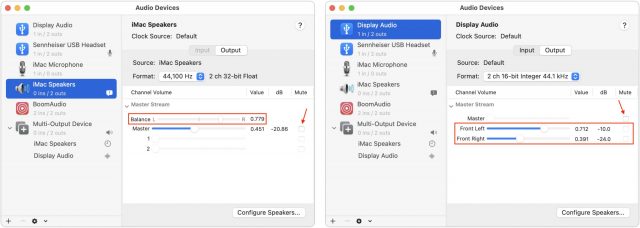
- Pay attention to the Mute checkbox to the left of the volume sliders. I found it extremely helpful to mute one set of speakers and then the other as I worked to set the volumes and balances appropriately. (For a more precise way of determining the ideal volumes, you could use a sound pressure level app like Decibel X to measure the sound from each speaker in turn.)
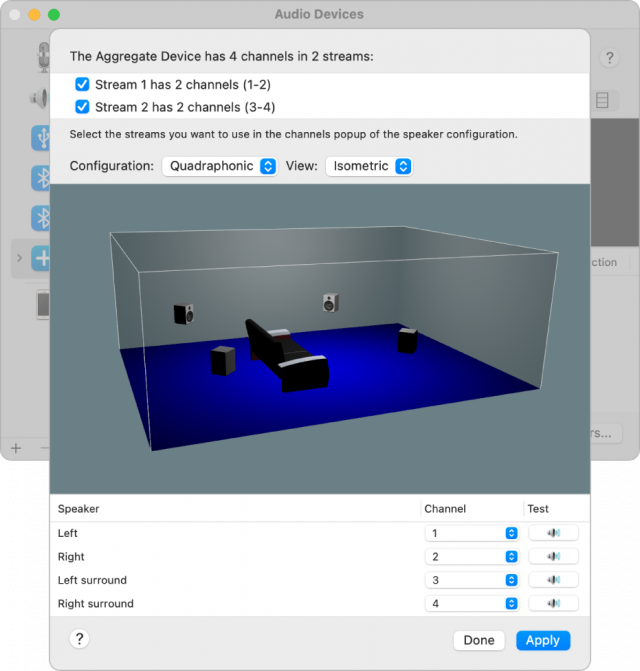
- If you’re configuring a surround-sound system with more speakers, click the Configure Speakers button to bring up an interface for connecting speakers with channels. I don’t have the hardware to test this, so I recommend clicking the ? button in the Configure Speakers interface for more information.
- Finally, if you would prefer to see a more descriptive name, click the name of the Multi-Output Device entry and edit it as desired.


You’re done, but now it’s time to investigate the gotchas.
Gotcha #1: No Volume Control for Multi-Output Devices
Unfortunately, as you’ll quickly discover, a multi-output device has no master volume control in the Sound preference pane, the Volume menu bar item doesn’t work, and macOS’s built-in keyboard shortcuts are disabled. Needless to say, this is a problem, albeit one that has numerous workarounds.
- SoundSource: The best solution to this problem is the SoundSource utility from Rogue Amoeba (a recent TidBITS sponsor), which provides menu bar access to system devices (including multi-output devices), lets you control volume on a per-app basis, and can add effects to any device or app. Even better, if you take a quick trip to SoundSource > Preferences > Audio, you can select Super Volume Keys, which enables the system volume keys to control otherwise uncontrollable audio devices. SoundSource costs $39, though TidBITS members can save 20%, dropping the price to $31.20.

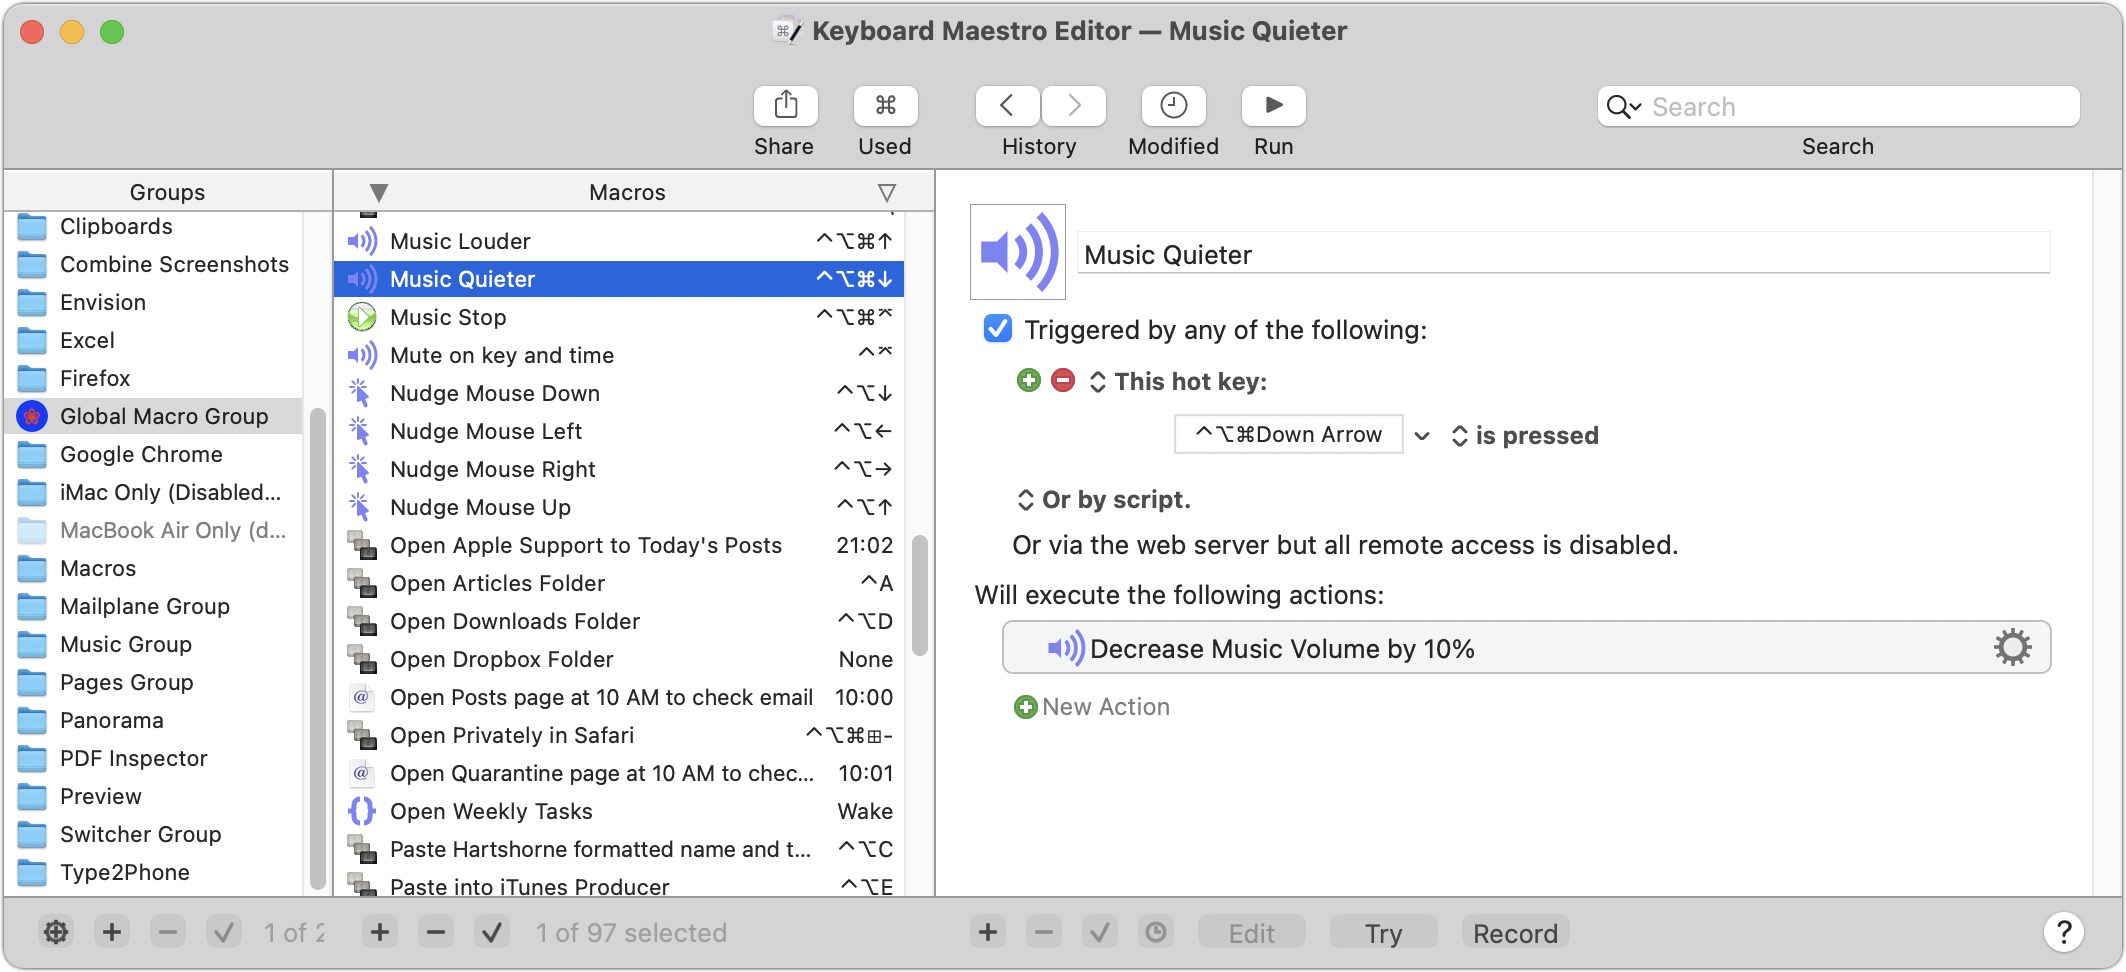
- Music: Although I always think about controlling volume at a system level, I was reminded that the Music app has its own volume control and keyboard shortcuts. If you play audio only through Music, you could manage volume entirely within the app.
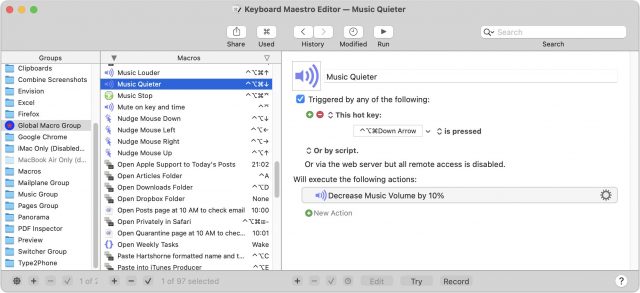
- Keyboard Maestro: It’s always worth trying to solve problems with Stairways Software’s Keyboard Maestro, though in this case, it’s not a complete solution. Although Keyboard Maestro has actions that can increase, decrease, and mute the system volume, those actions won’t work unless you also have SoundSource’s Super Volume Keys enabled. More effective are Keyboard Maestro’s actions for controlling volume and playback in the Music app. With those, you can create macros that let you increase or decrease the volume of currently playing music, or just pause playback. Keyboard Maestro costs $36, and TidBITS members can save 20%, dropping the price to $28.80.
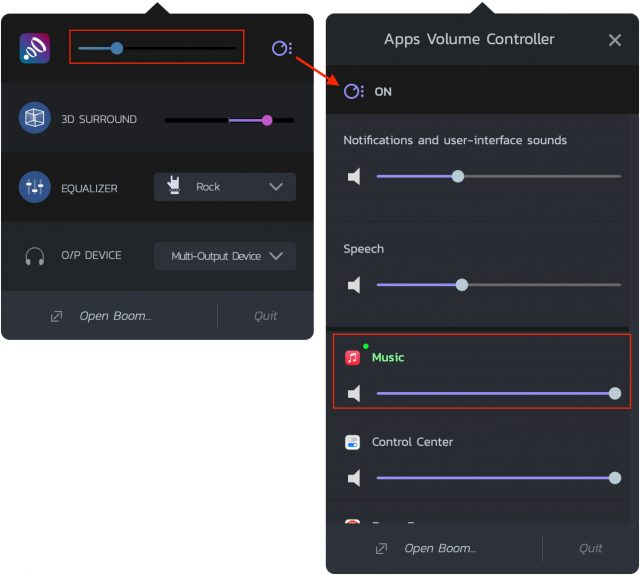
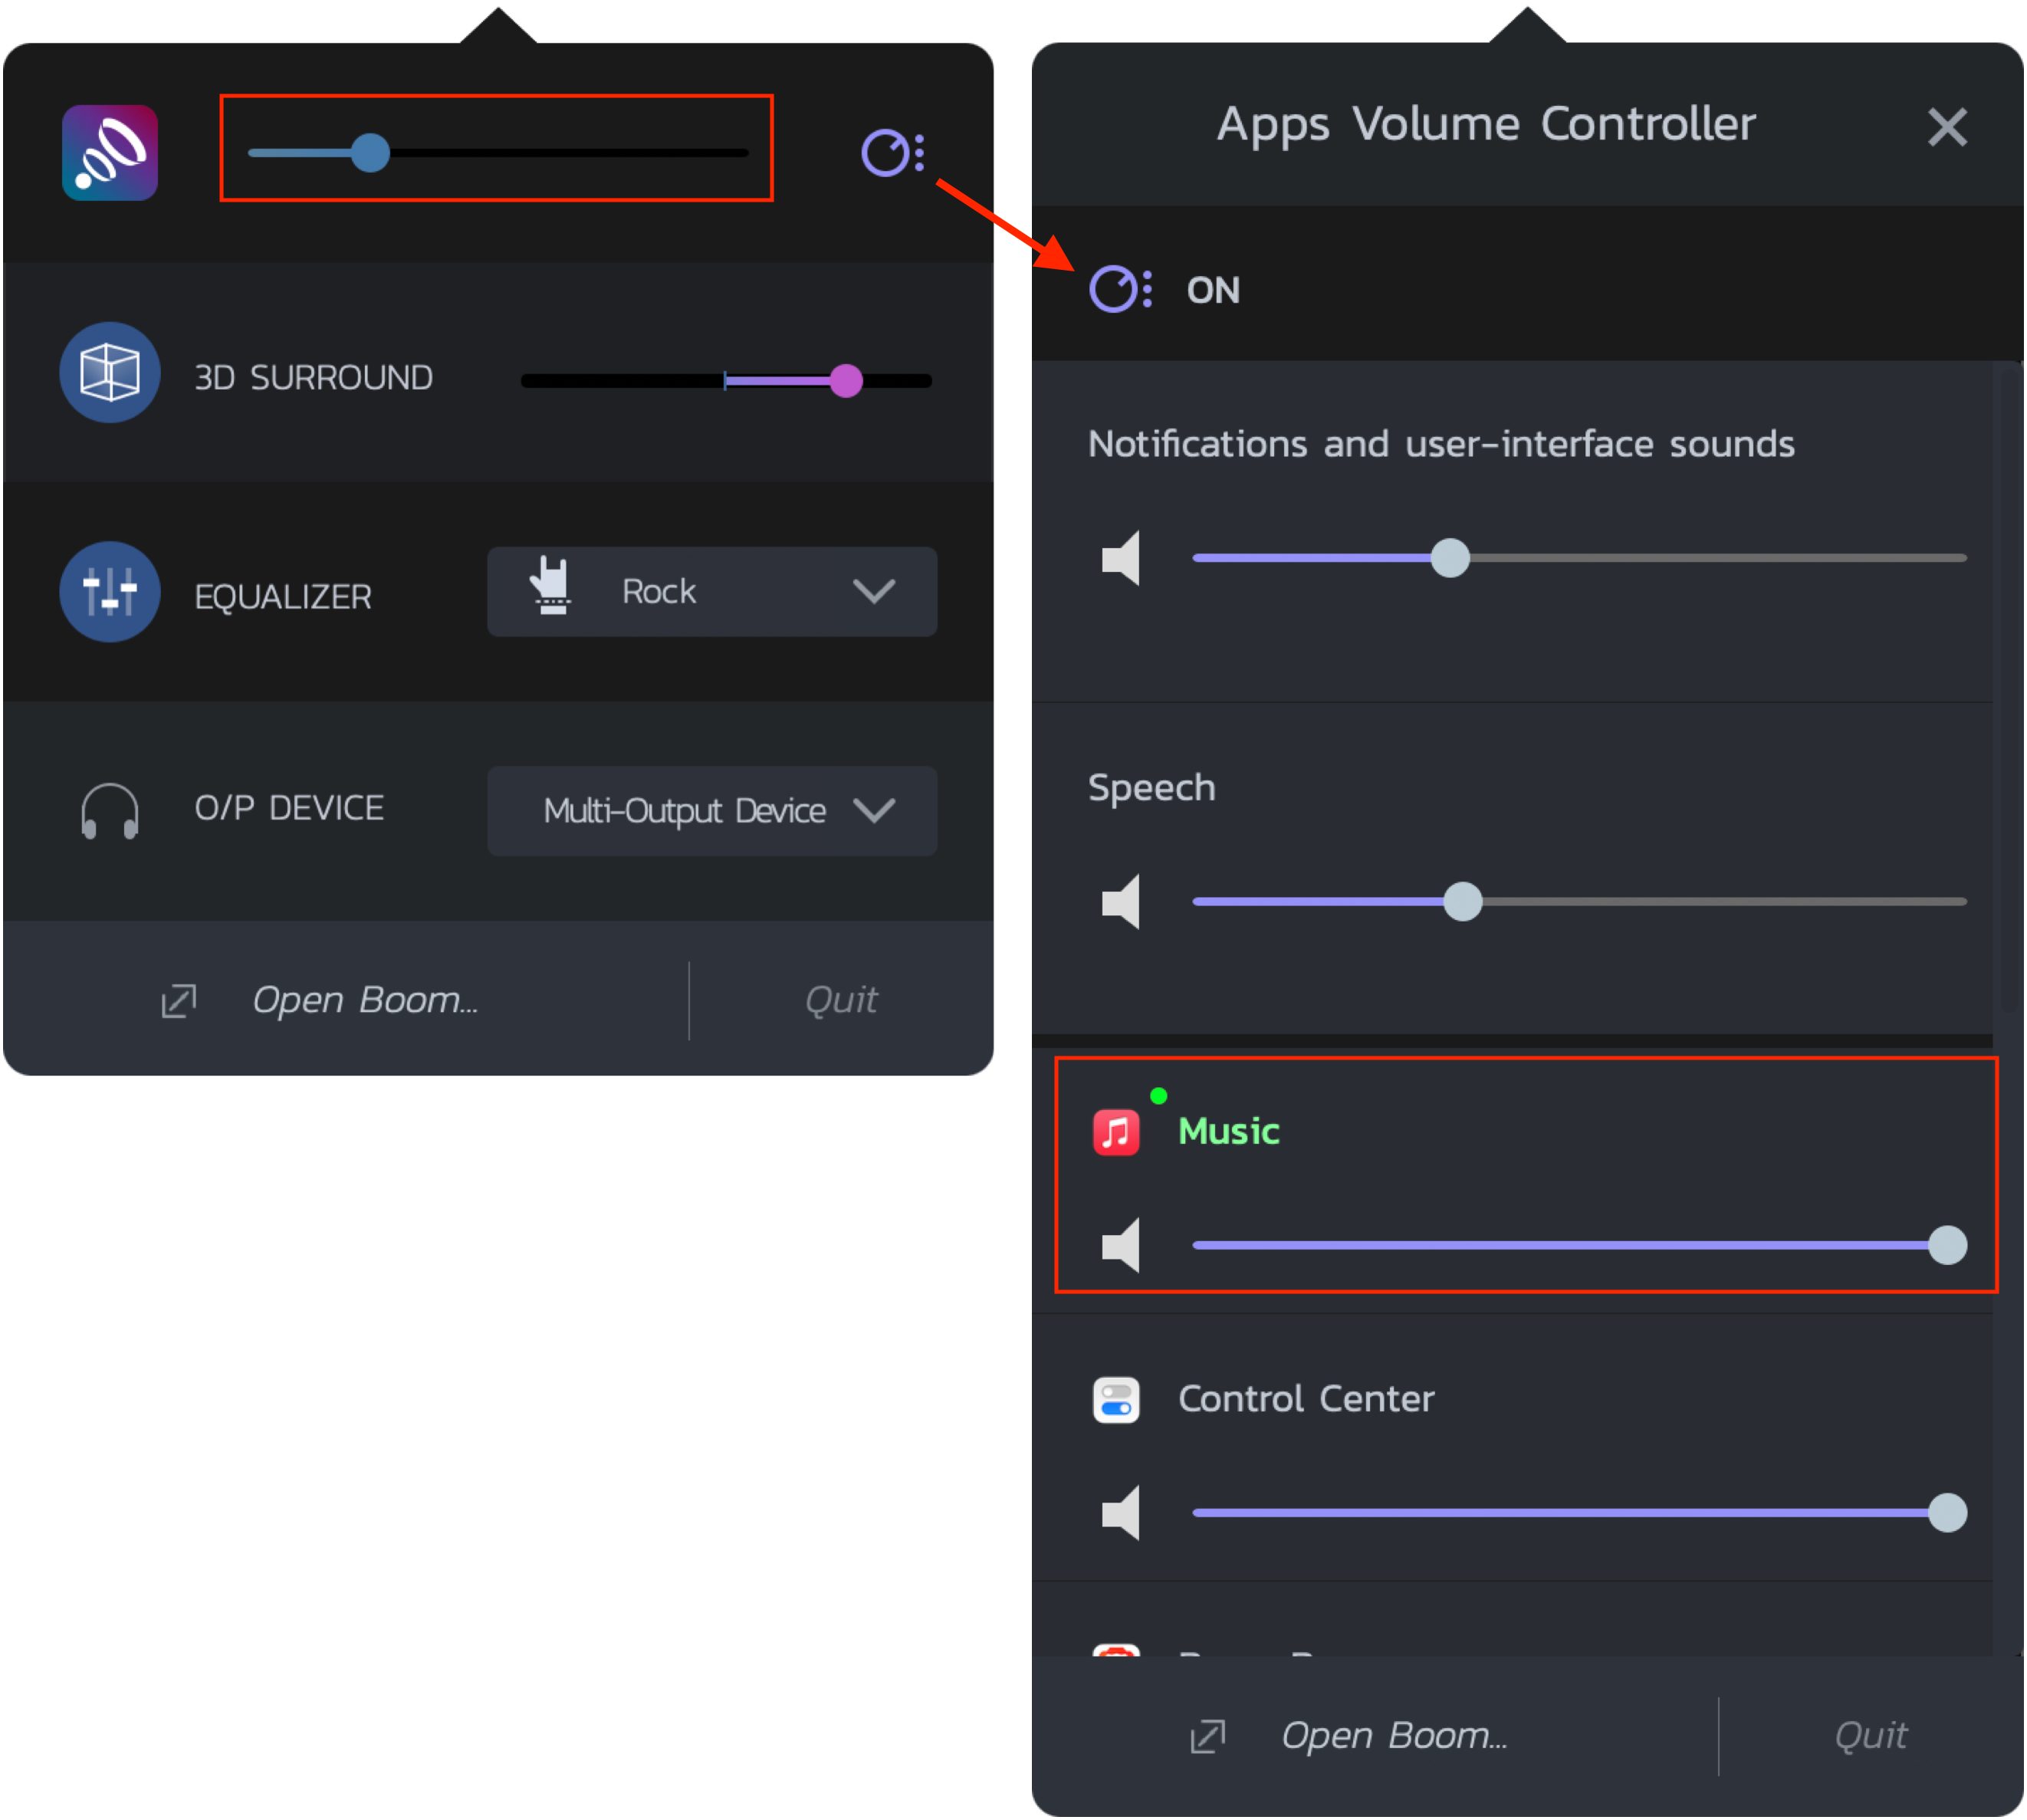
- Boom 3D: I’m quite fond of the 3D sound effect provided by Boom 3D from Global Delight (another recent TidBITS sponsor). It provides some features that intersect with this problem, though it’s not entirely satisfactory. Most notably, Boom 3D has a volume control in its menu bar interface, and you can assign hotkeys to control it within any other app. Plus, Boom 3D enables per-app volume settings, much like SoundSource. The problem is that the main volume control doesn’t go to zero, rendering it useless as a mute option. The per-app volume does go to zero, so you can mute a particular app, but that requires an extra click and slider manipulation—there are no hotkeys for per-app volume. Boom 3D costs $14.99, and TidBITS members can save 25%, dropping the price to $11.24.

Realistically, since I have all these apps at my disposal, I’m going to employ all of them. SoundSource provides a nice dashboard to all sound-related activities on my Mac and enables the system volume controls, Keyboard Maestro lets me control audio from the keyboard, and Boom 3D enhances the music.
Gotcha #2: No AirPlay in Multi-Output Devices
You can add an AirPlay device to Audio MIDI Setup by clicking the + button and choosing it from the Connect AirPlay Device menu. Once you do that, an AirPlay output becomes available for selecting as part of the multi-output device. Unfortunately, as soon as you make the multi-output device the default audio output, the AirPlay device disappears, and no audio is sent to it by the multi-output device.
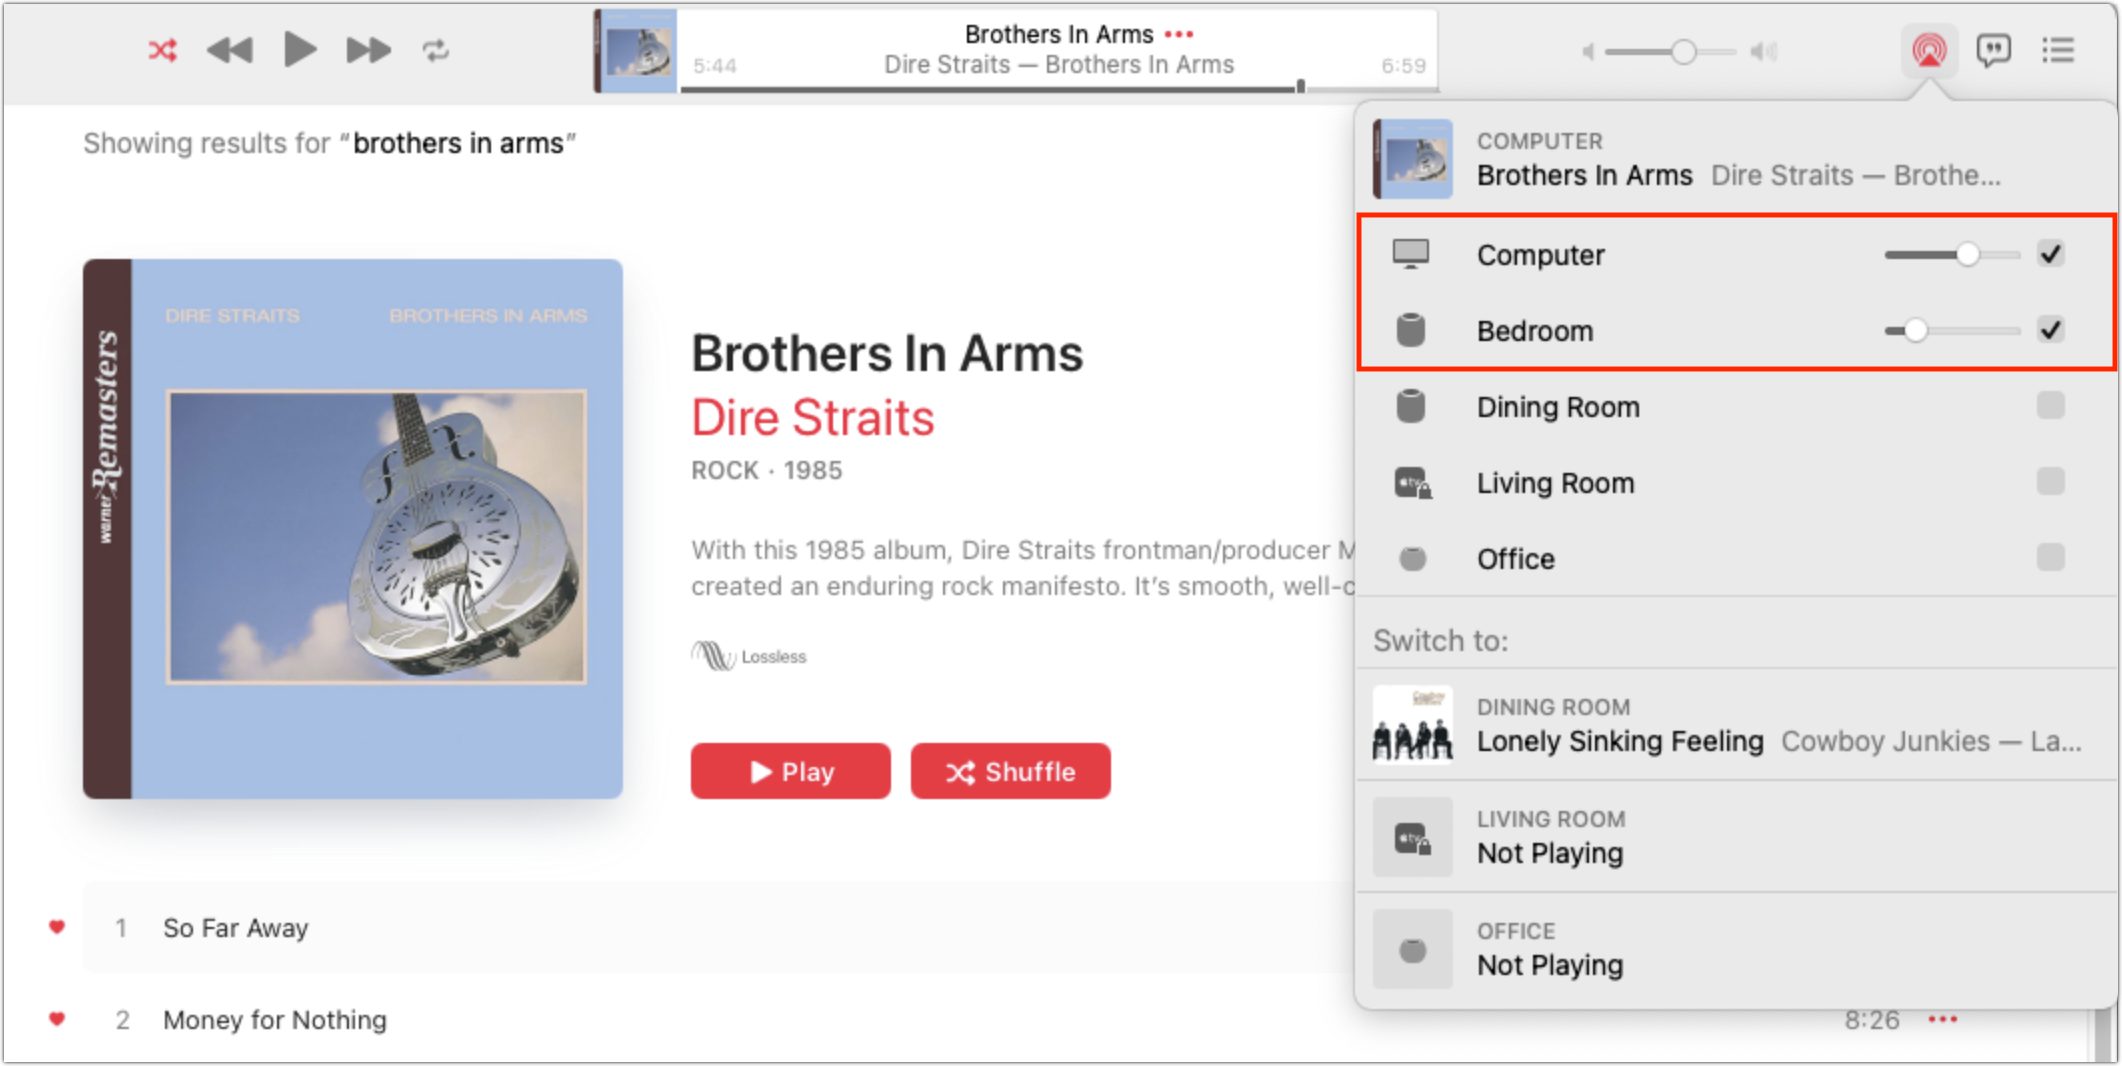
However, there is a workaround, at least for those using the Music app. If you click the AirPlay button in the Music toolbar, you can select multiple AirPlay destinations and set their volumes independently. The Computer destination uses whatever audio output is selected in the Sound preference pane, so in this situation, it would be my Multi-Output Device. When I combined that with the Bedroom HomePod that I borrowed temporarily, my office was filled with sound.
There are two downsides to this workaround:
- It works only in Music. That may be obvious, but if you want to listen to music on YouTube through Safari, say, you’re out of luck.
- The only volume slider that controls all the selected speakers is in the Music app itself. You may find yourself, like me, thoroughly confused when other apps seem to be controlling volume without making any appreciable difference. (The HomePod was loud enough that I could barely tell when my iMac and Thunderbolt Display speakers weren’t contributing to the overall sound.)
The solution to those problems is Rogue Amoeba’s Airfoil. It can distribute audio from any Mac app—or all system audio—to AirPlay and non-AirPlay audio devices, working around the Music limitation. You can even independently choose which speaker through which to play “computer” audio. And it provides keyboard shortcuts for controlling volume and muting audio. Airfoil costs $29, or $23.20 for TidBITS members after the 20% discount.

On to Speaker Research
Although I’ve thoroughly enjoyed working through all the implications of bonding the speakers in my iMac and Thunderbolt Display, when I brought the HomePod into the mix, it instantly became apparent that it produces much higher quality audio on its own, particularly in terms of bass. That suggests that my audio hacking won’t preclude the need to replace my Altec Lansing FX6201 speakers, perhaps with something that has a subwoofer. So now it’s time to stop writing and start researching all the recommendations in TidBITS Talk (and if you have any others, please contribute them).
For testing speaker balance, I find that the title track form Al Stewart’s album Year of the Cat is great. The intro starts out solely in the left speaker and stays that way for 34 seconds. Afterwards,the percussion is mainly in the right speaker with the rest of the sound mixed between the speakers.
For testing mid-range and treble, I’ve always liked the the track I Think It’s Going to Work Out Fine from Ry Cooder’s Bop til You Drop.
Hm, for balance wouldn’t it be simpler and more accurate to find a mono recording, close your eyes, & fiddle with it until it seems to be in front of your nose?
Linking to this if you want to consider new speakers…
Using a mono track is fine for determining balance, but if you also want to test separation, it’s great to have a track that clearly has different things happening in the left and right channels.
Thank you! This article is another reason that I love subscribing to Tidbits. Never did I think to combine audio outputs from two monitors, but this afternoon, for the first time ever, I jammed out to a sorta-kinda-stereo sound system. Thank you for sharing — plus recommending Rogue Amoeba for volume control.
Huh, Interesting. Stereo separation, you mean? That’s something audio engineers can and do manipulate in producing a mix, and it can vary wildly from one recording to another—a lot of 60s rock recordings have instruments popping up in all sorts of unlikely places. So I would think it would be an unreliable way of determining speaker position?
Anyway–the track you recommend is one of my favorites on one of my favorite CDs. As I recall Bop 'til You Drop was either the first or one of the first digitally recorded rock albums. Have you noticed how low its level is in comparison to other CDs? I suspect that was because they were taking full advantage of the enhanced S/N ratio of digital technology. I’m continually having to adjust the volume 'way up when “I Think It’s Going to Turn Out Fine” comes around on my iTunes playlist.
Okay, I used to be into connected speakers… but a few years ago I got religion…not really, but I did leapfrog into wireless sound on a SONOS system. Outstanding sound quality and volume separation and control.-easy to set up, easy to add rooms and even coordinate all, at the same time! Still in love with a pair of 3 s linked to a beam tv sound bar,. Also serves surround sound audio only, and a portable move speaker temporarily in the kitchen, or the deck. Separate app for iOS and OS Never a regret…good value for the price. Oh yeah , I stream tune in, Pandora, prime music, iTunes and my own library HD attached to the router… so flexible !
@rlennox I did the same 2 years ago! Except I went with the Ikea Sonos bookshelf speakers.
It was a true revelation for me. Through all of my research and subsequent purchases (JBL LS305, audio interfaces, cables, etc.) I realized that I just really want to play an enhanced radio in my office area.
Sound and music are much like wine to me. I only know what tastes good and doesn’t give me a headache. But I can’t discern a wine’s “oakiness” and the subtle hints of caramel, blackberry, and rodent droppings.
Don’t get me wrong–I totally dig all music equipment and I really wanted to be that audio guy. I love music but I’m not a musician nor a sound engineer.
I kind of did the same, but on a less expensive level.
I really really want a 5.1 system to listen to some box sets I’ve been collecting. I used to play music and think I still have a reasonably good ear. But I have to be honest with myself and say I’ve never been able to afford a top of the line system, and truth be told the best system I have in my life right now is in my 2004 car (and that’s mostly stock, it was just a decent system for its time).
I had a small tuner and speakers about 10 years ago but they started acting up and I came to the realization that I really only listened to my iPod though them, and those three pieces took up a LOT of space for iPod playing. I would also walk around with my phone playing in my pocket.
I started working from home more and thought, how can I setup something in my office to stream music without running more wires in an already cluttered environment? Coincidentally a coworker brought a small BT speaker into the office we shared, I did some research and found Anker!
I love loud music but can’t work with loud music so did I really need to spend a lot money for great sounding loud speakers? Probably not. The first one I bought - yes one - was just a small cube BT speaker that I sat across the room. That finally died and in 2019 I searched again, and ended up with Anker Soundcore Flares. I bought 2 so I can have stereo this time. I looked at Sonos (needed power) and others (even did my famous spreadsheet comparison) but these checked my boxes at a reasonable to me price ($110/pair)
I found out after I got them that the BT wouldn’t reach outside, so I did go back online to buy a Varo wifi speaker. That one I tend to carry around the house and outside because the range is greater.
My biggest sticking point was getting battery operated speakers.
I have since found I can’t run both BT and WiFi speakers at the same time, but I can run either of them plus the computer speakers if I want.
And sadly setup is always attached to your phone, but both products allowed me to delete the apps once that was done.
Diane
(ps I love speaker conversations!)