Protect Yourself from Blue Light with Digital Color Filters
Perhaps it’s a cliché, but I’ve made health the focus of this new year. I’m hitting the gym, tracking health with my Apple Watch, and experimenting with countering the effects of blue light exposure (for more on my health experiments, see “How I Finally Embraced the Apple Watch as a Fitness Tracker,” 7 February 2022).
The science isn’t settled, but there is a growing body of research that links blue light exposure from screens to sleep problems that may, in turn, contribute to cancer, diabetes, heart disease, and obesity. There’s a tinge of pseudoscience to some of the claims, but even Harvard Medical School points to these effects, recommending red lights and blue-light blockers at night, such as special glasses or screen filters.
Anecdotally, as someone who stares at screens all day and much of the night, I’ve been dealing with increasing eyestrain, dryness, and headaches as I get older. Apple has acknowledged this problem and provided a baked-in solution. Night Shift, introduced in iOS 9.3 and macOS 10.12.4 Sierra, gives you a free and easy way to experiment with blue light filtering. (Of course, if you need accurate color representation on your screen for graphics work, you won’t be able to use Night Shift.)
Reducing Blue Light on the Mac with Night Shift
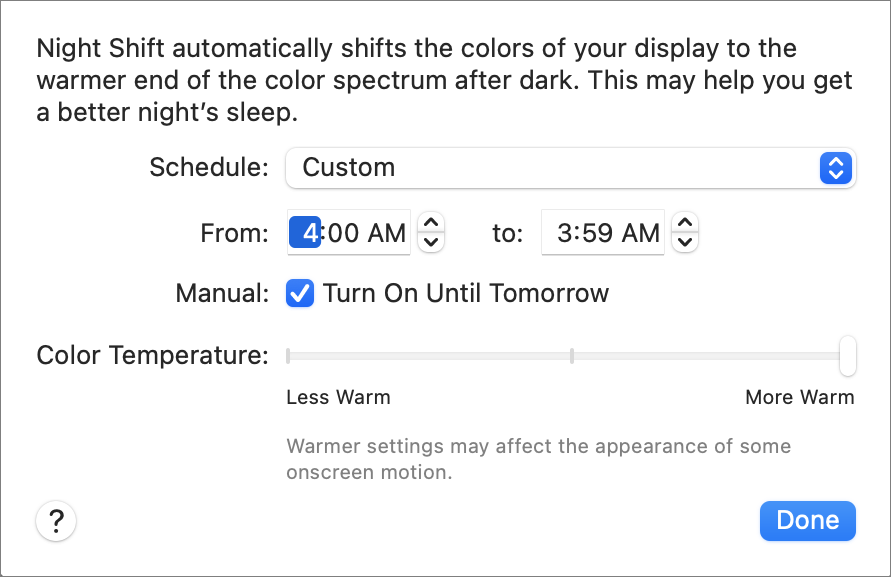
To try Night Shift on the Mac, go to System Preferences > Displays > Night Shift, and select Turn On Until Tomorrow. If you want to leave it on all the time, there’s a trick: for Schedule, choose Custom, and set the time from 4:00 AM to 3:59 AM. That way, there is only a brief minute during the wee hours in which Night Shift is off.
But Night Shift may not be all that effective. In a 2018 study, researchers at Rensselaer Polytechnic Institute had 12 young adults look at iPads between 11 PM and 1 AM. They tested four conditions across four nights: LED goggles that emitted a lot of blue light, Night Shift set to less warm, Night Shift set to more warm, and a dim light control with orange goggles. The researchers found that when Night Shift was enabled, the participants’ melatonin levels were slightly less suppressed, but there wasn’t a significant difference between settings. (Melatonin is a hormone that helps you sleep, and exposure to blue light suppresses it.)
But this was a small study, almost certainly conducted on college students whose sleep schedules and habits aren’t representative of older or younger people. And while Night Shift’s effects weren’t significant with respect to melatonin suppression, they did show a slight improvement. The researchers also noted that screen brightness was also a factor. All this got me thinking—what if Night Shift doesn’t block enough blue light?
With that last idea in mind, I looked for something stronger. Initially, I tried f.lux, the classic open-source app that Apple Sherlocked with Night Shift, but it’s tuned for gradual blue light reduction throughout the day. I wanted to eliminate blue light with the flick of a switch.
Eliminating Blue Light on the Mac
Night Shift reduces blue light but doesn’t eliminate it. To do that, you need a red filter, since red is the opposite of blue on the color wheel. Thankfully, the Mac has a built-in way to do that.
First, turn on Night Shift as described above, which removes some blue light but not all. We’re going to add a toggleable color filter on top of Night Shift to eliminate even more:
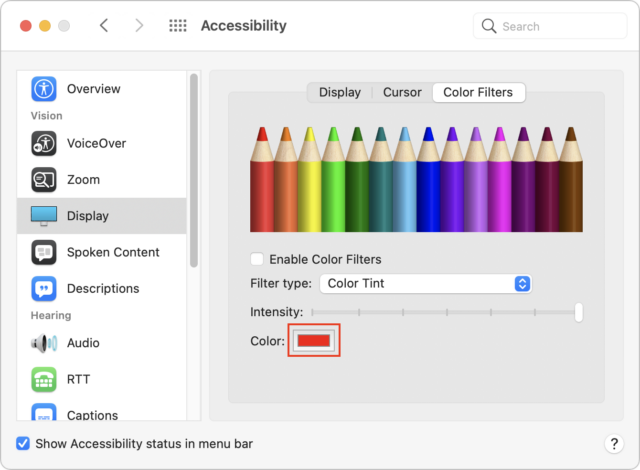
- Go to System Preferences > Accessibility > Display > Color Filters.
- For Filter Type, choose Color Tint.
- Move the Intensity slider all the way to the right.

Now we want to set the maximum shade of red:
- Click the box next to Color (highlighted above) to open the color picker.
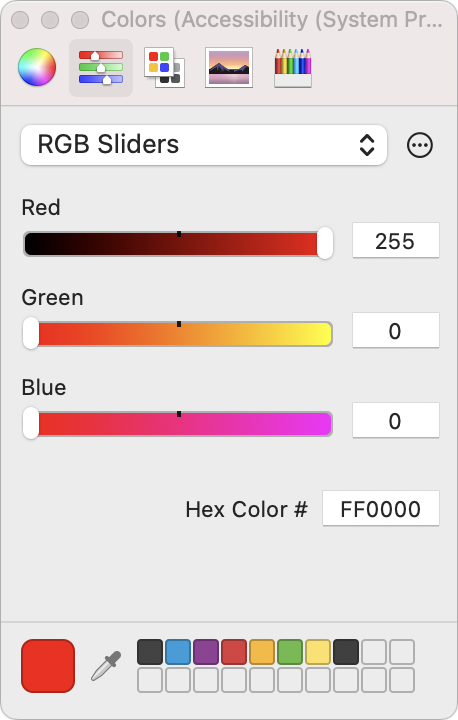
- Click the second icon in the toolbar and choose RGB Sliders from the pop-up menu. Turn red all the way up (255) and set both green and blue to zero.
That’s our initial setup. Now let’s make it easy to turn on and off:
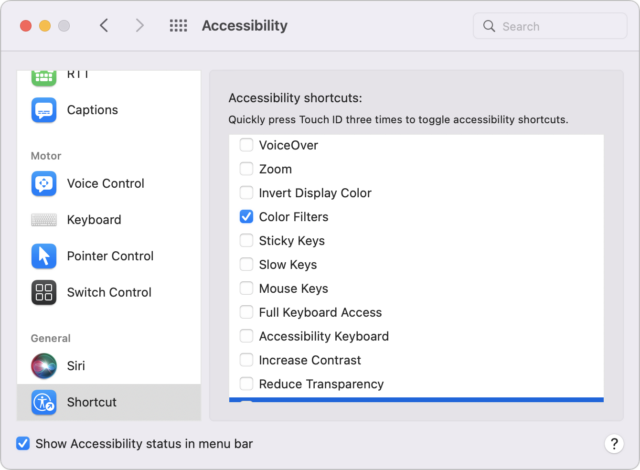
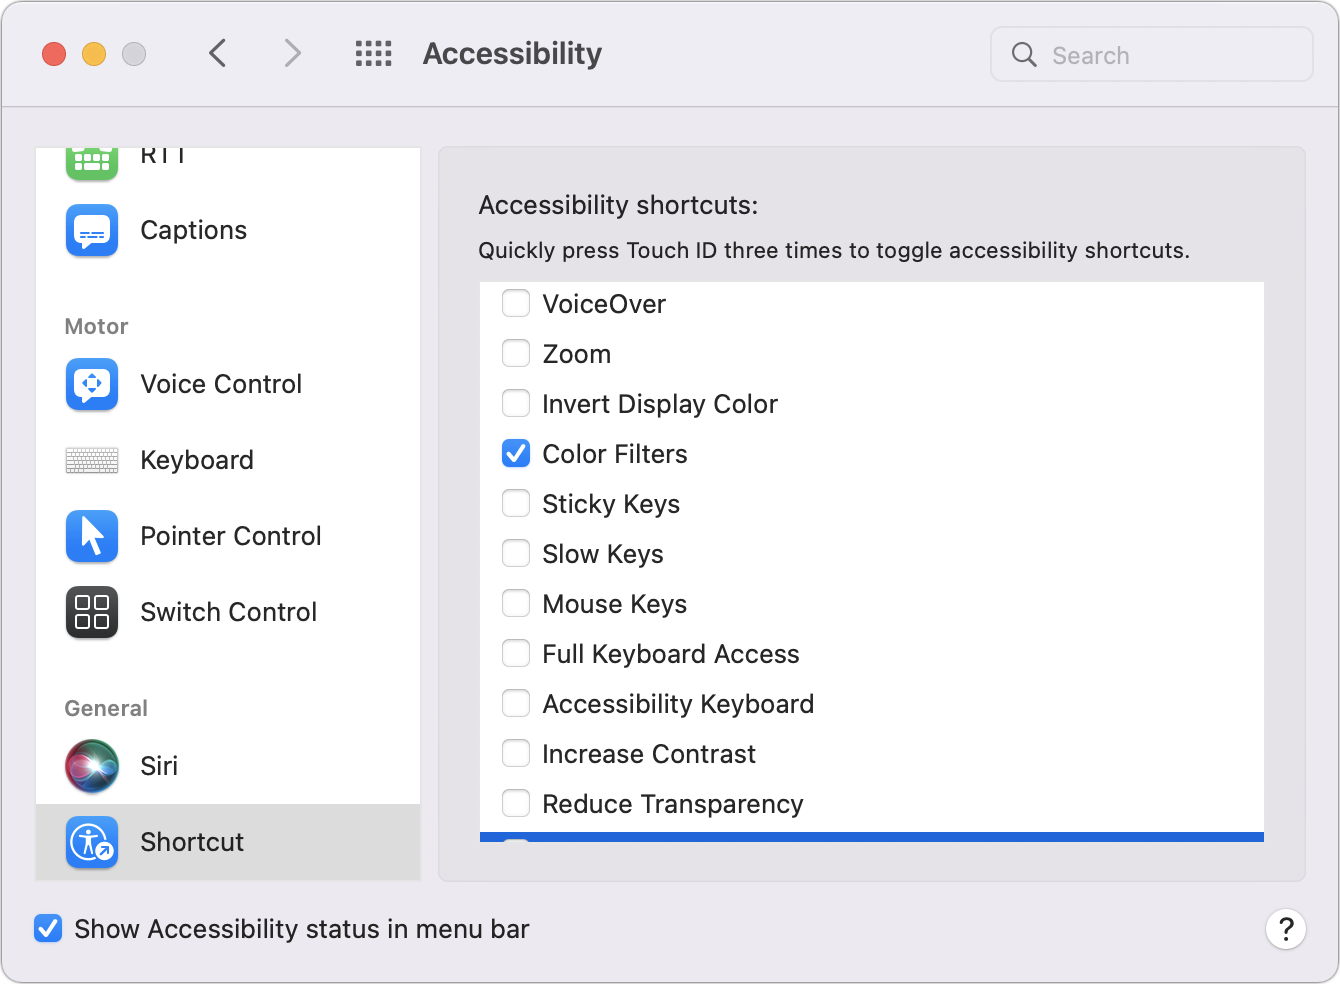
- While in the Accessibility preference pane, select Show Accessibility Status in Menu Bar at the bottom of the pane.
- Scroll all the way to the bottom of the sidebar and select Shortcut.
- Unless you need any of the other features listed, uncheck everything except Color Filters.
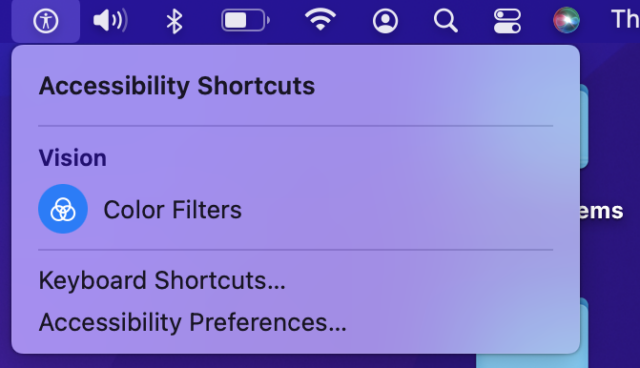
Now you have two ways to toggle the red color filter:
- Press Command-Option-F5 on your keyboard or press the Touch ID button three times. If you have more than one Accessibility shortcut enabled, it will present a (rather slow) menu that lets you turn accessibility features on and off. Otherwise, it instantly turns the screen red.
- Click the Accessibility icon in the menu bar (it looks like a little man in a wheel) and choose Color Filters.
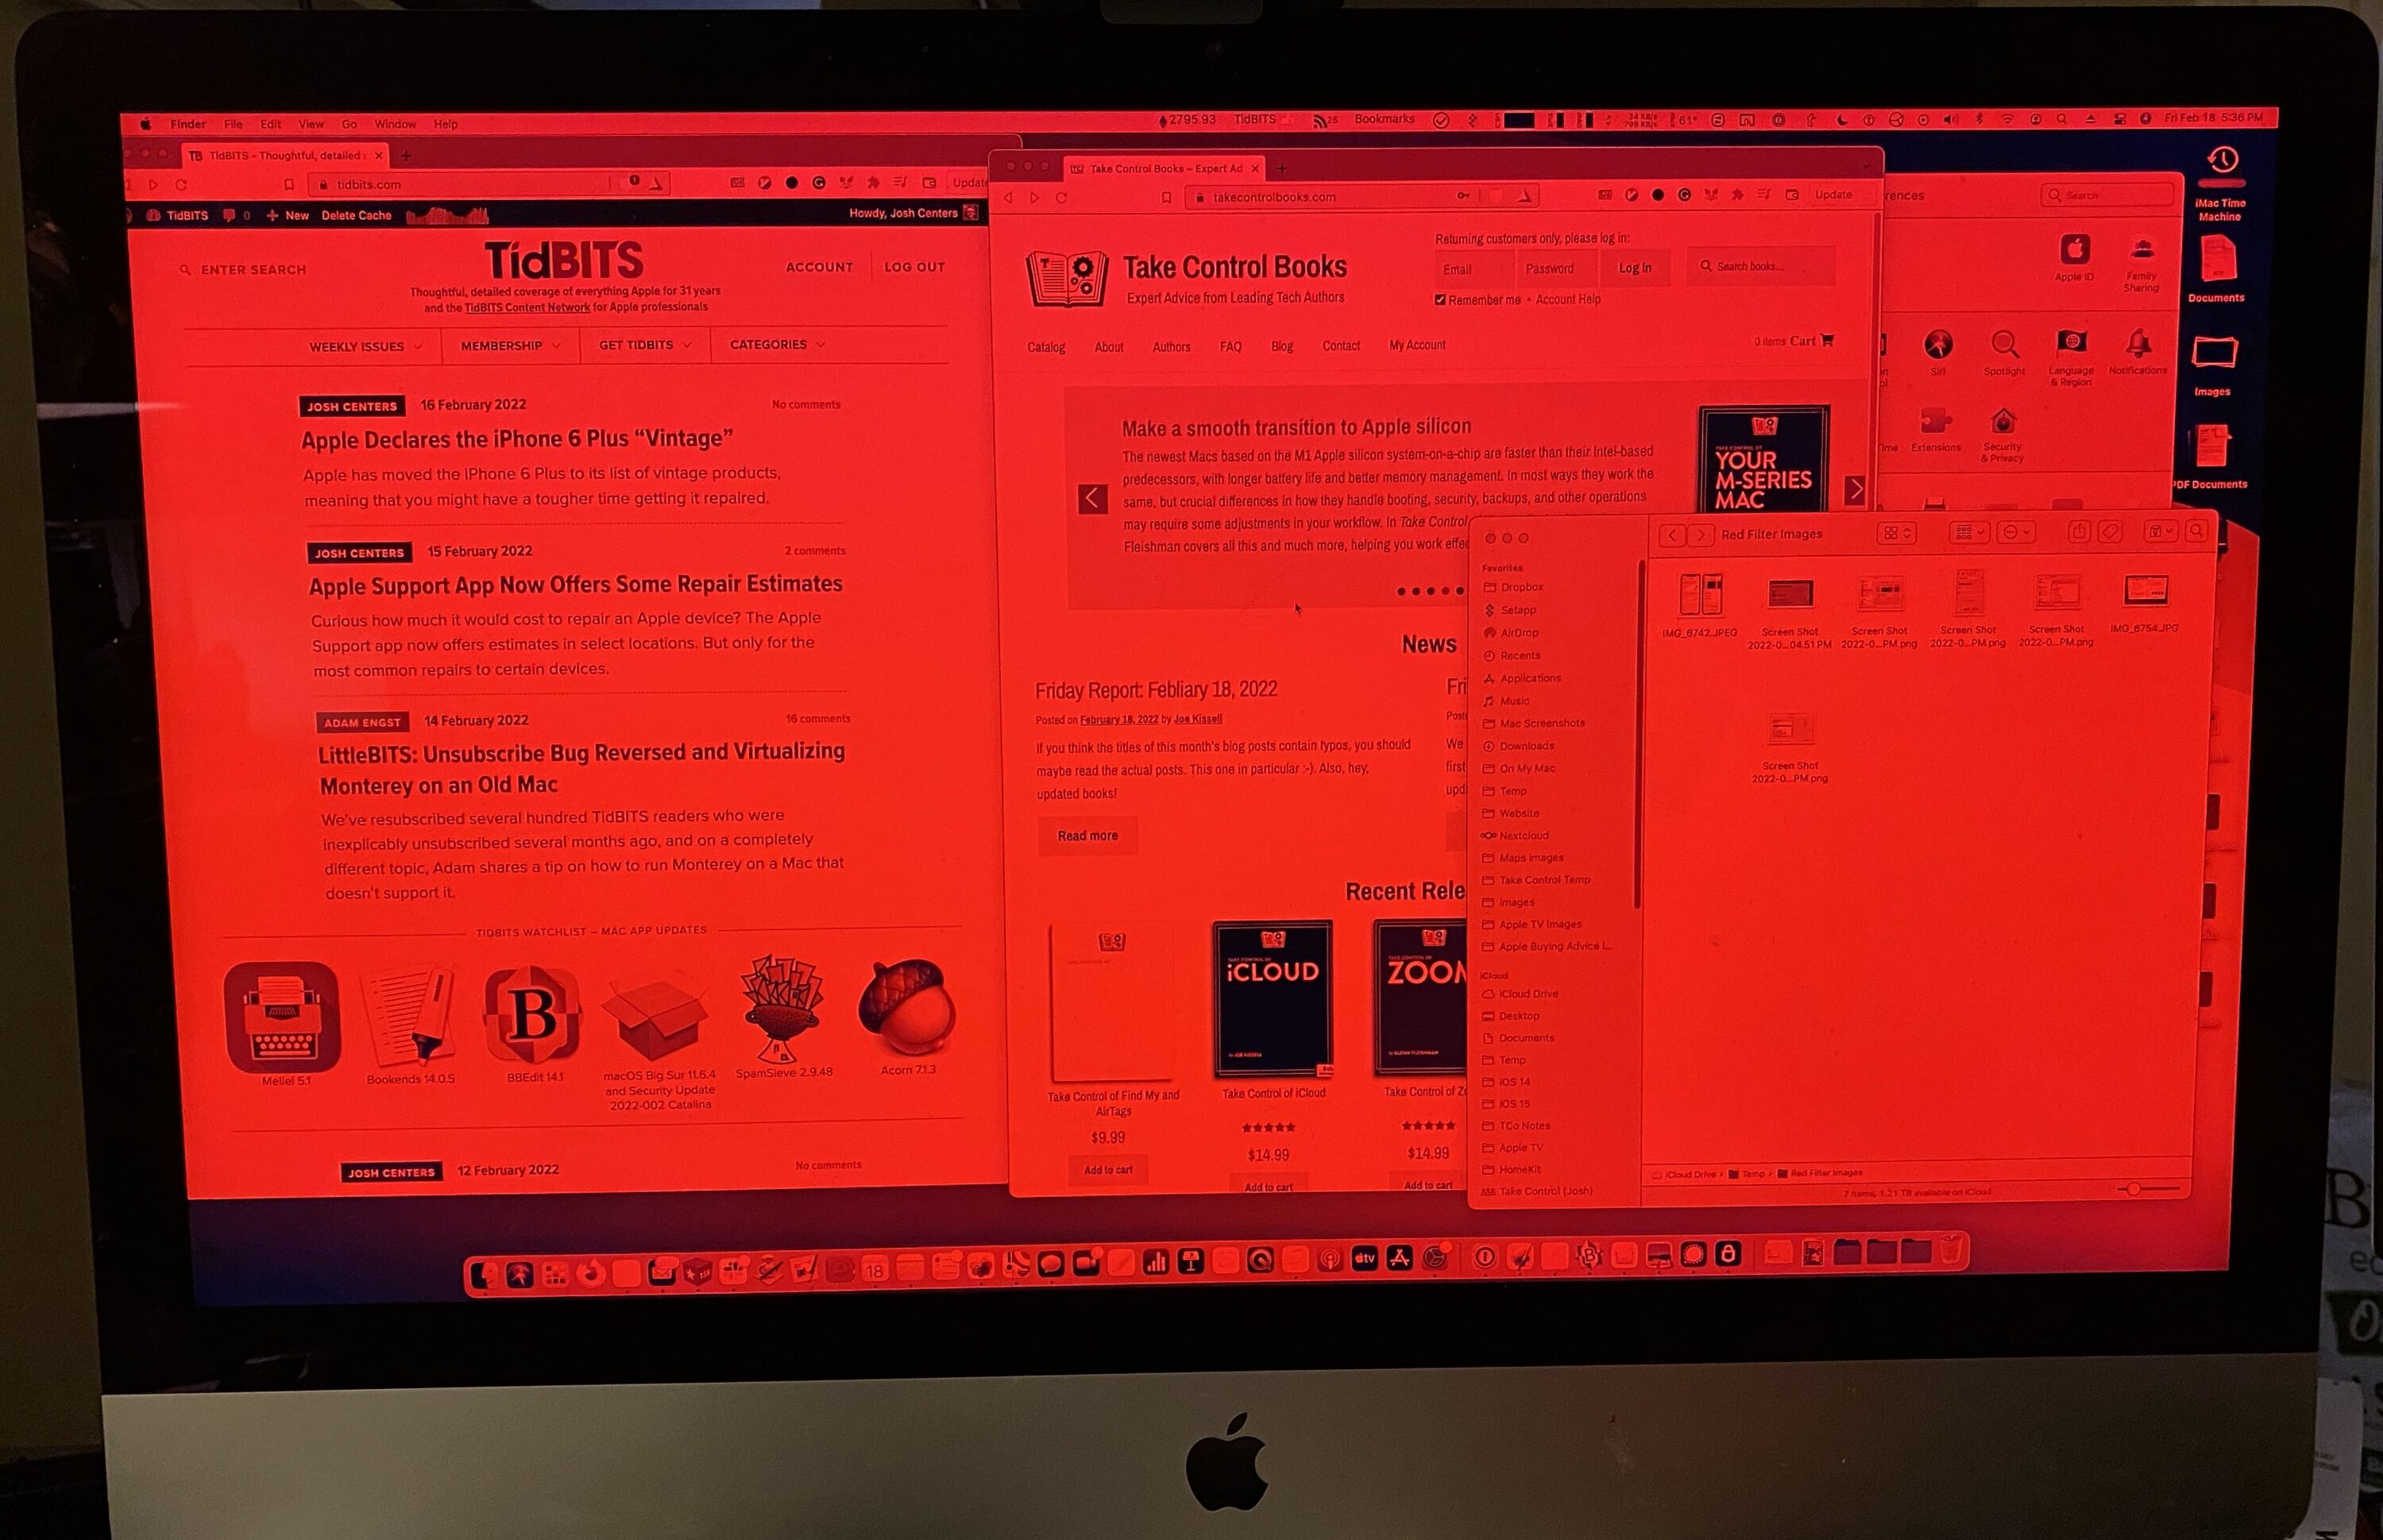
As you can see in the photo below, this provides a rather shockingly red screen that’s appropriate for indicating your Evil Computer Hacker status or developing analog film in a darkroom.
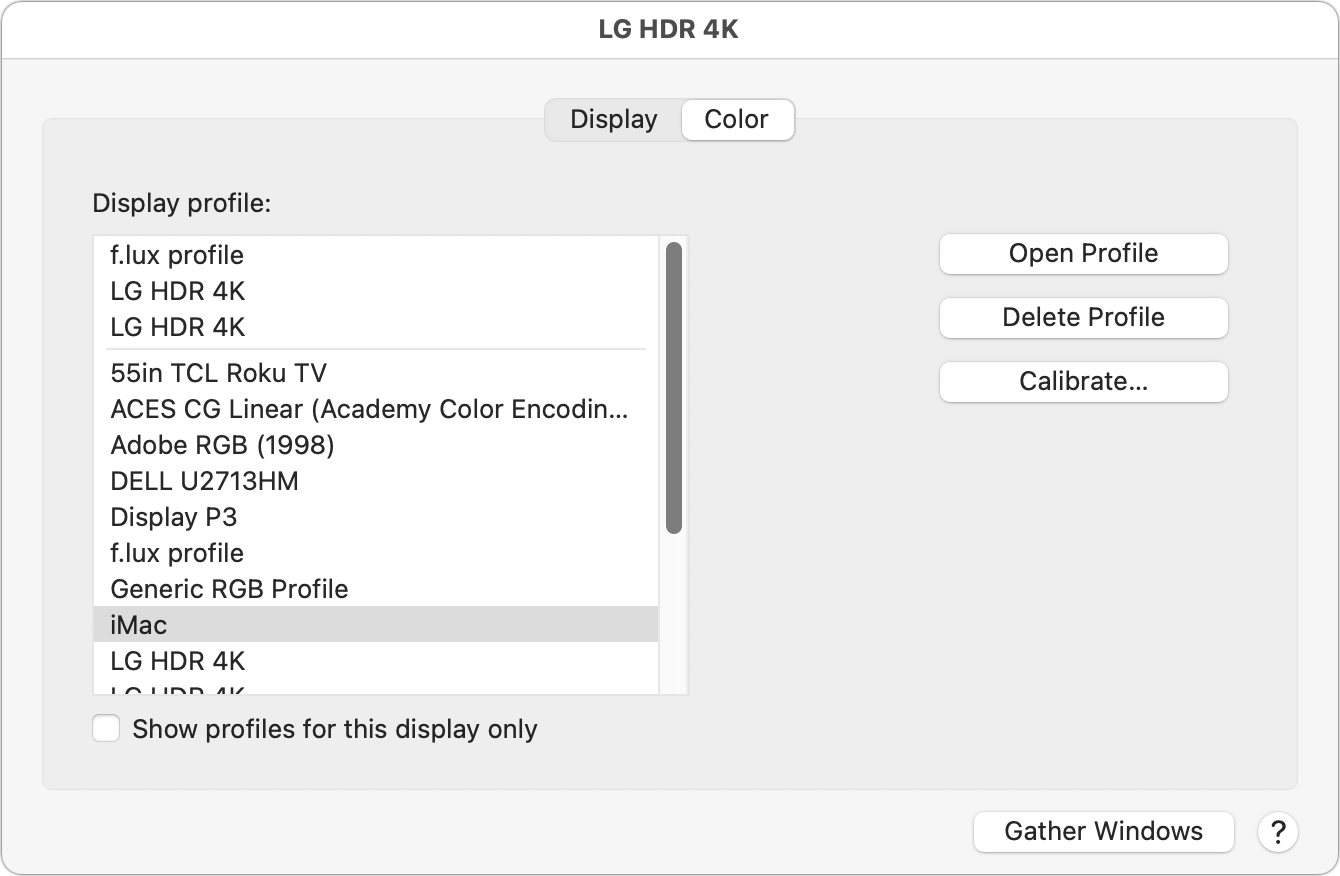
If the color filter doesn’t work on a second display, the likely culprit is a color profile. To fix that, open System Preferences > Displays. Make sure you’re looking at the display the color filter isn’t working on because macOS shows an individual settings panel for each display. Click Color, and then pick another profile like Generic RGB Profile. If you don’t see any that work, uncheck Show Profiles For This Display Only to show all available profiles.
Based on my testing, the problem seems to be that some color profiles simply won’t display certain colors. The LG monitor connected to my iMac won’t show pure red unless I set it to the same color profile as the iMac.
To make the most of this color filter, turn your screen brightness down to the lowest comfortable level since studies indicate that brightness is as disruptive to sleep as blue light.
Eliminating Blue Light in iOS and iPadOS
You can use the same techniques to set your iPhone or iPad to reduce and eliminate blue light. First, set up Night Shift to run 24 hours per day, minus one minute:
- Go to Settings > Display & Brightness.
- Tap Night Shift.
- Turn on Scheduled and set it from 4:00 AM to 3:59 AM.
- Drag the color temperature slider all the way to the right to More Warm.
Once again, to eliminate blue light, we’re going to take advantage of color filters:
- Go to Settings > Accessibility > Display & Text Size > Color Filters.
- Turn on Color Filters.
- Select Color Tint.
- Drag the Intensity and Hue sliders all the way to the right.


Your screen should be absolutely red, which isn’t always desirable. For instance, the podcast app Overcast, which has a largely orange color scheme, is practically unusable with the red color filter. However, it’s easy to make the filter togglable:
- Go to Settings > Accessibility > Accessibility Shortcut (at the bottom).
- Select Color Filters.
Now you can triple-press the side button or Home button (depending on your iPhone model) to turn the red color filter on and off.
What about brightness? Consider turning off Auto-Brightness while you’re in Settings > Accessibility > Display & Text Size and then manually adjust screen brightness to the lowest comfortable level using Control Center.
Blue Light Special vs. Red Light District
Let’s run an informal experiment. Try one of these approaches for turning your screen red while using your devices after dark. Then let me know in the comments if your eyes feel better or if you see improved sleep quality. Personally, I find the darkroom approach easier on my eyes, but I have yet to find a direct correlation to sleep quality. I’m much better off avoiding my iPhone entirely before bed and instead reading on my Kindle.
If you get tired of the red screen, simply disable the color filter settings outlined above.
What is wrong with using f.lux to change the color of a display?
I have had headaches for a large part of my life. They can have so many reasons:
And so on.
You can help your eyes with eye training. See “Improve Your Eyesight Naturally” at Amazon.
An important part for headaches is getting enough magnesium with “magnesium oil”.
I appreciate that you touched on the research and science (studies) as being unsettled, even though you write that it’s trending more likely to be a real thing. In recent years, products, like eyeglass lens coatings with blue light filtering for example, have been heavily marketed so I’ve tried to check on the science a couple times myself. And a few years ago, I asked my retinologist for his opinion. He acted like I had asked him about his political affiliation and he gave no useful answer. Discouraging. Prices dropped so my regular glasses now have premium (top of the line) blue light filtering. So do I still need to set up my Mac, iPad, and iPhone as you carefully explained? (Thank you!) Actually, I do for sure for my iPad and iPhone because I often use these without wearing glasses (my very close vision is better without glasses).
Josh: Quick question here: You describe in detail, how best to mitigate blue-light emissions from Apple devices. With respect to blue-light emissions, what makes Kindle different than Apple devices? In your article, you say, you’d rather use Kindle at night, just before bedtime
.
Nothing, but as I state in the article, it’s hard to control manually. Plus, you can perform my method without installing anything extra. I’ve done some of the eye training exercises, but I should get the book and get more serious about it. I agree on magnesium and take magnesium chloride and magnesium glycinate daily.
Yes, I would, for the reason you outline. Also, extra protection won’t hurt. I’ve actually heard that it’s bad to wear blue light-blocking lenses in the sun but I have nothing to back that up with. I actually have some blue-light sunglasses that fit over my prescription glasses, but I don’t wear them often because they make me look goofy.
My understanding is that the Kindle Paperwhite’s lights emit some blue light, but not as much as an iPhone. The screen also isn’t as bright. All I know is that I fall asleep much faster reading my Kindle than if I’m reading on my iPhone, and I seem to fall asleep even faster if I wear my goofy blue light glasses mentioned above.
Amazon Kindles don’t have backlights, they use E Ink, a reflective, not emissive display (LCDs and OLEDs are emissive). The Kindle Paperwhites and other models with LEDs have them arranged around the edges, casting light onto the E Ink so it’s visible in the dark. They use “white” LEDs that include blue wavelengths but you can turn down their brightness or turn them off and read with whatever light you want.
The fifth edition Kindle Paperwhite released in October (and the third Kindle Oasis) does allow you to adjust the color temperature of the LEDs, I assume allowing you to reduce the amount of blue in their light.
Yes, you’re correct. It’s not a backlight so much as sidelights. I don’t have the latest Kindle, but knowing that you can adjust the color temperature might tempt me to buy one the next time it’s on sale.
Let’s not forget the other devices in homes, like appliances, clocks, and accessories that cast a obnoxious bright blue light … like at night. A mask film, sharpie or other way to dim/mute that blue cast… its unnatural. It might be unlike the more time-consuming, harsh, unhealthy affect to some with migraines and such that use displays all day. But if you awake late at night, some accessories (OWC drives, Dlink switches, USB hubs…) light up a room, hall or numerous areas that you might not need turn a light on… same with car instrument displays and interiors.
Last month, I was made aware of the accessibility issues to many with the colour temp of displays. I know I am affected by the frequency of GM motors rear light LEDs on cars (try this, turn head/eyes fast to scan left and right…with GM SUV infront of you…its painful and noticeable). So lighting can affect many with painful results.
I’ve been using Night Shift with default settings on my mobile devices for years. I have found Philips Hue White Ambiance bulbs (I don’t need a disco party) and Apples HomeKit Adaptive Lighting, is quite nice. It’s very much Night Shift for your home lighting. Merely turning it on is a no-brainer. I noticed an overall level of comfort as a result and I set 3 scene brightness levels. I run the lights at 30% in the morning and evening. I added the Lutron Aurora that locks the wall switch to the on position and gives you a push-click ON/OFF and a dimmer dial which controls the Hue bulbs if I feel the need to override my brightness automation
Several years ago I invested in a pair of orange safety goggles, designed speifically to exclude wavelengths from blue up (for people using industrial lasers). I’ve tested them and found that they do, indeed, exclude all blue and higher light. I wear them in the evenings. Whether they truly help my sleep, I don’t know (I use a combination of tools), but the scientific basis is sound. All light stimulates alertness. Brighter light is stronger. Higher-energy light is stronger. So blue (indigo, violet) light has the greatest effect.
I wear UVEX brand.
I’ve read that Raymond Teller (of Penn and Teller) wears orange goggles too, and swears by their effectiveness.
I find the best way to read on my iPhone (so as not to disturb my bedmate) is to have the red filter to 100% and have the book (in the books app) set to back page/white text, this makes the text completely red. If I am awake in the night, I can read without disturbing anyone, plus the red light doesn’t disrupt my night vision.
This is all moot and a waste of time for anybody that profiles their monitor for color balance and uses picture editing software to view accurate colors. But thanks anyway.
Very useful for skygazers too. Although most planetarium apps have the red filter built-in, it’s handy to have it available system-wide.
Have adjusted the settings on my iPhone X as suggested and will try it out and report back. Many thanks!
The article says “Night Shift, introduced in iOS 9.3 and macOS 10.12.4 Sierra…”. I am on 10.13.6 and there is no Night Shift in the Displays Preference.
Night Shift also has hardware requirements, it won’t work if the Mac is not new enough and it won’t work if the display won’t support it. Use Night Shift on your Mac. It does work with more displays than those listed in the support article, it works with my 2020 HP monitor using DisplayPort.
A couple of pointers for this system that I’ve developed recently:
The red color filter can make many onscreen elements hard to see, especially if they’re blue, red or orange. If you turn down the Intensity slider a few notches you still block most blue light while making the filter much more usable, which means you’re more likely to keep it on.
You can automatically turn this on with a Personal Automation. Open Shortcuts, tap Automation, tap the +, and choose Create Personal Automation. Choose Time of Day, Sunset, and then adjust the time to your preference. After tapping Add Action, search for “color filter” and choose Set Color Filter. You can also use the same automation to turn down brightness and turn on Dark Mode.