Do You Use It? Proxy Icons Quietly Boost Productivity
Our first few Do You Use It? polls focused on prominent features that have starred in keynotes, been mentioned on macOS Web pages, and migrated between platforms. We’re switching gears with the results from this next poll, which asked if you use proxy icons. They’re one of my favorite macOS features, and I was fully expecting that even many TidBITS readers wouldn’t use them, if only because of not knowing what they are or what they’re good for. The poll results backed up my expectations, with only 40% of respondents using proxy icons regularly and another 17% using them occasionally. Even the number of respondents was down from previous polls, with just under 500 votes. Allow me to persuade you to give proxy icons a try!
![]()
What Are Proxy Icons?
Proxy icons, or as Apple now calls them, “window title icons,” are tiny icons that sit next to the window title in Finder windows and windows from document-focused apps. Dragging the proxy icon to another app or location has the same effect as dragging a standard Finder icon.
![]()
Those who weren’t already proxy icon users before macOS 11 Big Sur are forgiven for not noticing them. That’s because Apple chose to hide the proxy icon in Big Sur by default, revealing it only when you moved your pointer over the window title or clicked in that area. It was undoubtedly an attempt to make the Mac interface look simpler, but it came at the cost of discoverability, like so many of Apple’s interface changes.
A defaults write command made it possible to reduce the length of time you had to hover over the window title before the proxy icon appeared, but only in macOS 12 Monterey did Apple acknowledge the overall wrong-headedness of this change and provide an option to keep the proxy icon visible at all times (see “TipBITS: Always Show Window Proxy Icons,” 26 March 2022). Apple inappropriately relegates this setting to System Settings/Preferences > Accessibility > Display > Show Window Title Icons. While there may be an accessibility argument for the visibility of proxy icons, they’re a longstanding functional part of the macOS experience for everyone and shouldn’t be hidden.
![]()
What Can You Do with Proxy Icons?
The simple answer to that question is anything you can do with standard icons in the Finder. They’re called “proxy” icons for just that reason—they stand in for the real thing. What’s interesting about proxy icons, however, is that their ready accessibility means you can use them in situations where working with a Finder icon wouldn’t be worth the effort. After all, once you ensure that proxy icons are always visible, they’re right in front of you in window title bars, just waiting to be dragged.
Here are some real-world uses that TidBITS readers recommended in our poll:
- Open files in non-default apps: Many standard document types can be opened by multiple apps, so if you’re looking at a JPEG file in Preview, for instance, but you want to open it in Affinity Photo, you can drag the JPEG’s proxy icon to Affinity Photo’s Dock icon.
- Open a folder of files: If you have a folder of text files you want to open in BBEdit or a collection of images to browse in GraphicConverter, you can drag a folder’s proxy icon to the BBEdit or GraphicConverter Dock icon.
- Move files to different folders: If a file you’re working on isn’t located in the right folder in the Finder, you can move it by dragging the proxy icon to the destination folder. Imagine you’ve downloaded a bunch of stock image photos and need to distribute them to various project folders. You can open them all in Preview, open windows for the Finder destinations, and then drag each photo’s proxy icon to the desired folder.
- Navigate in Open dialogs: Whenever you’re looking at an Open dialog, you can drag a proxy icon into it to make it display the contents of the folder containing the dragged proxy icon. Suppose you are working on a document and want to open another document stored in the same folder. However, when you choose File > Open, the Open dialog shows a different folder. Rather than navigate up and down and all around the folder hierarchy, dragging the open file’s proxy icon to the Open dialog takes you directly to the desired folder.
- Navigate in Save dialogs: Similarly, when looking at a Save dialog for a new document (or a Save As dialog), you can drag a folder or file proxy icon to the dialog to change the location to its enclosing folder. However, dragging a file proxy icon has the added benefit of pre-filling the name of the dragged file for the new one. That’s handy when the new file’s name should be similar to the dragged one, perhaps varying only by a date or version number.
- Enter paths in Terminal: Typing long paths at the command line in Terminal is slow and error-prone, whether you’re using
cdto move into a deeply nested directory or specifying a destination for a command that takes a pathname. Drag any proxy icon into a Terminal window to insert a properly formatted path to that folder or file. The tip I gleaned from the discussion is that Command-dragging an icon or proxy icon into a Terminal window has the same effect as typingcd, dragging the icon in to get its path, and pressing Return. - Attach files to email messages or text chats: It’s common to find yourself working on a file you want to share with someone via email. Drag the file’s proxy icon to an email message or your email client’s Dock icon to attach it. This trick also works well with Messages and other chat apps. Make sure to save the file before dragging it so your changes are reflected in the shared file.
- Combine text and word processing files: Imagine that you want to combine a collection of text files. Rather than a convoluted dance of Select All > Copy > switch documents > Paste, you can open the destination document in one window and drag each file’s proxy icon into the destination to put its text at the insertion point.
- Shelve a file in Yoink: The Yoink utility provides a “shelf” for storing files and other content you want to work with later. If you’re working with a file that you want to access in the future, drag its proxy icon to Yoink to add it.
- Preview text in Marked: The Marked app is a previewer for Markdown and other plain text markup languages. Suppose you’re writing in iA Writer, which lets you focus on your text, but you want to see what your document will look like when formatted. Drag the proxy icon from iA Writer to Marked to open a preview.
- Preview HTML documents: When writing HTML, you will likely want to preview your work repeatedly. Although some text and HTML editors have their own previewing capabilities, it’s important to check that your HTML code renders properly in at least Chrome, Firefox, and Safari. Drag the HTML document’s proxy icon to a browser’s Dock icon to do that.
Proxy Icon Quirks and Caveats
The modifier keys you can use while dragging a file or folder in the Finder also work with proxy icons. So, when using a Finder location like the desktop as a destination:
- Move: Command-drag a proxy icon to move the open file there without closing it, even when the destination is on another drive.
- Copy: Option-drag a proxy icon to make a new copy of it there.
- Alias: Command-Option-drag a proxy icon to create an alias there.
There is one action that always works with a standard Finder icon but may not with a proxy icon: dragging to the Trash. Try that with a proxy icon in Pages or TextEdit, and nothing will happen. However, it’s not a universal prohibition—BBEdit allows it, and other apps may as well.
Eagle-eyed users may notice that document proxy icons are sometimes grayed out, as in BBEdit, and such icons may not even be draggable, as in GraphicConverter. That happens when the file has unsaved changes. Not all apps honor this historical interface convention (which is pretty subtle, I’ll admit), and apps like Pages that use Apple’s newer approach to title bar controls instead append “Edited” to the window title. Either way, save the file before dragging its proxy icon to ensure your changes are incorporated.
Several people noted that proxy icons don’t work in Excel. However, as the discussion progressed, it turned out that the problem was not with Excel but with all Office documents stored in OneDrive. It’s unclear why Microsoft disables proxy icons for Office documents in OneDrive, given that they work fine for other types of documents in OneDrive and for Office documents in Dropbox, Google Drive, and iCloud Drive.
Mail used to sport proxy icons that you could drag to the Finder to create an alias to that message. Although Mail messages no longer have proxy icons, you can drag from anywhere in the header of a message to create a mailbox (.eml) file of the message.
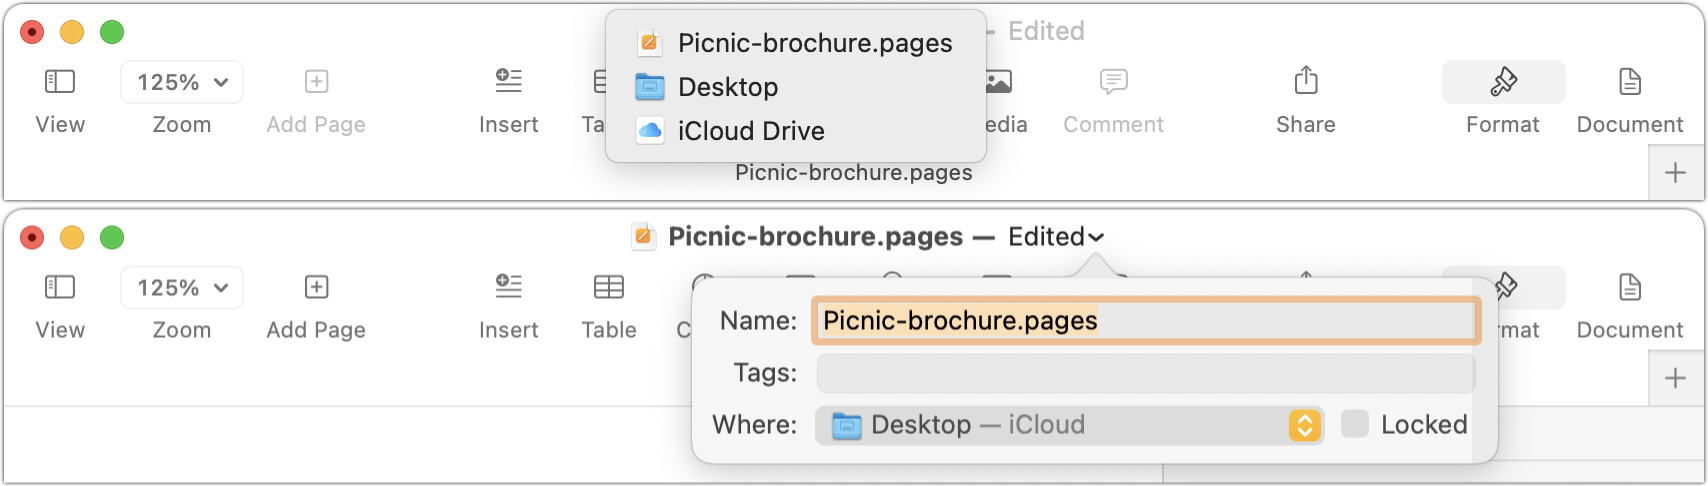
Finally, some people spoke up in favor of the directory menu that pops up when you Command-click the window title. This menu is associated with the proxy icon only by proximity, but it’s helpful for checking the enclosing folder to see if the file is stored in the proper place or is the correct copy. Similarly, in apps like Pages that adopt Apple’s new title bar interface, mousing over the window title reveals a down-pointing arrow that, when clicked, brings up a popover with fields for renaming the file, managing tags, and checking the folder location.
If you haven’t previously used proxy icons, I hope this look at one of the Mac’s unsung features has given you ideas for speeding up your workflows. Those of us who are accustomed to employing proxy icons in our everyday Mac usage would be distraught to lose such a productivity-enhancing capability. And if you’re already a fan of proxy icons, I hope you learned something new, like the trick of Command-dragging an icon into a Terminal window to change to that directory.
It’s so weird. Even after reading your detailed explanation today, I just don’t get it. I’m looking in BBEdit right now. I see a bunch of open files. They have little icons next to their names. As usual I can control-click on files and select show in Finder and a bunch of other stuff. What is special about the icon? I’m obviously missing a major point somewhere.
You drag files in the Finder? Dragging the proxy icon is the same thing.
Yes, you can “show in finder” and drag the resultant file; the proxy icon obviates the necessity of the show-in-finder step, with attendant Finder window, etc. Not the most major thing, but nice.
I do a LOT of drag and drop. For a while Apple really emphasized d&d; not as much anymore.
OK, sorry for the dumb question. To where are you dragging the file? It’s not to someplace in the Finder anyway? Thanks.
Another location in the Finder is just an option. Anywhere in macOS that can receive a file is a potential destination: a Choose button in a Safari Window, the app icons in the Command-Tab application list, the app icons in the Dock, the content of any file… almost anywhere, really!
@ace maybe there is an article to be written here about drag and drop itself? It became a part of macOS life only after System 7, if I’m not mistaken.
Apart from what @juandesant mentioned, open/save dialogs.
Some examples were given in the prior thread.
I think drag-and-drop at some level has always been part of the Mac interface, no?
@s1dorner is right that Apple used to push drag-and-drop as an interaction method much more long ago. I remember being utterly flummoxed by some early Apple user-and-group interface in the late 1980s because the only way to move a user into a group was to drag them, and there was no indication of that.
Yeah, I think so too. From what I can see, it was originally called “click-and-drag,” but as far back as I can remember, that’s how you ejected a floppy disk: Drag its icon to the Trash (which gesture was itself a bit alarming at first). I think “drag-and-drop” started in System 7, which introduced the ability to drag selected text around and drop it elsewhere in the document.
It is still a way to eject media. Drag a mounted volume to the trash in the Dock and it will change to an “eject” icon. It will unmount a disk image and will eject storage media if possible (e.g. an optical disc).
But these days, I prefer to type CMD-E or use the eject button on my keyboard.
Regarding the Mail app, one tip I find useful is to drag the message onto the Reminders icon in the Dock. This creates a new reminder with a link to that email.
Although Apple recently introduced a Remind Me feature in Mail I still find the Reminders App method more flexible.
Drag-and-drop inside a document/application was there from the beginning. But drag-and-drop as a collaboration tool between applications/documents started with System 7. Together with publish-and-subscribe, they were the most promoted tentpole features (plus always on Multifinder) for that release.
publish-and-subscribe was wonderful. I was very sad when it went away.
Drag and drop in the finder was there from the beginning. Unless my memory fails me, drag and drop editing, clipping files, etc were not.
For one, I keep my screen festooned with docks (five of them RN, one of which has four tabs) that I often drag things into, without ever bringing the Finder into the picture. Other folks have mentioned other uses.
I also drag things into Terminal windows, which inserts the proper-escaped filename for various interesting command-line stuff.
How do you have multiple docks?
I obviously have some things to learn I never knew about.
doug
Perhaps he means multiple Desktops, otherwise I think you’d need a third party utility to create multiple Docks.
There are several third-party utilities that provide additional docks. I used to use DragThing, and now I use iCollections (because DragThing never went 64-bit.)