TidBITS#1354/30-Jan-2017
This issue of TidBITS coincides with Joe Kissell’s latest book, the essential “Take Control of Your Digital Legacy,” which will help you ensure that your digital photos, videos, email, and documents can be passed on to your family. In an engaging chat with his (fictional) Aunt Agatha, Joe explains the basics of why you should care about your digital legacy and where to focus first. Last week in ExtraBITS, we linked to a Reddit thread that erroneously claimed Apple was deleting reviews for the LG UltraFine 5K Display — in retracting our criticism, Adam Engst explains what we should have done and rounds up legitimate problem reports. Slack has introduced the much-requested threading to the company’s eponymous group messaging service, but as Slack expert Glenn Fleishman explains, the feature feels a bit tacked-on. Josh Centers has the next entry in his “A Prairie HomeKit Companion” series, explaining the initial setup of HomeKit to prepare your home for automation. Finally, Adam Engst reviews Setapp, MacPaw’s new subscription service that provides full access to over 60 independent Mac apps for $9.99 per month. Notable software releases this week include DEVONthink 2.9.10/DEVONnote 2.9.9, Quicken 2017 for Mac 4.4.3, Art Text 3.2, ChronoSync 4.7.3, Safari 10.0.3, and iTunes 12.5.5.
Retracting Criticism of LG UltraFine 5K Display Review Removal
TidBITS recently published an ExtraBITS link pointing at a Reddit thread claiming that Apple had removed reviews from the Apple Store page for the LG UltraFine 5K Display (see “Apple Pulls LG UltraFine 5K Display Reviews,” 23 January 2017). We have since learned that Apple had not at that point turned reviews on for that product, possibly because it was available only for pre-order for some time before shipping. In fact, Apple has now enabled ratings and reviews for the LG UltraFine 5K Display, with the screen garnering a 3.0 average rating and 79 user reviews of varying positivity.
Hence, the claim on Reddit that Apple removed negative user reviews cannot be true (and the original poster now says he was incorrect, though he stands by his criticism of the display). For confirmation, and this is what we should have done before publishing, we looked in the Internet Archive’s Wayback Machine, which showed that, from the time the LG UltraFine 5K Display page was first crawled on 5 November 2016 until this week, there have never been any user reviews. In addition, we confirmed that
other products in the Apple Store with user reviews do show those reviews in the Wayback Machine, so it’s not just an anomaly with the Apple Store site.
In other words, we should never have published that ExtraBITS link. We regret both the error and calling into question behavior on Apple’s part that never took place. It’s important that readers be able to trust that we can back up any criticisms that we make, and while we were certainly not alone among news outlets in publicizing that Reddit thread, we should have checked more carefully before believing it.
That said, the question about whether the LG UltraFine 5K Display is suffering from an untoward number of problems remains valid. That question has come up quite a few times in the Apple Communities discussion boards. Most of those posts are compatibility queries, and there is no way to know how many users of the LG UltraFine 5K Display are experiencing no troubles, but a non-trivial number of problem reports remain unresolved:
- LG UltraFine 5K monitor — external devices not detected
- Macbook pro 13 t/bar with Lg ultrafine 5k charging
-
MacBook Pro (2016) black screen after unplugging from LG 5K Display
-
MacBook Pro 15” (2016) Crashing while connecting/disconnecting the LG 5K Monitor
-
Macbook Pro 13” Late 2016 has issues connecting to LG UltraFine 5K Display
-
Does your LG Ultrafine 4K display turn on and off continuously? mine does
It would be inappropriate for us to recommend for or against the LG UltraFine 5K Display without formal testing. Since it’s a new and unusual, if not unique, item that’s currently available only from Apple, the burden is on Apple to ensure that it works. If you’re interested in buying one, check out iMore’s review (particularly the compatibility information that points out you’ll get 5K only on a 2016 MacBook Pro with Thunderbolt 3) and be aware that you may experience more issues as an early adopter.
Slack Shoehorns Threaded Messages into Its Interface
The group messaging and collaboration service Slack has at long last added threaded messages. Slack lets companies, groups, and individuals set up free or paid teams that function as private communications hubs. Conversations in teams center around channels, which theoretically correspond to a particular subject or sub-group.
(Last year, I wrote a pair of books documenting Slack: “Take Control of Slack Basics” and “Take Control of Slack Admin.”)
But channels can quickly become overwhelming, either because of talkative people, too many members relative to the breadth of topics discussed, or overlapping projects. In some cases, messages flood the channel, and you would have to spend all your waking hours scrolling and reading to keep up. In others, the interleaving of unrelated conversations and replies makes it hard for anyone in the channel to follow a particular discussion.
Until now, Slack’s general advice — and mine — was to split a channel that was too busy or too interleaved into additional separate channels, each with a stricter focus. But that imposes a different burden, as it requires people switching among multiple channels to keep up. Context switching is neurologically hard, and also makes it more likely someone will miss valuable information that’s not specifically called out to them.
Slack tried to drive down the middle of this conundrum with its new threading feature. The company chose to embed threads within a channel rather than, say, indenting and collapsing them, a common feature in discussion boards and email programs. When you want to interact in a thread, you take your “sidebar” discussion into a literal interface sidebar or use a new team-wide Threads view.
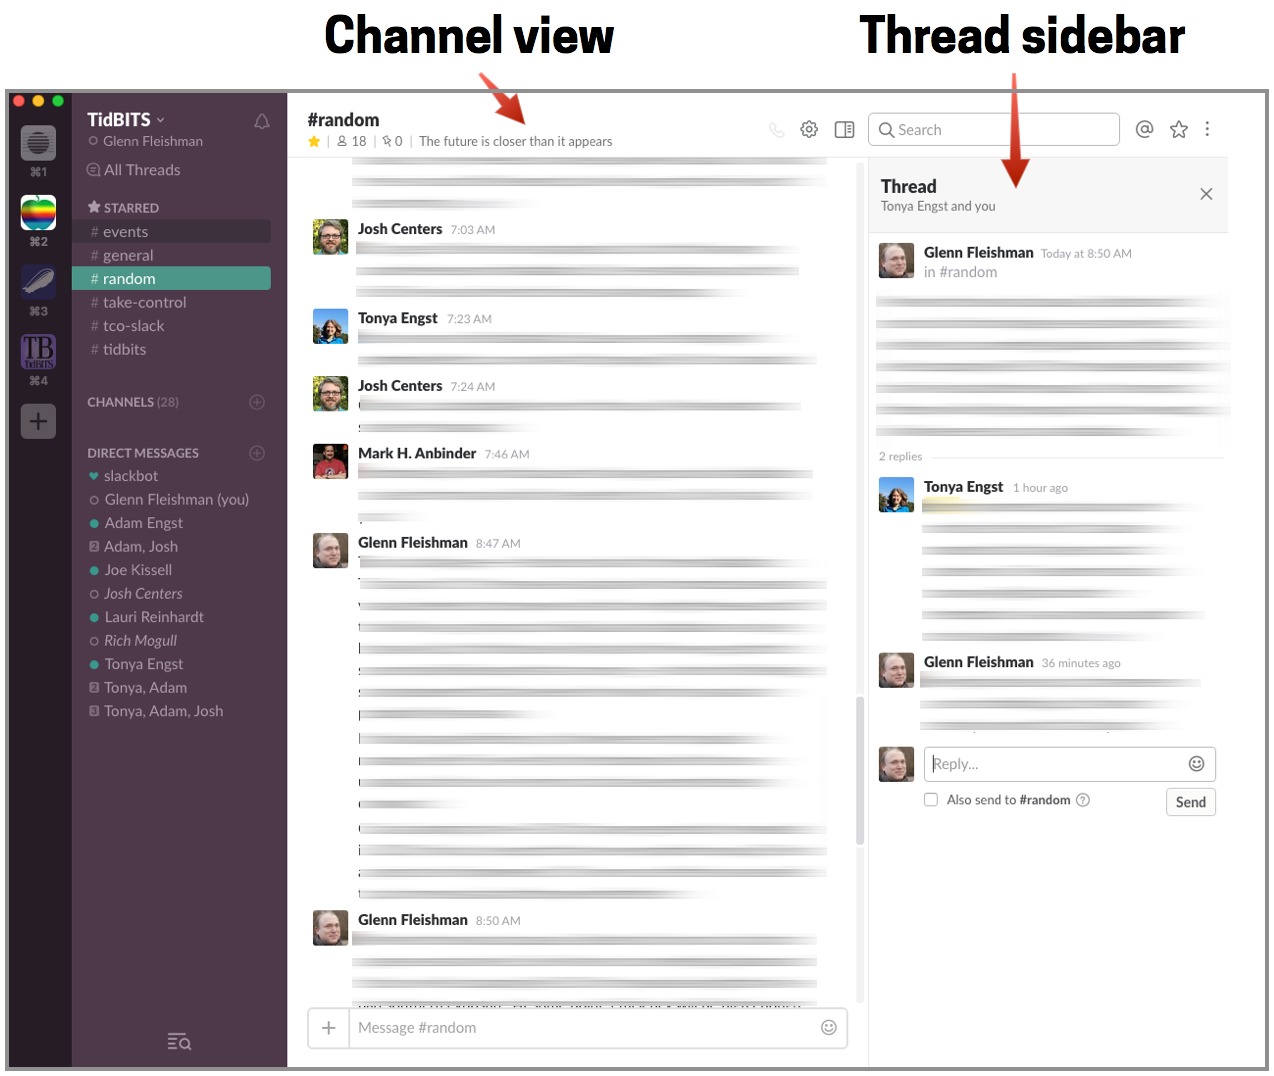
You can add a thread to any message in Slack’s desktop or Web apps by hovering over a message and clicking the new Start a Thread button; in the mobile app, press and hold a message and choose Start a Thread. This opens a Thread sidebar in the desktop or Web apps, or slides over into a Thread view in the mobile app.

The Thread view shows all the messages in the thread and lets you type a reply, with an option to select an Also Send to #channelname checkbox. If you check that box, Slack displays the first message and the one you just posted in the channel.

As threads start appearing in a channel, you’ll see avatars beneath a message and a count, like “5 replies”, that’s also a link. Click or tap the link, and you’re dropped into the Thread view. When viewing a thread, if you lose your place in the main channel’s discussion, you can hover over the first message in the thread or any replies in the channel and click the Open in Channel button. This scrolls you to the appropriate spot in the channel and highlights the
threaded message. Clicking or tapping a message that has been sent back to the channel is also a quick way to open the thread.

Unfortunately, it’s easy to miss the fact that a message has become the start of a thread. To make it simpler to find threads, Slack added an All Threads link at the top of the team sidebar. The label changes to New Threads when any thread in which you’ve participated has a new reply. Click or tap All Threads, and you can scroll through your threads — but unlike the rest of Slack, which has older messages scroll from bottom to top and out of view, the Threads view shows
threads with the newest replies on the top. This sorting switch and the split between channels and All Threads aren’t entirely comfortable.
If you want to stop getting notified about a thread, you can hover over the first message in the sequence, click the Show Message Actions (…) button (or hold down on the message on mobile), and choose Unfollow This Thread.
Threads can help prevent digressions, keep project-based discussions together, and segregate anything that not everyone in a channel needs to be in on while still keeping it available to anyone who is interested. If you’re in a Slack team with overloaded channels, encouraging people to shunt related conversations into threads might offer a good solution. You might think of them as temporary sub-channels instead of threads, if that makes it easier to visualize their use.
The best use for threads that I’ve found is a form of “topic necromancy,” as one colleague described it. Before threading, if you wanted to reference a message that was further back in the channel, you had to use the Share command, which let you post a message and include the quoted and referenced message. (The necromancy refers to reviving that message from the “dead” part of the channel.)
However, with threads, you can instead use Start a Thread to reply to the old message, and then a new thread forms referencing that person and anyone else you might @-mention in your reply. This approach leaves the old message in place, but Slack notifies participants about the new thread. When you’re done discussing the old topic, you can post a reply that shares it back to the channel if it’s relevant.
Do I love this approach to threading? Not so far. Although I’m still getting used to how to use threads, it’s still too easy to just continue with the quick back-and-forth in a channel. We’ll see if users manage to change their habits. That said, I understand that Slack had to compromise between trying to engineer threads into a linear chat interface while not making it so unfamiliar that users require retraining.
While this moves Slack closer to a discussion forum approach, in which everything is a thread instead of an eternally scrolling chat, it still retains its distinct identity and informality. We’ll see how Slack’s team continues to improve on this over time.
A Prairie HomeKit Companion: Setting Up Accessories and Rooms
In “A Prairie HomeKit Companion: Core Concepts” (3 November 2016), I discussed the general principles of HomeKit automation, such as Accessories, Rooms, and Scenes, and offered a general overview of HomeKit. In this installment, we’ll explore some of the details involved in setting up the software, and then we’ll put it all together in “A Prairie HomeKit Companion: Controlling Accessories” (16 January 2017). If you’re impatient, I have a compact guide to HomeKit in “iOS 10: A Take Control Crash Course.”
General Advice — Before you begin, you need at least one HomeKit device. In “A Prairie HomeKit Companion: Core Concepts” (3 November 2016), I recommended two categories of HomeKit device:
- A smart plug, such as the Elgato Eve Energy or the iHome SmartPlug. You plug one of these inexpensive smart plugs into an electrical outlet to turn it into a smart outlet. Then you can turn any device plugged into it — a lamp, heater, or fan, for instance — on or off by controlling the plug.
- A smart lighting system, such as the Philips Hue. The Hue system is much more expensive than a smart plug, but it offers capabilities that a smart plug and lamp combo can’t, such as dimming and color changing. For more on the Hue, see “Getting Started with the Philips Hue Smart Light Bulbs” (1 August 2016).
I recommend these devices for two reasons: they’re immediately useful and they’re not scary. A smart lock or a thermostat is a big investment that might require professional installation, but anyone can install bulbs and plugs. Plus, if you program your lamp incorrectly, it could annoy you by turning on or off at the wrong time, whereas a mistake with a smart lock or thermostat could result in you being locked out of a cold house.
Remember that not every home automation gizmo is HomeKit-compatible — Apple must approve all HomeKit devices, which is an expensive and time-consuming process for manufacturers. Apple publishes a full list, and if you have any doubts, check the box for the “Works with Apple HomeKit” badge.
![]()
Finally, when you first launch the Home app, you’ll be prompted to create a Home, name it, and choose a background photo. Don’t stress about these choices, because you can easily change them later. The name “Home” and the default background picture are sufficient. You can set up multiple Homes, but for the sake of simplicity, I’ll assume that you have only one.
Setting Up Accessories — To take advantage of Home, the HomeKit control app built into iOS 10, you have to add your HomeKit Accessories to it. As I explained in “A Prairie HomeKit Companion: Core Concepts,” Accessories are the actual home automation devices.
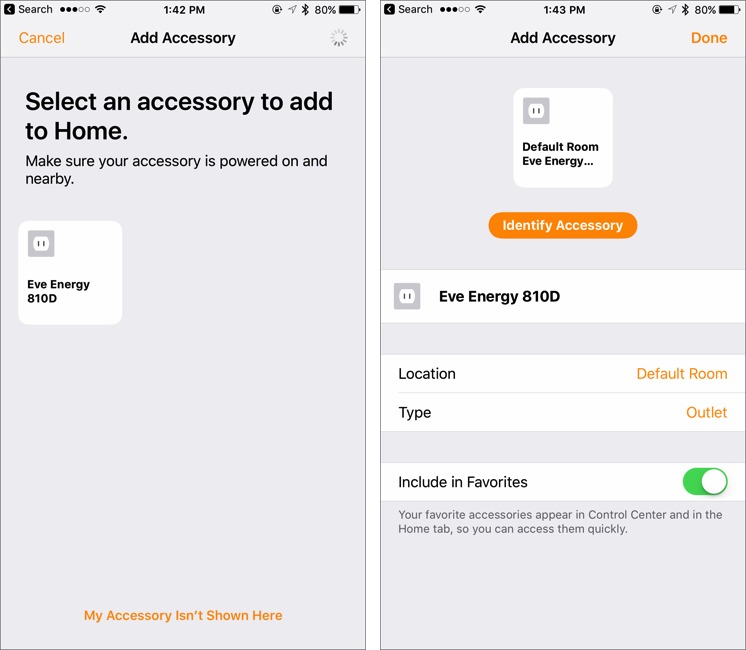
First, power on your Accessory. The next step depends on your device. You have to set up Hue lights in the Hue app itself and then add them to HomeKit from the app, as I explained in “Getting Started with the Philips Hue Smart Light Bulbs.” However, you can set up many standalone devices, such as the Elgato and iHome plugs, directly in the Home app. Here’s how to do that:
- In the Home or Room screens, tap the plus button in the upper right.
-
Tap Add Accessory.
-
If everything is working correctly, your Accessory should appear on the Add Accessory screen. Tap it.
-
Next, you’ll be prompted to either type in or scan the device’s HomeKit code. That code can be found either on the device or in the box. Some devices, like those from Elgato, provide their codes on convenient cards. Be sure to save those codes, ideally in a secure vault like 1Password, because you need them every time you set up the devices.
The final screen offers a number of options:
-
Identify Accessory: Tapping this button activates your Accessory so you can spot it in the real world, often with some sort of blink or flash. This is handy if you’re not quite sure which device in your house you’re working with. That might seem ridiculous, but just wait until you’re setting up multiple smart bulbs with names like SMARTBULBFN2187.
-
Accessory Name: By default, this is the factory name of the device, like “Eve Energy 810D.” I recommend changing it to something more descriptive, like “Music Room Lamp.”
-
Location: From here, you should choose the Room in which your Accessory will live. The default is — get this — Default Room, which is sort of a waiting room for your Accessories. If you haven’t yet set up a Room, you can do so from the menu — just give it a name and choose a picture (the default is fine).
-
Type: This field describes the type of Accessory. You can leave it alone.
-
Include in Favorites: Enabling this switch makes it so the Accessory appears in the Home screen of the Home app, as well as in the Home pane of Control Center. Unless you have a lot of HomeKit Accessories (one TidBITS reader told me he has 75!), I recommend leaving this switch turned on.
Setting Up Rooms — Now let’s talk about Rooms. As you might recall from “A Prairie HomeKit Companion: Core Concepts,” Rooms are the second level in the HomeKit hierarchy, under Homes. HomeKit Rooms, of course, should match up with the physical rooms where you have Accessories. I have Rooms like Bedroom, Living Room, and Laundry Room. You get the idea.
You access Rooms in the Rooms screen of the Home app. In that screen, tap the hamburger button to see and switch among a list of your Rooms. To add a Room, tap that hamburger button, choose Room Settings, and tap Add Room.
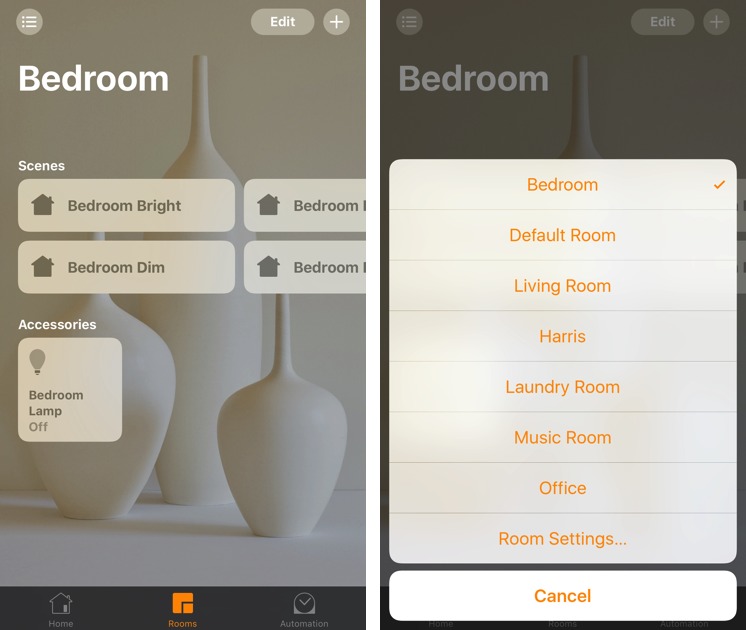
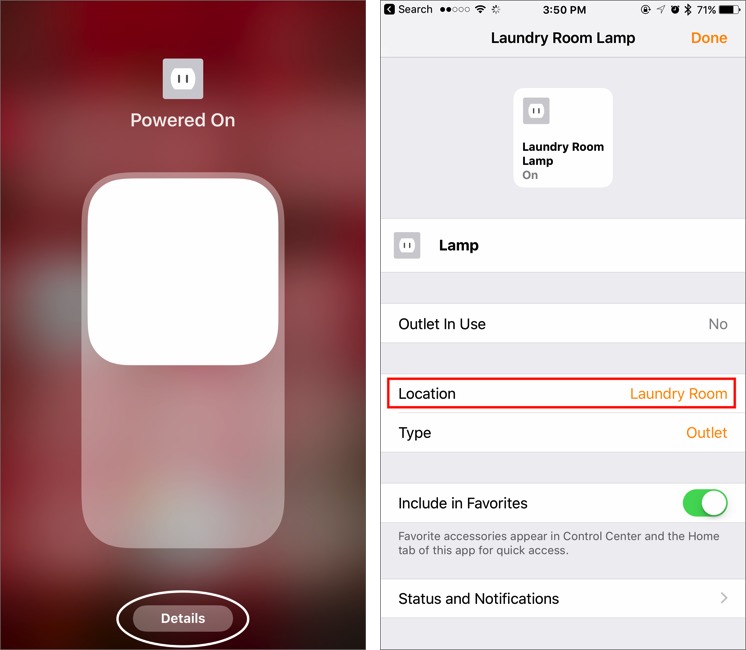
Accessories are always in a Room, even if it’s just the generic Default Room. As you set things up, you’ll want to move Accessories from one Room to another. To do this, tap and hold an Accessory (or use 3D Touch if your iPhone supports it), tap its Details button, and then choose Location to pick a new Room from the list.
Why are Rooms so important? Two reasons: they organize your Accessories in a logical manner and to support Siri. I can tell Siri to turn on my Living Room lights, and all the lights associated with that Room turn on.
Once you’ve set up one or more Accessories and Rooms, and put the Accessories in the appropriate Rooms, you’re well on your way to automating your home or office.
Just as Accessories are tied to a Room, so are Scenes, which are collected actions for your Accessories. In the next installment of this series (see “A Prairie HomeKit Companion: Controlling Accessories,” 16 January 2017), I’ll discuss additional Accessory options, controlling your Accessories, and creating and using Scenes.
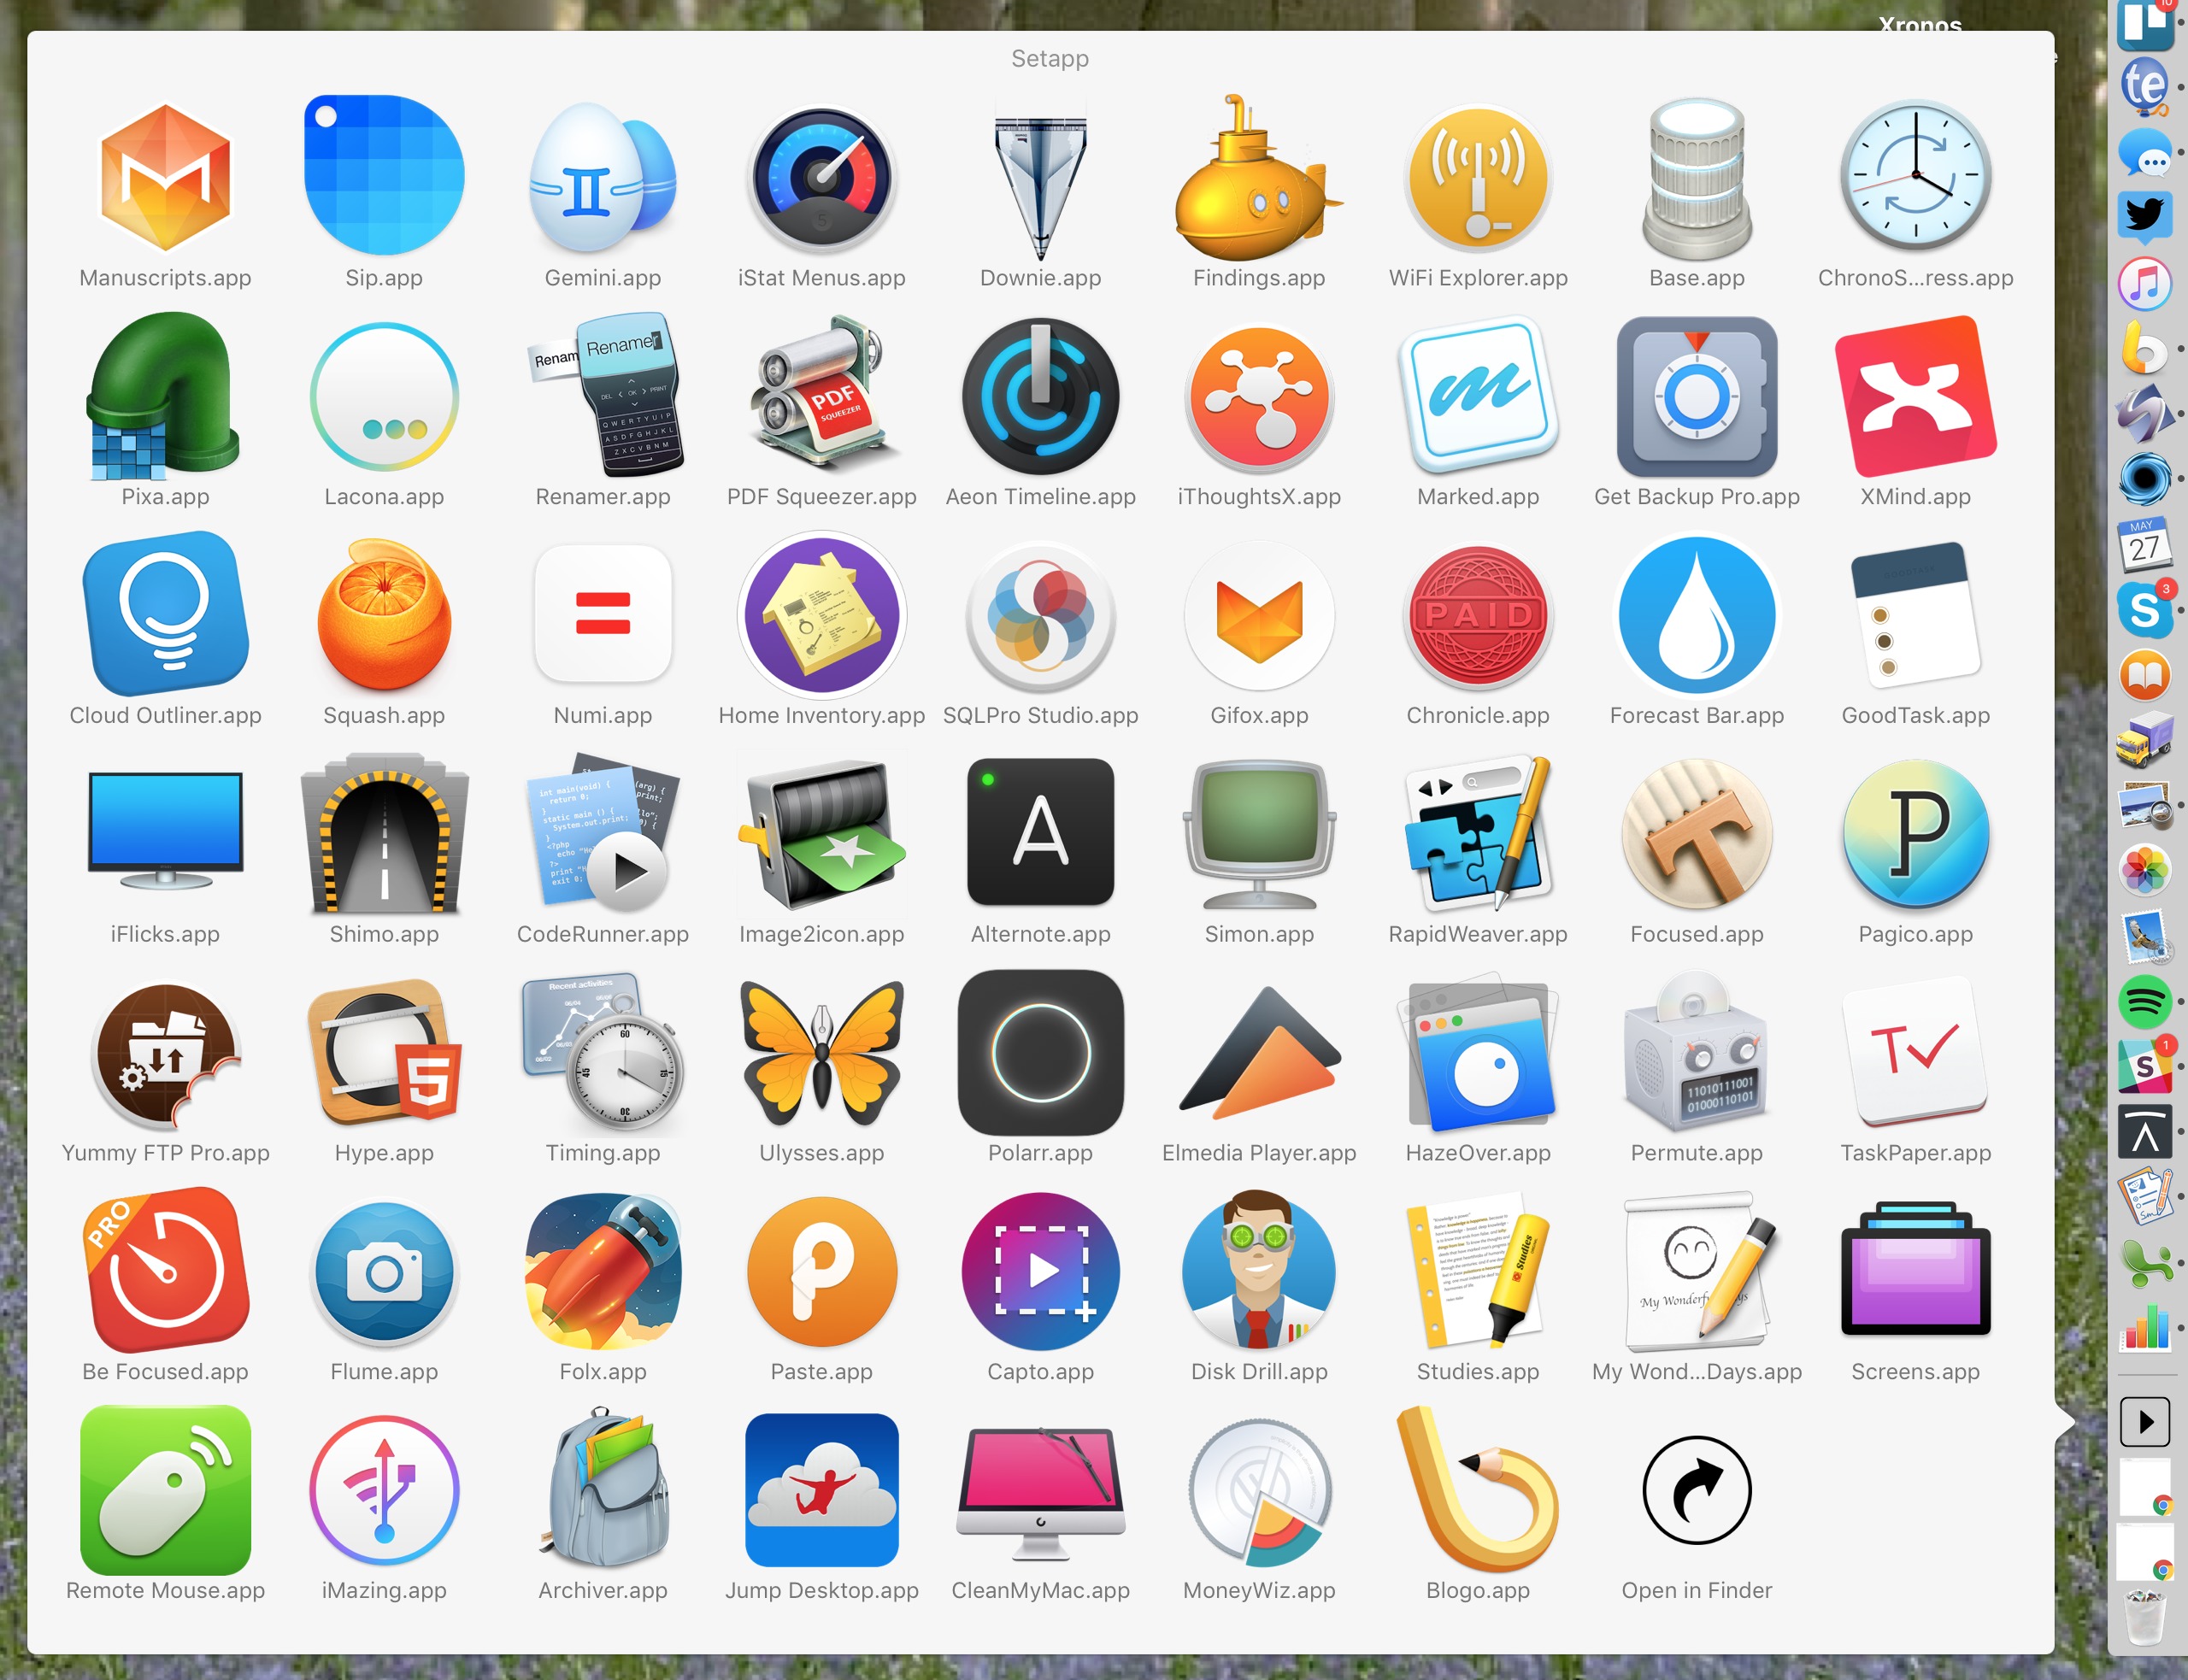
Setapp Offers Numerous Mac Apps for One Monthly Subscription Fee
I know, some people really don’t like subscriptions. I get it. But sometimes the value proposition is compelling. For many people (me included), paying $9.99 for a month of Netflix beats buying a movie on iTunes for that $9.99 (or more). It’s the same with Spotify or Apple Music — you can play a lot of music in a month for the same price as purchasing a single album on iTunes.
Setapp for Users — That’s part of the pitch for Setapp, a new subscription service from MacPaw that gives Mac users access to 60 carefully curated apps today, with more coming in the future. Pay $9.99 per month (the first month is free) and you can use any number of those apps for no additional charge. Nor will the price go up as more apps are added. It’s unlikely apps will be removed often, if at all, given that developers sign a 12-month non-exclusive agreement.
Setapp automatically keeps its apps up to date at all times, so you don’t have to fuss with installing updates — including major new upgrades. These apps aren’t demos, crippled, or older versions, and there’s no advertising anywhere. You can even use Setapp on a second Mac merely by signing in on that Mac.
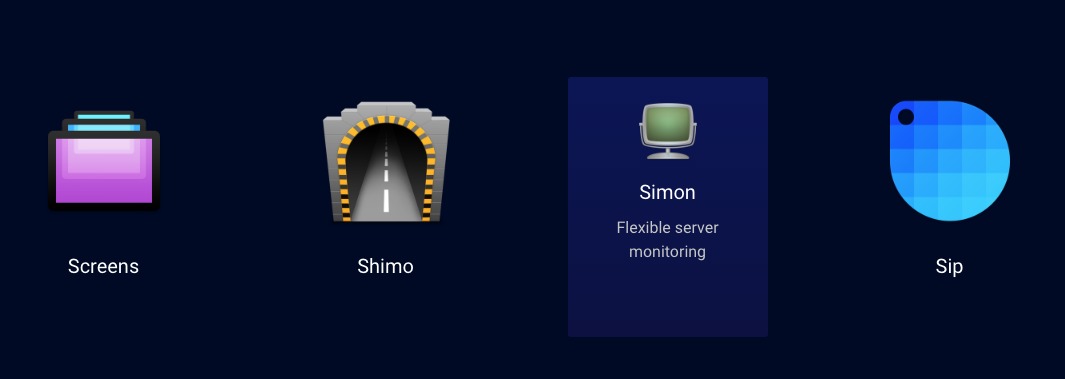
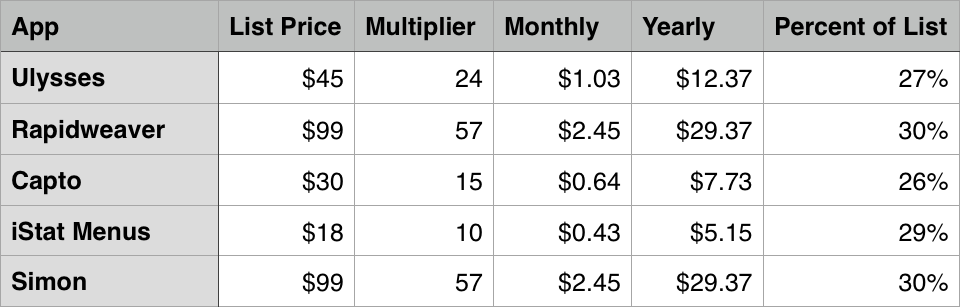
Obviously, the question comes down to whether you’ll use enough of the included apps to make the subscription worthwhile. Let’s say you want to write in Ulysses ($44.99), create Web pages in RapidWeaver ($99), take screenshots with Capto ($29.99), keep track of your Mac’s performance with iStat Menus ($18), and monitor your server with Simon ($99). You’d pay nearly $300 to buy all that software, or you could subscribe to Setapp for 30 months for the same price.
Those are all fine apps, and while I’m not familiar with every app included in Setapp, those I do know about are solid. MacPaw is selecting which apps get included in Setapp to avoid overwhelming users with too many similar choices. You can browse through the full list of current apps, and as I said before, more will be appearing soon.
It’s also worth considering that Setapp includes some apps, such as MacPaw’s own Gemini duplicate finder, that you may want to use, but so infrequently that you can’t bring yourself to buy them outright. Gemini costs $19.95; I’m not sure I’d buy it for a couple of uses per year, but I’d be happy to have access to it in Setapp. I could even see some people subscribing to Setapp on and off as a way of testing apps that they might later purchase.
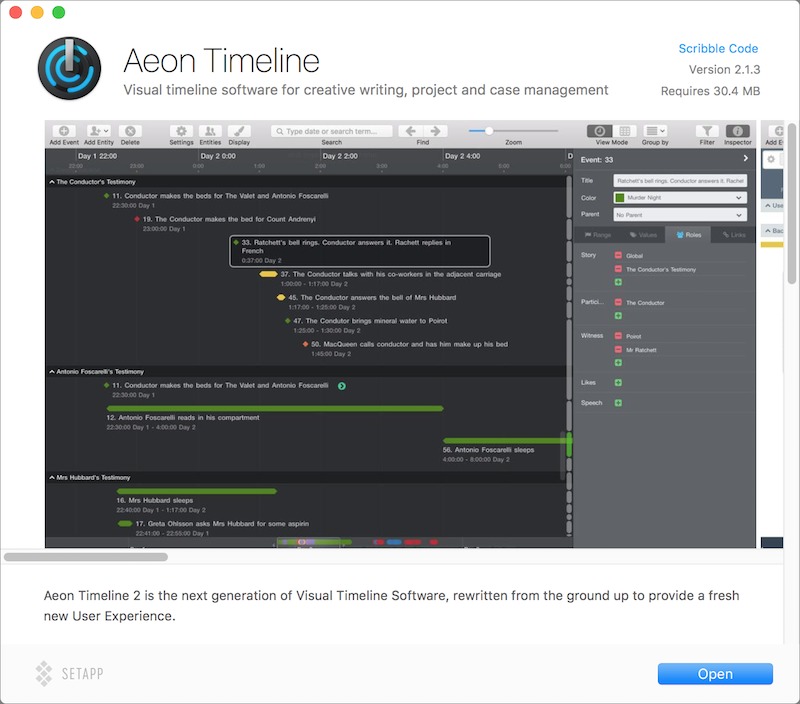
There is another potential benefit to the subscription approach. Matthew Tobin, developer of the included Aeon Timeline, said he was excited about how Setapp’s model overcomes a flaw in the standard version-based licensing approach.
Version-based licensing stifles creativity. Developers are forced to choose between creating paid upgrades, which delays feature releases, and free updates, which discourages investment to improve apps. If users embrace subscription models, both sides are better off: developers will be rewarded for improving their app for the long haul, and new features will be in users’ hands faster instead of held back for artificial milestone releases.
Using Setapp — Working with apps in Setapp is simplicity itself, since it integrates right into the Finder in OS X 10.10 Yosemite or later. MacPaw has a good video overview.
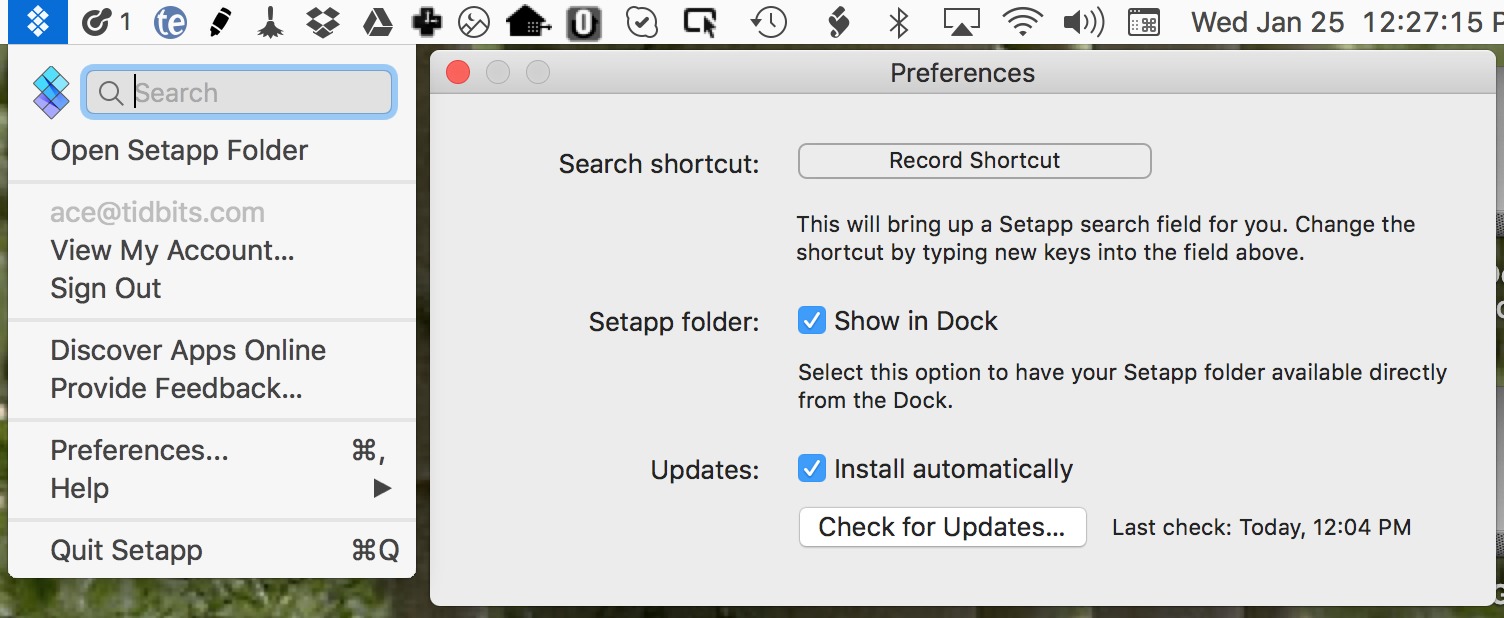
Once you’ve installed Setapp and signed in, a Setapp folder appears in your Applications folder and adds itself to your Dock and Finder window sidebar and toolbar (you can remove it from any of these locations if desired).
You also get a Setapp menu in your menu bar; it provides access to a few preferences, most notably the presence of the Dock icon and a search shortcut I had to change because it conflicts with LaunchBar’s Control-Space.
Inside the Setapp folder are “teasers” for all the apps — they’re only about 2–3 MB in size. Double-clicking one doesn’t launch the app itself, but instead opens a window that describes the app in detail, complete with screenshots. Click an Open button in that window and the app downloads and launches. From then on, it’s a normal copy of the app.
This teaser approach is smart, since it eliminates the need for any additional interface and lets you save space. Setapp itself takes up about 110 MB, and the stub apps occupy another 300 MB, but an app like RapidWeaver would be nearly 90 MB on its own. If you install an app you don’t want to use, you can delete it, after which Setapp will revert it to its teaser state. You can even remove the teasers too, and get them back by choosing Restore Hidden Applications from the Setapp menu.
I find that the Setapp app list on the Web is actually a little better for browsing through apps that you’ve never heard of before, since it provides a quick description when you mouse over the app’s icon.
Note that Setapp’s Dock icon regularly changes to focus on different apps; that has made me curious enough to open a few teasers for apps whose icons I didn’t recognize.
Setapp for Developers — The next question about Setapp is if it’s a good deal for developers — should we users worry that subscribing to Setapp will result in reduced revenues for the developers we want to support?
No one knows the answer to that yet, but here’s how Setapp works for developers. First, developers get 70 percent of all revenues, with MacPaw retaining the other 30 percent. The developer share of the revenue is distributed based on the number of apps each user launches in a month, with the actual amounts calculated as a percentage of the list price of the app.
So let’s take the sample set of apps I mentioned above and see how that breaks out (with round numbers). Of a single user’s $10, $7 goes to the developers and $3 goes to MacPaw. That $7 is distributed among five apps that cost $291 proportionally by list price, broken out into 17 price tiers with individual multipliers. Assuming I’ve understood MacPaw’s documentation right, each app in this example would earn about 30 percent of its list price in a year. The more apps you use, though, the less each developer will earn.
To grow the user base and reduce developers’ reliance on application revenues, MacPaw also pays out a 20 percent partner fee (from its 30 percent). For each user who signs up for Setapp from a particular developer, that developer receives 20 percent of that user’s payment ($2) each month as long as the user continues to subscribe. That could significantly increase revenues for developers, and it incentivizes them to direct customers to Setapp along with providing normal license sales.
Developer Opinion — I talked to a handful of developers who are participating in Setapp. All were interested in experimenting with it as a new channel, particularly for picking up casual users. Matthew Tobin said:
My position on it is somewhat experimental. We joined Setapp to give customers a choice and to see how it works for us, but I certainly don’t intend to adopt it as my only way to connect to customers — we will continue to support direct license sales as our primary channel.
David Sinclair of Dejal concurred, saying:
I thought it could be a good means of marketing and extra revenue. I’m excited for the launch, and looking forward to seeing how well it does. It seems like a very useful service and elegant implementation, so I am hopeful it’ll be very popular with Mac users, and help more of them discover Dejal Simon.
Joe Japes of Econ Technologies said that while he personally prefers buying software, he thinks Setapp has a lot of potential:
I think it will bring us a lot of new users that we could not reach before so overall it will be a financial gain.
Duilio Proni, developer of Econ Technologies’ ChronoSync Express, thinks Setapp will become even more valuable in the future:
The Setapp model makes perfect sense for a lot — if not the majority — of people. What some people don’t seem to realize is that the collection of software is not static. They intend to grow it to at least 2–3 times the current size. The current offerings are good but there are gaps that should get plugged over time.
Matthew Tobin provided additional thoughts about the pros and cons of participating from a developer’s standpoint:
The main upside I see is exposure to potential new revenue from casual users — i.e. the kind of people who might use the app a few times a year when they need to perform a particular task, but won’t use it often enough to warrant purchasing a license for $50.
The success of the platform in that respect will depend on how well Setapp manages to market individual apps and encourage users to explore all of the apps on offer. If users don’t know what they are paying for (especially if the platform grows too big), they won’t know to look for and use our app when it would help them, and that casual income stream would dry up.
The most obvious potential downside would be if participating in the platform undermines baseline license sales — but I hope the markets are sufficiently different, or that remuneration from repeat users is not too dissimilar to a license sale (this depends on how many apps users normally launch).
MacPaw is currently adding products to Setapp mostly by invitation, so if you’re a developer, probably the best way to join is to talk with another developer who is already participating to see if they can help you get an invite. You can also contact MacPaw to make sure they’re aware of your product.
Brave New App Store — Since Setapp offers the first month free, there’s no downside in signing up and giving it a try. If you don’t find yourself using enough of the apps, it’s easy to cancel your subscription at any time.
Regardless, kudos to MacPaw for having the gumption to try something new, particularly in a world that includes Apple’s Mac App Store. But since the Mac App Store hasn’t universally delighted users and developers, there’s room for Setapp.
Aunt Agatha Ponders Her Digital Legacy
I turned 50 earlier this month. To celebrate, I dyed my hair purple and wrote my 56th Take Control book, “Take Control of Your Digital Legacy.” This title was inspired by a number of conversations I’ve had with readers of TidBITS and Take Control in recent years, which have frequently turned to topics of data longevity. People have been asking me how they can be sure their photos, videos, email, documents, and other important data will outlive them, and this book contains the results of my research and thinking on the matter.
To introduce the book to you, I’ve framed a number of the questions that prompted the book, and their answers, as a conversation with my completely imaginary Aunt Agatha.
Aunt Agatha: Happy belated birthday, Joey!
Joe: Aunt Ag, I’d really appreciate it if, now that I’m 50, you’d stop calling me Joey.
AA: Sorry. Old habits. What brings you here today, other than my peach cobbler?
JK: Don’t be silly. I’m also here for the ice cream. And I wanted to chat with you about my new book.
AA: Not another one! What must I take control of this time?
JK: You’re going to like this one, because I wrote it with you in mind. The book is called “Take Control of Your Digital Legacy.” It’s sort of estate planning for your digital possessions.
AA: Are you’re saying I’m old?
JK: Not at all; 68 is the new 55. And anyway, people of any age can expire suddenly. But… (drumroll) your data can live on forever.
AA: And that’s a good thing?
JK: Absolutely! By deciding what data sticks around in the future, and in what form, you can shape the way people remember you. But if you do nothing, the stuff on your computer and iPad could suffer the same fate as that box of childhood souvenirs you found rotting in the basement. Not something you want to pass on, if you know what I mean.
AA: Ew. You may have a point.
JK: Cool. So now that I have your attention, what would you like to know about your digital legacy? Ask me anything.
AA: Well, for starters, what exactly do you mean when you say “digital legacy”?
JK: Your legacy is everything you leave for the future — not just your possessions, but also your stories, your accomplishments, and your contributions to the world. It’s the sum of how you’ll be remembered years from now. Your digital legacy is the part of that involving digital data: your digital photos, documents, email, and more. It’s stuff that Grandma and Grandpa didn’t have to think about, but that future generations will consider more important than scrapbooks and photo albums.
So, the starting point of the book is that you get to make decisions now about what will happen to your digital data after you’re dead — and far into the future.
AA: Shouldn’t all that be covered in my will?
JK: It could be, but conventional wills hardly ever address digital assets, at least not in sufficient detail. And because your files, photos, online accounts, passwords, and so on change so frequently, it would be a hassle to keep amending your will to make sure it’s always up to date. Furthermore, your executor may not have the technical expertise to deal with all your data properly.
AA: OK, if my will isn’t the best place, where do I record my wishes for this digital stuff?
JK: I suggest supplementing your will with a digital will that spells everything out, including a high-level list of your digital assets and your preferences for preserving and distributing data, dealing with all your accounts, and so on. And then you’ll select a digital executor who will carry out these instructions.
AA: OK, a picture is forming, but now it’s getting me worried. I have a zillion photos, files, and accounts. Some of it is important, but a lot isn’t. Realistically, how am I going to document all that stuff?
JK: Don’t worry. You start by filling in a downloadable template I made. It’s not complicated. Life is short, and you shouldn’t have to spend weeks or months pondering every last file and reorganizing your whole computer. Instead, I recommend thinking about your data in terms of broad categories, and creating a fairly short list that includes brief annotations about the kinds of stuff you have, where to find it, and what to do with it. Depending on how much detail you feel like providing, filling out the template could take a few hours or a weekend. That’s just part of planning your digital legacy, but it’s an essential component.
AA: Suppose I’m still feeling a little overwhelmed. Could you pick out just one piece of it to get me started? What do you think is the most important thing to deal with first?
JK: Without a doubt, it’s your passwords. If you got hit by a bus tomorrow, would Uncle Aubrey know how to unlock all your devices and get into all your accounts? As tedious as it might be, someone else could look through all your digital stuff and figure out what needs to be done, but if they don’t have the passwords, they’ll be stuck before they even get started. I mean, you’re not going to be passing on your passwords to your grandkids, but you will be passing on some of the stuff those passwords protect.
I should emphasize that working through even one topic from the book can make life way easier for you, Uncle Aubrey, Timothy and Felicia, and their kids. If you have the time and energy to do everything, that’s super, but picking and choosing the parts that are most important to you is also fine. Something is always better than nothing.
AA: I’ve got boxes of old family photos, and it would be nice to pass those on along with my digital photos. What should I do with them and other non-digital data?
JK: As you know, I’m a big fan of digitizing things that are analog. Not just photos, but audio recordings, home movies, and the like too. Someone gave me an MP3 file, digitized from an old reel-to-reel tape, of the audio from when Uncle Bill was on the TV show “To Tell the Truth” back in 1963. I think that’s cool, and if that tape had never been digitized, it wouldn’t have survived much longer.
Anyway, about the photos: Yes. Get a scanner, make a nice cup of tea, and start scanning. Keep notes as you go about who’s in each photo, and anything else you know. You’ll gradually build up an annotated index of sorts. Maybe you do this for a few hours every Saturday afternoon, one small batch of photos at a time. It’ll take a while, but don’t think of it as work, think of it as a relaxing stroll down memory lane. Even if you never get through all of them, each photo you scan is another piece of history you can easily share online with the rest of the family, and a useful addition to your digital legacy.
AA: Do I need to worry about what file format I use? I’m thinking mainly of photos, but the same question could apply to all the files on my computer.
JK: Worry is a strong word. But yeah, you should think about it. Remember all those documents you created years ago in AppleWorks? And how hard it has been to find any app today that will open them? That may be an extreme example, but file formats become obsolete all the time. It’s a complicated topic, so in the book, I explain what formats experts recommend for various kinds of files, and you can decide whether, or to what extent, it makes sense to convert your existing files.
AA: You mentioned email earlier. Should that really be part of my digital legacy? It feels kind of weird to let other people read it.
JK: You don’t want anyone to see how many messages you get every day from Publishers Clearing House?
AA: Hey… I may already be a winner!
JK: You’re always a winner in my book, Aunt Ag. But let’s think about this. If someone were to read through all the hundreds of thousands of email messages on my computer… well, first of all, that person would need to be committed, in either sense of the word! Most of that email would be excruciatingly boring. On the other hand, by reading my email, someone could produce a detailed biography of me — they’d know exactly where I was, what I was doing, and what I was thinking on virtually every day of my life. I can imagine that being interesting to my distant descendants, or to historians once I become famous. (That’s on my to-do list for the next decade.) I
know I’d be thrilled to have that sort of information about Grandma and Grandpa.
Of course, your email could also include messages that are embarrassing or that contain secrets you really don’t want to add to the family record. Not that I’m judging. If you want to pass on your email but exclude certain things, you’ll have to go in and weed out those messages manually, I’m afraid. Better to do it now than have Tim and Felicia stumble across them later.
AA: Food for thought. Speaking of potentially embarrassing material, what will become of my Facebook page when I die?
JK: Facebook lets you set someone up as a legacy contact (your digital executor would be the perfect choice) so that when you die, that person can decide what to do with your account. That might mean memorializing it online, with one final message to your friends, or deleting the account altogether. Some other social media services offer something similar, some don’t. But as long as you spell out your wishes in your digital will and give your digital executor access to the accounts, that person can ensure that your posts are handled in whatever way you think is best.
AA: I see a theme developing here. All right, besides passwords, photos, email, and social media, what else I should be thinking about?
JK: Well, it’s a long list, frankly. I know you have lots of online accounts. Some of those, like Dropbox, iCloud, and CrashPlan, could contain tons of important data. Plus there are all those miscellaneous files on your computer, like letters you’ve written, artwork and music you’ve created, calendars, contacts, apps, and all the rest. All the major categories are included in the template I made. Not everything needs a long-term legacy plan, but it’s important to at least think it through.
AA: OK, here’s a puzzler. What about all the music, movies, and TV shows I’ve purchased from iTunes? Can I leave those to your cousins?
JK: Purchased media is, as they say, a bag of hurt. Most purchased media uses copy protection to prevent anyone other than the licensed purchaser from using it. That’s because you don’t actually own this stuff, you’ve only purchased a license to consume it, and that license is exclusive to you. So it gets tricky, sometimes in a technical sense and other times in a legal sense, but I talk through the issues in the book.
AA: Assuming I organize and document everything the way you describe, do I just leave my computer to my digital executor in my will? Is that how the data gets passed on?
JK: It’s definitely helpful for your digital executor to have access to your computer when you’re gone. But your computer won’t keep working forever. I mean, your descendants 100 years from now aren’t going to be gathering around great-great-grandma Agatha’s antique iMac to look at photos. The same is true of most storage media — hard drives and SSDs don’t last forever, and CDs and DVDs deteriorate over time. You can buy so-called “archival” media, but there’s no telling whether someone in the distant future will be able to find a device that can still read it. Imagine if someone handed you a floppy disk that was recorded 30 years ago. Even if the
data’s still intact, it’s basically useless to you.
There are many ways to approach this problem, and although there aren’t any perfect solutions, using more than one kind of storage media, storing copies separately, and asking your heirs to occasionally copy your data onto new media are steps in the right direction. If you can get Tim and Felicia to integrate your data into their own, which is then backed up regularly and passed on to their kids, that will increase the longevity of your files significantly.
AA: So now you’re going to tell me that if I want all the details about how to plan for my digital legacy, I have to buy your book?
JK: You? Nah, you get the family discount of 100 percent off. But definitely tell all your friends to buy it!
Thanks to my imaginary Aunt Agatha for cleverly asking all the right questions about “Take Control of Your Digital Legacy.” The book, which costs $15, goes into complete detail about all the topics mentioned here and much more. It shows you how to inventory your digital assets, prepare a digital will (with the included template file), share passwords securely, scan old photos, make decisions about social media accounts, and much more. I hope you’ll find it helpful in planning your own digital legacy.
TidBITS Watchlist: Notable Software Updates for 30 January 2017
DEVONthink 2.9.10/DEVONnote 2.9.9 — DEVONtechnologies updated all three editions of DEVONthink (Personal, Pro, and Pro Office) and DEVONnote to version 2.9.9, adding an option for importing notes and attachments from Apple Notes to the three editions of DEVONthink. When importing data from Apple Notes (which requires OS X 10.11 El Capitan or later), DEVONthink honors the folder structure and preserves the formatting of notes.
The three editions of DEVONthink also get an improved, more responsive experience when editing text in fullscreen mode (eliminating flickers and supporting substitutions), fix a number of PDF-related issues in macOS 10.12 Sierra, enable encrypted PDFs to be unlocked again, add encoding support for messages dragged from Apple Mail, use MultiMarkdown 5 to render Markdown documents, improve handling of many concurrent synchronizations, and fix multiple issues related to scanning. DEVONthink Pro Office improves archiving UNIX mailboxes and speeds up loading messages from Apple Mail, while DEVONnote receives a workaround that makes random crashes caused by macOS Sierra 10.12.2 less likely.
Shortly after this release, DEVONthink was updated to version 2.9.10 to correct a bug that caused synchronizing with Dropbox to fail. DEVONnote required no updating, so it remains at version 2.9.9. (All updates are free. DEVONthink Pro Office, $149.95 new, release notes; DEVONthink Professional, $79.95 new, release notes; DEVONthink Personal, $49.95 new, release notes; DEVONnote, $24.95 new, release notes; 25 percent discount for TidBITS members on all editions of DEVONthink and DEVONnote. 10.9+)
Read/post comments about DEVONthink 2.9.10/DEVONnote 2.9.9.
Quicken 2017 for Mac 4.4.3 — Quicken Inc. has released version 4.4.3 of its Quicken 2017 for Mac financial management app to fix a bug that inadvertently deleted bond interest income transactions. This bug was introduced in version 4.4.0 when Quicken started merging dividend and buy transactions into a single reinvested dividend, and you’ll need to add those transactions back manually. The update also resolves an issue where changing the description or address of an online bill pay payee with an “&” in the name could cause the payment to be rejected silently. ($74.99 new from Quicken Web site and Mac App Store, free update from Quicken 2017, release notes, 10.10+)
Read/post comments about Quicken 2017 for Mac 4.4.3.
Art Text 3.2 — BeLight Software has released Art Text 3.2 with added support for the Touch Bar on the new MacBook Pro, enabling you to switch between Inspector tabs without interrupting the workflow, as well as helping you add a layer, zoom, export, and share a file. The graphic design app also now supports Google Fonts, adds new Panorama textures, improves Environment Mapping, and adds support for copying and pasting styles. ($29.99 new from BeLight Software or the Mac App Store, free update,
634 MB, release notes, 10.10+)
Read/post comments about Art Text 3.2.
ChronoSync 4.7.3 — Econ Technologies has released ChronoSync 4.7.3 with added support for v4 authentication of AWS S3 commands and an updated set of AWS S3 predefined endpoints that includes all the latest v4-only regions (see “Investigating ChronoSync 4.7 for Cloud Backup,” 22 December 2016). The synchronization and backup app also adds the capability to specify a region identifier within the parenthesis to support future regions, adds logic to work around a memory leak in a system call on OS X 10.8 Mountain Lion, fixes a bug in the Scheduled
Items editor that prevented changes from being saved, and resolves a couple of display issues in the Choose Target window. (Free update, $49.99 new for ChronoSync with a 20 percent discount for TidBITS members, 41.2 MB, release notes, 10.8+)
Read/post comments about ChronoSync 4.7.3.
Safari 10.0.3 — Apple has released Safari 10.0.3 for OS X 10.10.5 Yosemite and 10.11.6 El Capitan (macOS 10.12.3 Sierra also includes it; see “Apple Releases macOS Sierra 10.12.3, iOS 10.2.1, tvOS 10.1.1, and watchOS 3.1.1,” 23 January 2017) with patches for WebKit-related security vulnerabilities. The update deals with multiple memory corruption issues that could allow arbitrary code execution after processing maliciously crafted Web content, plus a state management issue that could lead to address bar spoofing. Safari 10.0.3 is available only via Software Update. (Free, release notes, 10.10+)
Read/post comments about Safari 10.0.3.
iTunes 12.5.5 — Apple has released iTunes 12.5.5 in conjunction with the release of macOS 10.12.3 (see “Apple Releases macOS Sierra 10.12.3, iOS 10.2.1, tvOS 10.1.1, and watchOS 3.1.1,” 23 January 2017). Unfortunately, Apple provides only the inscrutable “minor app and performance improvements” for its release notes. If you come across any notable changes in terms of performance or user interface, please leave a comment below. (Free, 263 MB via direct download or Software Update, release notes, 10.9.5+)
Read/post comments about iTunes 12.5.5.
ExtraBITS for 30 January 2017
In ExtraBITS this week, we get a look at Apple’s and Amazon’s contrasting approaches to home automation, and Apple joins the Partnership on AI.
Apple Versus Amazon in the Smart Home Race — Stephen Nellis of Reuters has penned an article examining the difference in how Apple and Amazon approach home automation. Hardware manufacturers who want to sell HomeKit devices must include special chips and produce their accessories in Apple-approved factories. After that, manufacturers must send their devices to Apple for a lengthy approval process. By comparison, getting a device to work with Amazon’s Alexa personal assistant requires just a software review. Getting a “Works with Alexa” label requires hardware testing, but that can
be done by a third-party lab and takes no more than 10 days. As a result, Alexa threatens to overwhelm HomeKit with the number of compatible devices, but Apple’s approach leads to easier setup, higher security, and better compatibility. Also, Apple HomeKit devices do not require an Internet connection, which improves both security and response times.
Apple Joins the Partnership on AI — Apple has officially joined a group called “Partnership on AI” as a founding member, alongside other major tech firms like Amazon, Facebook, Google, IBM, and Microsoft. Also joining the board of trustees are representatives of non-profit groups, including the American Civil Liberties Union, Association for the Advancement of Artificial Intelligence, MacArthur Foundation, OpenAI, Peterson Institute of International Economics, and UC Berkeley. The stated goals of the partnership are to support best practices for, advance understanding of, and create an open
platform for discussion about artificial intelligence. Given Apple’s tendency toward secrecy, it will be interesting to see what role it will take in the group. Regardless, considering the promise and risks associated with artificial intelligence, it’s good to see tech giants and non-profits coming together in this way.