#1410: Finder freezes, Apple TV 4K HDR, reading on the iPad, TidBITS transition
If all goes as planned in our transition to WordPress, SendGrid, and Discourse later this week, this issue will mark the end of one era and the start of another. Adam Engst explains how the new system will revolve around your TidBITS account, which we’re moving over for you. Is your Mac’s Finder locking up? If you’re a Dropbox user, Josh Centers has a possible solution, and he also delves into the muddy waters of HDR on the Apple TV 4K. Finally, Charles Maurer draws on his experience in visual research to explain how you can figure out the optimal settings for reading on your iPad. Notable software releases this week include VLC Media Player 3.0.1, ScreenFlow 7.3, Mellel 4.1, OmniOutliner Essentials and Pro 5.3, and Keyboard Maestro 8.2.
How Accounts Work in the Next-Gen TidBITS Infrastructure
Despite the fact that Tonya and I had the flu all last week, we’re still planning to flip the switch on our Internet infrastructure move late this week. That’s a plan, not a promise, but if all continues to go well, our new system should send everyone who subscribes to TidBITS a welcome email message. It will include a link to the live site and instructions for changing your TidBITS account password.
Since it will be relevant for many of you immediately, I’d like to explain how we’re using accounts in our next-generation infrastructure, hosted at ArcusTech and DigitalOcean. As before, you must have an account to subscribe to the email edition of TidBITS — that’s how we know your email address. A standard account in our WordPress-based content management system includes your name, email address, password, and subscription choices. There’s also a link to change the profile image that will be associated with any comments you leave. Passwords are hashed and salted — the system uses bcrypt — making the data tasty, but designed to choke any cracking software.
For those fine and upstanding citizens who support our work, the account information also includes TidBITS membership details and controls, along with a personalized full-text RSS feed. (Memberships are managed by the Paid Memberships Pro plug-in for WordPress, and all payments happen through Stripe.) So you’ll have to log in to find that RSS link and to access the many Mac software discounts we’ve negotiated for you. Logged-in TidBITS members also won’t see paid ads.
We’ve brought over your TidBITS membership information, such as membership level, expiration date, and renewal type, but because this is an entirely new system, no previously automatic renewals can take place. The new system will send you an email when it’s time to renew; you can also check that date on your account page.
We’re using a system called Discourse for commenting, and although it too requires an account, it boasts a single-sign-on capability that enables it to rely on our WordPress account system for authentication. Once you’re logged in on the main TidBITS site, you won’t have to log in again to leave a comment in Discourse. There are lots of user preferences you can set in Discourse, so that will be worth exploring.
For email, we’ve given the nod to the transactional email service SendGrid. Subscribing or unsubscribing from one of the weekly TidBITS lists (English, Dutch, or Japanese) or individual articles as they’re published (for TidBITS members) involves clicking a checkbox in your profile page. That action automatically makes the appropriate thing happen in SendGrid’s lists, so they remain in sync with WordPress. So again, the TidBITS account is the central source of data.
There are two exceptions to that with SendGrid. First, if your address bounces, SendGrid automatically adds it to an unsubscribe list locally, but does not communicate that fact back to our system. Similarly, anyone who clicks the Unsubscribe link at the bottom of an email message will unsubscribe directly in SendGrid, with no communication back to WordPress. Such a link would be possible but seemed like it was more work than it was worth. The upshot of these exceptions is that if you want to resubscribe after a bounce or a link-triggered unsubscribe, you’ll need to contact us at [email protected] for help.
I hope that gives you enough of a conceptual overview to get started as soon as you can access the new site. I’ll write more in the future to explain other aspects of what’s changing.
Freezing Finder? Dropbox and Overstuffed Folders May Be the Culprit
For the last few months, my iMac had been getting slower and slower. Specifically, I was seeing the dreaded beachballs of death far more often than I care to, and the Finder was freezing regularly, forcing me to relaunch it multiple times per day. (If you ever need to do this, hold down Option, click and hold the Finder icon in the Dock, and choose Relaunch. For more Dock tricks, see “macOS Hidden Treasures: Dominate the Dock,” 6 March 2017.)
I first tried all the usual fixes, like deleting all the Finder plist files in ~/Library/Preferences/ and running First Aid in Disk Utility. On a hunch that Dropbox was somehow involved, I had even tried revoking its Accessibility access, and although that seemed to help for a while, the frequent beachballs returned. The main thing I had left to try was a clean install, but since I had done one of those when I installed macOS 10.12 Sierra, doing another so soon seemed excessive.
I kept looking for a solution that didn’t involve repaving my iMac, and after some spelunking through the Internet, I found that turning off Dropbox’s Finder integration fixed the problem. Here’s how you do that:
-
- Click the Dropbox icon in the menu bar.
- Click the gear icon in the upper-right corner and choose Preferences.
- Uncheck “Enable Finder integration.”

The downside to disabling Dropbox’s Finder integration is that doing so eliminates the sync icons in the Finder for files and folders synced with Dropbox, along with the special Dropbox options in the Finder’s contextual menu. I wasn’t thrilled about losing those capabilities, so I kept searching.
Eventually, I found some hints that a folder containing a very large number of files could cause Dropbox, and thus the Finder, to choke. It doesn’t make sense that this could be true of folders outside the Dropbox folder, but after I cleaned much of the junk out of my Downloads folder — it had over 1500 items in it and consumed over 26 GB — I was able to re-enable Dropbox’s Finder integration without bringing back the beachballs or freezes.
However, I have some folders that are legitimately large and not just full of junk. After re-enabling Dropbox’s Finder integration, a week of solid performance was ended when the Finder choked while browsing one of these folders, which has some 8800 items in it. I turned off Finder integration again and relaunched the Finder, and I haven’t seen any problems in a week since. I hope the solution sticks this time.
So if you’re suffering from Finder problems along these lines, it’s worth toggling Dropbox’s Finder integration and taking a few minutes to clean out unnecessarily overstuffed folders. You probably have an idea of which folders contain vast numbers of files, but if not, DaisyDisk is a handy tool to find them. For free options, you could turn to OmniDiskSweeper or the open-source GrandPerspective.
If you’ve experienced similar performance issues while using Dropbox, let me know in the comments. I don’t know if the problem lies with the Dropbox app, with the Finder, or with some combination of the two in particular circumstances, but I’d like to try to help the relevant engineers get to the bottom of it.
The Apple TV 4K’s HDR Nightmare
As much as it pains me to say this, Gene Munster was right. For years the former Piper Jaffray analyst was routinely mocked because at every Apple investor call, he would ask Apple leadership if they were planning to make an Apple-branded smart TV set. But after weeks of fighting to get HDR working with my Apple TV 4K, I’m convinced that if Apple intends to succeed in the TV business, the best thing to do would be to ship a television set that just worked. I’ve been writing and updating “Take Control of Apple TV” for four years now, so I know that if I’m flummoxed, the average user has little hope.
In the simplest possible terms, HDR video lets you watch movies with a broader range of colors than before. While you either have to have an enormous TV or sit very close to the screen to notice much difference with 4K video (as I explained in “Apple TV Finally Enters the 4K Realm, but It Will Cost You,” 12 September 2017), HDR is a more striking change, and one that doesn’t require a TV the size of Texas.
If you want to see what HDR looks like without trying to set it up on your TV, you can view 4K HDR iTunes video content on an iPhone 8, iPhone X, or 2017 iPad Pro (see “HDR Movies Now Available for 2017 iPad Pro Tablets,” 16 September 2017).
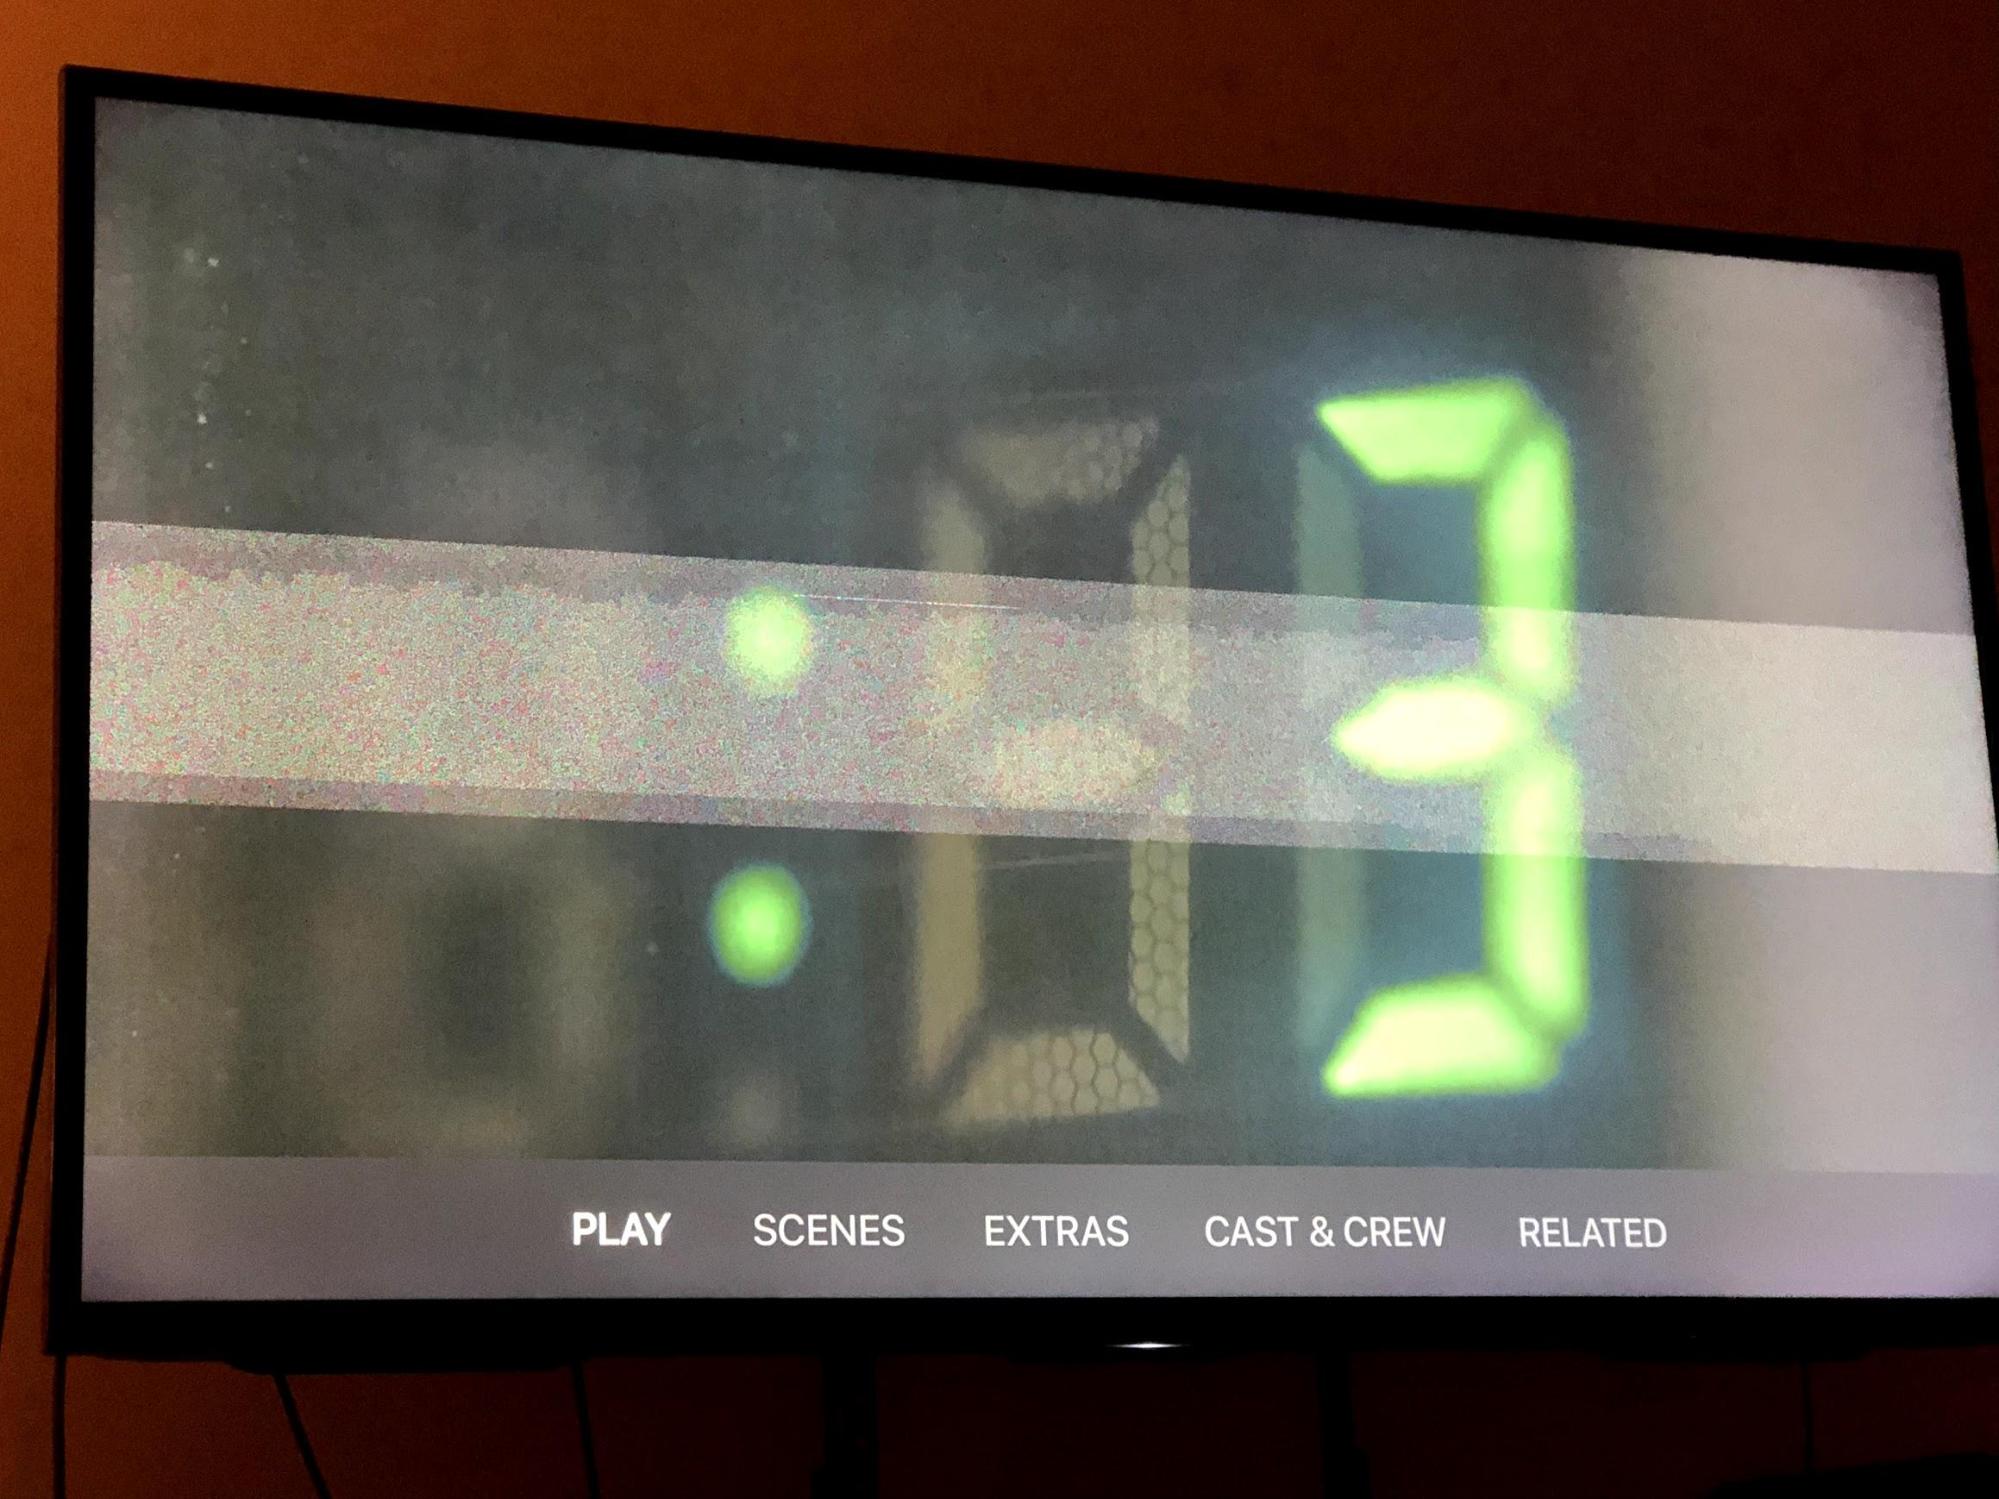
But for the big screen experience, you’ll need an Apple TV 4K. That’s when the problems start. You may go to enable that setting and… it’s not available. Or maybe you force the setting and weird things start happening: your Apple TV slows down, you get weird sparkles on your TV, odd bands of color, or the screen just freezes. As you can see in the photo, that’s what happened to me, and here’s what you can do to try and fix those issues.
Are You Prepared for HDR? — First, make sure that you’re properly set up for HDR. As for hardware, you need:
- An Apple TV 4K. The older fourth-generation Apple TV will not display HDR.
- A television that explicitly supports HDR. 4K TVs often support HDR, but not always, so check carefully.
- A “high speed” HDMI cable.
For years, I’ve said that an HDMI cable is an HDMI cable. That’s no longer entirely true. For HDR, you’ll need what’s known as a “high speed” HDMI cable designed for the high bandwidth requirements of 4K resolutions, 60 Hz refresh rates, and HDR color. The good news is that high speed HDMI cables are cheap: I bought one for $6.99 on Amazon. However, a lot of people swear by the $29.95 Belkin HDMI cable sold by Apple. I might try it as a last resort, but I don’t think it’s necessary.
When checking your TV’s specifications, note that there are two main HDR formats: HDR10, which is more widely adopted, and Dolby Vision, which is visually superior. A TV that supports Dolby Vision should also support HDR10, but not vice-versa.
Making all of this even more confusing is the fact that users can update the software in most recent TVs. In my article introducing the Apple TV 4K, I noted:
For instance, my 2015 Sony supports HDR, but only via Android apps that run on the TV itself. That’s because its HDMI ports are HDMI 2.0, not HDMI 2.0a, which is the minimum requirement to transmit an HDR signal (HDMI 2.1, of course, also supports HDR).
As it turns out, one of my Sony TV’s updates fixed this, though the community isn’t sure which one it was. The only way I discovered the change was by stumbling across Settings > Picture & Display > Dynamic Range while looking through my TV’s settings one night. It pays to explore your TV’s settings every so often.
You also need to make sure that your content supports HDR. In the iTunes Store, this is easy to see in a movie’s listing. Look for the 4K icon — the one next to it will say either Dolby Vision or HDR if the film is available in HDR.

But if the content is in Dolby Vision and your TV can do only HDR10, does your TV display some HDR or does it ignore that data completely? I don’t know. Apparently some TVs can translate between the formats, but it’s a murky issue.
Generally, you can expect newer movies from major Hollywood studios to be in 4K and some sort of HDR. The notable exception is Disney, which isn’t yet releasing its videos in 4K. Also note that you won’t have to pay anything extra for 4K or HDR in iTunes, and iTunes will upgrade existing HD movies for free once the studio upgrades the underlying content.
Finally, keep in mind that you need to have a fast Internet connection to stream HDR content. Apple and Netflix both recommend 25 Mbps or more of downstream bandwidth.
Check Your Apple TV Settings — Once you have the right TV, the right cable, and the right content, you need to make sure that HDR is enabled on your Apple TV. For that, head over to Settings > Video and Audio > Format. What you see is based on what your setup will support. Ideally, choose 4K Dolby Vision 60 Hz here, though 4K HDR 60 Hz is a close second place. If you don’t see even 4K HDR 60 Hz, you can usually scroll down to the bottom, choose Other Formats, and select it from that list, but doing so will likely cause the aforementioned problems.
At first, I forced my Apple TV 4K to output 4K HDR 60 Hz in Settings > Video and Audio > Format > Other Formats. Initially, it seemed to work. (Much like changing resolutions on the Mac, when you change formats, the Apple TV takes a minute to switch to that format and then asks if you can see the display. If you don’t respond to the prompt, it assumes you can’t see it and returns to the previous setting.)
But I immediately noticed sluggish performance — unusual for the Apple TV 4K — and my wife complained about it “going nuts” when I wasn’t there. Over time, I too noticed various glitches and artifacts.
If that sort of thing happens to you, go to Settings > Video and Audio and choose Check Cable. That runs a test to see if your current HDMI cable can support the display settings you’ve chosen, and it will set your Apple TV to output the best quality it detects. Alas, running this test always set my Apple TV back to 4K SDR 60 Hz — SDR stands for standard dynamic range.
If you use an A/V receiver, it could also be involved. Even if it has HDMI ports, it may not support 4K video, and even if it supports 4K video, it may not do HDR. I haven’t used a receiver for years — a direct video connection between the Apple TV and your TV set is always simpler and more reliable. To avoid the need for an A/V receiver, I bought a TV with plenty of HDMI ports and a 5.1 sound bar. (Even when I last had a receiver, I set it up so that it only handled audio.)
The eventual solution turned out to be related to my TV settings. After much fussing, I finally solved all of my HDR woes by going to Settings > External Inputs > HDMI Signal Format on my Sony TV set and changing the HDMI ports from Standard Format to Enhanced Format. After doing that, everything worked great at 4K HDR 60 Hz, and it passed the Check Cable test.
Good news for fellow Sony TV owners: the upcoming tvOS 11.3 update will reportedly add support for Dolby Vision for Sony TVs. My pal John Martellaro at the Mac Observer cleared up his HDR issues with the tvOS 11.3 beta (poor John struggled as much as I did — not even advanced science degrees and time at NASA can help you with today’s TV problems). But for now, 4K HDR 60 Hz is the best I can do, and I don’t even have an option to try to force Dolby Vision.
If you want to push the envelope for a smidgen of extra quality, on the Apple TV 4K, go to Settings > Video and Audio > Chroma (if it’s available), and set it to 4:2:2 instead of the default 4:2:0. RTings has a decent explanation of what this does, but in essence it means less compression and thus a theoretically clearer picture.
But Now Everything Looks Weird! — You’ve enabled all this stuff and now things look strange. Part of it is the HDR look, which can take a little getting used to. But by default, the Apple TV 4K makes everything HDR, and it also displays everything at the highest possible frame rate. HDR conversion makes for unusual colors and even artifacts, and forcing a high refresh rate causes what’s often called the “soap opera effect,” where everything seems to move just a bit too smoothly.
Fortunately, the Apple TV 4K offers a fix for these issues. Go to Settings > Video and Audio > Match Content and turn on Match Dynamic Range and Match Frame Rate. The only downside of this setting is that you may see a brief black screen whenever the Apple TV switches formats, but if you have a high-speed HDMI cable and everything is working properly, you likely won’t notice it.
For more helpful Apple TV tips, check out “Take Control of Apple TV,” which I’ve updated for the Apple TV 4K and tvOS 11.
Is This HDR On? — I hope I’ve helped you get the most out of your Apple TV 4K’s picture quality, but here’s a sad confession: even though HDR is enabled on my Apple TV, I’m playing HDR content, and I’m using a high speed HDMI cable, I’m not certain that it’s actually reaching my TV. HDR movies look a little different, but our perceptions can be deceiving when it comes to audio-visual stuff, which is why that world is so full of snake oil. Let’s examine the evidence:
- While watching known HDR movies from iTunes, I swipe down on the Siri Remote’s touchpad to reveal movie details. I see a 4K icon, but not HDR or Dolby Vision. I’ve asked friends what they see, and I know for a fact that it will display an HDR or Dolby Vision icon when enabled.
- When I press Display on my TV’s remote, I see the 3840×2160 4K resolution displayed, but nothing about HDR or Dolby Vision. Nor do I see anything in my picture settings like other Sony TV owners report.
So, although the picture looks outstanding, I can’t tell you for sure that my Apple TV 4K is actually displaying any form of HDR. I’ll be curious to see if the iOS 11.3 update changes anything.
Why Do You Have to Go and Make TV So Complicated? — I give up. The picture looks fantastic regardless of whether or not it’s actually HDR, and I have more important things to do than spend weeks of my time figuring out if my TV is displaying an extra two bits of color. Besides, I mostly watch old black-and-white episodes of “The Andy Griffith Show.” (I’m more interested in the technology of TV than the content itself. So sue me.)
TV should not be this complicated. Even years ago, when I had to help my dad adjust the outdoor antenna to watch “Married with Children” in the early days of Fox, what we were doing made some sort of sense. This HDR nonsense is just indecipherable. I’ve been emailing friends who have contacts throughout the industry, and everyone is as confused as I am. And I literally wrote a book in this space!
It’s not entirely Apple’s fault. The TV world has long worked like this, with numerous incompatibilities between TV sets and peripherals. But Apple could solve all of this by making a television. Imagine: no calibration, no special settings, nothing to twiddle with! Just sit down and watch TV in the best possible quality. Sure, it wouldn’t be Apple’s most profitable business, but neither is the current Apple TV.
Until that day comes, I’ve seen my family relying more and more on my Chromecast Ultra. It has no interface, and no settings as such — it just works. Best of all, it’s voice controlled when paired with a Google Home smart speaker. Nothing delights my son quite as much as saying “OK Google, play PJ Masks,” and seeing the TV coming to life with his favorite show. It’s magical. Hmm, something magical that just works… that sounds like the products our favorite fruit company used to produce.
Better than the Printed Page: Reading on an iPad
Apple’s Web site makes the iPad sound like a gift of God for graphics, but the company hardly mentions the iPad’s main purpose for some of us: reading books. Nor I have ever heard of anyone who switched on a new iPad, saw the screen, and exclaimed: “What a pleasant way to read! Surely I ought to empty my bookcases and put all of my books onto this.”
I suspect the marketing moguls at Apple do not care much about reading books, because if they did, they could set it up to induce that reaction. Indeed, after fiddling with the settings and buying some cheap apps, my wife Daphne and I both find ourselves preferring the iPad to paper. Not only do we buy ebooks by choice, we have even found ourselves buying ebooks to replace hardcovers on our shelves, because reading on the iPad is quicker and easier.
We have optimized the iPad for reading by working with our knowledge of visual perception. Daphne is a prominent visual scientist and I have worked and written with her extensively. In this article I shall share our approach.
Black on White — To begin I feel obliged to point out the obvious — or at least what ought to be obvious but appears not to be in the curious world of Web designers: our brains are built to read black on white, not white on black. From the first day of life we prefer dark-on-light and the preference never stops. It is built into the brain. However old you are, and however much experience you have had viewing photographic negatives or working on ancient video terminals, your visual system will still find it easier to process black on white.
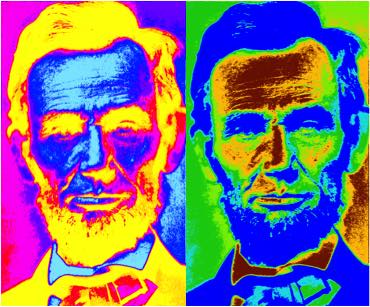
This preference does not stem merely from custom and familiarity. You can see this in the pictures below, where all of the colours are bizarre. The colours are so bizarre that familiarity is not a factor, yet the dark-on-light portrait on the right is easier to identify. Although light type on a dark background may look spiffy, and you may have managed to get used to it, it is intrinsically more difficult to read.
Unless you want to read in the dark, don’t waste your time with white type on black. If you see a Web page designed that way, tap Safari’s Reader button — the stacked bars that sometimes appear at the left end of the address field. However, that button is often unavailable or fails to capture the whole page, so it is sensible to set up an alternative to keep at hand, a “bookmarklet” that runs a JavaScript to redisplay the page sensibly. Bookmark some page — any page — and put the new bookmark in the Favorites bar. Now
edit it. Change the bookmark’s name to “Clarify” and change its URL to this text:
javascript:styles='*%20%7B%20color:%20black%20!important;

%20background-color:%20white%20!important;%20background-image:

%20none%20!important;%20%7D%20a:link%20%7B%20color:%20%2300007F

%20!important;%20%7D%20a:visited%20%7B%20color:%20%23007F00

%20!important;%20%7D%20a:hover%20%7B%20color:%20%23FF0000

%20!important;%20%7D%20a:active%20%7B%20color:%20%23FF7F00

%20!important;%20%7D';%20newSS%20=%20document.createElement('link');

%20newSS.rel%20=%20'stylesheet';%20newSS.href%20=%20'data:text/css,'

%20+%20escape(styles);%20document.documentElement.childNodes%5B0

%5D.appendChild(newSS);%20void%200
Tapping this Clarify bookmark will not bring up a new Web page. Instead, it will usually (JavaScript permitting) reload the current page with black type on a plain white background. This makes almost any white-on-black Web page easier to read unless it depends upon white graphics or white controls. It ought to work in any browser on any device.
Brightness — I now hear somebody grumbling in the background: “But the white screen of an iPad is hard on my eyes.” Yes indeed, it can be hard on the eyes. It must be tamed. Paper reflects about 90 percent of whatever light strikes it, but the iPad’s glow is constant and often brighter than anything else indoors. It must be matched to the ambient brightness. Unless you are outside, when the screen may not be bright enough, you will likely need to reduce the iPad’s screen brightness by a lot. iOS’s automatic screen dimming can do this to a certain extent, but I frequently find my finger fiddling with the brightness slider in Control Center.
Tint — Diagrams of the brain are usually overly simple. They show one function here, another function there, and no interaction between them. The reality is complex. Neurons fire more like shotguns than rifles, so neuronal activity spreads broadly. To one extent or another, different parts of the brain commonly interact.
One such interaction is between areas perceiving colour and areas perceiving lines. These interactions can affect reading. Unfortunately, this is a topic that has seen extravagant claims, sloppy research, and scientific interest damped by patents in North America. However, some good research has come out of the UK, largely by Arnold Wilkins. Wilkins has shown convincingly that real interactions do exist, and these interactions affect a large minority of the population. Little else is known for sure but:
- Coloured overlays can help many people read the printed page.
- Tinted computer screens can help many people read a display.
- Tinted eyeglasses can help many people read anything and/or can lessen migraines.
- The tint will be unique to the individual.
To see if you may be helped by a tinted screen, I created this test using colours that Wilkins suggested. It’s a rough electronic equivalent of a test he developed using transparent plastic overlays. Click through its different colours. If one of them makes the text clearer or more stable or easier to read in any other way, then tint your iPad’s screen. Don’t expect to duplicate the colour of the test exactly — it’s just a starting point — but fiddle with the hue and intensity sliders in Settings > General > Accessibility > Display Accommodations > Color Filter.
Most likely you’ll see no difference on the test, but if a colour makes the text stabler or clearer or easier to read, you might also benefit more generally from tinted eyeglasses, especially if you get migraines from time to time. In the UK, many opticians prescribe and dispense tinted lenses inexpensively under the National Health Service, based on technology that Wilkins developed at Cambridge University. Outside the UK this technology is available sparsely, but a sales force set up by Helen Irlen is ubiquitous. See Cerium and Irlen.
Matching Light — If you see no difference with the colour test above, you can still make reading more comfortable by matching the colour of your screen to the colour of the ambient light.
To see how much ambient light varies in hue, take a look at the photo below. It shows the light I see in the background while reading in my easy chair. Cloudy days see all of the window shades up and all of the colours cool; sunny days see all the shades down and all the colours warm; nighttime sees no sunlight at all, just light from lamps that are warmer still. The colour of light doesn’t matter at all when reading paper, because paper always reflects the ambient tint, but if a screen glows a different colour than the background, it will distract.

Apple’s True Tone control in Settings > Display & Brightness is supposed to modify the display’s colour to match the ambient light. It provides a modest improvement, but the iPad’s default tint is unlikely to be ideal. You can tickle this default in Settings > General > Accessibility > Display Accommodations > Color Filters. For me, what works best is to slide the hue slider rightward one-eighth of the way.
Also, True Tone never makes the screen warm enough to match artificial lighting at night. To warm the screen more at night, I schedule Settings > Display & Brightness > Night Shift to sunset-to-sunrise, and I slide its colour-temperature slider two-thirds to the right.
Reading — When you look around the world, your eyes do not see all that you perceive. You stare for a half-second or so at one spot then move your eyes suddenly to another. While you fixate on a spot, your eyes see a small spot of sharp lines surrounded by a ring of blur; between the fixations your eyes see nothing. Almost all that you perceive, your brain infers from rings of blur.
This holds when you are reading too, which has significant implications for the layout of a page. The illustration below shows circles of text your eyes might see clearly enough to read while scanning the first paragraph. At the bottom, I’ve copied the text from the first paragraph contained within each circle. This is the information your eye might have picked up.
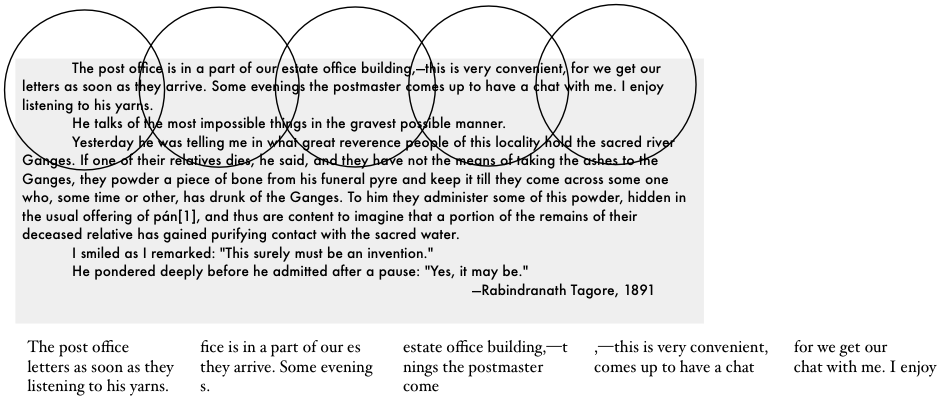
Here is the same text laid out in a column. Here each circle presents more of the text, and the circles overlap, so more of the meaning comes through.

Of course, in neither layout could your brain process all of the text at once. In both layouts, your eyes will zigzag across and down the page. However, every fixation on the vertical layout feeds the brain more information than any fixation on the horizontal, making the words easier to process.
On the other hand, these are individual words and meaning comes more from phrases than from words. Phrases are the molecules of language, words are merely atoms. Thus, the optimal width of a column is determined by how clearly it presents phrases, not words. This varies with the complexity of the text.
At one extreme is
a modern newspaper.
Newspaper prose
builds simple words
into short phrases,
so narrow columns
display them well.
In contrast, the considerate cadences,
the sesquipedalian and Latinate vocabulary,
and the archaic usages and structures
of Georgian literature — all of these several
attributes condense and assemble themselves
within the brain most sensibly and clearly
when traced by the eye across broader lines.
Newspapers and magazines often use columns appropriately but books seldom do. That’s because the layout of a printed book is optimized not for readability but for sales. A publisher can sell X copies if he can keep the price to $Y, but that requires using a small, thin font at its default spacing with minimal margins, and filling the page with text. Moreover, to sell in a shop the book needs to look attractive, so the text will be justified neatly on the right.
None of this is good for reading. A larger and possibly thicker font would be more legible. The default spacing of type is the minimum possible but reading comfortably requires some space between the lines. Justifying the right edge of text requires varying the spacing between words and letters, a variation that’s a form of noise the brain needs to ignore.
On an iPad, I can adjust all of those parameters and more, not with iBooks but with the third-party app MapleRead. I can also switch off hyphenation so that the eye does not need to process broken words. The next two screenshots show how I set it up for two different books: a serious history (horizontal) and a modern novel (vertical). The font is Futura. To my eye, Futura is the clearest for full pages of text on an iPad (although not on my Macintosh), but your eyes will differ, so experiment with different fonts. Some of Arnold Wilkins’s work suggests that Verdana would be a good font to try.
MapleRead is designed to read books in EPUB format. That is the standard, generic format for ebooks, the format used by virtually every source of ebooks other than Amazon. Amazon uses the Mobi format for its Kindle books. Both formats are similar under the hood but Mobi is locked to Amazon’s products, so if an ebook
I want is available only from Amazon, I convert it to EPUB.
I convert Kindle books on my Mac in a cross-platform shareware product called Calibre. Calibre also stores my books on my computer, where they are automatically backed up, and sends them to my iPad either by mail or over the Web.
Neither Calibre nor MapleRead will open any book that is protected by digital rights management (DRM). However, anyone living outside the United States may legitimately search for a Calibre plug-in that will automatically remove DRM from ebooks, and then may legally download and use any such plug-in he may find on any ebook that he buys. That is my situation living in Canada.
Unfortunately, in the United States, the U.S. Digital Millennium Copyright Act applies. This law not only forbids U.S. residents full and free access to their electronic purchases, it also forbids U.S. publishers like TidBITS from describing workarounds. Thus, I may not discuss here my own legal attempts to remove DRM. I may state, however, that, whether or not I have easily found DRM-removal tools for most ebooks, I have found no way to remove the DRM from ebooks purchased through Apple.
On the other hand, DRM is irrelevant to classic literature. A vast number of books that are in the public domain can be downloaded for free from Project Gutenberg. (It’s worth checking Project Gutenberg’s Canadian and Australian sites, too, since I have found books there that are not on the U.S. site and vice versa.) You can also download complete works of many classic authors for a few dollars from Delphi Classics. I find Delphi’s editorial work to be well worth the money.
EPUB is the most practical format for reading most books but only PDFs will do a good job with pictures. Also, many ebooks and nearly all journal articles are available only as PDF files. PDF basically gives you a printed page in electronic form, so a PDF file is almost always most legible when printed on paper. That said, skimming and reading PDFs on the iPad can save a lot of time and trees. Calibre can extract the text from a PDF and convert it to EPUB format, but the result is usually grotesque. I prefer to leave them as they are, but I do usually magnify the pages and read them not in iBooks but in DjVu. This app
lacks gimmickry that gets in the way of reading and, unlike most other PDF readers, it maintains its magnification across pages.
System Settings — A winter wonder of downtown Toronto is women wearing high heels to walk on ice and snow. Nothing could be less sensible but thus does appearance sell clothing — and iPads. Just look at this clever animation! So what if the needless movement distracts you. You no longer need to read, just as you no longer need to walk.
Many of these graphical high heels are built into iOS and cannot be changed — for example, the login screen, where the virtual keyboard shows grey characters on grey instead of black on white. However, some of them can be changed and may improve your book-reading experience. Here is a list of some additional settings that make the iPad less spiffy but easier to use. All are buried in Settings > General > Accessibility:
- Bold Text > On
- Button Shapes > On
- Increase Contrast > Reduce Transparency > On
- Increase Contrast > Darken Colors > On
- Reduce Motion > On
- On/Off Labels > On
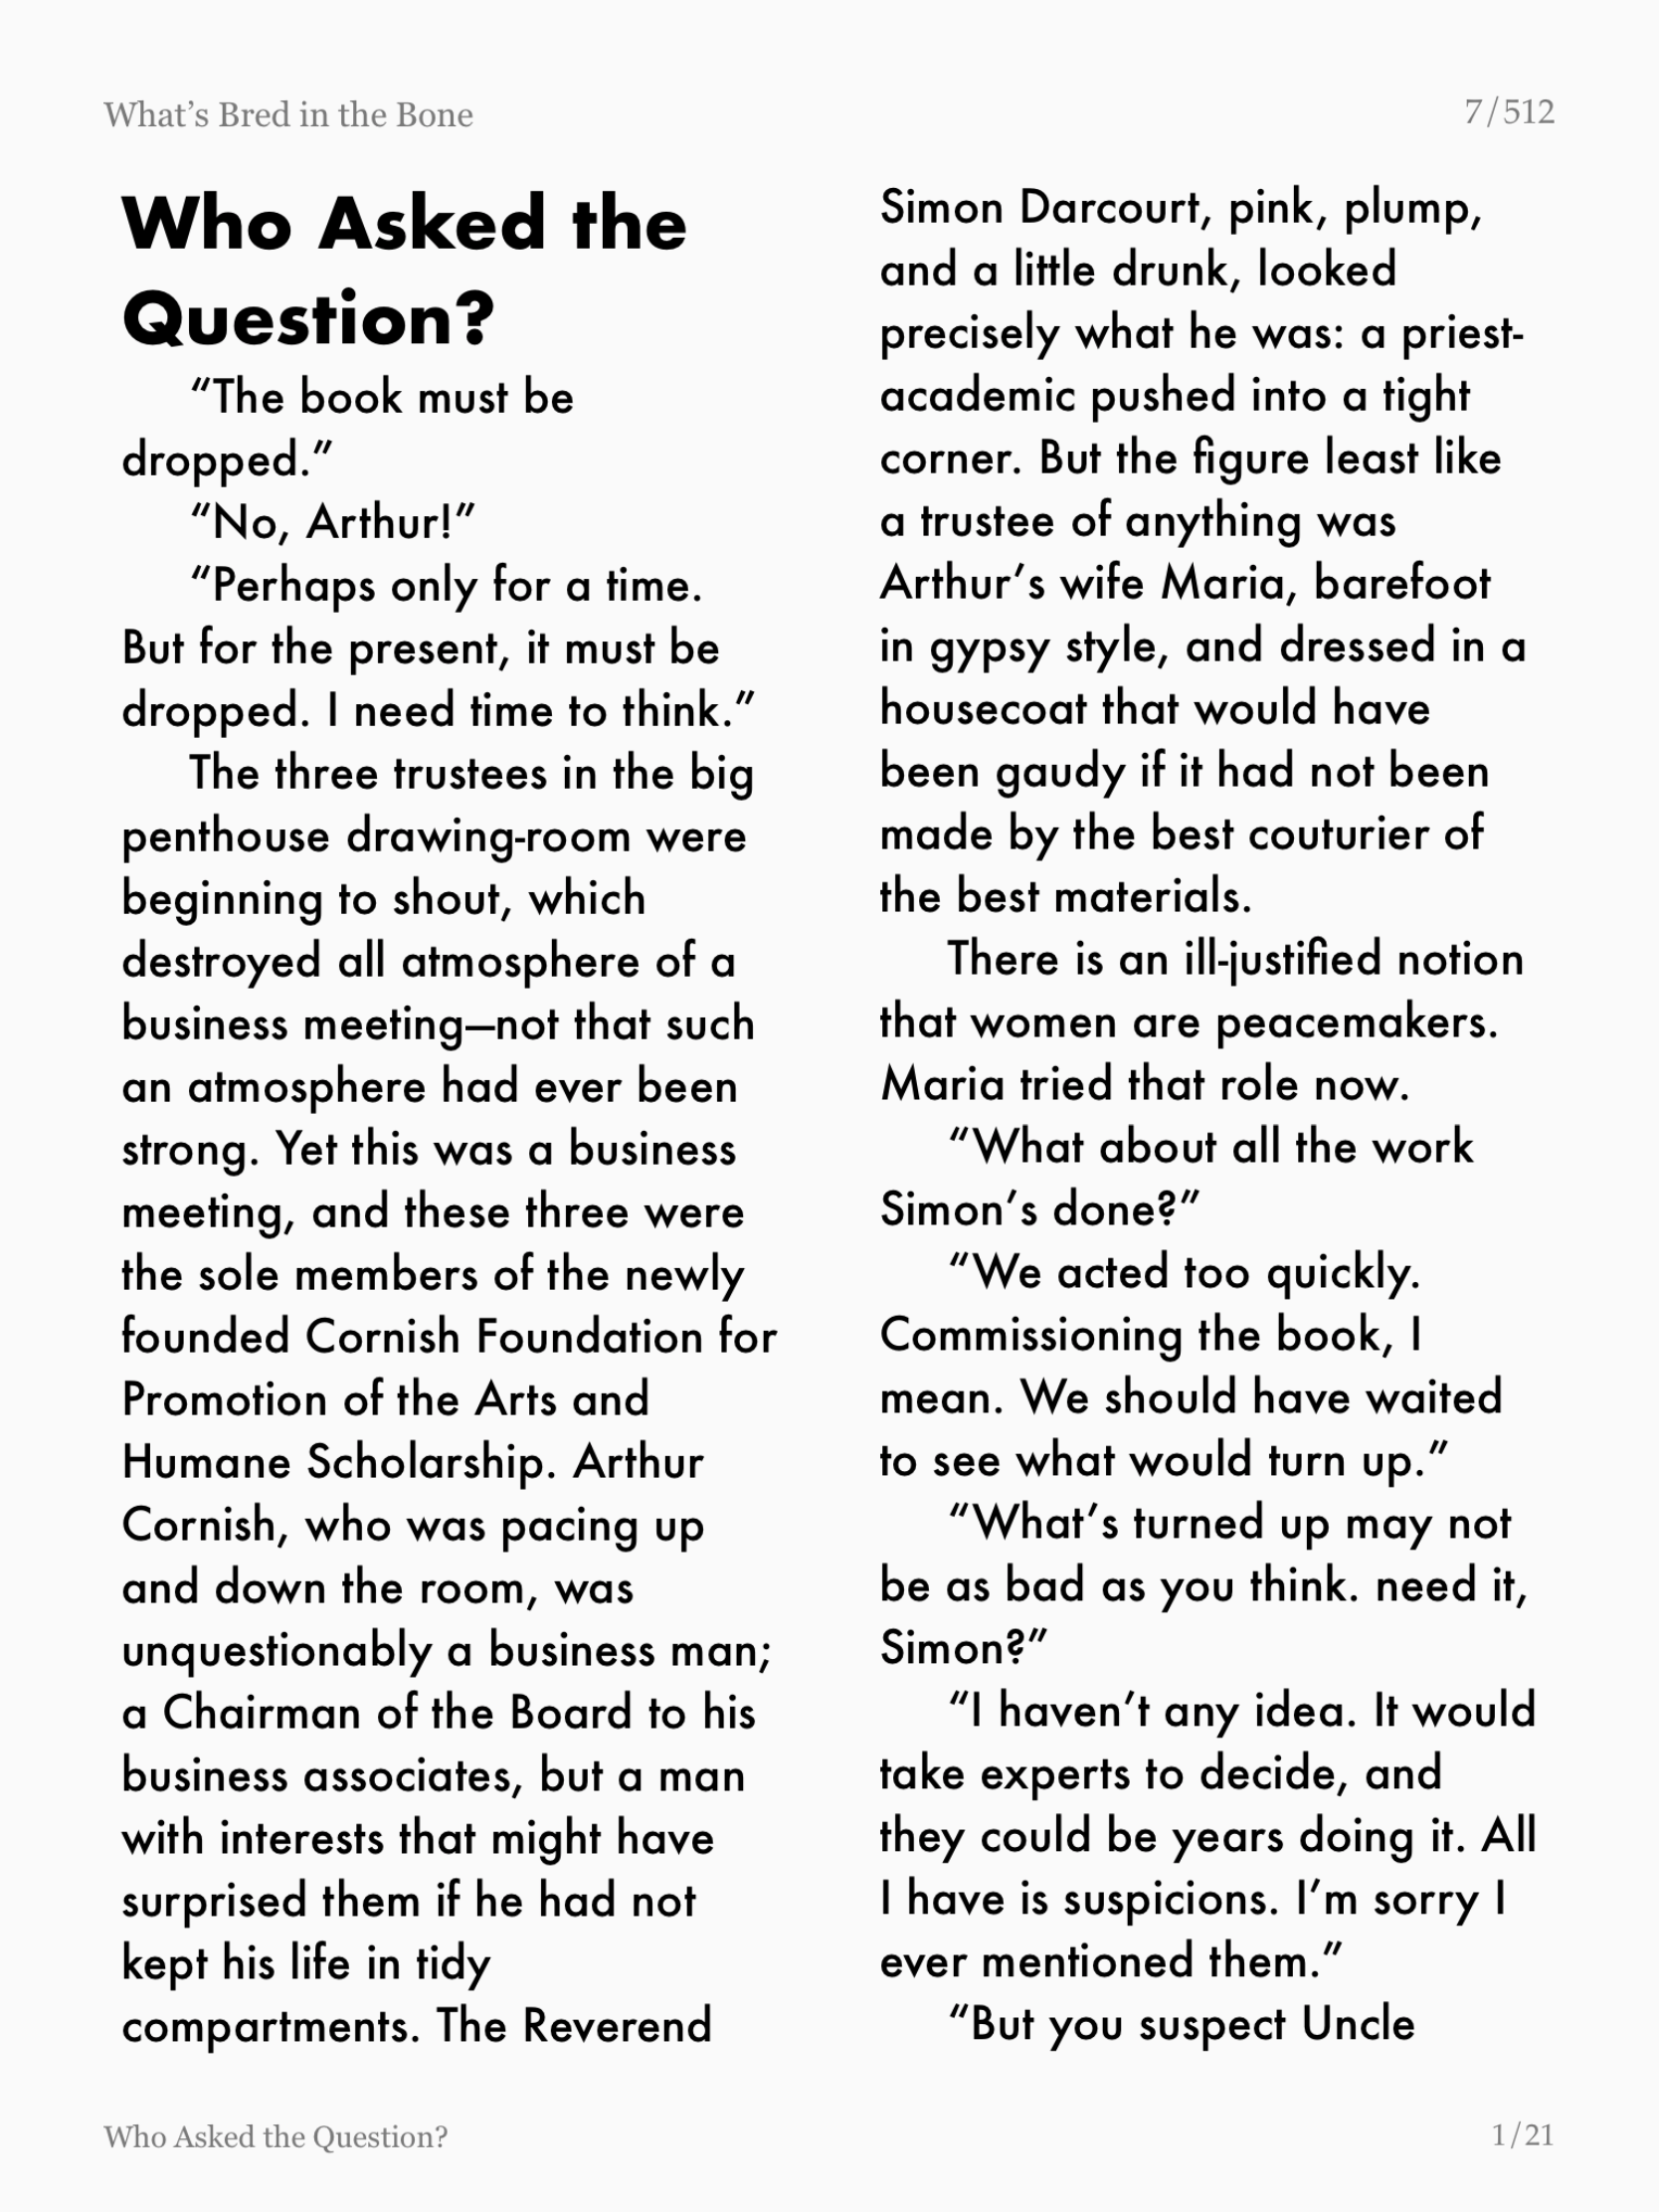
Finally, you might try the $4.99 keyboard PadKeys. As you can see in this comparison with Apple’s default keyboard (top), PadKeys (bottom) is easier to see. The letters are a little larger, but more importantly they are not crowded by symbols. When your eye is searching for a letter, Apple‘s grey symbols create visual noise, the visual equivalent of hearing other people talking while you’re trying to hold a conversation. Also, PadKeys makes the numbers and punctuation marks much larger and black instead of grey.
PadKeys is also easier to use because its layout more closely approximates a conventional keyboard. It even includes left-right cursor-control keys plus buttons for undo, redo, and paste.
Like Apple’s keyboard, PadKeys lets you type alternate characters by flicking your finger, but PadKeys has you flick your finger upward rather than downward — toward the character you want, not away from it. This feels more natural. You can also drag your finger from key to key if you prefer, although that requires teaching PadKey’s autocorrect dictionary that you usually mean, for example, “dessert” rather than “desert”. I prefer to type with one or two forefingers and forgo the keyboard’s attempts to help me choose and/or spell my words.
I suggest setting PadKeys to use the bold theme with All-Caps Keycaps and Dark Mode switched off, and with Show Shift Hints switched on.
[If you found the information in this article valuable, Charles asks that you pay a little for it by making a donation to the aid organization Doctors Without Borders.]
TidBITS Watchlist: Notable Software Updates for 26 March 2018
VLC Media Player 3.0.1 — VideoLAN has updated its open-source VLC media player to version 3.0.1, fixing Hybrid Log-Gamma (HLG), improving HEVC 10-bit performance with the VideoToolbox framework, and improving MKV seeking speed. The release returns an option to disable the fullscreen controller panel, improves auto-layouts, removes a misleading playback warning indicator, fixes a bug with the show sidebar setting being ignored on restart, and resolves issues with Chromecast audio detection. (Free, 44.7 MB, release notes, 10.7+)
Read/post comments about VLC Media Player 3.0.1.
ScreenFlow 7.3 — Telestream has released ScreenFlow 7.3 with a rebuilt audio driver that restores capture of system audio playback on the iMac Pro. The screencast recording and video editing app also adds a modifier key to add media either in sequence or as layered when adding from the Media Library to the timeline.
The release also fixes numerous bugs, including abnormal audio when recording with the Mac App Store edition, canvas resizing issues with external monitors, a crash that occurred when exporting with the AppleTV preset, and incorrect clip duration displayed in the clip inspector (which caused issues with timeline zoom on a 60 FPS timeline). ($129 new from the Telestream Web site or from the Mac App Store, free update, release notes, 10.11+)
Read/post comments about ScreenFlow 7.3.
Mellel 4.1 — RedleX has issued Mellel 4.1 with a number of new features, including native DOCX file format import, character tracking, auto-kerning for most TrueType fonts, and minimum word spacing. The word processor receives enhancements to its outline capabilities, including alternating colors for outline items, no double indent for wrapping items, and an option to truncate items instead of wrapping the lines.
The release also draws story points on their own line with a default font and a background with lines along the sides, ensures the Auto-title palette reflects the selection in the outline pane, fixes a bug that caused strikethroughs to be drawn at the bottom of the letters instead of the middle in macOS 10.13 High Sierra, and resolves an issue that would cause bibliography scanning to override character attributes. ($59 new from RedleX and the Mac App Store, $29 upgrade, free update, 89.1 MB, release notes, 10.6+)
Read/post comments about Mellel 4.1.
OmniOutliner Essentials and Pro 5.3 — The Omni Group has released version 5.3 of OmniOutliner Essentials and OmniOutliner Pro, with the update ensuring that the Search field in the toolbar remembers the last used setting between Filter and Batch Find and that Quick Look works in macOS 10.13 High Sierra. The outlining and information organization app also fixes a bug that caused child rows to display in the wrong order after ungrouping or outdenting a row, improves the speed of saving certain documents, ensures that pasted or duplicated rows with pop-up column
values retain those values, resolves a crash related to memory management in High Sierra, and fixes a bug with font colors being applied incorrectly in PowerPoint exports. OmniOutliner 5 is available from the Mac App Store as a free download (providing a 2-week free trial) with options for unlocking Essentials and Pro features at $9.99 and $59.99 respectively. ($9.99 new for Essentials, $59.99 for Pro, 38.7 MB, release notes, 10.11+)
Read/post comments about OmniOutliner Essentials and Pro 5.3.
Keyboard Maestro 8.2 — Peter Lewis of Stairways Software has released Keyboard Maestro 8.2, adding a new Applications Palette that displays running applications. The automation and clipboard utility also adds an Apply Modifiers to a Specific Application action, a Dragged File trigger to support dragging files to macros in macro palettes, and a Macro Library entry for an Application Palette group.
The release also provides a warning about translocated applications when setting them in the Application pop-up menus, fixes a bug with Prompt With List, and resolves an issue with AppleScript creation of actions. ($36 new with a 20 percent discount for TidBITS members, free update, 22.4 MB, release notes, 10.10+)
Read/post comments about Keyboard Maestro 8.2.
ExtraBITS for 26 March 2018
In ExtraBITS this week, the CEO of easyDNS offers sensible advice for limiting Facebook usage, and Apple reveals new Apple Watch bands for spring.
Should You Delete Your Facebook Page? — Mark Jeftovic, the outspoken CEO of DNS provider easyDNS, has weighed in on the whole Facebook/Cambridge Analytica scandal with opinions that are simultaneously harsh and realistic. He starts by equating social media platforms to “The Spew,” a 1994 short story by Neal Stephenson in Wired, and lays out multiple condemnations of Facebook and Mark Zuckerberg. But then Jeftovic returns to the real question at hand: Should you delete your Facebook page? He recommends keeping business Facebook pages but not relying on them, and he says he’ll
keep a personal Facebook page while assuming that anything he posts is completely public and will be used for targeting. But he votes against the mobile Facebook apps, which try their hardest to harvest your contact data.
Apple Reveals Spring 2018 Collection of Apple Watch Bands — Apple has announced a new collection of Apple Watch bands, which will be available later this month. On the slate are new sport bands ($49), woven nylon bands ($49), sport loops ($49), and classic buckles ($149) in spring colors. Apple has also created new bundles, including the space gray aluminum Apple Watch Series 3 (GPS + Cellular) with the Black Sport Loop and the space gray aluminum Apple Watch Nike+ (GPS + Cellular) with the Midnight Fog Nike Sport Loop. The Nike Sport Loop band ($49), which will
now be sold separately, will come in new colors, and the Hermès Single Tour Rallye ($439) and Double Tour ($489) bands now display contrasting paint details.