TidBITS#774/04-Apr-05
Jeff Carlson upped the ante on holiday cards this year with a full-fledged DVD; read on for an article sharing the essential lessons he learned in the process. Adam relates his experience of switching to MaxEmail for incoming fax-to-email service, and Glenn Fleishman covers the announcement of Adobe Creative Suite 2 and notes that Skype users can now receive calls from normal telephones for a small fee. In Take Control news, check out our redesigned Web site!
Skype Adds SkypeIn for Mac
Skype Adds SkypeIn for Mac — I’ve written a bit about Skype, a voice-over-IP program for Mac, Windows, and Linux that offers great quality service, five-user conference calling, and outbound calls at low rates to the regular phone network (see "Road Warrior Scramble" in TidBITS-771). But wait! There’s more. Skype is now testing SkypeIn, an inbound telephone number attached to your Skype account. Other companies offer a similar service, but typically only in a bundle. For instance, Vonage has what they call a soft phone service, but it’s an add-on to an existing Vonage full-service account.
<http://www.skype.com/products/skype/macosx/>
<https://tidbits.com/getbits.acgi?tbart=08028>
SkypeIn costs a ridiculously low 10 euros for three months of service in this phase (including unlimited inbound calls and voicemail), or about US$4 per month. The Vonage service is Internet telephony only, while Skype includes Skype-to-Skype and inbound and outbound telephone network calling. And Skype includes instant messaging and file exchange, too. [GF]
<http://www.skype.com/products/skype/macosx/ changelog.html>
Adobe Announces Creative Suite 2
Adobe announced today that the latest versions of Photoshop, Illustrator, InDesign, and GoLive will hit the market in May 2005 as part of Creative Suite 2, the company’s thorough refresh for their flagship products. Acrobat is on a separate track, and was updated to version 7 in fall 2004.
The new CS2 offers a host of advantages for those working across many Adobe programs by further pulling together elements that get created in one program, tweaked in another, and placed on a page (Web or print) in another. The new Adobe Bridge software works with Version Cue CS2, a WebDAV-based server that retains multiple versions of files in an archive, to allow browsing across all kinds of media, including looking at older revisions, storing multiple live versions of a single file, and even browsing and purchasing royalty-free stock photography.
New features in Photoshop include a vanishing point feature for adjusting perspective, better raw digital camera file support, 32-bit-per-channel images, and layer control through click and drag. Illustrator gains live trace, live paint over bitmaps, Photoshop layer support, and aid for creating content for mobile devices such as cell phones. Indesign now features object styles and support for Photoshop and PDF layers. GoLive is improved with better previews through embedded rendering, visual tools for building CSS-based pages, mobile device authoring tools, secure FTP (SSH and SSL), and the capability to create favicons. Version Cue now supports multiple live versions of the same for use in different applications, but more important, it apparently now works, too – something I couldn’t say about Version Cue CS.
CS2 comes in Standard and Premium editions. Premium includes Acrobat Professional, GoLive, Illustrator, InDesign, and Version Cue. Standard omits Acrobat and GoLive. Premium costs $1,200 from scratch, or $550 as an upgrade from either CS 1.1 or earlier edition, or $450 from CS 1.3. Photoshop CS or 7.0 users can pay $750 for an upgrade to the entire suite. Standard is $900 from scratch, $350 from a previous CS version, or $500 from Photoshop CS or 7.0.
Replacing eFax with MaxEmail
I’m not a fan of faxes. I fully admit they’re useful on occasion, when the source material is on paper, or when a form must be filled out in pen and returned, often with a signature. But as a technology, fax has always bothered me, since it usually generates more paper than would otherwise be necessary. But, like it or not, being able to send and receive faxes remains an integral part of doing business today, so Tonya and I own a fax machine. It’s acceptable for sending faxes when a PDF in email won’t do, but we’ve never liked receiving faxes on it, since the print quality is lousy and, more important, allowing it to answer a phone line is always cause for annoyance, particularly given that it’s necessary so infrequently.
Long ago, we solved this problem by signing up for an eFax Free receiving account; it accepted faxes and sent them to me as TIFF-F attachments to email messages (see "Rejiggering Personal Voice Communications" in TidBITS-593). Because the account was free, it also meant that eFax could (and did, frequently) send me advertisements to support the service. The ads were annoying, but the account was free, and for our limited fax reception needs, the price was right.
<https://tidbits.com/getbits.acgi?tbart=06528>
At some point, however, eFax presumably realized that free accounts weren’t worth as much as paid accounts, and they increased their efforts to encourage me to start paying for an eFax Plus account for $13 per month. Since the comparison was with putting up with the annoyance of managing incoming faxes on our existing fax machine for free, I politely ignored their messages. Eventually, though, eFax must have decided I wasn’t worth the effort anymore, and cancelled my account. In theory, I could have tried to sign up for a new eFax Free account, but at least when I read the fine print just now, it would have been a violation of their customer agreement, which states that a customer is limited to a single eFax Free account, that you couldn’t receive more than 20 pages in month, and that you’d have to use whatever random area code you were assigned. I didn’t care about the area code, but I wasn’t sure if signing up after they’d canceled my legacy account would be kosher, and if I were to receive more than 20 pages in a month, I’d have to upgrade the account or have it automatically cancelled. No thank you.
Enter MaxEmail — After looking around for another free fax reception account, I decided that there either was no such beast anymore, or that if one did exist, it would be too onerous to use due to intrusive advertising or other restrictions. The fee-based service that floated to the top of my research next was MaxEmail, which offers a Lite service option that provides reception of up to 500 fax pages per month for $15 per year. The $9 per month MaxEmail Plus provides additional features such as being able to pick your area code, but MaxEmail Lite does all I want, and it does it well.
MaxEmail’s standard features include:
Delivery in PDF format instead of TIFF-F, which was always difficult to work with given that GraphicConverter was the only utility I had that could see multiple pages in TIFF-F files. TIFF-F is also an option with MaxEmail, but PDF has been much easier to deal with.
Delivery to up to five email addresses, which makes it possible to have Tonya receive incoming faxes as well, so I don’t become a bottleneck on her work.
Delivery options that allow for attaching the fax to email, sending just a notification message with a link to the fax on the Web, and alerts for pagers and cell phones. Bandwidth isn’t a problem for us, but Tonya prefers the notification option.
A Receive Activity Log that shows faxes I’ve received in the last month, and lets me resend them to myself or to forward them to another email address. I haven’t had to use this feature, but I could easily see wanting it if something went wrong with the email message containing the original fax. For an extra $2 per month, MaxEmail will hold onto all faxes for a year.
<http://www.maxemail.com/fax/services_ features.html>
I’ve been extremely happy with MaxEmail so far because it has just worked. Whenever I’ve expected an incoming fax, it has appeared in my email promptly, and printing the PDFs when necessary has never been a problem. Since the incoming faxes are attachments in email messages, I can archive them like any other email message, though I do change the editable Subject field in the message in Eudora so I don’t have to puzzle over what "1 page MaxEmail fax from 123456790" might have been later on.
If you’ve been looking for a way to bring faxes into the email world, or just a way of freeing up a phone line, check out MaxEmail.
Building a Holiday DVD
Now that Adam lives in Ithaca, the only time we see each other in person is at January’s Macworld Expo in San Francisco. When we met up for the last show, at a small gathering at Joe Kissell’s apartment, one of the first things he said was, "Man, you’ve ruined it for the rest of us!"
What had I done? He pointed to Joe’s mantelpiece, which had a copy of the beautiful, professionally printed Christmas card that he and Tonya sent out. And then I knew: my family’s holiday "card" this year was a DVD containing video, music, and still photos from the previous year. I had raised the geek bar.
What Adam didn’t know was that the DVD almost didn’t happen. I started later than I should have, and even though I’ve made several videos and DVDs while writing three editions of my book on iMovie and iDVD, I made the classic mistake of thinking, "I’ve done this before… it’ll go quickly!" The truth, of course, is that no multimedia project (or home repair project, or writing assignment, for that matter) ever goes as fast as you think it will. I didn’t keep track of my time, but I estimate the project took 30 to 40 hours of work over a three-week period, compressed to try to finish it before Christmas.
<http://www.necoffee.com/imovievqs/>
Whether you’re creating a holiday DVD, a movie chronicling your most recent vacation, or the highlights of a child’s birthday party, the following chronicle of my experience should help you create your own DVD project more easily and effectively.
Gather Material — Even though we were assembling a project packed with multimedia elements, my wife Kim and I started by writing a traditional letter that touched on the year’s highlights (my sister’s wedding, a trip to Arizona, etc.). From that basic script I created an outline in Microsoft Word listing the highlights and noting any corresponding video or still photos I already possessed, and whether I needed to shoot any new footage.
For example, I ended up shooting some new video of Kim building a ceramic bowl (a new hobby of hers). Also, I wanted to summarize some of my work accomplishments, so I used Boinx Software’s iStopMotion to create a movie of me working at the computer while books and lots of coffee cups magically appear around me. (You can view the clip at the second URL below.)
<http://www.istopmotion.com/>
<http://www.tidbits.com/resources/774/jeffworks_ stopmotion.mov>
The video footage taken throughout the year, such as from our Arizona vacation, already existed in iMovie. I assumed that our viewers didn’t want to sit through a holiday DVD that lasted several hours, so I chose a few representative scenes and exported them from iMovie as DV-formatted QuickTime files. (Here’s a tip: You don’t have to export an entire movie in iMovie 4 or iMovie HD. Command-click the clips you want to export, and then chose Share from the File menu. Make sure you mark the checkbox labeled "Share selected clips only," then click the QuickTime icon, and choose Full Quality DV – or a different format, but Full Quality DV is good for importing into Final Cut Express – from the "Compress movie for" popup menu.)
For still pictures, I launched iPhoto and built a new photo album containing the photos I wanted to include. I also knew I wanted to create some background music in GarageBand, but since the music would depend on the length of the scenes in the video, I saved the composing part of my project for later.
Managing Assets and Planning — With the raw materials assembled, I was ready to edit. My original plan was to use iMovie, but I quickly realized that iMovie didn’t offer the flexibility I’d need: I was pulling together a growing number of assets (video clips, digital still photos, background music, a voiceover narration), and I wanted to create a few simple special effects (photos overlaid on the video). Although iMovie could have handled the job – with the help of one of GeeThree’s Slick volumes of iMovie plug-ins for the special effects – I decided to edit the movie in Final Cut Express instead for that and a number of other reasons.
<http://www.geethree.com/>
<http://www.apple.com/finalcutexpress/>
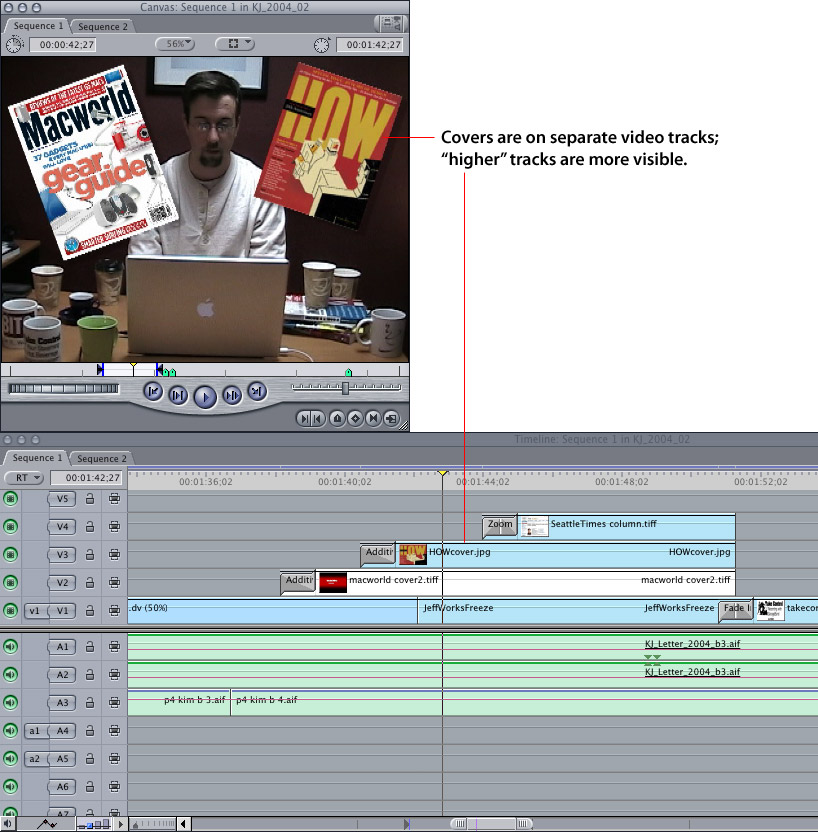
The big advantage of using Final Cut Express was that I wouldn’t be limited by iMovie’s one video track and two audio tracks. Final Cut Express offers up to 99 video and 99 audio tracks, which let me arrange layers on top of one another. For example, in the scene from the completed movie where books and coffee cups appear, I added two magazine covers that pop up, complete with drop shadows.
<http://www.tidbits.com/resources/774/fce_ timeline.jpg>
I also chose Final Cut Express because I would be dealing with lots of still photos. I wanted the camera to appear to be moving slowing across them, an effect called "pan and zoom" but more commonly referred to by Apple as the Ken Burns Effect. Unfortunately, although the Ken Burns Effect is easy to implement in iMovie, its output is erratic (even in the current iMovie HD). There’s no way to control how fast the effect happens, so you frequently end up with a pan that starts quickly and then slows down, or vice-versa. Implementing a pan and zoom effect in Final Cut Express is slightly more involved, but the results are consistent. If I had stuck with iMovie, I probably would have used a third-party utility such as LQ Graphic’s Photo to Movie ($50) or Granted Software’s Still Life ($25) to create my pans, which could be imported into iMovie as DV-formatted QuickTime files.
<http://lqgraphics.com/software/>
<http://www.grantedsw.com/still-life/>
Since Final Cut Express doesn’t enjoy the inter-application integration shared between iMovie and iPhoto, switching to Final Cut Express required me to go back into iPhoto and export my images as JPEG files. In fact, I ended up going back to iPhoto several times for more photos as the project progressed, requiring more exporting. Fortunately, Final Cut Express makes it easy to keep track of your assets by creating bins in the Browser window. iMovie’s counterpart, the Shelf, stores only video files. (Actually, it can also store photos, but because the Shelf uses the same work area as the Photos pane, you must drag photos first to the Timeline, not directly to the Shelf). I created several bins for differently themed photos in Final Cut Express, which could be collapsed in a list view and put out of sight when I didn’t need them.
Remember that by this point I hadn’t begun editing clips at all; I had only pulled together the assets. So, the first lesson is to think ahead: gather your materials and anticipate what you’ll need, so you don’t end up with a half-finished project and the realization that you need to switch back into collection mode. In this case, I had my outline as a guide and a rough idea in my head of what might prove challenging. You might find it equally helpful to create rough storyboards highlighting each scene. If I had jumped headlong into editing the movie before thinking through what would come up later, I might still be working on the project.
Building the Movie — Before editing a frame of video, I had to perform a final edit on the script and make sure it was done – a concept that’s often alien to Hollywood, but terribly important when our "letter" served as the foundation of the video. Using a MacMice MicFlex USB microphone, Kim and I recorded the narration directly into Final Cut Express using the Voice Over tool. You’d think that reading from prepared text into a microphone would be easy, but it actually took us a couple of hours to get it right. Having never done an extended voiceover, I was surprised how speed, inflection, and enunciation can vary so much while recording.
<http://www.dvforge.com/micflex.shtml>
The narration also dictated how much video and photography to include. Playing it back a few times also gave us a chance to see if our movie would be too long; how much time would someone want to spend with it? 15 minutes? 10? The initial reading turned out to be a bit less than 6 minutes, which seemed reasonable.
Finally, it was time to add the visuals. As I’d learned from experience, I just tossed the footage and still photos in without messing with timing, titles, or transitions. It’s easy to get sidetracked making the opening sequence just right, but resist that urge.
Based on the narration, it was easy to tailor the video to the different thematic sections (introduction, working lives, friends and family, and best wishes for 2005). The time-lapse movie created with iStopMotion, for example, was about 12 seconds in duration, which in context seemed to be plodding. Speeding up the footage 50 percent (since it was time-lapse, the speed change didn’t look awkward as normal footage would) maintained a more active pace, and freed up some time in that section to create the superimposed the magazine covers. Though I had to choose which clips to use in the end, having the framework of the narration made the initial editing process feel like a fill-in-the-blanks exercise.
That’s also where my choice of Final Cut Express came in handy. In a section where I needed exactly 10 seconds of video, say, I could set the In and Out points (which define the section of the video clip that’s used) and then "roll" through the clip to find the best 10 seconds. In iMovie, I would have had to adjust the beginning and end points of the clip separately to find the sequence I wanted and then make sure it occupied 10 seconds. Final Cut Express, on the other hand, offers a Roll tool that keeps the 10 second window constant and, in essence, plays the footage behind it.
With the rough cut nailed down, I then went back through and fine-tuned the movie: adding transitions where needed, applying pan and zoom to the still photos, and creating titles for each section. Titles, especially, are better handled in Final Cut Express, where there are more controls for setting type size and placing the words on the screen.
Finally, I turned toward background music, most of which I built in GarageBand using Apple Loops (I’m not sufficiently adept with real-world instruments to record my own playing). Again, knowing the lengths of each section helped define the duration of the music and where to bring in other virtual instruments to highlight what was happening onscreen.
The only frustration I had with GarageBand was that you can only export your compositions by sending them to iTunes first, and then locating the AIFF-formatted audio file on the hard disk before dragging it into my movie. Final Cut Express HD, the current version, now includes Apple’s Soundtrack application for working with background music; I was using Final Cut Express 2.0. I haven’t had a chance to use Soundtrack, but it looks as if it would have made my music process easier.
<http://www.apple.com/finalcutexpress/ soundtrack.html>
(To see the final version of the Jeff Works section of the video, click the URL below, a 4.3 MB QuickTime movie. And remember that this was made with far-flung relatives in mind, who don’t keep up with my work life on a regular basis, so I apologize if it sounds like I’m gloating.)
<http://www.tidbits.com/resources/774/ jeffworks.mov>
Creating the DVD — With the movie completed, it was time to turn to the DVD. One advantage of using iMovie in this case would have been its great Create iDVD Project button, which packages everything up nicely, launches iDVD, and creates a new project all ready for tweaking. Instead, coming from Final Cut Express, I exported the movie by choosing QuickTime Movie from the Export submenu of the File menu. Then I launched iDVD and saved the project with a custom name.
iDVD offers plenty of beautiful templates to choose from, but I had created my own background image, so I chose a simple theme without any motion elements. To add my movie, I simply dragged it from the Finder to iDVD’s editing screen.
To change the background image, I opened the Customize drawer, switched to the Settings pane, and then dragged my JPEG image file from the Finder to the Background well. The rest of my time in iDVD was spent twiddling with the screen’s title font and color, choosing a border for the button one clicked to play the movie, and positioning those elements.
I also created a slideshow in iDVD by clicking the Slideshow button, and then dragging the collection of digital still photos from the Finder to the Slideshow editing screen. Since several people receiving the disc own computers, I made a point to enable the checkbox labeled Add files to DVD-ROM in case they wanted high-resolution versions to add to their own photo libraries. A DVD disc holds roughly 4.7 GB of data, and my little 6 minute movie only took up a little over 1 GB, so I had plenty of room for dozens of photos.
Burning the project to a DVD-R disc took only about an hour, since it didn’t contain much data. Then I tested the disc on as many DVD players as I could find: every DVD-equipped computer in the house and the DVD player connected to our television.
Duplication and Distribution — The last steps were to make several copies of the first disc, package them up, and mail them out. I connected an external LaCie d2 DVD+/-RW burner to my PowerBook and used Roxio’s Toast 6 Titanium to create duplicates. Having the added drive sped up the process slightly by keeping the original in the PowerBook’s SuperDrive, so I didn’t have to keep swapping it out for a new blank disc for each copy. The 16x speed of the LaCie drive was also a plus. If you have only one drive, you can use Toast or Disk Utility to create a disc image from the original and use that as the source for burning duplicates. iDVD 5 now includes the capability to create a disc image directly from iDVD without burning a physical disc (choose Save As Disc Image from the File menu).
<http://www.lacie.com/products/product.htm? pid=10548>
<http://www.roxio.com/en/products/toast/ index.jhtml>
As the discs came out of the burner, I affixed custom-designed labels created with Smile On My Mac’s disclabel software. Normally I’m hesitant about disc labels; if one comes off in a slot-loading computer drive, you could be in for a hefty repair bill. However, these DVDs were more than likely all destined for tray-loading DVD players. Besides, have you seen my handwriting? Making something using disclabel was definitely the wise choice.
<http://www.smileonmymac.com/disclabel/>
The last task was to buy cardboard disc envelopes that could be mailed without using a jewel case, which would have added weight and bulk and postage costs.
Speaking of price, this last push revealed a detail I failed to account for at the beginning of the process. Discs, labels, mailers, and postage add up (as did the two ink cartridges I need to buy for my inkjet printer – boy are those things expensive!). I estimate it cost me about $4 per disc (largely due to the emergency ink refill, so around $2 per disc without that expense). If price had been a major factor, I may not have embarked on the DVD project in favor of a nicely printed postcard.
But this project wasn’t one based on price. We were able to send a more vivid greeting to family members as far away as South Africa, and got some good feedback in return. In fact, while talking with Adam in January, he told me that his son Tristan ended up watching the video several times. Who would have thought that a holiday card would be a repeat experience?
Now, it’s time to start planning for next year’s DVD. Starting the project in April just might give me enough lead time.
PayBITS: Will Jeff’s experiences help you plan your next
video editing project? Thank him with a few bucks via PayBITS!
<https://www.paypal.com/xclick/ business=jeff%40necoffee.com>
Read more about PayBITS: <http://www.tidbits.com/paybits/>
Take Control News/04-Apr-05
The last few weeks have been full of work on the Web side of things as we try to make the Take Control site more coherent, easier to use, and helpful to people who would prefer to order via phone or fax.
<http://www.takecontrolbooks.com/news/>
Take Control Web Site Redesigned — As we gear up for the eventual release of Mac OS X 10.4 Tiger, we realized that our Web site desperately needed to be redesigned. In the early days, we had only a few ebooks, so a main page that listed them, and individual pages for each book, were totally appropriate. But as we increased our title count and added a variety of support pages, the usability of the site started to suffer. Some pages (like the home page and individual book pages) had too much information, and other pages (like all the support pages) forced users to figure out what sort of problem they were having and pick the right page. Plus, we’d added the Take Control News page without having a good way of integrating it with the rest of the site.
So, in rethinking the Take Control site, we focused the home page on providing a brief explanation of Take Control, showing off just our most recent titles, and offering links to recent news items. A persistent navigation bar at the top of the page provides links to the other three main pages: Catalog, News, and FAQ. The catalog page takes over as the complete listing of all our ebooks, translations, print books, and bundle offers. For ebooks and translations, the catalog also now makes it possible to add multiple items to the cart at once. (This doesn’t work with bundles because each bundle has a different coupon code, and an order can have only one coupon code, and it doesn’t work with print books, since they go through the Amazon cart.) The FAQ page brings together all our previous support pages with a unified table of contents at the top and a contact form at the bottom.
The pages for each ebook have changed considerably as well. They’d grown organically, as Web pages are wont to do, and much of the information on them was irrelevant or available in other places. After much consideration, we pared the pages down so they contained a left column that contained ordering controls, and a right column that described the book. At the bottom of the right column were three narrower columns containing just the facts about the book, the author bio, and a list of book reviews. Most notably, we removed the Table of Contents and Introduction sections from the page, since they made it extremely long and were available in their native form in the sample PDF, which also helps people get a feel for what makes a Take Control ebook better than 99 percent of the PDFs out on the Internet.
Behind the scenes, I utilized CSS heavily, much more so than before, and I also started relying on Web Crossing to include commonly repeated elements so changes can be made in a single place. The entire experience, particularly the CSS, required a huge learning curve, since I’d never worked with CSS before. CSS is tremendously attractive, but there are still implementation gaps and quirks; in particular, I came to dislike Internet Explorer on both Mac and Windows in entirely new ways because Internet Explorer tends to deal with CSS differently than all other browsers, requiring unsightly hacks to work around the differences. In a few places, I just threw up my hands and fell back to using HTML tables to position elements on the pages.
Finally, we have switched to the new domain of www.takecontrolbooks.com, which is clear and accurate, if a tad longer than ideal (takecontrol.com is in use for margarine). We shied away from www.takecontrolebooks.com because the extra E just made the words difficult to parse visually, and of course, we also have print versions of some of our books. All our old URLs should still work; the new domain is being handled via behind-the-scenes redirects in Web Crossing.
So give the site a look, and let me know if there’s anything you find confusing or difficult to use.
<http://www.takecontrolbooks.com/>
Phone and Fax Ordering Now Available — To help people who are uncomfortable ordering on the Web, or who have problems with our Web ordering process for whatever reason, we’ve enabled phone and fax orders via eSellerate. Basically, if you want to order over the phone, you find the SKU (stock keeping unit – a standard term for identifying products in retailing) ID codes for the ebooks you want on our Phone Order page, then you call eSellerate and relay the order information and payment details. Once the operator processes the order, you’ll receive an email receipt with download information. Placing an order via fax involves filling in the Fax Order page, then printing it and writing in the remaining information (quantity, subtotal, total, date, and your signature) before faxing it to eSellerate. Again, you’ll receive download information back via email. All the details you need are on our Phone Order and Fax Order pages.
<http://store.eSellerate.net/s.asp? s=STR5625274989&CMD=PHONE>
<http://store.eSellerate.net/s.asp? s=STR5625274989&CMD=FAX>
One more thing. To take advantage of a coupon (which is how all the bundle discounts work), you’ll need to start the order on the Web, just so you can get to the first page of the shopping cart. Then copy the coupon code from that page and either read it to the operator or write it on your fax order form. eSellerate will take it into account when placing the order.
Hot Topics in TidBITS Talk/04-Apr-05
The second URL below each thread description points to the discussion on our Web Crossing server, which will be faster.
Tinderbox impressions — Readers take the Tinderbox demo for a spin and compare how well the note-taker works over the long term. (3 messages)
<https://tidbits.com/getbits.acgi?tlkthrd=2530>
<http://emperor.tidbits.com/TidBITS/Talk/389>
Getting Tiger — With Mac OS X 10.4 Tiger nearing completion, Amazon has posted a rebate offer for those who order Tiger now. (7 messages)
<https://tidbits.com/getbits.acgi?tlkthrd=2531>
<http://emperor.tidbits.com/TidBITS/Talk/390>
Who’s clueless, the computer or the user? A hidden interface element leads to a fascinating discussion of design in software, interfaces, and real-world appliances. (25 messages)
<https://tidbits.com/getbits.acgi?tlkthrd=2532>
<http://emperor.tidbits.com/TidBITS/Talk/391>
Mini in your carry-on? Are you likely to cause a ruckus if you try to bring a Mac mini onto an airplane in your carry-on luggage? (10 messages)
<https://tidbits.com/getbits.acgi?tlkthrd=2533>
<http://emperor.tidbits.com/TidBITS/Talk/392>
Anyone using GoodPage? Following the recent DealBITS offer for Tari’s GoodPage Web design software, a reader solicits opinions from other people who may have downloaded the demo version. (3 messages)
<https://tidbits.com/getbits.acgi?tlkthrd=2534>
<http://emperor.tidbits.com/TidBITS/Talk/393>
Other credit card number theft stories — Clearly, Adam isn’t the first person to have his credit card number stolen (as related in last week’s issue). Others share their tales of frustration. (2 messages)
<https://tidbits.com/getbits.acgi?tlkthrd=2535>
<http://emperor.tidbits.com/TidBITS/Talk/394>
Introducing an elderly computer novice to Macintosh — An elderly friend wants to buy a computer, but with no previous experience, what other sources should he or she look to for help getting up to speed? (25 messages)
<https://tidbits.com/getbits.acgi?tlkthrd=2536>
<http://emperor.tidbits.com/TidBITS/Talk/395>
Thoughts about identity theft — Are credit cards more likely to be stolen than debit cards? What other steps can you take to protect your identity? TidBITS readers continue to offer good suggestions. (7 messages)
<https://tidbits.com/getbits.acgi?tlkthrd=2537>
<http://emperor.tidbits.com/TidBITS/Talk/396>
Mac-friendly GPS systems — Global Positioning Satellite (GPS) receivers are cool, but support on the Mac has always been spotty. One reader solicits suggestions for USB drivers and other information. (3 messages)
<https://tidbits.com/getbits.acgi?tlkthrd=2539>
<http://emperor.tidbits.com/TidBITS/Talk/398>