TidBITS#784/20-Jun-05
This week brings two highly divergent topics, as Charles Maurer returns with a set of instructions for non-experts to fix snapshots using sub-$100 software, and Jeff Carlson tries to hone his poker game against the computer opponents in DD Tournament Poker. In the news, Opera Software ships version 8.0 of their Web browser for the Mac and we announce the winners of last week’s DealBITS drawing.
Opera 8 Boasts Speed and Security
Opera 8 Boasts Speed and Security — Opera Software has released the latest version of its Web browser, Opera 8 for Macintosh. This version brings to the Mac the features available on Opera’s Windows and Linux browsers, including faster page loading, native Scalable Vector Graphic support (SVG 1.1 Tiny), enhanced privacy features, and Opera’s Extensible Rendering Architecture (ERA) to adjust page appearance based on the size of the browser window. Opera 8 requires Mac OS X 10.2 or later and is a 5.5 MB download. A limited version can be used for free, or you can purchase the full version for $40. [JLC]
<http://www.opera.com/>
<http://www.opera.com/pressreleases/en/2005/06/ 16/>
DealBITS Drawing: Matias OS X Keyboard Winners
DealBITS Drawing: Matias OS X Keyboard Winners — Congratulations to Joe Benenati of cox.net, Jan Ferrera of yahoo.com, Glenn Zieman of wi.rr.com, Eric Frampton of ericframpton.com, Don Andrews of mac.com, David Dunham of pensee.com, Amy Kvochick of kvochick.com, and Jean Ohlde of yahoo.com, whose entries were chosen randomly from 1,296 valid entries in last week’s DealBITS drawing and who each will receive an OS X Keyboard from Matias, worth $29.95. In addition, our last two winners were referred to DealBITS, so Andrew Kvochick of yahoo.com and Robert Ohlde of macconnect.com will also receive a keyboard. Keep an eye out for future DealBITS drawings, and remember that telling your friends, family, and colleagues about new drawings is a great way to increase your chances of receiving a prize; nearly 10 percent of our entries this time came from people who learned about DealBITS from a friend. [ACE]
<http://www.tidbits.com/dealbits/matias/>
<https://tidbits.com/getbits.acgi?tbart=08134>
Trying My Hand at Poker: DD Tournament Poker
I never attended a regular poker game in high school or college, and frankly didn’t think much of the game until a couple of years ago when a friend suggested we get some people together to play.
Right now, poker is experiencing a resurgence in popularity thanks to televised tournaments like the World Series of Poker and Celebrity Poker Showdown. I take a fraction of a speck of pride in the fact that my interest in the game came before the current television-fueled crazy, but honestly, I’m following the poker zeitgeist. Besides, watching an actress like Maura Tierney clean out celebrities who play regular poker games has its own perverse pleasure.
<http://www.worldseriesofpoker.com/>
<http://www.bravotv.com/Celebrity_Poker_Showdown /Recaps/2/Game_6.shtml>
The problem with poker, of course, is that it’s a shared game, and as such, it’s not easy to wrangle five or six friends (most of mine being busy freelance writers or artists) to commit to an evening of cards. One option is to get onto an Internet game, but I’m discovering that I’m not a great poker player, which makes me feel strange playing live poker with real people, even if they’re thousands of miles away. I’m also not excited about losing real money.
Mostly, I just like to play. Whenever the urge hits to wager some make-believe cash, I’ve recently turned to two poker applications that run on the Mac. In this installment, I’ll take on Donohoe Digital’s DD Tournament Poker; in a future article I’ll put Scenario Software’s iPoker to the test.
<http://www.ddpoker.com/>
<http://scenario.com/iPoker/>
Know When to Hold ‘Em — If you haven’t been following along with the poker craze, it’s currently dominated by a variant called Texas Hold ‘Em (or just Hold ‘Em). Each person is dealt two cards face down, and everyone bets or folds. Then, three cards are dealt face up (also known as the "flop"), which are shared among the players, followed by another shared face-up card (the "turn"), and finally one more shared, face-up card (the "river"). (I have to admit that part of the allure of poker for me is its terminology.) Betting occurs between each round, and the best combination of five cards out of the seven total wins the hand.
As played in tournaments, Hold ‘Em works well for large groups, as it involves several betting opportunities and a series of mandatory antes (known as "blinds") that raise the stakes. The blinds not only increase after a set period of time, but they also rotate around the table; for example, the person sitting to the left of the dealer has to put up a "small blind" before the cards are dealt (say, $10 in chips), while the next person to the left puts up a larger amount, known as the "big blind" ($15). This system prevents a player from simply folding their cards at every hand and keeping their stash of chips. The person with all of the chips at the end of the game is the winner.
In DD Tournament Poker 1.2, a tournament can involve any number of computer opponents: the normal Card Room setup involves 40 players, while a re-creation of the 2004 World Series of Poker tournament includes 2,576 players. You can also play a Heads-Up game, which is you against just one other opponent.
The interface is a top-down view of one table, which holds 10 players. As players go broke, other players are brought to your table in larger games.
As you can imagine, the level of coordination required to keep track of all these players and chips is ideally suited for a computer. A list at the top-left corner of the screen keeps tabs on the number of hands dealt, how many players and tables are active, and your ranking in the overall scheme. To my surprise, this little bit of information does a good job of making me feel like I’m part of a bigger enterprise; at times I’ve been in second place, but had the highest chip count at my table, making me wonder who else out there was on top. (Hey, imagination is the best part of any game, right?)
Computer Skill — Keeping in mind that I don’t have a lot of real-world Hold ‘Em experience (I’ve played just home games, never in a real casino), the artificial intelligence in DD Tournament Poker seems formidable. You can choose between Low, Medium, and High levels of skill for the computer opponents. At the Medium and High levels, computer players will try to bluff more often, raise bets more frequently, and note your past performance in a game.
I typically play with Medium-level opponents, who sometimes manage to tease my chips away from me by betting small amounts when they hold a strong hand, which encourages me to try to bluff them by betting large. But often a bluff will work: especially earlier in a game, it can be easy to "steal the pot" by raising to three or four times the current bet, forcing the other players to fold.
What’s missing from a computer game are "tells," often non-verbal cues that signal when a player has a good hand or is bluffing. For example, in a computer game you can’t see someone lean back in his chair when he has a good hand, or scratch his nose when he’s bluffing. To professionals, tells are as much a part of the strategy of playing as knowing which cards are likely to produce a strong hand.
However, you can pick up a few electronic tells based on the computer opponents’ behaviors. Some players raise often, and if the hand reaches the final card without everyone else folding, you can see whether the player was bluffing or not. Unfortunately – at least as far as I can tell – individual players don’t exhibit consistent behavior. Albert (they’re all shown with just first names) may play aggressively in one game, then timidly in another. So you can’t base your past performance against Albert the next time he shows up at your table. (Version 2.0 of DD Tournament Poker, which is due 05-Aug-05, promises improved AI behaviors and settings; purchasing the current version after 20-Jun-05 will get you a free upgrade to version 2.0.)
<http://www.ddpoker.com/details-v2.html>
Keep Your Hands Where I Can See Them — What would a card game be without the potential for cheating? You may not be able to hide an ace up your sleeve, but DD Tournament Poker offers several cheat options intended to help you improve your game.
One frustration of poker is that if you fold, you don’t get to see everyone else’s cards to know whether your hand could have beat them or not. This rule prevents everyone from knowing if you were bluffing or not, and often encourages real players (me included) to stay in with a weak hand to see what comes after the flop, the turn, or the river. The program’s cheat options include the capabilities to show the winning hand, show the hands that folded, and to show all of the community cards – so you can smack yourself when you realize that your meager two of spades and four of hearts could have turned into a hand-winning straight, for example.
More powerful is the option to peek at other players’ hands. With this feature enabled, moving your mouse over an opponent’s cards displays them. The computer won’t be able to bluff you then, though you can still lose a hand by not knowing which cards are coming up before they appear. Lastly, you can also choose Never Go Broke, which sneaks half of the tournament leader’s chips into your pile at the next hand. Kids, don’t try this at home!
Poker Night — DD Tournament Poker is designed for solo play, but you can also use it to help you host a home tournament using Poker Night mode along with real cards and chips. It displays a large digital clock that counts down the current level, and lists the amounts for the current blinds. This feature lets you keep a home game in check, raising the blinds at set intervals so you don’t end up playing all night long. The preset poker games are tailored for different levels of play; Poker Night 1, for example, is set to last approximately 3 hours, whereas Poker Night 2 will last 4 hours or more.
You can also configure a poker night game to your specifications, setting the amounts of the blinds, the number of rebuys (if someone loses their chips, they can put up more money to get back into the game), and how the prize pool is allocated at the end of the night.
I haven’t had a chance to conduct a live Hold ‘Em tournament, so I can’t say much more, but I like the fact that the computer is handling some of the aspects that someone might easily lose track of during the night.
Draw, Pardner — DD Tournament Poker includes a number of other features that don’t require much explanation. You can choose different card back designs, or use your own (though specifying my own image slowed down card dealing performance). A preference displays hand information, giving you the odds of winning based on your current hand strength. You can also choose to view your cards only when you pass your cursor over them; this option helps you memorize your cards and resembles real-life play, where you typically look at your cards once and then leave them face-down on the table. The sound effects are nice and subtle, and you can adjust their volume level. An option for background music is also available, but I turned that off after launching the program for the first time.
DD Tournament Poker is a Java application, so the controls don’t have a Mac feel to them, but this isn’t a big deal: the buttons needed to play (Bet, Fold, Call, etc.) all work by typing the command’s first letter; the only time I ever need to touch the mouse is when I’m saving a game to resume later or access the program’s options.
If Texas Hold ‘Em is your poker game of choice, DD Tournament Poker is a great computerized version of it. I especially like that it’s not just a card simulator – the developer has engineered the game to be a digital tool for preparing you for the real thing, for those who have the nerve to play against human opponents. Perhaps someday soon I’ll venture out to a local casino (of which there are now several in Washington State) and see if my training has paid off.
DD Tournament Poker is well worth the $30 registration fee. A demo version is available as a 9.5 MB download, which limits each game to 30 hands.
<http://www.ddpoker.com/demo.html>
Fixing Snaps in a Snap
I enjoy work. Like the narrator of "Three Men in a Boat," I can sit and watch it for hours. Whenever I have something that needs to be done, I work hard to find a way to put it off. Nothing, I have found, facilitates this job like fixing photos. It’s easy and rewarding. It helps me to procrastinate for hours.
My wife Daphne used to be less skilled at procrastination than I, but then she found a camera that she could use (see "Picking a Point-and-Shoot Camera: Panasonic DMC-FX7" in TidBITS-783) and tried fixing up some of the pictures she took. Now her procrastination is coming up to snuff. She finds that fixing her photos provides an excuse to look at them again and, although she is a beginner, the manipulations are still immediately rewarding.
<https://tidbits.com/getbits.acgi?tbart=08136>
To help Daphne, I thought about what might be sensibly done from the perspective of a novice using a snapshot camera. I developed a recipe that has worked out well. It is designed to improve snapshots as much as is usually practical requiring the least amount of skill and time. It will not extract the most that is possible, but it ought to be adequate for most people most of the time.
Note that I worked out this method assuming the limitations of a typical point-and-shoot camera, the limitations that I explained last week. It is by no means ideal for pictures from a digital SLR. Also, this method cannot rescue bad exposures. Indeed, nothing can rescue bad exposures from a digital point-and-shoot. A digital SLR or film camera may still record extractable information from a bad exposure but with a digital point-and-shoot, what you see on the LCD after you take the picture is very close to what you will get.
(Fortunately, there is no reason to have poorly exposed digital pictures. As soon as you take a picture, you can see the result. If you don’t like it, you can modify the exposure and take it again. With a point-and-shoot camera, bad exposures usually result from the sun’s being in front of you, so that everything facing you is in shadow. Since the camera measures the average brightness of the scene, the bright sun fools the camera into exposing too little, leaving the shadows to disappear into black. This is so common that most point-and-shoot cameras provide a mode that compensates for it, a mode called something like backlight, snow, or beach.
The Basic 12-Step Process — Later in this article I shall talk about the software that’s needed to cook my recipe, but first I want to explain all of the steps. These may sound involved, but they are simpler than they sound. Daphne finds doing them to be quick and easy; the only hard part is remembering where the commands are buried in the menus and dialogs.
Most cameras save files in a format called JPEG that is highly compressed. This is convenient, but the compression algorithm loses information and every time you save a file in JPEG format, you apply that algorithm again, thereby losing still more information. You will probably want to save your work after each step. If you move the picture to your computer as a JPEG file and work on it that way, the image will slowly disintegrate. Instead, when you copy the picture onto your computer, convert it to a TIFF file and work on that.
Outdoors, the difference in brightness between the darkest shadows and the brightest details exceeds 1,000,000:1. On a printed photograph the range available is hardly more than 100:1. Clearly, you want to use all of the range that the paper will allow. You want to set the tonal levels within the photo to run from dead black to pure white. This step requires moving two pointers.
Once you adjust tonal levels, the picture may look too dark or too light overall. Another way of saying this is that the average tone of the picture is too dark or too light. To correct for this, you want to tell the computer exactly how dark to make the average tone. This step requires nudging a pointer until the picture looks the best.
Overall the picture should look okay now, running from black to white with most of the detail appropriately dark or light. However, most likely the shadows will be too dark. You will probably want to lighten the shadows – just the shadows, not everything that’s dark. Again, this step requires moving a slider until the picture looks the best.
It should be obvious from the difference in range of brightness (Step 1) that no picture can accurately reproduce what you see. This holds for colour as well as brightness. The colour of a picture can never be accurate, it can only be pleasing. Snapshot cameras usually produce some form of pleasing colour without intervention but often the overall hue would be better slightly warmer or slightly cooler. Changing the hue requires nudging a slider and looking for improvement.
Just as cameras compress brightness, so they compress the saturation of colours. However, to allow for extremes, they usually do this more than is necessary. Photos usually look more pleasing with the saturation slightly increased. You can increase saturation by nudging a slider. After you have done this, you may want to readjust the hue slightly.
Red-eye looks grotesque and is easy to fix: point at or encircle an eye and click.
Vertical lines ought to be plumb. If they are not, rotate the picture to make them plumb, which involves grabbing one corner of the picture and dragging it a few degrees around a circle. Of course, if the vertical lines are not all parallel, they cannot all be plumb. In this case find the best compromise.
-
If you tilt a camera upward to photograph a building, the walls will converge toward the top so that it appears to be collapsing. Unless the camera is obviously pointed way up or down – unless you are looking up at a skyscraper or down at your shoes – vertical lines ought to be vertical. Similarly, unless the camera is obviously pointed sideways, horizontal lines ought to be horizontal. Changing them involves reshaping the picture by dragging its four corners until it looks right or by nudging some sliders that drag the corners for you.
(People usually treat this as an advanced manipulation, but that’s a holdover from film, when adjusting perspective required spending a long time under a black cloth behind a view camera. In a computer these adjustments are only a little bit fiddly and they can make a stunning difference.)
-
Crop the picture to concentrate attention on what matters and to remove whatever does not. Don’t worry about the proportions of the picture, worry about the content. Cropping requires drawing a rectangle around what you want to keep and clicking.
-
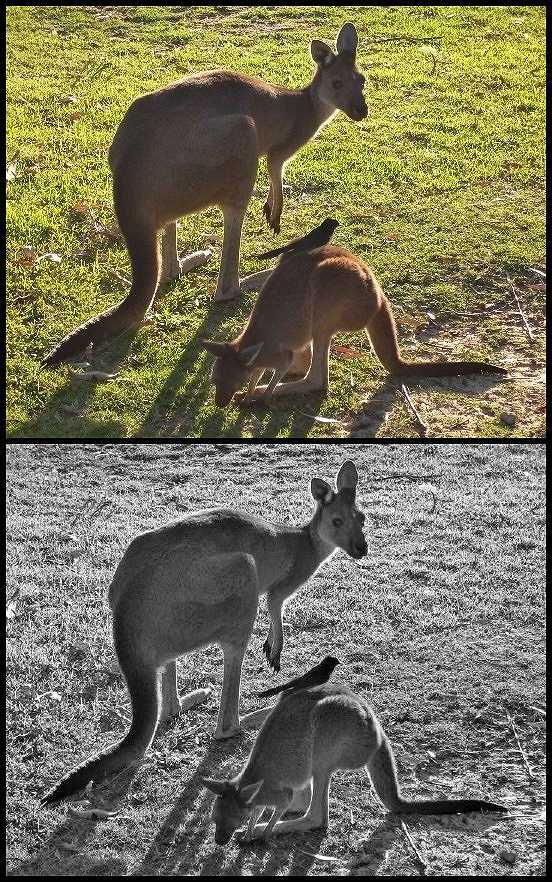
If the information in a photo comes more from its lines than from its colour, then colour may distract the eye, thereby subtracting more than it adds. In this case, converting the picture to black-and-white may be beneficial. You can see an example of this at the link below. If a photo doesn’t seem as good as it ought to be in colour, try it in black-and-white, or "greyscale" in computerese. A single mouse-click will convert the picture and you can always undo the change. If you like the results, save it under another name and try steps 3 and 4 again.
-
If you exaggerate edges, the picture will look sharper – up to a point. If you exaggerate them too much, edges will become distorted. You can play with this by adjusting a slider or choosing a menu command. Since point-and-shoots already sharpen the image, this will often not be useful on enlargements but it is likely to be for small pictures on the Web. Always perform sharpening on copies because it is not reversible and the appropriate amount varies with the picture’s purpose.
When I first explained all of this to Daphne, she thought I was mad. "This is quick and easy? And are sumo wrestlers skinny?" But then I walked her through a photo and she was hooked. She started out wanting to save every picture and fix up just the bad ones but now that she has seen what happens, she fixes up the better ones and throws the others away. She no longer is willing to accept a tree growing out of Hedy’s head. Of course it might be possible to remove that tree – images can be retouched so much that nothing is left of the original – but that is for another level of photographer.
Choosing Your Tools — Although I cooked up this recipe for novices, my taste buds seem to differ from the folks who design programs for editing photos. Neither iPhoto nor any other program aimed at novices can handle the job completely. Below the professional level, only two packages can. The more expensive is GraphicConverter ($30) combined with two third-party plug-ins, ShadowFixer ($17) and Perspective ($40). (Plug-ins are small programs that add functionality to another program. Other plug-ins will do the job of Perspective but they cost more.) The cheaper, more powerful, and quicker alternative is Adobe Photoshop Elements ($80), which can do everything all by itself. Photoshop Elements also comes with better documentation.
<http://www.lemkesoft.com/en/graphcon.htm>
<http://www.fixerlabs.com/pages/shadowfixer.html>
<http://www.theimagingfactory.com/>
<http://www.adobe.com/products/photoshopelmac/ main.html>
(To install ShadowFixer and Perspective, copy them to /Library/Application Support/GraphicConverter/Plug-ins. The Library folder can be either the one in the computer’s root directory or the one in your home directory. The former location will provide access to all the users of your computer, the latter to you alone.)
Photoshop Elements is the better value, but it’s even more confusing than GraphicConverter, which is saying something. On top of that, Photoshop Elements violates a number of Macintosh norms and conventions and does not integrate particularly well with other programs. For example, its "attach to email" function will not recognize the email client I use, PowerMail.
When I looked at the two for Daphne, I concluded that GraphicConverter would be simpler but it offers a host of preferences that must be set appropriately to avoid frustration, and its documentation is not for the novice. Without a help desk in the house, I suspect that Photoshop Elements would be easier to learn.
In both programs, some of the steps call for moving a slider until the pictures looks the best. No matter how experienced you are, manipulations like these never feel certain because it is never possible to see when an image looks the best. All you can do is see that it has stopped getting better and is getting worse again. You need to overshoot in both directions, note in each direction when you first see that the picture is getting worse again, and split the difference. After a few overshoots in each direction, either you will be reasonably sure where the centre point is or you will have learned that the changes are ambiguous enough that the exact setting does not matter.
Finally, before you start, calibrate your monitor. This is a trivial job. Open the Displays pane of System Preferences, click the Color tab, and then click the Calibrate button. In the window that comes up, make sure that Expert Options is checked, then click Continue, and follow the instructions. When you are asked to set the gamma, set it for the PC standard, 2.2. This has become part of a universal standard (sRGB). The old Mac standard of 1.8 is no longer appropriate for general use.
GraphicConverter Instructions — To learn more about using GraphicConverter, a $10 PDF manual by Hagen Henke is indispensable. The Help menu points to it. Here are the step-by-step instructions for using GraphicConverter 5.6 to perform the process outlined above. [Note that you may be able to use older versions of GraphicConverter, albeit with slight interface differences, but I couldn’t get version 4.4 to recognize plug-ins. -Adam]
1. Save as TIFF. Choose Save As from the File menu and in the Save dialog, choose TIFF from the Format pop-up menu.
2 & 3. The levels adjustment is under Picture > Levels. The histogram on the left shows each tone in the picture. The triangles show the end points and the middle. Move the outer triangles inward to the farthest edges of the curve then adjust the middle triangle so that the picture looks best overall.
4. Choose Filter > Fixerlabs Filters > ShadowFixer. Fiddle with the two sliders until the shadows look best, starting with the Amount slider at 50 percent. Afterwards check steps 2 and 3 again, in case there was an interaction. Note that you can enlarge the little windows in the ShadowFixer plug-in by clicking the + sign.
5 & 6. Hue and Saturation sliders are in Picture > Brightness/Contrast. Before you touch them, be sure that the Link Sliders and Full Screen Preview checkboxes are selected. Avoid the Brightness and Contrast sliders.
7. To fix red-eye, click the elliptical selection tool, select the pupil, select Effect > Red Eye. The elliptical selection tool is the second from the top in the left-hand column of the toolbox, which you open by choosing Window > Show Toolbox (or Picture > Toolbox in older versions).
8 & 9. To rotate the photo and correct perspective, choose Filter > theImagingFactory > Perspective. Choose the length of your lens (not critical and sometimes the wrong length looks best) then fiddle with the sliders. Rotation interacts with the other two but you can always set rotation first, click OK, and then open the window again and do the others. This isn’t good in principle, because each manipulation here loses a mite of sharpness, but the difference would never be noticeable in a snapshot, not even when it’s enlarged.
10. Crop by selecting what you want with the rectangular selection tool (first or second tool on the right side of the toolbox, depending upon your version of the program) then selecting Edit > Trim Selection.
11. Convert to black-and-white using Picture > Mode > Grayscale then try steps 2, 3, and 4 again.
12. Play with sharpening (on a copy) by adjusting the slider in Effect > Sharpen Edges.
Photoshop Elements 3.0 Instructions — You will need to work in Standard mode. To select this, click on the Standard Edit button, not the Quick Fix button. Both of these are in the horizontal toolbar on the upper right. (Note that the button looks like a button, a button that is enabled and ready to be clicked – that won’t work, for it is actually the disabled button, the button that has already been selected. The user interface in Photoshop Elements is frustratingly inconsistent. Fortunately, the help files are good.)
Before you start, set Photoshop Elements > Color Settings to Limited Color Management. This is appropriate not just for the Web, as the dialog states, but also for snapshot printers and any photo-printing service that you are likely to use.
1. Save as TIFF, selecting the option to embed an sRGB profile in the Save As dialog. (You don’t need to worry about the color profile, but note for the record that Photoshop Elements will embed a profile generated for Windows, a profile that works inconsistently on Macs.)
2 & 3. The levels adjustment is under Enhance > Adjust Lighting > Levels. The histogram shows each tone in the picture. The triangles show the end points and the middle. Move the outer triangles inward to the farthest edges of the curve then adjust the middle one so that the picture looks best overall.
4. Lighten shadows in Enhance > Adjust Lighting > Shadows/Highlights. Afterwards check steps 2 and 3 again, in case there was an interaction.
5 & 6. Hue and saturation are in Enhance > Adjust Color > Adjust Hue/Saturation.
7. To remove red-eye, click the red-eye tool (about halfway down the vertical toolbar on the left) then click on each red eye. Sliders in the horizontal toolbar at the top let you fine-tune the area blackened and the tone.
8 & 9. To rotate the photo, choose Image > Rotate > Free Rotate Layer, allow Photoshop Elements to create a new layer, then grab one of the black "handles" on the edges of the photo and rotate it. (Be sure no part of the picture is selected when you start this, else the command will rotate only the selection. To deselect something in Photoshop Elements, choose Select > Deselect.) Alternatively, if you need to correct perspective, you can skew the photo in every direction and thereby correct the rotation at the same time. First enlarge the canvas an inch or two (Image > Resize > Canvas Size), and then choose Image > Image Transform > Skew and move the handles.
10. To crop, first click the cropping tool (about halfway down the vertical toolbar on the left), then drag out a rectangle. To crop that rectangle or deselect it, click the cropping tool again or Control-click the image and choose Crop from the contextual menu.
11. Convert to black-and-white using Image > Mode > Grayscale then try steps 2, 3, and 4 again.
12. Play with sharpening (on a copy) using the top three menu commands in Filter > Sharpen.
PayBITS: If Charles’s instructions for fixing photos were
helpful, he asks that you make a donation to Doctors Without
Borders: <http://www.doctorswithoutborders-usa.org/donate />
Read more about PayBITS: <http://www.tidbits.com/paybits/>
Hot Topics in TidBITS Talk/20-Jun-05
The second URL below each thread description points to the discussion on our Web Crossing server, which will be faster.
To Buy or Not to Buy — It’s the question everyone is asking now that Apple has announced it is moving the Mac to Intel processors. This discussion brings up many issues related to buying a computer in general, including notes on backward compatibility with existing software and how long people go between Mac purchases in general. (29 messages)
<https://tidbits.com/getbits.acgi?tlkthrd=2629>
<http://emperor.tidbits.com/TidBITS/Talk/483/>
Chip switch to promote Windows conversions — Will Intel-powered Macs convince more Windows users to buy Apple hardware and switch to Mac OS X, considering that the future boxes will theoretically be able to also run Windows? (3 messages)
<https://tidbits.com/getbits.acgi?tlkthrd=2631>
<http://emperor.tidbits.com/TidBITS/Talk/485/>