TidBITS#881/28-May-07
Our gaze wanders far and wide this week, with Jeff Carlson offering a review of Ovolab’s Geophoto, a tool for giving your photos location tags and then browsing through them via a cartographic interface. Jeff also alerts us to the latest security update from Apple, passes on tips for making multiple-page documents in Adobe Illustrator, and points to a useful shopping list for HD video editing gear. Not to be outdone in the tip department, Adam collects oodles of scroll wheel-related tips, notes that MacLink Plus 16 can read Word and Excel 2007 for Windows documents, and expresses both amusement and alarm about the latest news from the copyright front.
Security Update 2007-005 Released
Apple has released its fifth Mac OS X security update of 2007 to patch a number of potential vulnerabilities. Security Update 2007-005 makes changes to CoreGraphics, iChat, VPN, BIND, crontabs, PPP, and other components, in most cases correcting problems that require either local user access or access to the Mac via a local network. However, several fixes are more important. An update to BIND prevents a possible remote denial of service attack (but because it reportedly overwrites the BIND launchd plist file, it may both turn BIND off and cause other changes to be lost, a potential problem for Mac OS X Server machines), a new version of fetchmail prevents possible
disclosure of passwords, and a fix for CoreGraphics in Mac OS X 10.4 provides additional verification of PDF files to avoid possible crashes when opening maliciously crafted PDFs. The update is available via Software Update or for download in four varieties: for Mac OS X 10.4.9 as Universal (29.2 MB) and PowerPC (15.7 MB) installers; and for Mac OS X 10.3.9 Client (42.5 MB) and Server (56 MB)
systems.
Copyright Fun and Games
In the fun category, Professor Eric Faden of Bucknell University has created a video review of copyright principles. You’re probably thinking, “How could anyone make a video about a legal concept even mildly entertaining?” But Faden’s truly inspired video works on many levels because it consists entirely of extremely short clips (often no more than one word) from a wide variety of animated Disney movies. It’s thanks in large part to Disney that copyright – which was designed to encourage creativity by giving the creator control over copying for a limited time – now lasts for the life of the creator plus 70 years, or, for a work of corporate authorship, 120 years from the date of creation. But thanks to the short length of the clips, its non-profit educational nature, and the fact that it would in no way affect the potential market for the copyrighted works, Faden’s video undoubtedly falls under fair use.
Moving from fun to games, the latest idiocy to emanate from the U.S. Department of Justice is a legislative proposal (in other words, something the DoJ would like Congress to turn into law) that would criminalize copyright infringement. (For a selection of entirely reasonable, real-world copyright infringements that could be criminalized by this proposal, see my article, “J.D. Lasica’s Darknet: People in the Copyright Wars,” 2006-06-05.) Under this proposal, the RIAA wouldn’t have to settle for extracting money from citizens who may have infringed copyright; instead, they could just get the
federal government to take away the miscreants’ computers and throw them in prison. That’s right – the DoJ wants people who even attempt to infringe copyright to be liable for property forfeiture and prison time, just like drug dealers.
And to make sure that none of these attempted copyright infringements go undetected, the DoJ wants to allow law enforcement to wiretap personal communications in copyright infringement investigations. The sheer audacity of this proposal is astonishing – it’s hard to do more than sputter, “But but but!” as you read it. But what you can do is write to your elected representatives to urge them to oppose this proposal if it is introduced; the Electronic Frontier Foundation has a tool that makes it easy.
[Updated 30-May-07 to correct copyright term lengths in the first paragraph and to reference Cornell University’s Copyright Protection Chart.]
MacLinkPlus Deluxe Converts Word/Excel 2007 Documents
Thanks to Jim Dewitt, who alerted me that DataViz’s venerable MacLinkPlus Deluxe, now at version 16, also includes read-only support for the file formats used by Word 2007 and Excel 2007 under Windows. So, if Microsoft’s free beta converter doesn’t work for you (see “Microsoft Office Open XML File Format Converter in Beta,” 2007-05-21), and you want an alternative to Panergy’s docXConverter, check out MacLinkPlus Deluxe. DataViz deserves kudos for sticking with the conversion game for so long and with such a large list of file formats. My experience
is that conversions are seldom perfect, but any automatic tool that brings you closer to the desired result is a good thing.
DealBITS Winners: SmileOnMyMac’s PageSender
Congratulations to Paul Michaelis of pmds-search.com, Gerry Swislow of certif.com, and Scott Gay of mcleodusa.net, whose entries were chosen randomly in last week’s DealBITS drawing and who received a copy of SmileOnMyMac’s PageSender, worth $40. Thanks to the 412 people who entered this DealBITS drawing (and who received a discount on PageSender), and we hope you’ll continue to participate in the future!
Making Pages in Adobe Illustrator
When writing about the end of FreeHand last week (see “Farewell FreeHand,” 2007-05-21), I mentioned one of the features that Adobe Illustrator still lacks, the capability to create multiple pages within a document.
A few readers quickly pointed out that multiple pages are possible, though not as easy to implement as in FreeHand. Charles A. Reeves, Jr. wrote:
“I’ll admit to never using FreeHand, so I don’t know how it handles multiple pages, but it is possible to do multi-page documents in Illustrator. I do it all the time, and in fact have several booklets I publish which I print directly from Illustrator. Just go to Document Setup and create an artboard that is big enough so that all the pages will fit on it and is a multiple of the document page size, and then click the button next to Tile Full Pages. A simple example would be a two page document. Make the artboard 11 inches high by 17 inches wide. When you go back to the document window you will have two side-by-side pages with little non-printing numbers “1” and “2” in the lower left corners. You may have to pull up Page Setup and
select the printer and letter size, and then click on the Page Tool to get the pages oriented correctly.”
John M. Stafford pointed out a feature that I was unaware of (since I need to use Illustrator only occasionally):
“Since version 10, Illustrator automatically includes a PDF in each document. So in the case of your two-sided postcard, use Acrobat Pro and combine the two sides. Now open the resulting document in Illustrator, and on open it will present a dialog asking which page you wish to edit.”
Lastly, long-time reader Brendon Cheves of Hot Door, Inc. pointed me to his company’s MultiPage plug-in ($100) for Illustrator, which looks like what I’m accustomed to in FreeHand.
So, the next time a client needs me to massage an Illustrator file, I’ll have a better idea of how to think like Illustrator, not FreeHand. Thanks for the tips!
Scroll Wheel Tips
Thanks to our buddy Bill Rabel in Seattle for the impetus to write this article. After Mark Anbinder wrote in “Call Me ‘Two Finger’ Mark” (2007-05-21) about how he was surprised to find himself addicted to two-finger scrolling on his MacBook (which is equivalent to using a scroll wheel or Mighty Mouse scroll ball), Bill went spelunking and found a trick I hadn’t previously known, causing me to look for other scroll wheel tips. (And if you’re interested in the history of the scroll wheel, check out “The Evolution of Scrolling: Reinventing the Wheel,” 2004-12-13.)
Scroll Horizontally — Many applications, such as word processors, are oriented vertically, so scrolling up and down with the scroll wheel is intuitive. But what about applications like Microsoft Excel and ProVUE Development’s Panorama database, which often require scrolling horizontally? Just hold down the Shift key and your scroll wheel switches to controlling the horizontal scroll bar instead of the vertical scroll bar. Applications must support this Mac OS X feature explicitly, so it may not be universal to all applications with a horizontal scroll bar.
Zoom In, Zoom Out — Hold down the Control key while you scroll with the scroll wheel and Mac OS X 10.4.8 or later will zoom the screen smoothly. Mac OS X has long provided screen zooming (see the Universal Access preference pane), but it required keyboard shortcuts that were awkward and jerky. Screen zooming isn’t just for those who have trouble reading too-small text or for presenters who want to focus on a particular part of the screen, though; it’s also great for zooming tiny Internet videos up to full-screen size. Of course, they pixelate more at larger sizes, but that’s fine if you’re sitting further back from the screen anyway. The only downside is that it’s hard to get the mouse pointer out of the
picture when you’re zoomed in on a video; normally you want the pointer to stay in the zoomed screen.
A further tip: if you take a selection screenshot with Command-Shift-4 or Snapz Pro X while zoomed in, the screenshot reflects your zoom level properly (trying to take a screenshot of an entire window while zoomed doesn’t work, though).
Scroll to Switch Applications — I’m not sure if this is any easier or not, but if you press Command-Tab, let up on the Tab key, and then use your scroll wheel, Mac OS X will scroll the selection in the application switcher. Of course, you can also just keep pressing Tab, which seems easier, or hover the mouse pointer over an application’s icon to select it.
Per-Frame Advance in QuickTime Player and iMovie HD 6 — Want to see if animators hid secret messages in individual frames of a film? If you can open it in QuickTime Player, using the scroll wheel pauses playback and then either advances or rewinds a frame at a time. It’s probably a little easier to do with a real scroll wheel that has little detents as you scroll. Alas, this trick doesn’t work in iTunes, DVD Player, or VLC, though you can play .m4v files from the iTunes Store in QuickTime Player.
The same trick works in iMovie HD 6, too, but with a caveat. The scrolling seems to work only as a per-frame preview; if you press the left or right arrow keys, which also rewind or advance per frame, the video jumps back to the point where you started scrolling.
Tab History Navigation in Mozilla-based Browsers — Here’s the tip Bill found. If you use Firefox or Camino with tabbed browsing, hold down the Option key and turn the scroll wheel to scroll backward and forward in the tab’s history. These browsers navigate back or forward one page for every scroll detent. It’s a fast way to move back through a lot of pages in a tab, though it’s easy to overshoot your target. Oddly, Netscape and Mozilla use Shift as the modifier key to navigate through a tab’s history, and Safari and OmniWeb don’t have the feature at all.
Change Font Size in Firefox and Camino — It’s all too common to run across a Web page with text that’s too small to read (Geoff Duncan explained this in “Why Windows Web Pages Have Tiny Text,” 1999-02-15). All Web browsers make it easy to expand or shrink text, usually with Command-+ and Command–, but you can also use the scroll wheel to do this in Firefox and Camino. Just hold down Command-Control and scroll to adjust text size.
Slow Down Text Scrolling in Firefox — Normally, if you’re scrolling through a long Web page, the speed accelerates as you turn the wheel. That’s good, since it means you can get to the bottom of a page quickly if you want. But at times you might want a slower scrolling speed so you don’t accidentally scroll past where you’re reading. Hold down the Command key while scrolling in Firefox and scrolling will slow to what seems to be an almost fixed rate. It might be useful if you prefer to keep your eyes in one spot on the page and scroll the text past that spot.
Zoom In and Out in Word and Excel — Speaking of small text… In Microsoft Word and Excel, if you find yourself squinting to read text at the default font size, you can zoom in and out with the scroll wheel. In Word, hold down Command-Control and scroll to change the zoom level by 10 percent increments per detent. In Excel, hold down Control-Option to zoom in and out by 15 percent increments. If you’re using two-finger scrolling on a trackpad, zooming in and out in this fashion may be hard to control.
Control Time with iCal — In iCal’s Day and Week view, you normally see the hours from 8 AM to 6 PM, or whatever you’ve set in iCal’s General preference pane. But by holding down Option and rolling your scroll wheel, you can increase or decrease the number of hours that appear in Day or Week views without opening the preferences window. Note that the changes are persistent, but they aren’t reflected in the preferences window.
Scroll Through the Years in iPhoto — In iPhoto 6’s Calendar pane, Apple gave us funny little up and down arrows on either side of the pane’s title for scrolling through the years. An easier way to scroll forward and backward in time in that pane is to use the scroll wheel – just make sure the mouse pointer is over that portion of the screen first.
There is one notable place where the scroll wheel doesn’t match up to dragging the scroller in the scroll bar. In iPhoto 6, when you scroll by dragging the scroller, iPhoto pops up a translucent display containing the name and date of the current film roll, updating it smoothly as you drag. Alas, that doesn’t work if you scroll with a scroll wheel, so here’s hoping that iPhoto 7 rectifies that situation.
A Personal Shopper for HD Video Editing Gear
When friends and family need to buy a new computer or accessories, they often turn to me for advice. I’ve learned over the years that they’re usually not looking for one of my “history of computing” answers that explains not only how much RAM the computer should have, but how RAM works and why more is better – they just want to know how much to get, and where to get it inexpensively. So, I’ll spend a few minutes online and work up a couple of options.
However, my experience extends only so far, and although I’ve written several editions of a book on video editing (“iMovie HD 6 & iDVD 6 for Mac OS X: Visual QuickStart Guide“), I’ve not had to deal in the higher realm of editing uncompressed high-definition video.
Fortunately, Mike Curtis lives and breathes HD. His Web site, HD for Indies, is geared toward independent filmmakers who are focused more on getting great footage and creating a movie than on the ins and outs of pushing HD video through a system.
If you’re looking to edit your own indie feature or starting a business editing video for others, Mike has taken on the role of personal shopper and put together three recommended Mac-based editing systems. In addition to the computer (all Mac Pro machines, but not necessarily the most powerful ones), Mike’s picks include LCDs and video monitors, RAM, graphics cards, HD capture devices, and multiple storage options. The bundles range in price from $9,000 for an entry-level system capable of editing uncompressed HD footage to $23,000 for a well-equipped system.
He’s worked out a deal with Silverado Systems (and he gets a cut of the order), but all the information is there, with notes and explanation, if you prefer an alternate vendor.
I’ve followed Mike’s site for a while, and even though I don’t shoot HD video, it’s always an entertaining and insightful read.
Geophoto Puts Your Photos on the Map
Photography is a visual medium, and yet our tools for locating digital photos are mostly textual and temporal. When you open iPhoto, you can visually scan through the pictures, but that becomes a problem in large libraries when hundreds of thumbnails streak by as you drag the scroller. Instead, you’re more likely to search according to date: scrolling down the page, the names and capture dates of iPhoto’s film rolls appear. Or, if you’re thorough, you may set up photo albums that describe their contents (“Africa Trip,” for example). In each case, you’re using a text-dependent, non-visual approach to finding images.
Now, think about how your mind locates images. In addition to knowing roughly when the photographs were taken (“March,” or “Spring,” or “Sometime in the last two years”), you no doubt associate a location such as “home,” “Los Angeles,” or “Africa.” Unless you had the foresight to set up albums or keywords with that specific information (and instead of “Los Angeles,” the location could have also been specific nearby areas such as “Glendale” or “Anaheim”), there’s no good way to use that information in your search. At least, not in iPhoto or most other photo-cataloging applications.
Ovolab’s $20 Geophoto looks to add that visual element to finding your pictures, as well as images from around the world. Geophoto lets you place your photos on a map, so you can easily find the ones you’ve taken in Montana, Madrid, or Pretoria. It also lets you subscribe to photo feeds over the Internet, whether or not those images are tagged with geographic data. A trial version of Geophoto 1.3 is a 42.5 MB download; it’s a universal binary and requires Mac OS X 10.4 and a graphics card with at least 64 MB of VRAM.
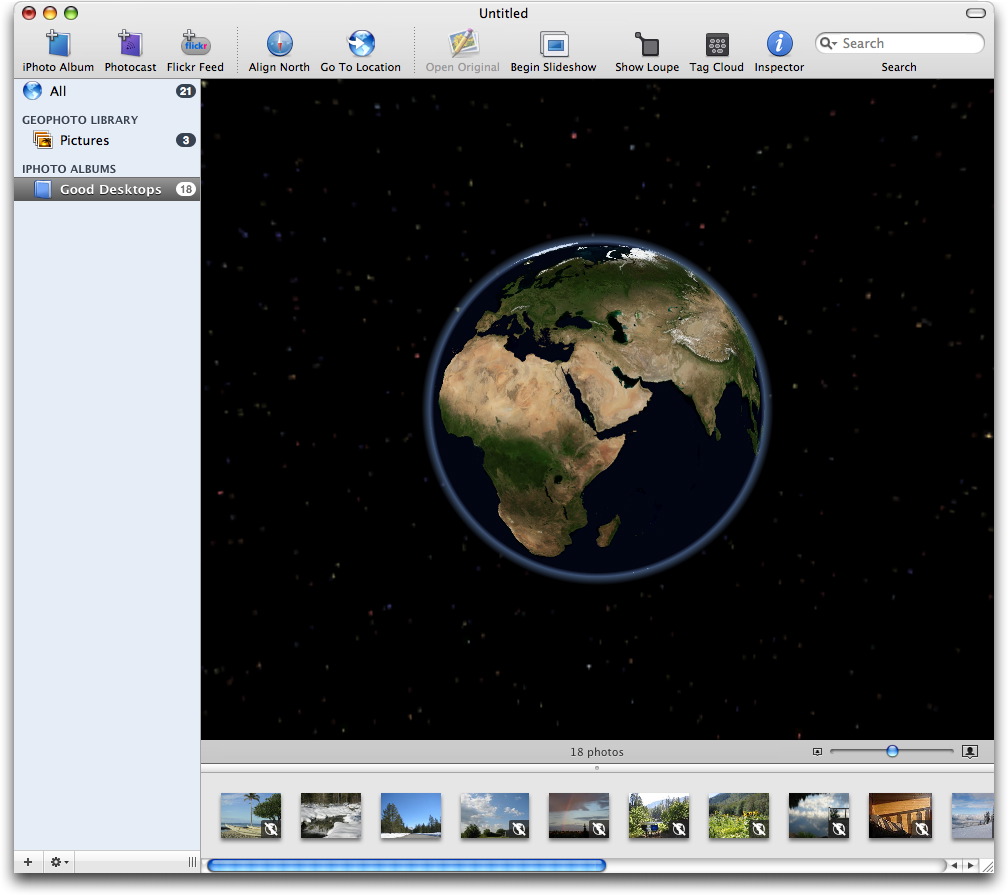
Get Out the Map — Geophoto opens with a slowly rotating satellite image of the Earth, which you can manipulate by clicking and dragging with the mouse. It feels very much like starting up Google Earth. Zoom in or out using the mouse’s scroll wheel, menu commands, or keyboard shortcuts.
(An aside: The keyboard command for zooming in is Command-+, with the plus sign being a long-established common shorthand for “zoom in.” However, you actually must press Command-Shift-= because the plus sign is the shifted character on the equal sign’s key. I understand the literal context at work, that you’re not zooming in by pressing “Command-equals.” But since Command-= does nothing except produce a system beep indicating you pressed the wrong button, why not map that key to zoom in too? You can get around this by pressing Command and the plus sign on an extended keyboard’s number pad, but that doesn’t help laptop users. Geophoto is by no means the only culprit in this regard, but merely the program where I want to put my foot down
and beg developers to anticipate such minor user interface annoyances so users aren’t compelled to write lengthy parenthetical asides like this.)
Photo albums appear in a sidebar list to the left of the globe and the photos themselves run horizontally across a pane at the bottom of the window. Initially, a new Geophoto library is empty. To start adding photos, you can drag photo files to the Geophoto Library Pictures collection, but it’s more likely that you already have a bunch of photos stored in iPhoto. If that’s the case, you can import iPhoto albums directly by clicking the iPhoto Album button and selecting an album. Geophoto doesn’t duplicate the photo files (thankfully, so it doesn’t chew up hard disk space), but only references the files linked to your iPhoto library.
Another way to add photos – either your own or those of others – is to subscribe to online photo feeds – either an iPhoto photocast or a photostream from Flickr. This is a fun and interesting feature that provides an ongoing selection of photos that’s refreshed manually or when you launch Geophoto. You can specify a Flickr group (for example, the Flowers group) to see the 20 most recent photos without going to the Web, a handy feature if you want to view photos from several groups at once. Even if you’re not as interested in attaching geographical information to pictures, Geophoto turns out to be a nice image browser for online feeds.
You can also subscribe to the feed of a specific Flickr user, but you must take a roundabout way to get to it. The dialog asks for one or more tags (words describing the image; “geotagged” is automatically filled in) and the user’s name. It seems odd that I can’t instead just enter the URL of the RSS feed that appears at the bottom of every user’s photos page.
Unless you imported photos that already contain mapping information, the thumbnail images in the strip at the bottom of the window display a globe icon with a slash through it. The next step is to place your images on the map, which, surprisingly, is one of Geophoto’s shortcomings.
Mark the Spot — Geophoto offers a few different ways to tag your photos with location data; these methods range from easy to maddening, depending on how precise you want to get.
Of course, the real solution to recording location metadata will require that digital cameras have built-in GPS capabilities. A few cameras already do this, and there are various accessories and techniques for existing cameras, but until such capabilities are widespread, you can use Geophoto’s tools.
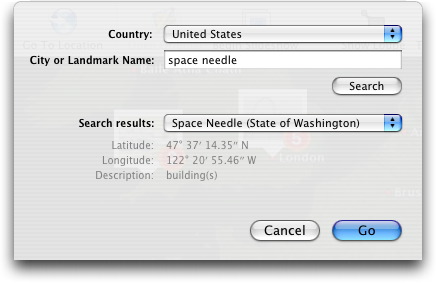
The preferred method seems to be Go To Location, a button and menu item (but not a keyboard shortcut) that displays a Mac OS X sheet with a Country pop-up menu and a field in which you can type a city or landmark name. Search results appear at the bottom of the sheet in another pop-up menu. Although most of my queries were successful, I encountered a few strange results, too: the search located teeny Bitter Lake in Seattle, but not the larger and more scenic Green Lake, although Green Lakes in Wisconsin, Alaska, and other states appeared. Actually, while typing just “green lake” brought no correct results,
typing “green lake washington” popped up several options that did appear to be in Washington, but weren’t the one I was looking for.
Another method is to drag a photo or album directly onto the globe. If you’re not zoomed in very far, this approach could result in your Paris vacation photos being displayed in Brussels or Berlin or Warsaw. So you’ll find yourself zooming in on sections of continent looking for more specific areas as you get closer to the ground. Bringing up the contextual menu (Control-click or right-click) offers a Zoom In command that centers the mouse pointer’s location in the window, which helps somewhat.
But you’ll soon get frustrated, because Geophoto ships with a limited amount of geographic detail. Unlike Google Earth, or Google’s satellite maps on the Web, zooming in doesn’t automatically increase the resolution of the terrain. To move beyond a thick soup of blurry pixels, you need to open Geophoto’s preferences, click the Imagery button, and download the next-best quality of satellite images. I say “next-best” because there’s no option to just download the highest resolution; you need to increase your view of the world in waves, downloading one set of files, then the next, and so on, four or five times.
The highest-resolution data (an average of 0.13 miles per pixel) is still pretty far away. Performing a search for Cornell University yields a patch of Earth roughly 50 miles square. I can zoom in further, but I have to take it on faith that dragging photos from the strip to the middle of the map will put them at the right place.

Fortunately, there are two options for fine-tuning your photo placement.
Selecting a photo and bringing up the Inspector reveals a Set button next to the Latitude and Longitude fields (which are not editable, so you can’t plug in those values if you happen to know them). Clicking Set takes you to the Go To Location sheet; after you get a search result, clicking the Set button positions your photo at that location.
(Selecting one or more photos in the strip and using the Set button is more efficient than finding a location and dragging photos onto it. However, Geophoto’s highly visual approach discourages one from looking for solutions in dialogs or palettes. Also, the introductory sticky notes that appear the first time the program is launched emphasize dragging photos to the globe and make no mention of the Set Location approach; you have to stumble upon it or find a reference in the getting started PDF.)
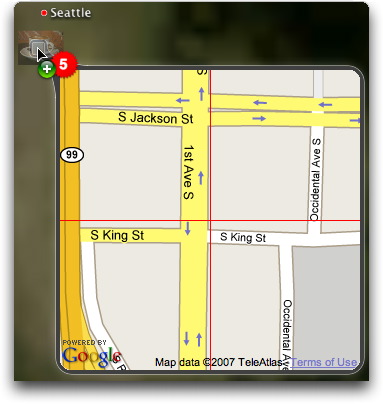
The other option is to display the Loupe. In traditional photography, a loupe is a magnifying glass that you place over negatives on a light table to inspect the quality of the images you shot. In Geophoto, the Loupe bridges the gap between the middle-altitude view of the globe’s highest resolution and street level. Within the Loupe’s square field of view is a Google street map; the resolution depends on how far you’re zoomed in on the map. Holding the spacebar and moving the mouse keeps the Loupe stationary and moves only its contents if you’re looking for something in particular, but clicking the mouse jumps you right back to where you were before pressing the spacebar.
If you find a more accurate location for your photo (like the city block where the picture was taken), you can move the picture to a new spot by Command-clicking it and dragging. A red crosshair appears to help you pinpoint, but its movement can be jerky depending on your zoom level.
Basically, placing your photos with any degree of accuracy beyond city level is a lot of work. Perhaps this is because we’ve all seen how the operation should work: like Google Maps on the Web or Google Earth, where the image resolution dynamically increases as you move closer to your destination. Using Google Earth and the Yahoo Maps feature in Flickr, for example, I was able to pinpoint the parking lot from which I shot a photo on Seattle’s waterfront. Geophoto couldn’t offer that level of detail, and even in cases where you might be able to narrow a location down to a city block, it’s not
easy to get there.
Adobe Photoshop Elements 5.0 under Windows provides just this type of geotagging, giving you a window to an interactive map that lets you drill down with usable resolution. (Photoshop Elements wasn’t updated beyond version 4.0 for the Mac.) Geophoto should adopt the same approach.
If you’re looking for specificity, the better approach is to tag the images with geographic data using Flickr’s tools, then import them as a Flickr feed in Geophoto. However, I don’t have a sense of how precise most people want to get. It may be enough to drop a folder full of images onto London to differentiate that set from photos taken in Seattle.
That leads to another problem, one which Geophoto is more adept at handling.
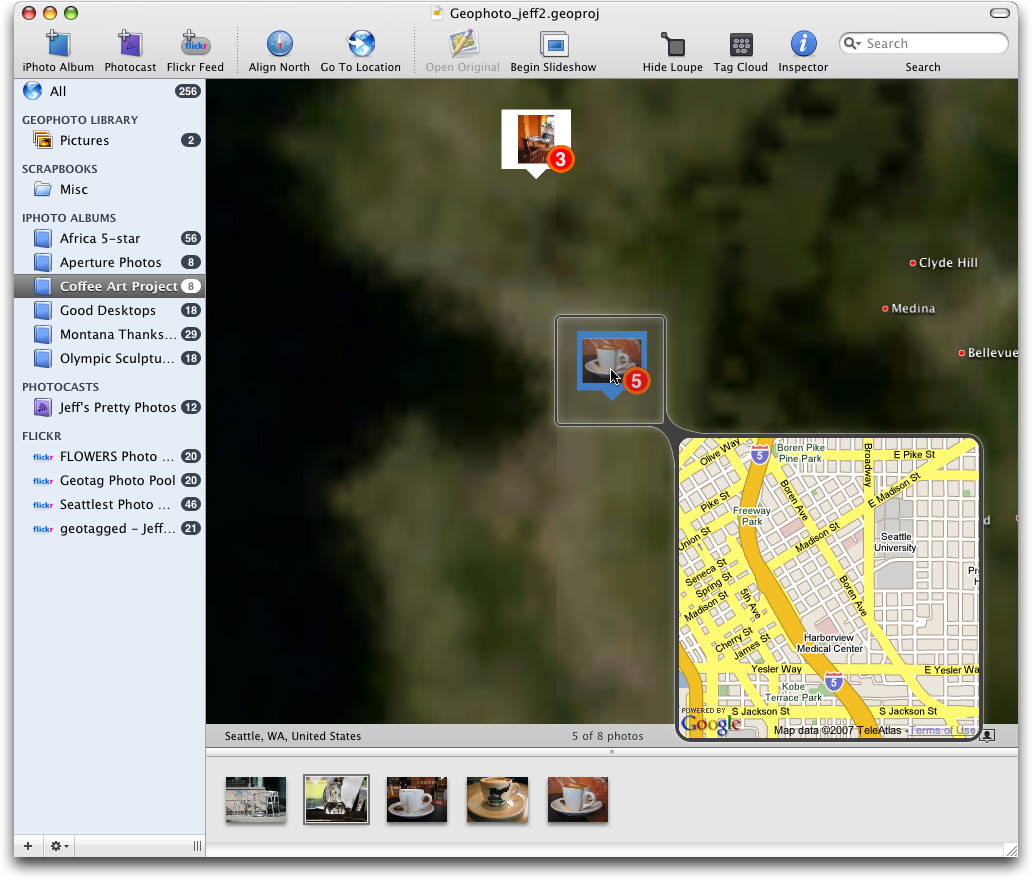
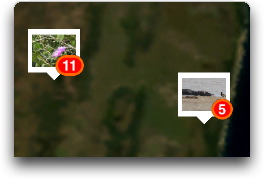
Find It Again — Once you start adding large numbers of photos to Geophoto, you’ll find yourself in the same situation that brought you to the program in the first place: searching for the photos you want to view. Assuming you’ve tagged your photos with locations, you can spin the globe and select stacks (multiple photos grouped together) based on their thumbnails; a slider in the lower-right corner of the screen controls the size of the thumbnail previews. But especially when you’re zoomed out, the stacks merge together so you’re still seeing only one thumbnail image with a number indicating how many photos are in the stack, not everything you’ve shot. (I actually like the way this effect operates, because
visual clutter can be just as bad as scarcity when looking for something.)
Geophoto’s tools for locating photos in its database are smooth and quick. Double-click a thumbnail to zoom one magnification level with the photo set centered, up to the globe’s maximum resolution. From there use the other zoom features to get closer if necessary.
But even zoomed out, clicking a group of photos makes them all appear in the strip at the bottom of the screen. From there you can double-click an image to view it at full size in an attractive slideshow screen.

A Search field actively narrows the number of visible images by searching the photos’ metadata, such as title and description, much the way the iTunes Search field finds songs as you type. And providing further textual filtering, a Tag Cloud floating palette lists every tag, with some sized larger than others to denote more frequent usage. Click a tag to view the photos it describes, as well as the other tags applied to those photos.
What I find most interesting about Geophoto, despite its difficulties in applying geographic data, is its focus on exploration. In fact, I’d go so far as to say that Geophoto is primarily a fun application for photo discovery, and secondarily a tool that serious photographers might use to geotag their picture libraries.
For example, I’ve already mentioned how it’s possible to maintain a running collection of the most recent images uploaded to Flickr groups. But you can also create new, custom Flickr feeds by positioning your mouse pointer on the map and choosing Find Flickr Photos in this Location from the contextual menu. Geophoto casts a virtual net over the area visible in the globe area and grabs 20 geotagged images. (It’s not as entertaining as FlickrVision, but not as fleeting either.)
Photos in the Real World — The proliferation of digital cameras is dramatically altering photography, democratizing it in a way that I think few people thought would be so pervasive. Geophoto contributes, too, by enabling you to export the location data back to the photos in your iPhoto library (choose Update Original with Location Information from the Item menu); the metadata is added to the image file. So if you applied a location in Geophoto, you can upload it from iPhoto to Flickr (or another service that can pull the data out of the file’s metadata) with the location intact.
People all over the planet are not only snapping pictures, they’re uploading and sharing the images with anyone who happens to stumble into their corner of the world – a corner that’s easier to find when spotlighted on a globe. Geophoto may be only an early and somewhat awkward solution to this desire, but it shows where we – or at least our digital photos – will be going.
Hot Topics in TidBITS Talk/28-May-07
Backwards from DVD to iMovie? Is it possible to extract the video from a DVD without requiring an intermediate conversion application? (1 message)
Other scrolling utilities — Mark’s article on two-fingered scrolling brings up a suggestion for a utility that works on older Macs. (1 message)
Keeping Home (Desktop) and Hearth (Notebook) together — Readers share their solutions for keeping data on multiple machines in sync. (5 messages)
Recording Streaming Video-Audio — Who needs to take notes during class when the class has a video stream? Here are some suggestions for capturing that stream to disk for later viewing. (5 messages)
Take Control News/28-May-07
One Day Left in Take Control Sale — Here’s a quick reminder that, because of the Memorial Day holiday in the United States, our 50 percent-off sale on all Take Control ebooks continues through 29-May-07.