Take Control of OS X Server, Chapter 13: Backup
This article is a pre-release chapter in the upcoming “Take Control of OS X Server,” by Charles Edge, scheduled for public release later in 2014. Apart from Chapter 1: Introducing OS X Server, and Chapter 2: Choosing Server Hardware, these chapters are available only to TidBITS members; see “Take Control of OS X Server” Streaming in TidBITS for details.
Backup
The long-lamented Dantz Development, creators of the Retrospect backup application, had a wonderful tagline for their product:
To go forward, you must backup.
Dantz trademarked that phrase in 1992, but it hasn’t lost any of its applicability today, 22 years later. The backup world may have changed hugely since then, but backing up remains absolutely essential.
When it comes to OS X Server, there are two aspects of backup that you’ll want to consider, backing up the server itself and running the Time Machine-compatible backup server for your users to back up to over the network. Let’s look at each in turn.
Back Up the Server
Luckily, when it comes to backing up your server, there’s little that’s different from backing up any other Mac, and as a result, I strongly encourage you to read Joe Kissell’s Take Control of Backing Up Your Mac, which is the most comprehensive guide to the subject available. It talks about the need for three types of backups:
- Versioned backups: Most Mac users rely on Time Machine, which creates versioned backups—copies of each file as it exists at different points in time. Time Machine works fine with a server.
- Bootable duplicate: Create and regularly update a bootable duplicate of your server on an external drive so you can bring your server back online quickly should its hard drive die.
- Offsite copies: It’s essential to have a copy of your data in another location in the event of fire, flood, or theft. Think about using a cloud-based backup service for this, or rotating one of several bootable duplicates offsite on a regular basis.
Take Control of Backing Up Your Mac also points out that you should consider in advance what you’d do if your server Mac itself dies. It’s easy to think that you could just move a hard drive to another Mac, but make sure that other Mac has sufficient CPU and RAM to run your services.
Enable Time Machine Backups
Turning on the Time Machine service is easy, but before you do, you want to make sure you have sufficient drive space available for backups.
Choose Backup Hardware
This raises the question of how much drive space you’ll need to allot to backups. Time Machine requires, at a bare minimum, that the destination drive have 1.2 times the space occupied by the data you’re backing up. But since the entire point of Time Machine is to let users go back in time to recover older versions of files, you’ll want to allocate more space for each user. How much more depends on how much space you have to play with and how much data each user creates. If someone mostly does email and Web browsing, with some light word processing and spreadsheet work thrown in, 1.5 times the current data would probably be fine. On the other hand, if a user is working with large graphics or audio files, 2 or 3 times the current
data wouldn’t be inappropriate.
And of course, you need to add up the amount needed by each user to come up with a total. If you haven’t done this before, you might be shocked by the space necessary, but rest assured there are plenty of products into which you can slot multiple large hard drives, including those from Drobo, Promise, and Synology.
Of these three vendors, Drobo’s products are the most unusual, relying on the proprietary BeyondRAID technology and offering in-place upgrading of drives and mix-and-match drive sizes. Promise’s Thunderbolt-based RAIDs are extremely fast and have the implicit blessing of Apple, being sold through the Apple online store. Finally, Synology’s NAS (network attached storage) units are also highly regarded. Needless to say, don’t skimp on your storage box or how it connects to your server; USB 2 isn’t acceptable.
Also consider the possibility that you’ll want to swap between a pair of these devices, so you can have have one that’s offsite at all times. Imagine what could happen if your office were to burn down or be badly damaged in an earthquake or flood—you’d lose all the original data on user Macs and the onsite backup.
Configure the Time Machine Service
Enabling the Time Machine service is easy—just select Time Machine in Server’s sidebar and click the ON button. When you do that, you’re immediately presented with the New Destination screen, which is where you choose a spot to store user backups and limit the size of each user’s backup to a specified size.
Click the Choose button next to Store Backups In and select the desired destination, usually the top level of a hard drive. Then, if you want, select the Limit Each Backup checkbox and enter a size in gigabytes (Figure 1). Click Create.
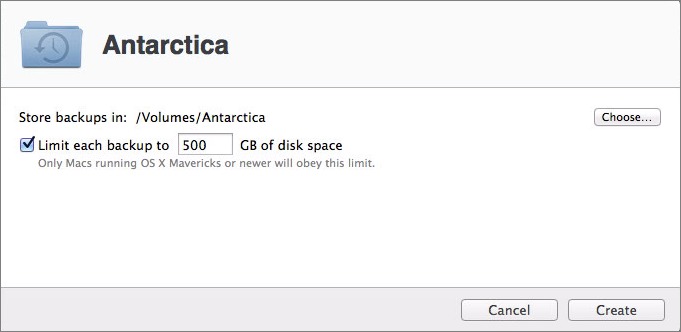
Figure 1: Choose a destination for your users’ backups and set a limit on how much data each user can store, if desired.
If you’ve selected the top level of a drive, Server creates a shared folder called Backups, storing it inside another folder called Shared Items. This Backups folder is a true shared folder, since Time Machine relies on the File Sharing service (see Chapter 6, File Sharing).
The Settings screen in the Time Machine service lists your newly created destination, showing at a glance how much space remains available on the drive (Figure 2).
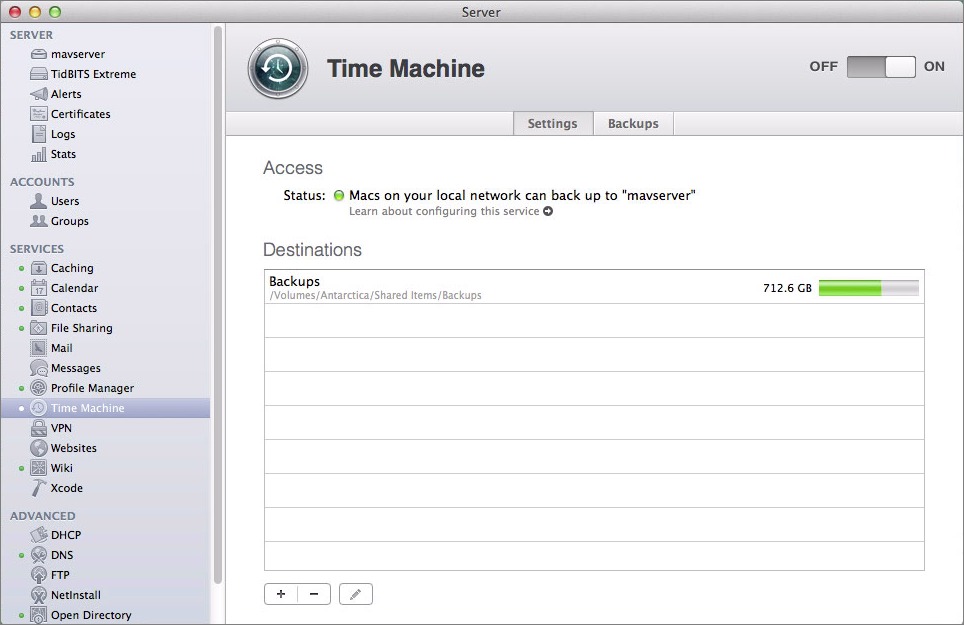
Figure 2: The Settings screen of the Time Machine service lists all your backup destinations.
If you want to change the backup size limit for a backup destination, double-click the destination in the Settings screen and enter a new number.
Although you cannot change where a backup destination’s files are stored on a given drive easily (and thus you can’t move them to a larger drive), you can define additional destinations, which appear to users as separate drives. To make a new destination, click the plus ![]() button, choose a location, and set a backup size limit.
button, choose a location, and set a backup size limit.
Back Up to the Time Machine Service
Configuring Time Machine on client Macs to back up to your new Time Machine service is only slightly different from configuring it to back up to any other drive, as explained in Joe Kissell’s Take Control of Backing Up Your Mac. Follow these basic steps:
- From the Time Machine menu, choose Open Time Machine Preferences.
- In the Time Machine preference pane, click Select Disk, choose your new backup destination from the list (Figure 3), and click Use Disk. If desired, select the Encrypt Backups checkbox.
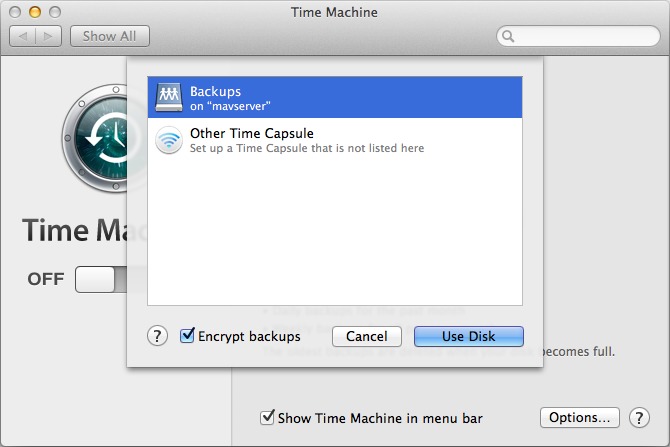
Figure 3: On each client Mac, choose your server’s backup destination.
- Since your backup destination is really a shared folder, you must enter the name and password of a user who has access to the shared folder (Figure 4). Click Connect.
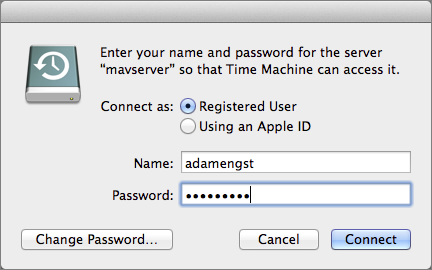
Figure 4: When prompted, enter appropriate credentials to connect to the shared folder.
- Time Machine starts backing up to the backup destination.
Needless to say, initial backups will take a long time as Time Machine copies all of each user’s data, but subsequent backups should be much faster.
Manage Backups
To keep track of the backup status of your users, and how much drive space their backups are taking up, click the Backups tab in Server’s Time Machine screen (Figure 5).
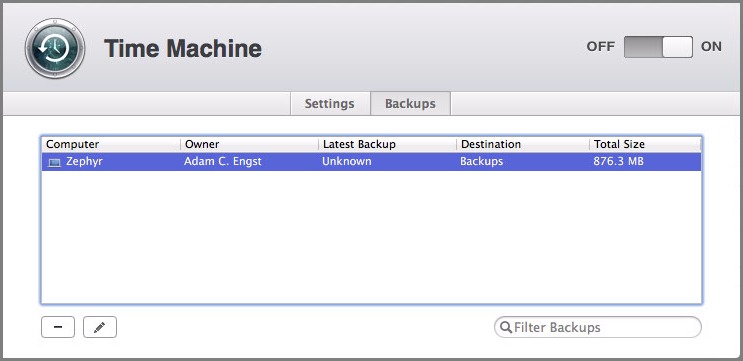
Figure 5: The Backups screen lists all your users.
There isn’t all that much you can do here, but pay special attention to the Last Backup column. If you have a lot of users, you can even sort the list by clicking column headers; if someone hasn’t backed up in a few days, it’s worth checking in to see what the problem may be, given that Time Machine runs automatically.
Similarly, sorting by Total Size is useful to identify which users are backing up the most data, which you could then use to adjust backup size limits or plan for new backup drives.
To learn more about a particular backup, double-click it to bring up the Summary dialog (Figure 6).
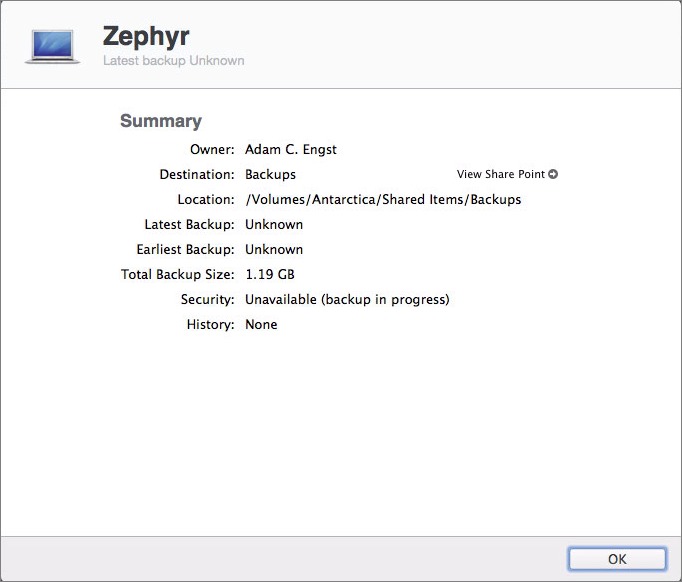
Figure 6: The Summary screen provides additional information about a particular backup.
Finally, if necessary, such as when a user leaves your organization, you can delete unnecessary backups by selecting them in the Backups screen and clicking the minus  button. Needless to say, deleted backups can’t be restored, so be careful!
Read More: About | Chapter 1 | Chapter 2 | Chapter 3 | Chapter 4 | Chapter 5 | Chapter 6 | Chapter 7 | Chapter 8 | Chapter 9 | Chapter 10 | Chapter 11 | Chapter 12 | Chapter 13 | Chapter 14
Just a little gotcha that caught me several times, and even second level Apple tech support could not help. Eventually worked it out by myself by accident after several weeks of frustration.
I cannot remember the exact circumstances, but at one stage I had to reconnect a Mac to the Time Machine service. However, the login failed repeatedly, although in a strange way. It seemed to connect but no backup would occur.
It turned out that you had to use the longname to login rather than the shortname.
All this was with Mountain Lion I think. Fortunately, I have not had to do this again since then, so I do not know if it has been fixed in later versions.
BTW, thanks for the tip about Bender. Looks like it could be very useful.
Interesting. I'm pretty sure I used the shortname when testing, so I hope it's fixed now.
Did the shortname in question have any accented characters or characters other than a-z (lowercase), 0-9, or a dash (hyphen)?
I could imagine OS X allowing the creation of a shortname that included characters other than the most basic set of alphanumerics but a service (like Time Machine) assuming shortnames to be limited to those characters. The service would work with the long name because it's expected for long names to include a wider range of characters.
No, it was just letters.