TidBITS#1312/14-Mar-2016
This issue kicks off our Take Control spring sale, where you can save 50 percent on all Take Control titles! You can also enter to win a free copy of BeLight Software’s Get Backup Pro (a $19.99 value) in this week’s DealBITS drawing. Michael Cohen has discovered that Google Docs can now generate ebooks in the EPUB format, but the feature isn’t fully baked yet. Julio Ojeda-Zapata wades into the ocean of USB-C accessories, pulling forth some warnings and recommendations. Adam Engst and Josh Centers once again explore the power of Preview, with tips for viewing images and PDFs in OS X’s ubiquitous viewer. Last but not least, we are serializing Glenn Fleishman’s upcoming “Take Control of Slack Basics” book! Slack is a popular group messaging and collaboration service, and we invite everyone to read the first two chapters and join our new public SlackBITS group. Notable software releases this week include BBEdit 11.5.1, Airfoil 5.0.2, and ChronoSync 4.6.6 and ChronoAgent 1.6.0.
Save 50 Percent on All Books in Take Control’s March Spring Sale
Winter never really kicked in here at Take Control HQ this year, but spring’s sunny days and rising temperatures have now spurred the crocuses into action, so we’re celebrating with a sale! Now’s the time to beef up your Take Control reference library — add any number of books for 50 percent off, through 21 March 2016.
All our books are DRM-free and available in PDF, EPUB, and Mobipocket (Kindle) formats, so you can read wherever, whenever, and on whatever device you like. Remember, there’s no need to read a Take Control title from front to back; instead, each book has a Quick Start that helps you jump instantly to the information you need.
We’ve been hard at work the past few months on updates to a wide variety of titles — the tech world never sits still, so if you’re using any of these apps or services, you can now benefit from updated advice and tips. Check out:
- “Take Control of 1Password, Second Edition” provides extensive documentation of AgileBits’ hugely popular password management tool. Put bluntly, if you’re not using a good password manager, you should be, and this book will help even experienced users make the most of 1Password’s newest features.
- “Take Control of Dropbox, Second Edition” explains how to sync your own files through the Dropbox service and collaborate productively with other Dropbox users, along with explaining the many changes to Dropbox in the past year. It includes a cheat sheet you can share with colleagues who need Dropbox help.
-
“Take Control of Your Apple Wi-Fi Network” is the most complete guide to setting up, maintaining, and troubleshooting a Wi-Fi network with the Apple’s current gear. We refer to this book regularly whenever anything goes wonky with our wireless network.
-
“Take Control of OS X Server” covers Server 5 in El Capitan for anyone looking to turn a Mac into a server for a home, small business, or classroom. It’s an essential guide — running a server requires a lot of knowledge.
-
“Take Control of iTunes 12: The FAQ” answers oodles of questions about iTunes 12, including the Apple Music streaming service and iCloud Music Library. If you’re confused by iTunes, look here for help.
-
“Take Control of iCloud, Fourth Edition” remains the canonical reference to everything iCloud can do. If you’re not sure which features go with iCloud, how they work together, or how best to use them, read this book.

We also have books about El Capitan, iOS 9, Apple Mail, Audio Hijack, iWork (Pages, Numbers, and Keynote), PDFpen, Scrivener, TextExpander, Terminal, and much more. So stock your Take Control library today with the titles that you’ve been
wanting to read or that might be useful in the future.
Thanks so much for your continued support, and the many useful questions and kind comments you’ve sent over the years. Please do us a quick favor, and spread the word about this sale to your friends and colleagues — it’s the perfect way to introduce someone to the series or to get your parents to start using 1Password for Families.
DealBITS Drawing: Win a Copy of Get Backup Pro 3
Backup, backup, backup. Yes, I said that three times, and for good reason. As the saying goes, “two is one and one is none,” but three is even better. All Mac users should use Time Machine (or a comparable app that creates versioned backups) for individual file recovery, make offsite backups to protect against theft or catastrophe, and create regular bootable duplicates, sometimes referred to as clones.
Why clone your disk? Let’s say you have to take your main Mac in for repair, and you’ll be without it for a few days. In the meantime, you can plug your bootable duplicate in to another Mac — perhaps an old machine or one you borrow from a friend — and get right back to work. My bootable duplicate has saved my bacon many times.
There are other utilities for creating bootable duplicates, but if you’re not currently using one, or aren’t happy with the one you’re using, check out Get Backup Pro from BeLight Software. It makes clones with aplomb, and does a lot more as well.

In fact, creating a bootable duplicate is perhaps the simplest thing to do with Get Backup Pro. You can also use it to make incremental backups along with compressed and encrypted archives of specific folders. It features templates for data in certain apps, so you can easily back up your favorite music in iTunes, important messages in Mail, precious memories in Photos, and more. Get Backup Pro can even do one-way or bidirectional syncing of folders between disks or even between Macs. Clones, backups, archives, and syncs
can all run automatically on a schedule so you can’t forget — I update my system clone every night.
BeLight Software wraps all of this up in a sleek package for the attractive price of $19.99 — less than many competing apps. But if that’s intriguing, don’t buy it now, since BeLight Software is giving away five copies of Get Backup Pro in our latest DealBITS drawing. Just enter at the DealBITS page before midnight on 20 March 2016 for a chance to win a copy of Get Backup Pro. All information gathered is covered by our comprehensive privacy policy.
Google Docs Exports EPUBs, But Not Well
Time was when creating an ebook in EPUB format required some high-end tools and knowledge of XHTML and XML coding. Today, however, EPUB creation apps are increasingly available to anyone. I have on my Mac a number of apps that can produce attractive EPUBs without forcing me to touch a tag. Nor are these apps only for high-end professionals; they’re designed to be used by so-called “normal” people. For example, Pages and Nisus Writer Pro are aimed at general users, iBooks Author is targeted at teachers, and Scrivener is designed for writers —
okay, maybe it’s stretching things to call this last group “normal” but I think you get the point.
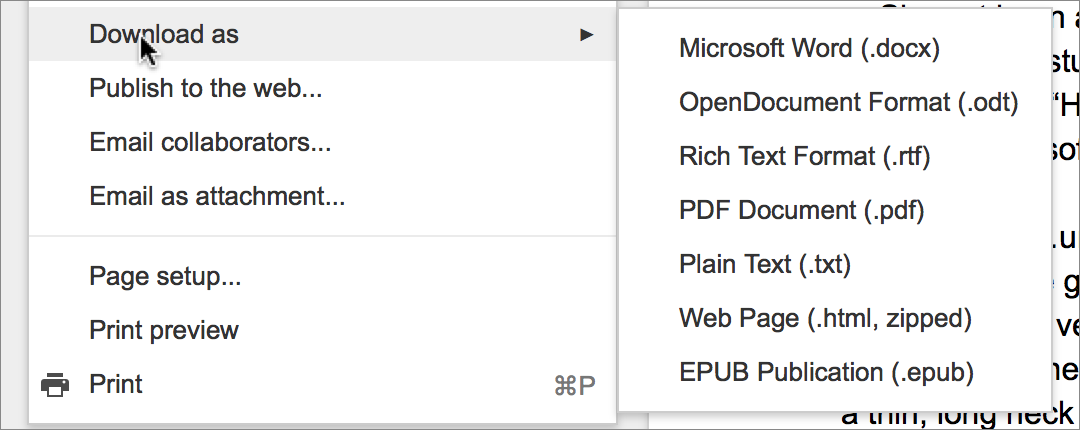
You can now add to this list of EPUB-creating apps Google’s word processing Web app, Google Docs. Recently making its way onto the File > Download As submenu in Google Docs is this new option: EPUB Publication. Choose that and — presto! — your document is downloaded to your computer as an EPUB ebook, ready to be opened by iBooks or any other EPUB reading app. No muss, no fuss, and it takes just seconds.
Sounds great, right? Not so fast: while the menu command does produce an EPUB as advertised, you may find yourself disappointed with the results unless your document is simple text with little or no special formatting.
Take, for example, the EPUB created from the dissertation file that a friend of mine had in Google Docs. The strict margin requirements that dissertations require were too much for the Web app to handle, producing an EPUB that chopped off the text at the end of each line.

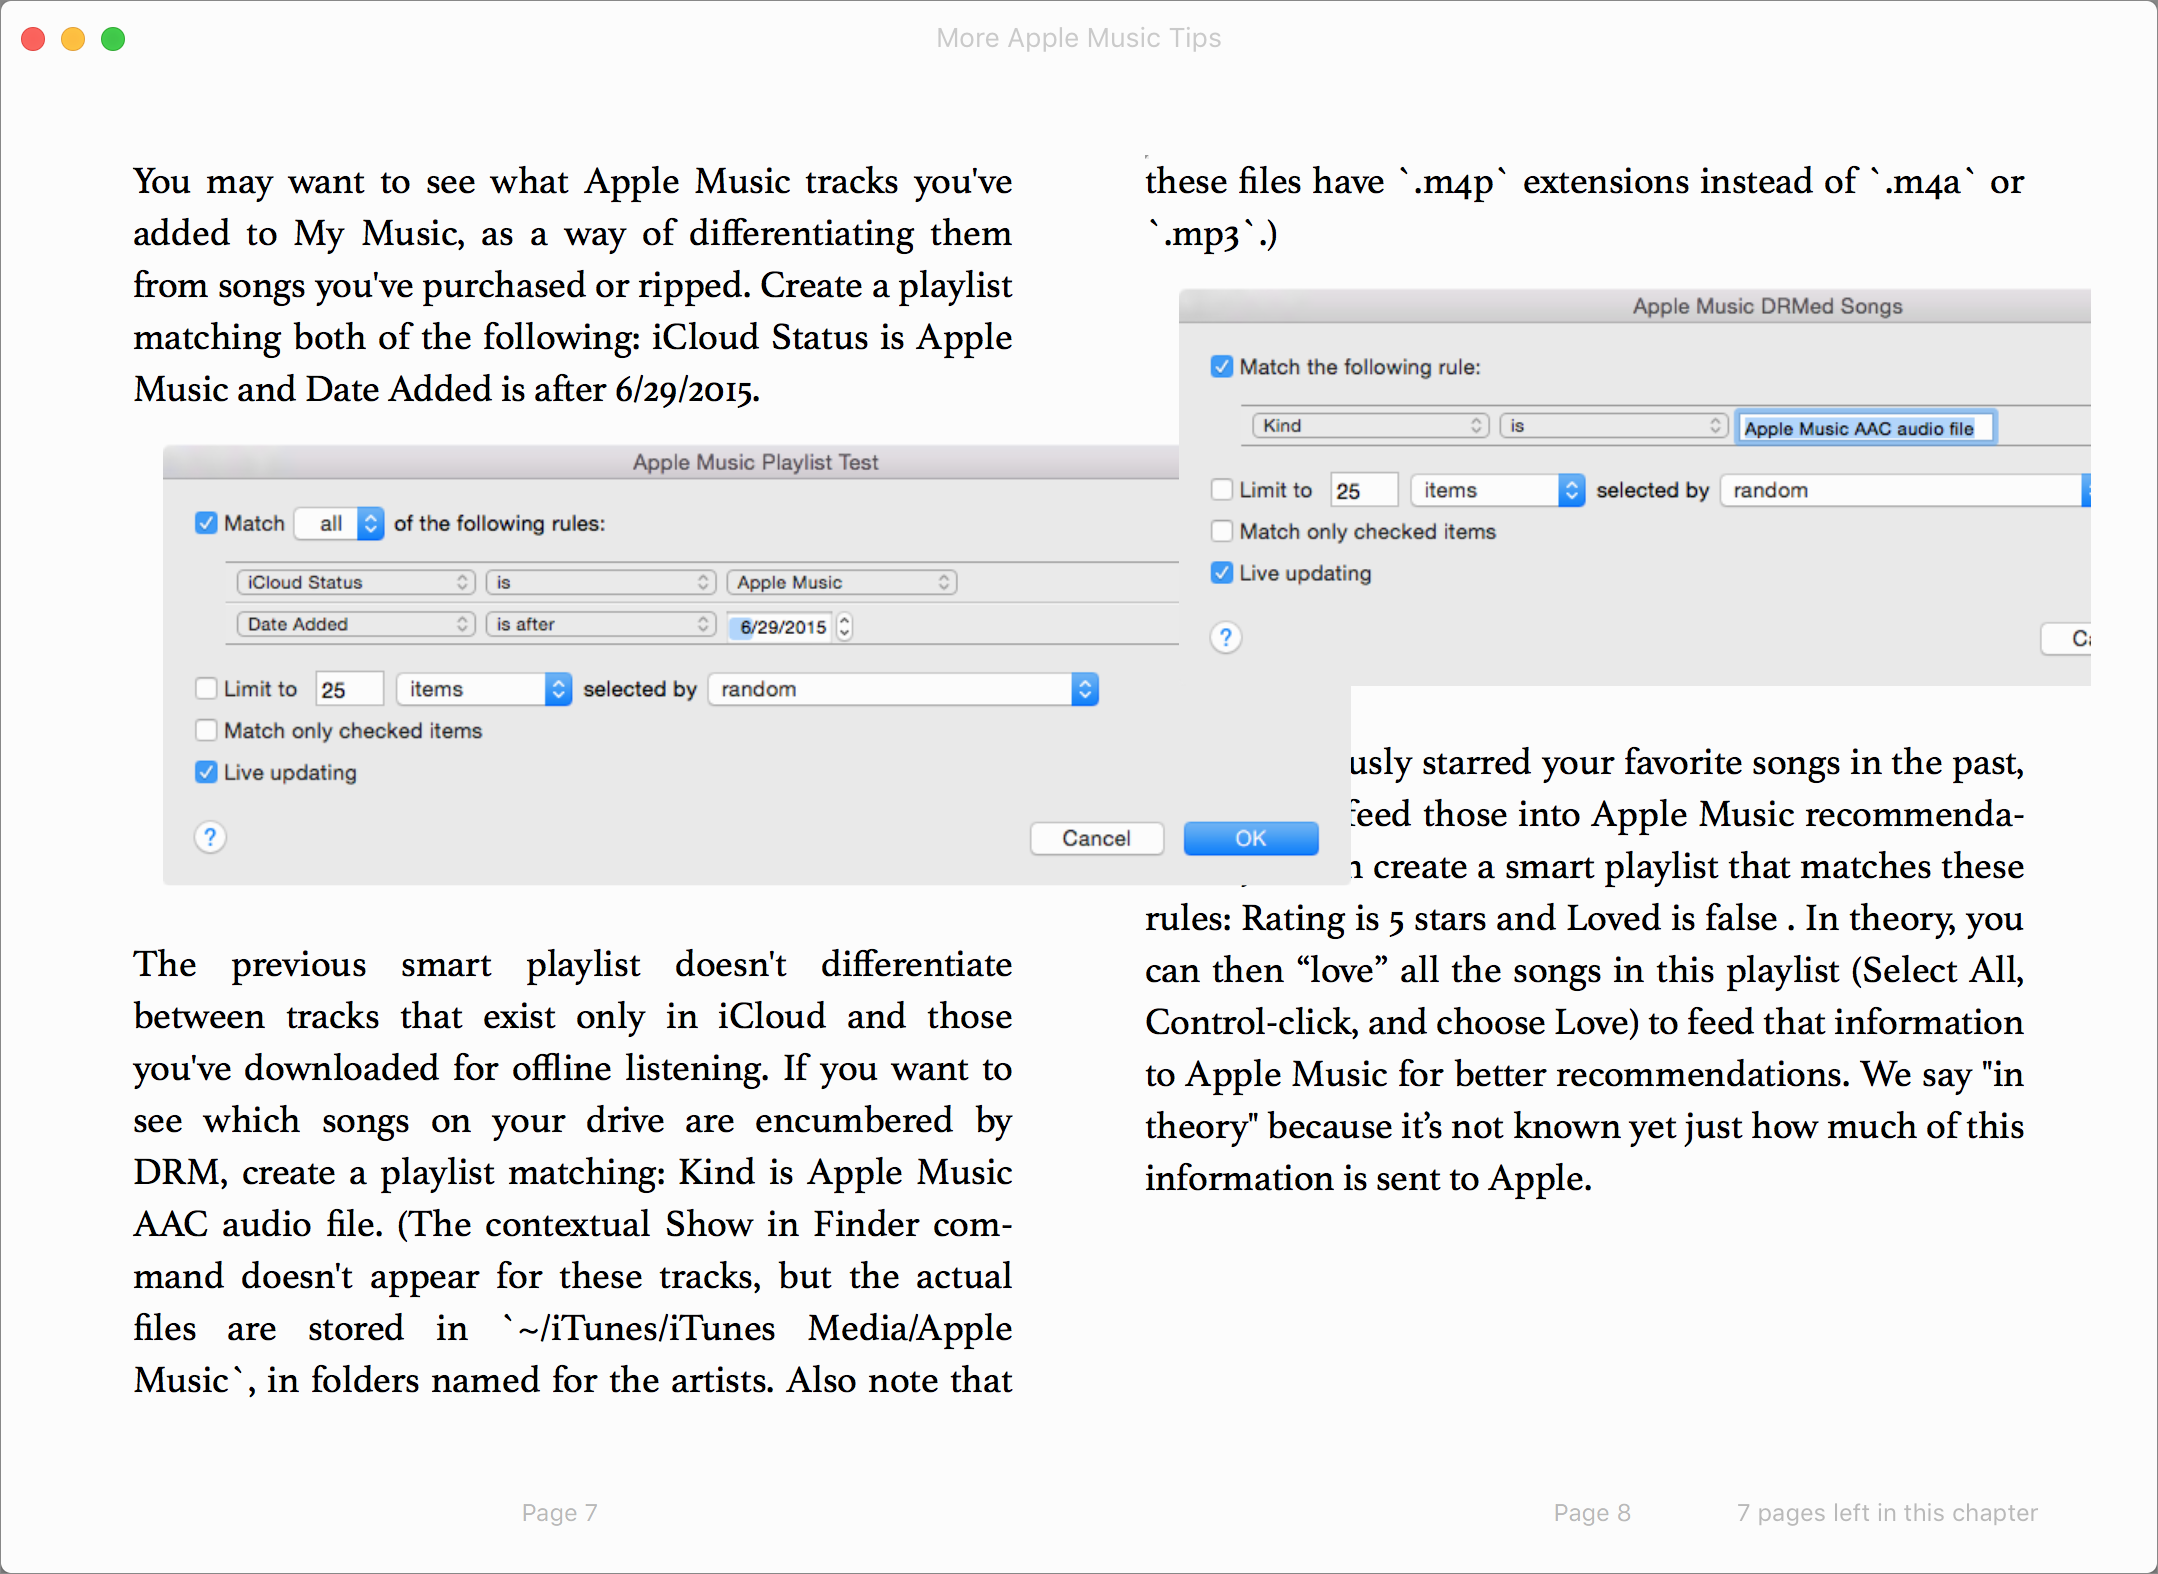
Okay, so maybe dissertations and their finicky formatting requirements are beyond this export feature. How about a simple text document that adds in an occasional image, as a school or business report might? Even then, problems arise. For example, a simply formatted TidBITS article about iTunes, when downloaded from Google Docs, produced an EPUB that, while not truncating text, fell apart when it came to the images: almost every image in the article extended beyond the margins — and not just the text margins
but the page margins, causing portions of images to spill over onto the next page.
Maybe simple documents without graphics can make it through Google Docs’ EPUB-exporting mill. To test that, I tried a page of a novel I wrote recently, a book that contains no images and precious little special formatting. Even something this simple broke when the exporter encountered italic text, adding an extraneous space after each italic.

In short, there’s no chance that Google Docs is currently capable of creating something as complex as a Take Control book, where we have styled text, lots of graphics, and a lot of internal and external links.
Although the capability to export a document as EPUB certainly has its uses, especially if you want to share the document with people who will view it on a mobile device where a PDF may be too awkward to view (remember, PDFs provide the images of printed pages, which on a small screen can be unreadably minuscule), the EPUB export capability currently provided by Google Docs is unlikely to provide satisfactory results for most people. Doubtless, Google will improve the exporter over time, but until it gets smarter about EPUB exporting, I can’t recommend it for any purpose beyond amusement.
“Take Control of Slack Basics” Serialized in TidBITS
We’re pleased to kick off another serialized Take Control book: “Take Control of Slack Basics,” written by Glenn Fleishman. Chapter 1, “Introducing Slack,” and Chapter 2, “Getting Started with Slack,” are available for everyone to start reading right now, and future chapters will be available to TidBITS members.
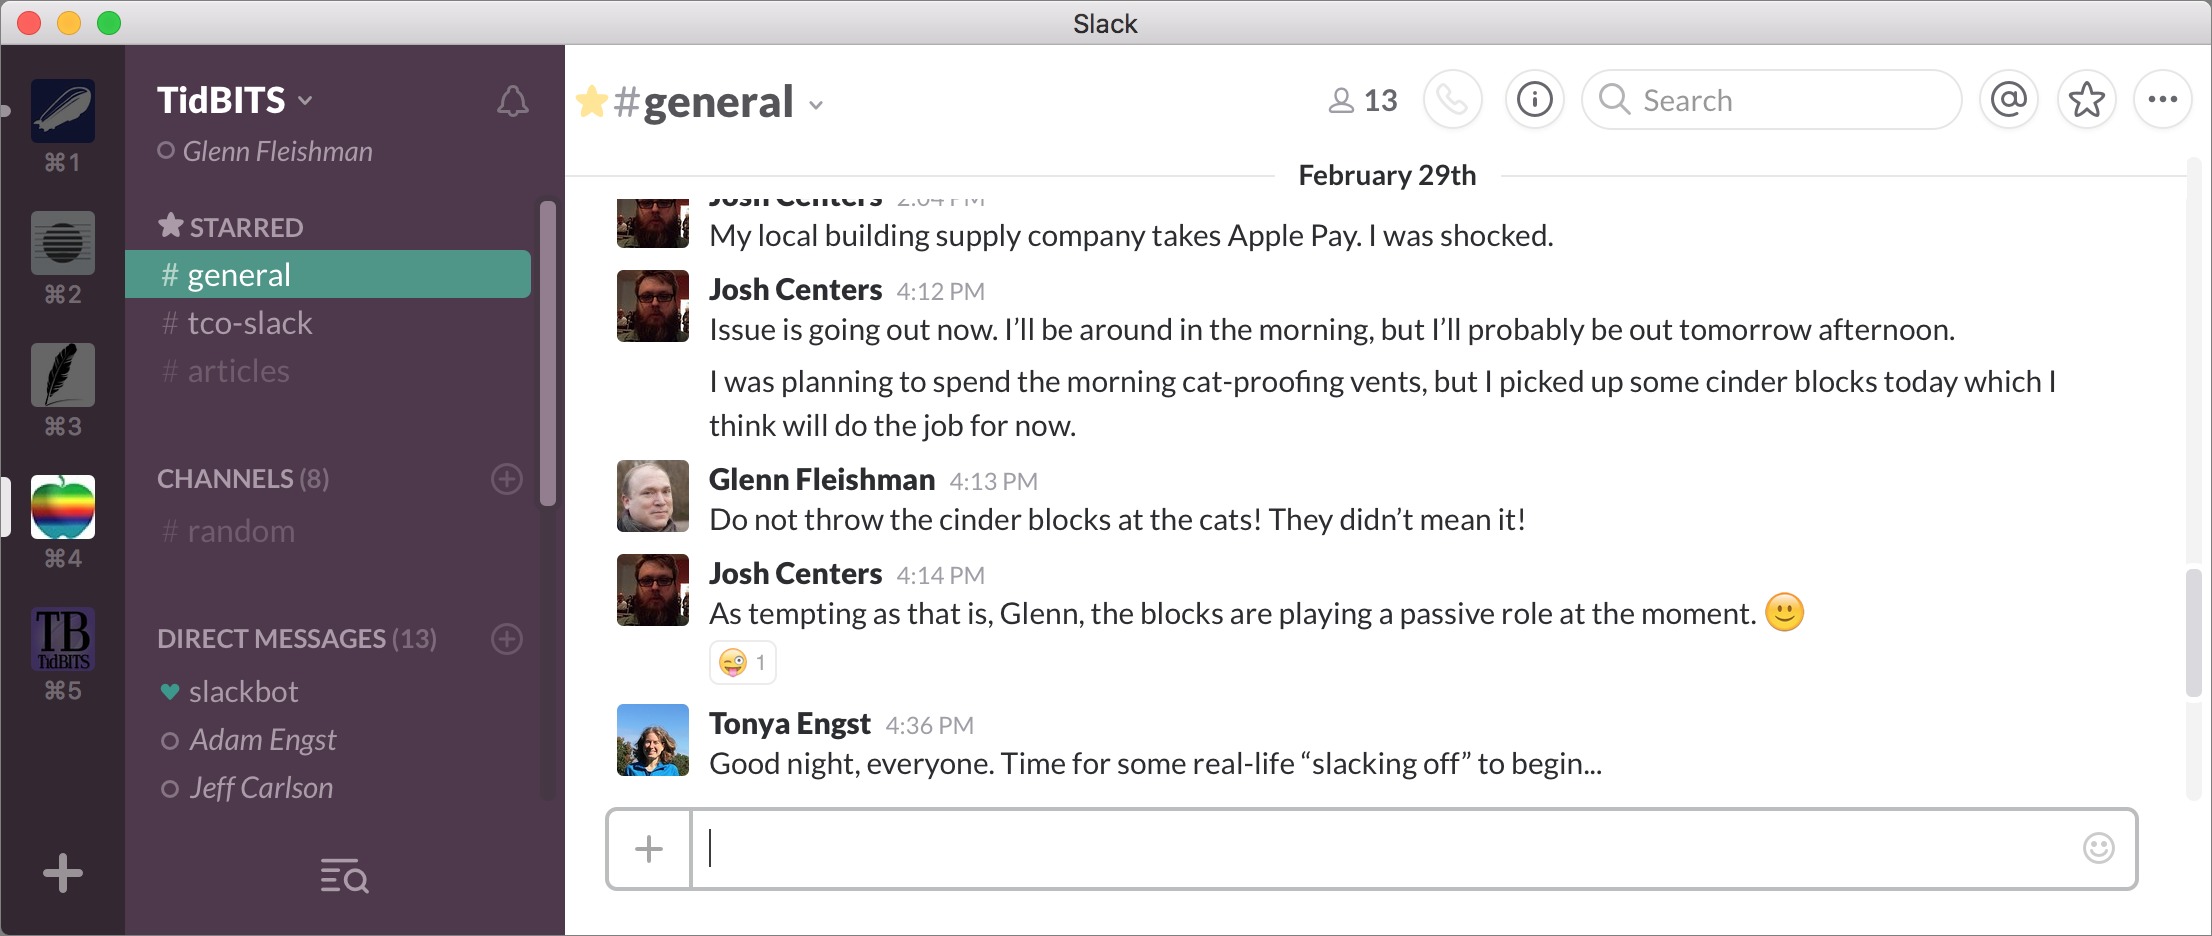
Slack is an interactive group messaging service — think of it as group chat on steroids — that works on the Mac and in iOS, Windows, Android, Linux, and any Web browser. Thanks to a generous free tier and compelling paid plans, Slack has become insanely popular, signing up over 570,000 paid accounts and boasting well over 2 million daily active users. For many organizations, focused Slack channels have taken over for out-of-control email threads, offering instant communication while retaining the persistence and searchability of email. Also helpful are Slack’s notification settings, which can be tuned to help people stay up to date without becoming overwhelmed. Perhaps most compelling for many
organizations, though, are Slack’s integrations, which enable hundreds of third-party services to transfer data in to and out of Slack, and “bots” that can interact with users directly.
We first heard about Slack when our friends Greg Scown and Philip Goward at Smile raved about it to us at the last Macworld Expo, and although we tried Slack shortly thereafter, it wasn’t until Glenn approached us about writing a book that we delved in sufficiently to understand Slack’s power. Since then, Slack has indeed reduced email traffic among the TidBITS crew significantly, and we’re wasting less time on slow back-and-forth messages. Admittedly, we spend a bit more time chatting, but in a decentralized organization like ours,
it’s important for everyone to feel involved. Slack has proven particularly effective for book projects, since it’s so easy to keep everyone in the loop.
Because Slack has evolved so quickly — the company added voice calling just a few weeks ago — its documentation isn’t always fully fleshed out. That was the impetus behind “Take Control of Slack Basics” — we wanted to help both new users who feel at sea after joining a team and current Slack users who want to dig into the many hidden tricks and techniques that will make them more efficient. Since anyone can start a free Slack team, Glenn is also working on a companion book called “Take Control of Slack Admin,” which will walk you through setting up and configuring your own team for your business, non-profit, academic department, club, or even family. (Slack’s basic paid tier is free for qualifying non-profits and all
paid levels are heavily discounted for education users.)
As we did with “Take Control of Your Digital Photos on a Mac,” “Take Control of Apple TV,” “Take Control of OS X Server,” and “Take Control of Security for Mac Users,” we’ll be serializing chapters of “Take Control of Slack Basics” in TidBITS over the coming weeks for TidBITS members, with chapters available as individual articles. We hope to release one or more new “chapticles” each week, and everyone is welcome to start reading Chapter 1, “Introducing Slack,” today (the first two chapters are available to all).
In the grand tradition of eating one’s own dogfood, we’ve also started a public Slack group that anyone can join. It’s impossible to predict exactly how SlackBITS will evolve, but if you have a question about “Take Control of Slack Basics” or Slack itself, you can ask it in the appropriate channel. We also have channels for questions about the Mac, iOS, and Apple TV, and we’ll create additional channels as necessary once we see what topics come up in #general. Instructions on how to join are in Chapter 1, “Introducing Slack.”
The full “Take Control of Slack Basics” will be available for sale in PDF, EPUB, and Mobipocket formats for everyone like any other Take Control title once it’s done, but to read the pre-release chapticles in TidBITS, you must have joined the TidBITS membership program and be logged in to the TidBITS Web site. It’s a great way to support TidBITS and learn more about Slack! Other benefits of TidBITS membership include a 30 percent discount on all Take Control books and discounts on numerous Mac apps, a full-text RSS feed, immediate email delivery of new articles as they’re published, and a banner ad–free version of the TidBITS Web site.
The full table of contents is:
- Chapter 1, “Introducing Slack”
- Chapter 2, “Getting Started with Slack”
- Chapter 3, “Master the Interface”
- Chapter 4, “Post Basic Messages”
- Chapter 5, “Go Beyond Basic Messages”
- Chapter 6, “Work with Channels”
- Chapter 7, “Have Direct Message Conversations”
- Chapter 8, “Configure Notifications”
- Chapter 9, “Search Effectively”
- Chapter 10, “Manage Bots and Integrations”
- Chapter 11, “Be Productive in Slack”
- Chapter 12, “Start a Team”
So please, take a look at the first few chapticles, and let us know what you think in comments at the end of the chapticles or via SlackBITS!
MacBook Accessories Reduce Single USB-C Port Inconvenience
When Apple added the USB-C connectivity technology to its 2015 MacBook, it wasn’t the only high-profile laptop maker to take this step. Google put USB-C into its second-generation Chromebook Pixel, which it released at about the same time as the MacBook appeared, in March of last year.
But unlike the Chromebook Pixel — which boasts a USB-C port on each side, along with a pair of regular USB-A ports — the MacBook has only a single USB-C port. For many people, that’s a problem.
Sure, USB-C is amazingly versatile. That one teeny port can be used for inbound power to charge the notebook, and outbound power to charge a phone, along with data transfer, video output, and wired networking. But with no second port on the MacBook, users are often forced to engage in awkward swapping — halting a charging session to link with a projector, say, or to plug in an external hard drive.
Apple has addressed the MacBook USB-C limitations, to a degree, with a handful of accessories. These include the $19 USB-C to USB-A Adapter that permits users to plug in traditional USB devices and the $79 Digital AV Multiport Adapter that provides an HDMI port and a USB-A port along with one pass-through USB-C port.
These accessories are a bit on the pricey side, though, and their plain white doesn’t match the MacBook’s gold, silver, or space gray.
Independent manufacturers have stepped in with more accessory options for port expansion, as well as for power, storage, and more. I’ve been testing several of these, and have a few recommendations. But first, a couple of warnings.
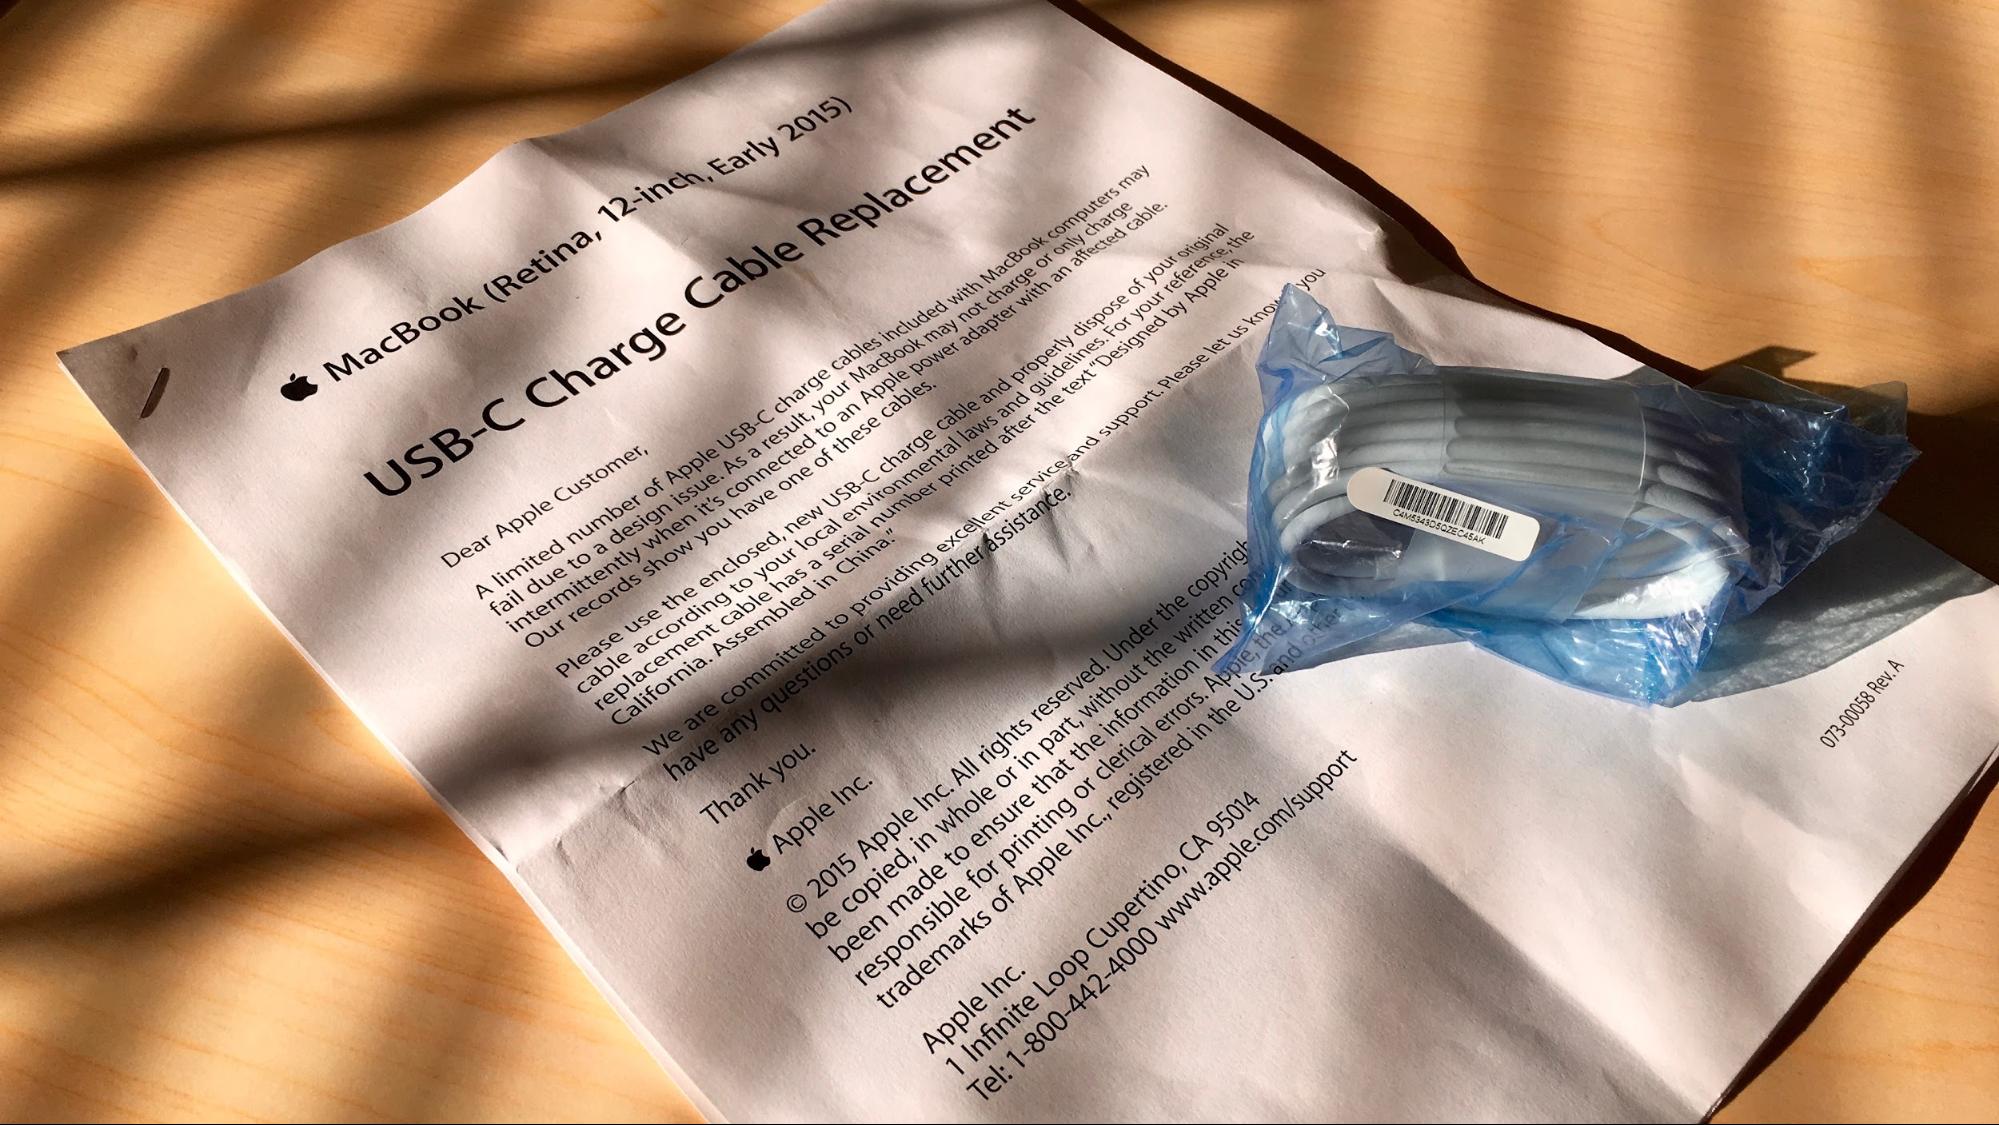
Two Warnings About USB-C — The first problem is simple, and easily remedied. Apple recently disclosed that some USB-C cables bundled with the MacBook are defective. Cables included with MacBooks sold through June 2015 may not charge, or may charge intermittently, Apple says.
MacBook purchasers who provided mailing addresses during product registration or as part of an Apple online store purchase will have a replacement cable sent to them. Others can get replacement cables at Apple retail stores, via an Apple Authorized Service Provider, or by contacting Apple support. Regardless, the deadline for snagging a new cable is 8 June 2018.
As I was writing this article, I unexpectedly received such a USB-C cable. I say “unexpectedly” since I’m not a MacBook owner, but apparently even tech journalists who got review units are on the list.
The second USB-C issue is more complicated, and may require you to do a bit of research.
Google engineer Benson Leung has warned that certain USB-C cables could damage a laptop, tablet, or handset by transmitting too much power under certain circumstances. He learned this the hard way, ruining his own Chromebook Pixel with a badly designed USB A-to-C cable.
Because USB-C can handle more power than previous types of USB, on-the-fly adjustments are required, depending on the circumstances. A bit more delicacy is required when pulling power from a notebook, say, than from an electrical outlet, lest the computer be damaged (which is what happened to Leung’s Chromebook Pixel). A properly designed USB-C cord can regulate this. A poorly designed cable might fumble this all-important task and fry a device.
A range of third-party, cut-rate cables are suspect because they do not fully adhere to the USB-C spec, according to Leung, who has been testing cables and posting often-withering reviews. Others have distilled his reviews into spreadsheet form.
The kind of cable specifically at issue has a USB-C connector on one end and a conventional USB-A connector on the other. Cords with USB-C ports on both ends are fine, according to Leung. He has been advising USB-C users to buy cables from trustworthy third-party sources such as Belkin or, better yet, directly from Apple or Google.
Laptop Magazine notes telltale physical characteristics that can help MacBook users distinguish between good and defective connectors on USB-C cables. Problems with the cord portions of the cables are harder to spot, but users can check if the cables are certified by the USB Implementer’s Forum.
In short, be careful when purchasing USB A-to-C cables!
USB-C Port Expansion Accessories — The MacBook add-on accessories I selected for evaluation are designed to make your life less stressful — and stressed is exactly how I felt when trying to make do with a single USB-C port — while providing crucial added capabilities.
The initial and most important such capability is, of course, port expansion. A number of compact hubs exist for this purpose, and I tried an Anker product along with two hubs from Satechi. These are different enough to require careful study so you purchase the one that’s right for you.
Anker’s $59.99 Premium USB-C Hub with HDMI and Power Delivery provides two USB-A ports, one HDMI port, and one USB-C pass-through port. It’s good choice for those hooking up a MacBook to a display or TV, while also needing free USB-C and USB-A ports for traditional accessories.
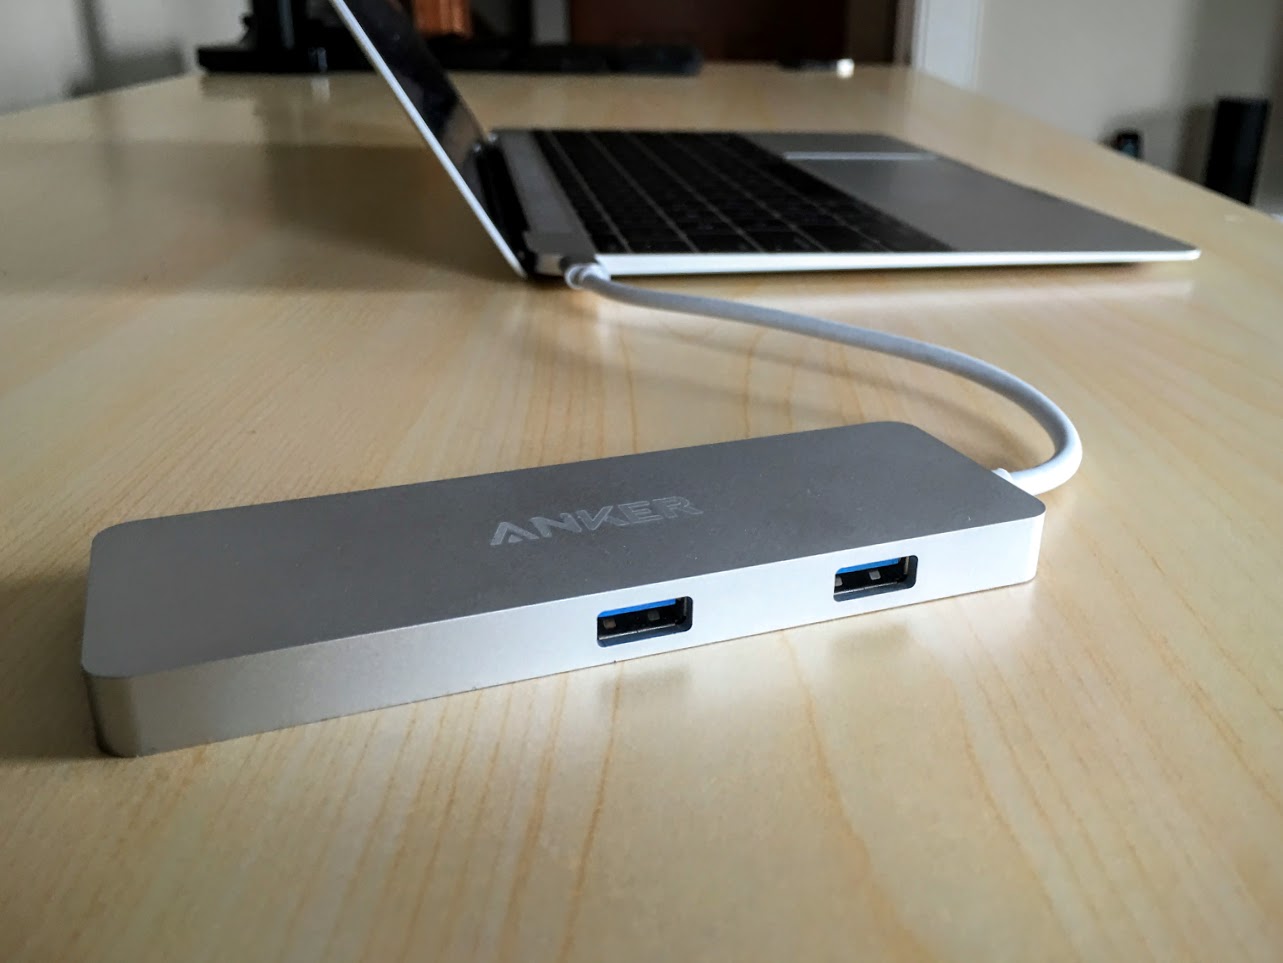
I hooked the MacBook to my HDTV via the Anker hub, and everything worked splendidly.
The device is a shiny silver slab (sorry, gold and space-gray MacBook users, no color-matched hub for you) with a short built-in USB-C cord. The USB-A ports are on one of the longer edges, with the HDMI port on the other long edge, and the USB-C port at one end (opposite the cord).
Anker’s hub is the equivalent of Apple’s Digital AV Multiport Adapter, but with an extra USB-A port, a more attractive look, and a substantially lower price tag. It’s difficult to see why anyone would buy Apple’s device instead.
Satechi’s $34.99 Type-C USB 3.0 3 in 1 Combo Hub is somewhat similar to the Anker hub, but is intended for photographers and others who make heavy use of flash-storage cards. The hub has an SD card slot and a Micro SD card slot along with three USB-A ports.
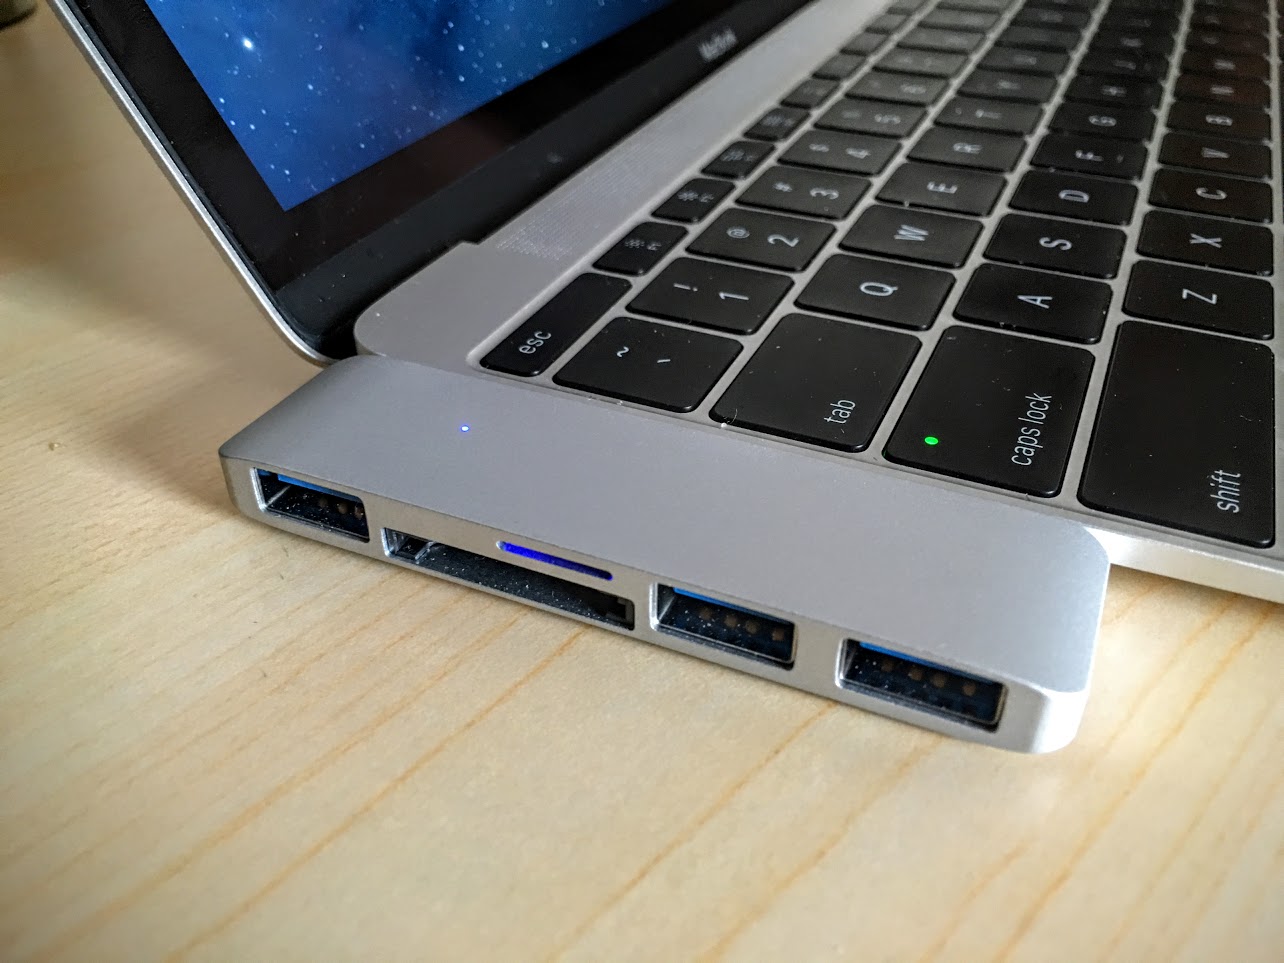
The hub boasts a cool space-saving design, too, with a USB-C prong that juts out to plug into a MacBook, positioning the device flush against the notebook’s side. If you’re going to have a hub sticking out from the side of a laptop, this is a good way to do it.
The Satechi hub has one obvious limitation: it lacks a pass-through USB-C port. Fear not: Satechi has a newer hub, the $44.99 Type-C Pass Through USB Hub with USB-C Charging Port, which replaces one of the USB-A ports with a USB-C port. This model is otherwise nearly identical to Satechi’s older hub, albeit a bit wider.
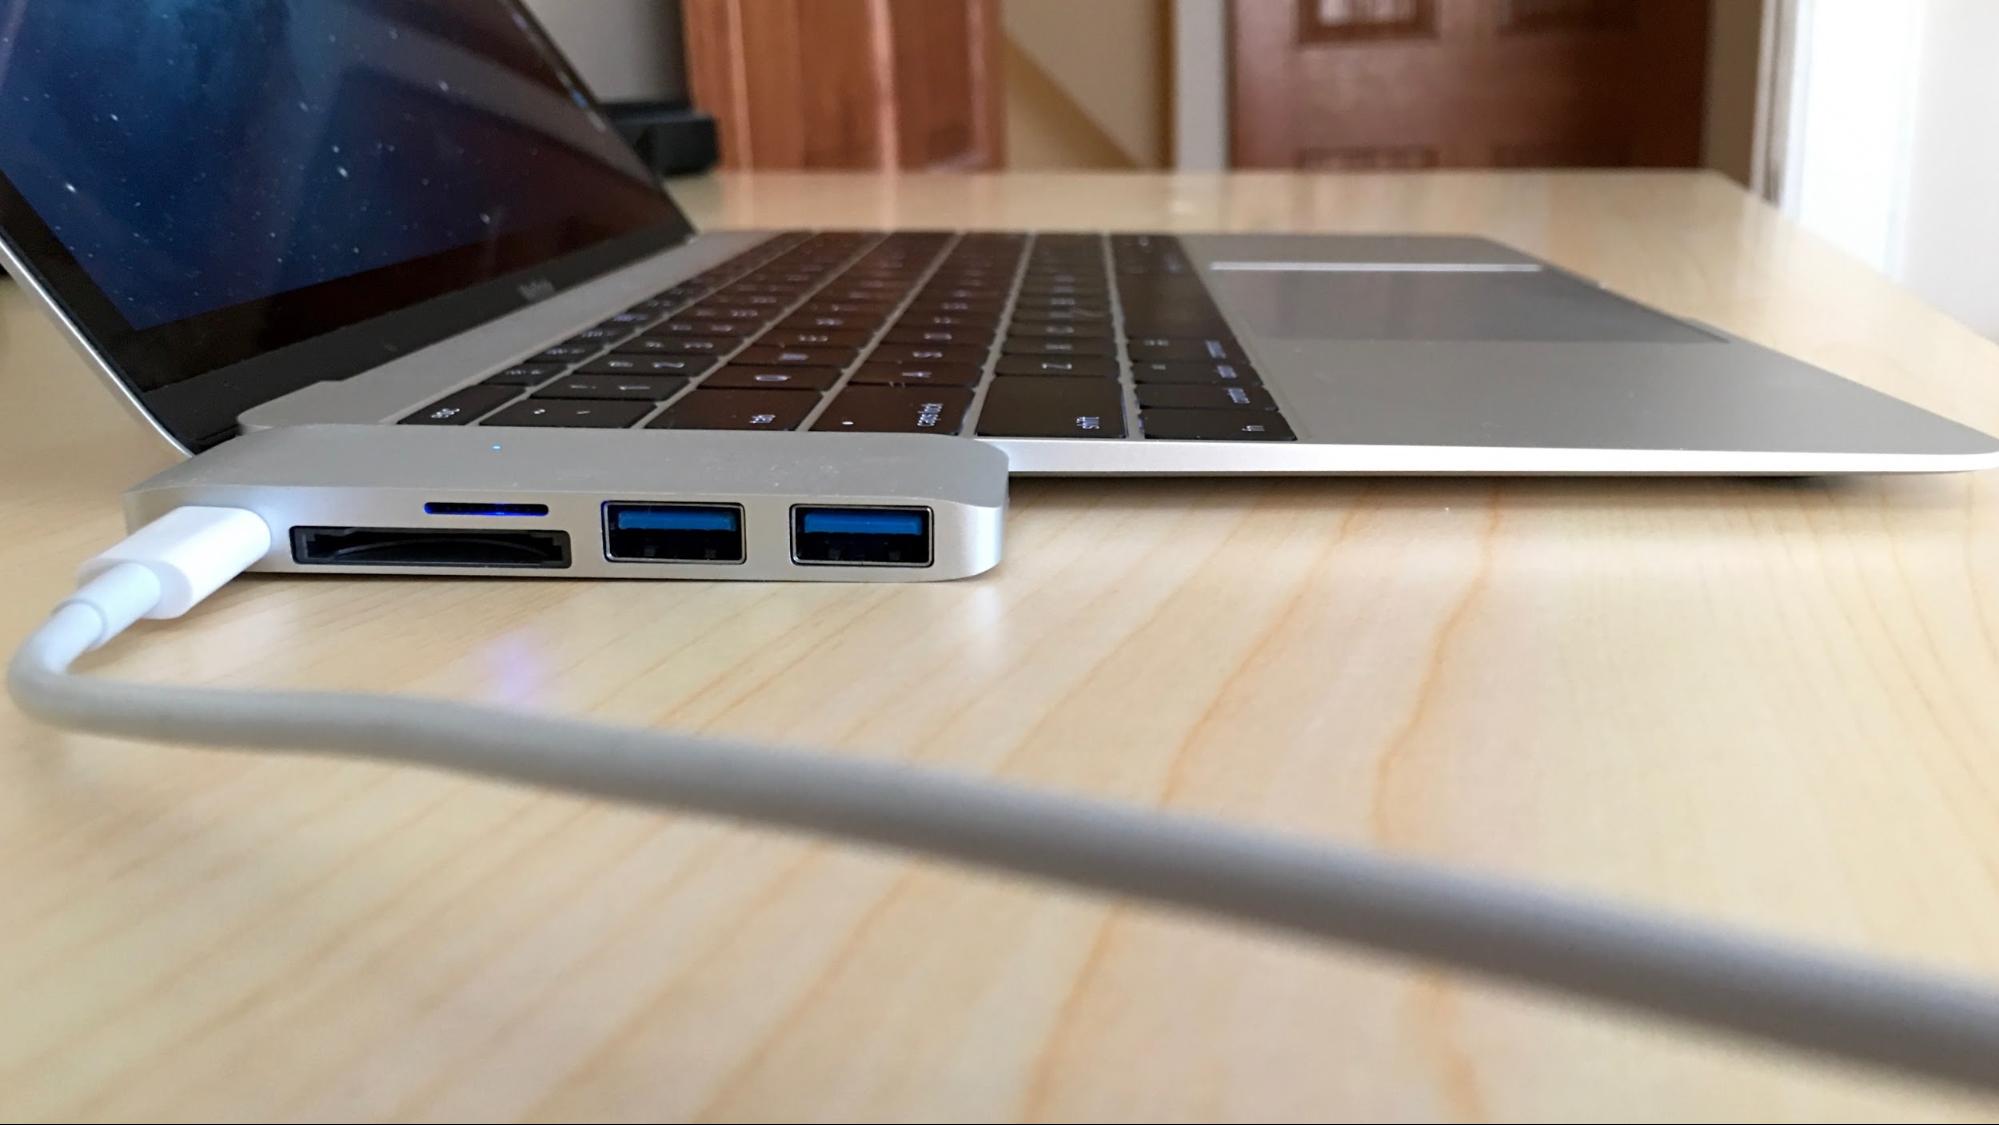
MacBook aesthetes can rejoice, too, since both Satechi hubs come in your choice of gold, silver, or space gray.
TWiT’s Leo Laporte said he is happy with a similar hub, the $49.95 HyperDrive USB Type-C 5-in-1 Hub with Pass Through Charging, as he noted on a recent episode of the MacBreak Weekly podcast (featuring TidBITS’s own Adam Engst as one of the panelists!). This hub also is available in three colors to match the three MacBook shades.
Extra USB-C Accessories — Once I had the port-expansion problem licked, it was time to look further afield for accessories that would maximize the MacBook’s flexibility and versatility. I started by shopping around for cables. Mindful of Leung’s warnings, I avoided no-name cables like the plague they can be.
Belkin’s $29.99 USB-C to USB-A cable was essential since it freed me from using only Apple’s USB-C charger and let me use USB-A ports. For instance, I wanted to take advantage of Griffin’s $59.99 WatchStand Powered Charging Station, which is not only an Apple Watch charging stand, but also a powered USB-A hub with two ports. I put one of those USB-A ports to work for MacBook charging in my home office so I could deploy Apple’s official cable and charger elsewhere.
The Belkin cable is thicker than the Apple model, but not too much, and I like its sturdiness. Benson Leung doesn’t appear to have reviewed it, but Belkin claims its various USB-C cables are “the most reliable, highest grade, and safest cables on the market.” The company has made its Web site a treasure trove of USB-C information, and Belkin is a brand I’ve trusted for years.
Another simple accessory, SanDisk’s Dual USB Drive Type-C thumb drive, is small, yet features both USB-C and USB-A connectors with a rotating and reversible design. Either connector is available with a quick flip.

It’s a fine sneakernet option for those wanting to move gigabytes of data between the MacBook and computers with regular USB ports. The model I tested stores 32 GB.
The Dual USB Drive is so small I feared losing it, but it has a loop for attaching it to a thin chain or lanyard. Though largely made of plastic, it seems sturdy enough.
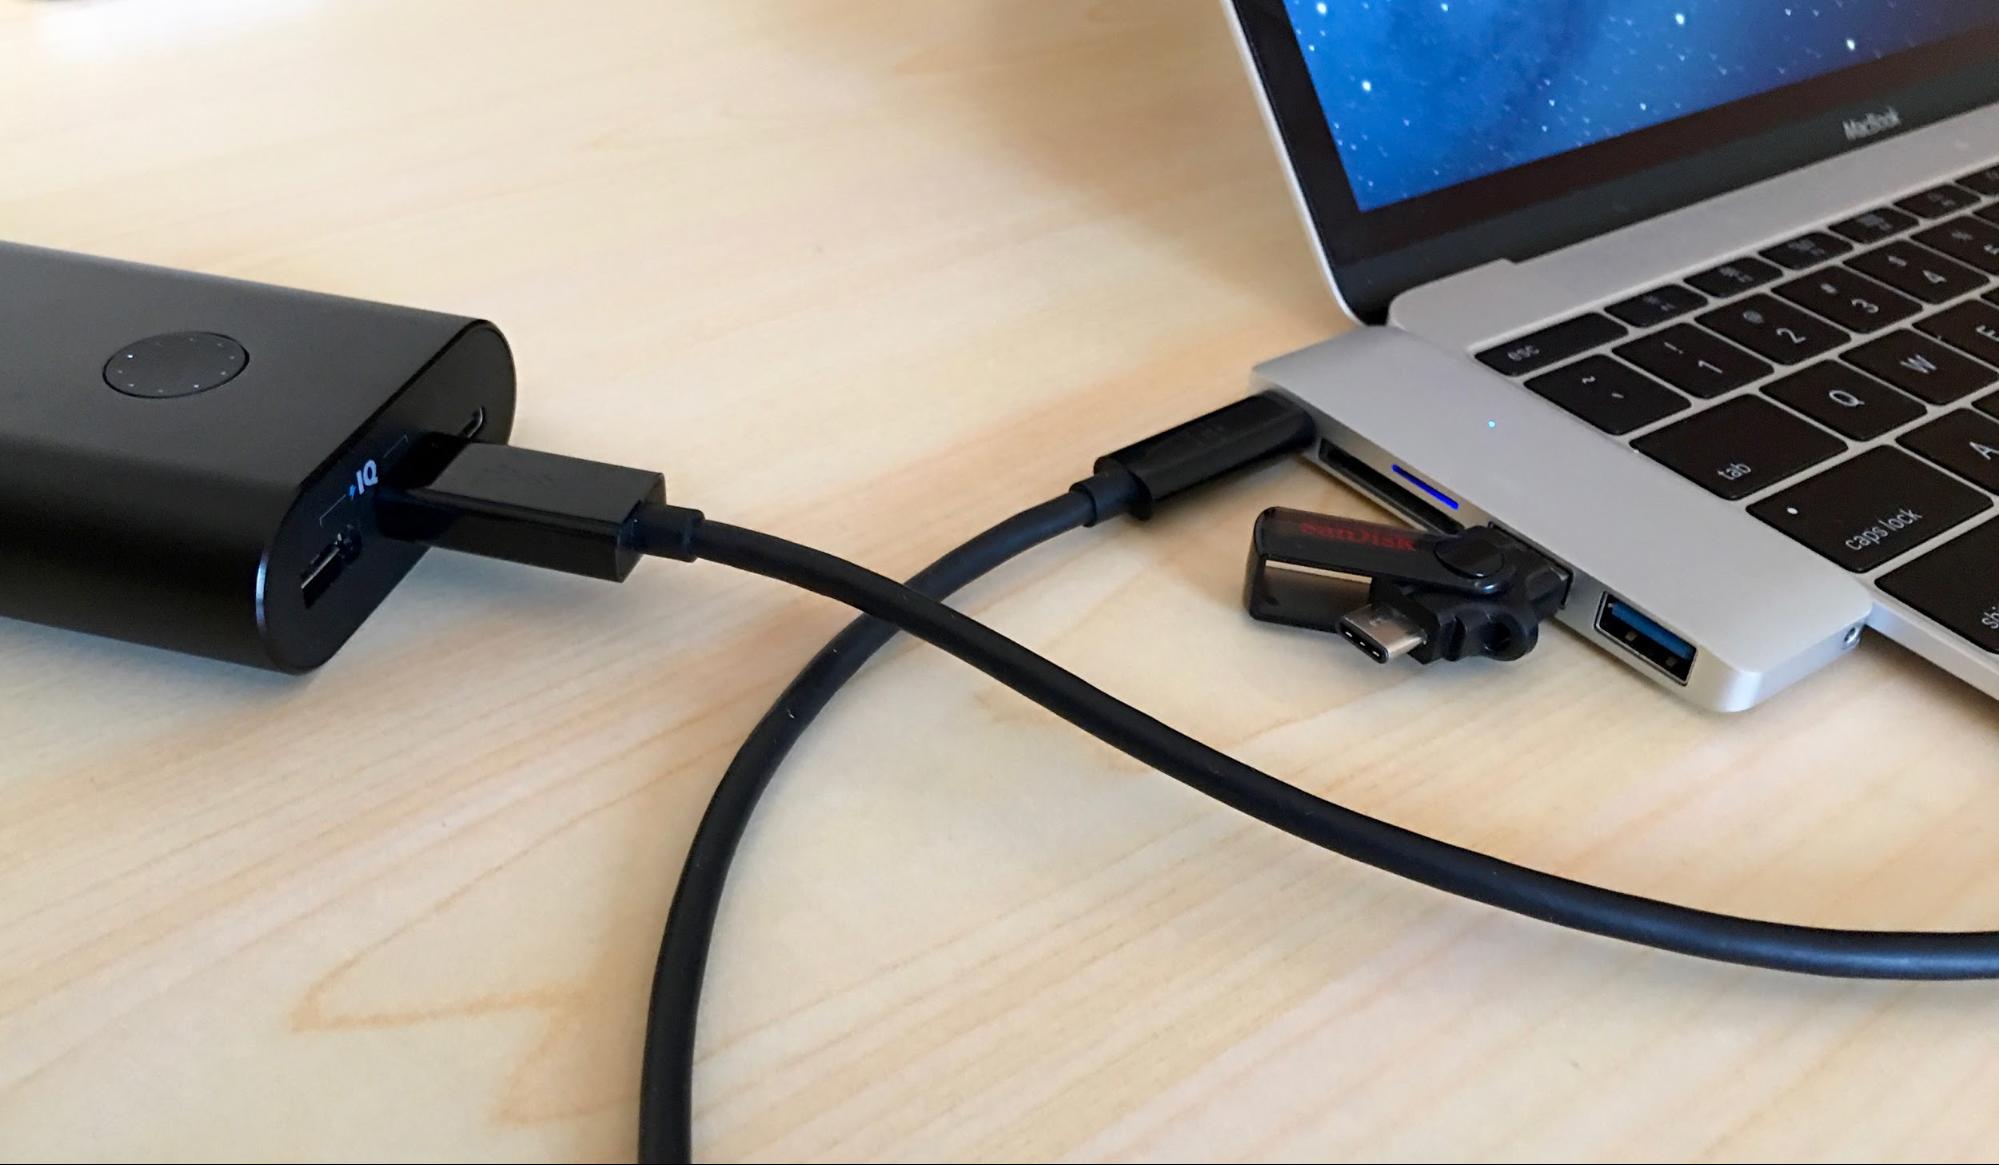
For power, I procured Anker’s $59.99 PowerCore+ 20100 USB-C Premium Ultra-High-Capacity Portable Charger, a portable battery pack with two USB-A ports and one USB-C port. It’s a hefty, albeit attractive, beast with dark metal and rounded edges, and well worth its weight in a backpack or messenger bag, because it provides a ton of juice for charging the MacBook along with a smartphone and/or tablet.

The PowerCore+ has a round button with a series of tiny white LEDs that tell you at a glance how much power is left in the battery. A fully lit circle of LEDs means a full charge.
Once I had the PowerCore+ at full capacity, I was able to charge a depleted MacBook fully and juice up an iPad Pro partially before the PowerCore+ battery ran dry. That’s pretty impressive.
You can use the PowerCore+ to charge the MacBook in a couple of ways. With the bundled USB-C to USB-A cable, you can jack the MacBook into one of the brick’s two USB-A ports and charge the laptop that way. Or you can use the MacBook’s USB-C to USB-C charging cable, but there’s a bit of trick to this. Upon initially making the connection, you’re actually charging the PowerCore+ off the MacBook, and not the other way around. To reverse the power flow, press the power brick’s button.
Charging the PowerCore+ itself also can be done by plugging into a wall charger that uses either USB-A or USB-C. This can all be a bit confusing given the bidirectional nature of USB-C technology. (Another PowerCore model has a micro USB port, which is unidirectional: it’s only used for recharging the power brick.)
Anker’s PowerCore+ is only one of several such charging bricks now available. TidBITS’s own Glenn Fleishman, wearing his Macworld hat, recently compared several of these. Anker’s model ended up being his pick, which lines up nicely with my favorable take on the product.
At one point I had several USB-C accessories making beautiful music together. I plugged the Satechi expansion hub with USB-C passthrough into the MacBook, and then jacked the Anker power pack into the hub’s USB-C port in order to charge the notebook. The SanDisk flash drive went into one of the hub’s USB-A ports, but could just as well have gone into the hub’s USB-C port once the laptop was charged and the power pack removed.
More USB-C Gear Coming — Many more MacBook-relevant USB-C accessories are available, and even more are on the way.
Belkin, Anker, and Satechi, for instance, sell a dizzying range of hubs, cables, chargers, adapters, and more to meet a MacBook user’s needs in a range of scenarios, such as Ethernet networking and connecting to mobile devices with Micro USB ports.
Last month’s Consumer Electronics Show in Las Vegas brought a flurry of USB-C-related announcements. Most of the upcoming products are me-too accessories similar to those detailed here, but a few stand out.
Acer, Asus, Lenovo, and LG announced displays that can be driven through built-in USB-C ports, meaning that MacBook users won’t have to use separate adapters. Asus’s 15.6-inch MB169C+ display is especially interesting, because it’s a mobile monitor with a folding design intended to be deployed as an auxiliary screen, connecting to the MacBook via USB-C with no need for its own power cord.
MacBook users who miss Apple’s old MagSafe technology will likely appreciate Griffin’s BreakSafe Magnetic USB-C Power Cable. As its name implies, it has a breakaway design that splits in two when a cord mishap happens, leaving only a small dongle in the USB-C port and yanking away the rest of the accessory without laptop damage. At least, that’s the claim; I’ll have to see it to believe it.
Wrapping Up the Cords — The MacBook is my favorite portable Mac, in large part because it blends a Retina display in an ultra-portable package with good looks and even a choice of colors. It’s a bit underpowered, but I can live with that.
However, that single USB-C port pains me. It is a classic case of Apple taking minimalism too far. This was particularly frustrating for me after I tested a second-generation Chromebook Pixel and realized that I required at least two USB-C ports for stress-free use.
If I were in the market for a MacBook, I’d likely wait to see if the second-generation model adds another USB-C port. That’s roughly what happened with later-model MacBook Air laptops, which gained a second USB-A port after the single port on the maiden model proved too limiting.
But for those using the current MacBook, the accessories detailed here provide some measure of salvation. Apart from the Anker battery pack, they’re all quite compact, too. This is yet another case of third-party accessory makers spotting a deficiency in an Apple product and remedying it brilliantly.
The Power of Preview: Viewing Images and PDFs
In “The Power of Preview: Pulling Files into Preview” (25 February 2016), we offered tips for bringing documents and images into Preview, the surprisingly powerful document and image viewing app built into OS X. For this installment, we’re going to focus on Preview’s prime directive: viewing images and documents (primarily PDFs, although as you’ll remember, Preview can also open iWork and Microsoft Office documents).
Use and Customize the Toolbar — In the following sections, we’ll cover a number of features available from Preview’s menus, but many of them are more easily accessed via the app’s toolbar. Regardless of whether you’re viewing an image or a document, you should see it at the top of the Preview window. If it’s not showing, reveal it by choosing View > Show Toolbar or pressing Command-| (that’s not an uppercase “I” but instead a pipe character, which is accessed by typing Shift-Backslash, using the key above Return). There’s also a separate Markup Toolbar, which we’ll cover in a later article.

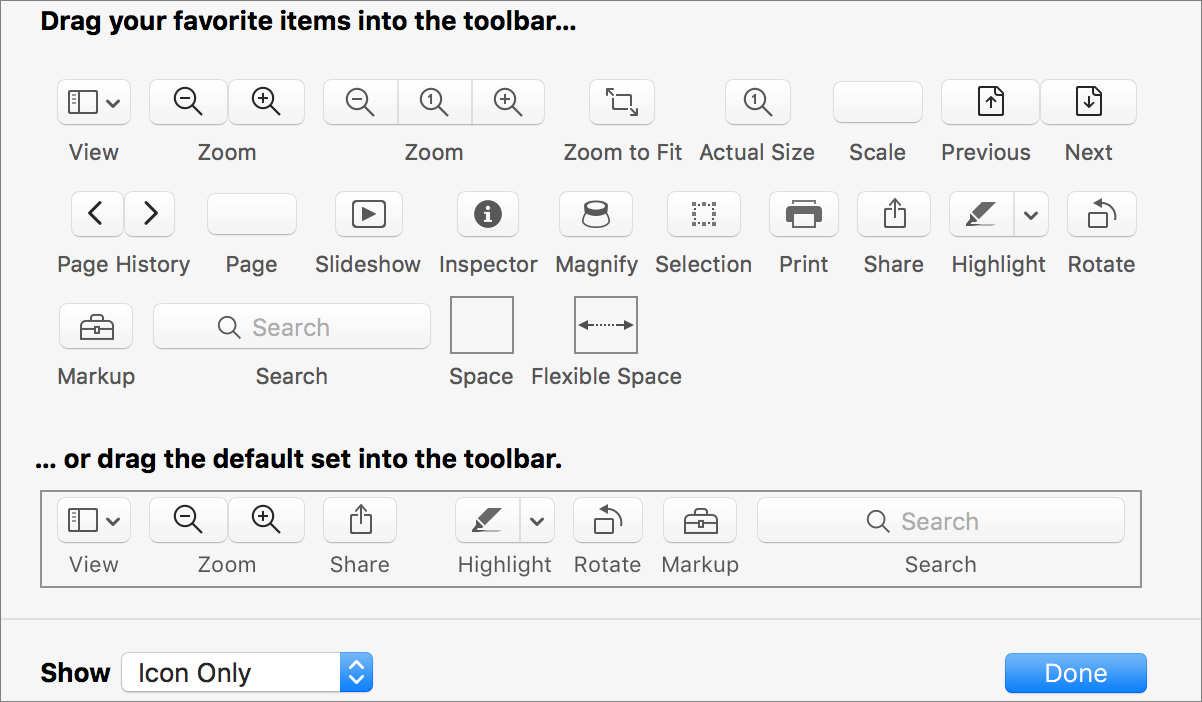
Like a good Mac app, Preview lets you customize which controls appear on the toolbar. Plenty of controls are available, all of which duplicate menu commands. To get started, choose View > Customize Toolbar. Here are the buttons you can add to the default set:
- A Zoom button set that includes an Actual Size button
- Zoom to Fit and Actual Size, as described below
- Scale, which enables you to zoom to a specified percentage
- Previous and Next page buttons for page-by-page PDF navigation
- Back and Forward page history buttons for link-based PDF navigation
- Page, which lets you jump to a specified page
- Slideshow, which starts a slideshow — more on that shortly
- Inspector, for showing and hiding the Inspector window
- Magnify, which displays a loupe for examining small details or text
- Selection, for switching to rectangular selection mode quickly
- Print, for opening the Print dialog
Thumbnails and Table of Contents in the Sidebar — When it comes to navigating among multiple images and PDF pages, Preview’s sidebar is your friend. Preview tries to be smart about displaying its sidebar, so if you open multiple images, the sidebar automatically appears. Preview isn’t smart enough to show the sidebar automatically for multiple-page PDFs and to hide it for single-page documents, but it does try to remember your previous selection, either in general, or for a particular document, and restore that state of the sidebar. It’s usually best to display the sidebar for multiple-page documents.
You can hide the sidebar by choosing View > Hide Sidebar. That command is a one-way toggle; if Preview’s sidebar is showing, choosing Hide Sidebar makes it disappear and puts a checkmark next to the menu command. Choosing it again does nothing; to reveal the sidebar, you must instead choose another of the sidebar-related commands. If the sidebar is showing, you can also hide it and reveal it again by shrinking and expanding the window horizontally.
For viewing multi-page documents and collections of images in the sidebar, you have two main options: View > Thumbnails (Command-Option-2) and View > Table of Contents (Command-Option-3). The former shows graphical previews of images and document pages, while the latter displays a text list of image file names or PDF bookmarks. Regardless, clicking an item in the sidebar navigates to the associated page. Remember that you can drag the sidebar’s divider to the right to see the images or pages larger, or see more of the sidebar text; dragging it left makes more room for the current image or page.
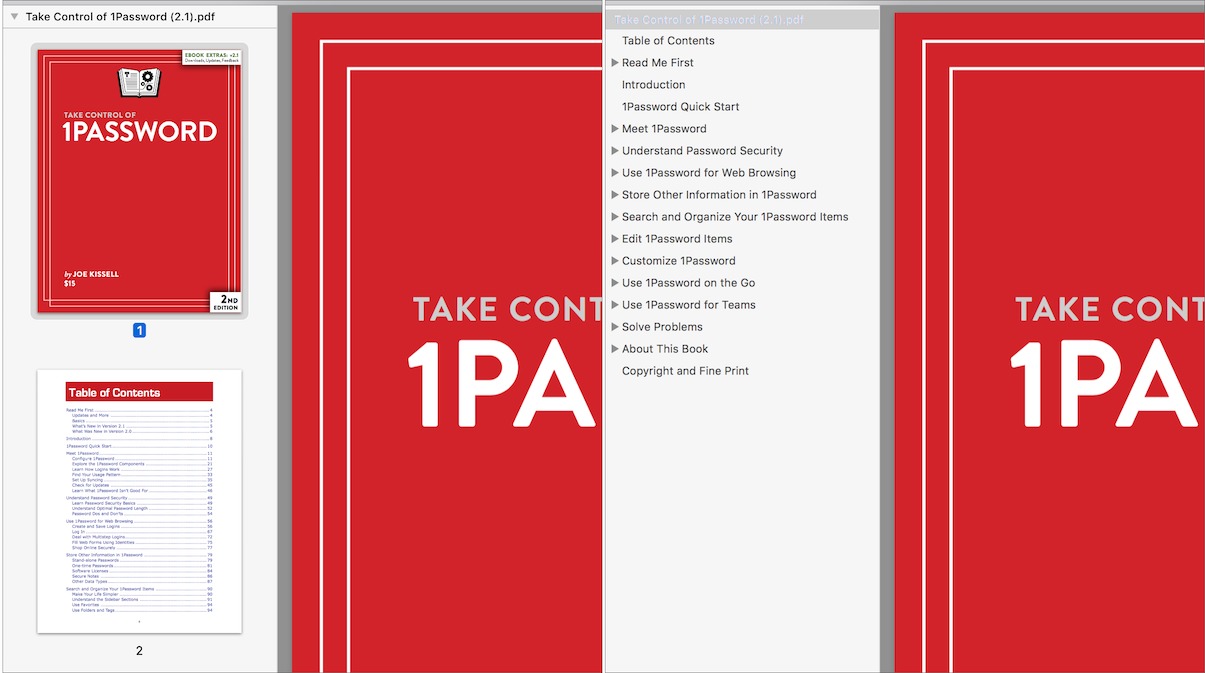
When you’re showing the table of contents in the sidebar, you can navigate through its entries with the keyboard: the Up and Down arrow keys do what you’d expect, but the Right arrow key expands a hierarchical ToC level, and the Left arrow key collapses the outline again.
You can also view images and pages as thumbnails in a single-window grid with View > Contact Sheet. Double-click any thumbnail to focus on it. We’ll talk more about these features in a future article, but notice that you can drag pages around in a PDF to rearrange them, or even select one or more pages and press Delete to remove them (the same is true of Thumbnail view).
Here’s a tip we should have mentioned in our previous article about opening files. Let’s say you have a group of images open in a window, and you want to open more images in that same window. You can drag them from the Finder into the Thumbnail view of the sidebar, or into the Contact Sheet view, to do just that.
And, let’s say you’re evaluating a bunch of images and you need to delete some. You can do that right from within Preview; with the unwanted image selected, choose Edit > Move Selected Item to Trash or just press Command-Delete. It’s great for winnowing out bad images.
Highlights, Notes, and Bookmarks in the Sidebar — The next option in the View menu is Highlights and Notes (Command-Option-4), and it requires a bit more explanation. As you read a PDF, you can highlight passages and add notes, and later access them via the sidebar.
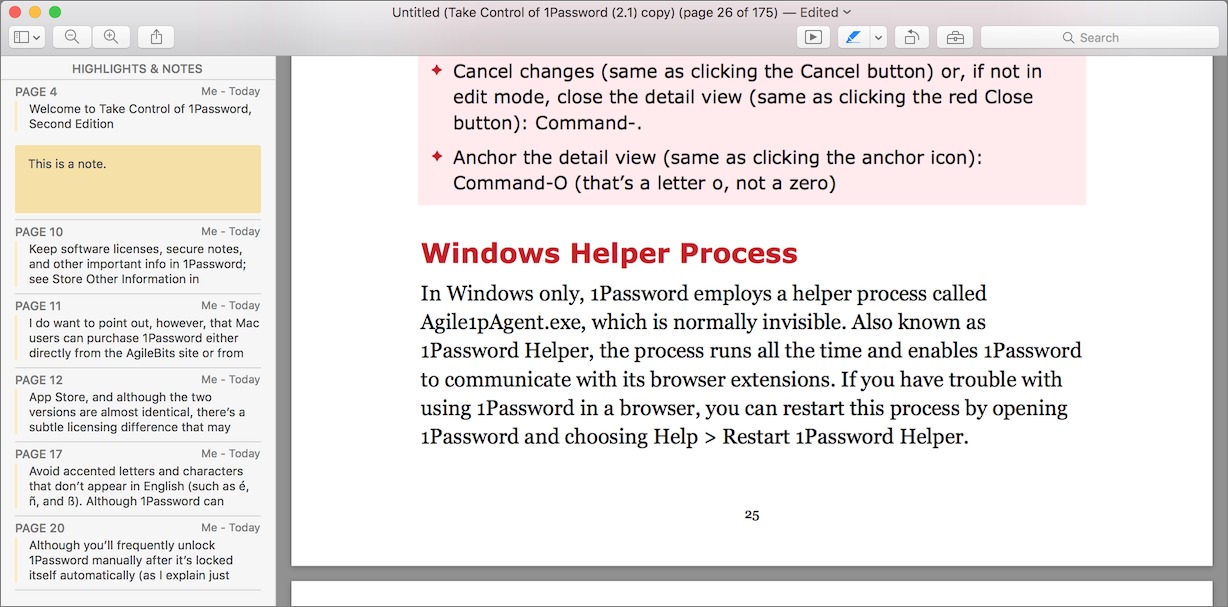
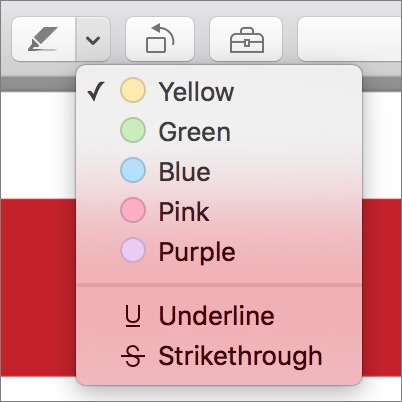
To highlight text, first choose Tools > Annotate > Highlight Text or, for an easier approach, use the Highlight button in the toolbar. Click it, and it turns blue, with the yellow highlighter enabled by default. Click the arrow next to the button to choose among several highlighter colors, as well as underline and strikethrough.
While Highlight is enabled, select text in the PDF to highlight it. Control-click the highlight to add a note, change the highlight style, or remove the highlight entirely.

If you choose Add Note, a box appears, into which you can enter text. When you’re done, click outside that box, and it shrinks down to a smaller box attached to the highlight. Click the little box to expand the note. These features combine to provide a great way to take notes on a PDF while you’re reading and refer to them later.

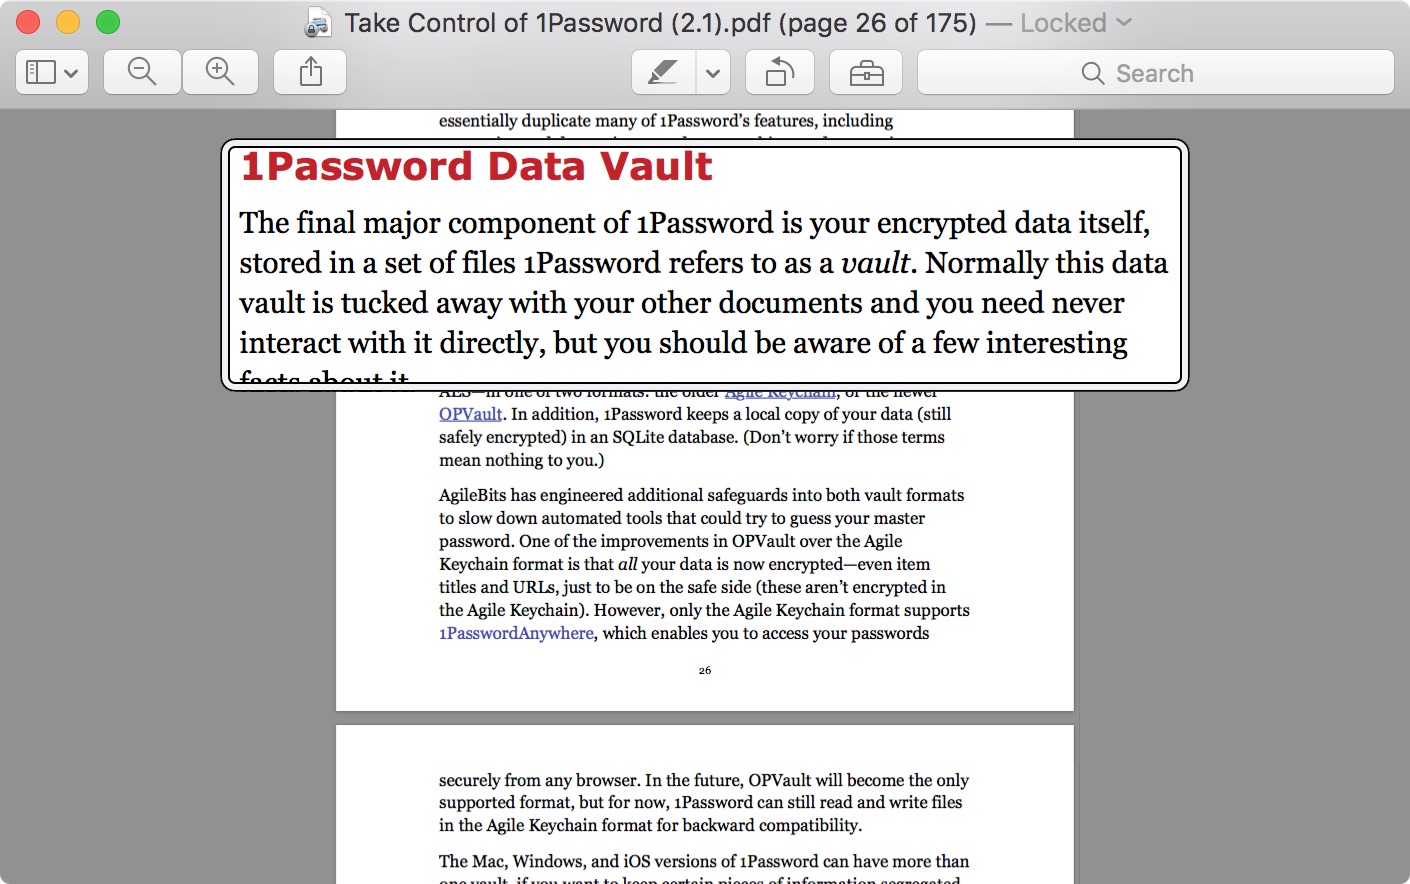
You can also bookmark pages in a PDF, by either choosing Tools > Add Bookmark or pressing Command-D. A little red bookmark appears in the upper-right corner of the page to indicate that the page has been bookmarked.

To view your bookmarks in the sidebar, choose View > Bookmarks (Command-Option-5). To delete an unneeded bookmark, select it in the sidebar and press Delete.
It’s worth noting that Adobe Acrobat Pro and Adobe Reader use the term “bookmark” for items in what Preview calls the “table of contents.” What Preview calls “bookmarks” are, as far as we can tell, specific to Preview, so don’t assume that anyone reading your PDF in one of Adobe’s programs can see them.
Zooming In and Out — Under the View menu, there are options to Zoom In and Zoom Out. Those commands are self-explanatory, but note that they also work in Contact Sheet view. Don’t rely on the menu commands, though, since there are more efficient ways to zoom in and out. Command-= (remember it as Command-plus, but you don’t need the Shift key) and Command– (Command-minus) zoom in and out, respectively, as does pinching in and out on a trackpad.
The View menu offers additional choices for document zooming: Zoom to Fit (Command-9), which fills the window with the document or image, and Actual Size (Command-0), which does just what it says, regardless of whether the file fits in the window or not. Zoom to Fit in a large window is usually the best way to read PDFs.
For even more control, you can make a marquee selection in an image or PDF (choose Tools > Rectangular Selection and drag out a rectangle) and then choose View > Zoom to Selection.
A useful accessibility tool for those without perfect vision is the Magnifier, under Tools > Show Magnifier (though it’s easier to engage it by pressing the Backtick key, just above the Tab key). It turns your cursor into a magnifying glass inside Preview, providing a loupe to expand a portion of an image or making small text in a PDF easier to read. Turn it off quickly by pressing Esc.
PDF Navigation — Although it may not have exactly the same capabilities as Adobe Reader, Preview is a robust PDF reader. Along with the previously mentioned options for navigation within a PDF, the View menu offers three options for how you view PDFs: Continuous Scroll, Single Page, and Two Pages. View > Continuous Scroll (Command-1) lets you see the bottom of one page and the top of the next one as you scroll through. Choose View > Single Page (Command-2) to scroll through a document page by page, and View > Two Pages (Command-3) to scroll through by two-page spreads. Which is best for you depends on personal preferences, the document in question, and your screen size.
Happily, you can set your favorite in Preview’s preferences; more on that in a moment.
The easiest way to scroll through a PDF is with a trackpad or mouse, but you can also use the arrow keys, Page Up and Page Down, and Home and End. If you look in the Go menu, you see commands for Up, Down, Previous Item, and Next Item, but this is a case where the keyboard shortcuts are infinitely preferable — the Up and Down arrow keys move in those directions, and Option-Up arrow (or Page Up) and Option-Down arrow (or Page Down) activate Previous Item and Next item.
The difference between Up/Down and Previous/Next Item depends on context. For instance, if you have the document pane selected and a PDF zoomed so less than a full page appears, Up and Down scroll a few lines at a time, but Previous/Next Item scrolls a page at a time. However, if you have the Table of Contents sidebar selected, Up/Down moves between ToC entries, while Previous/Next Item moves between pages.
That may seem a little confusing, but as a rule of thumb, if the arrow keys don’t do what you expect, hold down the Option key while pressing them (which is also true for many commands in OS X). Or just use Page Up and Page Down whenever you want to navigate by pages.
Good PDFs like our Take Control books feature links to other parts of the document. That’s where the Back and Forward commands in the Go menu come in handy. Choose Go > Back (Command-[) to bounce back to the link you clicked. Then, Go > Forward (Command-]) returns you to that link’s destination.
You can also jump to a specific page by choosing Go > Go to Page (Command-Option-G). In the dialog that appears, enter the page number, and press Return or click OK. If you don’t end up at the page you expect, see the explanation of Use Logical Page Numbers below.

Full Screen and Slideshows — Sometimes you want to cut out distractions while reading a PDF. Or perhaps you want to display a collection of images or a PDF-based presentation (like those we create for some of our Take Control books) for a group. Preview offers two useful options for that under the View menu: Enter Full Screen and Slideshow.
Choosing View > Enter Full Screen (Command-Control-F; you can also just click the green zoom button) puts the window into OS X’s standard full-screen mode. If you’re viewing a PDF, you can choose among the usual Continuous Scrolling, Single Page, and Two Pages views. Continuous Scrolling is the odd one here, since it also zooms the document to fit the width of your screen. Within full-screen mode, you can use the same trackpad, mouse, and keyboard navigation controls.
Choosing View > Slideshow (Command-Shift-F) displays the current document or image fullscreen, and advances the slide every 5 seconds. (For images, you need to open all the images at once, so they appear in the same window — more on that in a moment.) A toolbar displays near the bottom of the screen, with controls to move between slides, play or pause the slideshow, and exit the slideshow. You can use the toolbar buttons or the arrow keys to move between slides manually; pressing Esc exits.

Search — Assuming that Preview sees a document as containing text (which is not true of all PDFs), you can enter a search term in the toolbar’s Search field to find all instances in the document. If the toolbar isn’t visible, choose Edit > Find > Find (Command-F) to get a Search dialog.
Regardless, Preview highlights any found words, search results show in the sidebar, and a search toolbar provides buttons that enable you to sort the results by search rank or page order. We find Preview’s search rank entirely inscrutable; stick with page order. In that search toolbar, Preview also provides arrow buttons for cycling through the results and a Done button that leaves search mode (you can also click the X button next to the search term).
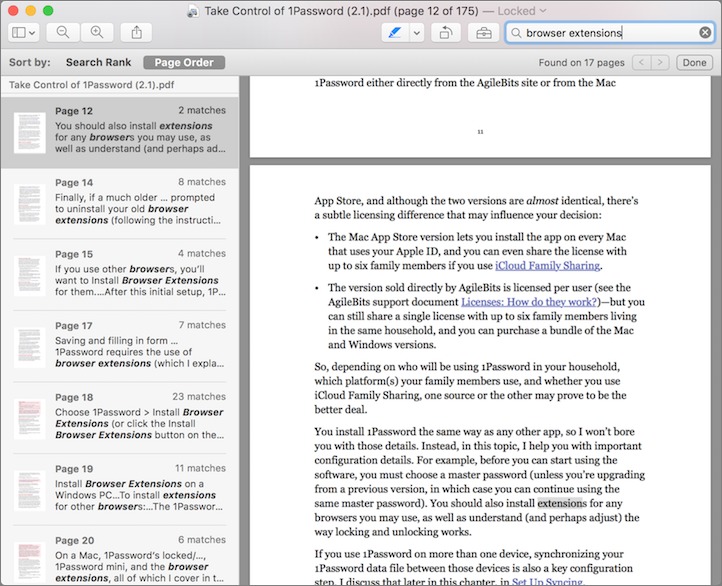
Frustratingly, Preview searches for multiple words independently by default, which usually provides too many results. To search for a phrase, surround the words with double quotation marks.
Although searching may not seem useful when viewing images, if you’ve opened a bunch at once, you can search for text in their file names to limit the sidebar list to just those that match.
Setting Preview Preferences — Although the number of options for how Preview displays images and PDFs may seem overwhelming, most people prefer the same views most of the time, and you can set your favorites in Preview > Preferences.
- General: There are two settings here. The first affects how Preview opens files. You can choose to open all files in one window, open groups of files in the same window, or open each file in its own window.
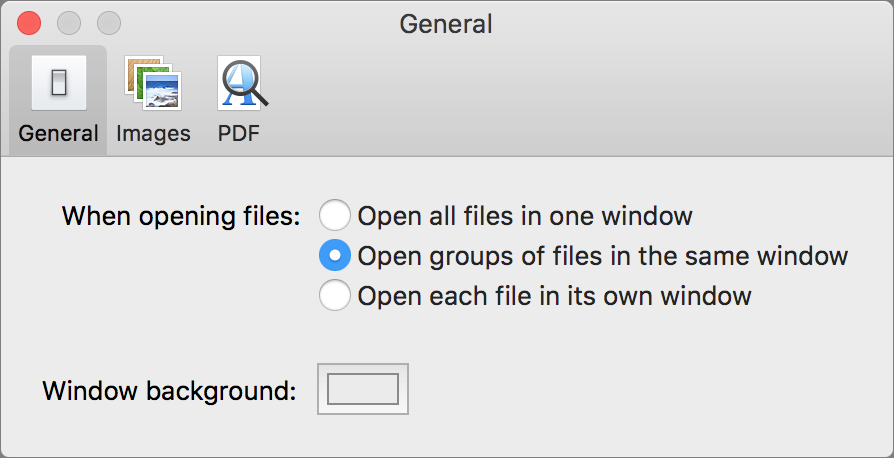
The first option for how files should open is often confusing. Let’s say you have a Take Control PDF book open in Preview, and you double-click a JPEG-based photo in the Finder. It will open in the same window as the book!
If you select the third option, when you select multiple images and open them in Preview, they all open in separate windows, which is overwhelming and makes navigation far more difficult.
The default option, Open Groups of Files in the Same Window, is generally the best choice.
The second setting in the General pane is for the window background, letting you customize the color of the empty space around documents and images. The default is gray, but you can use the color picker to make it any color you wish.
-
Images: There’s only one setting here: Define 100% Scale As. There are two options: 1 Image Pixel Equals 1 Screen Pixel and Size on Screen Equals Size on Printout .
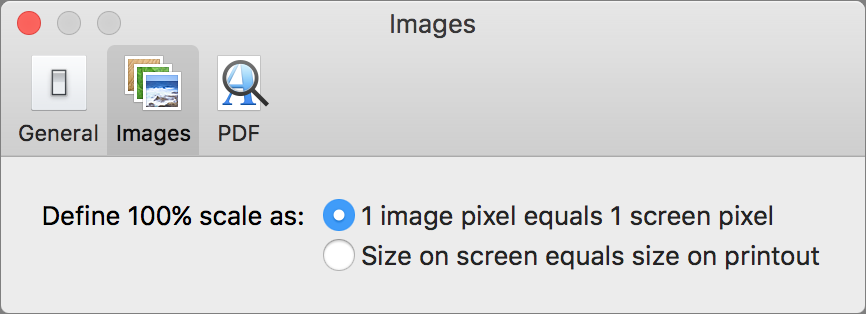
This affects how files are displayed when you choose View > Actual Size. We’ll be honest here — we have no idea why you’d choose one option over the other, so we recommend keeping it at the default, which is 1 Image Pixel Equals 1 Screen Pixel.
-
PDF: Things here are a bit more interesting. The first setting is again Define 100% Scale As, and again, we suggest leaving it at the default option of 1 Point Equals 1 Screen Pixel.
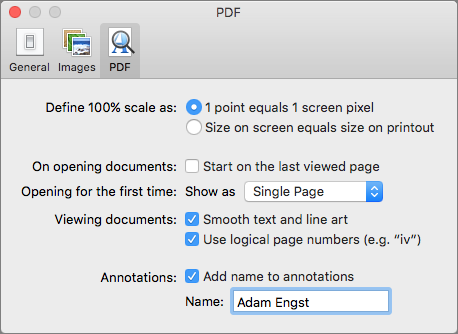
The next setting is a checkbox that tells Preview to open documents on the last-viewed page, which is checked by default and makes it easy to return to your place when reading a PDF-based book. If you do a lot of PDF creation and testing, deselect it so PDFs always open to the first page.
Next is Opening for the First Time, which sets how to display pages. The options here are Continuous Scroll, Single Page, and Two Pages, as described above. Choose the one that best fits your working style. Continuous Scroll is probably best on smaller screens; Single Page or Two Pages may be better if you have a 27-inch screen.
The next setting is to Smooth Text and Line Art, which is enabled by default. Unless you find that text looks blurry in Preview, keep this on.
After that is Use Logical Page Numbers. This setting tries to help with documents that have early pages denoted with Roman numerals instead of Arabic numbers, as explained in this Apple support article. Usually, it’s best to keep it enabled, but if you have trouble hitting the correct page when using Go to Page, turn it off.
The last setting is Add Name to Annotations, which marks highlights and notes with your name. This is useful if you’re collaborating on a PDF with other people, so you can see who marked up what. You can enter your name here, but it will probably already be filled in for you, from your user account profile.
View Metadata with the Inspector — That’s about it for what you can do in Preview with viewing images and PDFs, but what about the metadata surrounding those files? That’s where the Inspector comes in handy. Choose Tools > Show Inspector (Command-I) to reveal the Inspector window.
Whether you’re viewing a document or an image, the first pane in the Inspector is General Info, which shows things like file size, resolution, creator information, and when the file was created.
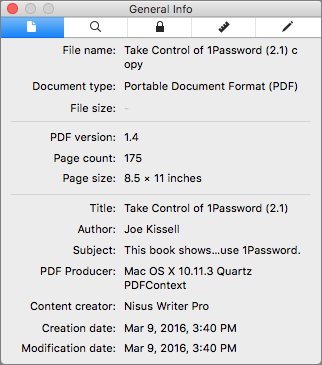
The other panes vary depending on whether you’ve viewing an image or a PDF:
- More Info (images only): This pane shows advanced image information, like EXIF data, color data, resolution, and DPI.
-
Keywords: Here you can add keywords to a document or image so that those files can be found more easily in Spotlight. Click the plus button to add keywords and click the minus button to remove them.
-
Encryption (PDFs only): This pane tells you if the PDF is encrypted, and if so, what permissions you have. Yes, Preview can encrypt your PDFs, and we’ll cover that in another article.
-
Crop (PDFs only): This pane shows you the dimensions of the area selected with the Rectangular Selection tool. You can crop a PDF page to those dimensions, something we’ll cover in another article.
-
Annotations: Use this pane to view and jump to your highlights and notes — just like the sidebar. You can also add new notes to a highlight by selecting it and typing in the lower portion of the pane. For an image, anything you add counts as an annotation.
This is the second article in our series on the power of Preview, but we’re still just scratching the surface of what Preview can do. If it could do only what we’ve outlined in these first two articles, it would still be an entirely worthwhile app. But there’s so much more in Preview to show you!
TidBITS Watchlist: Notable Software Updates for 14 March 2016
BBEdit 11.5.1 — Bare Bones Software has released BBEdit 11.5.1 with added support for HSL (hue, saturation, and lightness) notation in color schemes. The venerable text editor also makes some adjustments to increase contrast and visibility of selected and sub-line differences, fixes a bug that caused odd graphic effects when scrolling after making the sidebar of a new editing window visible, updates the search keyword tables to include new or changed preference settings, maintains the location of the insertion point relative to the top line of the document when using Page Up and Page Down to move the insertion
point, improves error reporting for invalid grep patterns, and fixes a crash that occurred when running a text factory from the Scripts menu and using the Choose button to modify the list of items to process. ($49.99, free update, 11.8 MB, release notes, 10.9.5+)
Read/post comments about BBEdit 11.5.1.
Airfoil 5.0.2 — Rogue Amoeba has released Airfoil 5.0.2, a maintenance release for the recently upgraded wireless audio broadcasting app (see “Airfoil 5.0,” 18 February 2016). The update improves handling of sync adjustments in the Advanced Speaker Options window (which may require a one-time readjustment of these settings), avoids audio and networking issues caused by App Nap, fixes a bug where sync adjustments for the Computer output were forgotten, deselects the defunct Airfoil Video Player app if it’s selected from a previous version, and puts a stop to
“needlessly” displaying a warning when an active Bluetooth speaker disconnects from your Mac. ($29 new with a 20 percent discount for TidBITS members, $15 upgrade, 13.9 MB, release notes, 10.9+)
Read/post comments about Airfoil 5.0.2.
ChronoSync 4.6.6 and ChronoAgent 1.6.0 — Econ Technologies has released ChronoSync 4.6.6 and ChronoAgent 1.6.0, improving the performance of the SmartScan feature (an advanced algorithm that analyzes a volume for changes), particularly when connected to ChronoAgent. Both ChronoSync and ChronoAgent were updated (as were the company’s ChronoSync Express, InterConneX, and ChronoMonitor apps) in an effort to upgrade the security model
employed when establishing secure data communication sessions between each other (see this Econ Technologies Tech Note for more details).
The ChronoSync synchronization and backup app also improves recovery from broken/bad network connections, improves the efficiency of its “Optimal host routing” logic, fixes automatic exclusions at root level of volumes that weren’t working, enhances the background scheduler to better deal with system sleep cycles, prevents a crash from occurring after closing a sync document window within 1–2 seconds of sync completion, and improves compatibility with local iCloud Drive storage. In addition to improved security, ChronoAgent fixes a bug where user/group ID mapping could be disabled temporarily, and enhances its compatibility with ChronoSync’s “Attempt reconnect on drops” and “Optimal host routing” features. (Free
updates for both apps; $49.99 new for ChronoSync with a 20 percent discount for TidBITS members, 33.5 MB, release notes, 10.8+; $14.99 new for ChronoAgent, 12.1 MB, release notes, 10.8+)
Read/post comments about ChronoSync 4.6.6 and ChronoAgent 1.6.0.
ExtraBITS for 14 March 2016
We have just two ExtraBITS this week, since all the stories about Apple and the FBI were merely speculation or opinion on one side or the other. In solid news, Apple is holding an event on 21 March 2016 and we get a look at how growing up in Alabama shaped Tim Cook.
Apple to Hold Event on 21 March 2016 — Apple would like to “loop” reporters in on an event to be held 21 March 2016 at 10 AM PDT on Apple’s Infinite Loop campus. However, if you’re out of the invite loop, you can watch a live stream on Apple’s Web site (or on an Apple TV, natch) at that time. Rumored announcements include a smaller iPhone SE, a 9.7-inch iPad Pro, new Apple Watch bands, and software updates for OS X, iOS, tvOS, and watchOS. It’s going to be a long Monday for us.
How Rural Alabama Inspired Tim Cook’s Activism — Unlike late Apple CEO Steve Jobs, who saw his work as activism itself, Jobs’s successor Tim Cook has been outspoken on issues related to civil liberties. Todd Frankel, writing for The Washington Post, traces the origins of Cook’s activist spirit back to his upbringing in rural Alabama, where as a young gay man, Cook encountered segregation and the Ku Klux Klan. Cook often returns to his hometown, but he’s rarely celebrated there.