Take Control of OS X Server, Chapter 5: DNS Service
This article is a pre-release chapter in the upcoming “Take Control of OS X Server,” by Charles Edge, scheduled for public release later in 2014. Apart from Chapter 1: Introducing OS X Server, and Chapter 2: Choosing Server Hardware, these chapters are available only to TidBITS members; see “Take Control of OS X Server” Streaming in TidBITS for details.
DNS Service
Now that you’ve configured your server and set up Open Directory, we can move on to configuring other services. The first we’ll look at is DNS, or Domain Name System, which is a system for naming computers, resources, and services. If you’ve been following along in this book, you’ve already turned on the DNS service in order to enable Open Directory. Now, it’s time to improve and extend your DNS configuration.
Although DNS configuration beyond what you already did in Turn On DNS, in Chapter 3, isn’t absolutely necessary, a little additional configuration can provide improved performance due to cached domain-name lookups and let your client Macs use names rather than IP addresses to refer to the server and its services. For example, your users will have an easier time remembering mavserver.pretendco.lan than 192.168.210.2. And, to make it even easier, you can even associate names with certain services, like file sharing, since it’s easier to remember that the internal file server is called files.pretendco.lan than mavserver.pretendco.lan (even if they’re just two names for the same server).
Another benefit of using names rather than IP addresses is that if you move certain services to other servers in the future, you can just, for instance, repoint files.pretendco.lan at a different machine, and your users don’t have to change anything to access your file server.
Finally, if you have multiple servers, running DNS internally becomes increasingly important for distinguishing between the servers.
The order in which you set up services and their associated DNS names isn’t important; you obviously can’t use a DNS name until you’ve set it up, but every server and service is accessible via its IP address until then. It’s easiest to create DNS names for the various services you anticipate enabling now, but if you forget one, just come back and set it up later.
Understand Zone and Record Types
Before I get into how to configure DNS, let’s take a step back and make sure you understand what sort of DNS records you can work with in OS X Server. For basic usage, many of these will be created for you or aren’t necessary, but you will likely want to create machine, alias, and mail exchanger records, depending on the internal services you set up.
Each domain name you create is known as a zone. Each item that you want to point somewhere is known as a record. You can see and create the following in Server’s DNS screens:
- Primary zone: The DNS domain. For example,
www.pretendco.lanwould have a primary zone ofpretendco.lan. The primary zone is created for you when you create your first machine record. - Machine record: A machine record, or, in DNS speak, an A record, maps a computer’s name to its IP address. Every server should have a machine record, and you created one back in Turn On DNS. In our example, the machine record maps
mavserver.pretendco.lanto192.168.210.2. - Alias record: Also known as a CNAME, the alias record maps one name to another. For instance, if you’re running both file and Web services on
mavserver.pretendco.lan, you might want to define alias records forfiles.pretendco.lanandwww.pretendco.lan, pointing both of them back atmavserver.pretendco.lan. There’s nothing special about these aliases—you can make them whatever you want (as long as they’re short, and use only letters, digits, and hyphens), with the primary goal being to make them sensible for your users. - Nameserver record: The nameserver, or NS, record specifies the authoritative DNS server for each zone. If you have only one DNS server on your network, it should be the server itself. The Server app creates the nameserver record automatically when you create your first machine record.
- Service record: Service or SRV records hold special types of data that describe where to look for services for a given zone. For example, iCal can leverage service records so that users can just type the username and password during the setup process. You should not need to create service records unless you’re setting up a DNS server to do some pretty advanced stuff.
- Mail exchanger record: Also known as an MX record, a mail exchanger record points to the IP address of the mail server for a given domain. You need a mail exchanger record only if you’re running a mail server.
- Text record: Although it would seem impossible to create a text, or TXT record in Server, there’s a trick. When you create a machine (A) record, there’s a Text field; you can enter the necessary text in that field to get at TXT record. TXT records are primarily useful for specifying SPF and DKIM details (both aimed at improving bulk email deliverability), so it’s unlikely that you’d need a TXT record.
- Reverse zone: This automatically created zone maps each name that IP addresses within the zone answer with. Don’t worry about it.
- Reverse mapping: In the DNS world, reverse mapping equates to a PTR record that maps an IP address to a domain name—exactly the reverse of normal DNS. It’s necessary only for mail servers, since many Internet mail servers are configured to reject incoming messages from any IP address that doesn’t have a reverse DNS PTR record. You can’t create a reverse mapping manually in Server—it’s created automatically for the first IP address listed in each machine record.
- Secondary zone: You won’t need to worry about secondary zones either; they’re read-only copies of primary zone information stored on other DNS servers.
Configure DNS on the Server
As I noted at the start of this chapter, there are two main reasons to run a DNS server in a small home or office network, caching and mapping names to IP addresses. The good news is that there’s absolutely nothing to do to take advantage of Server’s DNS caching capabilities—it automatically caches every request and serves the cached information on subsequent requests if the information hasn’t aged out.
Setting up additional records to map names to IP addresses is a bit more work, but not much. First you’ll create alias records to the machine record you created in Turn On DNS and a mail exchanger record in Server, and then you’ll need to adjust the DNS settings on client Macs so they know about your new DNS names.
Follow these steps to create your alias records, as well a mail exchanger record. For the purposes of this example, we’ll create alias records for file and Web servers:
- In the sidebar’s Advanced category, click DNS. The DNS pane appears at the right.
- From the gear
 pop-up menu, choose Show All Records to display all the zones and records that Server has created for you, and to put the DNS pane in a mode where you can create record types other than machine records.
 - Click the plus
 button, and from the pop-up menu that appears, choose Add Alias Record.
 - Leave the Zone pop-up menu alone, but in the Host Name field, enter
files, and in the Destination field, enter the name of your server, such asmavserver.pretendco.lan(Figure 1). Click Create.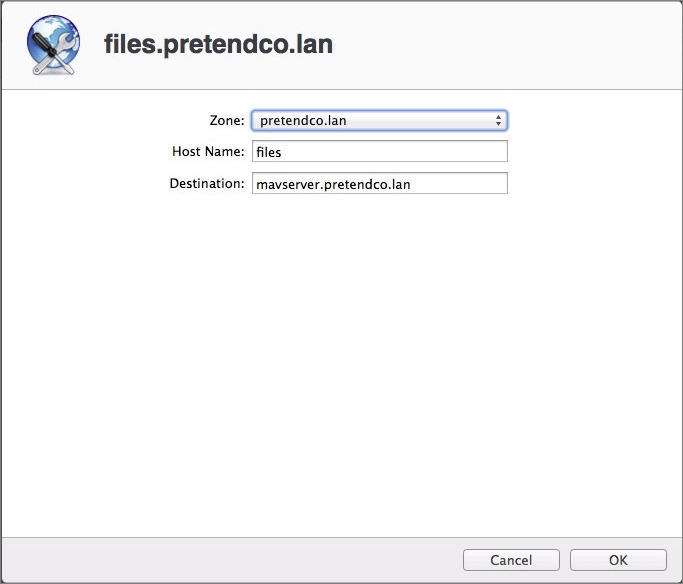
Figure 1: Enter the alias name for your file server in the Host Name field.
- Repeat Steps 3 and 4, but enter
wwwin the Host Name field this time. - Click the plus
 button again, and from the pop-up menu, choose Add Mail Exchanger Record. You can skip this and the next step if you don’t plan to enable OS X Server’s mail services.
 - Once again, leave the Zone pop-up menu alone, but in the Mail Server field, enter your server’s domain name prefixed with
mail, as inmail.pretendco.lan(Figure 2). Leave the Priority field at 0—if you had multiple mail servers, higher numbers in this field would cause them to be used at lower priorities. Click Create.
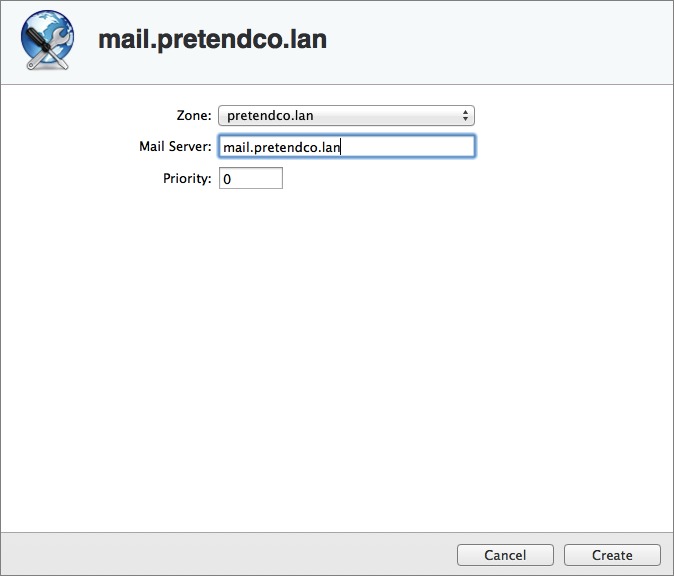
Figure 2: Enter the name you want to map to your mail server.
An Even Easier Solution
These steps are easy, but in fact, Apple has made them even easier. I wanted to walk you through them so you’d see a bit more of what’s happening behind the scenes, but in fact, you could have done all this from the screen for your initial machine record (Figure 3).
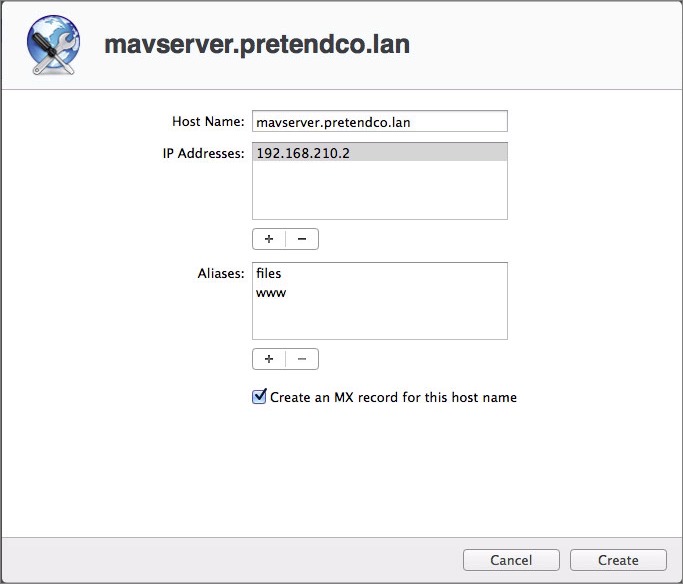
Figure 3: You can create alias and mail exchanger records right from within the machine record screen, as long as Show All Records is not selected.
As long as Show All Records is not selected in the gear  pop-up menu, the screen for a machine record lets you add a list of aliases, and includes a checkbox to create an MX record.
Configure DNS on Client Macs
The simplest way to configure the client Macs on your network to use your new DNS server is to reconfigure your DHCP server (often your DSL or cable modem, or an AirPort base station or similar router) to provide the new server as the first DNS entry, as I’ve shown in Figure 4. It’s safest to enter another DNS server—either one run by your ISP or a major public one like Google’s 8.8.8.8—in the second DNS Servers field, since that will be used as a backup for DNS lookups if your local DNS server were to go down for some reason.
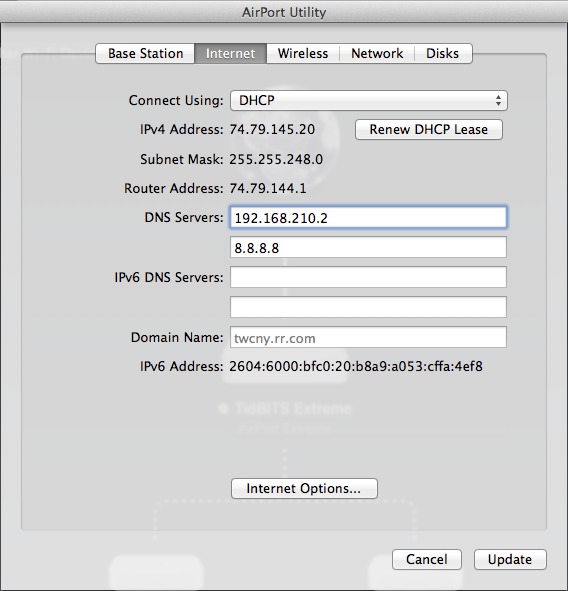
Figure 4: If you point your DHCP server at your DNS server, all the client Macs on your network that get their information from the DHCP server will automatically start using your new DNS server.
If you cannot access the DHCP server for your network, you can always assign the DNS server manually on each client Mac:
- Open the Network pane of System Preferences.
- Select the interface for which you wish to adjust DNS settings (likely Ethernet or Wi-Fi).
- Click the Advanced button, and then click the DNS button to open the DNS view (Figure 5).

Figure 5: Configure the DNS Server settings on client computers to look to your new server.
- In the DNS view, beneath the left-hand DNS Servers list, click the plus
 button to get a new entry in the list, and then enter the IP address of your DNS server. It’s a good idea to repeat the process with one or two additional DNS server IP addresses that the client Macs can use for DNS lookups should OS X Server go down.
 - Click the OK button and then click Apply to save your changes.
If all has gone well, you’re now running a DNS server for your network, and all the client Macs on the network are using that DNS server to look up IP addresses for both internal and external machines.
Read More: About | Chapter 1 | Chapter 2 | Chapter 3 | Chapter 4 | Chapter 5 | Chapter 6 | Chapter 7 | Chapter 8 | Chapter 9 | Chapter 10 | Chapter 11 | Chapter 12 | Chapter 13 | Chapter 14
Start the discussion in the TidBITS Discourse forum