Take Control of OS X Server, Chapter 8: Mail Services
This article is a pre-release chapter in the upcoming “Take Control of OS X Server,” by Charles Edge, scheduled for public release later in 2014. Apart from Chapter 1: Introducing OS X Server, and Chapter 2: Choosing Server Hardware, these chapters are available only to TidBITS members; see “Take Control of OS X Server” Streaming in TidBITS for details.
Mail Services
Despite the constant claims about how email is dead (to be replaced by instant messages, Facebook, Twitter, iMessage, or whatever), there is no communication medium more important than email to most organizations. Even people who claim they don’t use email much get testy when they miss an important message or can’t log in for some amount of time. Email is important.
It’s also simple—the SMTP, IMAP, and POP protocols on which email relies have been around for decades, and there’s not much to maintaining the database of user and message information. In OS X Server, enabling all the Unix apps that provide mail services under the hood is merely a matter of clicking an ON button and twiddling a few checkboxes.
But there’s a huge catch. Email is an ecosystem—no mail server can stand on its own, because it must be willing to accept messages from anywhere on the Internet and be capable of sending to anywhere. And due to spammers and other nogoodniks, every email server on the Internet is constantly being bombarded with spam, viruses, and malware, often sent by zombie computers marching in massive international botnets. And don’t get me started about dealing with distributed denial of service (DDoS) attacks, having your server used to relay spam, or the massive blowback that happens when one of your users’ email addresses is used as the return address for spam. As I said in an earlier chapter, email is a toxic hellstew, and I strongly
recommend you avoid running your own mail server. I don’t, not any more.
Here are my recommendations:
- For an individual hoping to run a mail server for a family, OS X Server will work, but unless you have vast amounts of free time to tinker with settings and deal with spam, you’re better off signing everyone in your family up for individual email accounts with iCloud, Gmail, FastMail, or the like.
- For a small business in need of mail services, the amount of time you’ll spend (or pay a consultant to spend) on OS X Server makes it a poor investment. Instead, I recommend something like Google Apps for Business, which costs $50 per user per year, or Microsoft’s Office 365 for Business, which starts at $60 per year but which includes a full Microsoft Office subscription for $150 per year. In general, Office 365 is better if you need Exchange compatibility or have predominately Windows clients; otherwise Google Apps is a bit cheaper.
- For an organization that must run its own mail server, look at Kerio Connect. It isn’t cheap, starting at $465 for five users for a year, but it is an industrial-strength mail server.
That said, as much as I’m trying to warn you off enabling mail services in OS X Server, I’d be remiss if I didn’t walk you through the basics either so you can turn on mail services or so you can reflect on what would be involved.
And if you turn on mail services, I recommend keeping these configuration options and policies in mind as you go, because they will help secure your server:
- Make sure to use SSL so your users’ email passwords can’t be sniffed when they check mail at public hotspots like Starbucks. This is enabled by default, using the self-signed certificate you created when setting up push notifications. I explain how to confirm your certificate at the beginning of Configure the Mail Service, ahead.
- Use all of Server’s options for scanning incoming and outgoing mail for viruses and spam. More on these in Edit Filtering Settings, ahead.
- Ensure that your users have strong passwords with good password policies. See Configure Password Policies, back in Chapter 4.
Prepare to Run a Mail Server
Before you start configuring in the Server app, you have some ducks to line up. These tasks vary (widely) depending on your specific situation, but the general instructions below should get you started.
So far, we’ve been configuring your server with the assumption that it would be used only inside your LAN, and not be accessible to the outside Internet. For a mail server, that obviously won’t work. (Technically, you could set up the mail server to provide email for just staff in an office without any connections to the outside world, but in my experience, that’s a non-starter because users always want to exchange email with other Internet users.) So, some of these tasks relate to putting your server on the Internet.
Static IP Address
Back in Configure the Server’s IP Address, in Chapter 3, you ensured that your server would have a static IP address on the LAN. It’s also essential that it have a static IP address for the outside Internet (the WAN, or wide area network, in networking jargon). You’ll need to set that up with your DNS provider.
In IP Address, in Chapter 3, I talked about how you might be able to use dynamic DNS instead, but for a mail server, dynamic DNS is a bad idea. Any interruptions in service will likely cause mail delivery failures, which will make your users crazy.
DNS Configuration
Along with that external static IP address, you’ll need to have a real domain under which all this mail will be handled, and an external hostname for the server. So, where we’ve been using mavserver.pretendco.lan as an example for the internal domain name, for the purposes of this discussion, we’ll assume you want to receive email at pretendco.com. And we’ll assume that your server’s hostname (and thus machine, or A record) will be osx.pretendco.com.
The tasks you’ll need to complete with your external DNS provider and ISP include:
- Create a machine or A record for
osx.pretendco.com, pointing it at your external static IP address. - Set up an alias or CNAME for
mail.pretendco.com, pointing it atosx.pretendco.com. - Set up a mail exchanger or MX record that says mail destined for
pretendco.comshould be handled bymail.pretendco.com. - Get your ISP to create a reverse mapping, or PTR record, that associates your external static IP address with
mail.pretendco.com.
Port Forwarding
It’s also essential that you open particular ports on your router so email can flow in and out. This is easily done in AirPort Utility, assuming you’re using an AirPort base station as your router; other routers should be similar. The ports you’ll need to forward may include the following (but if you’re not planning to let clients use POP, for instance, don’t forward those ports):
- SMTP: 25
- IMAP: 143
- IMAP with SSL: 993
- POP: 110
- POP with SSL: 995
Happily, AirPort Utility lets you choose these from a pop-up menu (Figure 1), making configuration even easier, since it fills in the Public TCP Ports, Private IP Address (that of your server), and the Private TCP Ports fields for you. (To view the menu, edit your base station in AU, click the Network button, and then click the plus  button beneath the Port Settings list.)
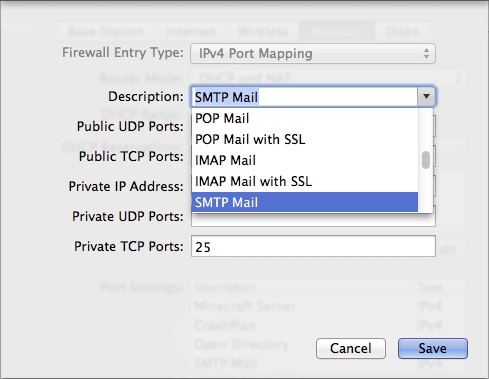
Figure 1: Setting up port mapping for mail services in AirPort Utility is just a matter of choosing from the Description pop-up menu.
Check the RBLs
One of the main ways that server administrators configure their mail servers to block spam is via real-time blackhole lists, or RBLs. The basic idea is that as soon as a mail server is identified as sending spam, its IP address is added to an RBL. When receiving messages, other mail servers consult RBLs to see if the sending server is known to relay spam, and if so, the receiving server rejects the message.
In general, RBLs are good, since they reduce the impact of spam on the Internet immeasurably. However, if your IP address is on an RBL when you set up your mail server, the mail your server sends may be rejected or even dropped silently without being delivered. So, it’s important to check the RBLs before you start to make sure your IP address isn’t on such a list.
(Why would this happen? Depending on how your ISP sets things up, other clients may share the same IP address as you, or if you’ve gotten the IP address recently, it’s possible the previous user’s mail server had been taken over and used to send spam, landing the IP address on an RBL.)
Luckily, there are multiple services that will check a long list of different RBLs for your IP address. A popular checking site is MX Toolbox (Figure 2); you might also try the Multi-RBL Check of The Anti-Abuse Project.
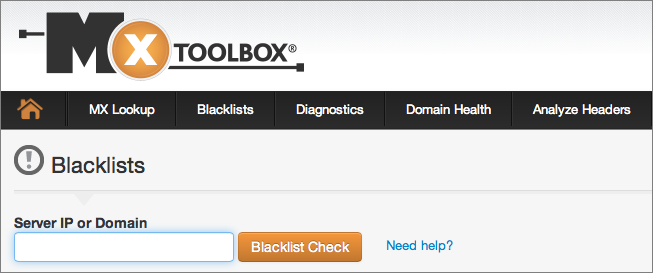
Figure 2: It’s easy to check whether your IP address is on an RBL with the free MX Toolbox service.
Back Up Users, Mail, and Settings
Mail is critical for most businesses, and even many home users live and die by their email (which will be stored on the server for those using IMAP), so it’s not only essential that your mail server be up and running 24/7, it’s imperative that you back it up constantly and be able to restore it quickly in the event of a disk failure or other catastrophe.
Chapter 12, Backup, is devoted to the topic of backups, so I won’t say much about it here, but before you bring your mail server online, jump forward to that chapter and make sure you’re backing up appropriately. I realize that’s not possible for those reading this chapter as a TidBITS article, but the practical upshot is that I recommend using Time Machine at a minimum; enhancing your backup strategy with a bootable duplicate and an offsite backup would also be good.
Configure the Mail Service
Once all the tasks listed in the previous topic are taken care of (and I mean all), it’s time to start working in the Server app.
The first step is to make sure you have an SSL certificate associated with various mail services, since it will be used to encrypt your logins. Luckily, since you configured push notifications back in Configure Alerts, in Chapter 3, this is just a quick confirmation step.
In the Server app, click Certificates in the Server section of the sidebar. Under Settings, the Secure Services Using pop-up menu should be set to your server’s host name, indicating that the self-signed certificate you created when enabling push notifications is being used to secure all services.
To verify that it’s being used for mail in particular, click that menu and choose Custom. In the dialog that slides down, you should see two Mail entries (Figure 3). Click OK.
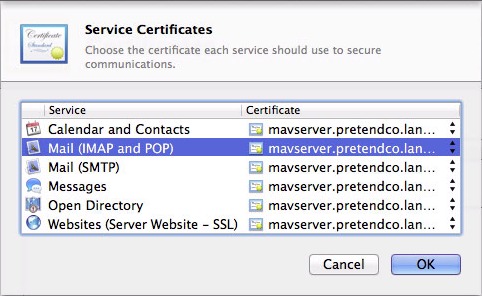
Figure 3: Make sure your self-signed certificate is selected for Mail (IMAP and POP) and Mail (SMTP).
Now let’s configure the mail service. Click Mail in the Services section of the sidebar (Figure 4). Although there are only six controls, plus the main ON button, some of them require a fair amount of explanation.
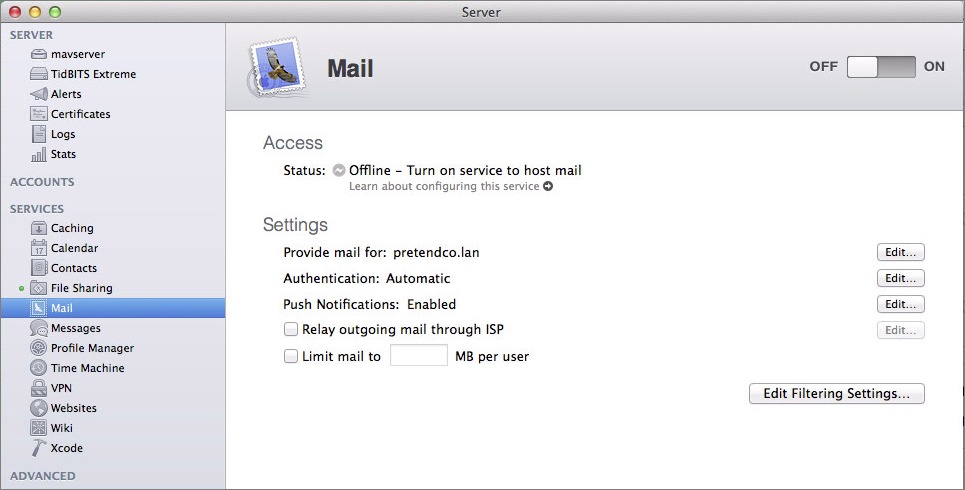
Figure 4: Mail settings in the Server app.
Provide Mail For
The first setting is the domain for which you’re going to provide mail services. This is not the fake domain we’ve been working with all along, but the real domain that you configured at your DNS provider earlier in this chapter. Since OS X Server defaults to the domain in the server’s host name, you’ll need to change it.
Click the Edit button to the right of Provide Mail For, enter the desired domain in place of the fake one, and if you want to provide mail for additional virtual domains (which would require additional DNS setup at your DNS host), click the plus  button and enter them as well. Click OK.
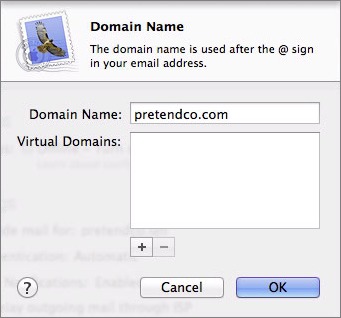
Figure 5: Enter the real domain for which you want to provide mail services.
Each user account that you’ve set up on your server has a short name, and you’ll end up with an email address for each short name at each domain. For example, if you have accounts for charles and emerald, those accounts will be able to receive email at [email protected] and [email protected]. And if you’d set up a virtual domain of toxichellstew.com, those users could also receive mail at [email protected] and [email protected].
Authentication
Your users must authenticate whenever they try to exchange mail with your server, both incoming and outgoing. OS X Server supports a wide variety of authentication protocols, including Kerberos, Digest (CRAM-MD5), Cleartext, APOP (for POP only), and Digest-MD5, and a number of sources for that authentication information, including Open Directory, Active Directory, and the set of local users.
The easiest approach here is simply to stick with Automatic, which will query your Open Directory master for authentication information and allow any of the authentication protocols.
If you want to set particular authentication sources or protocols, click the Edit button next to Authentication. Make your choices using the Authenticate Using pop-up menu, and if you choose Custom, the protocol checkboxes (Figure 6). Click OK.
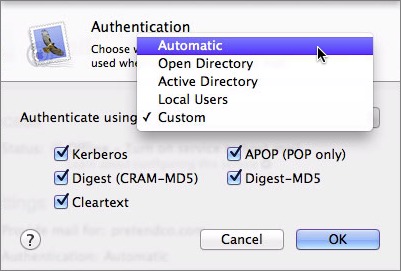
Figure 6: Stick with Automatic for authentication, but if you need to be more specific, it’s possible.
Push Notifications
There’s nothing to do here, since you turned on push notifications long ago, in Configure Alerts, in Chapter 3. What you actually did was to enable push notification of new email messages. What’s that mean?
Imagine that a new message arrives at the mail server for [email protected]. With push notifications on, the mail server notifies that user’s email client that it should retrieve the message via IMAP—push notifications are just an alert to the client that it should check in.
The utility of push notifications, particularly for a mobile email client, is that it doesn’t have to check for new email unless there is some. This reduces network traffic, CPU usage on the device, and battery drain.
Relay Outgoing Mail through ISP
To reduce the damage done by badly set up (and thus easily compromised) mail servers, many ISPs block all SMTP traffic on their networks that doesn’t go through one of their servers. In other words, depending on your ISP, your mail server may not be able to send outgoing mail to any arbitrary server on the Internet at all.
The workaround is to relay all outgoing mail through a particular SMTP server that will accept your outgoing messages and send them on to their eventual destinations.
Even if you can send outgoing mail directly, you may not wish to, because relaying your mail through another server reduces the chance that your server will be blacklisted for some bad behavior.
There are three main approaches for relaying through another server:
- Your ISP: Talk to your Internet service provider and see if they require that you relay through them, or even if they don’t require it, see if they would allow you to relay through one of their servers.
- An email appliance: There are a variety of devices you can buy, such as a Barracuda Spam Firewall, that sit between your mail server and the Internet, filtering both incoming and outgoing mail. They cost about the same as a computer ($2,000) and may have annual upgrade fees.
- External filtering service: A cloud-based service, like McAfee’s SaaS Email Protection and Continuity, may be more cost-effective than an email appliance, but offers basically the same incoming and outgoing filtering capabilities.
To configure your mail relay, click the checkbox for Relay Outgoing Mail through ISP and in the dialog that appears, enter the host name of the other mail server, adding your username and password if SMTP authentication is necessary (Figure 7).
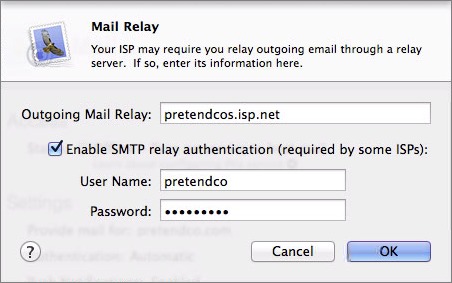
Figure 7: Configure your outgoing mail relay if necessary.
Limit Mail To
Many users don’t delete incoming email, which has both pros and cons. On the pro side, thinking about which messages to delete and which to keep takes time that could be spent more productively, and it can be useful to have a complete archive of old email. On the con side, that email can take up a lot of disk space, especially if your users tend to receive a lot of large attachments. Plus, for some businesses, archived mail can prove a legal liability if subpoenaed in a lawsuit.
OS X Server doesn’t have any way of enforcing email retention policies, but you can set the total amount of mail each user can keep. Select the Limit Mail To checkbox, and enter the mail store size, in megabytes. It defaults to 200 MB, but you can enter any number of megabytes you like.
Edit Filtering Settings
Unless you’re using an email filtering service like McAfee’s SaaS Email Protection and Continuity, you’ll certainly want to turn on Server’s email filtering capabilities. To view these controls (Figure 8), in the Mail pane, click the Edit Filtering Settings button.
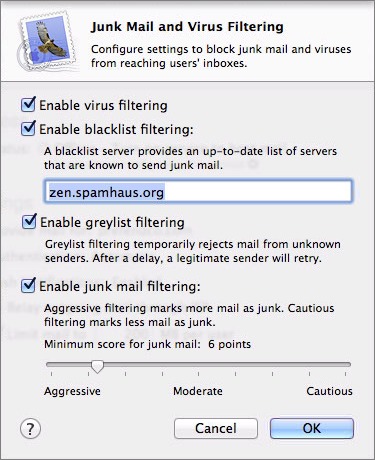
Figure 8: Turn on filtering services unless your mail server is already protected by a cloud-based filtering service or email appliance.
Apple packs a lot into a single dialog, so let’s go through each of these in turn:
- Virus filtering: Handled by a Unix app called ClamAV, this service scans all messages for known viruses. To keep up with newly discovered viruses, Server relies on a process called freshclam, which downloads updated virus definitions from the Internet periodically.
Message containing viruses aren’t delivered, but are stored in/var/virusmails, and notification is sent to the address configured for email alerts. - Blacklist filtering: You don’t want your server to appear on a real-time blackhole list, but it’s a good idea to take advantage of them when filtering incoming mail for spam. By default, Server is set to use Spamhaus, but there are numerous other RBLs you can employ (an overwhelming number, in fact). If you want to use multiple RBLs, separate them with commas.
- Greylist filtering: Where a blacklist is definitive—either a server is on it or it’s not—greylist filtering is fuzzier. When you enable greylist filtering, your mail server temporarily rejects all mail from unknown senders while recording the IP address of the sending server, the address of the sender, and the address of the recipient. Legitimate mail servers won’t be offended and will just retry the message some minutes later, and on the second try, the message will be accepted. Greylisting works because spam apps don’t generally retry rejected messages; they’re trying to send so many messages that they can’t afford the delay in retrying.
- Junk mail filtering: The last option, junk mail filtering, provides an interface to the well-known SpamAssassin package. SpamAssassin evaluates all incoming messages against a massive set of rules, assigning points for aspects of messages that are “spammy.” Each messages ends up with a SpamAssassin score, which is compared against the slider setting (note the number of points associated with each slider setting).
If the number of points accumulated by a message is greater than the SpamAssassin setting, SpamAssassin adds***JUNK MAIL***to the Subject of the message and delivers it. Users can then configure their email clients to filter such messages to a Junk Mail mailbox.
Enable Mail Services
Once you’ve configured all the settings for the Mail service, click the ON button to enable the service. It may take a few minutes while Server starts all the various related services and downloads new virus definitions.
You can set up a mail client to check your work, but for the moment, it’s easier to launch Terminal on another computer and use telnet to see if your mail server is working. In Terminal, enter this command, changing the host name to that of your mail server:
telnet mail.pretendco.com 25
If it’s working, you should see a response like the following:
Zeus:~ adam$ telnet `mail.pretendco.com` 25
Trying `mail.pretendco.com`...
Connected to `mail.pretendco.com`.
Escape character is '^]'.
220-`mail.pretendco.com` ESMTP Postfix
To exit the conversation with your server, type quit and press Return.
Tweak Mail Settings via Command Line
Apple has exposed relatively few settings for Postfix, Dovecot, ClamAV, and SpamAssassin via Server’s graphical interface. As you might expect from mature Unix apps, there are many more settings you might want to configure, which must be done from the command line.
First off, there’s a useful command line invocation that will give you details of the status of each service. In Terminal on the server itself, enter this command:
sudo serveradmin fullstatus mail
Next, to see a full list of mail-related options, enter:
sudo serveradmin settings mail
To be clear, many of the default settings are fine and shouldn’t be messed with unnecessarily. If you’re going to change something, make a note of what the setting was before you change it, in case you break something and need to put it back. Here are a few settings that people commonly want to change.
Reset SpamAssassin’s Subject Line
If you don’t like SpamAssassin’s default ***JUNK MAIL*** Subject tag, you can change it with this command:
sudo serveradmin settings mail:postfix:spam_subject_tag = "***DIE SPAMMER DIE***"
Enable Virus Notifications
By default, the administrator doesn’t receive an email notification when ClamAV catches an email containing a virus-infected attachment. To enable this option and configure the address that will receive notification, use these commands, changing the address as desired:
sudo serveradmin settings mail:postfix:virus_notify_admin = yes
sudo serveradmin settings mail:postfix:virus_notify_admin_email = "[email protected]"
Change Message Size Limits
I find a lot of Mac environments want to accept email messages of pretty much any size rather than reject messages with too-large attachments. By default, message size limits are enabled. To disable them, use this command:
sudo serveradmin settings mail:postfix:message_size_limit_enabled = no
Even better, set a new limit (in bytes)—the default is 10 MB and this command sets it to 50 MB:
sudo serveradmin settings mail:postfix:message_size_limit = 52428800
Other Settings
Look through the rest of the settings that are listed when you enter sudo serveradmin settings mail and see if any pique your curiosity, but again, don’t go changing things willy-nilly, or you’ll likely break your mail server. If you’re not certain what a particular setting does, run a Web search on it and see what you can find. Apple has documented many of them in various spots, and other users may have discussed the setting as well.
Configure Mail Clients
Now that you have mail services running in OS X Server, it’s time to set up the client side, which is straightforward. Although the specifics vary a little by app, I’m going to look at setting up the Mail client that comes with OS X. The same types of settings—IMAP and SMTP server names, and authentication credentials—apply to all mail clients, whether on Windows or in iOS.
To set up Mail for yourself (the steps will be the same for other users), follow these steps:
- In Mail, choose Preferences from the Mail menu, and click Accounts to display the Accounts pane.
- Click the plus
 button at the bottom of the list of accounts on the left, and in the dialog that asks what sort of mail account to add, select Add Other Mail Account and click Continue (Figure 9).
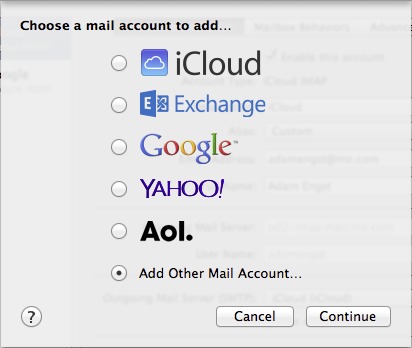
Figure 9: Add a new account in Mail’s Preferences window.
- In the Add a Mail Account dialog, enter the name you’d like people to see when receiving mail from you, the email address associated with your account on the server (your user name), and your password, then click Create (Figure 10).
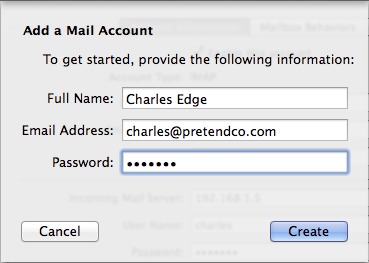
Figure 10: Enter your name, email address, and password.
- In the Incoming Mail Server Info dialog, your username and password are already filled in, so you have only to choose between IMAP (the most common choice—see Choosing between IMAP and POP) and POP and enter the mail server name or IP address, and click Next (Figure 11).
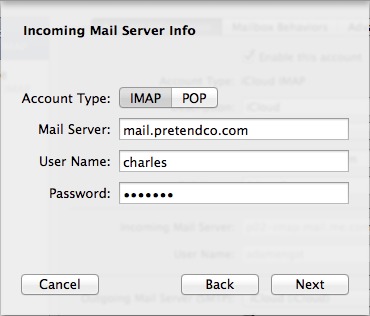
Figure 11: Choose between IMAP and POP, and enter the host name or IP address of your mail server.
- Next comes the Outgoing Mail Server Info dialog, where you should enter the host name or IP address of your mail server, and your username and password again (Figure 12).
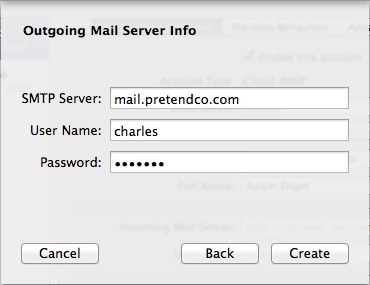
Figure 12: Enter the host name or IP address of the server again, for outgoing mail.
- To finish the process and set up the account in Mail, click Create.
Read More: About | Chapter 1 | Chapter 2 | Chapter 3 | Chapter 4 | Chapter 5 | Chapter 6 | Chapter 7 | Chapter 8 | Chapter 9 | Chapter 10 | Chapter 11 | Chapter 12 | Chapter 13 | Chapter 14
You forgot to mention port 587: it's the standard port for authenticated mail submissions. It was invented to get around the very common blocks of port 25, and is the default for most mail clients.
Also worth noting that many IP addresses (even static) will be blacklisted - either because you haven't arranged with your ISP to use it for outbound mail, or because it has previously been allocated to a spammer. So, it's important to check the IP address against various blacklists before deploying a mail server. For example, you could use http://www.dnswatch.info/dns/rbl-lookup
And one other thing: if the IP address doesn't have a PTR record pointing to the domain name of the host, you'll look like you don't own the IP address: so you'll look like a spammer. Make sure you have at least a pair of matching PTR and A records.
Thanks for reminding me about 587 - I missed that in editing because AirPort Utility so clearly includes all the others.
RBL checking and getting a PTR are indeed important, and are mentioned above.
Please describe in more detail what battling "against the constant onslaught of spam and malware" requires in practice.
Once OS X Server's mail and DNS and reverse-DNS, etc., are set-up and SpamAssassin is in place, what more battles need to be fought?
Servers routinely get blacklisted for little to no reason. Settings from ISPs change, other people get blacklisted that you need to whitelist, etc. It's standard admin stuff. If you only have a few domains you mail back and forth with, it's not usually a massive deal. It does help that those NDRs are usually googleable so not complicated, just consistent to deal with the problems.
I'm trying to think back to some of the things that have made my life miserable in the past...
* SpamAssassin marks something incorrectly and a user goes ballistic because they missed an important message. And figuring out why they missed it takes 30-60 minutes you don't have on an important day.
* An idiot spammer sends spam to a few hundred thousand addresses with a return address of one of your users. Depending on a wide variety of possibilities, your server is blacklisted, suffers from delivery delays as it processes the bounces, starts bouncing legit mail to the user due to mail quotas, runs out of disk space, or crashes. And you have to explain all this to the user, who probably isn't technical and doesn't understand.
* One of your users has poor password hygiene and his account is compromised and used to send spam. Again, you're blacklisted, all your other users are confused and angry because their mail isn't going through, and you have to drop everything to figure out what happened and try to fix it. Getting off blacklists can be difficult, time consuming, and depressing, since you know you're not a spammer, but the people who run the blacklists have no reason to believe you.
* Either through some misconfiguration on your part, or a security exploit, your server is used to relay spam. This can not only get you blacklisted, but can get your Internet connectivity shut down.
Charles is right that this is standard sysadmin stuff, and if you are a sysadmin and understand what that means in terms of being at the beck and call of both a server and its users, you'll probably be fine. It's just important to realize that running a mail server is far from set-and-forget.
Just a couple of comments:
Under DNS Configuration - maybe explain why you should setup a PTR record as this isn't obvious.
Under "Connecting to Mail Server When Port 25 Is Blocked" The last bullet point should read "On the router, you can forward a custom port to port 25 on the server in order to..."
I also have a question about the Junk Mail filtering. Does SpamAssassin add a new email header with the score in as well as add the text to the subject if the score is breached?
Does mail.app move email with the ***JUNK MAIL*** to the Junk folder automatically?
I have a number of mac minis running at my library, hosting various PHP apps and other systems that need to send mail. All I want a particular box to do is send mail out to a relay on campus. Don't want the machine to accept any incoming mail or relay mail for anyone else.
Is there an easy way to configure mail under OSX Server (10.8 and 10.9) to do that task?
Is setting up server even necessary for this very limited "outgoing smtp only" capability?
I'm not sure what the best way to do this is, Wally, since the Mail server isn't very granular in terms of what you can turn on and off (I don't see any way to avoid enabling incoming mail, for instance).
Perhaps Charles has some other ideas.
I'd just use the firewall to restrict incoming access from all but your LAN IPs. You can then use the Relay to relay outgoing mail through. Or better yet, use "sudo serveradmin settings mail:postfix:mynetworks:_array_index:0 = "127.0.0.0/8" to add an array of your local networks so smtp only works there.
Awesome post. I've been doing this for 20 years as a hobby on my own domain but you just answered some of my long standing questions in very simple and easy to understand language. Thanks Adam!!
Comments like this warm the cockles of my heart. :-)