Original photo by Alexas Fotos
Everything You Wanted to Know about Using the Mac App Store (For Now)
There’s a new Mac App Store just around the corner, in macOS 10.14 Mojave, and thanks to changes in Apple’s policies, it’s wooing back some beloved Apple developers like Bare Bones Software and Panic (see “The Big News about macOS 10.14 Mojave Is Dark,” 4 June 2018).
For the next several months, though, you’ll still be shopping in the current Mac App Store, with the current App Store app, whose features aren’t always obvious and which has a few glitches. The utility that you bought in 2010 which hasn’t worked in years, for instance, doesn’t have to haunt your Purchased list forever. You can avoid pig-in-a-poke purchases by checking an item’s Info page, which includes reviews by users. You don’t have to supply your password for every single item you buy when you’re on a shopping spree. And if you experience an interrupted download, there are various ways to restart it.
Set App Store Password Preferences
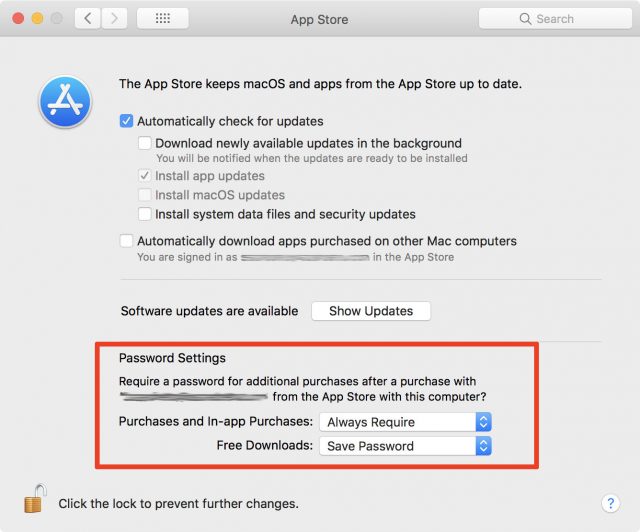
Before you go shopping, take a trip to the App Store preferences to set your shopping password preferences. If you’re in the App Store app, choose App Store > Preferences or open System Preferences > App Store. Either way, you’ll end up in the App Store pane of System Preferences. At the bottom of the pane, set the two items under Password Settings:
- Purchases and In-app Purchases: The Always Require option is self-explanatory. Require After 15 Minutes lets you click a few Buy or Get buttons in a row without repeated demands for your password. But pay attention to the second part of the label: Purchases and In-app Purchases. Although I’m sure no one has ever mistakenly clicked or tapped an option that makes an in-app purchase, you might be the first, and reentering your password is a small price to pay for avoiding other small prices. (And if you’re sharing your computer with a child, it’s even more important to keep this at Always Require so they can’t make additional in-app purchases after you’ve allowed the first one.)
- Free Downloads: It’s obvious what Require Password does, but the same can’t be said of the Save Password option. You can rightly assume it’s the poorly phrased opposite: once you’ve entered your password for anything else, a free app doesn’t need your password to be downloaded. (Signing in to the App Store at the beginning of a shopping session counts as entering your password.)
If you work on more than one Mac using the same Apple ID, you may also want to select Automatically Download Apps Purchased on Other Mac Computers in this preference pane. (Note that this says “automatically”; you can always manually download specific apps you’ve purchased on one Mac to another one linked to your Apple ID.)
Buy/Install Basics
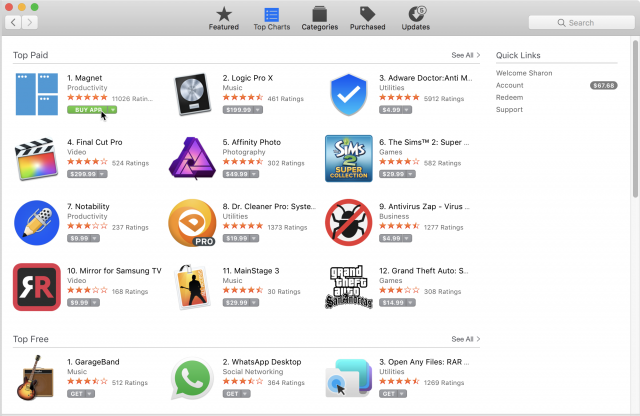
Now it’s time to go shopping: launch the App Store app (conveniently available by choosing Apple > App Store). If necessary, sign in with Store > Sign In. Use the Search field if you know what you’re looking for; click the Featured, Top Charts, or Categories button to browse. When you find what you want, click the item’s price, which changes to Buy App; click elsewhere in the window to revert to the price if you change your mind. Freebies have a Get button that changes to Install App when clicked.
If you want to know more about an app before you buy, click its name to go to its Info page, which not only has further information but also displays reviews and ratings from users. You can use the Buy or Get button from there or move back to the previous screen with a click of the Back (<) button or by choosing Store > Back.
The installation process of a downloaded app is nearly invisible. An installer file downloads, runs, and courteously erases itself. The app takes up residence in your Applications folder, and its icon appears in your Dock and Launcher screen.
Purge the Purchased List
Your App Store Purchased list (click the Purchased button in the toolbar) is a permanent record of your interactions with the store. My Purchased list, like my clothes closet, still includes things I bought in 2011. It also still lists OS X Lion, Mavericks, and Yosemite, as well as various utilities I tried out but which were either not what I’d hoped or stopped functioning after a system update.
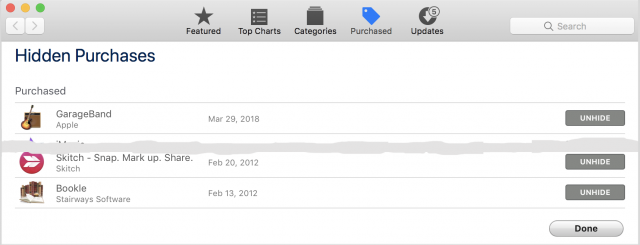
Because your Purchased list is permanent, you can’t delete any oldsters. But you can hide them: Control-click anywhere in the segment that describes the item, choose Hide Purchase in the pop-up menu, and confirm the decision in the dialog. These hidden items are still part of your purchase history—they’re just no longer displayed in this list.
Getting your hidden purchases back in the list is also a cinch, although it takes more steps. Choose Store > View My Account, and then, in the Hidden Items section, click Manage. Click the Unhide button for any item you want re-listed and click Done when you’re, you know, done.
Deal with Mac App Store Problems
Here’s how to deal with the most common issues.
You can’t connect to the Mac App Store
This Apple support article describes fixes for several common connection problems, starting with checking your Internet connection (of course, if that’s the problem, you won’t be able to read the article). It explains such things as how to check Apple’s Web site status, update your account, and check inside normally hidden system-level folders. (It also advises that you should make sure that your “date and time are set correctly for your time zone,” so you might want to start by trying that quick potential fix.)
Clicking Buy doesn’t (or doesn’t seem to) do anything, OR the app seemed to download, but it’s not in the Dock or in your Applications folder
Look for it in the Purchased tab in the App Store window; if it’s not in the list, choose Store > Reload Page.
If it appears in the list with a Download or Install button, click the button; you won’t be double-charged. If it has an Open button, check your Dock and/or Applications folder (or do a Finder search)—you may have been fooled by a small file with a very short download time.
If it’s not anywhere in the Purchased list, go back to it in the Store and click the Buy button again. (If there’s a Buy button, you weren’t charged for it.)
A download was interrupted
Most interrupted downloads pick up where they left off as soon as your Mac re-establishes its Internet connection. You might get a dialog asking if you want to resume the download, and sometimes you’ll have to supply your Apple ID again to prove that you’re still you.
No auto-resume or dialog? In the App Store window’s toolbar, click Purchased, find the app in the list, and click its Resume button. If you were on a buying spree and clicked to download multiple items, you can check whether any are still in transit or waiting in line by choosing Store > Check for Unfinished Downloads.
An app downloaded but didn’t install
If a download seems to go smoothly but the app doesn’t appear in your Dock (or Launchpad screen), go back to the Purchased list and click the app’s Install button if it has one.
If the button is Open, the App Store thinks it’s installed, so the problem might be that the installer downloaded but for some reason didn’t automatically run. Look in ~/Library/Application Support/App Store/ for an installer file, and launch it with a double-click.
You get “Unknown Error Occurred” when you click Buy
When I wrote about this a few years ago, Apple’s advice was to quit the App Store app, wait at least 10 seconds, and then relaunch it. Why 10 seconds—practically an eon in computer-cycle time? I don’t know, nor do I know why it’s no longer recommended. But I include it in case you’re using an older system and version of the App Store app and it would work for you; it won’t hurt, no matter your situation. Besides, quitting and relaunching a misbehaving app, wait or no wait, is the universal first-line palliative.
There’s a warning in red type by an item in the Purchased list
I’ve only ever seen this once, and it was several years ago. I have no idea whether it’s still an issue because I can’t fake a problem that might trigger it. If you get a warning right within the Purchased list about a download error (or something else—again, my experience here is limited) for a specific item, and you redownload the item and everything is fine but the warning stays, here’s how to get rid of it: Choose Store > View My Account, scroll to the bottom of the screen and click the Reset button for Reset All Warnings for Buying and Downloading.
Quick Tips
Here are some tips for working in the App Store app:
- “Reinstall” a macOS app: You see a reference to a Safari update—or Photos, or Mail—and realize that you’re a version behind, but can’t find an update for it? That’s because they, like other macOS apps (they’re listed here) are automatically updated when you update the operating system.
- Find a macOS installer: You won’t see macOS installers for macOS 10.12 Sierra or later in your Purchased list—unless it’s one that you haven’t yet downloaded—but they are available. If you need one, use the search field to find macOS installers, typing macos high sierra, for instance.
- Go to previous “screens” in the App Store: As you browse around for the latest offerings, you can easily move through screens you’ve already viewed. Click the Back and Forward buttons at the left of the toolbar, or use Command-[ and Command-] to trigger the commands in the Store menu.
- The App Store is checking your Applications folder: Check your Purchased list, and you’ll likely find a variety of buttons for the listed items, based on each app’s status: Download, Install, Open, or Update. I always thought the App Store app was merely keeping track of what I had done thus far with each item. But, no! Drag an installed app out of your Applications folder, and its button in the Purchased list reverts to Install. You may need to choose Store > Reload page to see this effect, but it’s automatically updated when the App Store app is relaunched. Put the app back in the Applications folder and its button in the Purchased list goes back to Open (or to Update, if that’s the status). This is equal parts convenient and creepy. Presumably, this works only if the item is still available in the Mac App Store, but I haven’t been able to test for that.
- Store credit: Your store credit is displayed under Quick Links next to the Account label when you’re in Featured, Top Charts, or Categories view. You can also check it by choosing Store > View My Account, where it’s at the bottom of the screen. Note that it’s the “Apple ID Balance,” not the “App Store Balance”: this is the same credit that shows in the iTunes Store and the iBooks Store.
- Outdated-app icons: On a related note, if an app (from the App Store or elsewhere) can’t run under the macOS version you’ve installed, its icon changes to include the slashed-circle international symbol, meaning “This app won’t run under your current system.”
Do you have any tips to share for the Mac App Store? Let us know in the comments. And for bonus points, how many of the above icons can you identify?


I never realized cmd-[ and cmd-] were the back and forward commands. Obviously, checking the menu would have revealed it. I never got cmd-left and cmd-right (which I use in every browser) to work so I just assumed Apple had somehow chosen not to include keyboard shortcuts.
Now if only there were a simple way to get cmd-left and cmd-right to work in the MAS. Safari obviously supports both. I wonder why the MAS doesn’t. On my US keyboard, cmd-left/right is much easier to use than cmd-[/].
One more thing in case any readers wonder. A MAS app doesn’t absolutely have to be in /Applications for the MAS to know it’s installed on your system. If it’s in the path somewhere below /Applications/ that’s good enough. So for instance, you can move MAS downloads to subfolders in /Applications and the MAS will still recognize they’re installed on your system.
I try to stay away from the Mac App Store as much as possible. Apps purchased on the MAS can’t be updated as frequently as those bought direct from the vendor so you are more vulnerable to a security problem with MAS apps. I also feel that the vendor gets more income by not having to pay Apple’s 30%+ “tax”.
That has not been my recent experience. I don’t remember the last time I became aware of an app update when it wasn’t immediately available from the MAS, including the last two that were widely publicized security updates. Apple appears to have streamlined its process for approving updates.
Yes, though cmd-left and cmd-right are inconsistent, so I never use them for navigating pages. If you’re in a text box they (quite rightly!) move the cursor to the beginning or end of the line. Cmd-[ and cmd-] always work, and are standard shortcuts for previous/next page in all sorts of browsing views and apps.
Out of interest, where are the [ and ] keys on the US keyboard? On the UK one, they’re above ’ and \ and so very convenient for one-handed combination with the right cmd-key. I actually find the arrows a lot more awkward, as they’re too close, so I have to scrunch my hand together to get my thumb on the cmd-key and a finger on one of the arrows.
I’ve never encountered any inconsistencies, apart from MAS breaking cmd-left/right. For beginning and end of line I always use ctrl-a/e as is basically standard in the UNIX world (Emacs).
[ and ] are to the right of the “P”
Diane
App updates tend to take longer on the MAS since Apple has to approve them, but perhaps this has improved recently (it certainly has on iOS).
I got into the cmd-left/right habit back on classic Mac OS, and even on OS X for many years using Unix shortcuts were inconsistent because they weren’t supported in Carbon apps. But in any case, you will find that if you’re in a text box in Safari, cmd-left will take you to the beginning of the line, and not the previous page. Maybe you’ve never used the keyboard to go back a page when in a text box (which is admittedly not a common occurrence!)?
No, sure, I’ve definitely also noticed that. I usually just tab out of the text box and then cmd-left/right will work as expected.
A problem is if there are many text boxes and tab just moves the cursor to the next of many. Of course shift-tab moves the other way. Fortunately, once you’ve moved the cursor to the address bar (easy to notice since it highlights) esc will get you out of editing mode and cmd-left/right will do what you want.
Hey Simon,
Keyboard Maestro allows users to “coax” the macOS into working more the way they want it to.
Creating a couple of macros to “alias” the backward and forward keyboard shortcut is a walk in the park.
I’ve used it since v1 came out in 2004.
-Chris