Photo by Apple
Catalina’s Sidecar Turns an iPad into a Second Mac Monitor
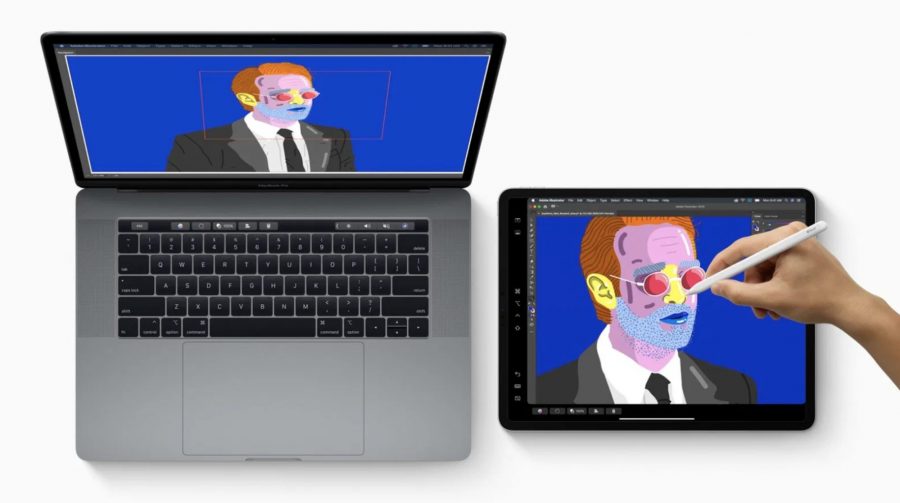
One marquee feature in macOS 10.15 Catalina is Sidecar, which enables the use of an iPad as a second Mac monitor. That is handy for extending the Mac desktop to gain added workspace, or for mirroring a Mac’s desktop on a second screen to share information with others more conveniently.
Turning an iPad into a secondary display is not a new idea. Third-party software, such as Duet Display and Air Display, has turned iPads into Mac monitors for years. AstroHQ even came up with a hardware approach, in the form of its $69.99 Luna Display dongles for Mac, to provide better performance and reliability (see “Luna Display Turns an iPad into a Responsive Mac Screen,” 7 December 2018).
AstroHQ recently lamented that it had been “Sherlocked” by Apple and Sidecar, but insisted it was still in the game. Indeed, the Luna can do things Sidecar cannot. Most recently, AstroHQ announced a Mac-to-Mac mode for Luna Display that can turn one Mac into a second display for another. That’s something TidBITS has been interested in for years—see “Build Your Own 23-inch MacBook” (5 February 2007) and “Tools We Use: Teleport” (27 August 2007)—and we hope to evaluate Luna Display’s Mac-to-Mac mode soon.
Apple’s Sidecar feature, though, is free (assuming users already have all the hardware pieces). The fact that it’s built into macOS means it may relegate some third-party competitors to niche status (or the pursuit of other markets, such as Windows and Android.)
With Sidecar, Apple mostly delivers on its promise to readily transform an iPad into a Mac screen with little fuss and a grab bag of unique capabilities. Be warned, though, that Sidecar is still a bit rough around the edges, so expect to see glitches.
Attaching the Sidecar
Sidecar isn’t for everyone, thanks to stringent hardware requirements. You need a Mac with a Skylake processor or newer running Catalina—this leaves out plenty of older Catalina-ready Macs—along with an Apple Pencil-compatible iPad, which also must be running iPadOS 13.
Sidecar works over a wired or wireless connection. Tethering the tablet to the Mac via a USB-C or Lightning cable provides the best performance and reliability. The wireless option isn’t bad, though—when it works at all.
For a wireless connection, your Mac and iPad must be using the same iCloud account. Both devices must have Bluetooth, Wi-Fi, and Handoff (in Settings > General > Handoff) enabled. In wireless mode, Sidecar uses Bluetooth for initial iPad detection and a point-to-point hookup for data transfers once connected, with an effective range of about 10 feet (3 meters).
If the wireless mode doesn’t work for you, try a physical cable. I resorted to this approach on a number of occasions when the wireless option inexplicably failed me. The USB-C or Lightning cable must connect directly to a Mac, not indirectly via a hub.
Regardless of the connection method, to begin using Sidecar, click the Display icon in the menu bar, and choose your iPad from the menu. The Mac’s screen will blink momentarily, and then the iPad’s screen will be replaced by an extension of the Mac desktop, just as you’d expect.
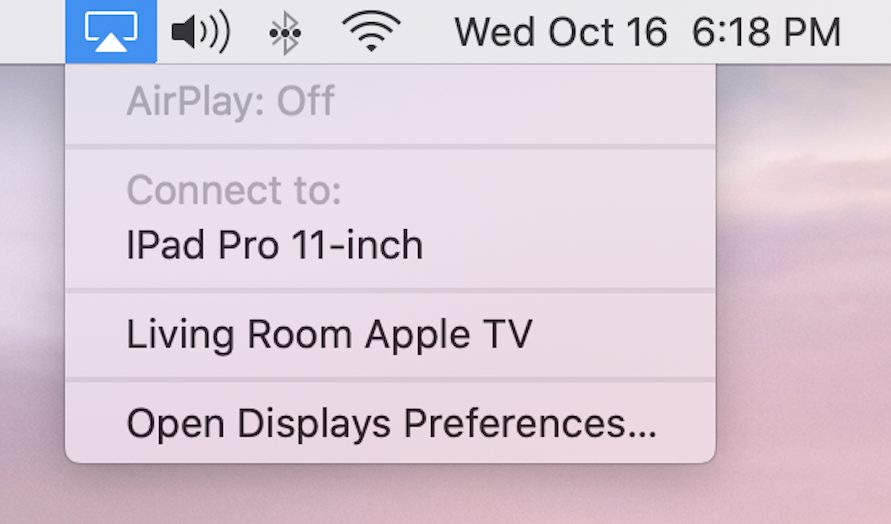
If that doesn’t work, open System Preferences > Display, and make sure that your iPad is the designated AirPlay display via the pop-up menu at the bottom.
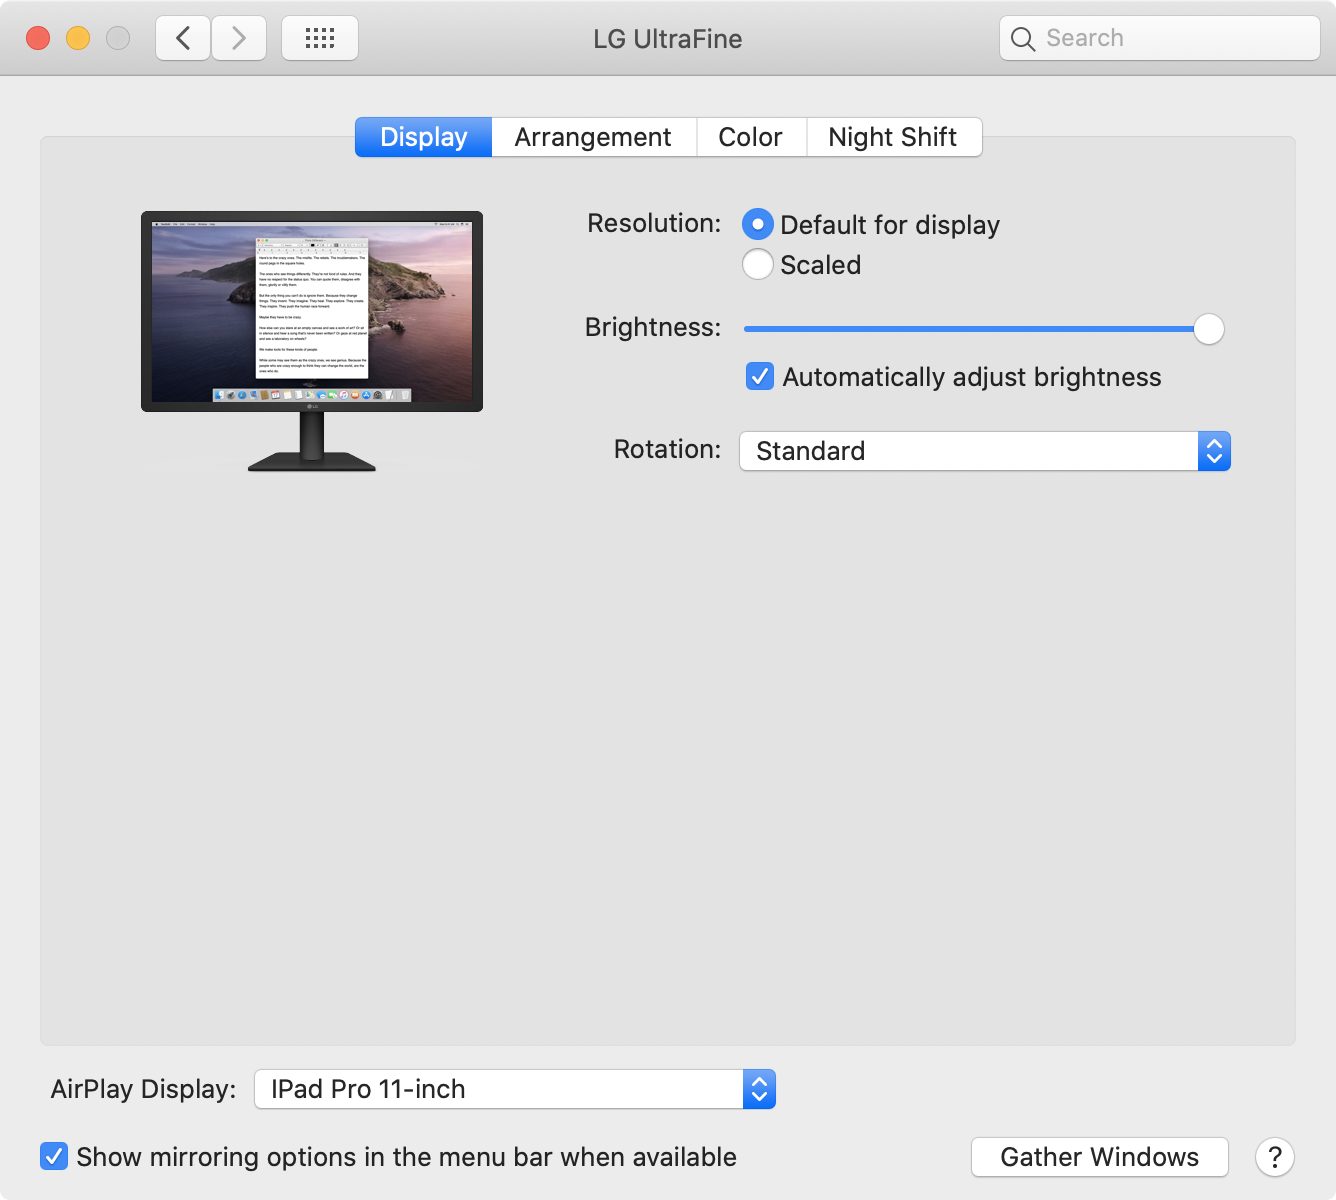
Once everything is set up properly, you can use the iPad with your Mac just as you would any dual-display setup. For instance, in System Preferences > Display, you can turn screen mirroring on and off or adjust how your Mac and iPad displays are arranged in relation to each other.
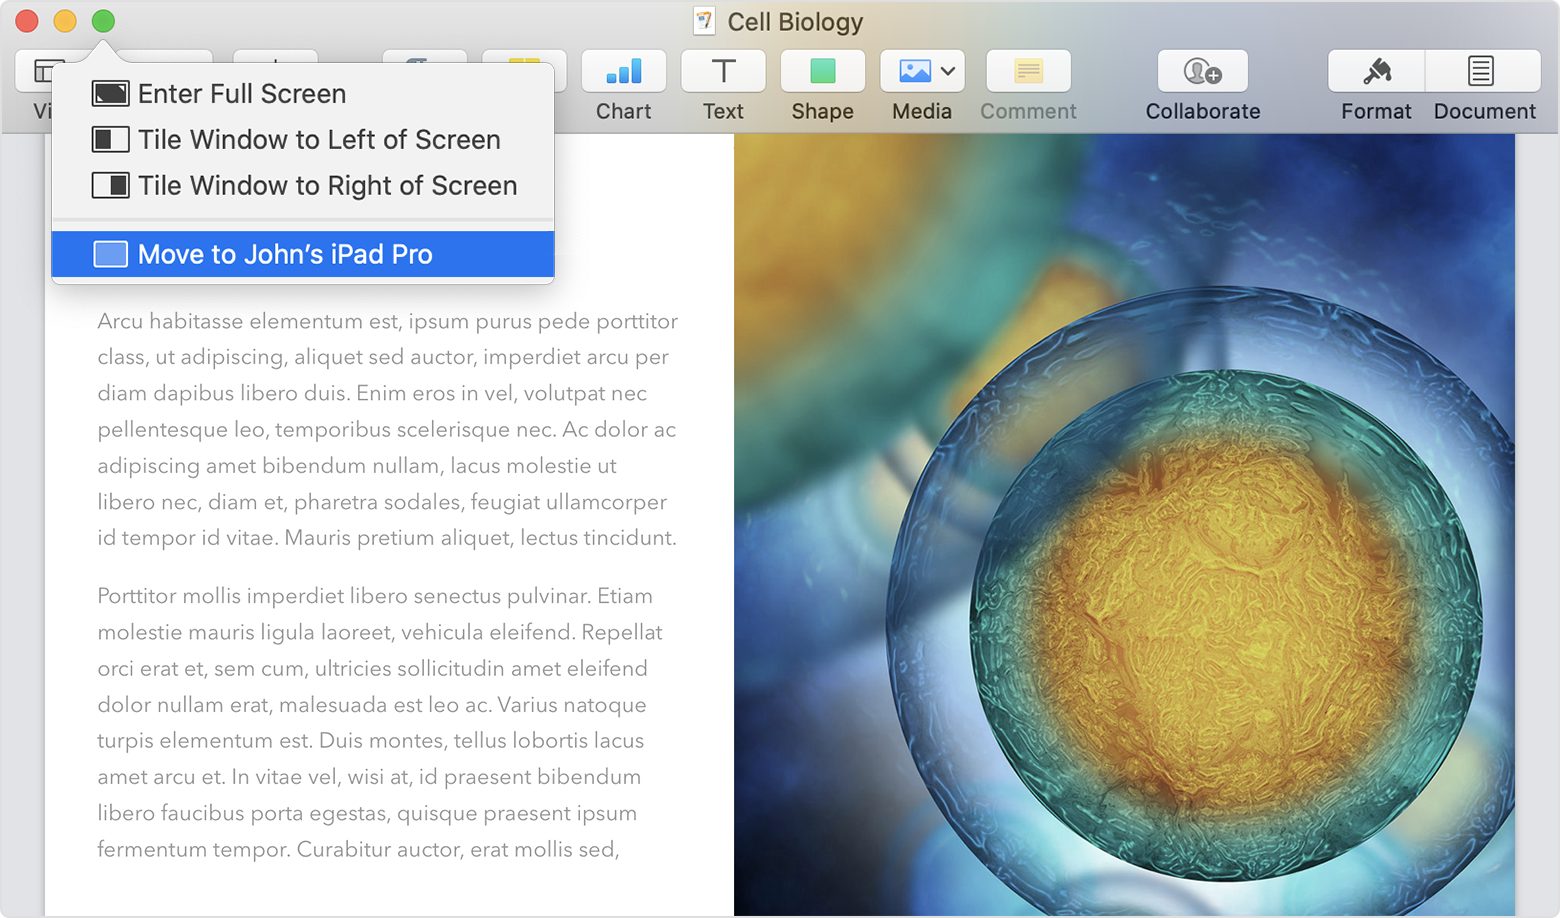
Now you can decide which apps appear on the iPad screen. This can be as simple as dragging windows from one display to the other. Better yet, click the Window menu available in many apps, and you’ll see an option to move windows with one click: Move to iPad or Move Window Back to Mac, depending on which device contains the window. Some apps lack a Window menu, but similar window-moving options appear when you hover the Mac’s pointer over the window’s green zoom button.
Special Sidecar Features
Sidecar offers several unique features that make it interesting if a bit quirky. For instance, the iPad Sidecar’s tablet interface displays two optional control strips—one running horizontally on the iPad display, the other vertically—that respond to finger control.
The horizontal strip, called the Touch Bar, should be instantly familiar to anyone who has used the physical Touch Bar on a MacBook Pro, and it looks and works much the same. Different control options appear depending on which app you are using, just as on the MacBook Pro. The physical Touch Bar has received lukewarm reviews, and I’m not sure the Sidecar equivalent will be any more popular, but some people might like it.

The vertical strip, called the Sidebar, does a number of things:
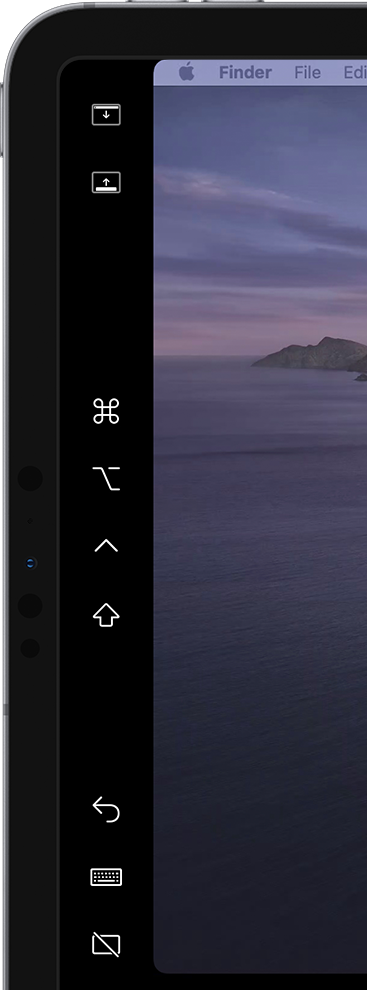 The top two buttons show or hide the Mac menu bar on the iPad screen when a Mac app is in full-screen mode and shift the Dock between the Mac and iPad screens.
- In the middle of the strip is a quartet of modifier keys: Command, Option, Control, and Shift. These are mostly for specialized users, like artists who need to engage a modifier key with one hand while using an Apple Pencil with the other. Apple provides an example:
While sculpting a model in ZBrush, an artist can use the modifier keys in the sidebar to zoom, rotate, and pan around their model as they draw with Apple Pencil. Double-tapping a modifier key will keep it active, allowing more prolonged work without the need to hold it down. An additional tap will deactivate the key.
- At the bottom of the Sidebar are an Undo button, a Keyboard button to show and hide a small floating keyboard (which appears to be the stock iPadOS 13 virtual mini-keyboard), and a Disconnect button to end a Sidecar session.
You can configure these control strips in System Preferences > Sidecar. It lets you toggle the Sidebar and Touch Bar on or off. It also enables you to move the Sidebar to the left or right of the screen, and put the Touch Bar on the top or bottom. The pane also lets you initiate or end a Sidecar session, as an alternative to using the Display menu in the menu bar or the Disconnect button on the Sidebar.

Honestly, I never found the Sidebar or Touch Bar particularly useful, and mostly kept them hidden to maximize the usable screen real estate on the iPad.
Using the Apple Pencil
Sidebar and Touch Bar aside, you largely can’t use the iPad via finger input during a Sidecar session, which is confusing since the iPad is fundamentally a touch-driven device. For the most part, you’ll use the mouse cursor on the iPad screen, like any other display.
There are a few ways of interacting with Mac apps on Sidecar using your fingers. Use vertical two-finger swipes to scroll through long Web pages and documents. When you are working in text documents, you can use iPadOS 13’s three-finger actions to copy (pinch), cut (pinch twice), paste (pinch out), undo (swipe left or double-tap) and redo (swipe right), much as you would using native iPad apps.
Sadly, inconsistent fingers-on-iPad responsiveness kept me from relying on these actions in Sidecar as routine alternatives to Mac mouse and keyboard input.
If you have an Apple Pencil, you can also use it to tap Mac interface elements on the iPad screen and to control pointer and cursor positioning. Swiping with the Apple Pencil selects text.
As with finger input, I found Apple Pencil support to be unreliable. Sometimes it worked, but it often failed, for reasons I couldn’t discern. I gave up and relied on my Mac input devices most of the time.
Sidecar also supports several everyday tasks via Continuity features, which work independently from Sidecar. One of these, Continuity Sketch, lets you sketch with an Apple Pencil on your iPad and insert the sketch into a Mac document. Similarly, Continuity Markup lets you sign Mac documents, correct papers, or circle details in images using an Apple Pencil on the iPad.
More sophisticated Apple Pencil actions are possible when using Sidecar with a variety of third-party apps—including productivity apps, such as BusyCal, Evernote and PDFpen, as well as apps for drawing, design, and photo or video editing, such as Adobe Illustrator, Affinity Photo, Final Cut Pro and Pixelmator Pro. Note the ZBrush example above.
A double-tap on the side of the Apple Pencil 2 engages particular features in some apps. If this is the case with apps you are using, enable double-tap functionality via the Sidecar pane in System Preferences. Otherwise, keep it deactivated.
Other Features
Here are a few other Sidecar features and quirks to keep in mind:
- Sidecar and iPadOS: Sidecar doesn’t prevent you from using iPadOS when Sidecar is engaged. Swipe up from the bottom of the iPad screen, and the Home screen reappears, with a Sidecar icon on the far right of the iPad’s Dock. Tap the icon to re-engage Sidecar. You can even have iPadOS Slide Over windows floating atop Sidecar—just swipe left from the right side of the iPad screen. (Apple claims you can position Sidecar and an iPad app next to each other via Split View, but I couldn’t get this to work.)
- Sidecar with other external displays: Sidecar supports only one iPad at a time. However, it has no problem working in tandem with a conventional secondary monitor that is also hooked up to the Mac, for a total of three active screens operating as a single, extended display.
- Limited display settings: You can’t change display scaling and color profiles on the iPad. My 11-inch iPad Pro’s screen is stuck at a pixel-doubled resolution of 1116-by-756 on the Mac (which doesn’t look bad), compared to the IPad’s native resolution of 2388-by-1668 pixels.
- Sidecar and external keyboards: Although it’s possible to use Sidecar’s cramped on-screen keyboard, it’s not suitable for extended interaction, and the full system keyboard is not available. You can use an external keyboard, such as Apple’s Smart Keyboard for the iPad, perhaps when moving away from the Mac and using your iPad and Sidecar on the couch. Prepare for wonkiness, though. I’ve already noted issues with finger and Apple Pencil screen interaction that would cripple such work sessions even with an attached keyboard. Also, Command+Q does not work with a physical keyboard. Command+Tab during a Sidecar session does not bring up the Mac’s app switcher, as you might expect, but the iPad app switcher. Command+Space won’t open Spotlight on the Mac, which would make the most sense during a Sidecar session, but iPadOS search.
Sidecar Upshot
Sidecar does not yet match third-party alternatives feature for feature, as Luna Display maker AstroHQ takes pains to note. But the fact that Sidecar is free and built into the latest version of macOS and iPadOS means it automatically has a broad audience.
Apple has aspired to make Sidecar dead simple to use, which adds to its appeal. It largely succeeds in its goal of transforming an iPad into a Mac screen.
But, as I discovered, the technology is still glitchy and unreliable. Feel free to give it a try, but temper your expectations for now.
If you want to use Sidecar with an unsupported Mac, it may be possible (if slow).