Apple Enhances HomeKit with Sensor-Based Automations and Timed Turn Offs
Before I wrote Take Control of Apple Home Automation, I documented here in TidBITS how I set up my dehumidifier to turn on automatically whenever the humidity in our underground TV room rose to an unacceptable level (see “A Prairie HomeKit Companion: The Elgato Eve Room” 19 June 2017). In short, my Eve Room monitored the humidity level, and I set up an automation to turn on an Eve Energy outlet connected to our dehumidifier. At the time, the problem was that Apple’s Home app didn’t recognize the Eve Room as a sensor for automations, so I had to jump through some convoluted hoops with Eve’s HomeKit app.
While finally updating the book (waiting for the Matter partnership to materialize might not have been the best move; see “Home Automation Standard Gets an Official Name,” 17 May 2021), I took the opportunity to revisit that automation and take advantage of some subtle yet important changes to the Home app. In iOS 15.1, Apple finally made it so sensor-based automations could be triggered based on air quality, humidity, or light level (see “Apple Releases macOS 12 Monterey with iOS 15.1, iPadOS 15.1, watchOS 8.1, tvOS 15.1, and HomePod Software 15.1,” 25 October 2021).
With the right sensors, this new capability can open up a world of possibilities, and if you have a lot of HomeKit accessories, you may have more sensors than you realize.
The Hidden Sensor
In my old setup, I used an Eve Room to monitor humidity. It does other neat things, too, like track air quality and temperature. There’s only one problem: I can’t find it. It’s small, has little buttons and a screen, and has to be put in a prominent place, so my best guess is my kids started playing with it and left it somewhere.
Thankfully, while exploring Automation settings, I discovered that my Ecobee thermostat has a secret humidity sensor. The thermostat doesn’t appear as an accessory in the Home app, but I can query Siri about the humidity in my kitchen, where the Ecobee thermostat is installed, and it shows up as a sensor for automations, as you’ll see in the next section. It’s not in the same room as my dehumidifier but only a few feet away. Plus, it runs off my HVAC system’s power instead of a battery, so that’s one less thing to worry about. And since it’s attached to the wall, my kids won’t mess with it.

So before you go buying new sensors for automations, it’s worth checking in the Home app to see if you have sensors you didn’t know about.
Creating a Sensor-Based Automation
With all that out of the way, recreating my old automation was simple. If you’d like to do something similar, here’s how.
Open the Home app on an iPhone, iPad, or Mac, tap the + icon (below left), tap Add Automation, and then tap A Sensor Detects Something (below right). (If that option is grayed out, you don’t have any sensors available.)
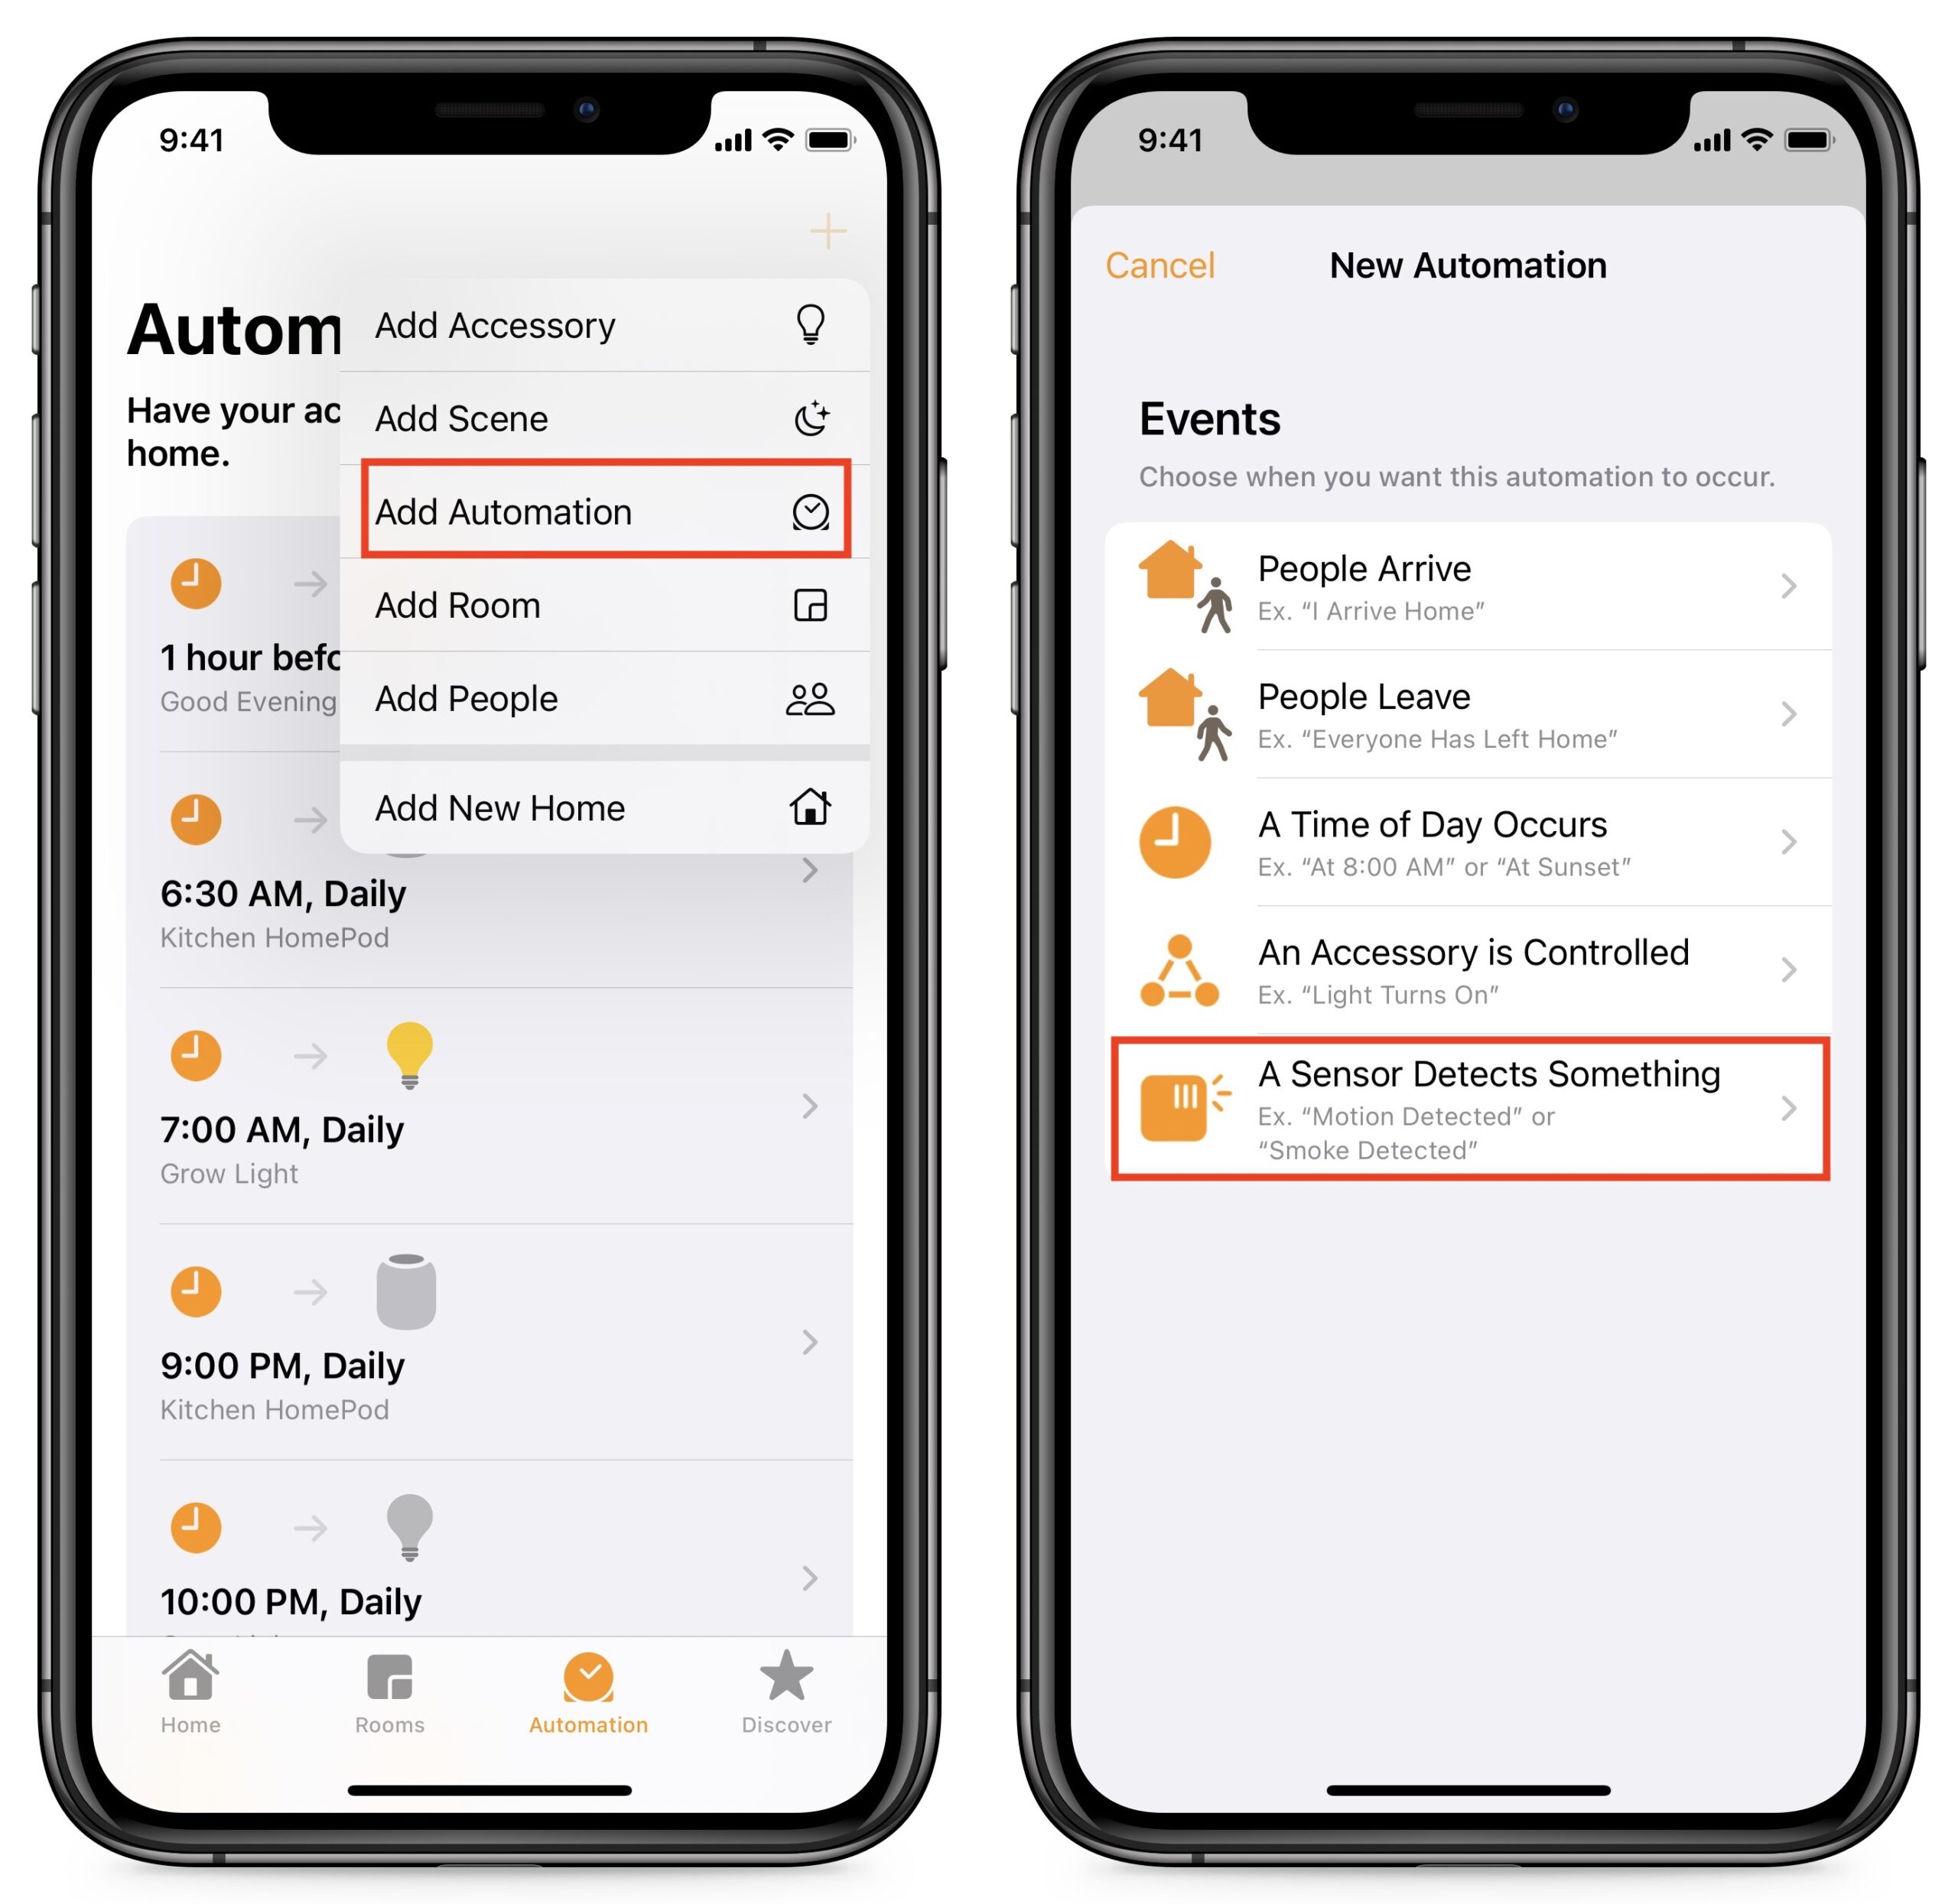
The next screen displays the available sensors in your home. Not all are well labeled—as you can see in the left screenshot below—so you have to learn how to read the icons:
- Thermometer: Temperature
- Green person: Motion
- Orange person: Occupancy (similar to the motion sensor, but less sensitive)
- Water drop: Humidity
- Wavy lines: Air quality
Tap a sensor to select it; you can choose only one sensor per automation. Tap Next to set up how to trigger the automation (below right). The details vary for every type of sensor, but they should be easy to understand. For instance, you can set a motion sensor to trigger based on whether or not it senses motion. For humidity, you can set a humidity percentage and then set the automation to trigger if it rises above or drops below that percentage.

At the bottom, you see settings for Time and People, which let you fine-tune the automation. Time lets you set times when the automation can trigger. By default, that’s any time, but you can set it for day, night, or specific hours. The People setting lets you trigger an automation based on who is home.
I used to caution users about the People setting because it didn’t work well in situations where cellular service was weak or nonexistent, like my house. That has improved since iOS 14, so I use it more now, primarily with low-impact automations like setting my cameras to record only when we’re out of the house. However, remember that Apple’s definition of “people” in this case is iPhone users in your Family Sharing group, so you still have to be careful. For instance, if we set it so the lights would turn off when we left home, heading out for date night could leave the babysitter and our kids in the dark.
Once you have the criteria set, tap Next for a screen of all the scenes and accessories that the automation can trigger (below left). Tap those you want to include. Don’t worry yet about specifying what the accessory will do. After you have selected all the right accessories, tap Next, which brings you to the final screen (below right).
On the last screen, you can tap the top field to rename the automation, but most importantly, pay attention to the accessory tiles, which let you set what they do. For most accessories, a tap sets them to turn on or off. As with normal accessory control, you can long-press (or Control-click on the Mac) to fine-tune actions.
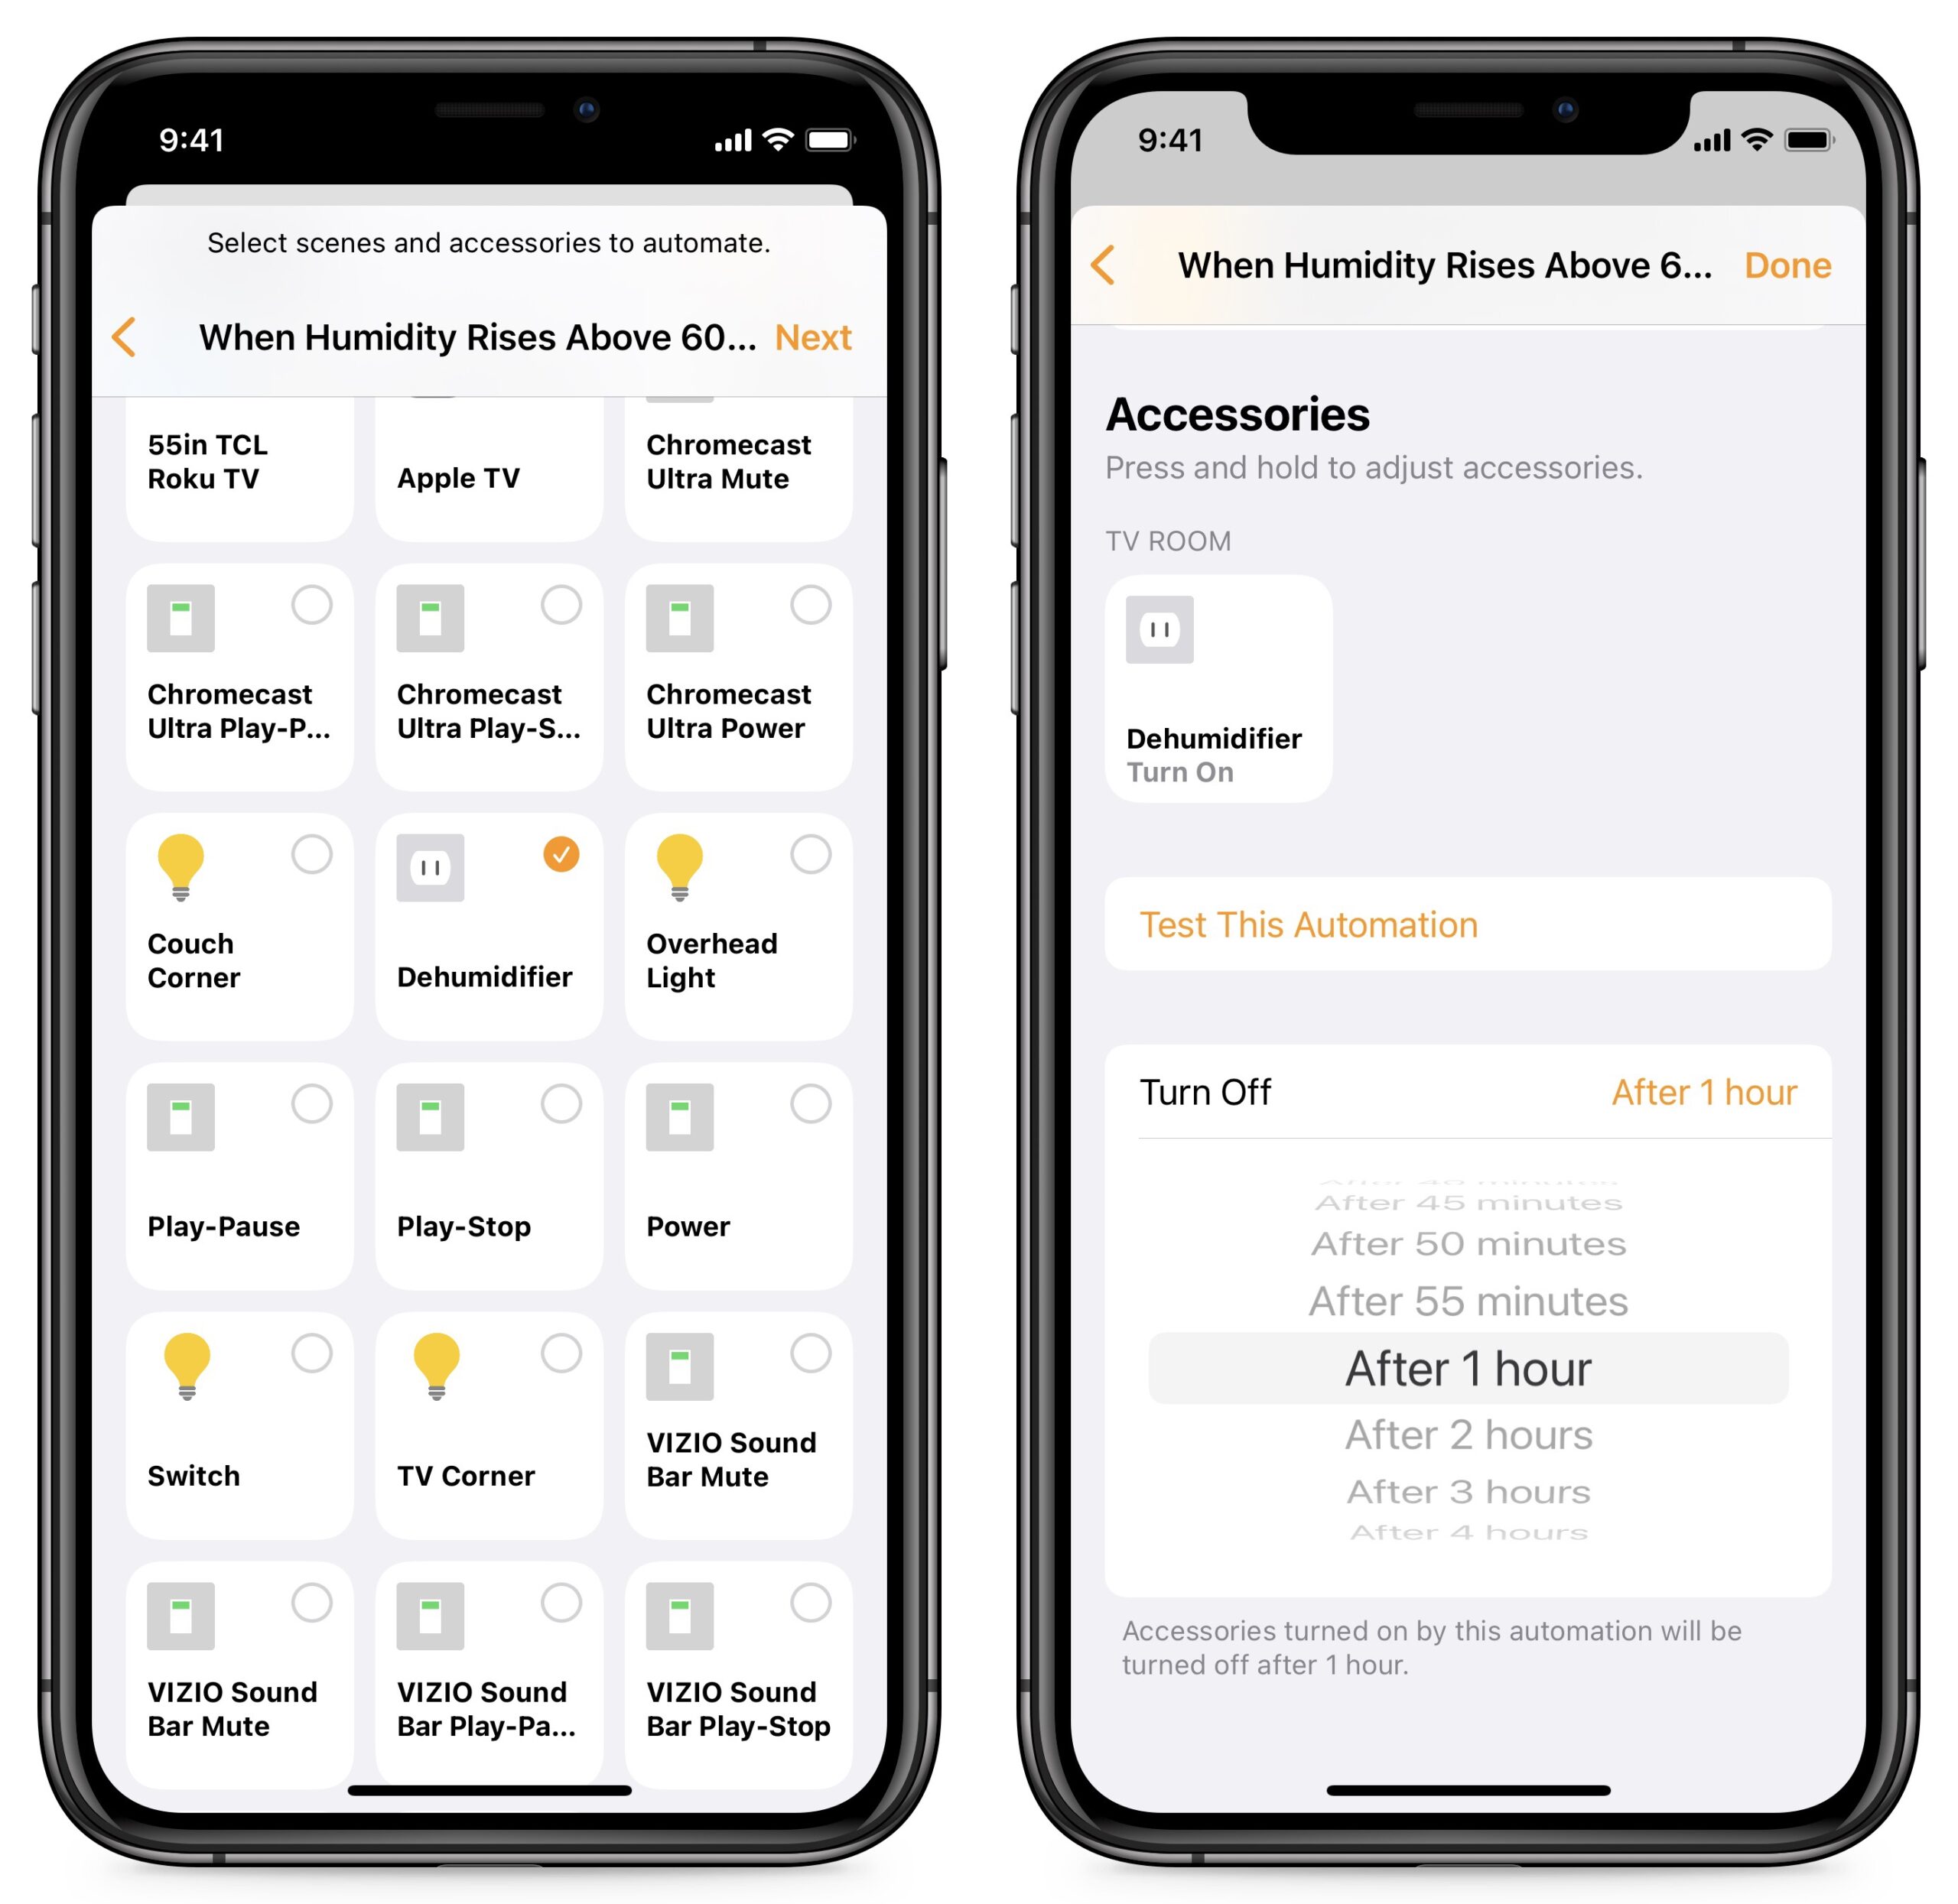
Automatically Turn Off Automations
I want to call your attention to another automation improvement that you’ll find at the bottom of this final screen: Turn Off, another worthwhile enhancement that Apple has made to HomeKit automations. After an automation turns on an accessory, the Turn Off feature enables it to turn the accessory off after a specified length of time.
Turn Off turns out to be useful in many contexts. Let’s say you want a motion sensor to turn on a light at night when you stumble out of bed to go to the bathroom. Previously, there was no simple way to turn that light off, but now the automation can automatically turn it off after a few minutes.
I’m using that setting to further streamline my dehumidifier system. Previously, I had set up two automations: one to turn the dehumidifier on once the humidity rose to a certain level and another to turn it off after the humidity dropped below another level. Now, instead of the second automation, I can set the dehumidifier to turn off after an hour. If the humidity is still high, it’ll kick back on.
Helpful as timed Turn Off is, it reveals a gap in the Home app’s capabilities. What we really need is for automations to be able to turn themselves off in the same ways they turn themselves on. So, for humidity, it could turn on when the level rises above 60% and off when it drops below 40%. Or, an automation triggered by a motion sensor could turn off a set number of minutes after motion is no longer detected.
In any case, I’ve hopefully given you some ideas for how to take more advantage of HomeKit in your home.
Thanks Josh. I will dig out my old Wemo motion sensor and see if I can combine it with a Cygnet smart power outlet. I had this working several years ago with a Wemo power outlet but found the Wemo system (bridge/power outlet) was unreliable. In any case, Wemo withdrew from the Australian market.
I think the timed “turn off” feature has been available for a couple of years but it only pops up as an option if you set an accessory to turn on in an Automation so is easy to miss.