How to Securely Erase a Mac’s SSD or Hard Drive
Over on TidBITS Talk, user Lucas043 posed a question that prompted a fascinating discussion. Lucas043 has a Samsung Portable T7 SSD being used for backup. The SSD has intermittent access problems and is still under warranty, so it could be returned with no problem, but it contains sensitive client data. Lucas043’s question: What’s the most secure way of erasing the drive?
There are multiple answers to this question, but not all may be appropriate for a drive that’s being returned under warranty. Others may be perfect if you want to erase an SSD or hard drive securely but have different goals for the drive afterward.
It’s also worth considering what you think “securely” should mean. Do you want to prevent someone from recovering the files with off-the-shelf software? Are you concerned that a company like DriveSavers could extract the chips or attach new controllers? Do you worry about a government-level agency reconstructing the data?
Let’s go through the possibilities.
Destroy the Drive
The simplest way of ensuring that no one could ever read the data on an SSD is to don some eye protection and hit it repeatedly with a hammer. That’s quick, effective, and satisfying, but it does present a problem when trying to return the drive under warranty. Samsung probably doesn’t cover SSDs that come back in numerous small bits. Of course, you must physically destroy the chips inside the SSD, so make sure they’ve been thoroughly smashed.
With a hard drive, a hammer would have a similar effect, though you would want to make sure you damaged the actual platters, which is best done by drilling several holes in them. I recently did this for some elderly friends with a few old drives and a dead Mac mini (see “Helping Senior Citizens Reveals Past Apple Lapses and Recent Improvements,” 24 June 2022).
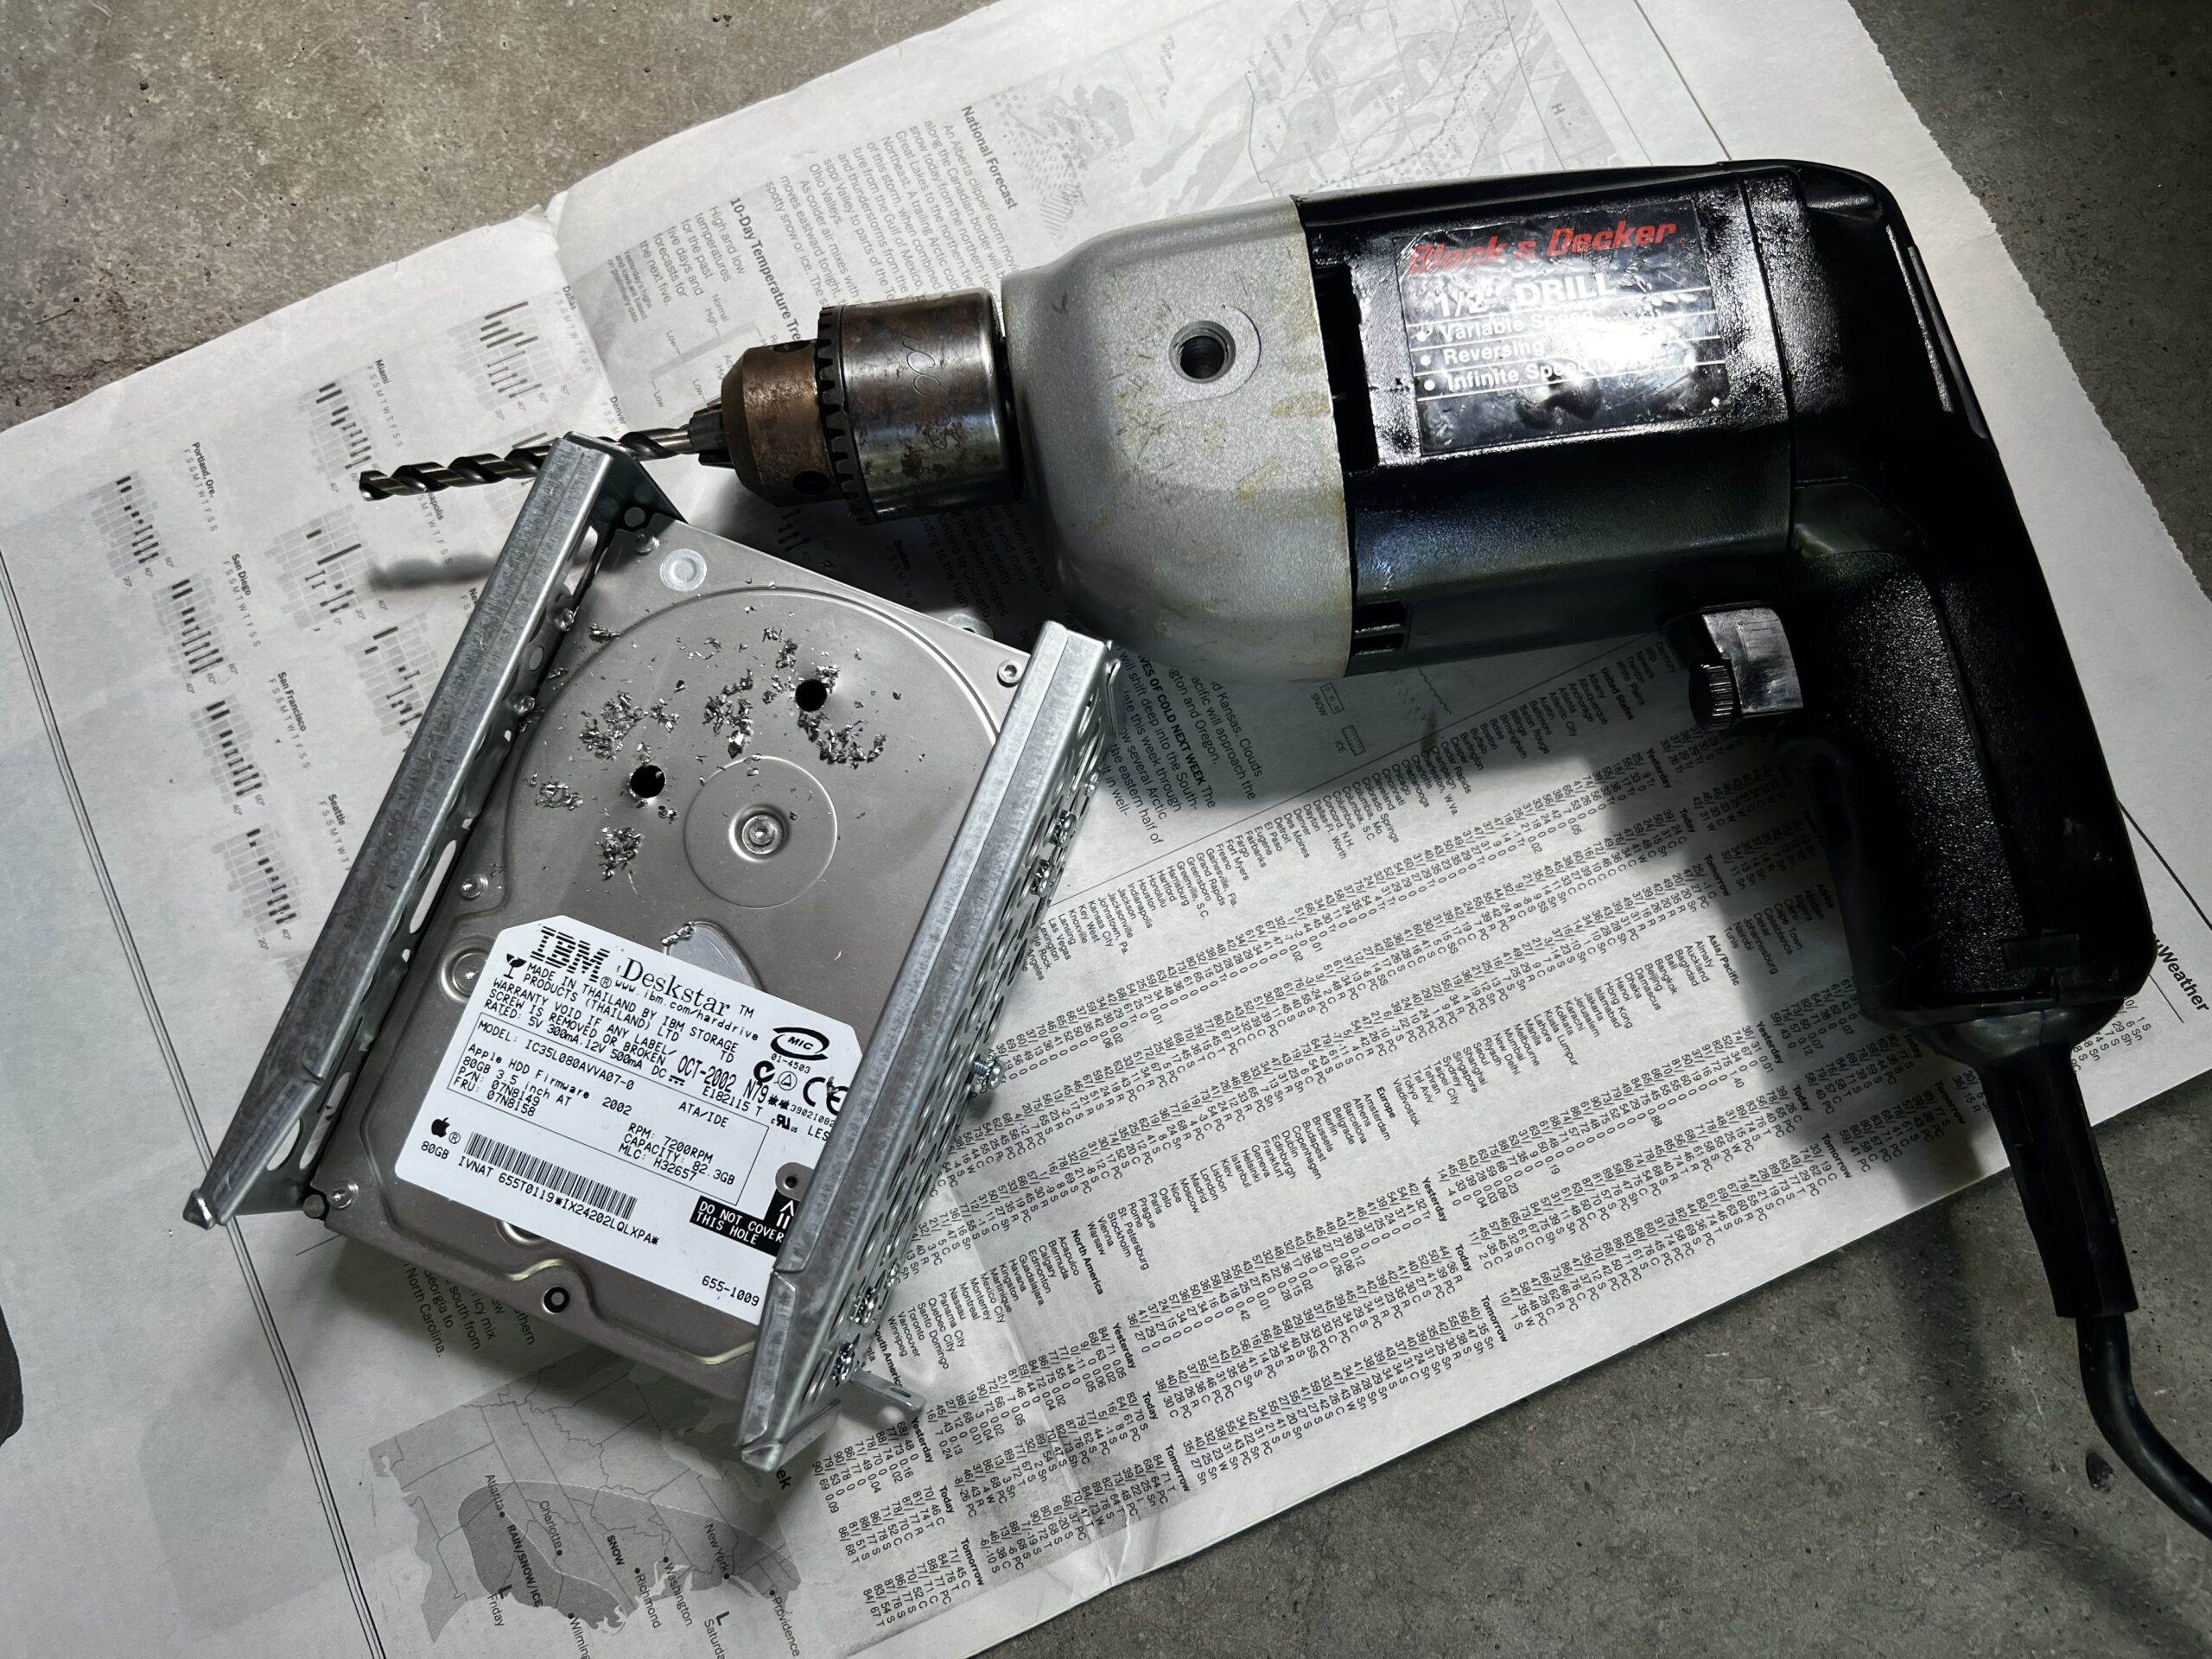
If you’re concerned about government-level extraction, drilling holes in a hard drive might not be sufficient. For that, a degausser would be more effective, or you could open the drive, remove the platters, and destroy their surfaces with sandpaper or something abrasive. There are also shredders that can eat drives, but these and degaussers are mostly appropriate for IT departments that have to decommission numerous drives containing sensitive information.
For normal people, once you’re done destroying your drive, take the remnants to an electronics recycling center in your area. When I did that, I winced when the guy who took the 2010 iMac and Cinema Display from me tossed them across the loading bay into a large bin. They were dead, of course, but still—Macs aren’t generally something that one throws.
Erase the Drive with Disk Utility
The most obvious way of erasing a drive is to select it in Disk Utility and click the Erase button. Disk Utility will unmount the drive, delete the directory that keeps track of which blocks are used by which files, and create a new directory. In other words, none of the data is actually being erased; all that’s disappearing are the pointers to the storage blocks where the data is located. No directory, no access to the data.

That’s fine if you plan to reuse the drive yourself or give it to someone you either trust or don’t believe could ever muster the technical know-how to recover data from the erased drive. Or, more realistically, it’s also sufficient if your data isn’t that sensitive.
However, a simple erase in Disk Utility won’t pass muster for those concerned about security. Some apps can scan the blocks of a drive and recreate the directory, enabling file recovery. Particularly if the drive could be scanned for data shortly after being reformatted, before new data has been written over the previously used blocks, you have to assume that even a relatively non-technical person could recover much of the data.
Secure Erase the Drive Using Disk Utility
The solution to the previous approach’s limitation may seem obvious: write random data and zeroes to every block on the drive during the formatting process. That way, no recovery software can read the data that remains behind after the directory has been deleted. Disk Utility makes this easy: select the drive, click Erase, and in the dialog that appears, click Security Options and choose how many passes of random data and zeroes it should write.
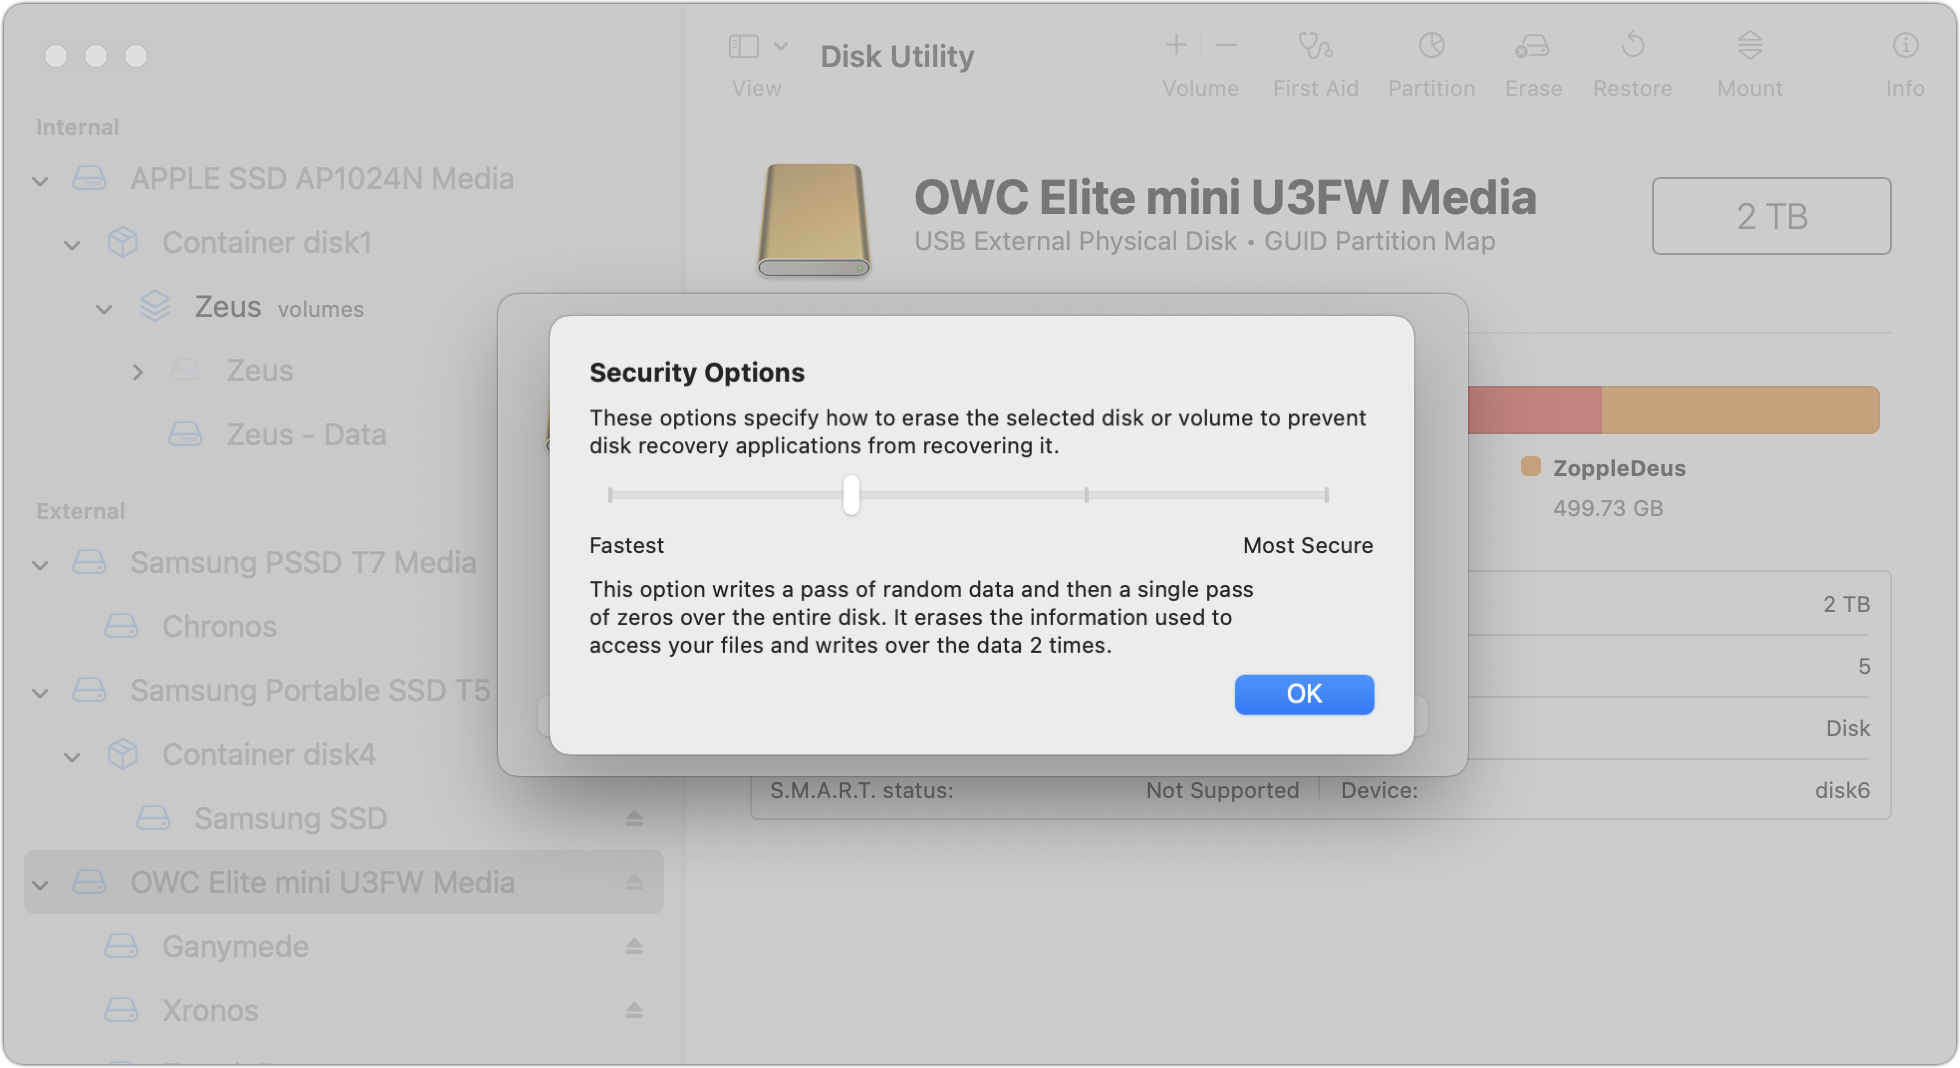
Apple describes the options well but doesn’t point out that the more passes, the longer the process. I’ve never tried a seven-pass erase, but it could take days to complete on a sufficiently large drive:
- Fastest; Not Secure: This option does not securely erase the files on the disk. A disk recovery application may be able to recover the files.
- Two-Pass: This option writes a pass of random data and then a single pass of zeros over the entire disk. It erases the information used to access your files and writes over the data two times.
- Three-Pass: This option is a DOE-compliant three-pass secure erase. It writes two passes of random data followed by a single pass of known data over the entire disk. It erases the information used to access your files and writes over the data three times.
- Most Secure; Seven-Pass: This option writes multiple passes of zeros, ones, and random data over the entire disk. It erases the information used to access your files and writes over the data seven times.
Beyond the time involved, there are some additional caveats.
First, the Security Options button shows up only when it’s appropriate to use. One practical upshot of that is that you must select a drive—not a volume—in Disk Utility’s sidebar before clicking Erase because volumes don’t use all the blocks on a drive. If you’re worried about security, you want to be sure that all the blocks have been zeroed out.
Second, data could remain on a drive after a secure erase, thanks to the automatic swapping of bad blocks for good ones. If a block goes bad, the controller swaps it for a good one on the fly. If you then erase the drive, only the replacement good block will be erased, potentially leaving sensitive data on the bad block. Only a highly capable outfit like DriveSavers or a government-level agency could conceivably retrieve the data, but it’s not inconceivable. Nor is there any way of knowing what would be in those bad blocks.
Third, the Security Options button is available only when you’re reformatting a hard drive, not an SSD. Here’s why (thanks to David C. for this explanation and a lot of the great detail in the TidBITS Talk discussion). For technical reasons beyond the scope of this article, there is no direct relationship between the logical data blocks that software (including macOS) accesses and the physical data blocks in the SSD’s flash chips. The SSD controller’s firmware (on an SSD’s circuit board or in a Mac’s Apple silicon processor or T2 chip) maintains a database that maps logical blocks to physical blocks.
When you write to an SSD and the logical blocks you’re writing to already contain data, the SSD controller doesn’t overwrite the corresponding physical blocks (again, for technical reasons beyond the scope of this article). Instead, it writes the data to new, unused physical blocks, changes the logical-to-physical mapping database, and marks the previously used physical blocks as “garbage.”
Garbage blocks are not accessible to software (they are not mapped to any logical blocks), but they still contain data that could theoretically be accessed by equipment designed to bypass the SSD controller by directly reading the chips or hacking the SSD controller’s firmware.
At some later time, the SSD controller will perform garbage collection, which erases these garbage blocks, making them available for reuse. The specific mechanism used for garbage collection and when it actually occurs depend on the firmware running in the SSD controller and will vary for different SSD brands and models. Depending on the drive’s firmware and your usage—garbage collection is usually done only when the drive is otherwise idle—garbage collection might not take place for hours or even days.
This is why a secure erase is considered unreliable when used on an SSD. The act of writing random data to every logical block guarantees that all the physical blocks with your real data will be marked as garbage and therefore be inaccessible by software, but it does not guarantee when those garbage blocks will be collected and erased. If you plan on disposing of the drive, you have no way to know if the garbage data was collected before you last disconnected it from power. Apple’s removal of the Security Options button when erasing an SSD is an acknowledgment that it’s not sufficiently secure.
Still want to perform a secure erase of an SSD? You can do so from the command line, using the diskutil command.
- Run
diskutil listto determine the identifier of the drive in question. You’ll need to parse through the results to find the desired drive. - Use something like
diskutil secureErase 1 disk3to erase the drive, after which you’ll need to repartition it in Disk Utility before using it again. The 1 in the command above is for a single-pass zero fill erase, but if you readman diskutil, you’ll see all the other options, including the excessive-sounding Gutmann algorithm 35-pass erase.
If you’re not comfortable with the command line, this isn’t the time to experiment. Even then, I’m going to recommend that you avoid this technique, partly because it’s conceivable you could mistype the drive identifier and erase the wrong drive, but mostly because Apple includes a strongly worded note warning against it:
NOTE: This kind of secure erase is no longer considered safe. Modern devices have wear-leveling, block-sparing, and possibly-persistent cache hardware, which cannot be completely erased by commands. The modern solution for quickly and securely erasing your data is encryption. Strongly-encrypted data can be instantly “erased” by destroying (or losing) the key (password), because this renders your data irretrievable in practical terms. Consider using APFS encryption (FileVault).
We’ll get to encryption next, but some have wondered if there’s a way to create a huge device-filling file that would fill all the blocks with data. Alas, that’s almost exactly the same as using diskutil secureErase, so while it will probably clean out most data, it’s impossible to know what will happen with garbage collection. Don’t waste your time.
Encrypt the Drive, Then Erase It
The real solution to this problem is encryption. The ideal scenario involves enabling encryption on a drive before you do anything else with it, such that all data written to the drive is encrypted. When you later erase the drive, the encryption key will be destroyed along with the directory, rendering the data unreadable even if someone at the level of DriveSavers or a government agency were able to extract the data spread across the drive’s blocks.
How you do this depends on whether you’re encrypting your Mac’s startup drive or an external drive:
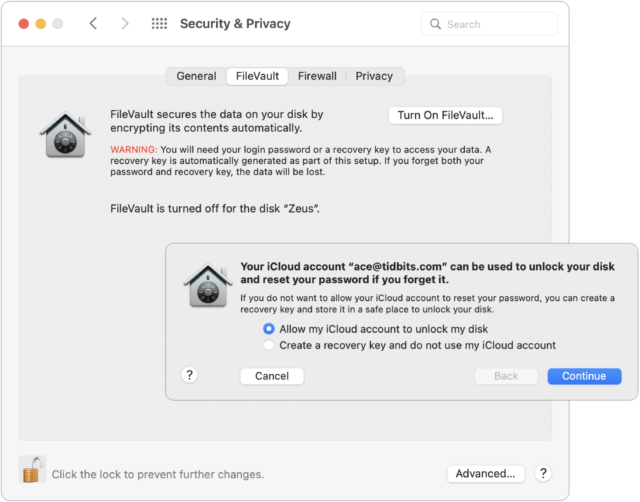
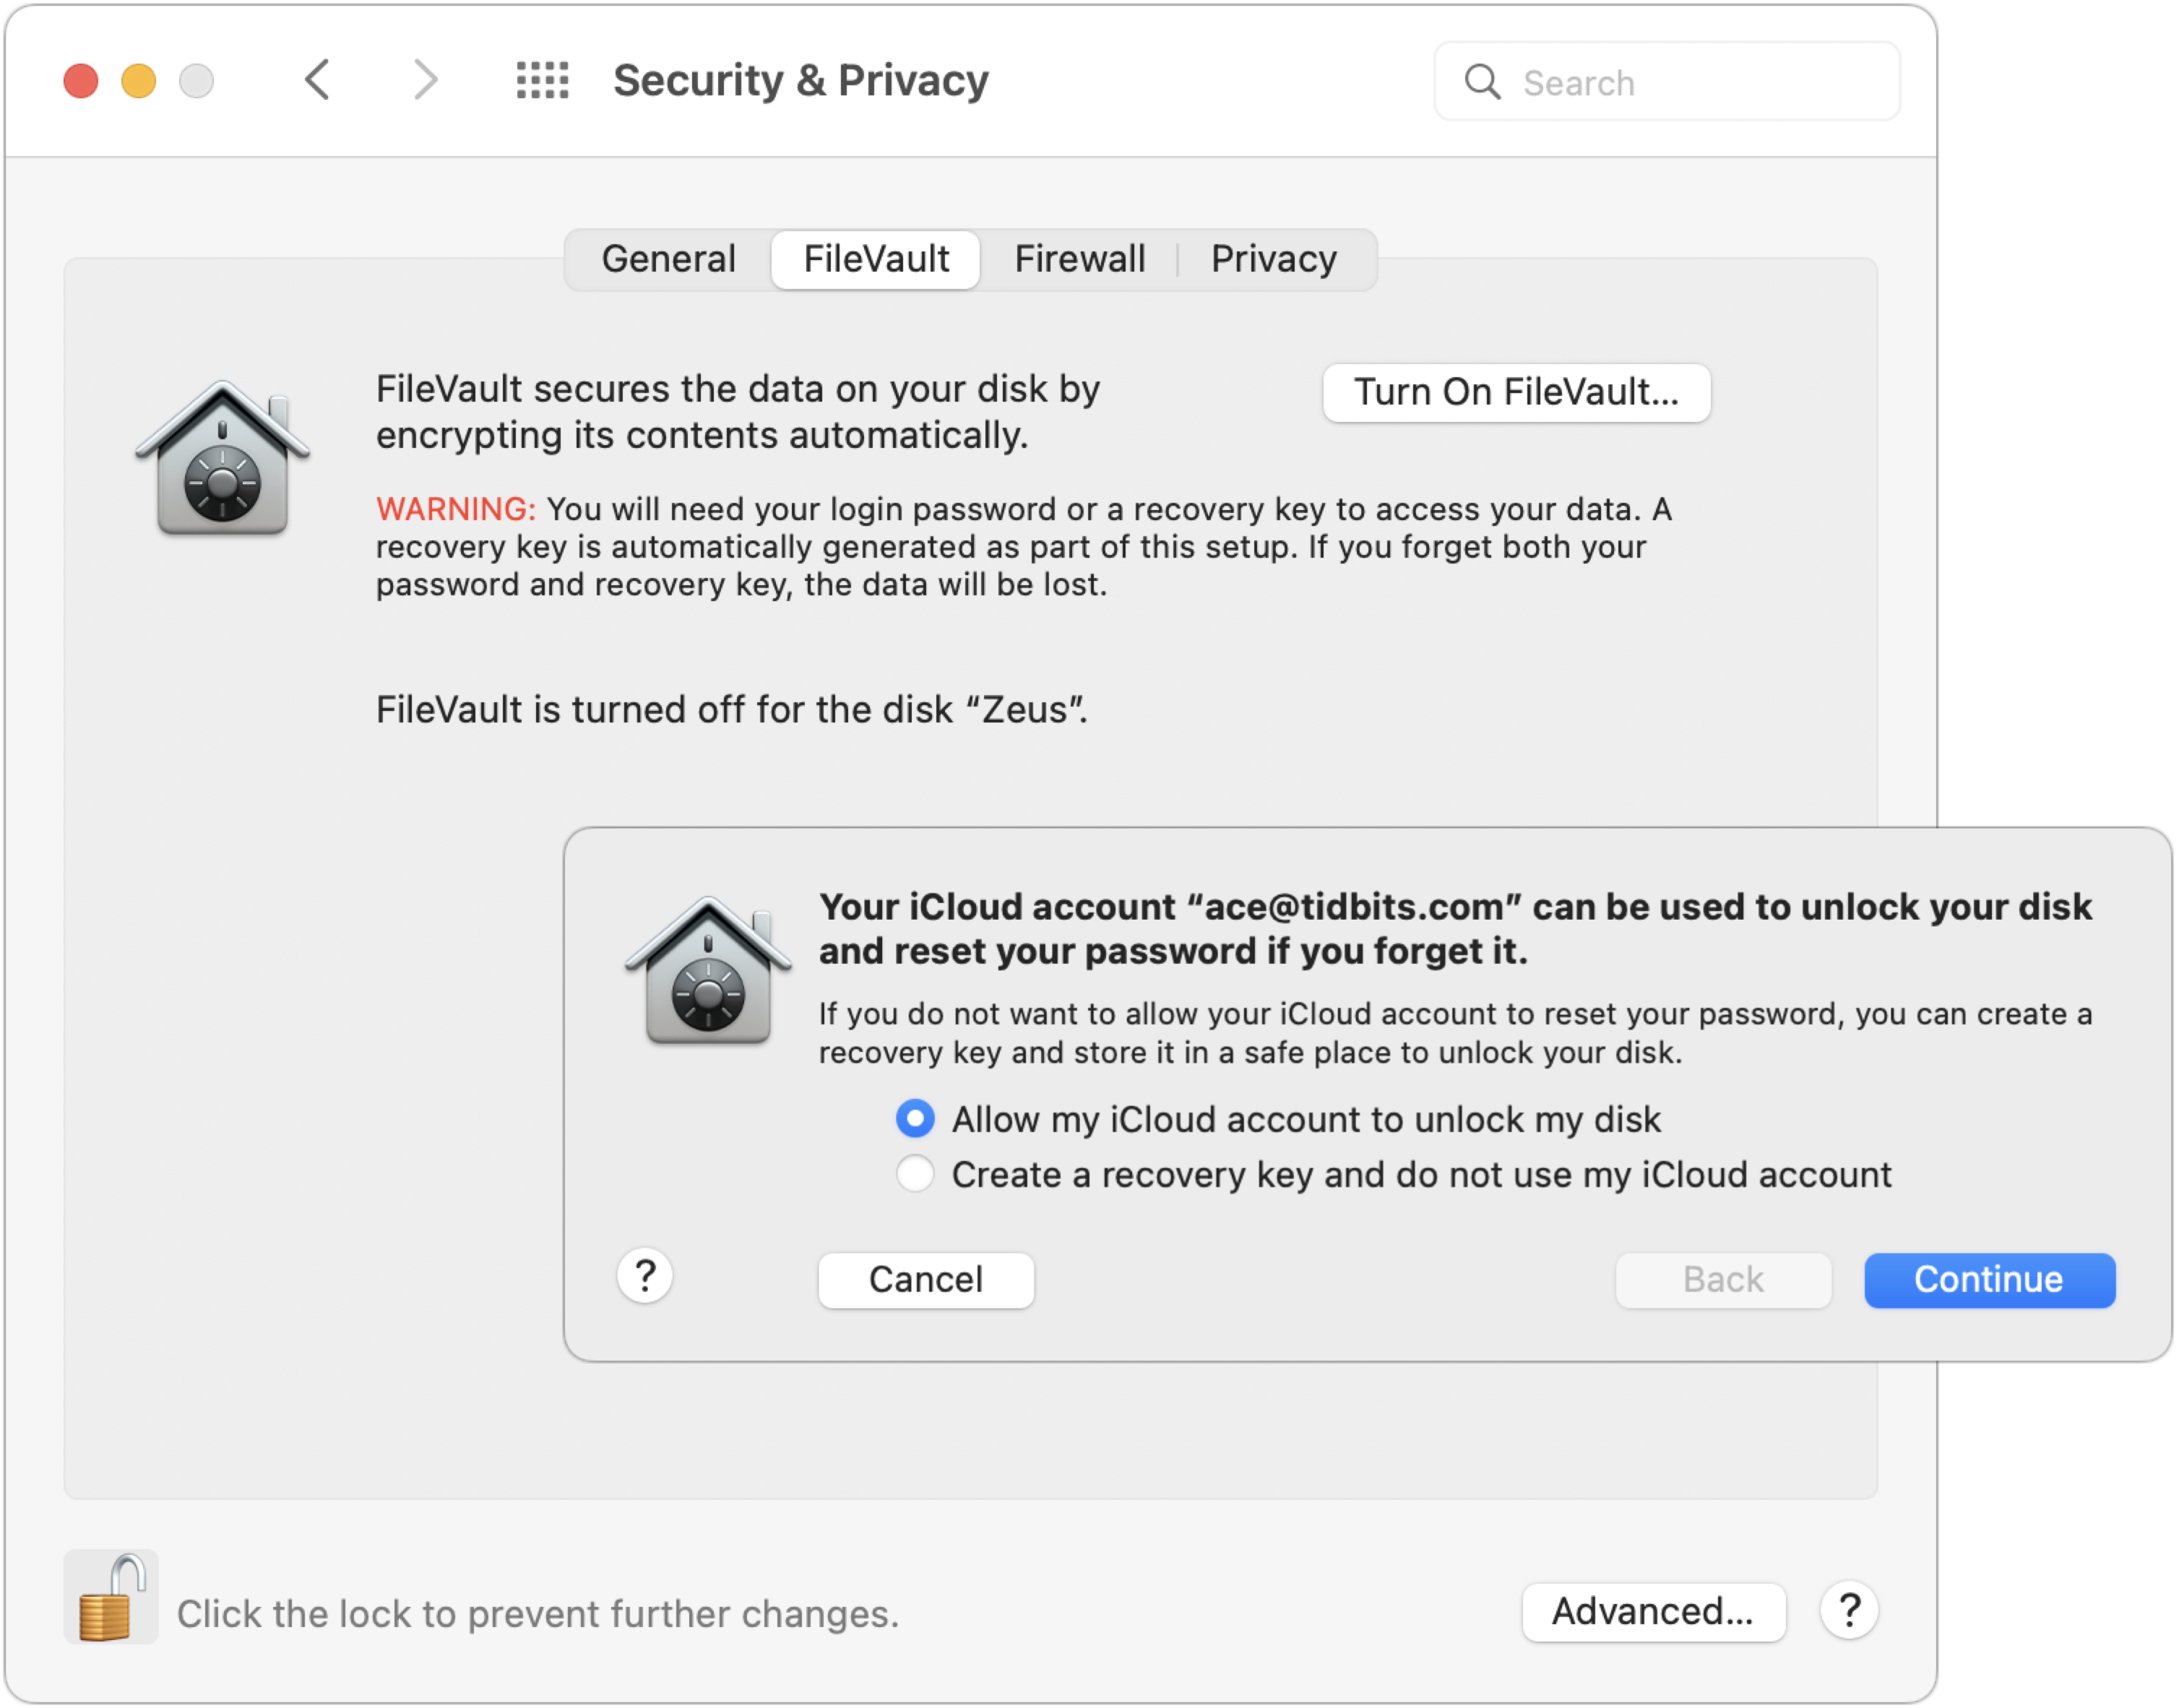
- Startup drive: To encrypt your Mac’s startup drive, turn on FileVault. Go to System Preferences > Security & Privacy > FileVault and click Turn On FileVault. You’ll get a dialog asking if you’d prefer to be able to unlock your drive using your iCloud account or use a recovery key. My feeling is that either is fine, but both are vulnerable to the xkcd wrench attack—I use the iCloud account approach.
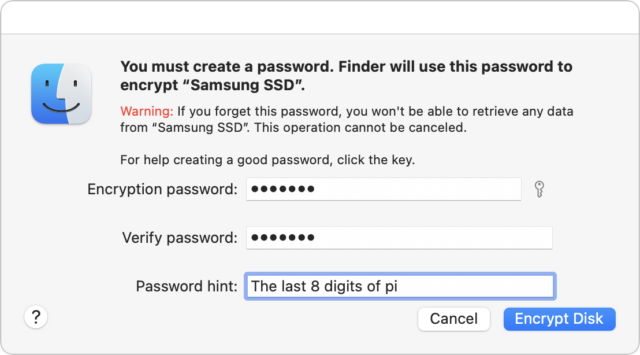
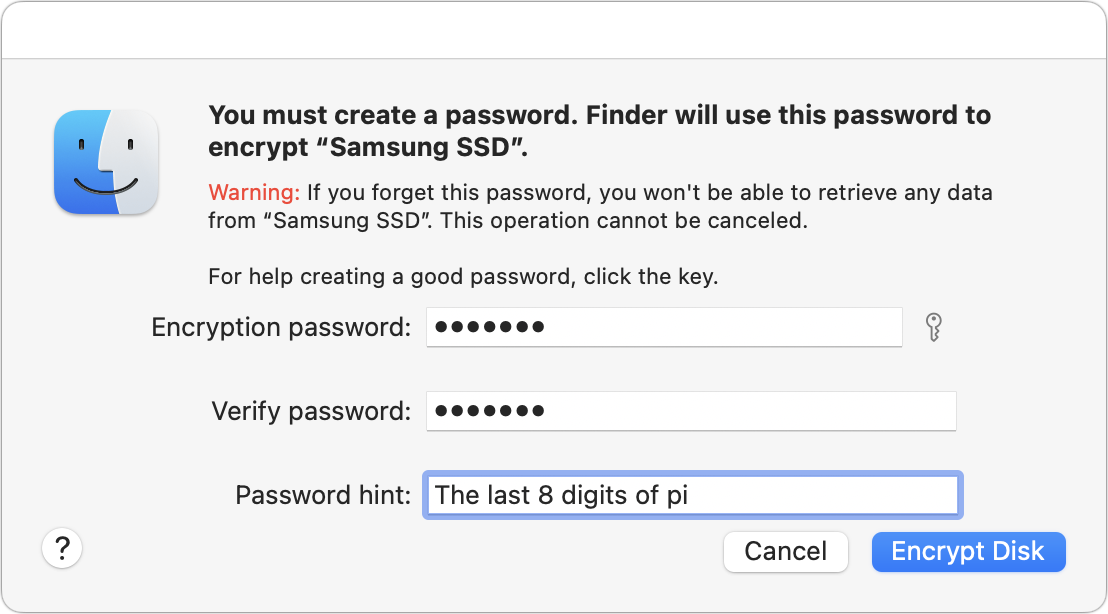
- External drive: FileVault protects only the startup drive; for external drives, take advantage of the APFS support for encryption. Control-click the drive in the Finder and choose Encrypt. You’ll be asked for a password and a hint, and macOS will help you pick a strong password if you like, though I’m pretty comfortable with the one in the screenshot. The next time you mount the drive, you’ll be asked for the password and given the opportunity to store it in your keychain so you don’t have to enter it manually again.
It’s worth keeping some facts in mind before doing all this.
- It’s quick and easy to turn FileVault on and off if you’re using a Mac with Apple silicon or an Intel-based Mac with a T2 chip. In that case, the data on the drive is already encrypted, but a password isn’t required to decrypt the data. That encryption ensures that the flash memory can’t be removed from the logicboard and decrypted; however, anyone with access to the Mac could theoretically still access the data. Enabling FileVault ensures that your account password is necessary to decrypt the drive.
- Enabling FileVault on an older Mac, particularly one with a hard drive, will take a long time because it has to encrypt everything, rather than just changing the key to one you control. Thus, if you’re enabling encryption just so you can erase the drive securely, let it finish before you erase. The FileVault screen in the Security & Privacy preference pane displays the status.
- If you’re encrypting your Mac’s startup drive and backing up with Time Machine, you should also make sure to encrypt the Time Machine backup drive. The same goes for any other backups you make to external drives.
- Encrypting data on an external drive, particularly a hard drive containing a lot of data, may take some time.
- There’s some question as to the vulnerability of data on erased blocks if you enable FileVault or encrypt an external drive after data has been written to it. The encryption will prevent access to any current data, but we don’t know if the erased blocks might still contain data that a sufficiently sophisticated attacker could extract. My feeling is that if you have a Mac with Apple silicon or a T2-enabled Mac, there’s no worry because the data is always encrypted; some erased data might be accessible, but it would be nearly impossible to put it together and decrypt it. It’s a little more of a worry with previously erased data on a subsequently encrypted external drive, but we’re still talking about intelligence agency-level work to access it. If you’re that important of a target, you should have enabled encryption before doing anything else with the Mac or external drive.
When it comes time to dispose of a Mac, you can destroy the encryption key by opening System Preferences and choosing Erase All Content and Settings from the System Preferences menu.

For an external drive, erase it in Disk Utility like any other drive. There’s no need to worry about security options because the encrypted data become random bits as soon as the encryption key is destroyed.
To make a long story short, if you think you’ll ever be concerned about erasing a drive securely, the best time to encrypt it is as soon as you start using it. If you haven’t yet turned on FileVault or encrypted a drive, the second best time to do so is now.
I find that a pair of linesman’s pliers comes in handy for insuring that the chips on Apple proprietary and M.2 Flash memory cards are well and truly rendered unreadable.
In the last couple of months, I’ve had the “pleasure” of opening up an old iBook (only 38 steps on iFixIt!) and the MacBook Pros of a certain age in order to destroy the HDDs/SSDs. Fortunately, my county landfill and recycling facility accepts old personal computers (or their wreckage) as well as other electronics for recycling. I take that to include the metal debris from drilling through HDDs.
Thank you for this lesson. Timely for me as I have some HDDs to be disposed.
Are you certain using the “diskutil secureErase 1 diskX” command in Terminal will securely erase Solid State Drives? I’ve read elsewhere that command is only to be used on older spinning Hard Disk Drives.
For SSD’s with TRIM enabled it would be enough just to erase the drive and then TRIM the unused blocks. Doesn’t work with the Samsung T7 though because there is no TRIM support over SSD. For Macs with Apple provided SSD’s it would be enough to erase the drive, re-install macOS and then start in safe mode (which will trigger an fsck command which TRIMs unused blocks as well).
Encrypt and then erase is what I usually use for HDD’s. Or indeed physically destroy them if they’re faulty.
In my understanding many SSDs had hardware encryption always on for a long time (10 years or so). This is at least true for Samsung SSD and very likely for some other brands.
Deleting the key would make all data unusable, but which command or action destroys or renews this key? At what point is this key set?
No, it won’t, which is why I included Apple’s complete warning against it. Why it won’t is explained in the encryption section next in the article.
If there is a Staples office supply store near you, they have an electronic recycling program that will accept (up to 7 items per customer per day) most forms of e-waste.
As mentioned in the article, this will mark all the data as garbage (making it inaccessible to software), but until the SSD controller runs garbage collection for those locations on the flash chips, a data recovery process that bypasses the SSD controller chip may be able to recover the data. Once the garbage is collected, however, it will be gone for good.
The big problem is that you have no way to know when your garbage data has actually been collected. If you let it sit powered-on but idle (e.g. connect it, but unmount all of its volumes) for a few days, then it would be reasonable to assume that all of the garbage has been collected, but without documentation from the SSD manufacturer, you have no way to know for certain.
Whether this matters to you will depend on the sensitivity of the data and what you will be doing with the drive after you’ve erased it.
Yes and no. TRIM will quickly and immediately mark all the blocks as garbage, making them inaccessible to software. But the physical flash memory won’t actually be erased until garbage collection runs, and there’s no way to know when that will actually take place. See above.
BTW, on macOS, Disk Utility will TRIM an SSD as a part of its normal disk erase process (only if macOS supports TRIM on it, of course).
Yes. Hardware-encrypted drives are a thing. When used without access credentials, they should (if implemented correctly) pair the flash chips to the SSD controller, so they can’t be read without it. But anyone connecting a computer to the SSD can still get access.
When used with access credentials (a password or a secondary key), then the data is secure and can’t be read if the password is lost.
The problem with these devices is that your computer must have the ability to provide the credentials (typically via a SATA or NVMe command). While there are PCs whose BIOS or EFI firmware are equipped to do this, I don’t think any Macs have this ability, which would make it useless for a boot device (but might be OK as a data device, if you have a software app that can send the the credentials after macOS starts up.)
As far as I know, Apple’s “solution” in this product space is their own SSD encryption based on Apple Silicon or a T2 chip. Older Macs must use a software encryption mechanism.
A few comments of my own on the article:
Degaussing is physical destruction.
While you might think “that’s just erasing the drive”, it’s more than that. A degaussing process scrambles all of the magnetic fields on an HDD’s platters. This includes the servo-positioning data needed for correct head alignment. There is no way to re-create this data without specialized equipment at the factory.
Once upon a time, when hard drives still used stepper motors and controller cards would count steps on the motor for head positioning (this would be 30-40 years ago now), you could perform a “low level format” to re-create the physical disk blocks that get wiped by a degauss operation. But ever since hard drives started using servo motors (which are necessary for the high track densities required by all not-completely-ancient drives), low-level formatting has become impossible outside of the factory.
In other words, unless you’ve got an incredibly ancient drive, once you degauss it, it will be forever be incapable of holding data.
A hammer might completely destroy a hard drive
Although older hard drives typically have platters made of metal, modern drives (including most 2.5" and smaller drives) typically have platters made of glass or ceramic.
So hitting them with a hammer (especially after opening the case) may be enough to shatter the platters, which will completely destroy your data. If you try this with the case open, I recommend putting it in a bag first, in order to contain the shards.
About the 35-pass Gutmann algorithm
The idea behind this is that when data is overwritten on a hard drive, there is a residual magnetic afterimage of the older data. It can be viewed with a magnetic force microscope. Some people have expressed concern that this might make it possible to recover data that has been overwritten although I have never read of an example (even anecdotally) of an organization actually recovering a file this way.
The Gutmann algorithm is based on the fact that magnetic media doesn’t directly record ones and zeros as magnetic positive and negative fields. For a variety of reasons, doing this produces data that can not be reliably read. Instead, a variety of algorithms (e.g. GCR, MFM and RLL) are used to encode data bytes into sequences of magnetic impulses. Each byte value may be represented by several different patterns of impulses, depending on the context of the surrounding data.
This means that if you want to completely scramble the residual magnetic fields, you want to write patterns that ensure that every magnetic impulse is reversed several times. The Gutmann algorithm attempts to do this, based on all of the different encoding schemes that were in use at the time.
But it is really pointless voodoo. Modern drives encode data using hardware like PRML, PMR/CMR and SMR that are completely different from the earlier generations of magnetic media. With these, you can adequately scramble the magnetic fields just as well by writing random data over a small number of passes.
Additionally, even if you are erasing an old HDD that uses old recording hardware, you only need to write the patterns designed for the encoding your drive is using. Using all 35 passes means that in addition to writing the patterns designed to scramble the fields used by your drive, you’re also writing many patterns that are pointless for your drive.
The Wikipedia article includes a quote from Gutmann himself pointing out these factors.
Smashing and tiresome secure erasing? Why not make or copy a large unimportant file (video, audio) and duplicate it until the drive is full? Maybe do it more than once. Isn’t that the fastest, simplest, and most secure method?
Because that doesn’t work, as the article says, and as was described in even more detail in the initial TidBITS Talk discussion linked in the article.
There’s a huge difference between wiping media in a way that software can no longer recover it, and wiping media in a way that a data recovery company or government agency can no longer recover it.
The former is pretty easy to do and there are lots of different techniques.
The latter is not easy to do and for many kinds of storage devices may be impossible to guarantee predictably-secure results. As @ace wrote, read the article for the ugly details.
I beg to differ. I use this method I describe and nothing has ever been recovered. Tested by sending to pros be recovered. Admittedly they are spinners, not ssd. Law work.
A 2tb drive cannot contain a 2tb movie and my reports. That is illogical. But I am willing to have my mind changed and be chilled. I have another set of drives due for collection, I will ask for anything more invasive/intensive on one of them.
I beg to differ with you. Short of physical destruction it is possible to potentially recover information from a spinning drive. Can’t see where or who or how…but I’ve seen the results. Not complete recovery of course and potentially no recovery at all…but in at least the couple of cases I know about some of the data was recovered.
Now…whether that’s enough to be useful is a whole different question…if it’s software then probably not but if it’s a text file or word doc or something like that…yeah, some came back…and it wasn’t cheap. Don’t recall the exact numbers but it made DriveSavers look like the Dollar General’s prices.
Intelligence work…they have more money than law work I guess.
A drive with 2TB of user-accessible storage actually has a capacity of more than 2TB. For some devices, it may be much more.
Hard drives have hot-spare blocks, in order to improve reliability over time. If a block is detected as bad by the controller firmware, its data will be relocated to a spare block. Subsequent overwriting is going to erase the swapped-in spare block, not the original, which might have recoverable data.
A recovery service that doesn’t modify the drive’s firmware will probably be unable to read data in the marked-bad blocks (that were swapped for spares). You would need to hack the drive’s firmware (or maybe use a proprietary diagnostic mode, if one exists) to bypass the normal LBA mechanism and access the physical disk sectors.
SSDs are even worse. Any SSD that isn’t complete garbage will have so-called “spare storage” in excess of what is user-accessible. This storage is maintained for a few reasons, including:
Consumer SSDs typically have 5-10% more physical storage than is user-accessible. High performance and enterprise SSDs may have a lot more - even 50% more (which is one of the reasons why these devices also cost a lot more, BTW)
When you write 2TB of data to that 2TB SSD, some of the overwritten data will remain (as garbage) in the spare storage until garbage is collected. Depending on your particular model, this may be as much as 1TB of data. You have no way of knowing what overwritten data is in that garbage storage, nor can you know when those flash cells will actually be erased (via garbage collection). A data recovery process that bypasses the SSD controller (either by directly reading the chips or by replacing the controller’s firmware) to gain access to the spare storage area will be able to read any overwritten data that has not yet been erased.
The article linked to does not seem to specifically mention the following and therefore seems slightly dated, I will however confess I only quickly skimmed the article.
For some time now Apple has fitted SSD drives to their Macs which use Apple’s own SSD controller chip rather than as was the case longer ago using standard PCI or NVMe type SSDs which had their own drive controllers.
When using a Mac which uses Apple’s own SSD controller the drive is shipped already paired to the unique logic board of that Mac. If you happen to have one of the earliest examples of this type of Mac it might have been physically possible to remove the drive and fit it to a different logic board but that different logic board would not recognise the content as it would not have the matching logic board encryption key. Newer Macs still using Apple’s own controller now have SSD storage that is part of the logic board and cannot be removed unless you have industrial grade tools and you then still have the same logic board pairing issue.
These Macs - T2 and onwards also come with the drive always encrypted - even if you have not yourself explicitly encrypted it. If you have not turned on Filevault there is still an active encryption key which is the paired logic board code. Obviously with FileVault2 not enabled it is easier to bypass logins e.g. if SecureBoot is also disabled. The big benefit however is that since ALL these drives are encrypted even if ‘only’ with a logic board paired code you can then do a simple erase command. This in reality does not write blank data to the drive, nor does it delete the disk directory it just destroys that paired encryption key and sets a new one meaning the logic board cannot read the drive anymore and therefore treats the drive as effectively blank. The fact that the drive is always encrypted on these newer Macs is why turning on FileVault2 is instantaneous since all it has to do is set a new different encryption key.
SSDs also have built-in measures which as a side effect make traditional erasing ineffective. These measures are intended to compensate for the fact the ‘flash memory’ i.e. SSD drives have a finite number of write cycles each ‘block’ can support. So one of these measures is ‘wear levelling’. This means ‘track 1, block 1’ is virtualised on an SSD and over time might point to many, many different parts of the SSD memory chips. They also for the same reason will spot traditional ‘secure erase’ attempts and prevent them so as to also prevent excessive ‘wear’ to the SSD.
So for the overwhelming majority of people the best option is to have FileVault2 or equivalent for other operating systems e.g. Bitlocker enabled and when you erase it by destroying the encryption keys you render it unreadable. As mentioned on Macs at least and possibly newer Windows PCs also effectively a drive is always encrypted even if you have not yourself turned it on.
For those who have a higher level of concern, physical destruction is the only option. Degaussers do not work on SSDs. I used to manage IT for a specialist law firm and had to get drives and even entire laptops physically ‘shredded’.
This is, in fact, a very good tl;dr summary for the article.
This is important. Although the T2 (or Apple Silicon) will encrypt the data that only serves to prevent the flash memory from being moved to another computer. If you don’t enable File Vault, then you can boot another operating system (e.g. a macOS installer), boot to Recovery mode, or use Target Disk mode to access the internal file system. With File Vault, however, this kind of access requires the password to unlock the device.
BTW, flash modules are removable on Mac Pros and on Mac Studios. But after being moved to a new Mac, they need to be paired with it, which re-generates the keys and effectively wipes the contents. On T2 Macs, you can use Apple’s Configurator 2 software to do this. I don’t know if it is yet possible to do it for Apple Silicon Macs.
Does this also apply to external drives?
External drives are not managed by a Mac’s built-in SSD controller (T2 or Apple Silicon). As such, they are not automatically encrypted. If you don’t encrypt the content yourself (e.g with File Vault) then anybody can access its content, simply by plugging it into their own computer.
FWIW, I generally don’t encrypt my external media, because I move my external drives between Mac, Windows and Linux computers. But I will encrypt sensitive data that I store on them, either via an encrypted disk image, password-protected zip file, or a password-protected document (e.g. via Microsoft Office - which encrypts password-protected documents.)
That won’t work on APFS. Even aside from how SSDs actually work, it’s already bound to fail on the FS level.
On APFS, when you “copy a file” the bits of that file do not get duplicated on your platter or flash. There’s merely a couple pointers that get added in your FS table. That’s why these days on APFS the Finder can duplicate a 100GB file in 2 sec.
I think folks would be wise to go read the original thread first. A whole bunch of stuff is being repeated here that was detailed at length already over there. Read count > post count IMHO.
The link is of course front and center in @ace’s nice article, but perhaps some folks are not even reading that. So here. Read this first:
True…but I remember a terminal command using cat and pointing it to device /null will create a new file of all 1s or 0s…let that fill the disk, erase, and repeat a couple times with reboots in the middle after erasing any vm files as well from /etc/var or wherever they live…can’t remember off the top of my head…that will be sufficient I honk to remove your data from any casual or even more than casual user…as previously noted only physical destruction is a guarantee and that means you can’t trade it in or pass it on. One could also just record a ery long video from the camera until the drive fills as well…but gain not perfect as any of the marked don’t use blocks could still potentially have some data…but gain short of destruction some of that might remain.
But seriously…for most normal people…and even the majority of greater than normal people…the above should be sufficient…and the greater than greater than normal VIP type people have enough money to not worry about a trade in just don’t worry and just smash it with a sledge hammer works just fine.
As a long time computer security guy…don’t forget that better is the enemy of good enough. Back when I worked in the ‘in the closets world…we just hit the dead drives with a sledge to break them open, pulled the platters and tossed them into a box in the server room…and every year or so me and one of my buddies would get ourselves a couple of Marines, arm the 4 of us with 1911s, and take them out to a local foundry who melted them for us. Some of the slightly less sensitive stuff we could have used the giant computer shredder…think of a wood chipper on steroids that could shred an entire computer into confetti…but separating the drives was too hard since we had to melt some of them anyway…and trying to get permission to use the shredder for all ran into the ‘we’ve always done it this way’ problem.
The rules never caught up to the tech.
There ya go suggesting common sense Simon…this is the intertubes and I’m not sure that’s legal. :-)
Seriously though…if the drive was encrypted from the get go…the crypto erase is good. If some data got written to it before encryption then potentially blocks containing data got swapped out as bad…and I don’t know enough about the encryption part of macOS to know whether those swapped out blocks get encrypted or not…if so crypto erase is still fine but if not…eh maybe not. That gets you back to still good enough for almost all purposes or destruction if you’re really paranoid…and I highly doubt that Samsung is going to do anything with the old drive besides toss it in the landfill or send it to the recycling folk if it has some value there.
neil
The three kinds of stress…nuclear, cooking and a&&hole. Jello is the key to the relationship.
This is no different from diskutil’s secure-erase (overwrite with one or more passes of zeros or random data).
But, for reasons already mentioned above, that will only wipe software-accessible data. It won’t necessarily wipe data that is inaccessible, but could possibly be recovered by someone able to bypass the device’s normal firmware (hot-spare blocks, SSD garbage blocks, etc.)
And although I haven’t seen actual reports, it wouldn’t surprise me if some SSD firmware takes shortcuts (optimizations?) like marking a block as garbage without writing anything when you write all-zeros to a block (which you would never see as a user, since a logical block that isn’t mapped to physical storage will simply read back as all-zeros).
Hardware de-duplication (assigning two logical blocks to a single physical block when the data is identical) is also something that wouldn’t surprise me (depending on what kind of files are stored on the device, this could greatly reduce the number of write cycles on the flash storage.)
Modern storage is far too complicated to assume that simple solutions, which worked just fine in the 80’s and 90’s, are going to work as expected today.
If you don’t think the next person in possession of your drive will send it to a data recovery company or a government agency, then a simple one-pass erase (or reformatting with TRIM) is sufficient. But there are plenty of people (some of whom are probably represented here) who don’t believe they can afford to take that chance.
Then physical destruction is really the only viable option…because we just don’t know how the device firmware works.
… or encryption. Encrypt the drive when it is new - before you add any content. Then at disposal time, reformat it and change/lose the key. Any data remaining in the garbage space will be encrypted with a key that nobody has, and will be meaningless to anyone scavenging it for data.
… and now we’re back to the article’s conclusions.
Yep…that’s the only choice except for destruction if one is either that paranoid or has NDA or HIPP or legal dealings or whatever on the drive so. That only 100% non-recoverability is acceptable. However…most of us don’t fall into those categories…and absent those cases, which every user must decide for themselves…erasing the drive, new partition and encrypted, fill with a large file or a series of large files that aren’t duplicates, then deleting the key is good enough for the majority of users since most people aren’t really going to pay the money to see if they can recover anything.
I went over this thread a couple of times, unfortunately most of the information is over my head. I have a 2019 macbook air I plan to trade in/recycle to Apple so I obviously need to keep the drive intact. Apple’s instructions are simply to erase, then install a new system – no mention of safe-reboot per @ernst …
Do we even know what Apple does with these trade-in’s …?
The computer had FileVault at some point, which was removed when it exchanged hands within the family, so it’s no longer encrypted.
Appreciate any insight, Brenda
A 2019 MacBook Air has a T2 chip and the flash memory is soldered to the board.
Since there is a T2, the data is already encrypted and therefore can not be accessed if the T2 is bypassed (e.g. by removing the chips). FileVault on this Mac simply associates a password with the encryption keys, but doesn’t actually change the underlying beheavior.
So an erase-and-reinstall from Recovery mode should be sufficient to securely erase everything. Erasing the volume will cause TRIM to be called for the entire volume, marking all the old data as garbage, and making it inaccessible to software. And since the chips are cryptographically tied to the SSD controller (the T2), there is no other way to access it.
I suppose it is theoretically possible for someone to replace the T2’s firmware with something that could provide access to the garbage data, but as far as I know, only Apple would have the ability to develop this firmware and based on everything I’ve read, I think they would refuse to do this (just like they refused to develop firmware that would let the FBI bypass iPhone security), and even if they did, I suspect it wouldn’t work unless the replacement firmware was installed before you erased the SSD.
In other words, unless you’ve got something so secret that government agencies are trying to force their way in, I would just follow Apple’s instructions and be comfortable with the result.
Thanks so much, David. I really appreciate it.