Center Cam Solves Webcam Eye Contact Problem
When videoconferencing became the norm during the pandemic, we all became aware of a basic problem with webcams—even when you’re looking at the other person’s image on your screen, the webcam that actually records where you’re looking is somewhere else, making it difficult to maintain eye contact. On Macs, the webcam always sits above the display, so when you’re looking at the other person, they usually see you looking down instead. And if you don’t center the video window, you can also appear to be looking off to the side. In this example, I’ve put the video window in the bottom right corner of my iMac’s screen. Terrible idea.

The best workaround is to shrink the other person’s preview and position it at the top of your screen, right under the webcam. That way, when you watch the other person’s face, you’ll appear to be looking right at them. You can help yourself remember to do this by writing “Look at me!” on a sticky note and attaching it to the top of the display, just above the webcam. (I also recommend hiding your own preview if you’re an accidental narcissist like me and can’t avoid looking at yourself.)

“Surely there’s a higher-tech solution to this digital awkwardness,” you’re thinking. Machine-learning solutions can artificially adjust your eyeballs, at least beyond the Mac. On the iPhone, you can turn on Eye Contact for FaceTime calls (Settings > FaceTime > Eye Contact), but it works only on the iPhone XS or later, running iOS 14 or later, and only when using FaceTime. It can also be…a little creepy. For Windows PCs with Nvidia graphics cards, the Nvidia Broadcast app has an Eye Contact feature that a video editor unnervingly used to make movie characters stare at you during their scenes.
 But we’re trying to bridge the uncanny valley, not dive into it, and that’s what makes the Center Cam interesting. Billing itself as “The World’s Middle-Screen Webcam,” it’s a tiny video camera on a thin gooseneck stalk with a clip that attaches to the top of your display.
Inventor Ian Foster came up with the idea while doing an internship as part of his master’s degree in social work counseling during the pandemic. The rapport he had built in person with his youth clients fizzled once they were forced to move to remote counseling, partly due to the inability to maintain the eye contact essential for establishing trust. His solution was to design a webcam that was small enough to go in the middle of the screen during a video call.
Although the guts of a webcam aren’t all that large, most standalone webcams are a few inches wide, and putting that much hardware in the middle of the screen would be awkward at best and problematic in terms of how much of the display it would obscure at worst. They would also likely require a thicker stalk that would cover even more of the screen.
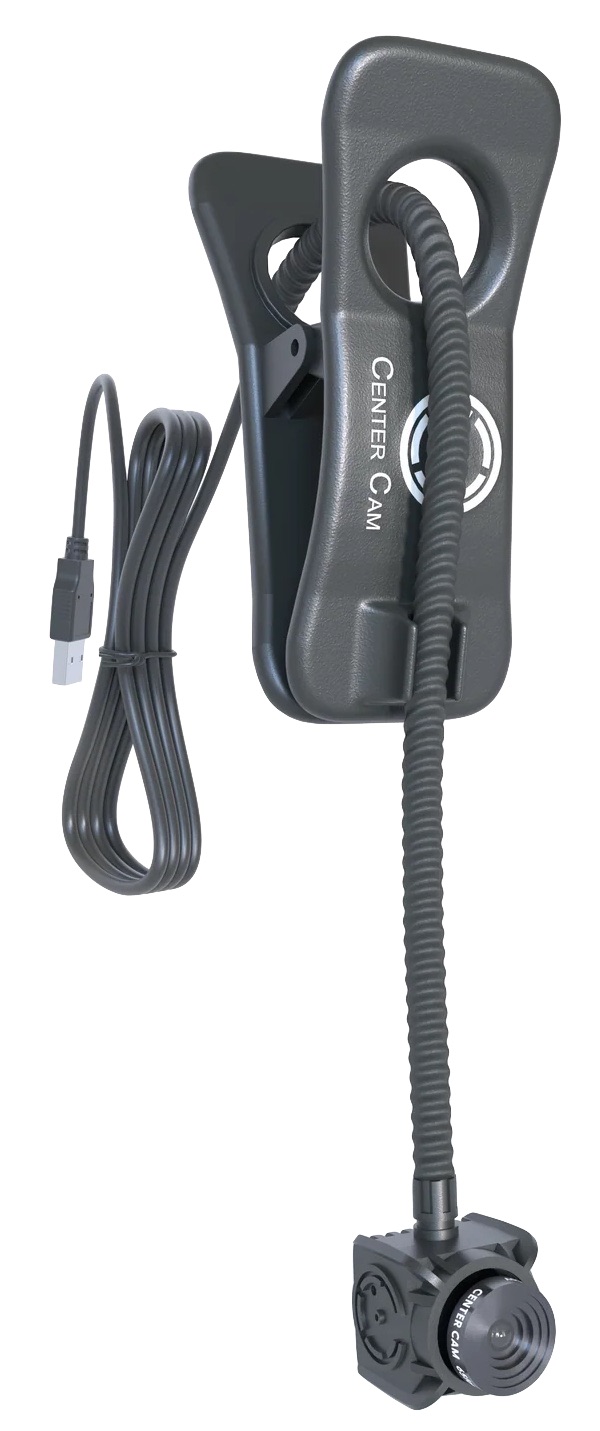
Center Cam Hardware
The Center Cam is a 0.60-inch (15 mm) cube, with a 0.40-inch (10 mm) round lens on the front. It hangs from a gooseneck stalk that you can bend however you want. The stalk is 16 inches (40 cm) long and 0.25 inches (6 mm) thick, providing plenty of positioning flexibility without getting in the way more than necessary. The gooseneck snaps into a slot on the clip to secure it in place and then feeds through the back of the clip, which you attach to your display. Most people will probably have the gooseneck come down from the top, but another approach might be to clip it on the side of the display and bend the gooseneck so it starts horizontally and then turns down.
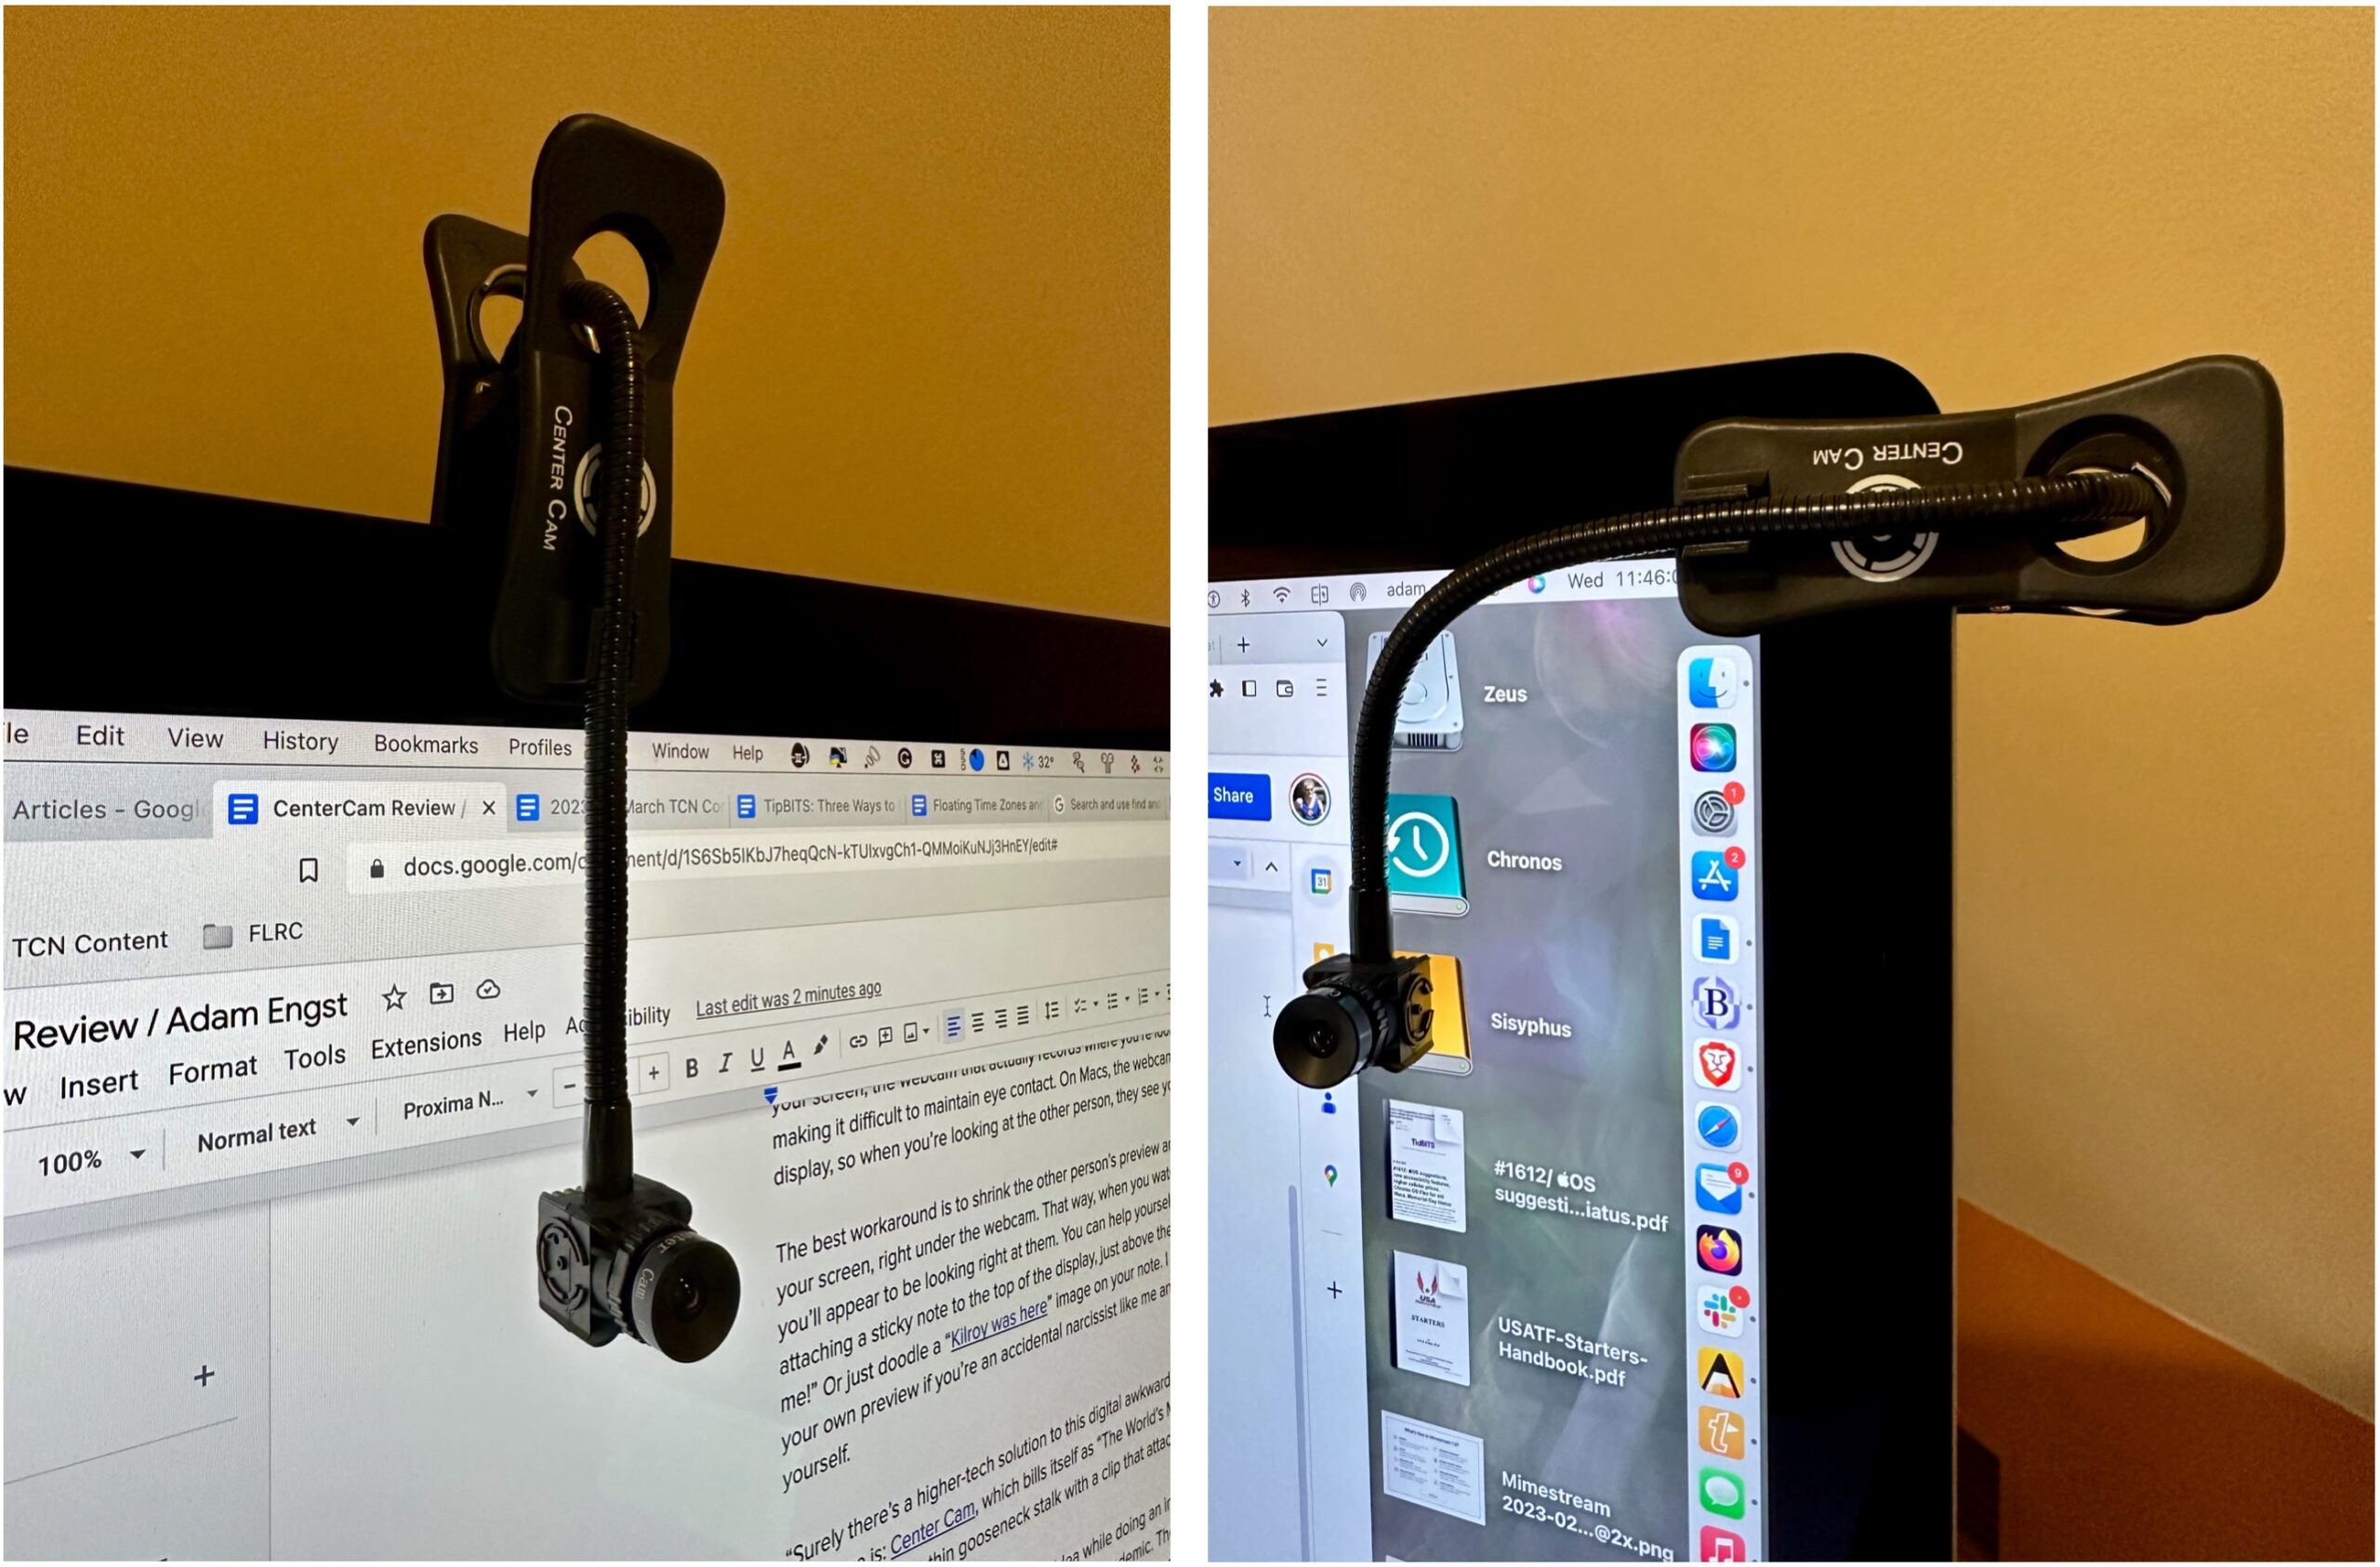
The spring-loaded clip expands to 2 inches (5 cm) wide, enough to clamp onto most screens. It has a ridged, rubbery material on the inside of the clip to ensure that it doesn’t scratch the display’s glass, and the tension is strong enough to hold it in place but not so strong that you have to worry about damaging the screen. I had no issues attaching it to either my 27-inch iMac or my 27-inch Thunderbolt Display, both of which have bezels that make it easy to keep the clip outside the functional area of the display. Although I didn’t use it for real with a laptop, the MacBook Air’s thinner top bezel forced me to position the clip lower, obscuring some of the top of the screen.
I found that the best location for the Center Cam was vertically down the left bezel of my iMac’s screen, next to my 27-inch Thunderbolt Display. That way, I could position the Center Cam in the dead space between my two screens, which worked well when I put a video call window up against the side of the display next to the Center Cam. For those with only one screen, it’s easy to move the Center Cam off to the side or remove it entirely when you’re not on a video call.
It’s important to realize that the clip is symmetrical, with another slot on the back. You’ll want to snap the rear portion of the gooseneck into the back slot to keep the weight of the gooseneck from pulling the clip off center. Even so, if the clip lists to the side, bending the gooseneck in the back can even out the forces to keep it straight.
The Center Cam sports a 1080p camera with 30 frames-per-second video. (Don’t get too excited—Zoom and some other videoconferencing systems often drop the resolution to 720p or even lower.) It has an ƒ2.1 lens and a 65º horizontal field of view, and it comes with a little lens cap for those who want to be certain that it can’t be used for covert video. The lens rotates to focus manually, so you can adjust it if necessary (apparently, it could shift during shipping). Mine was fine out of the box, and after playing with the focus briefly, I’ve left it alone.
The cable that snakes through the gooseneck is roughly 42 inches (106 cm) long, so you shouldn’t have any trouble connecting it to a USB port. It has a USB-A plug and requires only USB 2.0, though it also includes a USB-C adapter for newer Macs.
Once connected, the Center Cam appears to apps as a normal video input option called “CC HD webcam.” It also has its own microphone, cleverly called “SPCA2281B2 Camera,” which I haven’t used much. It works, but it’s not great, and I prefer the AirPods Pro.
The Future’s So Bright, You Gotta Wear Shades
Here’s where I’d like to say that I adore the Center Cam and have switched all my video calling to it. Unfortunately, that hasn’t been the case.
The entire point of the Center Cam is that it enables you to look better to other people, specifically by helping you maintain eye contact. It works well for that purpose, and when I asked people on calls if they could tell that I was using a camera that helped with eye contact, they all said yes.
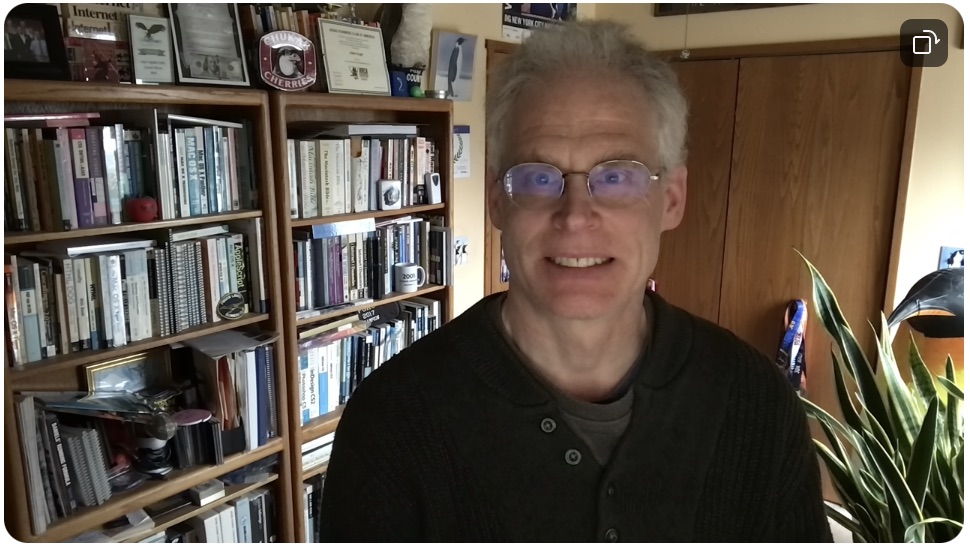
The problem is that the Center Cam is extremely light-sensitive. On the one hand, that’s good because it means that it works well in low-light situations. (Ironically, the Center Cam Deluxe package includes a ring light clip instead of the standard clip—it’s hard to imagine needing it.)
On the other hand, if you’re near a window or need an overhead light for other purposes, the image can be overexposed. From the eye-contact perspective, the image below is great, but the overhead light blows out my hair. And not in a good way.

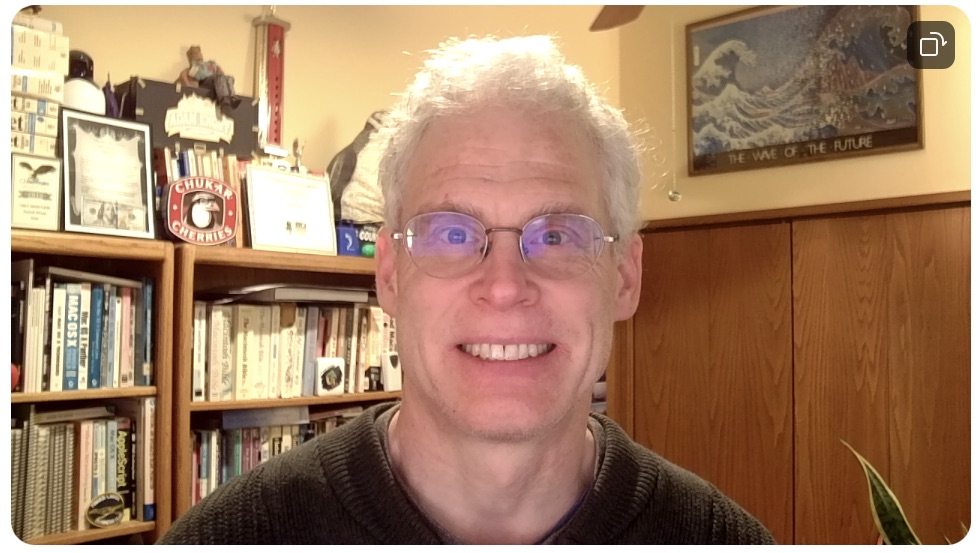
For comparison, here’s the same image taken with the iMac’s FaceTime HD camera. The FaceTime HD camera has a much wider field of view than the Center Cam, so you can see a lot more of the room around me. Plus, light and color are better balanced in the FaceTime HD camera’s image.

To bring down the halo effect on my hair, I turned off the overhead light. That dimmed the room, but not problematically so, as long as I didn’t need to read anything on paper. In the image below, my hair looks reasonable, and my skin is a more natural color, but the side of my face is over-illuminated by the window to my right.

Next, I dropped the shades, which made the room significantly darker than I like. Using the Mac wasn’t a problem—I’m a touch typist—but I couldn’t work with anything else on my desk. The image below is quite a lot better, however, with decent skin color and even lighting.

In the image above, most of the light on my face comes from the screen itself, which was largely white due to the documents I was using. But that’s easily avoided with a clever utility called HazeOver that dims the windows of all but the frontmost app to reduce distractions. Using HazeOver to black out everything but the Zoom preferences window significantly reduced the light on my face but made the Mac harder to use.
It’s also possible to adjust the Center Cam’s image somewhat with another utility called iGlasses. It can control the Center Cam’s exposure and brightness, along with temperature, tint, saturation, contrast, gamma, sharpness, and white balance. I played with it a bit but didn’t feel I’d made the image better enough to continue.
For comparison, here’s another shot from the iMac’s FaceTime HD camera with the overhead light off and the shades drawn—it’s much darker than the equivalent Center Cam image just above.
What about nighttime, which is when I do a lot of my Zoom meetings? I need the overhead light in my office on, which causes the Center Cam to overexpose my hair again, and generally gives the image a much warmer tone.
In comparison, the iMac’s FaceTime HD camera’s version of the shot looks quite similar to its daytime image.

I may be overthinking all this. However, in practice, what often happens when I’m using the Center Cam is that I connect to a Zoom call at the scheduled time, turn on the video, and am immediately unhappy with my preview. Rather than burn meeting time fiddling with the room lighting so the Center Cam’s image looks better, I switch to my iMac’s FaceTime HD camera, which provides a good image regardless of the room lighting.
But that’s just me. For some people and situations, eye contact is more important than overall image quality, which is hard to guarantee with videoconferencing anyway. If you’re looking for a webcam that will help you maintain eye contact during video calls, the Center Cam is worth considering. Its approach of putting the camera precisely at your eye level in the middle of your screen works well and doesn’t obscure more of the screen than is necessary. Although I wouldn’t recommend it if your office has a lot of windows, it’s ideal for anyone who works in dark surroundings. At $119.99, the Center Cam costs more than standard webcams, but that’s the tradeoff for its unique industrial design.
This is why Zoom’s ability to move speaker tiles around is so effective. I usually move a speaker’s tile top and center.
Very interesting post. Thanks @ace
Perhaps webcam Settings.app might help. It works with many external UVC compatible cameras and has several parameter adjustments.
That’s this? It seems like it would do the same things as iGlasses.
Yes, that’s this. I bought webcam Settings because the field of view Logitech, and later, Anker camera was simply too wide for my Zoom usage. My green screen is simply a 3 yard square of fabric hung opposite my desk. I can’t put the screen closer and still move around my office and default webcams see more than ten feet wide at six feet distance. webcam Settings can zoom in closer than even possible with AnkerWorks, preventing seeing beyond the green screen edges.
I have been very happy with an alternative product, the Plexicam. It’s essentially a transparent webcam mount that you can use with any webcam. It hooks onto the top of your screen/monitor, is simple to add or remove, and is easy to adjust.
I have no connection with Plexicam, I’m just a satisfied customer.
I had lust for Center Cam but not the cash. So I taped my $9 webcam to a plexiglass stalk. Then I position my Zoom image under it. My lust is gone but not my cash. I expect lots of lower priced competitors to flood the market soon.
Be nice to combine the smarts of Lumina Studio Camera with the svelteness of Center Cam
Well, that’s clever! I especially like the fact that it could easily be used with an iPhone for Continuity Camera.
The only problem is that at $75 (or $95 with the phone mounting kit), the Plexicam Pro is more expensive than most webcams.
And that got me thinking that it might be possible to attach something like the Lumina Studio Camera to a gooseneck with a tripod mount. It might attach your screen instead of above it, but as long as it puts the camera at the right height, it would solve the eye contact problem.
https://www.amazon.com/Fotodiox-Phone-Gooseneck-Tripod-Adapter/dp/B0814VK5XL
https://www.amazon.ca/Universal-Camera-Holder-Flexible-Gooseneck/dp/B07CSKCSMR
My low tech, low cost approach is to sit about three feet from the screen on which the webcam is mounted. My webcam microphone still picks up my voice well enough.
@ace, I agree the Plexicam seems expensive for what it is (though the company routinely offers discount coupons for 10% or more, that are easy to find online). I thought I’d mention it because many folks already own a separate webcam and this is the best flexible solution to mounting it I’ve seen to date. I like that if I need to replace or upgrade my webcam in the future I can reuse the Plexicam for the new unit.
Another on screen camera option is the iContact Camera. It’s similar quality, but more compact. Instead of moving the camera up and down you just move the video windows. icontactcamera.com