Follow These Steps to Clear Space on Your Mac
It’s inevitable that many of us will run low on free disk space on our Macs. The worst-case scenario is that you’ll run out entirely, which will cause your apps to exhibit all sorts of undesirable behavior or even render your Mac unusable! Don’t let it get to that point. The rule of thumb is that you want to keep at least 10% to 20% of your startup drive free to give macOS and everyday activities some breathing room. It’s necessary to keep that much space free for various reasons, including:
- Many apps rely on caches and temporary files that may require non-trivial amounts of space.
- If apps use up your Mac’s physical memory, macOS falls back on virtual memory, which creates large swap files.
- Time Machine creates snapshots on the internal drive before transferring them to a destination volume.
- Installing an upgrade to macOS requires significant amounts of free space.
What’s the very worst that can happen? Contributing editor Glenn Fleishman recently had to wipe one of his teenagers’ Macs after a massive Steam game download led to stalled Time Machine snapshots, resulting in a Mac with just 41K free. They tried numerous approaches to clearing space, but nothing worked—every attempt to delete files was met with errors complaining about the lack of free space. The Mac couldn’t even restart except into macOS Recovery. Fortunately, they had a Time Machine backup, and although full restores failed for unrelated reasons, its files were available for manual restoration.
Manually clearing space isn’t worth the effort if you have hundreds of gigabytes free. For instance, on a 1 TB drive, there is no benefit in having 500 GB free instead of 400 GB. Be more concerned if that drive has only 120 GB free.
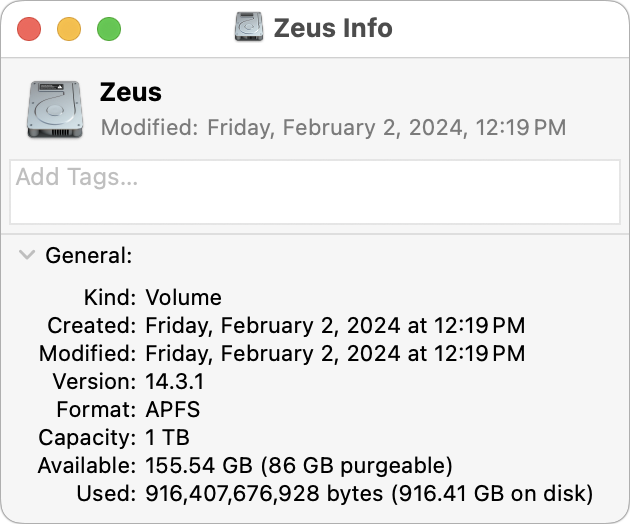 Longtime Mac users often get caught up in looking at the amount of free space reported by the Finder. We’ll check the storage numbers shown in a Get Info dialog, delete something, and check again. Don’t waste your time! Space management on the Mac is now largely indeterminate thanks to APFS, Time Machine snapshots, purgeable space, and more, as Howard Oakley explains. These technologies render the Finder-reported number unreliable at any given point in time. Even after you empty the Trash, it may take macOS several hours or more to update its free space reports. Restarting may or may not help trigger a recalculation.
Instead of stressing about exact numbers, I want to offer you a set of steps that will clear space quickly and easily on most Macs. Apple has advice here, and it’s not wrong, but it’s far from comprehensive. macOS also provides tools to help reduce unneeded drive usage at System Settings > General > Storage. Some are worthwhile; others do little or are incomplete. I’ll cover the helpful ones below.

I’ve arranged these steps in a particular order: I start with the easiest to perform, the most likely to help, and the least likely to lead you to delete something important. Later steps become more complicated and are more likely to require some thought to avoid erasing important data. Two points to pay attention to:
- Don’t follow the steps mindlessly, particularly as you get further down the list! At all times, you should make sure any to-be-deleted data is truly unnecessary. That could be more difficult if you’re helping a friend or relative with their Mac—don’t immediately take their word for it when they say something isn’t necessary.
- Depending on your goal, you don’t need to follow all these steps—think of them as a set of increasingly complicated recommendations instead of a mandatory series. It’s fine to stop once you think you’ve cleared enough space, remembering that the Finder probably won’t update immediately. However, error conditions caused by a lack of free space may disappear before the Finder’s numbers reflect reality.
One final note: I try to use the word “delete” for instances where the data will be gone afterward and the word “remove” when you’re only deleting the local copy of something that can easily be downloaded again from the cloud.
1: Empty the Trash
Choosing Finder > Empty Trash is obvious, I know, but not everyone does it regularly. Because modern Macs have so much storage, it’s easy to forget to empty it for months. If desired, you can set macOS to delete files automatically. Look in Finder > Settings/Preferences > Advanced for the “Remove items from the Trash after 30 days” checkbox.

2: Restart, Possibly in Safe Mode
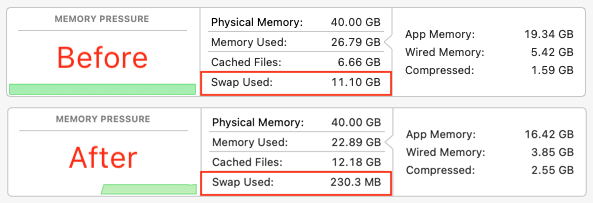
How could a simple restart reclaim disk space? Remember those virtual memory swap files I mentioned? When your Mac goes weeks or more without restarting, swap files consume a lot of space. A restart lets macOS start fresh. While writing this article, when I checked Activity Monitor’s Memory screen, my Mac was using 11 GB of space for swap files. After I restarted, that number dropped to 230 MB and remained there 90 minutes later for the second screenshot. Clearing swap files won’t help permanently, but it can be helpful briefly—particularly when the Finder reports it doesn’t have enough storage to complete file deletions or other activities.
To reclaim more space temporarily, consider restarting in safe mode, which clears potentially large caches. Since the introduction of Macs with Apple silicon, there are now two ways to boot into safe mode:
- On an Intel-based Mac, restart your Mac and immediately press and hold the Shift key until you see the login window.
- On a Mac with Apple silicon, first shut down. Then, press and hold the power button until “Loading startup options” appears. Select a volume, press and hold the Shift key, and click the Continue in Safe Mode button.
To have safe mode delete caches, you just need to get to the Finder. Once the Mac finishes booting in safe mode, you can restart again with no modifiers or startup steps to return to work—you don’t need to carry out any tasks within safe mode. Restarting in safe mode did nothing useful in my testing, but it’s easy and harmless.
Some suggest clearing logs and caches by running Titanium Software’s Maintenance, a subset of the company’s free maintenance utility Onyx. It offers many options for clearing space, but I’m hesitant to recommend it because I don’t know precisely what it does. When I tested Maintenance with a reasonable set of options, I couldn’t tell if it cleared anything at all. Also, Maintenance automatically restarts the Mac once it has reclaimed space, but several apps behaved oddly on the next boot, so I had to restart my iMac again before everything returned to normal.
3: Scan for Large Files and Huge Folders
It can be hard to determine what consumes large quantities of your drive space, so I recommend using a utility designed to help identify egregious offenders. These include the free GrandPerspective, OmniDiskSweeper, Disk Inventory X, and the $9.99 DaisyDisk. I like GrandPerspective’s graphical visualization, but it’s much slower to scan than OmniDiskSweeper, which relies on a text-based hierarchical view like the Finder’s Column View. The open-source Disk Inventory X is older. The popular DaisyDisk offers a combination of text and graphical approaches.
These apps scan your entire drive—you’ll have to grant them Full Disk Access permission—and help you identify excessively large files and folders, which can help you decide which of the following steps to focus on first. They’re valuable for finding and deleting out-of-control log files, cache files that aren’t automatically removed, large installers or updates you no longer need, and massive files like unused virtual machines.
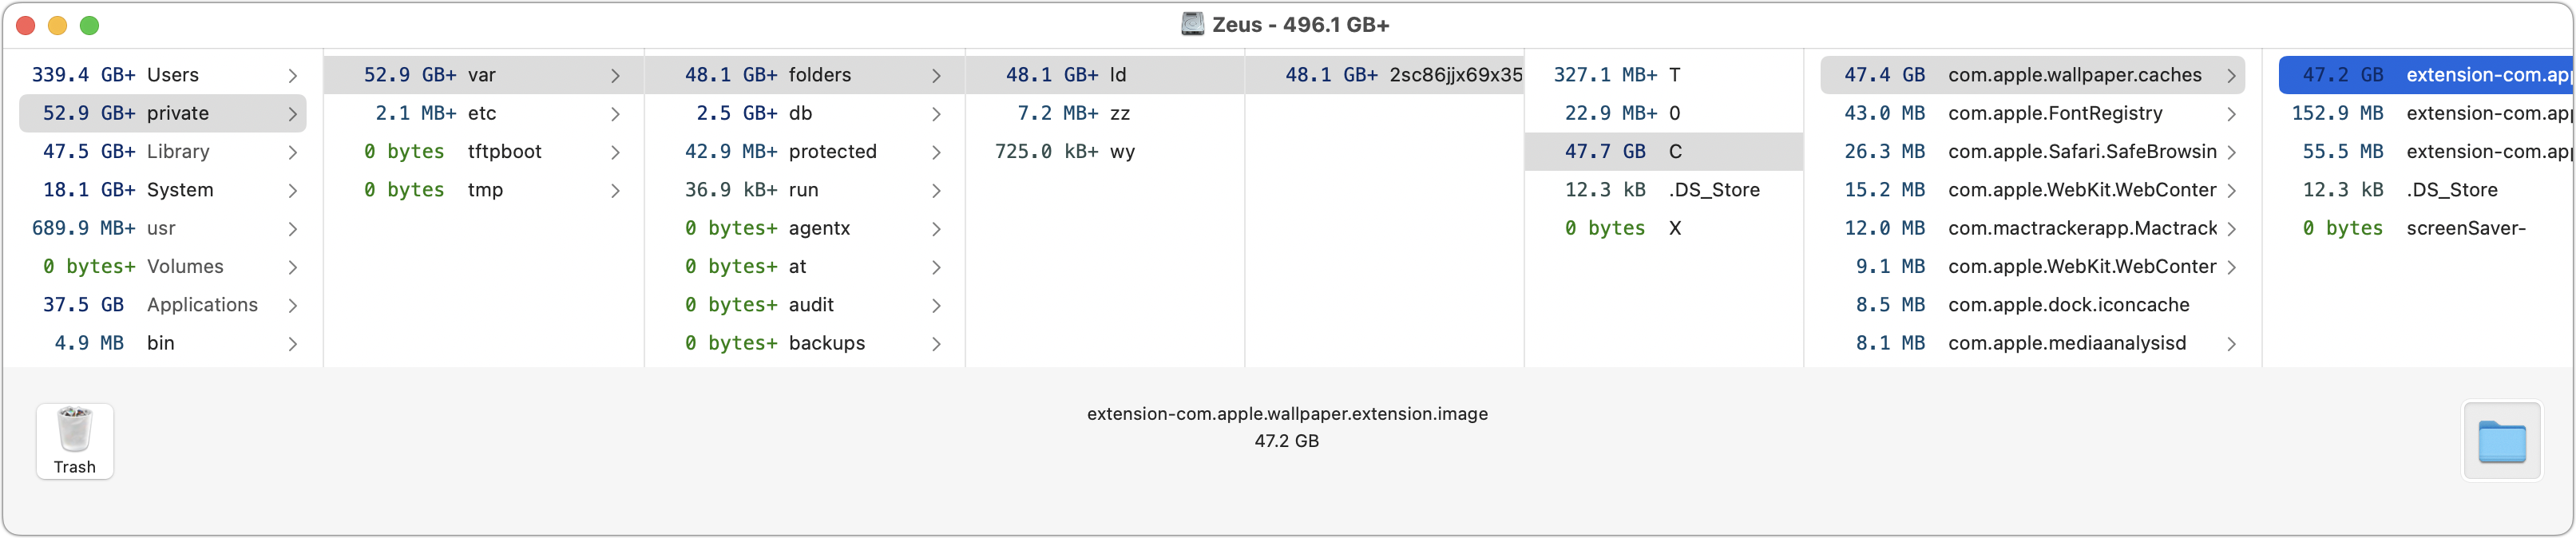
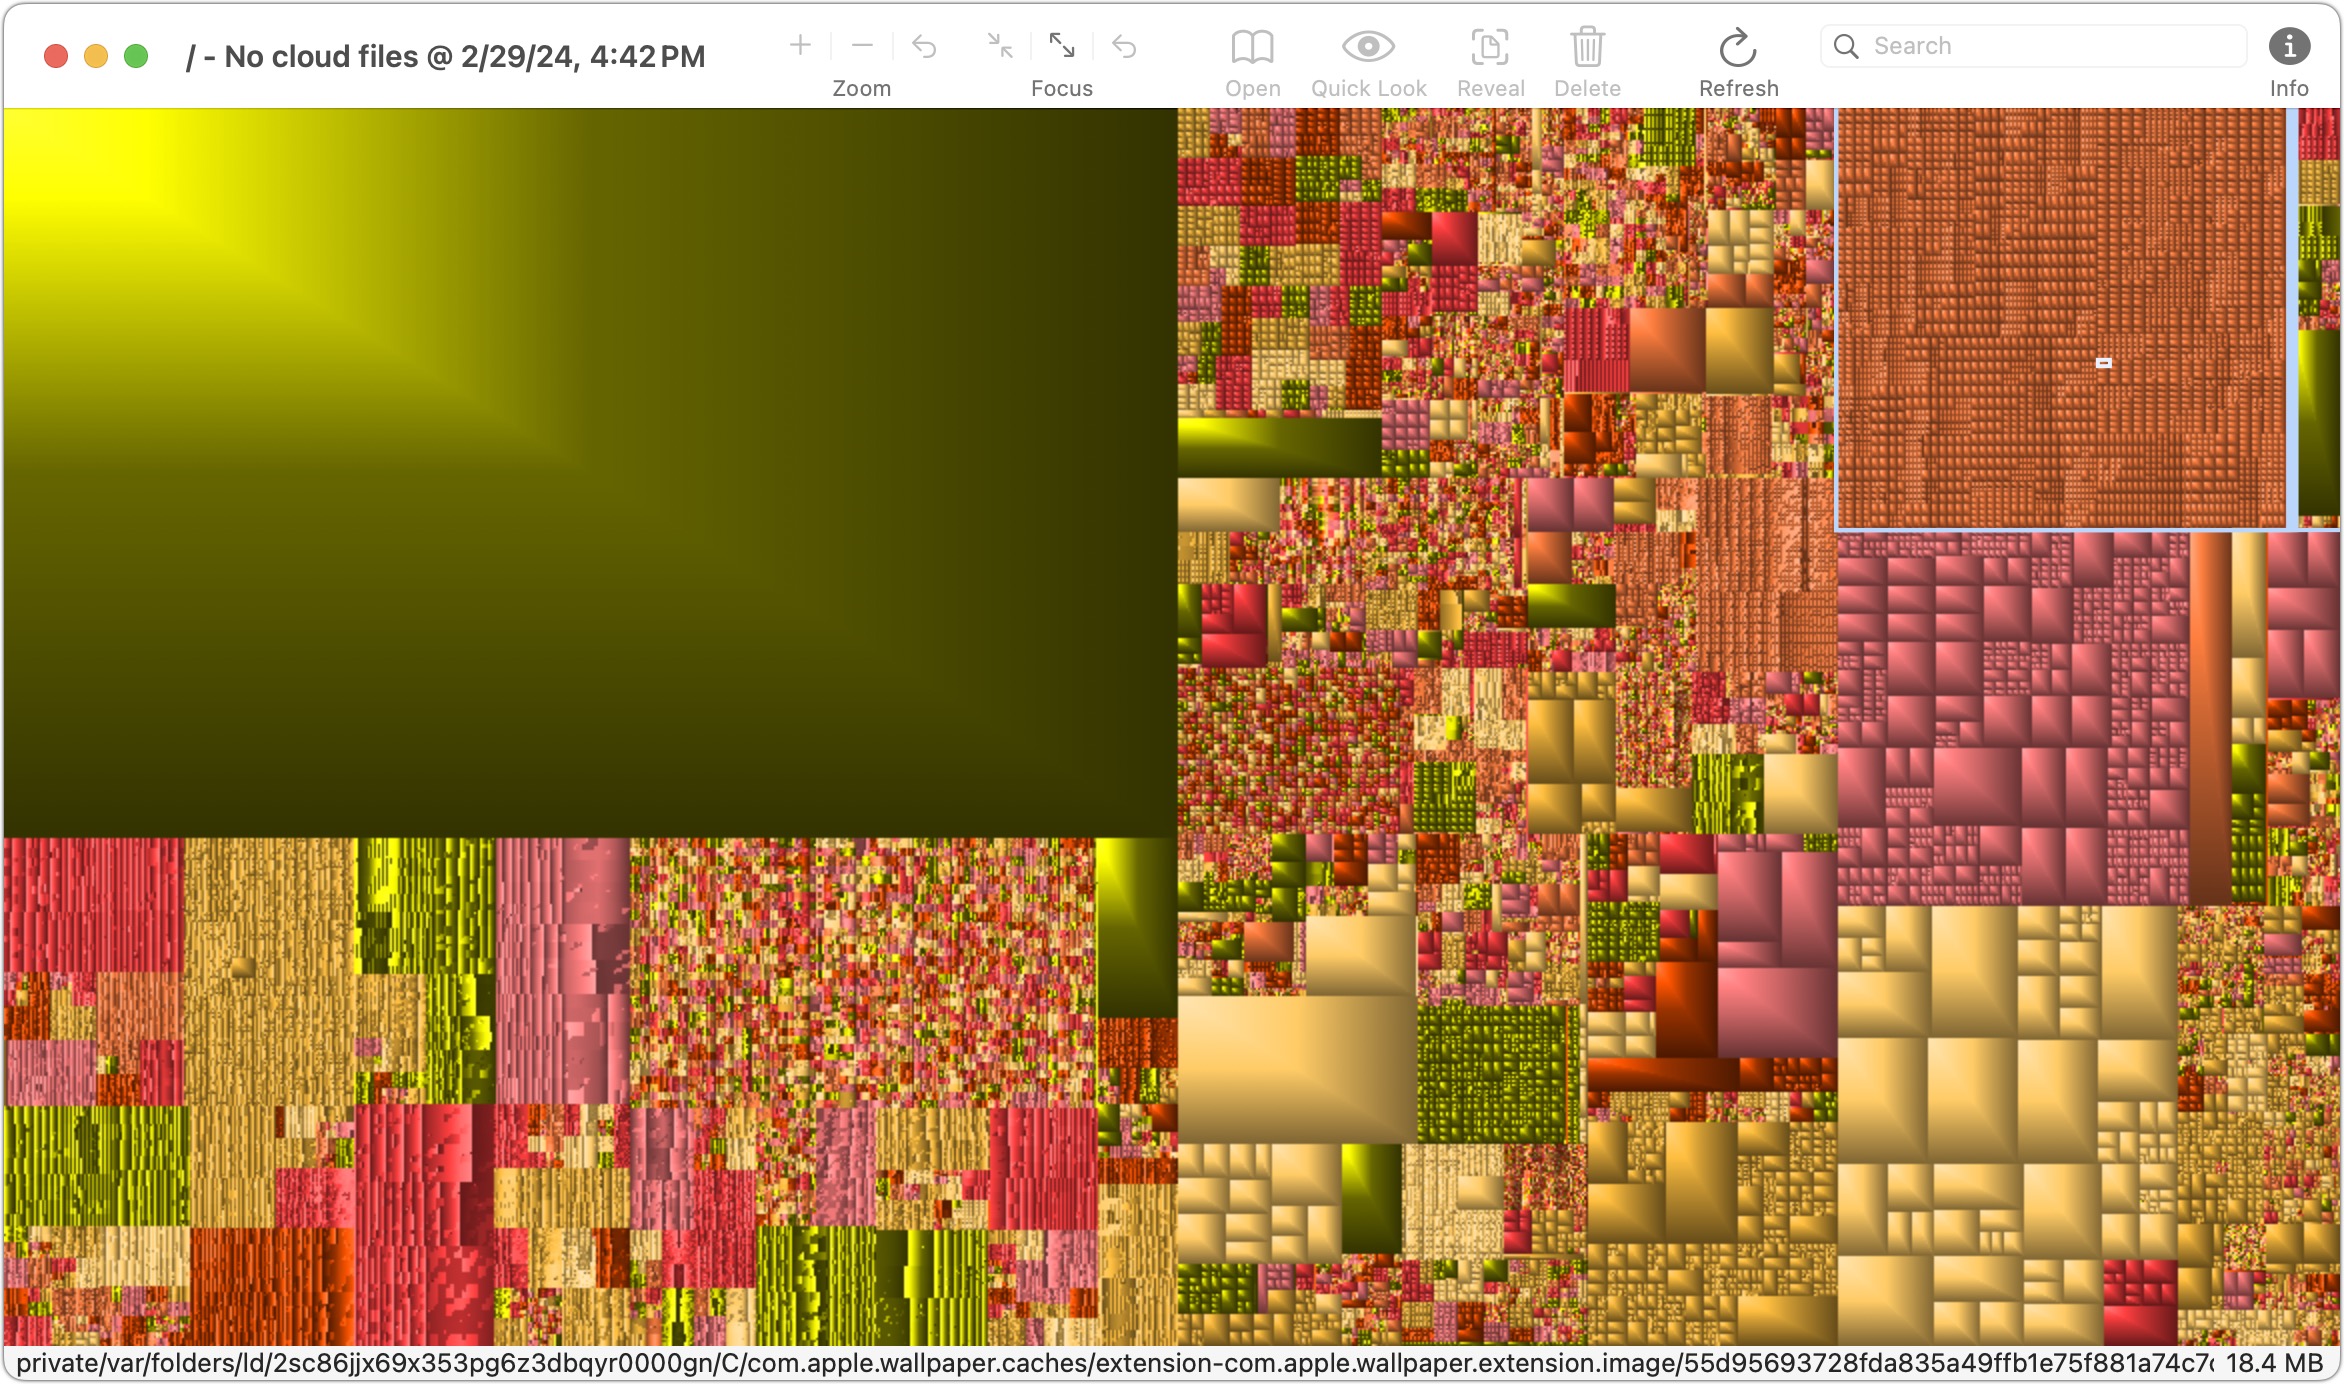
The revelations can be staggering. For instance, the OmniDiskSweeper and GrandPerspective windows below show 47 GB of wallpaper cache files. I use Irvue to randomize my desktop wallpaper, and I discovered that it chooses to download multiple copies of the same image rather than caching previously retrieved media. I have to look into that.
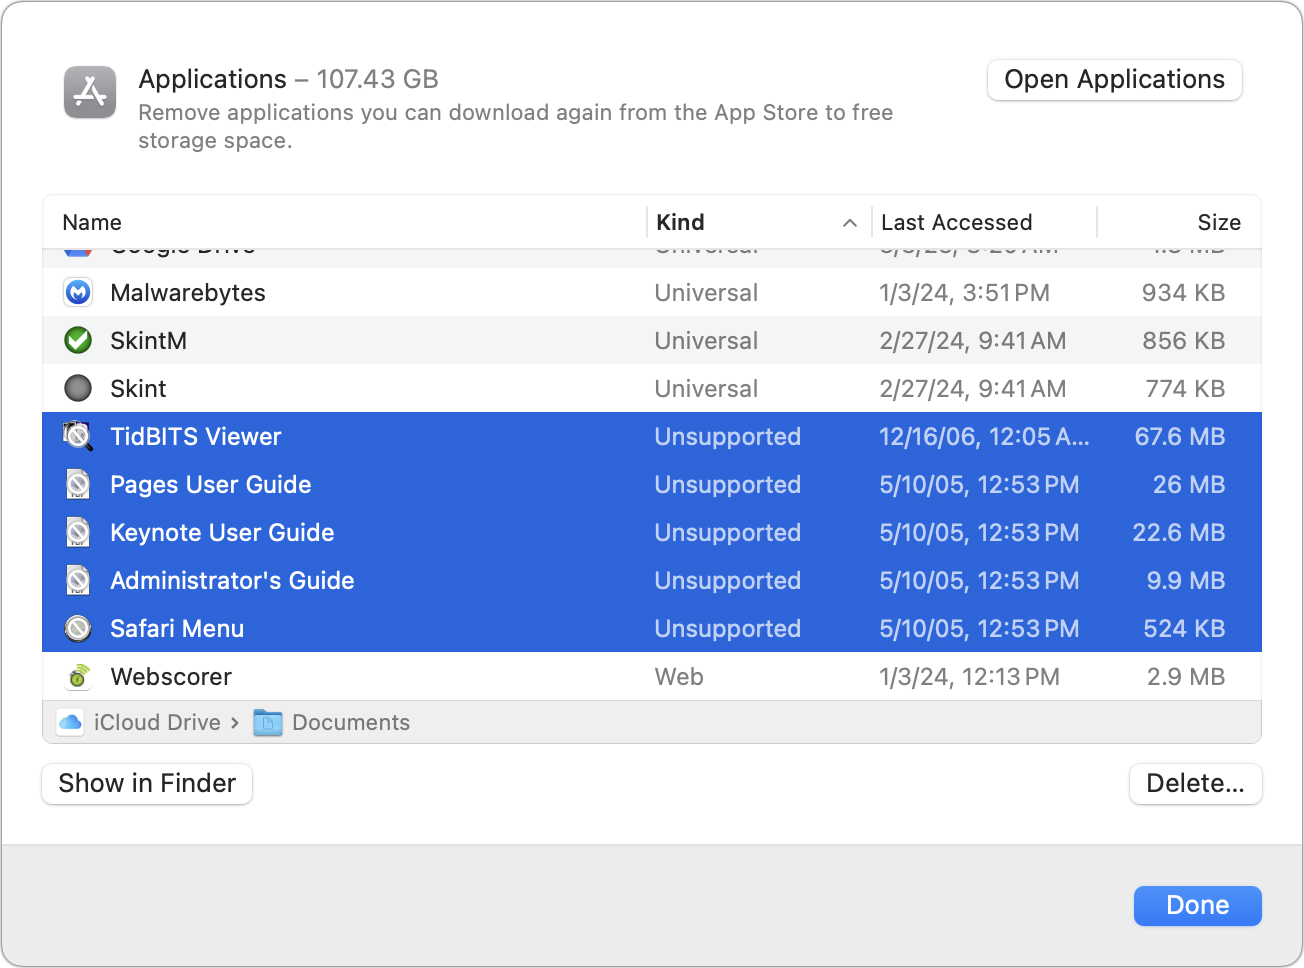
4: Delete 32-bit Apps and Duplicate Apps
On older Macs and those whose contents have been migrated forward across multiple versions of macOS, it’s easy to end up with defunct 32-bit apps that no longer run and may as well be deleted. Open System Settings > General > Storage > Applications, click the Kind column header, select all the apps marked Unsupported, and click Delete. You can do the same with apps marked Duplicate.
More generally, it’s usually safe to delete apps you no longer use since most can be downloaded again from the Mac App Store or a developer’s website should you ever need them. Sorting the Applications list by size may reveal some multi-gigabyte apps you haven’t launched in years.
To be sure you’re clearing out associated media, logs, preferences, launch agents, and other files when you delete an app, it may be worth employing a utility like AppCleaner, CleanMyMac X, or Hazel. When you delete an app, these utilities offer to remove associated files. Doing so won’t usually reclaim much space, but it will reduce the clutter in your Library folder, and it might remove a cache or media folder you didn’t even know existed.
5: Delete macOS Installers
Sort the Applications folder by name and delete macOS installers, whose names usually start with “Install macOS.” If you think you might need them again to install macOS in a virtual machine, archive them to an external drive or download them again.
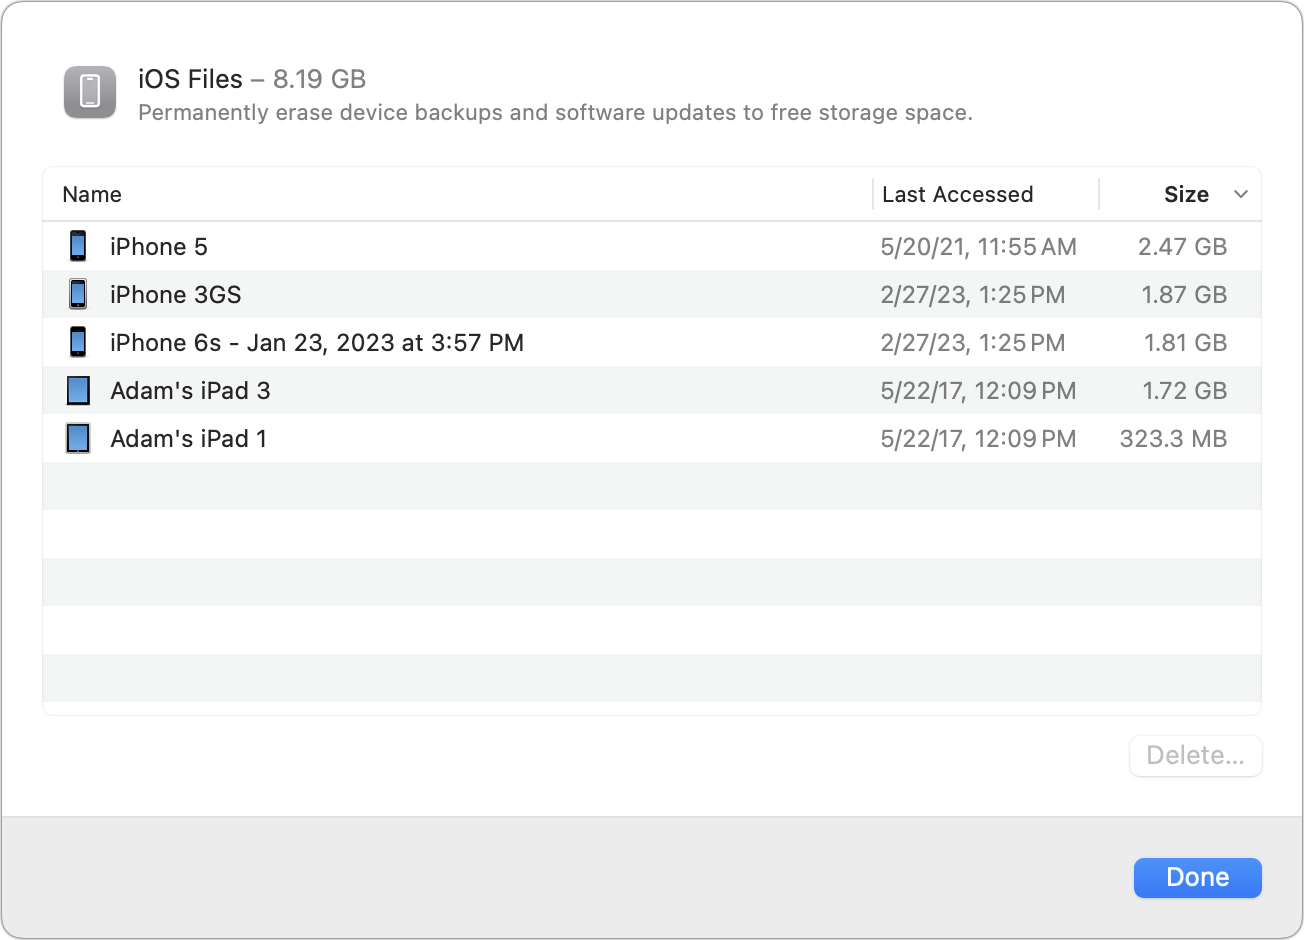
6: Delete old iPhone and iPad Backups
If you ever backed up an iPhone or iPad to your Mac, those backups may still be eating many gigabytes of storage space even if you’ve switched to backing up to iCloud. In System Settings > General > Storage > iOS Files, you can see how many backups you have and delete unnecessary ones. If you want to switch to iCloud for iPhone and iPad backups, make sure you have enough iCloud+ storage space and then turn on backups on your devices in Settings > Your Name > iCloud > iCloud Backup. These old backups will also appear in scanning utilities like GrandPerspective and OmniDiskSweeper, as mentioned in Step 3 above, but it’s easiest and safest to delete them using macOS’s native interface.
Those who have used iMazing may also see its backups and support files here, and they can also be deleted if you’re no longer using those devices or iMazing itself.
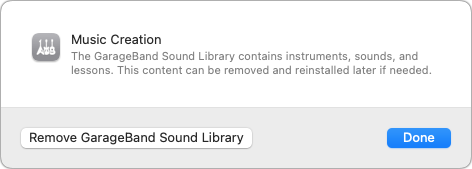
7: Remove the GarageBand Sound Library
During installation, GarageBand encourages you to install instruments and loops—first a 2 GB starter collection and then the complete 25 GB Sound Library. If you downloaded these files but are not actively using them, it’s safe to remove them because you can always get them again later from the GarageBand > Sound Library menu. To reclaim the space they occupy, open System Settings > General > Storage > Music Creation and click Remove GarageBand Sound Library.
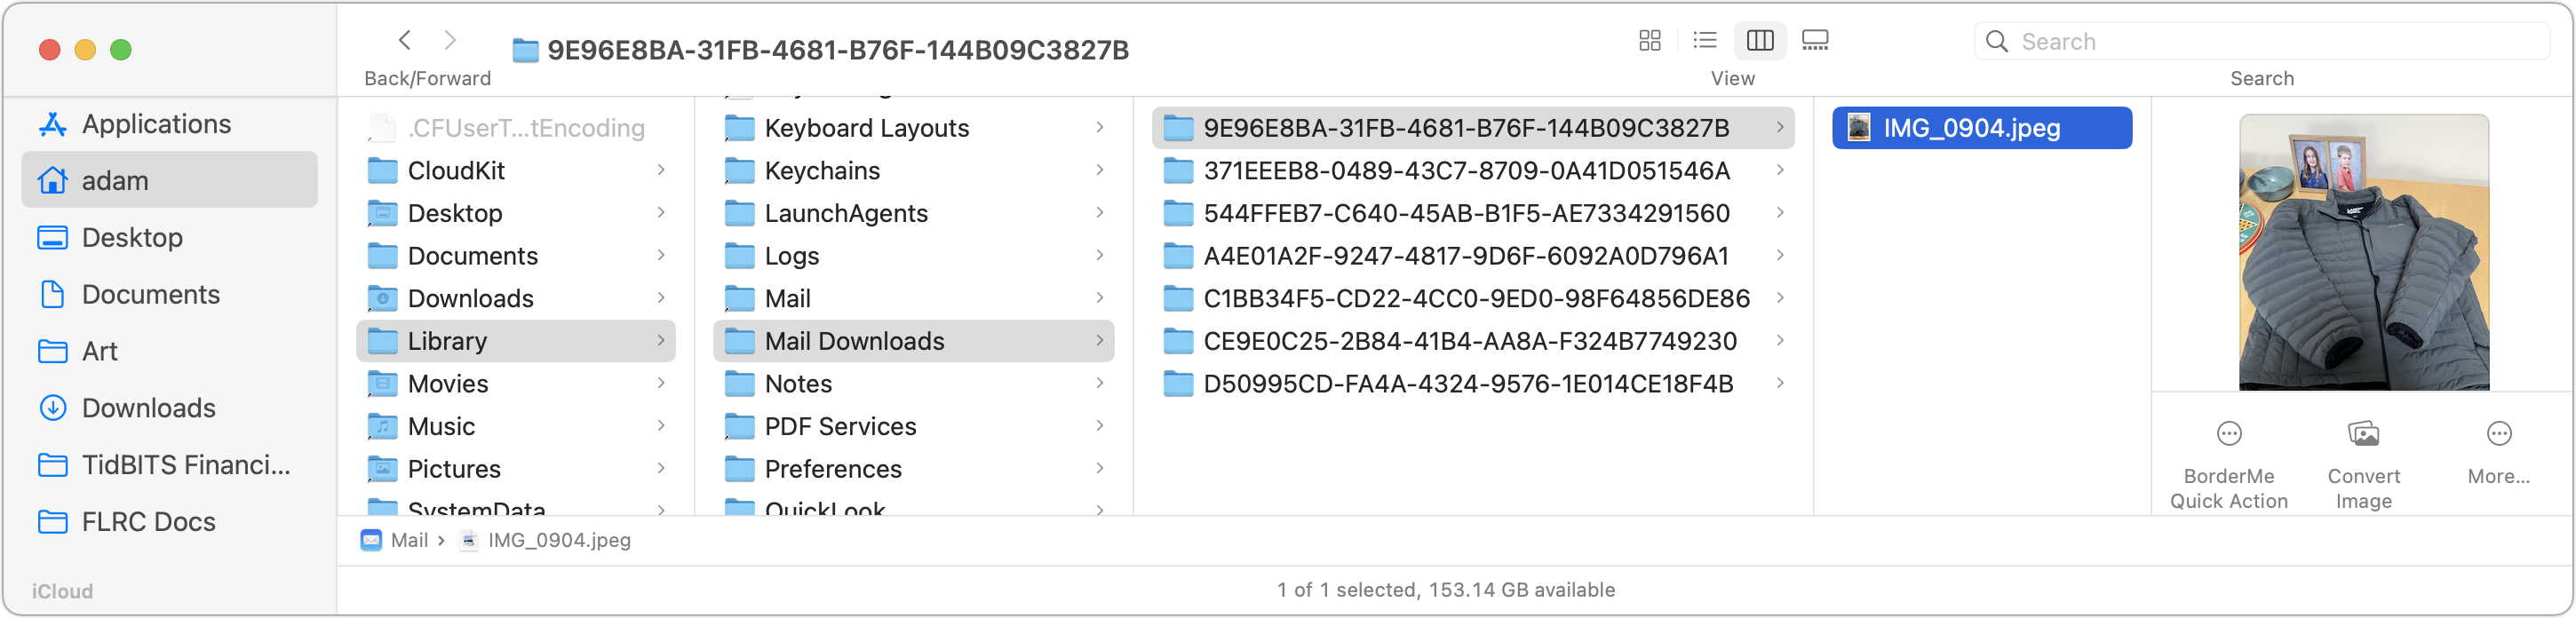
8: Remove Opened Mail Attachments
In Apple’s Mail, when you open an attachment, it extracts a copy of the file from the MIME-encoded message and stores it locally in a cryptically named folder at the path below. Or at least it does for me and many others—some seem to have nothing at that location, as discussed in TidBITS Talk. To view the contents of that folder, copy the path below, switch to the Finder, choose Go > Go to Folder, and paste this path.
~/Library/Containers/com.apple.mail/Data/Library/Mail Downloads
It’s unclear why Apple extracts attachments in this way, but since the attachments remain in the original messages, there’s no harm in deleting them. Some people reported finding gigabytes of files in there.
9: Remove Unwanted Podcasts
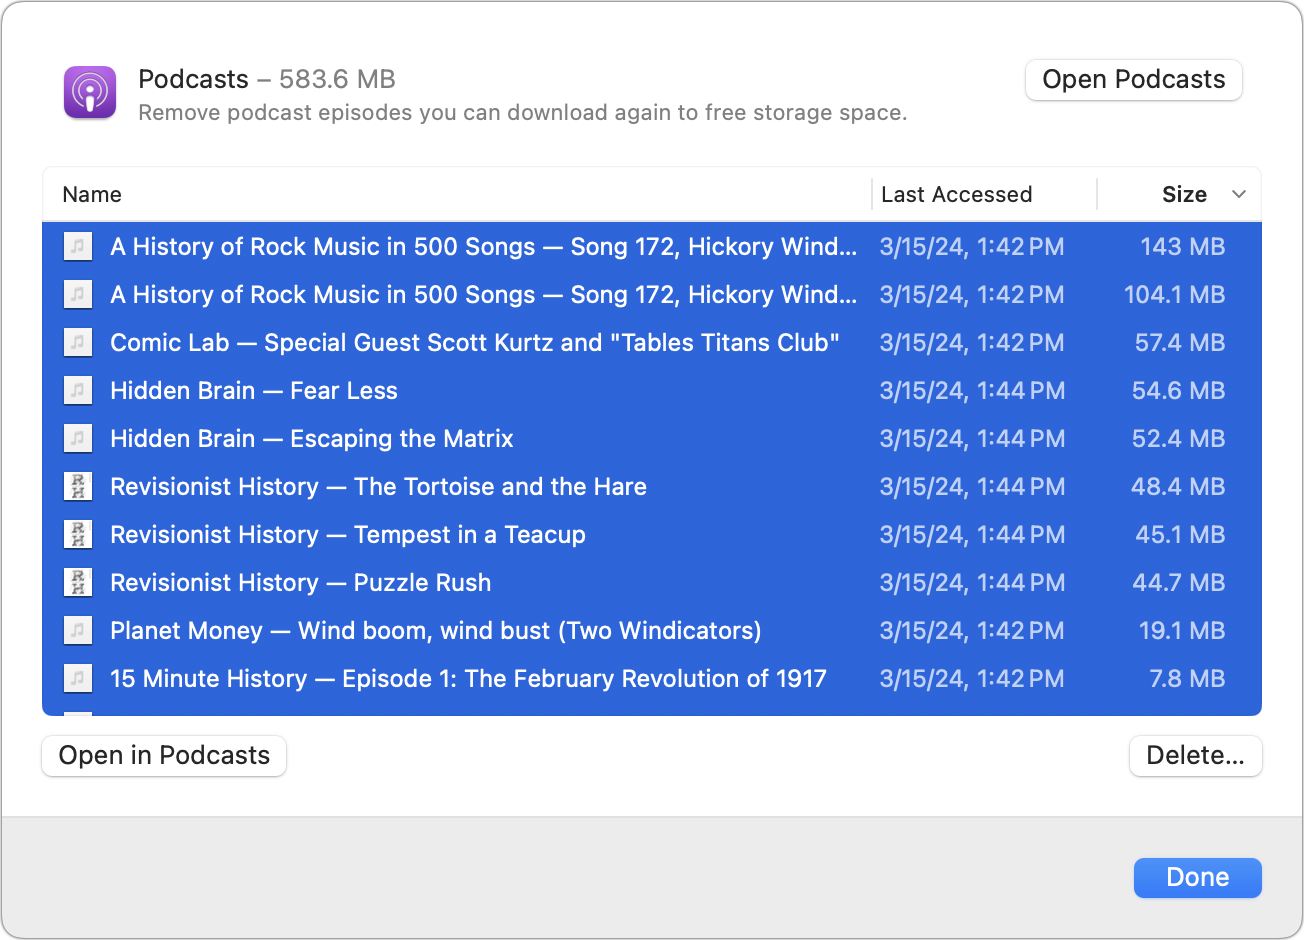
If you followed some shows in Apple’s Podcasts app but then stopped listening or switched to another podcast app or platform, the Podcasts app may have accumulated a lot of cruft you never intended to consume. To recover that space, open System Settings > General > Storage > Podcasts, select all the extra podcast episodes, and click Delete.
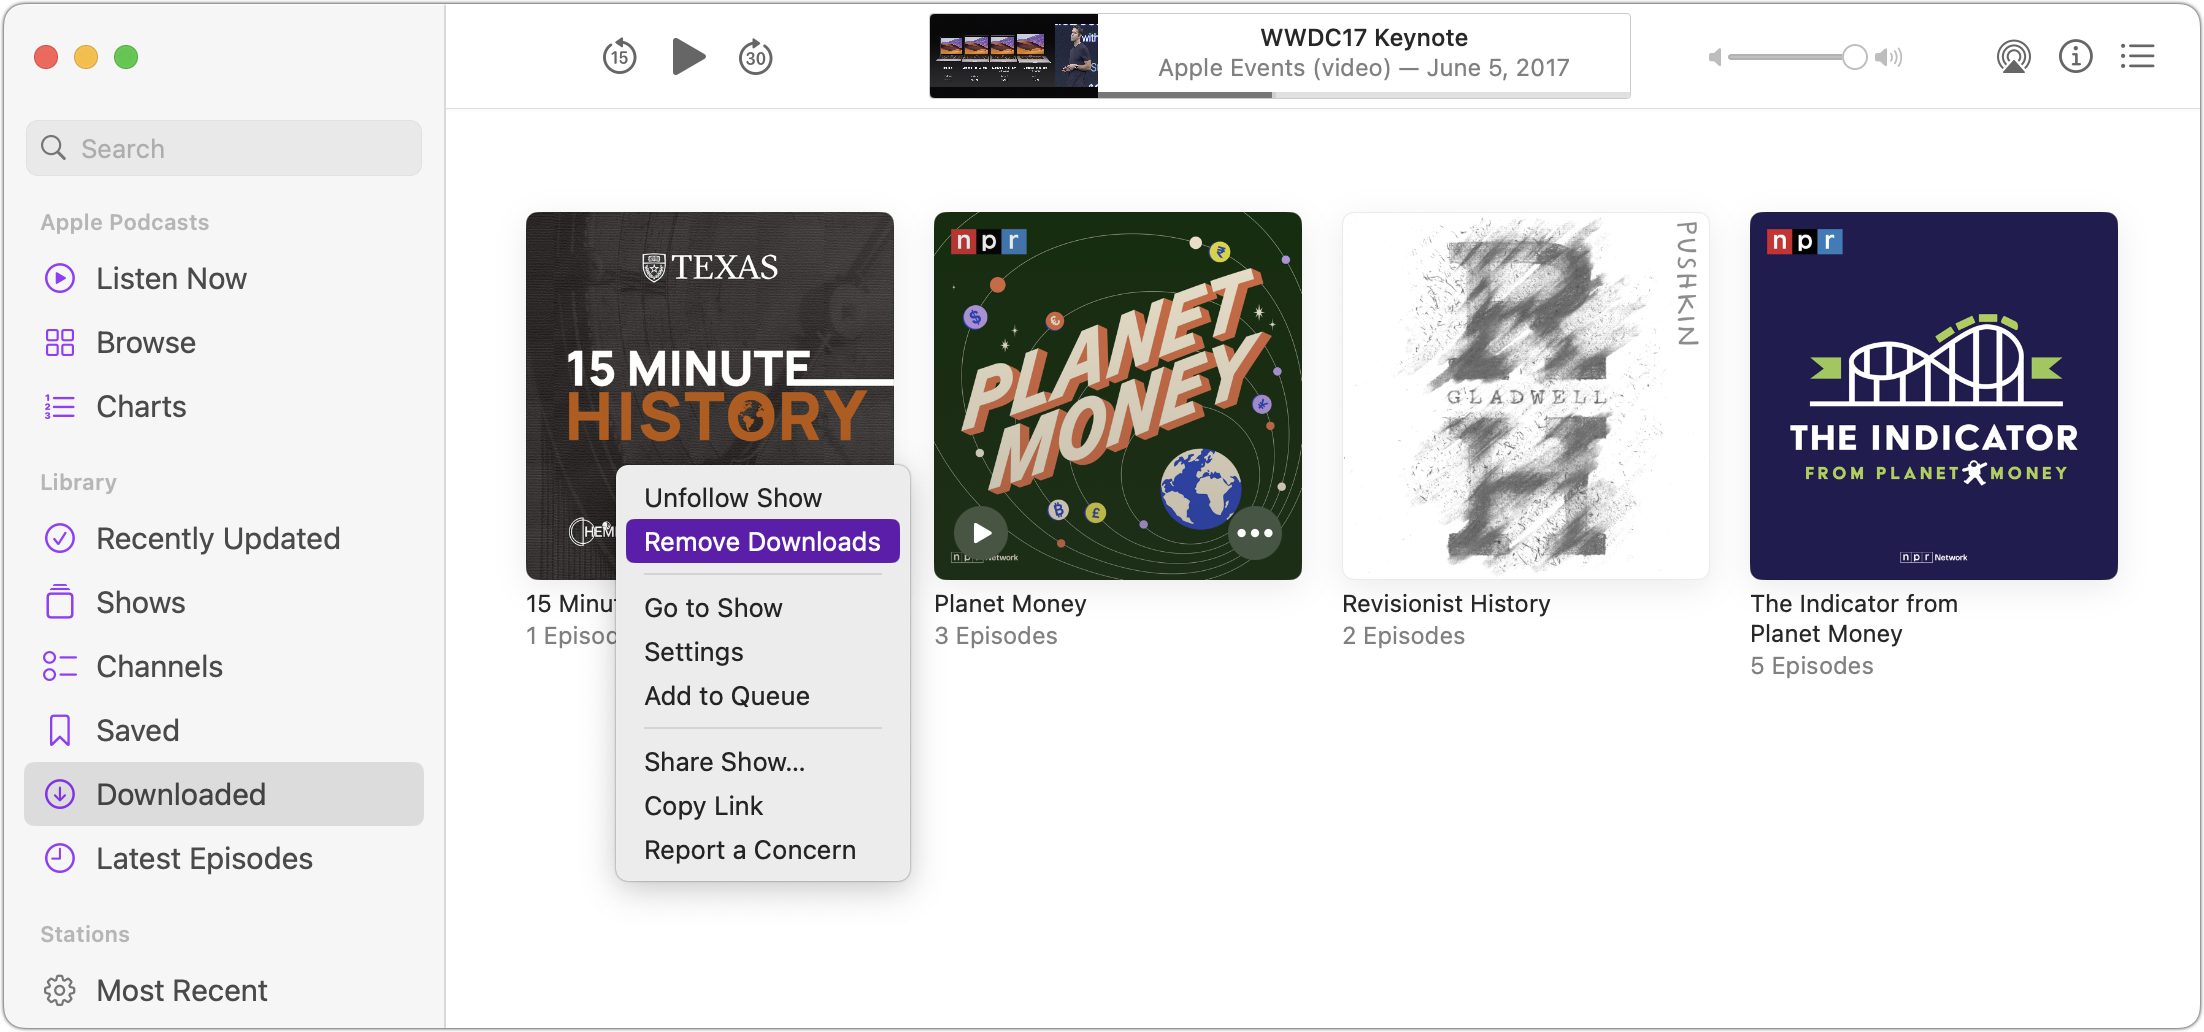
For a more focused approach, click Downloaded in the sidebar in Podcasts, Control-click each unwanted podcast, and choose Remove Downloads. Either way, make sure to set the downloading options appropriately in Podcasts > Settings > General. If you never want to listen to future episodes, choose Unfollow Show and then click Remove From Library to everything associated with the podcast.
10: Remove Watched TV Shows and Movies
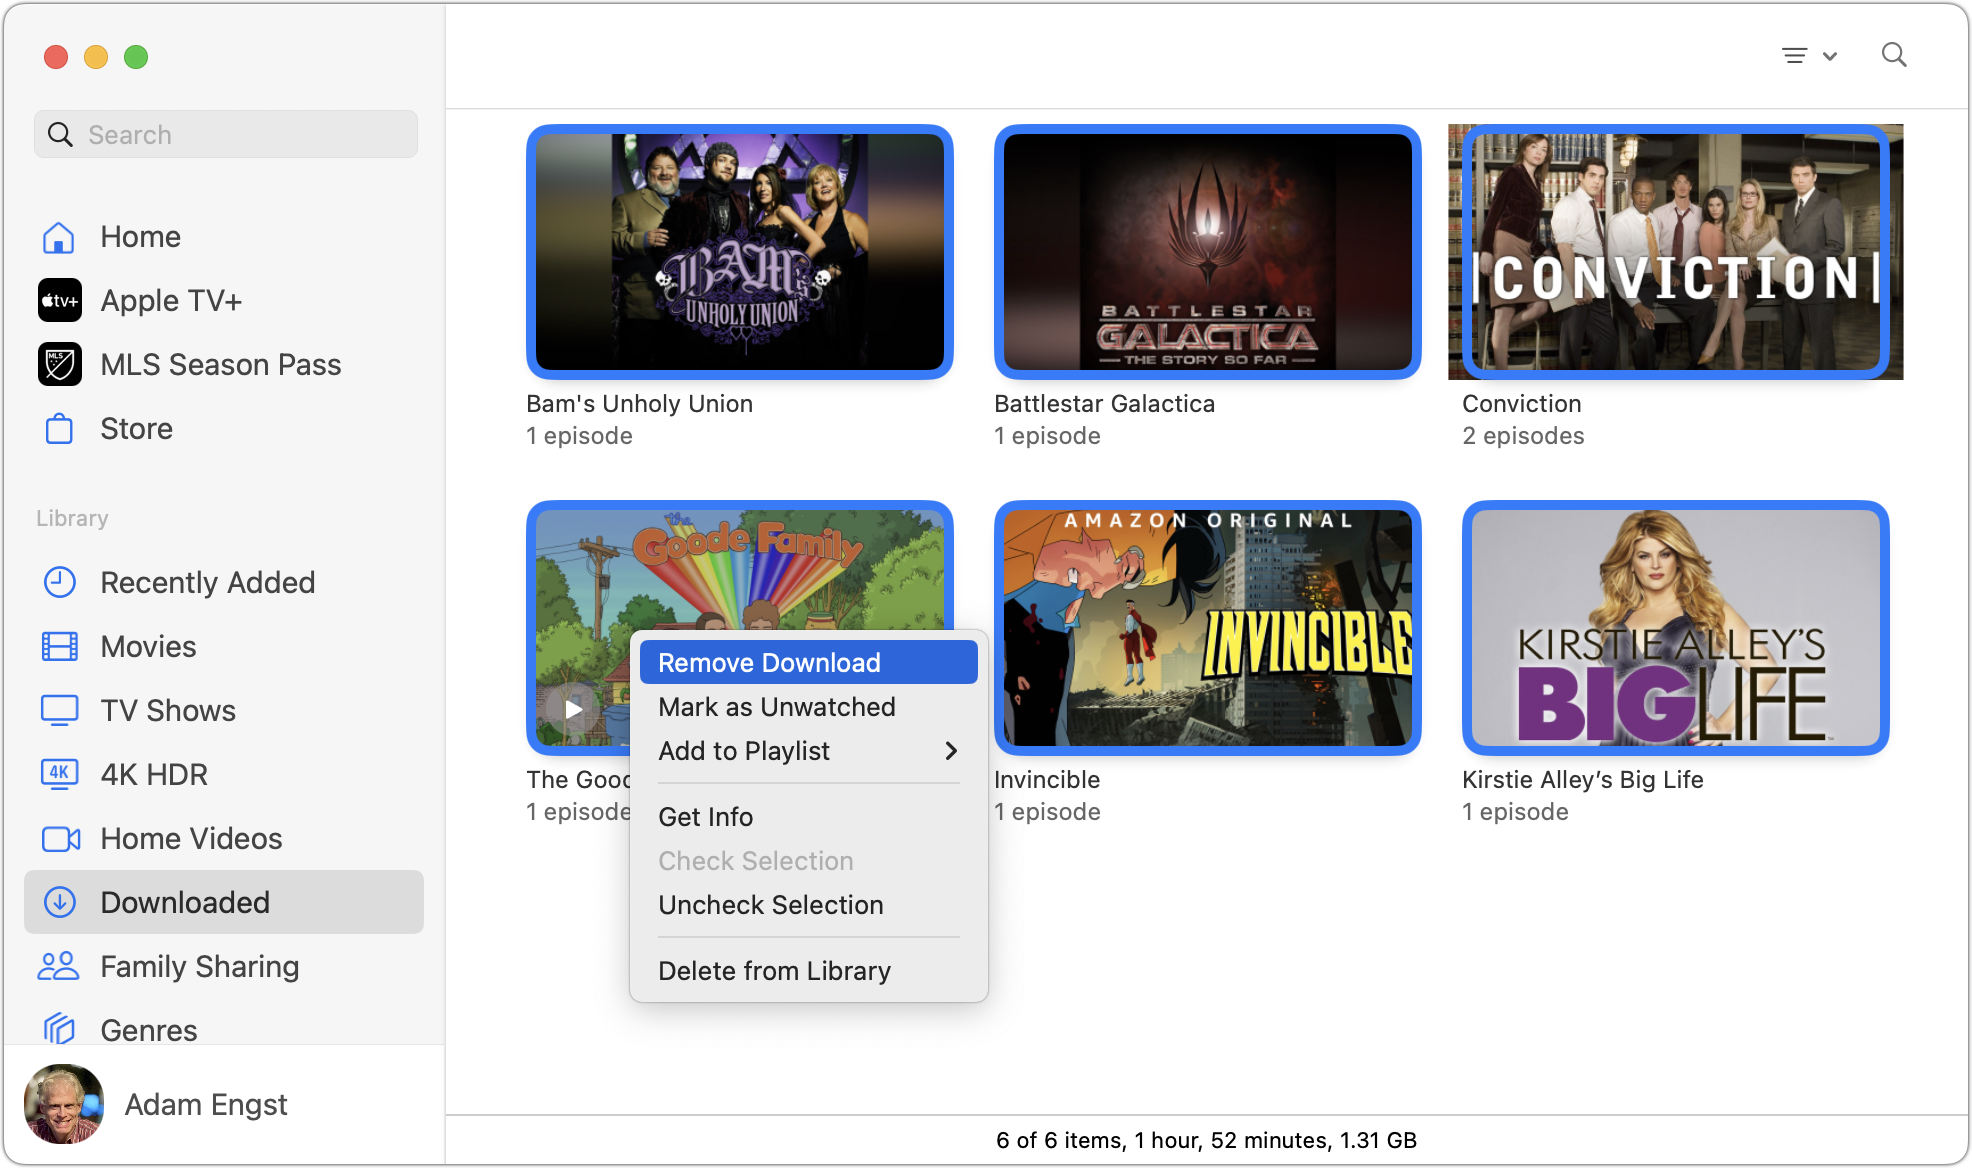
We’re starting to get into trickier territory here because not all movies and TV shows in the TV app can be downloaded again. To remove those that can easily be recovered, click Downloaded, select all, Control-click one of them, and choose Remove Download. (In my testing, the TV option in the System Settings Storage screen didn’t see all the downloads.)
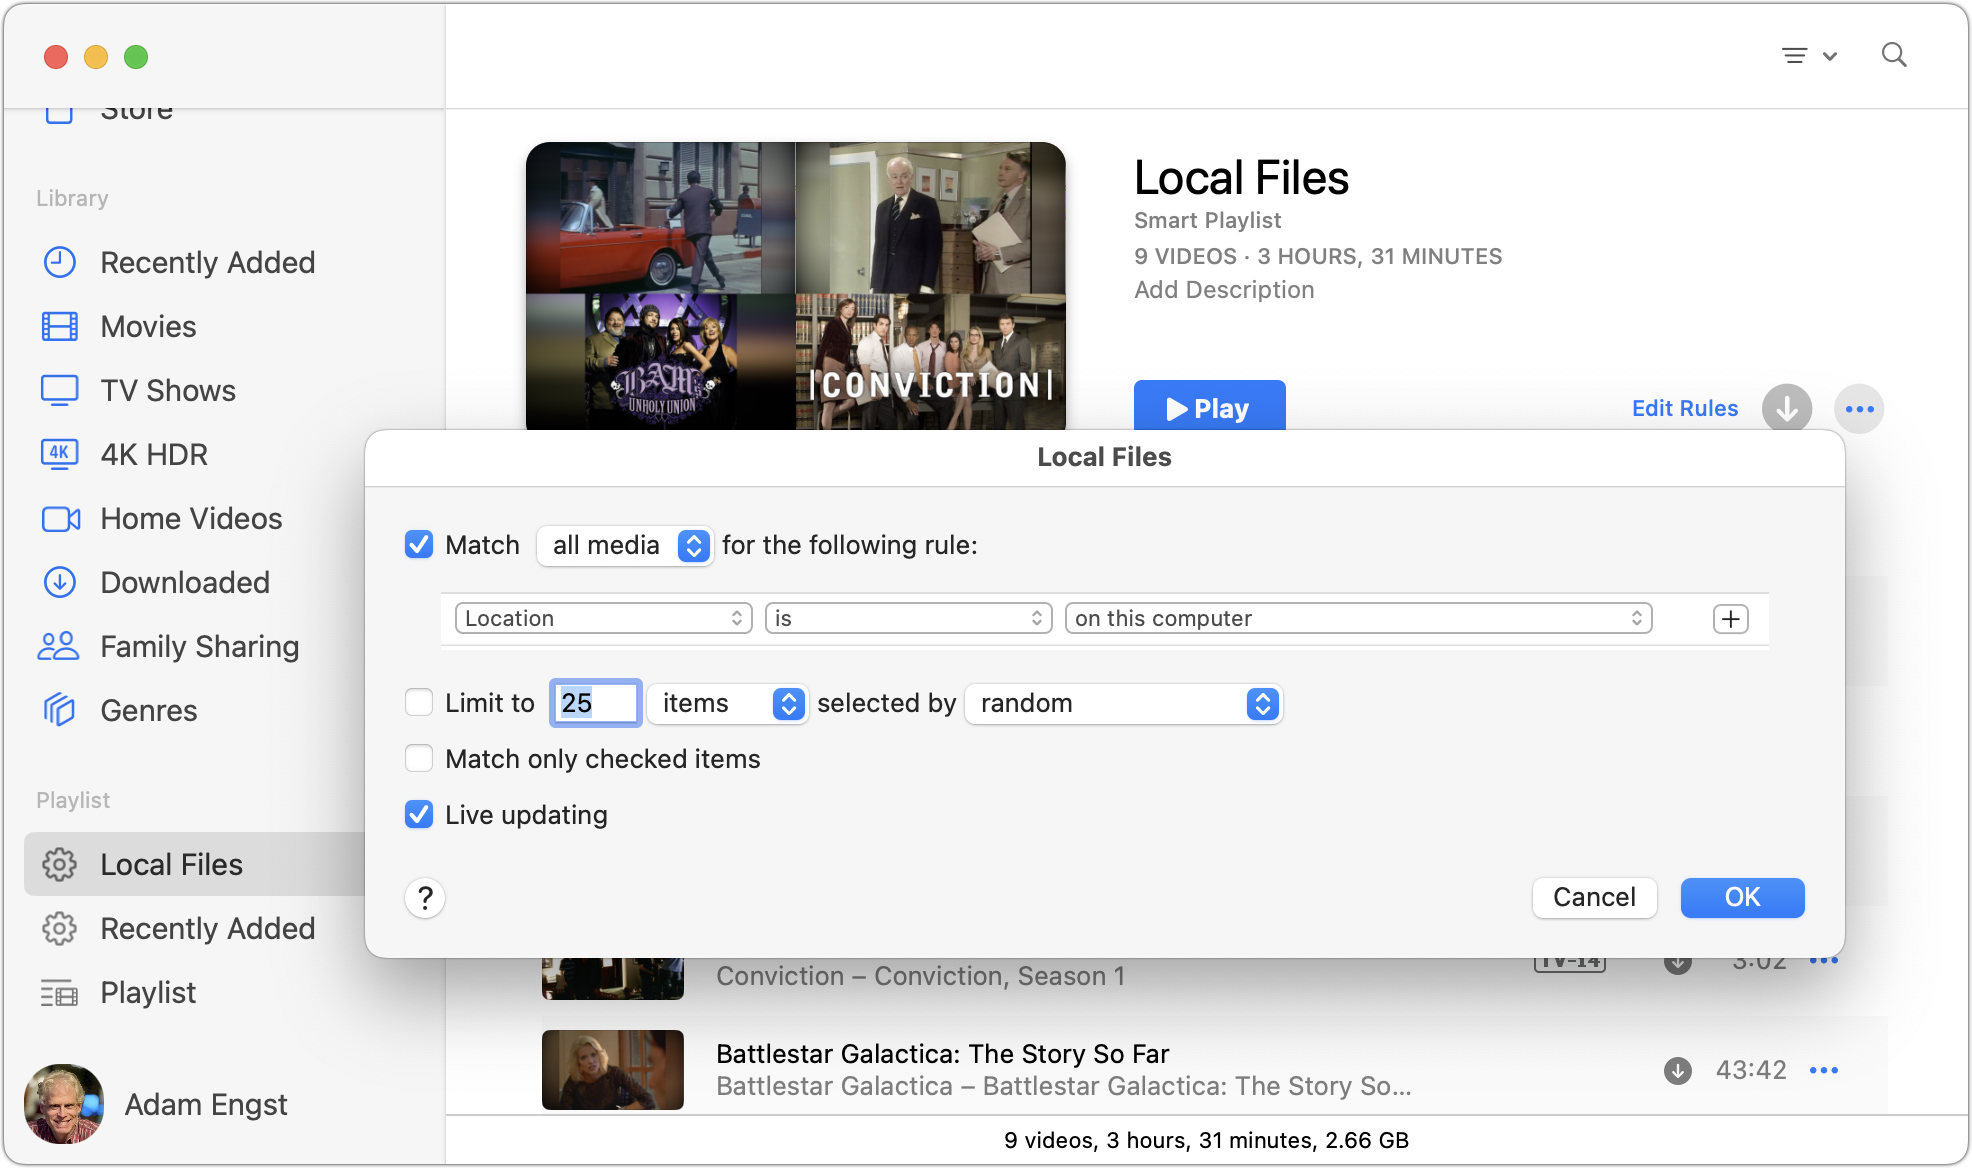
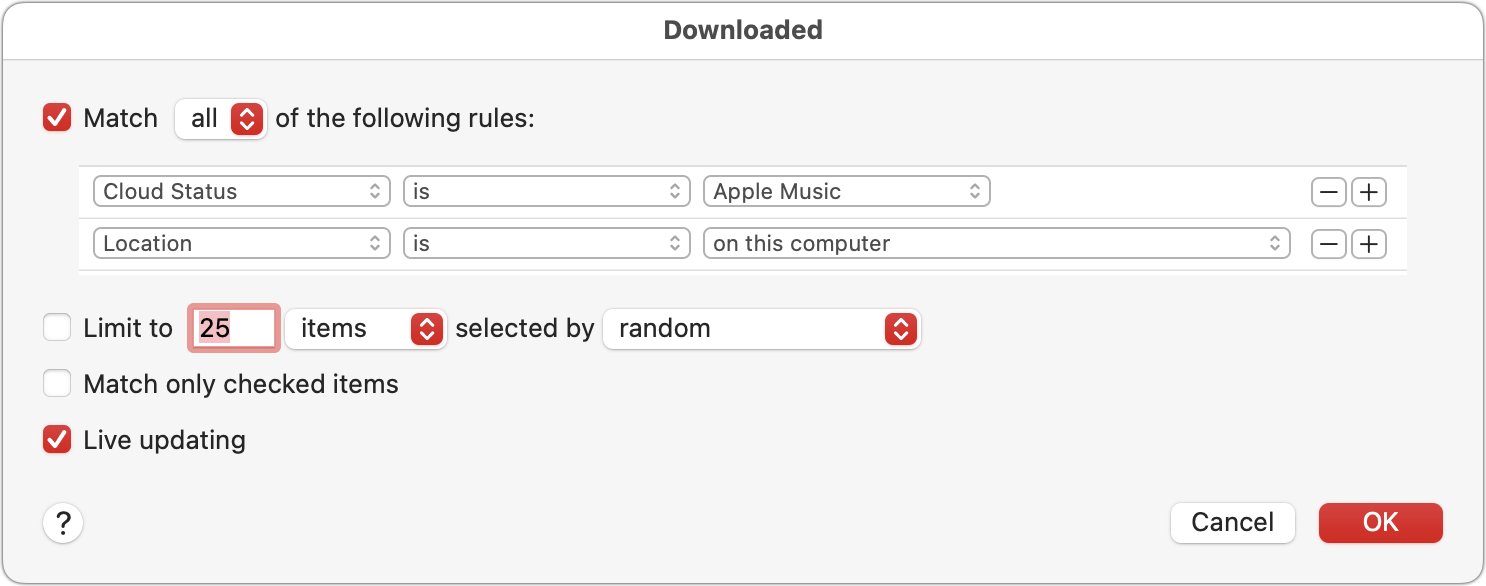
If manually added TV shows and movies are consuming space, create a smart playlist with a Location rule for items on the computer. To delete the files it collects, select them, Control-click one, and choose Delete from Library. Remember that you won’t be able to redownload such videos, so delete them only if they’re archived elsewhere or you don’t want to watch them again.
11: Remove Downloaded Copies of Apple Music and iTunes Match Songs
Just as you can remove downloaded video files in the TV app, you can also remove downloaded songs in the Music app. For some reason, the Music option in the System Settings Storage screen can only see and remove music videos, not regular tracks, but the smart playlist approach works for Music, too. Create a new smart playlist with a Cloud Status rule that matches either Apple Music or Matched (for iTunes Match) and a Location rule that looks for items on the computer. Then select everything it finds, Control-click one of them, and choose Remove Download. The Cloud Status rule is vital to avoid deleting music that exists only locally.
12: Remove Local Copies of Apple Books
I find Books the hardest to work with all of Apple’s media apps, but that may be related to it accumulating random test files over the years. (I’ve never regularly used it to read books—I prefer borrowing ebooks in Libby; see “Skip the Library Trip, Borrow Ebooks and More at Home,” 14 September 2020.)
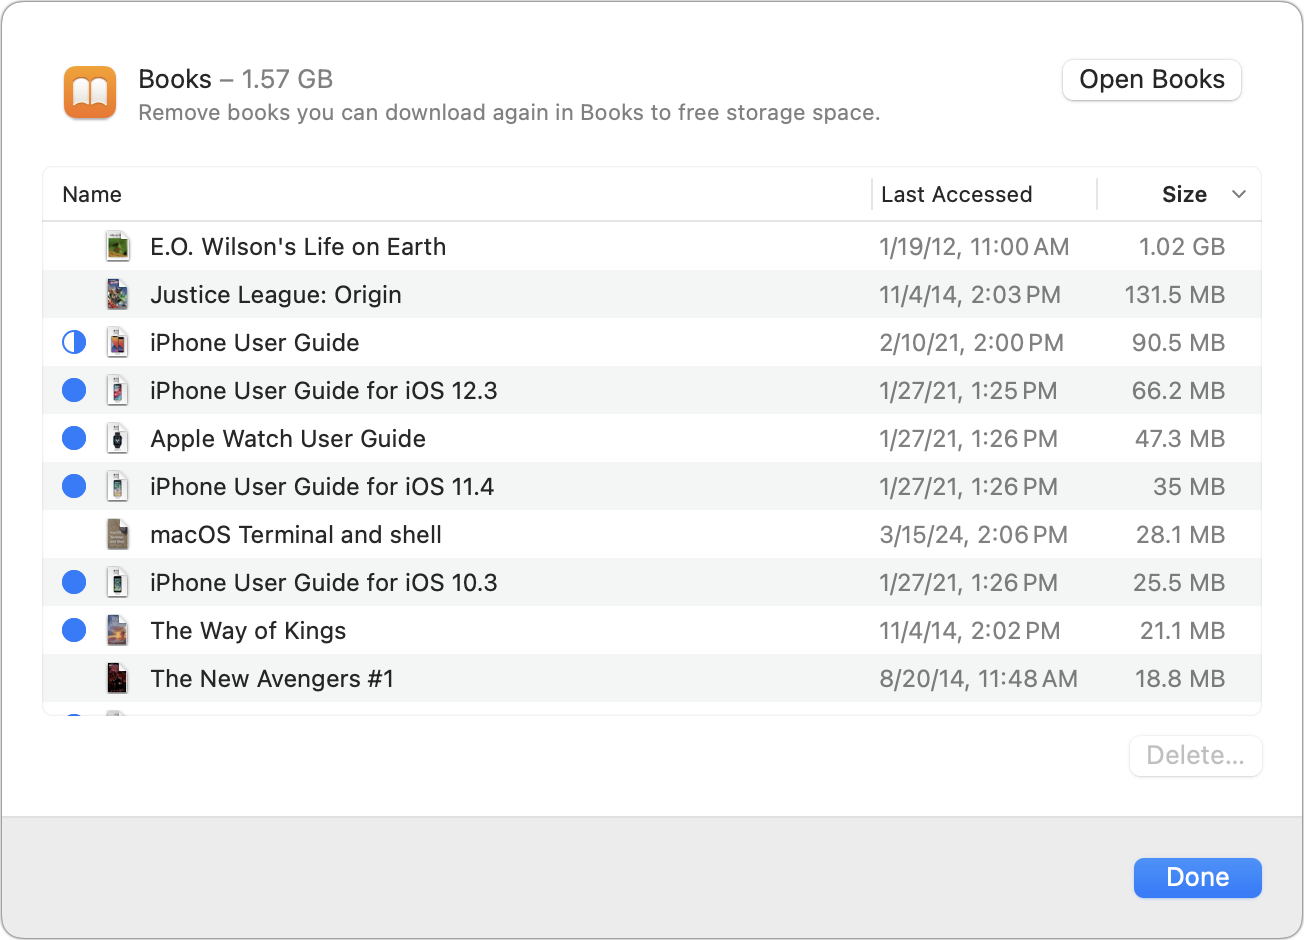
Apple makes it straightforward to remove downloads for books you’ve purchased from Apple Books (previously the iBookstore). Open System Settings > General > Storage > Books, select the books you don’t want, and click Delete.
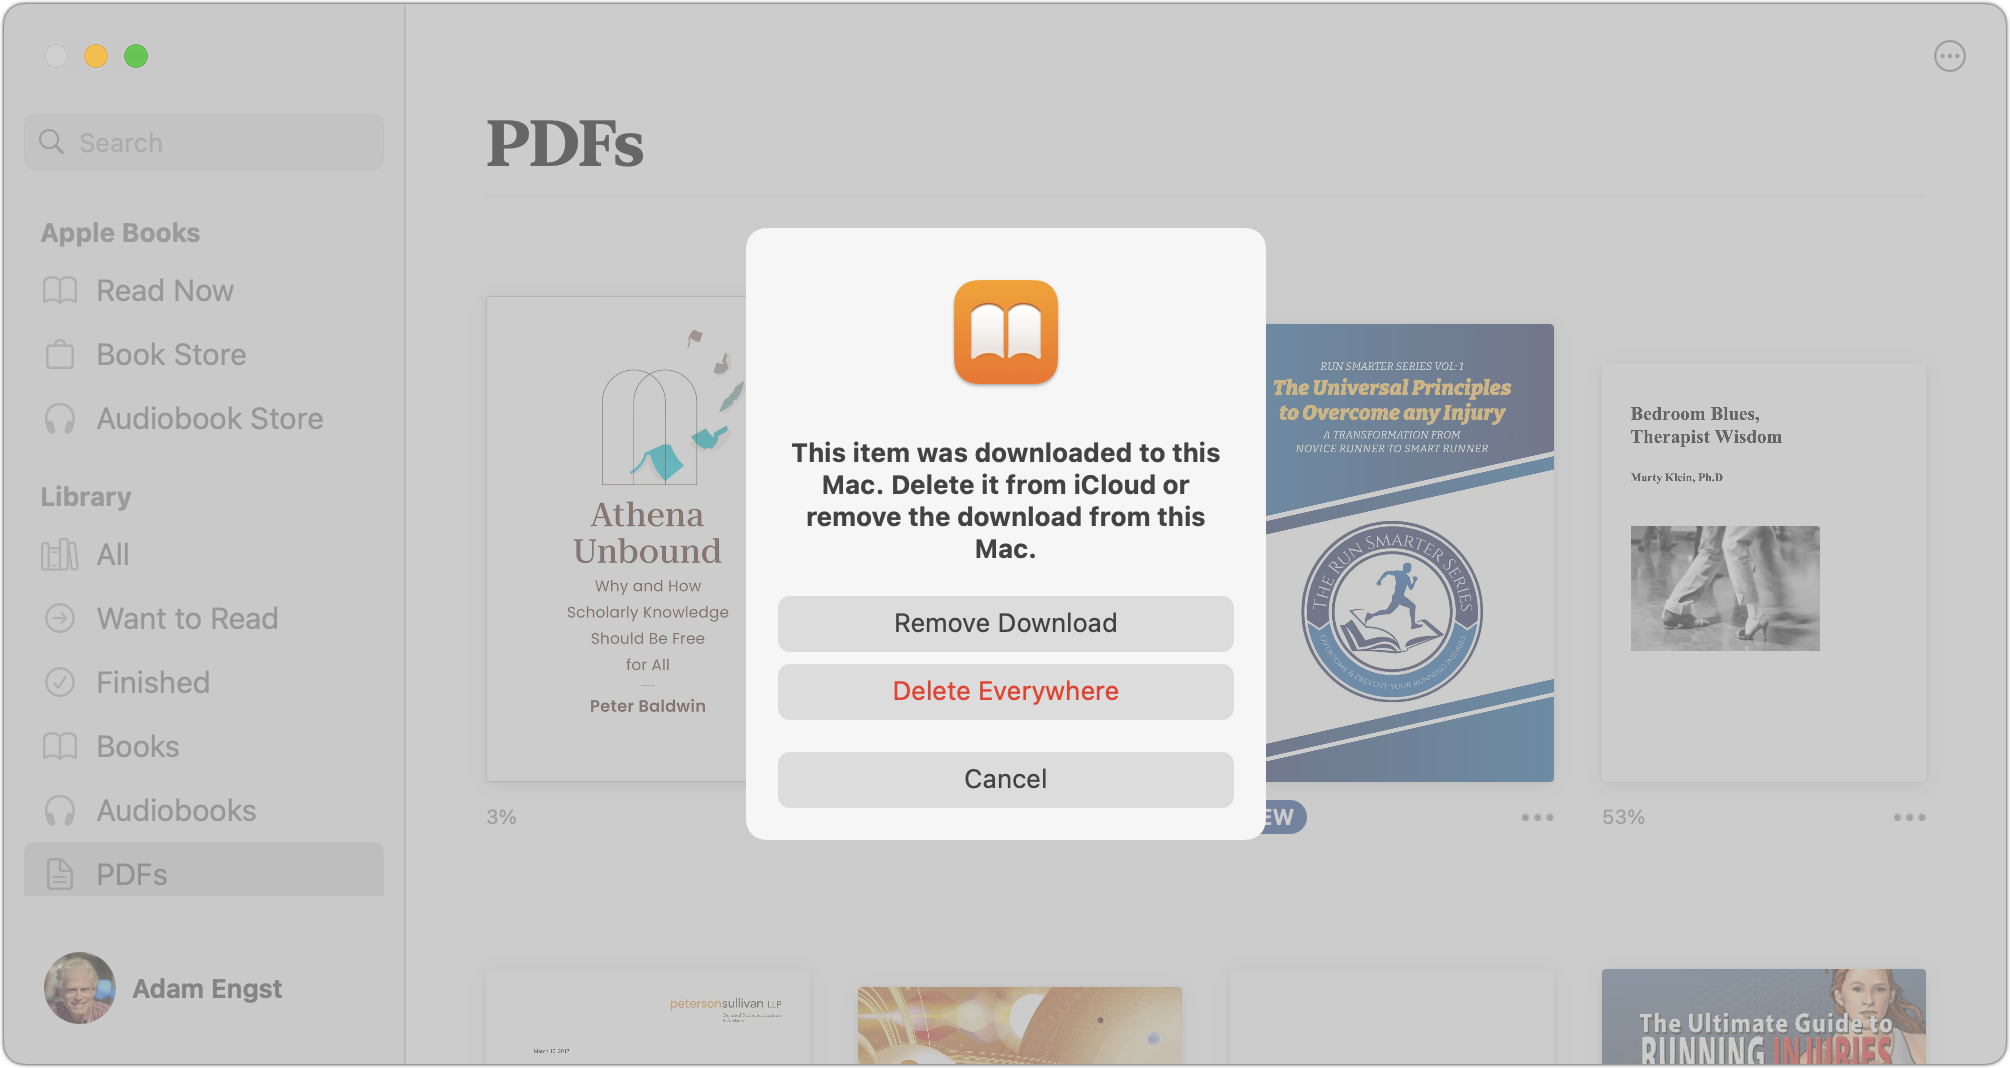
However, you could also have added large EPUB or PDF books to Books and synced them through iCloud. You can select one or more items in Books, Control-click one of them, choose Remove, and then click Remove Download. That’s unsatisfying because I could never figure out where the downloaded files lived to verify that they were actually being deleted. The only location I could find was iCloud Drive/Books, and I could view the contents of that folder only by double-clicking a PDF book to open it in Preview, Control-clicking the filename at the top of the window, and choosing the Books folder. But deleting a file from that folder deletes it from Books, too—it’s the same as clicking Delete Everywhere below and does not merely remove a download. Be careful.
13: Select Optimize Mac Storage and Remove Local iCloud Drive Files
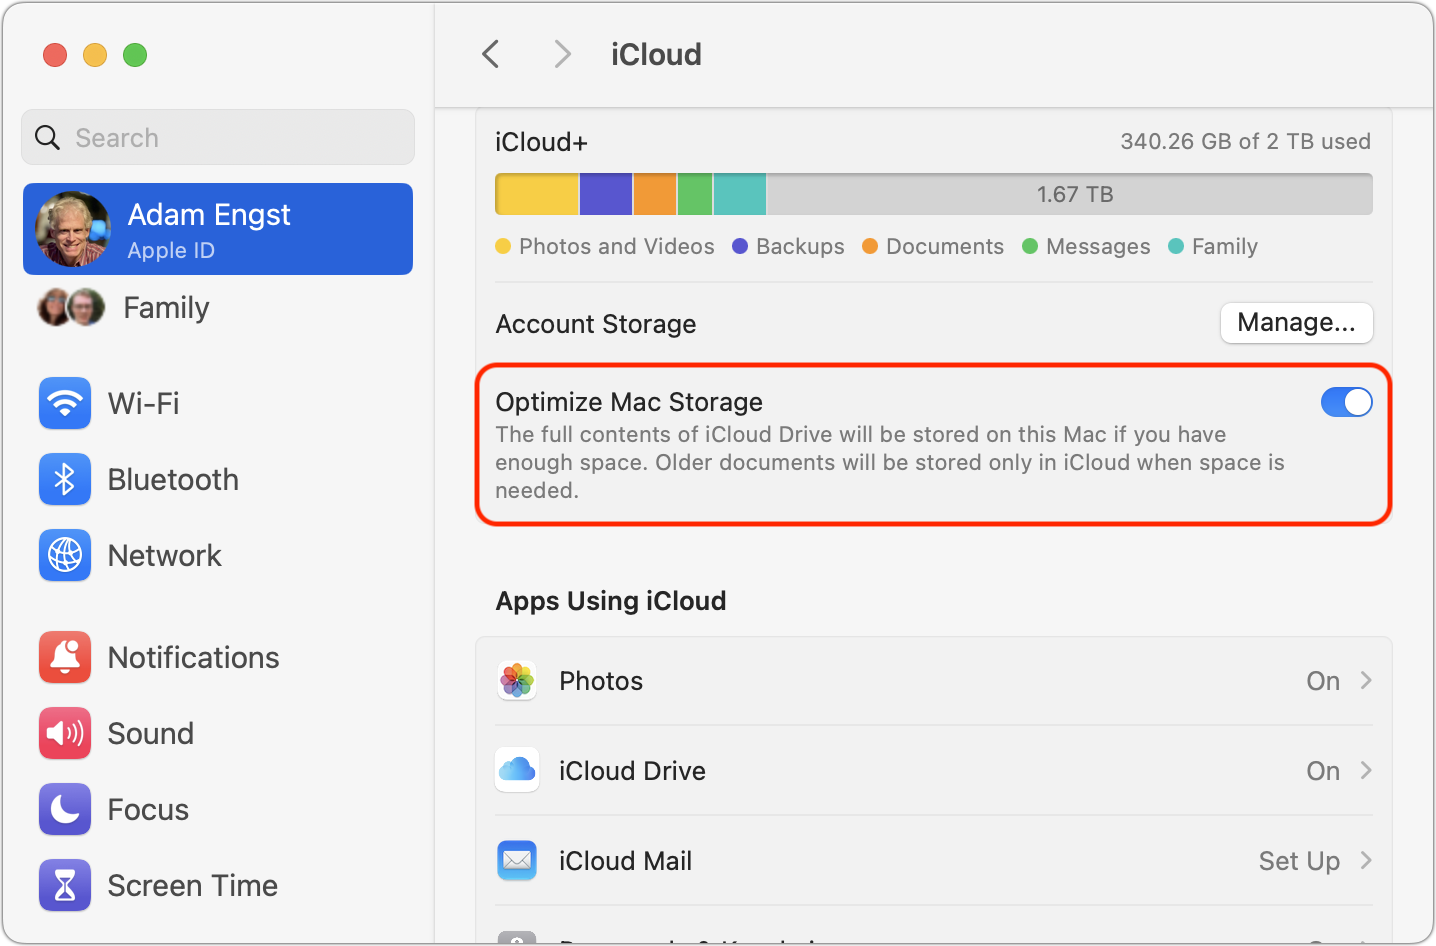
If you store large quantities of data in iCloud Drive, the local copies may consume a lot of space on your Mac’s drive. Because you can always download those files from iCloud Drive again, it’s safe to turn on System Settings > Your Name > iCloud > Optimize Mac Storage. Then, Control-click folders and choose Remove Downloads. Of course, cloud-only files won’t be backed up locally, but they should have been backed up before you turned on Optimize Mac Storage, and any files you modify or create will be local (at least for a while) and will thus be backed up.
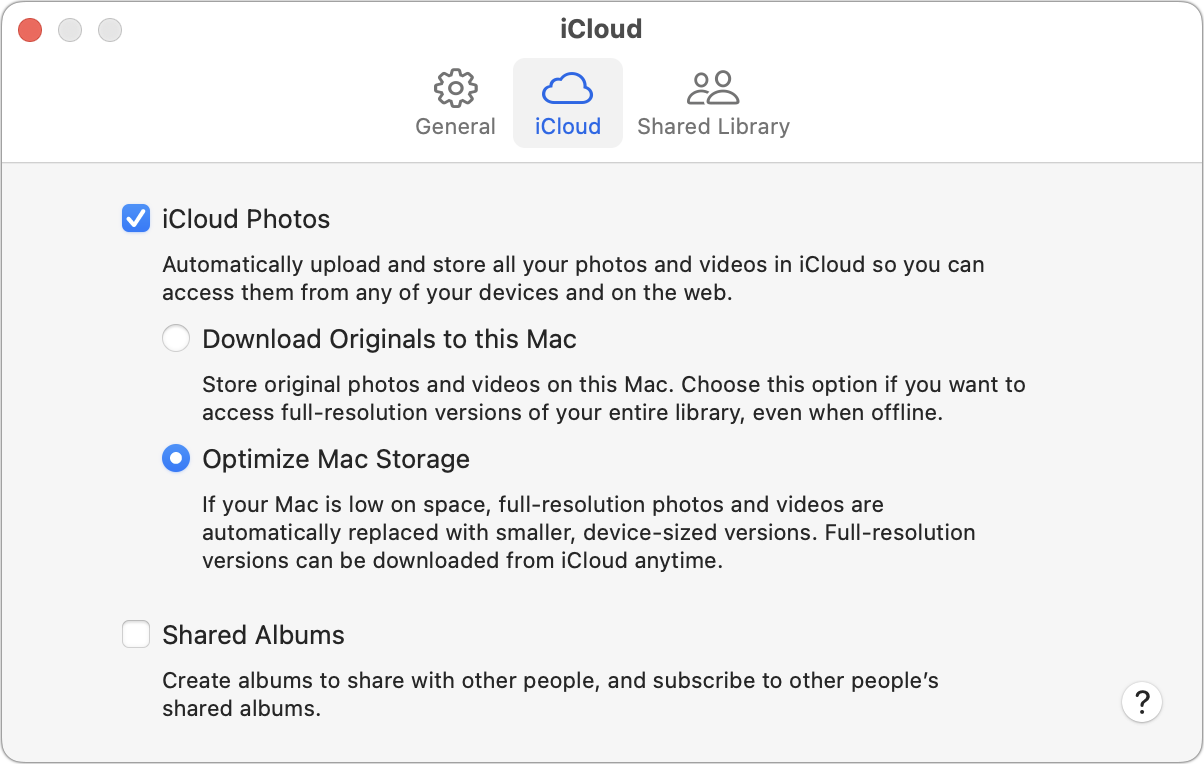
Conceptually similar is the option in Photos > Settings > iCloud to Optimize Mac Storage. As Apple says, it replaces full-resolution photos and videos with smaller, device-sized versions. Whenever you open a photo or video, Photos automatically downloads the full-resolution version from iCloud. You can turn this option on, and I’ve done that on my MacBook Air.
However, I would caution you about two things if you’re trying to clear space:
- Photos doesn’t provide a manual way to remove downloaded photos and retain just a placeholder. Space management happens automatically, so you shouldn’t expect to recover space immediately after enabling Optimize Mac Storage. However, turning it on will alert macOS that it can evict originals, so error conditions caused by low space may go away.
- Although I trust iCloud Photos insofar as I trust Apple’s ability to maintain the integrity of my files stored in its cloud services, I also want a local backup of the full-resolution images and videos because of the downside of a rare glitch deleting a lifetime of memories. There’s no way to create a local backup of iCloud Photos when Optimize Mac Storage is active. That’s why I use that setting only on my MacBook Air; I have my iMac set to “Download Originals to this Mac” for backup and better performance.
Although this is venturing into the weeds, if you use Box, Dropbox, Google Drive, or another cloud storage service, it almost certainly has an option to remove local copies of files. That may or may not be generally desirable, but if you’re trying to clear a bunch of space quickly, it will do so without permanently deleting any data.
14: Delete iPhoto Libraries
Although iPhoto has been dead and gone for many years, you could still have an iPhoto library on your drive because there was no prompt or migration path that deleted these libraries after you started using Photos. Assuming that you’ve migrated its contents to Photos (the package will have a .migratedphotolibrary extension), it’s safe to remove the iPhoto library.
However, you may not save much space. Apple uses Unix hard links to store the same master images in both iPhoto and Photos. Migrating from iPhoto to Photos doesn’t copy files from the iPhotos library—it adds new hard links. Likewise, deleting an iPhoto library doesn’t remove the hard-linked files from the drive, as those files exist independently of any single link. (Hard-linked files are deleted only when all hard links to them are deleted.) On TidBITS Talk, David C. explained how this works in detail, and when I looked back to see what we had written about it in TidBITS, I ran across Jason Snell’s article, “Initial Impressions of Photos for OS X Beta” (9 February 2015), which links to a Six Colors article explaining more about the hard links.
15: Delete Time Machine Snapshots
Today’s Time Machine leverages local APFS snapshots, generating one every hour and keeping the last day’s worth so you can restore recent files from Time Machine even if your backup drive isn’t available. Although these snapshots are of your entire volume, the magic of APFS means that each contains only the data that has changed since the previous one. This also means that if you download a huge amount of data in a single day, that data is essentially doubled by the snapshot!
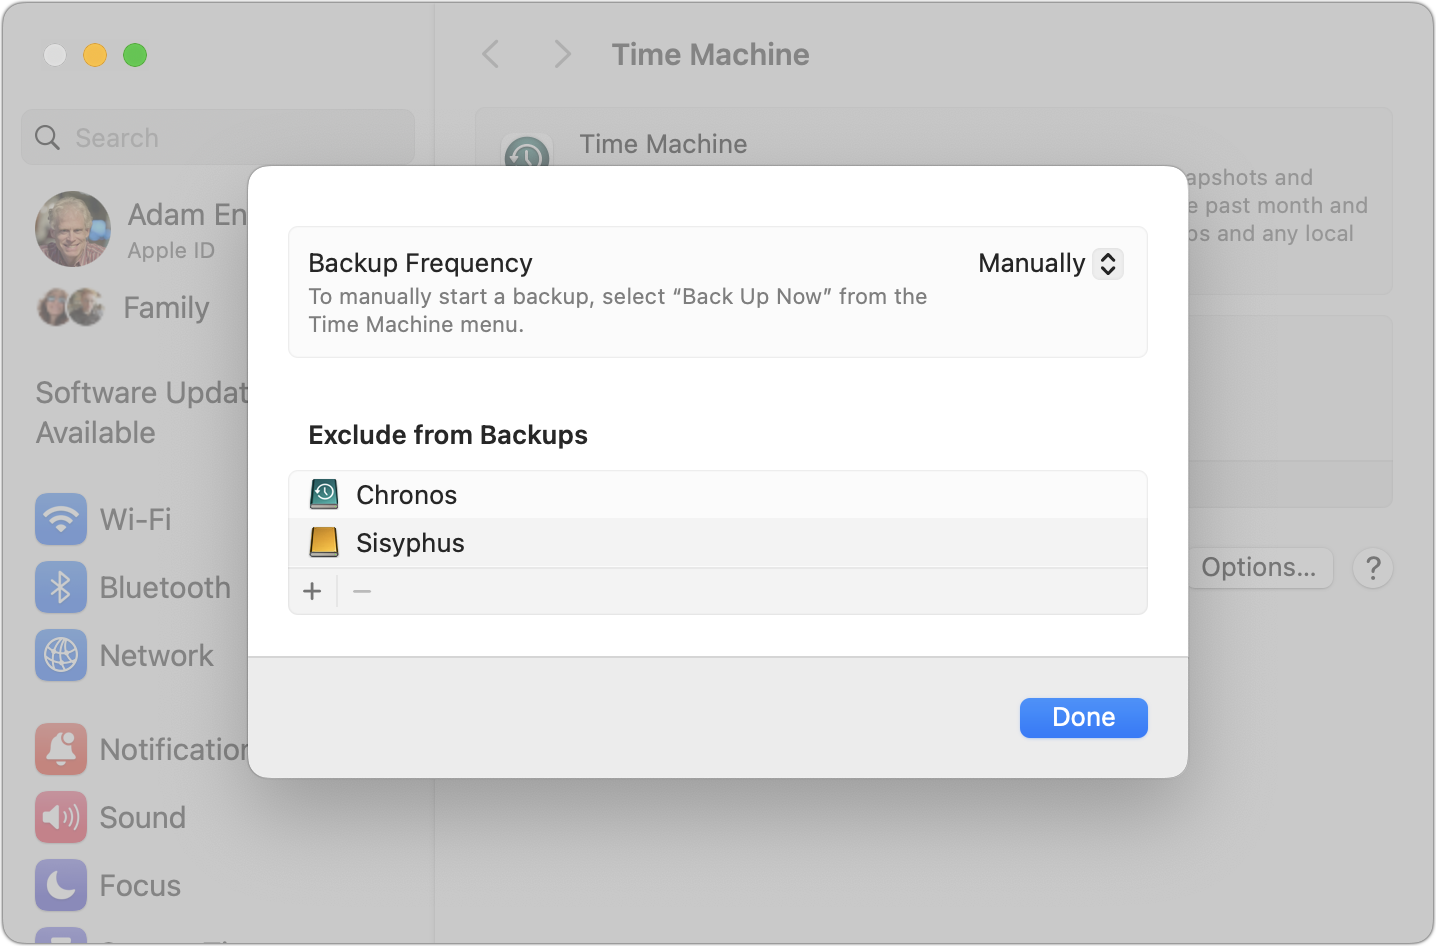
If you need to recover space temporarily, you can delete these snapshots. Apple recommends doing this by turning off automatic backups: open System Settings > General > Time Machine > Options, and set Backup Frequency to Manually. Make sure to turn automatic backups back on later—any sort of manual selection of files or backup triggering leaves open the possibility of not having a backup when you need it. Although Apple says the snapshots will be deleted in a few minutes, that didn’t seem to happen in my testing.
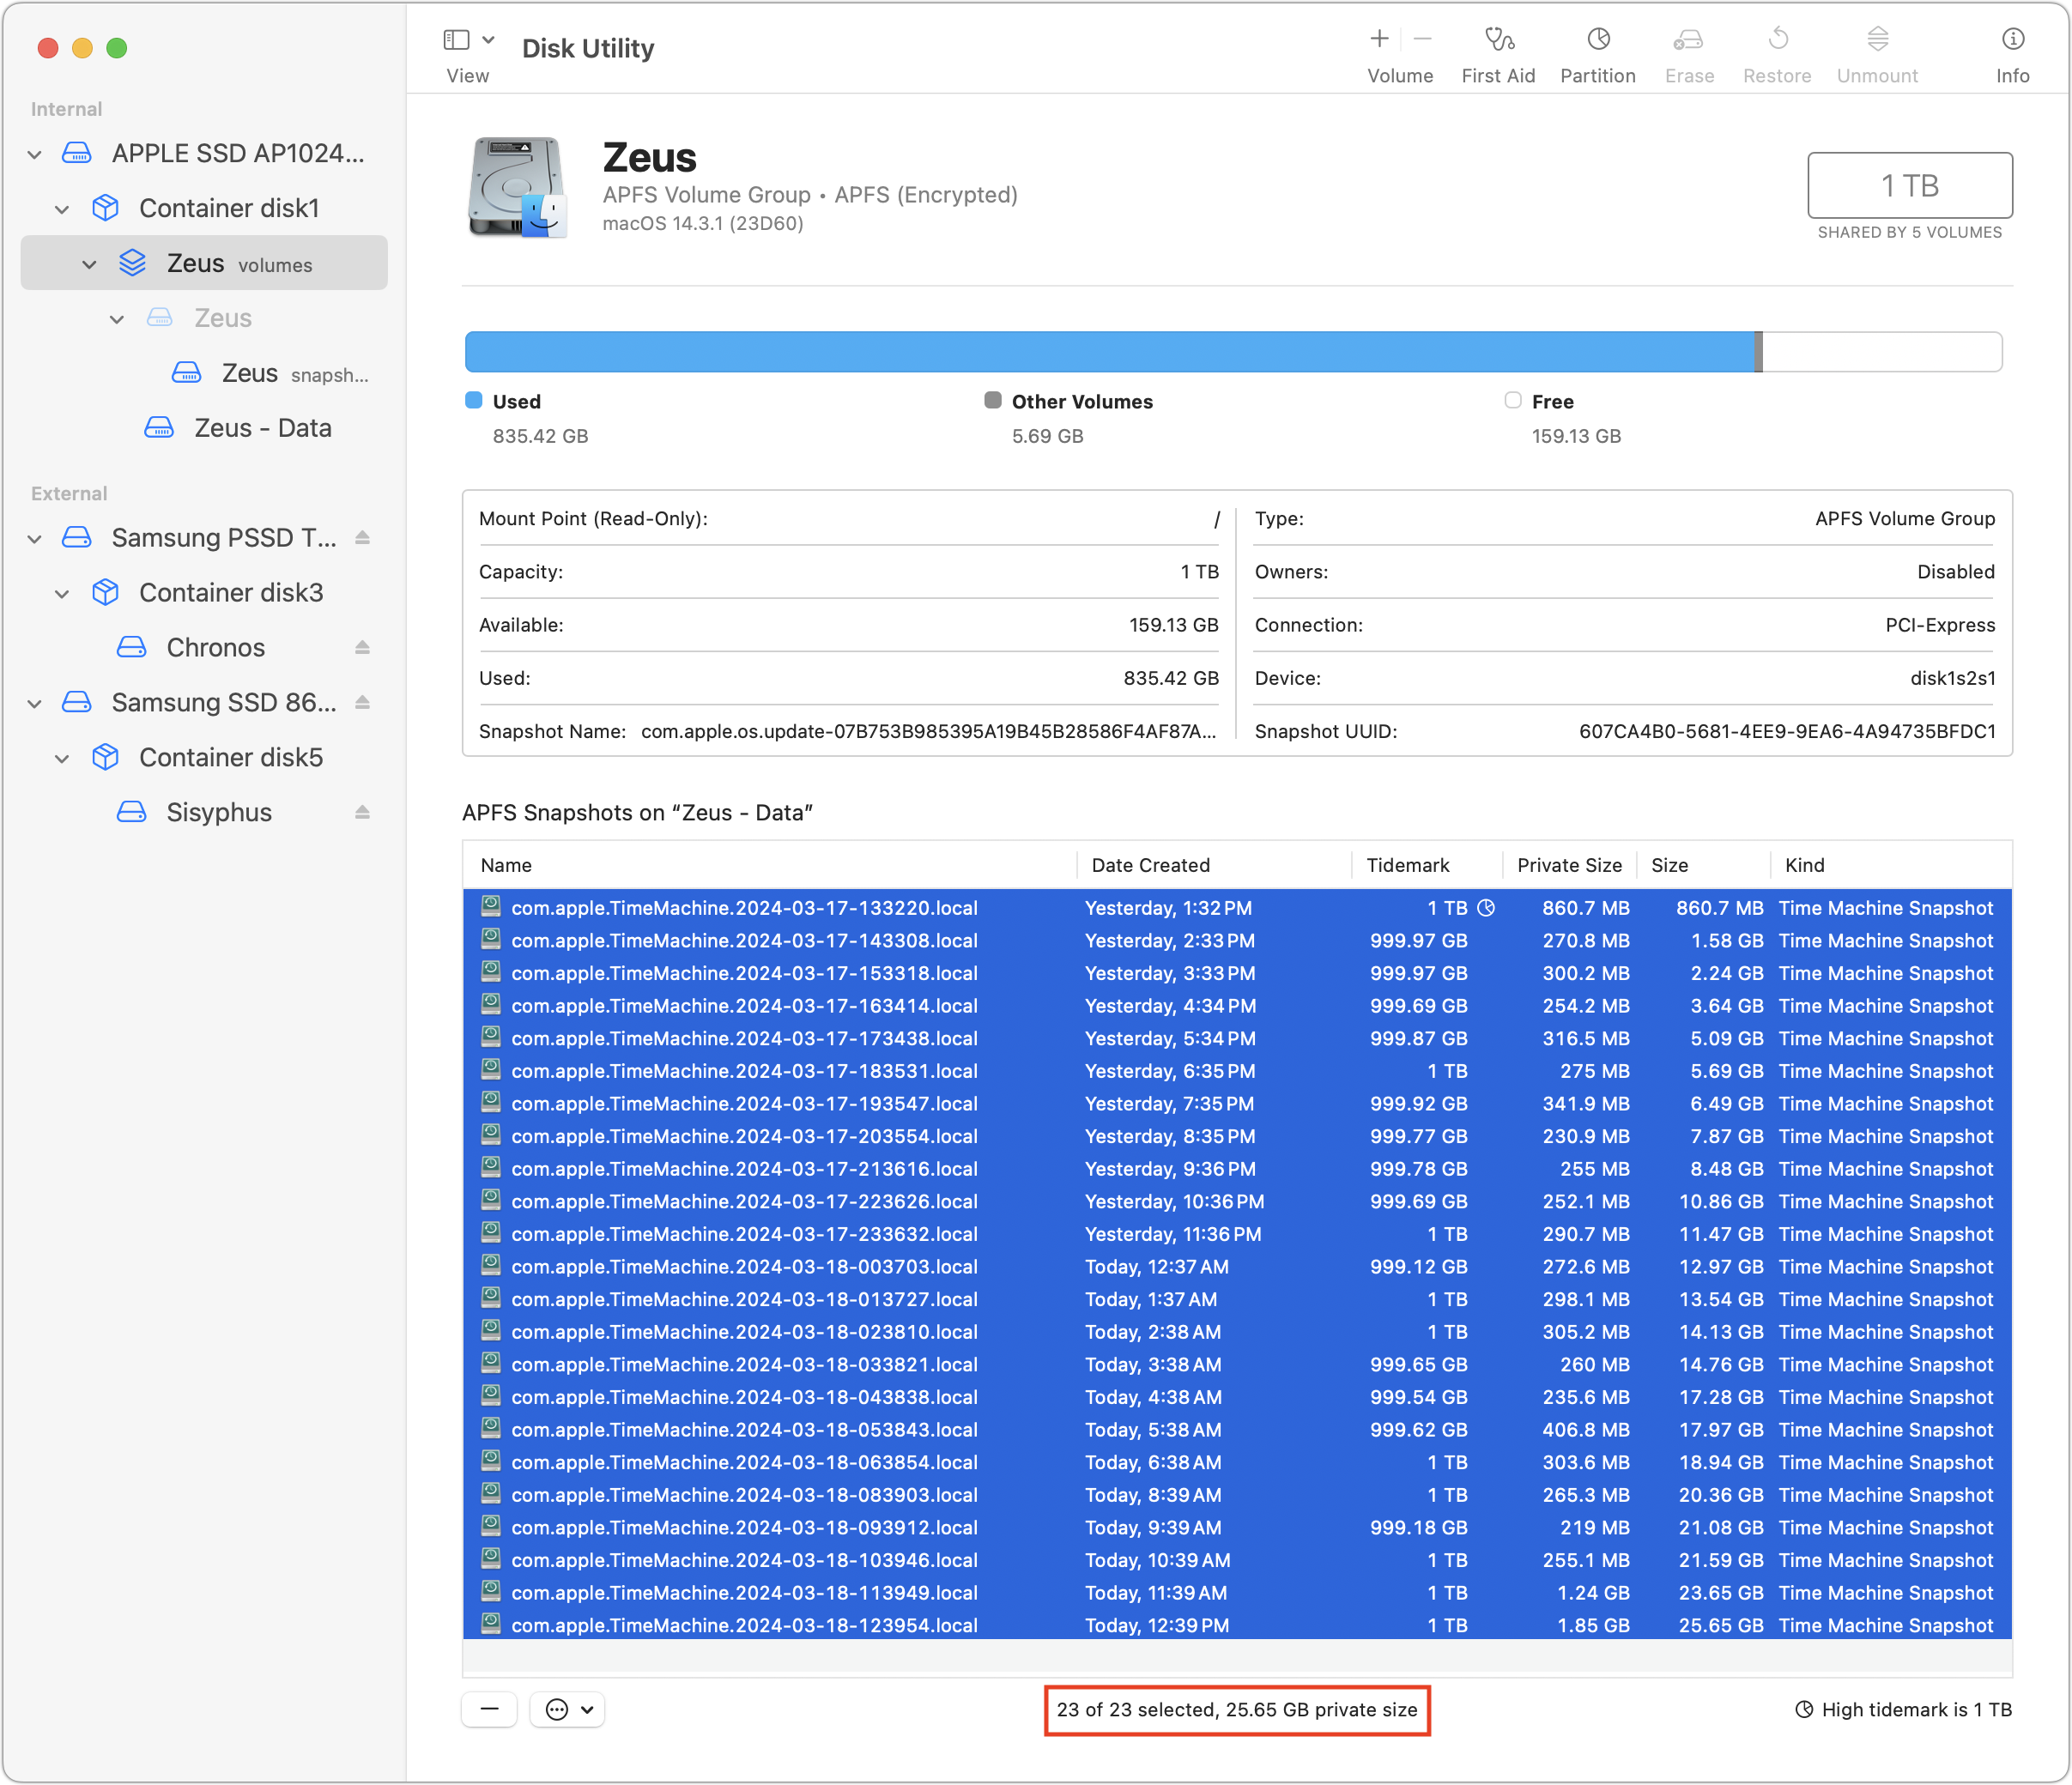
For more direct manipulation and immediate gratification, work in Disk Utility. Select your startup drive’s volume, and delete snapshots by selecting all of them, Control-clicking one, and choosing Delete.
I don’t recommend deleting Time Machine snapshots other than in exceptional circumstances for three reasons:
- Even though the snapshots are on your startup drive, deleting them seems to prevent the Time Machine interface from showing data that has been copied to your external Time Machine drive. If you need to recover something from the time covered by the snapshots, you may be able to do that by manually browsing each Time Machine backup folder in the Finder.
- Theoretically, you can see how much space deleting snapshots will save by selecting all the snapshots and looking at the private size number at the bottom of the screen. I’m not confident that will always be the case, but it will give you a ballpark figure.
- This approach to saving space works only temporarily because Time Machine will recreate these snapshots as it runs.
All that said, it may be worth checking Disk Utility to see if there are orphaned Time Machine snapshots taking up space unnecessarily.
16: Delete Unwanted Contents of the Downloads Folder
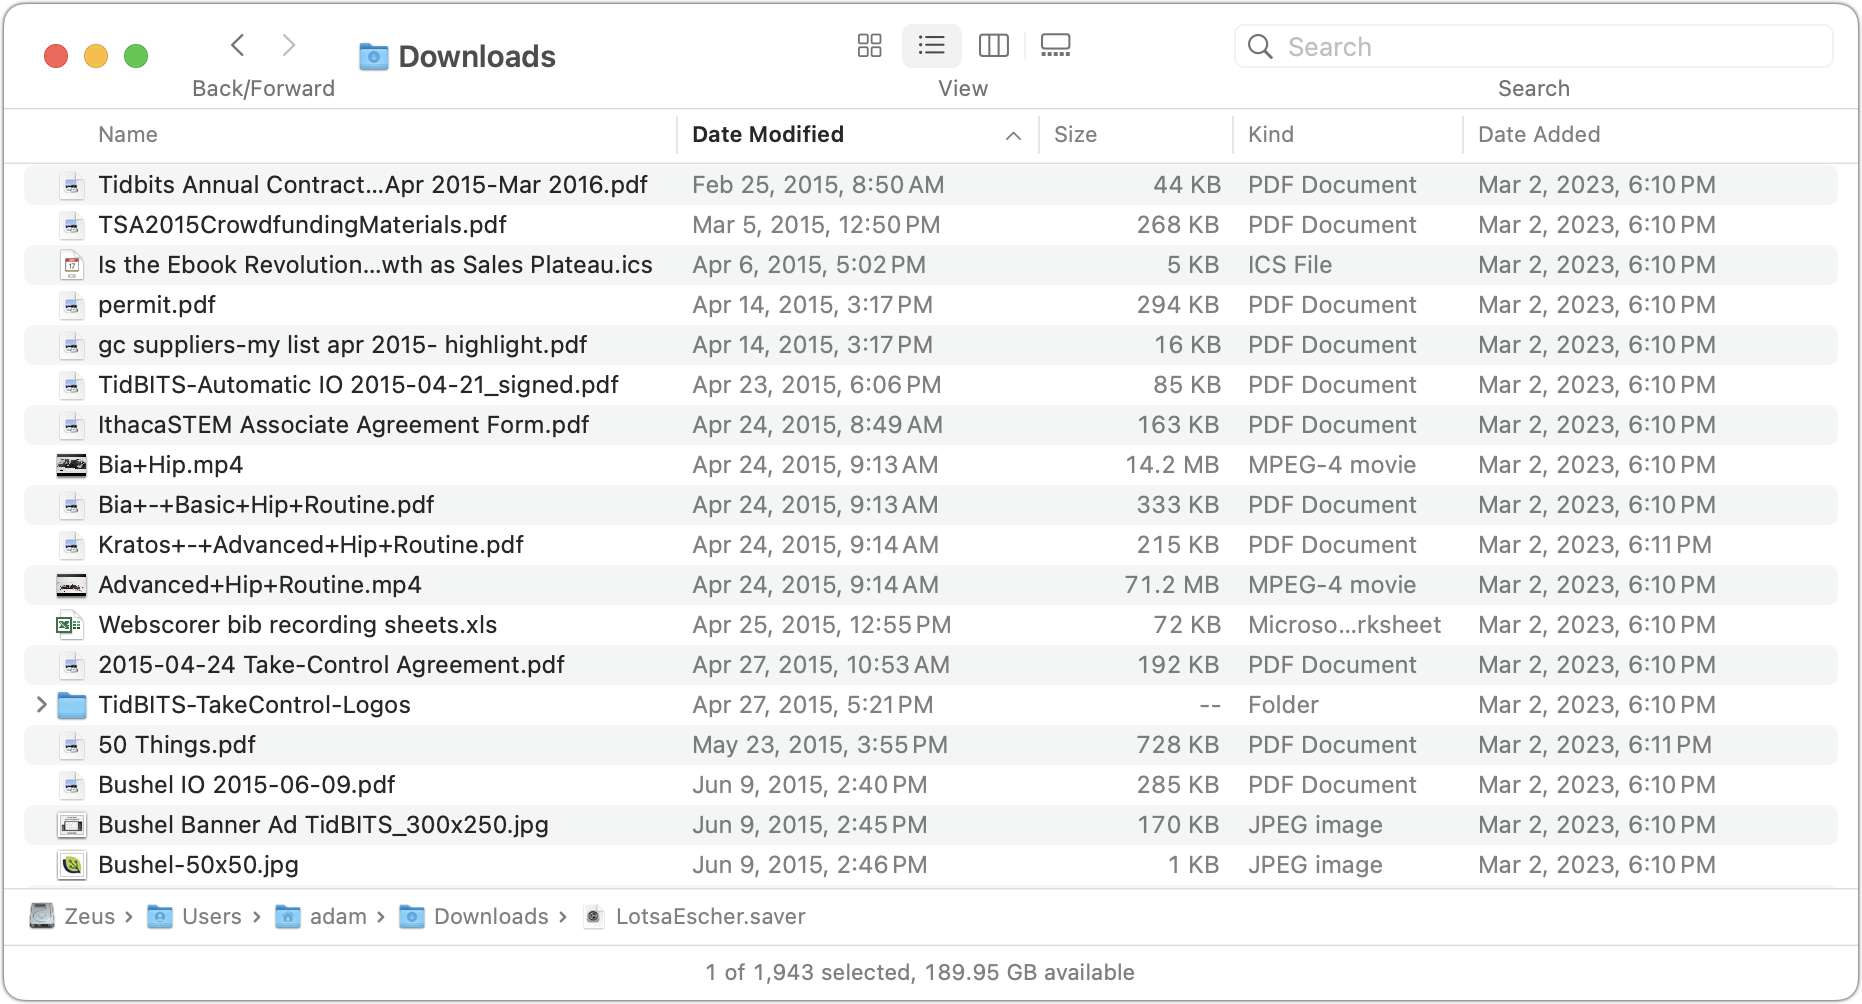
Many of us haven’t established a routine of deleting downloaded files we never need again. I’m terrible about this—my Downloads folder currently holds 1943 files occupying over 16 GB of space. If you’re sure you don’t need any of these files, you could choose File > Select All and drag them to the Trash.
But if you might need some recently downloaded files, consider sorting the Downloads folder by the Date Modified column in List View, then delete all the files that were last modified more than a year ago. Embarrassingly, I still have downloads from 2015.
Of course, if you have files or apps in your Downloads folder that you regularly use, don’t delete them. I think it’s dangerous to keep anything important in the Downloads folder—there’s no reason not to move such files to more appropriate folders.
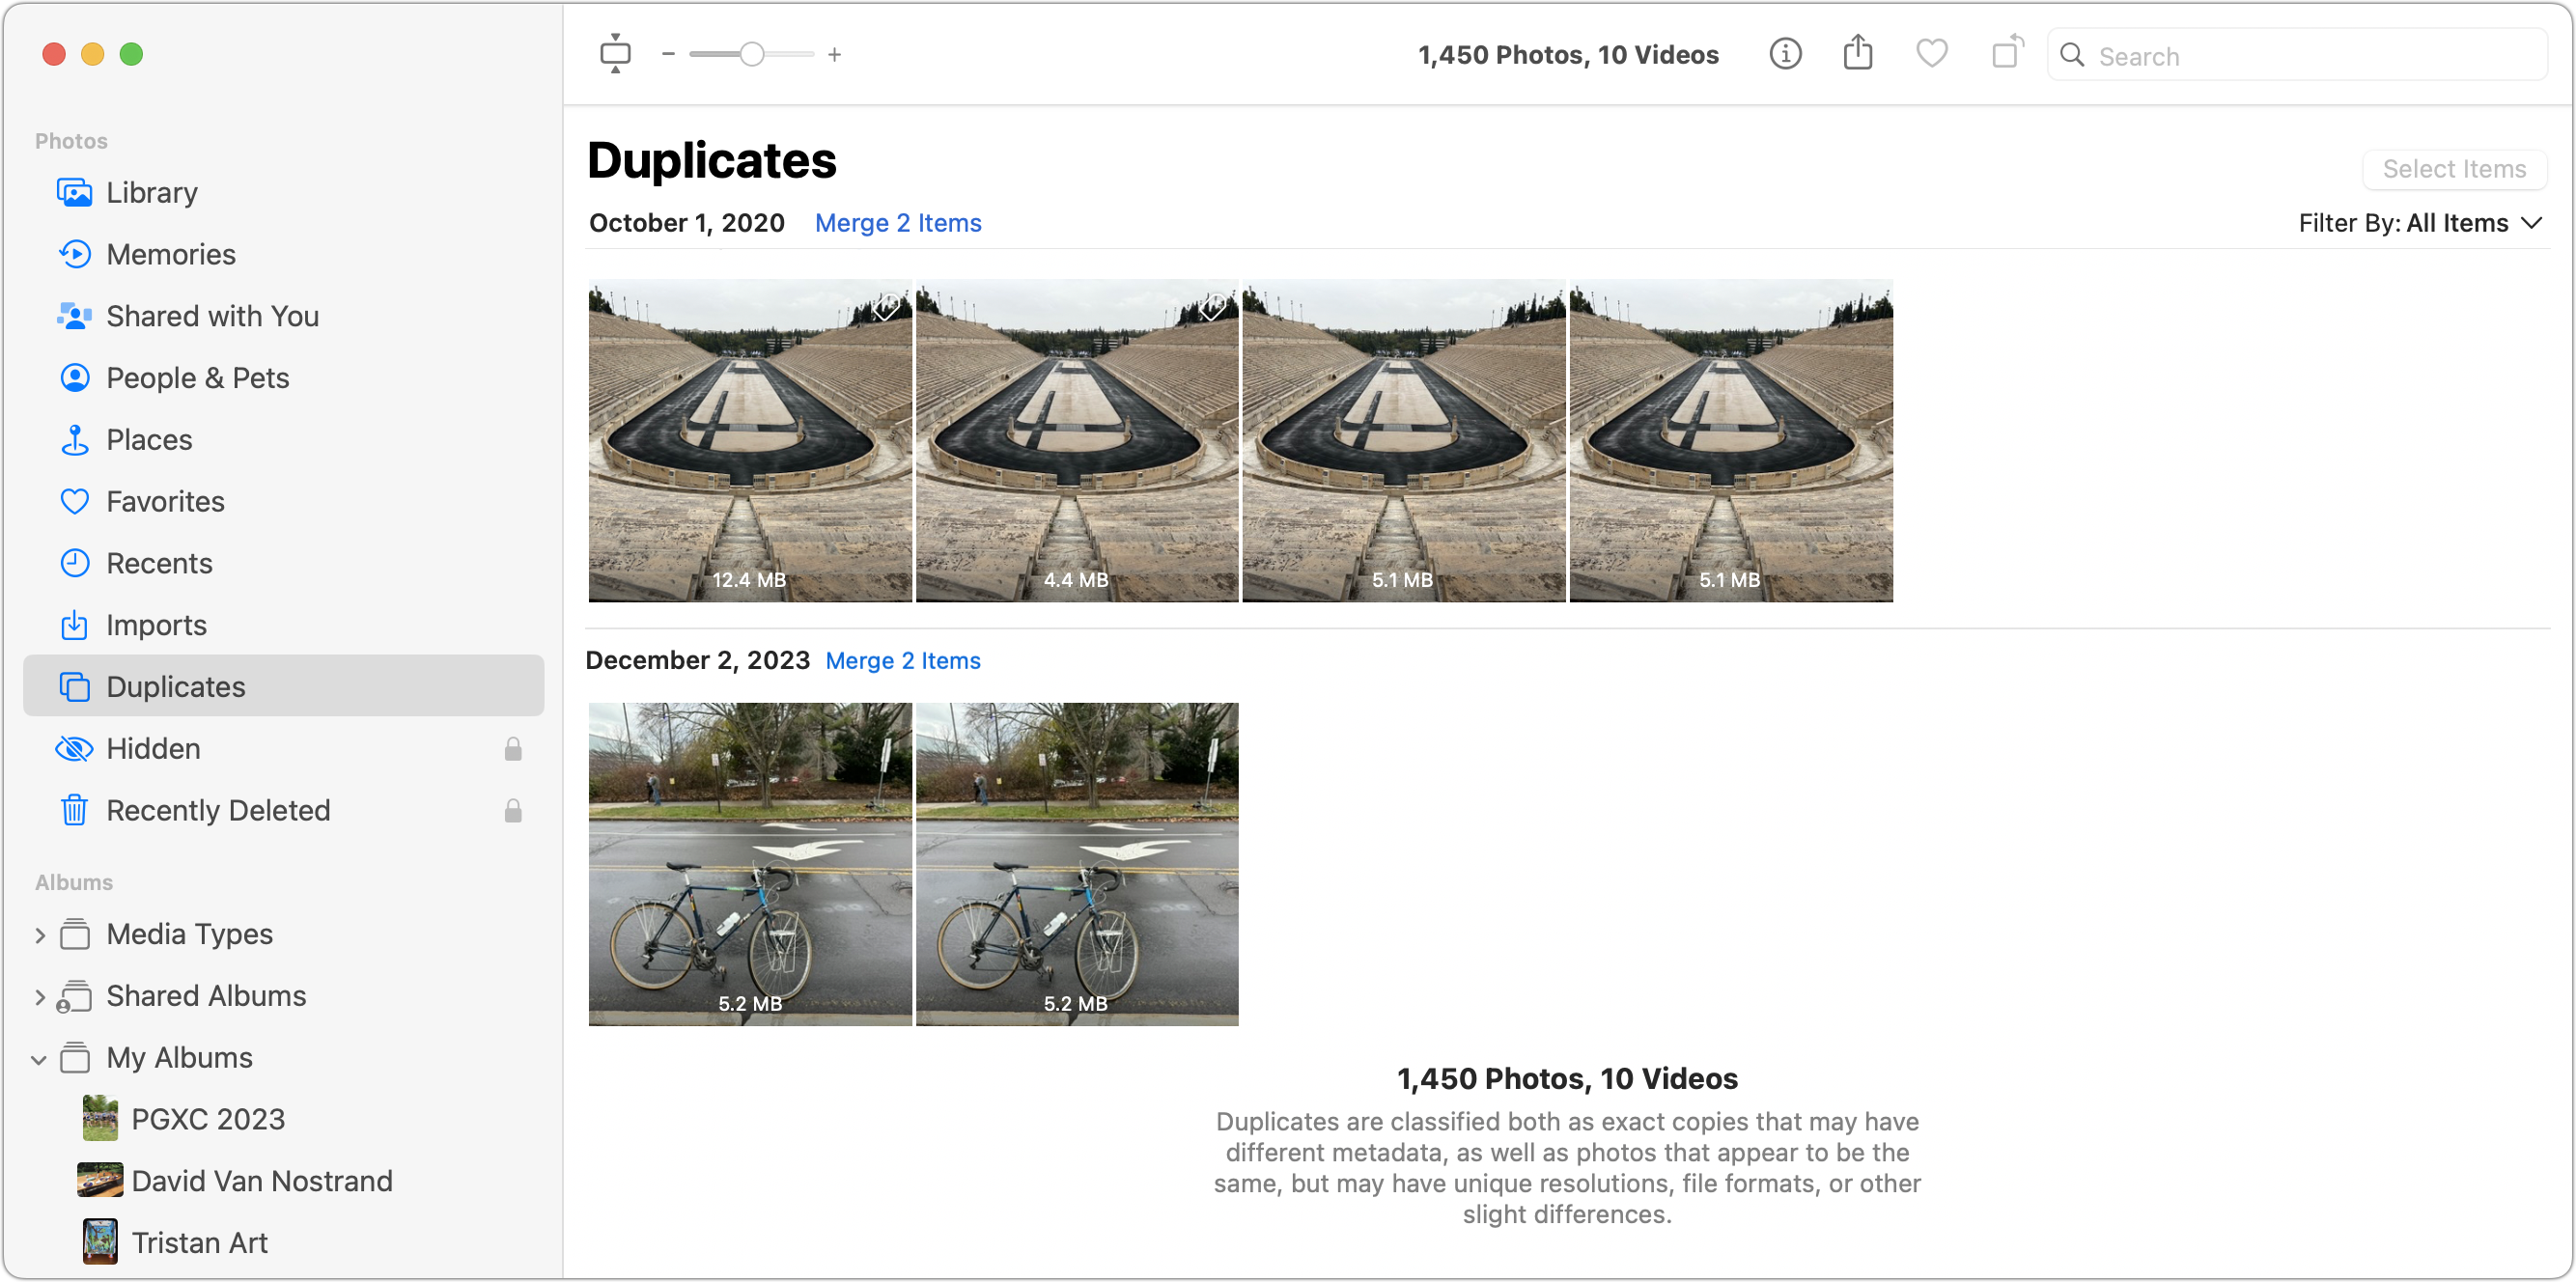
17: Delete Photo, Song, and File Duplicates
In theory, there’s no downside to deleting duplicates, but in my experience, it can require a fair amount of time to verify that what’s being deleted is genuinely a duplicate and isn’t desirable for some other reason, such as having the same file in multiple folder hierarchies.
Nonetheless, it’s generally safe to use the duplicate removal feature of Photos. Click Duplicates in the sidebar, select one or more sets of duplicates, and click either the Merge link above them or the Merge X Items button. Whether or not that saves significant space depends on your situation. Fat Cat Software’s $29.95 PowerPhotos may be easier to use or do a better job.
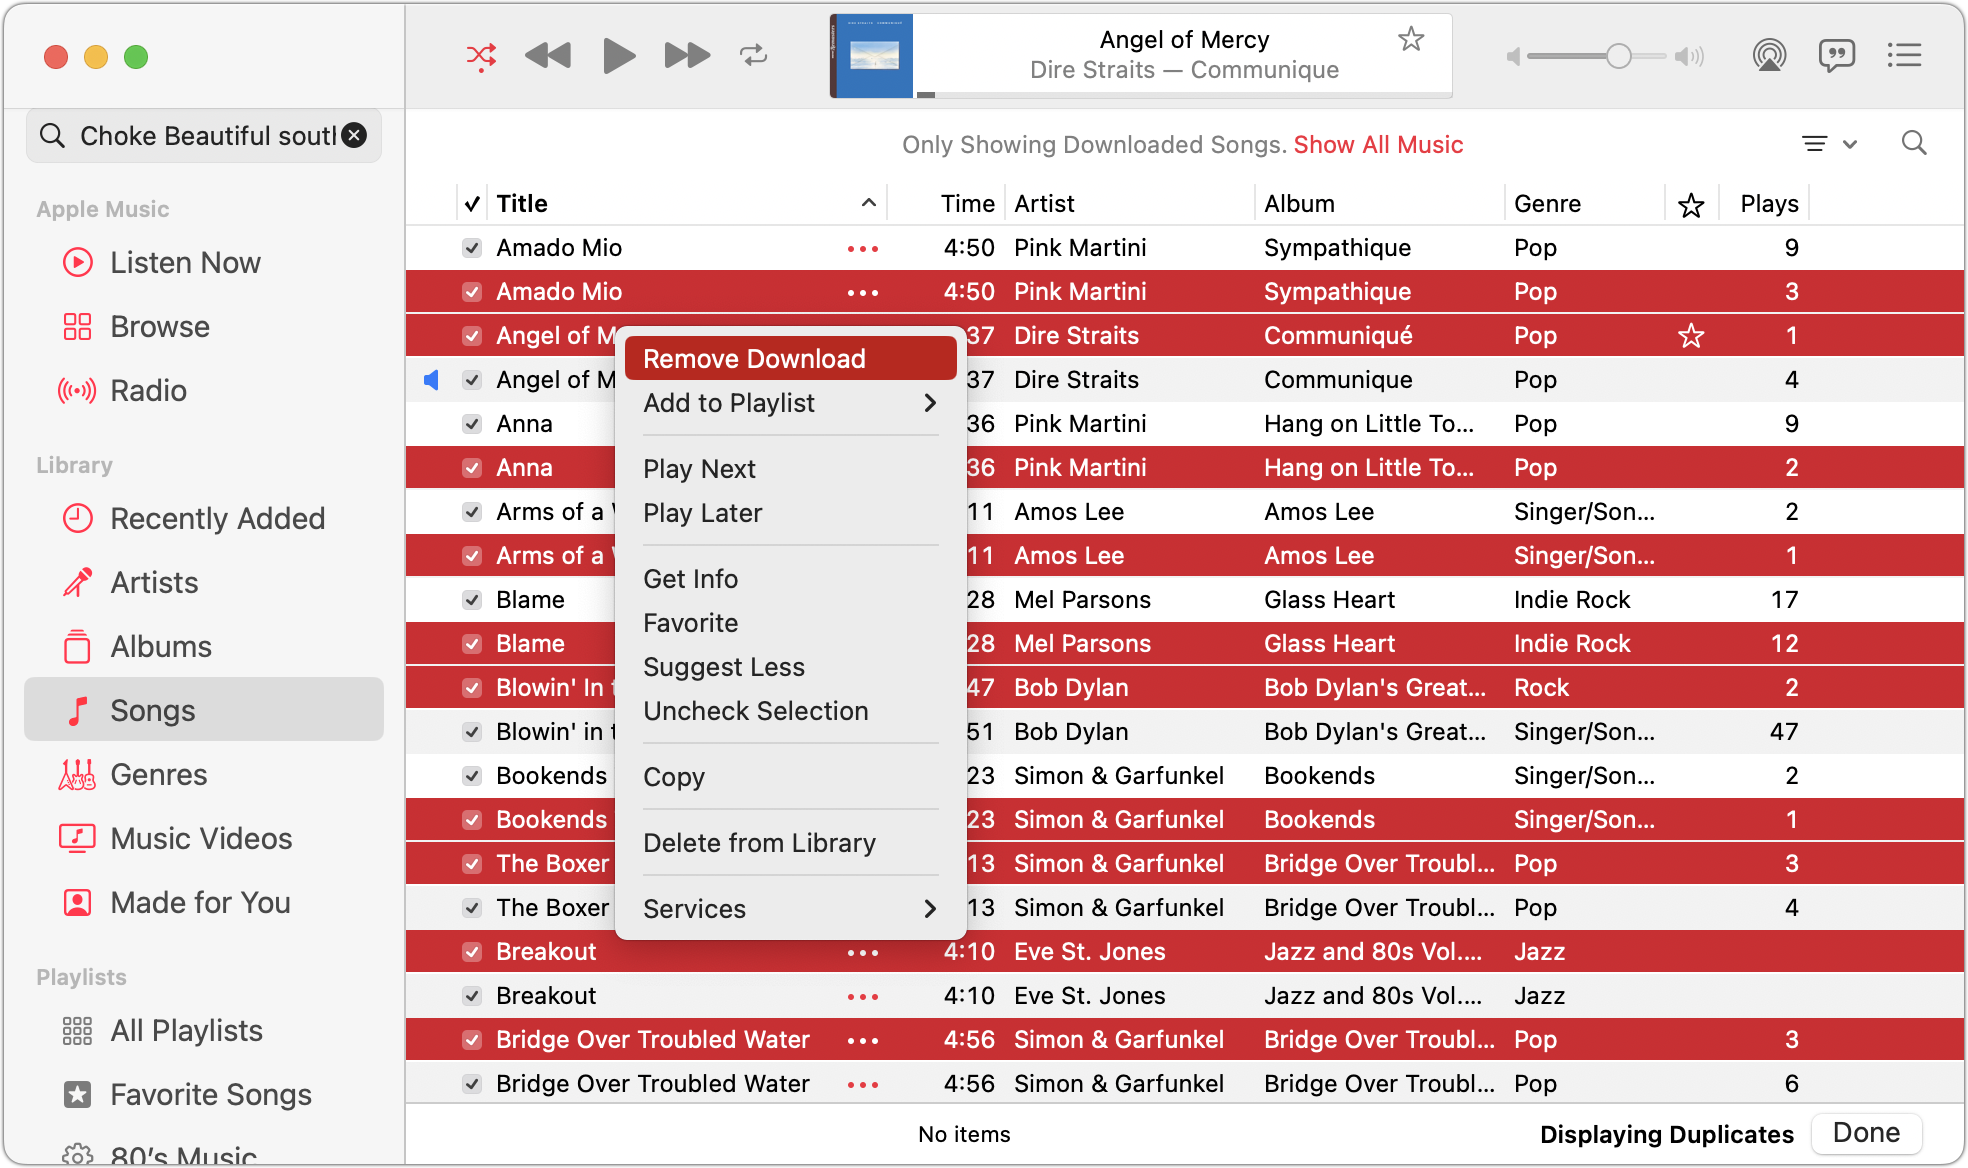
Although it can identify duplicates, Music provides no automated way to merge them like Photos. Click Songs in the sidebar, choose View Only Downloaded Music (since deleting Apple Music duplicates won’t save any space), hold down the Option key, and choose File > Library > Show Exact Duplicates to see duplicates whose downloads you might want to remove by Control-clicking and choosing Remove Download. I doubt most people will save much space by deleting duplicate songs.
Various utilities provide more general duplicate removal, but I’ve only used the $19.95 Gemini 2 from MacPaw; it’s also included in MacPaw’s Setapp service. It works pretty well when identifying duplicate images.
18: Delete Already-Imported Folders of Photos
Be very careful here. More than once, I’ve seen significant amounts of drive space consumed by leftover folders of photos that have already been imported into Photos, where the user wants them. If you can be certain those photos have been imported into Photos and copied into the Photos library (make sure Photos > Settings > General > Copy Items to the Photos library is selected), you can delete the folders. Moving the folders to an external drive or cloud storage service would be safer.
You could also reimport the folders of photos into Photos and then rely on the app’s duplicate-checking and removal features to ensure that you have everything in.
19: Use DevCleaner to Delete Xcode Caches
I mention this option near the end because most people don’t use Apple’s Xcode development environment. If you do, consider using DevCleaner to remove device support symbols, build archives, derived data, cached documentation, old simulator and device logs, and old documentation. I don’t use Xcode, so I can’t comment on how well it works.
20: Compress Large Files
If you have a collection of large files that you need to keep but don’t need to access regularly, you could consider compressing them. The easiest way would be to create a Zip archive by selecting a file or folder in the Finder and choosing File > Compress. That’s lossless—when you expand the files, they’ll be exactly as they were before being compressed. If compressing and expanding files manually sounds like a hassle, can we have a brief moment to remember DiskDoubler?
Those with video collections could consider using Handbrake to recompress the video files with a more efficient codec and tighter settings. Although such conversions can reduce the size of files by 75% or more, the process is lossy—the compressed data can never be recovered. Tread carefully!
21: Get External Storage
Finally, if you’ve gotten this far, you’re really bumping into the limits of your Mac’s internal storage. Since there’s no way to expand that for modern Macs, you’ll want to look into external storage, either an SSD or a hard drive. I’ve mentioned moving little-used data off to external storage a few times already, but if you have a massive Photos library you want to keep local, moving it to an external SSD can be a highly effective way of clearing space on your internal drive. Make sure you back up externally stored files as rigorously as you do your startup volume’s data!
I had a game-related storage crisis on an iMac recently, and I was getting nowhere until I started up in recovery mode, then saw in disk utility that there were snapshots taking up a lot of space (maybe just one snapshot, I can’t remember). I deleted it/them, and this dealt with the problem.
I wonder if there is something that can go wrong with snapshots when there is limited space left, and a game is downloading a large update?
This option is worth everything to me - I don’t have to think about emptying trash. I just trash items, and they’ll get purged in 30 days, which is usually more than enough time for me to figure out if it needs to restored - and if not, I’ve got Time Machine and other backups.
But it’s not the ideal solution. Windows solves this problem in a different (also useful but also incomplete) way. It lets you configure a maximum size for the contents of the Recycle Bin (their name for the Trash). So you can trash as much as you want and the files will linger forever, until the content of the Recycle Bin exceeds the threshold. Then it will start permanently deleting files, starting with the ones least-recently moved to the Recycle Bin.
A friend of mine had released what I consider to be the best trash manager - a utility called Compost. But it never got migrated to 64-bit for a variety of reasons, so it is no longer compatible with macOS. But it let you configure automatic Trash emptying with parameters including:
And these can be configured system-wide or on a per-volume basis (each volume mounted by macOS has its own separate Trash folder holding trashed items stored on that volume).
It also had some really nifty utilities to show all the various Trash folders that your account may be using, the amount stored in each, and the ability to empty just one of them while leaving the others alone.
I’d really love for a new Sonoma-compatible version of this, but my friend doesn’t have the kind of free time needed to develop and support it, so that’s not likely to happen.
If you frequently find yourself looking at swap files that are large like this (more than the total RAM for an 8GB system and more than half of a 16GB system), then that is a strong hint that you need more RAM.
Unfortunately, RAM is no longer upgradable without replacing the whole computer, but this is critical information to keep in mind when shopping for your next computer.
Even though swapping to Apple’s flash storage is very fast, it is far from ideal and (depending on the specific nature of the swap activity) it may lead to premature wear on that SSD.
Thanks for this tip. I didn’t even know it was possible. I never use GarageBand, so freeing up its parts is very welcome.
Snapshots will only be auto-deleted by the app that created them.
For Time Machine hourly snapshots, they are deleted after 24 hours. So you’ll never have more than 24 of them and deleted files will result in more free space 24 hours later.
Snapshots created by other software (like various backup utilities) will get deleted according to the schedule of the corresponding app. You should be able to identify the source of a snapshot from its name (visible in Disk Utility). Use the app’s configuration to control its snapshot management. If you’re no longer using the app, feel free to just blow away the snapshot (assuming, of course, that you know there’s nothing in there you want to preserve).
If you want to archive a snapshot, you can mount it and drag/drop files to an external storage medium. I don’t know if there’s an easy way to just archive a snapshot (e.g. make a disk image from it, which you can store externally), but that’s probably not generally a good idea, since it will containing everything on the volume from that point in time, which is probably more than you want to archive.
My sister-in-law is dealing with an out-of-space problem right now…on her 1TB drive in an iMac. The biggest culprit by far (as reported by Storage in System Settings) is that System Data is taking up over 600GB! I called Apple Support. They couldn’t really say what might cause it to balloon like that. But they did say that the only solution now is to erase the drive and start over…which I guess is what we’ll do (unless anyone here has a better idea).
Adam, in Step 4 you write " Open System Settings > General > Storage > Applications , click the Kind column header, select all the apps marked Unsupported, and click Delete." I’m maxed out at High Sierra on my 2011 iMac so is there a similar Storage item in System Preferences? I know it isn’t in the General control panel.
Adam, you write " … if you have a massive Photos library you want to keep local, moving it to an external SSD can be a highly effective way of clearing space on your internal drive. "
Can you expand on that in a future article? I’m sure I’m not the only user to try this and fail (in my case the library is no longer updated when we back up our phones).
I’ve also moved my music library to the external SSD but my Sonos system cannot find it and the Sonos engineers cannot find how to make it work.
Thanks
Howard
Hi Ted, I’d zero in on suggestion #3 in the article. OmniDiskSweeper or a similar tool will give you insight into what that 600GB is.
Hi Dennis - I seem to recall that Apple changed the name of System Preferences to System Settings in macOS Ventura.
In High Sierra, you can view 32-bit Apps by clicking the Apple menu > About This Mac > System Report > Software > Applications.
Scroll to the right and look for the “64-Bit” column which will either say “No” or “Yes” depending on whether an application is 64-bit or not. You can sort the list by clicking on the column header.
Edited to add for clarity - macOS Mojave was the last version of macOS to run 32-bit apps. Since macOS Catalina, 32-bit apps are no longer compatible with macOS.
The iMac was only using Time Machine. The disk had a ridiculously small amount of free space, like 200 or 20 MB or something and it was basically impossible to do anything with the computer at all, due to everything being painfully slow, so I was thinking that I was going to have to wipe it until I spotted the snapshot in recovery mode.
My impression was that it was triggered by a several GB download of game files, combined with something going wrong with a local snapshot - combined with a machine that doesn’t have a huge amount of free space on the internal drive by modern standards (20-50 GB normally). Note that this machine is permanently connected to the external disk drive that is used for Time Machine.
Did not see mentioned the step I often take first – check local backups of iOS units and delete them (sometimes not the latest one), but this might apply more to older systems as people less and less do local iOS backups.
You can also do via command line.
which will show disk usage and filter results to not show anything under 1GB. You keep repeating the command with new path to drill down to the problematic folder.
For example if you see that /Users is overly large then
Will show you which user to drill into. Up arrow brings up the last version of the command and then left arrow to move cursor to where you need to type the folder and it supports tab to autocomplete.
It also requires full disk access enabled.
As @mikebrogan said, GrandPerspective or OmniDiskSweeper is your friend here. It should reveal what caches, logs, or support files have somehow gotten out of control.
Sure. Open the System Information app, choose Window > Storage Management, and click Applications.
You can also use St. Clair Software’s free Go64 app.
Hmm! I wonder what went wrong? Apple has a support page about the process, but there’s very little to it—you just move the library and then designate it the System Photo library.
That would be Step #6.
Your Photos library is just a single bundle-file (that is, a directory made to look like a single file).
You can move/copy this file anywhere you want. You can also create multiple photo libraries, if you have too many photos to comfortably keep them in one library.
If you hold down Option while launching Photos, you will be presented with a dialog to let you create new libraries, choose the one you want to open, and add new libraries (e.g. ones copied from another computer):
One library is designated as the “System Photo Library”. This is the one that will be used for iCloud Photos and Shared Albums. You can pick any library to be this one. Just open it in Photos, go to the Settings dialog, and tell it that you want that library to be the System library:
So, using these features, my suggestion would be:
Import photos from another library in Photos on Mac - Apple Support
In the future, hold down option when launching Photos in order to select the library you want to open. If you launch it normally (without holding any keys) it will open whatever library you had open the last time you were using the app.
Yeah, that sounds about right. You download a lot of game files, filling your drive. But during that time, a local snapshot gets created. So when you delete those files, the free space doesn’t come back until you delete the snapshot(s) holding those files.
Since these are TM snapshots, they should auto-delete after 24 hours, but there’s no need to wait that long, especially if the lack of free space is creating critical problems. And if you have an external TM disk, then the contents of those snapshots should be backed up there anyway.
macOS should only retain one (the most recent) backup of each iOS device. If you want a backup to persist longer (e.g. for archival purposes), then you must explicitly archive it - which will cause your next backup to create a new file instead of replacing the existing one.
With your iOS device attached, select it in the Finder. On the “General” tab, click “Manage backups…”. Select the backup you want to archive, right-click it and select “Archive” from the menu. You will see that backup rename itself from the name of your device to the name of the device followed by a timestamp - that backup will persist until you delete it and a new backup file will be created the next time you make a backup.
In general, if you don’t make archives, you should only have one iOS backup per device. While you should probably delete backups corresponding to devices you no longer own, you shouldn’t delete backups for your active devices, since you may need them to recover from a critical problem.
Right – should read better before commenting! Sorry.
Actually it is quite common users have several backups of the same device without having chosen to save multiple copies and I think that was standard in earlier days at least (talking about iTunes here). Nowadays people seldom connect their iPhones to their computers and pay Apple to handle transfer of photos and other things (like backups, not transferred).
Thanks guys.
Howard
I think it may be simpler than that.
For my own system, I have very rarely archived backups. Usually as the last backup before wiping a phone (e.g. as a part of preparing it for a trade-in). I can tell those archived entries because they’re presented with a timestamp in the name.
But I’ve noticed this convention (timestamp with the name) for backups belonging to devices that definitely don’t fit this condition. I suspect Apple has forced existing backups into archive state as a part of some major upgrade (new macOS? new iOS?). But I’m not entirely sure about that.
Thanks for the suggestions everyone. Spurred on by your optimism, I did further searching of her drive…and eventually narrowed down the culprit. It was the Mail folder in the Containers folder of the Library folder in her Home Directory. It alone was over 600 GB!!
I’m not sure exactly what I want to do now. As she uses Gmail for her email, I’m thinking of just nuking everything and having Gmail download her mail to a clean Mail app. But that would lose all the folders she has set up within the Apple Mail app.
[BTW, the stuff inside the culprit folder is an odd structure. It shows her Home directory layout among other things. Not sure why that is relevant to Mail.]
Thanks for all the great suggestions.
One file I’d like to remove( don’t have an Airport router ) but clearly requires extra effort is AirPort Uility.app. All the obvious efforts ( such as booting into the restore partition, turning off SIP and using Terminal.app commands ) fail ( M2 Mini Pro and Ventura here ). Haven’t tried writing code but I suspect a Foundation call will have similar permissions issue as an ‘rm’ in Terminal.app. If anyone knows a way to delete this puppy, please shout. TIA.
The only other trick I use is afsctool, a command line app to apply transparent compression to files. Transparent compression is the same concept as DiskDoubler, mentioned fondly in the article.
I’ve automated it to compress all apps added to /Applications within the past week. The apps remain executable and are as quick or quicker to launch. So like the old AutoDoubler app.
The technology used is Apple’s own filesystem compression, exactly the same thing that is used to compress apps downloaded from the Mac App Store. If Apple use it, why shouldn’t we?
eg. Calibre ebook library app is 700MB but compresses to 350MB! Get Info will show 700MB file size, but actual disk space used is only 350MB.
Huge savings on big apps like Microsoft Office, etc.
https://github.com/RJVB/afsctool and it’s also installable using brew.
Ref: https://en.wikipedia.org/wiki/DiskDoubler
apps from Mac App Store:
apps run through afsctool:
That does seem out of control. Did you check the path suggested in the article to see if it’s related to attachments being downloaded? There may also be some logs that are seriously oversized, and GrandPerspective or OmniDiskSweeper should help you home in on those.
I know my space hogging problem. It’s duplicate files and folders. I have not found a utility that can intelligently scan a directory (say Documents) and scan for exact duplicate files and folders – and then make it easy to duplicate. I’d be happy with a being able to delete duplicate folders, providing they are identical in terms of each file inside the directory. I can’t imagine the disk savings available if that was easy to use. No, I don’t want a monster list of files i have to select individually to delete!
A quick search finds a MacWorld article with several suggestions:
It shows you a few simple things you can do with the Finder and then reviews four apps.
If I needed to roll my own, I’d probably write a script to generate a SHA-512 hash for every file under a specified location (e.g. ~/Documents). The bundled
shasumcommand can be used to do this. (The SHA-512 algorithm is probably overkill, but I don’t want any false-positives).Once I have a file containing a set of file-path/hash pairs, I can load it into a spreadsheet, sort the rows by hash values and look for identical hashes - these are almost certainly duplicate files. I can then decide which to keep and which to trash.
Over on his blog, @mjtsai wrote:
I’ve been thinking about this, and I wanted to explore the topic a little more here.
There are many possible scenarios with iCloud Drive files, including one Mac or multiple Macs, Optimize Mac Storage turned on in some places and not others, Time Machine backing up some Macs and not others, etc.
The guaranteed way of ensuring that iCloud Drive files are backed up at all times is to have the Mac that backs up via Time Machine keep Optimize Mac Storage turned off.
That’s basically what I recommend in the article for Optimize Mac Storage in Photos for the same reason. When Optimize Mac Storage is turned off, all files are local and will be backed up. Any files added or changed on other Macs will sync locally and will also be backed up.
So what if you need to reclaim space on the Mac that backs up via Time Machine? You can turn Optimize Mac Storage on, wait for it to catch up with you (Howard Oakley says this should be relatively quick if you’re not upgrading to Sonoma in the same process), and then evict folders to reclaim space by Control-clicking them and choosing Remove Download.
However, evicting them doesn’t remove them from the Time Machine backup, so they remain backed up. If you add or change any files in iCloud Drive, those have to be local because they’re actively being worked on, so they’ll also get backed up by Time Machine. I don’t know if there’s a scenario where Time Machine would trim those backed-up files after enough time, but it certainly wouldn’t happen for quite a while.
For the single Mac scenario, as long as you start with Optimize Mac Storage turned off, get a full backup of everything, and then turn Optimize Mac Storage on, files in iCloud Drive should remain backed up.
What about a multiple Mac scenario? To test this, I created and modified files on my iMac in a shared iCloud Drive folder and then looked at the folder on my MacBook Air, which has Optimize Mac Storage enabled and is backing up via Time Machine. Files that I added to the shared folder from the iMac were immediately copied locally to the MacBook Air and then backed up via Time Machine. So new files are protected.
In a multiple Mac scenario, files added from another Mac are made local and backed up by Time Machine.
Changed files seem to be a different story, though, and here I’m having trouble. In working with a folder of sacrificial test files that were local on the iMac but cloud-only on the MacBook Air, changes on the iMac sometimes resulted in the file being made local on the MacBook Air, but not other times. Two text files were never made local, but several Pages, Numbers, Keynote, PDF, and PNG files were. But one Pages file wasn’t. And when I removed all the downloads on the MacBook Air and tried changing the files on the iMac again, none of the files became local on the MacBook Air. Augh!!
So I think the only iCloud Drive/Time Machine mismatch comes when you change an existing file on iCloud Drive on another Mac and those changes are not copied locally to the Mac that’s backing up via Time Machine because it has Optimize Mac Storage turned on.
OK, now let’s think about how you could need a backup of such a file. The file exists on the other Mac and in iCloud Drive, so there are at least two copies. In a situation where the Mac is lost or damaged, the iCloud Drive copy remains intact, so a backup isn’t essential at that point. Deleting a file from an iCloud Drive shared folder also isn’t a problem because iCloud Drive retains deleted files for 30 days in a Recently Deleted folder on iCloud.com.
The need for a backup comes if you change (in a bad way) the file from the other Mac and that action is immediately reflected in iCloud Drive. Since there’s no other copy, and no historical copy, you’re out of luck. If iCloud Drive were to suffer catastrophic data loss, that too could require a local backup if all your Macs had Optimize Mac Storage turned on.
In the end, I’ll go back to the first bold bit above: The guaranteed way to keep iCloud Drive data safe is to keep Optimize Mac Storage turned off on a Mac that backs up via Time Machine.
And there went my afternoon. :-)
Such a retrograde step - so much for progress!
My 2009 Mac Mini still works well for Photoshop work (upgraded to SSD 10 years ago) it’s on El Capitan and accurately (it appears) informs me of the storage capacity - so manually backing up stuff works well for me.
The APFS ‘feature’ of misreporting available space on modern Macs is one of the main reason’s I don’t look forward to upgrading the Mac - along with the fact I’d lose access to a full version of Photoshop I paid c£700 for ( I use an iPad for internet banking and web stuff requiring a secure browser. )
True……but with today’s you can’t change anything computers…I stand by my long held opinion that as far as RAM and drive space go God has enough, the rest of us are just making do. I got 32GB/2TB in my 14 M1 MBP but will go to 4TB when I upgrade…after all it needs to process photos when I’m on the road and with 2 cameras that do 20 frames per second at 55MB/frame it adds up fast. I’ve already replaced my 2TB on the road back drives with 4TB models.
Nice. I tried Gemini, but irs clunky. I like your idea
I just buy my way out of this dilemma by (1) buying more space on my Macs (macStudio M1 and MBP16 M3); both have 2 TB internal now. (The internal Apple SSDs are faster too.). (2) Then, if I need more space, I have several 4 TB SSDs attached to the macStudio (all my old photos and documents). I am considering buying 4 TB internal when I replace the macStudio. Optimize iCloud is turned off on both systems - that way I can see all my “active” photos on both systems without waiting for downloads. Time Machine is running on both systems, and I run CCC backups about once a week. I figure my time has value, so paying for larger drives has real value for me.
David
I have used Duplicate Detective to review duplicate files and folders. Simple interface. Wish there was something more elegant, but I have not found it. I catalog my disks with NeoFinder, but it hasn’t helped find duplicates even though it has a function to do that. The Find Duplicates in Photos works pretty well, but that is a “do once and done”
First: great article, and very timely for me - thank you.
Second: Via Setapp, I’ve been using CleanMyMacX which has some good embedded tools to uninstall software, reset apps, clear caches, remove unused languages from apps, etc. It also has a “Space Lens” feature that has helped me identify big blobs of data so I can delete them, archive them on my NAS, move them to “cloud only” access in Dropbox/OneDrive/iCloud; etc. The one thing it doesn’t do is the duplicate cleaning you mention - I’m going to follow your lead on that one!
I currently have a large SSD in my MacBook Pro, which has enabled me to be lazy w/r/t paying attention to data sprawl. I’d like to move to a newer MacBook Air but they top out at 2TB - if I get my utilization down enough, I just might be able to make the move.
Thanks for reminding me about Clean My Mac X. I generally trust MacPaw, but I still like to exercise more control over what gets deleted than utilities. In particular, I’m always dubious about deleting languages even though I’ll never need them. It just feels like messing about within an app package is a recipe for some sort of trouble down the road because the package won’t match what would be expected.
I’m actually kind of surprised that deleting languages doesn’t break the app’s digital signature.
But maybe it does, but macOS only checks the signature immediately after installation? That seems to be how the quarantine flag works.
But if Apple decides to tighten security and validate signatures every time you launch the app, this could be a problem. At minimum, you’d need to jump through some hoop (like you have to do when running an unsigned app downloaded from the Internet) in order to tell macOS to continue trusting it.
Well, I kept drilling down…and eventually found that the big files were log files — in the Mail Container — several years old. No idea how this came to be. But I deleted them — and all now seems well. Thanks again for the suggestions.
Well, what do you know - Setapp also includes Gemini for duplicate finding. Working on that this week, too.
I haven’t had any issues with deleting unused language files and have done it for years. Not sure if it will cause issues at some point, but I’ll cross that bridge when I come to it.
Um, no offense but why bother? How big is your drive?
And . . . perhaps not in your case but modifying apps by removing things or changing things is a very bad idea in this era of signed and vetted apps. If you bought it / them from the App Store it’s a doddle to redownload and replace them after breaking the signature but from a developer’s site? That can take a bit more time to accomplish (particularly when you’ve lost the serial number ).
).
Dave
Howard, I’m still using the Sonos 1 controller app. I moved our huge Apple Music libraries to external 12TB WD drive and pointed Sonos to this pathway for the music folders music selection option with the Manage drop down menu. Has been working well.
Thanks Ross, I’ll see if using the S1 app helps.
have added some screenshots of Get Info to illustrate.