Take Control of OS X Server, Chapter 9: Mobile Device Management
This article is a pre-release chapter in the upcoming “Take Control of OS X Server,” by Charles Edge, scheduled for public release later in 2014. Apart from Chapter 1: Introducing OS X Server, and Chapter 2: Choosing Server Hardware, these chapters are available only to TidBITS members; see “Take Control of OS X Server” Streaming in TidBITS for details.
Mobile Device Management
From the enterprise angle, a significant feature of OS X Server is mobile device management or MDM, that is, software and services that make it easy for a system administrator to configure numerous devices—iPads, iPhones, and even Macs—with consistent settings and policies. With MDM, an administrator can manage these devices by deploying apps, wiping lost devices, unlocking devices when passcodes are forgotten (yes, it happens), and more.
It may be easy to set up a single iPad as you desire, but setting up 25 classroom iPads manually with the same settings might cause insanity. And you don’t even want to contemplate manual configuration of 5,000 iPads for a large business.
Profile Manager is an MDM tool built into OS X Server that’s designed to simplify the task of managing a fleet of Apple devices in a wide variety of ways. It works with iOS devices running iOS 5 and higher, and with Macs running OS X 10.7 Lion and later.
What can you do with Profile Manager? Lots, including:
- Push apps and Web clips to multiple iOS devices
- Set and enforce passcode policies
- Configure email settings
- Set iOS device restrictions
- Remotely unlock, lock, or wipe a device
- Control login screen options
- Set up printers in OS X
- Launch certain apps at login
- Automatically configure Exchange and Google Apps clients
- Require that Macs sleep when not in use
- And much more…
Before we go further, though, I need to offer a caveat. OS X Server’s Profile Manager is entirely functional, and if you already have a Mac set up as a server, $19.99 for OS X Server is cheap. But Profile Manager is far from the only—or the best for many environments—MDM tool available, and if you’re contemplating buying a Mac and getting started with OS X Server purely for Profile Manager, I recommend you look at third-party MDM solutions like AirWatch, FileWave, and JAMF Casper Suite. (Full disclosure: I am currently employed by JAMF.)
Third-party MDM tools have several advantages over OS X Server’s Profile Manager:
- Cost: If you consider the cost of a server Mac, the software-as-a-service solutions can be notably cheaper.
- Function: These tools often provide more coherent management consoles that are integrated with other capabilities or that fit into other management consoles, such as those for Microsoft Exchange. These tools can be more stable and even cluster-able for larger environments.
- Upgrading: Upgrades to OS X Server, such as the jump from 10.7 Lion to 10.8 Mountain Lion, have sometimes required that iOS devices be re-enrolled in Profile Manager. It’s not the end of the world, but it can be annoying.
Enable Profile Manager
On the face of it, Profile Manager seems like the most time consuming and complicated OS X Server service to configure because there are a lot of technical parts moving in the background and actual usage of Profile Manager takes place in a Web browser, not in the Server app. But, in fact, you can get Profile Manager up and running quickly provided you understand MDM and meet the prerequisites.
It’s essential that you have push notifications and Open Directory properly configured before starting with Profile Manager, so if you’ve jumped directly to this chapter rather than working your way through Chapter 3, Preparation and Installation, and Chapter 4, Directory Services, swing back and run through those steps.
Once you’ve handled these prerequisites, open the Server app and follow these steps.
Turn on device management:
- Click Profile Manager in the sidebar to open the Profile Manager pane at the right (Figure 1).
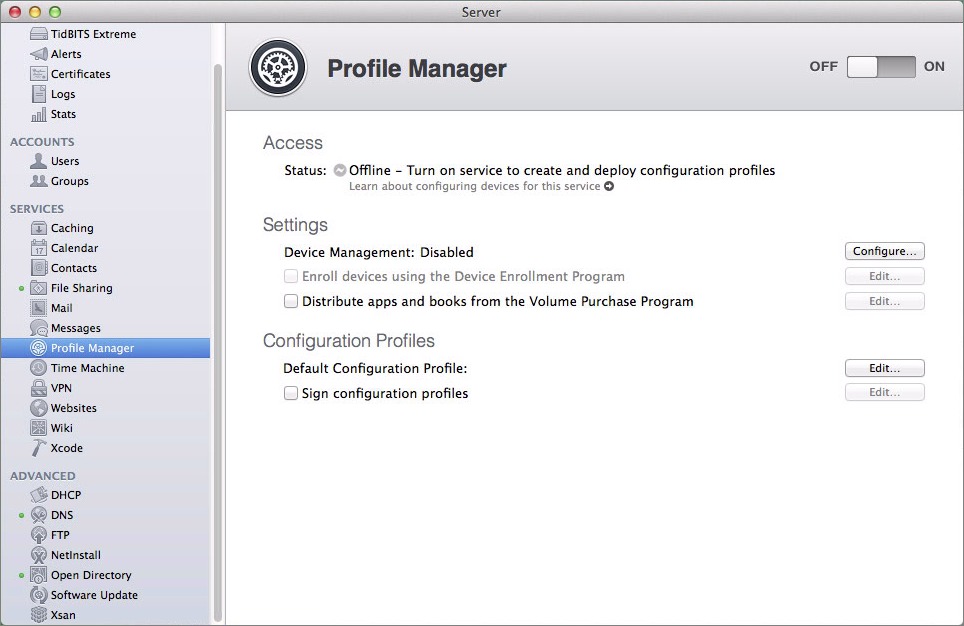
Figure 1: View Profile Manager’s main screen.
- In the Profile Manager pane, click the Configure button to the right of the Device Management label to start the Device Management assistant.
- Click Next.
- On the Organization Information screen, enter your name, administrator email address, and phone number (Figure 2). This information appears in the code signing certificate that protects Profile Manager communications. Since users will see what you enter, don’t be too cheeky. Click Next.
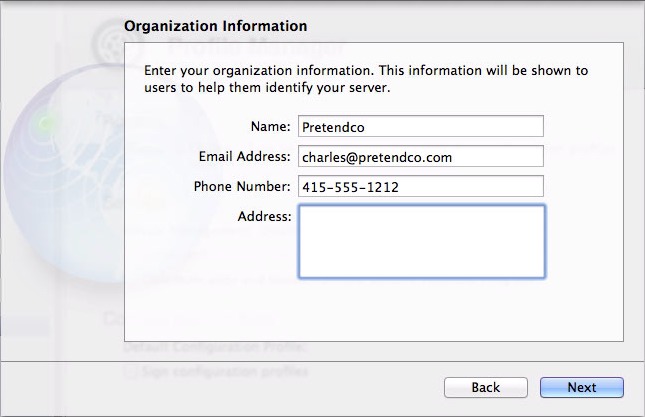
Figure 2: Enter your contact information in the Organization Information screen.
- On the Configure an SSL Certificate screen, choose an SSL certificate (Figure 3). The easiest approach is to choose the self-signed certificate you created back in Configure Alerts, in Chapter 3. Click Next.
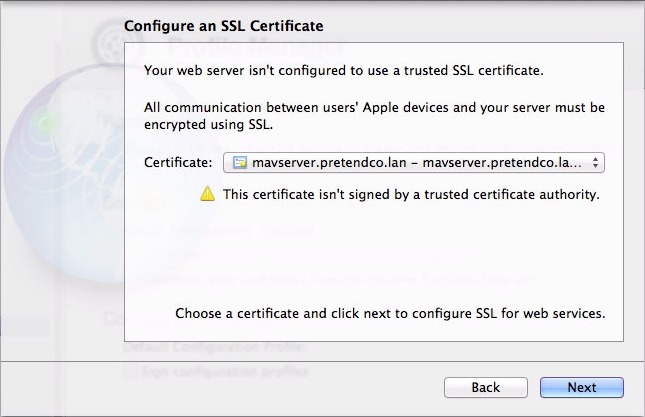
Figure 3: Choose an SSL certificate to protect the communications between your server and your users’s devices.
- On the Confirm Settings screen, click the Finish button to complete the Device Management assistant.
Back on the Profile Manager pane, “Enabled” appears next to the Device Management label and the Configure button has disappeared.
Create a default configuration file:
- Click the Edit button to the right of Default Configuration Profile.
- Give the profile a name, such as Everyone (Figure 4).
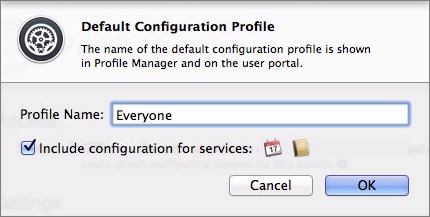
Figure 4: Name your default configuration profile and select the checkbox if you run all your services on this server.
- If you host any services (Calendar, Contacts, VPN, etc.) on this server, select the “Include configuration for services” checkbox—icons indicating which services are included in the default profile appear to the right of the checkbox. Otherwise, leave the checkbox unselected. You can enable other services later and have them configured for devices at enrollment time.
- Click OK.
The name of the profile appears adjacent the Default Configuration Profile label.
Maximize the security of your configuration:
- Select the “Sign configuration profiles” checkbox.
- In the Code Signing Certificate dialog that appears (Figure 5), choose your SSL certificate from the Certificate pop-up menu.
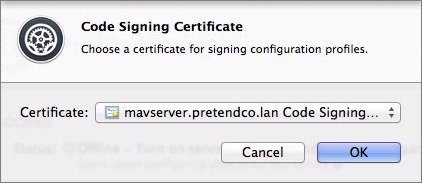
Figure 5: Choose a code signing certificate; unless you’ve installed a third-party certificate, your existing self-signed certificate is the only choice.
- Click OK.
Now that everything you need is in place, click the ON switch to start Profile Manager and wait for it to start up, which could take a minute or so.
When Profile Manager is done starting up, the Profile Manager screen has new links that open the user portal (described next) and the Profile Manager Web interface (described a little later in this chapter).
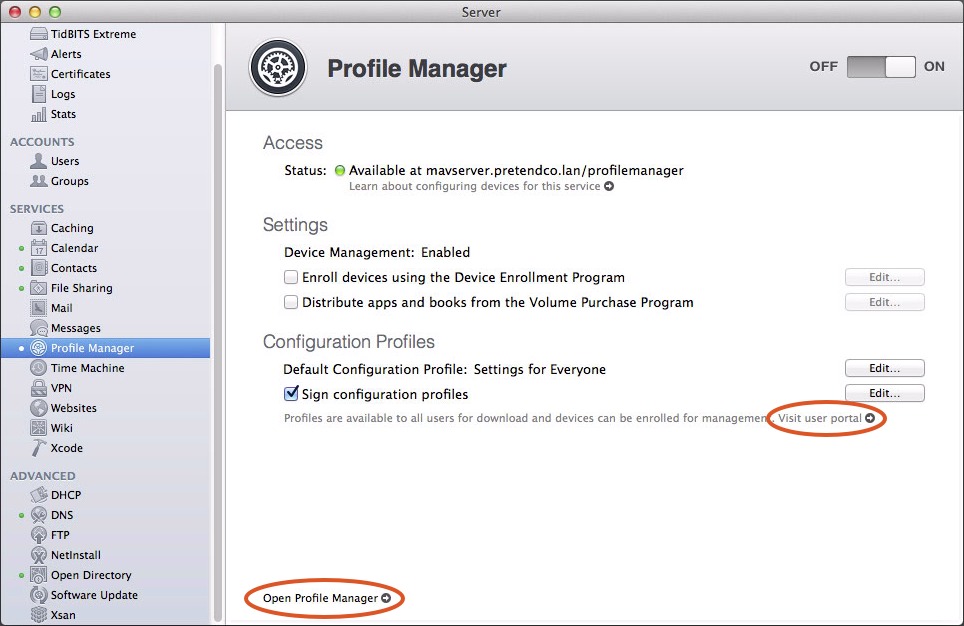
Figure 6: Once enabled, the Profile Manager screen shows a green light next to the Status label as well as links to the Profile Manager Web interface and the user portal.
Enroll Devices
Before you start enrolling all your devices in Profile Manager, pick one device that you don’t mind wiping repeatedly as you play with all the available options. If you don’t have a completely sacrificial device, remember that you can make a backup of a production device, wipe it for testing, and then restore your backup once your testing is complete.
Any device that you want to enroll must be able to connect to the Profile Manager user portal Web interface, so if you haven’t already updated the DNS settings for the device so it can see your server, do that now.
For example, to update the DNS on an iOS device, tap Settings > Wi-Fi, edit your Wi-Fi network configuration, and change the DNS entry to point at your server (Figure 7).
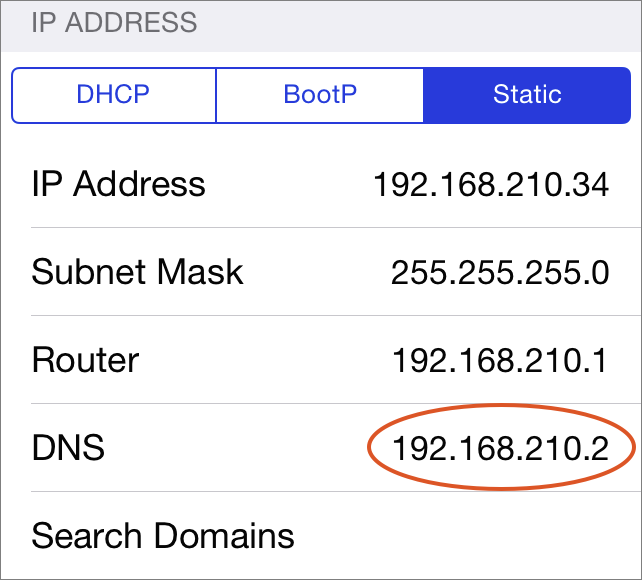
Figure 7: If necessary, change the DNS setting the iOS device so it can see your server on the local network.
Once the device in question has its DNS set properly, you can enroll it:
- Open Safari and load the Profile Manager user portal by visiting
host.domain.name/MyDevices. (For example, if the name of the server ismavserver.pretendco.lan, visithttps://mavserver.pretendco.lan/MyDevices. - Because of your self-signed SSL certificate, a prompt tells you that the server identity can’t be verified; tap Continue (Figure 8, left).
- Enter the user’s Open Directory credentials and tap Log In (Figure 8, right).
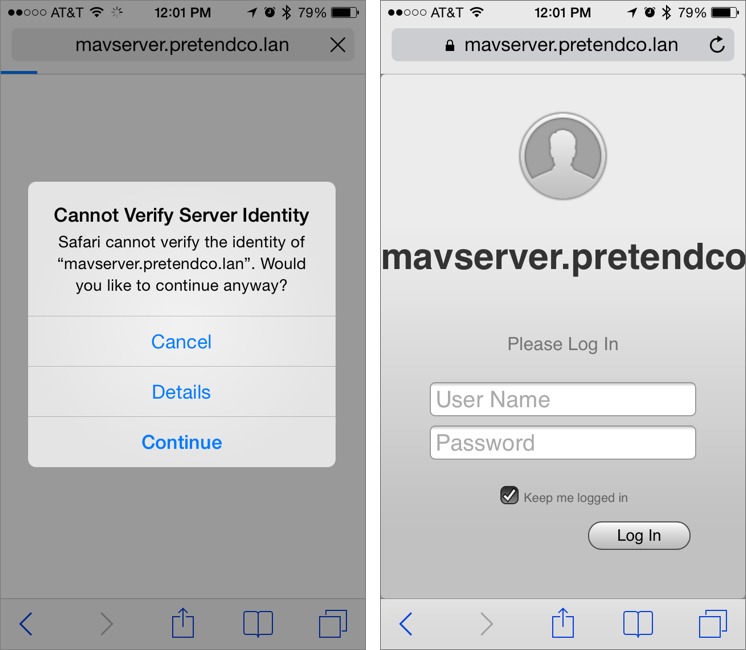
Figure 8: Tap Continue to accept the self-signed certificate, and then log in using your administrator credentials.
After you log in, you’re presented with the My Devices screen.
- Tap the Enroll button to enroll your device; this involves installing a profile, so tap Install (Figure 9).
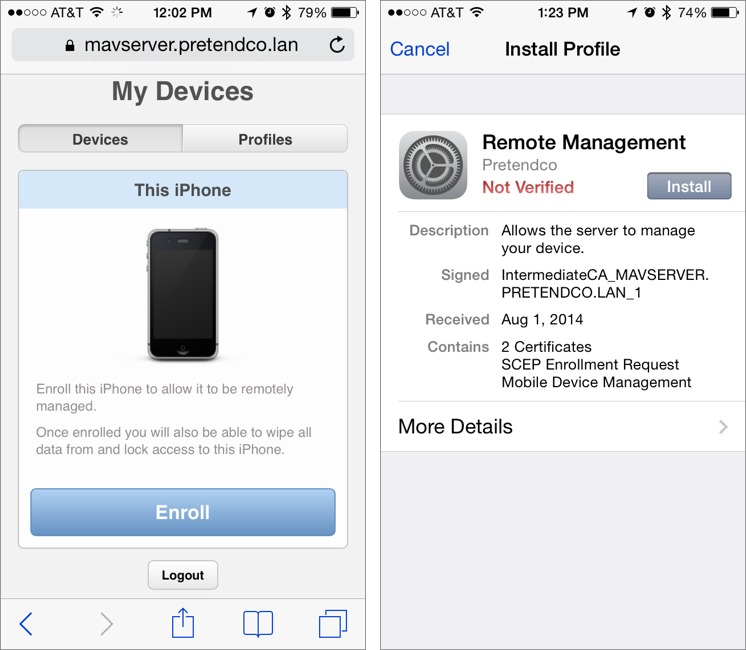
Figure 9: Tap the Enroll button, and if necessary, tap Install to accept your self-signed certificate.
- Because iOS takes security seriously, it presents another warning (Figure 10, left); tap Install in the upper right to acknowledge that you’ve seen it, and if prompted, enter the device’s passcode.
- Once the profile is installed, tap Done to finish (Figure 10, right).
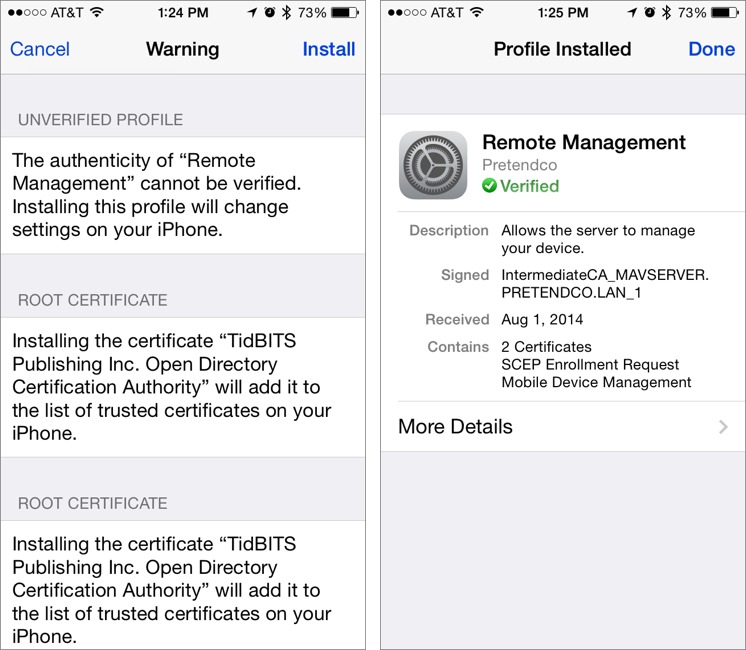
Figure 10: Tap Install to acknowledge the warning, and once the profile is installed, tap Done to finish.
Once enrolled, you can find the profile in Settings > General > Profile (Figure 11).
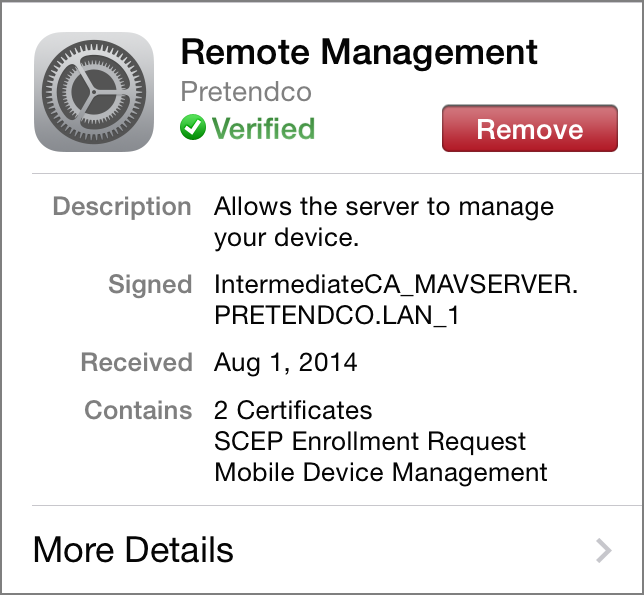 Figure 11: Find the profile in Settings > General > Profile.
After enrollment, there isn’t much that can be done from the user portal, though the user can log in to it at any time from any device, to lock or wipe the device (including the device logged in to the portal), or clear the passcode.
Why might a user want to do this? Imagine that she has boarded a plane and realized after take-off that she left her work iPhone in the boarding area. Maybe she’ll get it back, maybe she won’t, but she can use the in-flight Wi-Fi from another passenger’s Windows laptop to visit the Profile Manager user portal to lock or even wipe the iPhone.
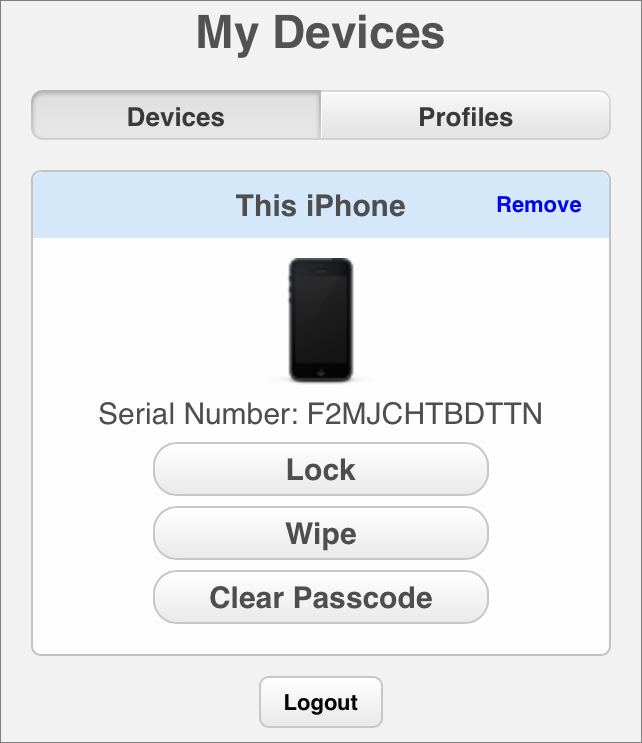
Figure 12: From the Profile Manager user portal, the user can always lock or wipe the device, or clear its passcode.
Of course, the point of mobile device management isn’t what the user can do; it’s about what the system administrator can do, such as configuring devices remotely. And that’s where we turn our attention next.
Manage Devices
Now that a device is enrolled, it’s time to visit the Profile Manager Web interface. Either click Open Profile Manager on the Profile Manager screen in the Server app or access it from any computer on your network in a Web browser by appending profilemanager to your server’s host name in a URL. (For the host mavserver.pretendco.lan, the URL would be https://mavserver.pretendco.lan/profilemanager.)
At the login page, enter the administrator credentials you use to to sign in to the Server app (Figure 13).
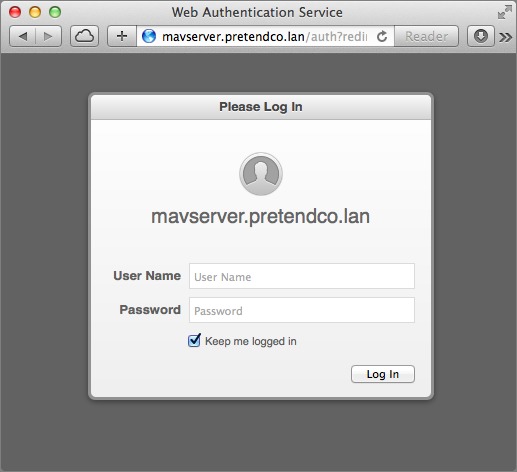
Figure 13: Log in to Profile Manager in a Web browser.
When you’re logged in, you’ll see Profile Manager’s Web interface (Figure 14). In the left-hand sidebar, you can switch among managing apps, devices, device groups, users, and user groups, and see both currently active tasks and a log of completed tasks. The pane in the middle displays the contents of the selected item in the Library section, and the large right-hand pane lets you manage that item’s settings.
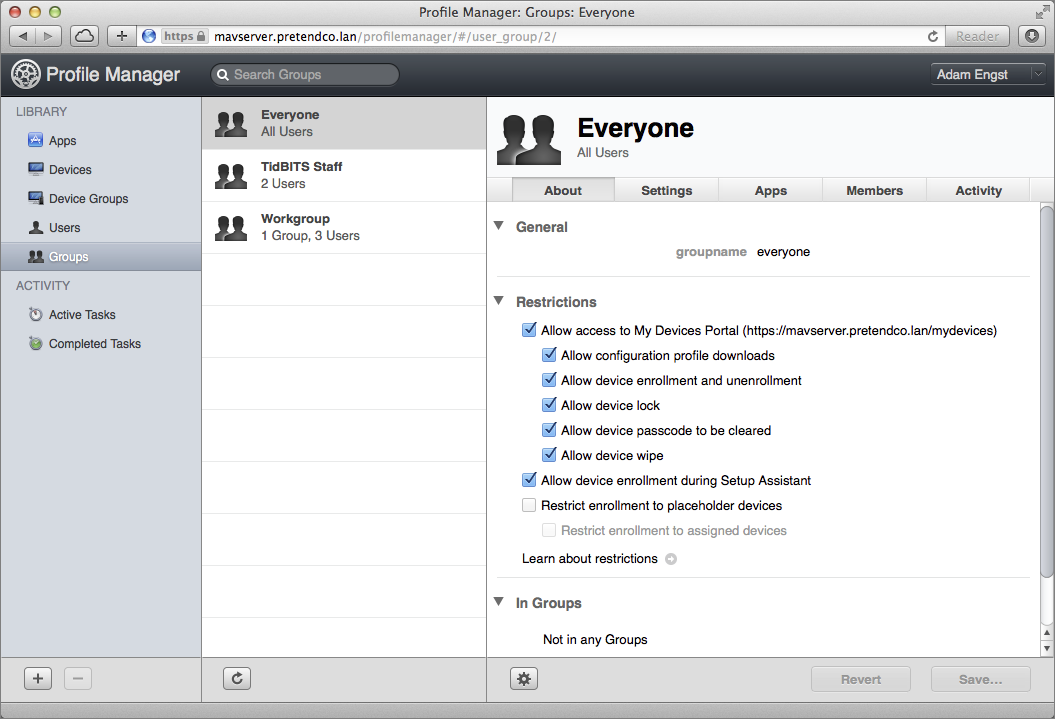
Figure 14: In the Profile Manager’s Web interface, select an item in the left-hand sidebar and then select an item in the middle pane. In this screenshot, I’ve selected my default configuration profile, Everyone, in the middle pane.
Regardless of whether you’ve selected a device, device group, user, or user group, you manage settings in essentially the same way. The best way to explore the many available settings is to click the Settings tab in the right-hand pane and then click Edit.
I’ll walk you through the two most common management tasks, forcing a passcode on a device and wiping a device remotely.
Force a Passcode
Users can, of course, set up their own passcodes, but you can take matters into your own hands and ensure that an appropriate passcode is in place:
- In the Profile Manager Web interface, click Devices in the sidebar and then in the middle pane select a device.
The initial About tab shows a wide variety of information about the device, including last check-in time, available capacity, battery life remaining, Do Not Disturb setting, Activation Lock status, installed apps, and more (Figure 16).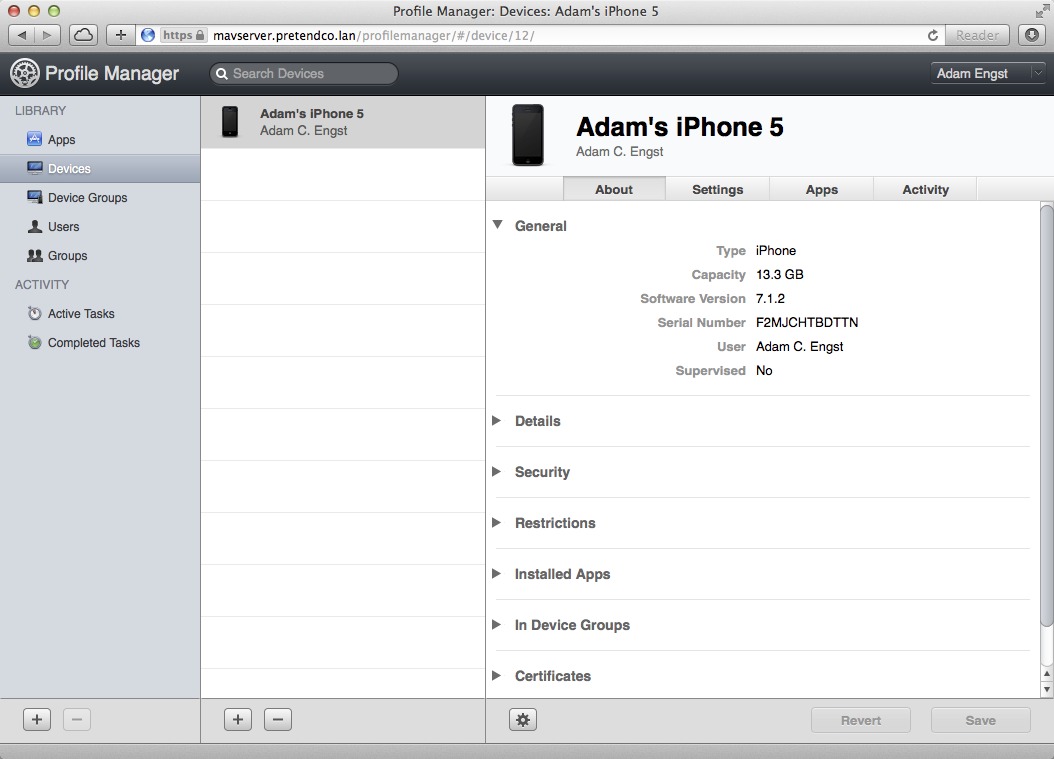
Figure 16: Profile Manager’s About tab for a device displays a vast amount of information that could be useful to a system administrator.
- Click the Settings tab in the right-hand pane, and then click the Edit button next to General to bring up a dialog showing all the possible settings, listed in a left-hand sidebar and separated into three groups of settings that apply to both OS X and iOS, just iOS, and just OS X.
- Click Passcode, and then click Configure at the right to reveal all the possible passcode settings.
- In the Passcode settings screen, select Allow Simple Value and set the Minimum Passcode Length to 4 (Figure 17). Click OK to commit the changes.
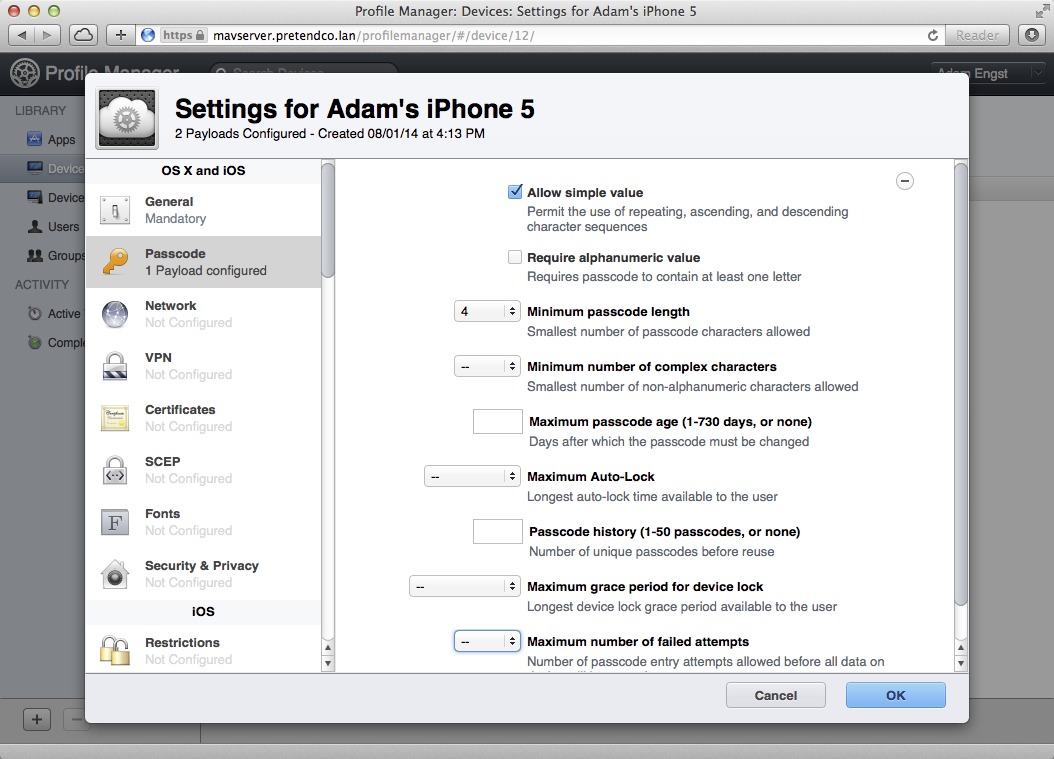
Figure 17: Configure the passcode settings as desired.
- Back in the main settings screen for the device, click Save to save your changes (Figure 18).
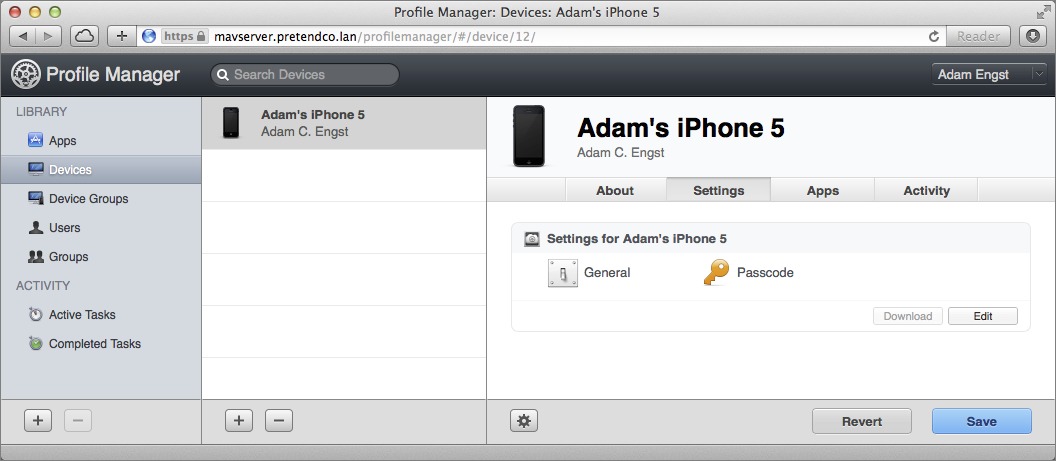
Figure 18: Make sure to save your changes!
If the device didn’t previously have a passcode, it will prompt the user to set one a few moments later. And if it did previously have a passcode, the passcode can no longer be turned off in Settings > Passcode.
Wipe a Device
The next task I want to showcase is wiping a device, which is something system administrators often want to do when a device is lost or stolen. Follow these steps:
- In the sidebar of the Profile Manager Web interface, click Devices.
- Select the device you want to wipe from the middle pane.
- At the bottom of the right-hand pane, click the gear
 button and from the pop-up menu that appears, choose Wipe.
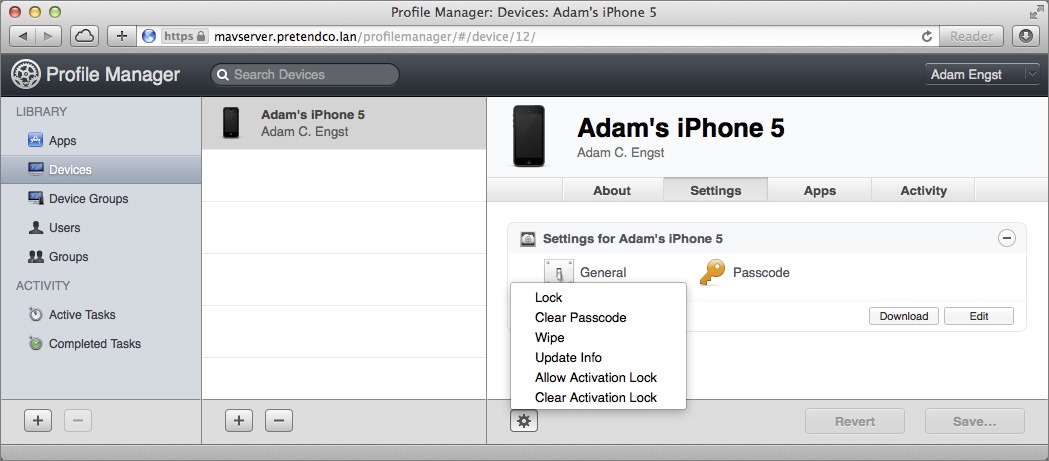
Figure 19: From the gear menu, choose Wipe.
- In the Wipe dialog that appears, select the device again and click Wipe.
The device is wiped instantly; if you were being a cowboy and trying this on a device that’s not actually lost, now’s the time to restore it from backup.
Read More: About | Chapter 1 | Chapter 2 | Chapter 3 | Chapter 4 | Chapter 5 | Chapter 6 | Chapter 7 | Chapter 8 | Chapter 9 | Chapter 10 | Chapter 11 | Chapter 12 | Chapter 13 | Chapter 14
 button at the bottom of the sidebar), name the group, and click the Save button.
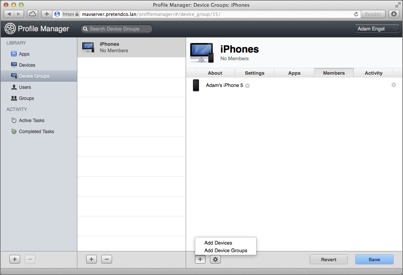
 button below the right-hand pane, click Add Devices (Figure 15), and in the dialog that appears, click the Add button for the desired device.
Can an IOS device enrolled to a profile manager server also be wiped by iClouds "find my phone"?
Yes, it sure can. Good luck!