TidBITS#1096/03-Oct-2011
The big news this week is Amazon’s announcement of the new Kindle Fire tablet, which Glenn Fleishman believes is the first viable tablet from a company other than Apple. But is it competition for the iPad? Also this week, Adam reviews the impressive group photo sharing site ZangZing, Tonya tells how the Fujitsu ScanSnap is simplifying her life as the mother of a 7th grader, and we welcome as our latest TidBITS sponsor the Mac and iOS app developer Global Delight. Last, but not least, we’ve published the new “Take Control of Backing Up Your Mac,” Joe Kissell’s definitive guide to backups. Notable software releases this week include Adobe Photoshop Lightroom 3.5 and Camera Raw 6.5, Firefox 7.0, PopChar X 5.3, and Teleport 1.1.
New Take Control Book Provides Easy, Comprehensive Backup Advice
I think it’s telling that our best-selling ebook of all time has been Joe Kissell’s “Take Control of Mac OS X Backups.” Quite simply, there is no more important topic for anyone who, like us, relies on a Mac for business, for important communication, or for irreplaceable data like personal photographs and videos. Over a hundred backup programs of every ilk vie for your attention, from Apple’s Time Machine to the simplest synchronization program. And then there are the online backup services, each promising more than the next. Through all this, Joe is the only person who has made a systematic study of the field, and his hard-won experience accounts for the popularity of his book.
Now, with the release of Mac OS X 10.7 Lion and numerous other changes in the backup world in the past year, Joe has updated all the details and distilled his various advice in “Take Control of Mac OS X Backups” and its younger sibling, “Take Control of Easy Mac Backups,” to provide a single, unified set of recommendations that will serve the needs of nearly any Mac user. The result is the 210-page “Take Control of Backing Up Your Mac,” available now for $15.
In “Take Control of Backing Up Your Mac,” Joe provides, as he puts it, “a modern approach to Mac backups that covers the bases but doesn’t overwhelm you with extraneous details.” Although it’s carefully designed so you can read just the parts that are important to you, the full ebook describes how to design a reliable backup system, understand backup lingo, shop for hardware, choose backup software, manage Time Machine (and determine whether Time Machine is a good option and what to do if it’s not), make backups, deal with any special backup needs, and — most importantly — recover lost data after a crash or other catastrophe.
Readers of “Take Control of Backing Up Your Mac” will learn how to:
- Understand the three components of a successful backup strategy.
- Reassess an existing backup strategy in light of changing habits or newly available options.
-
Choose a “versioned” backup program like Time Machine, and determine what to do if Time Machine doesn’t meet your needs.
-
Shop for and prepare a backup hard drive (or drives).
-
Set up backup software to make backups work smoothly and reliably.
-
Make offsite backups in various ways, including backing up to an online service.
-
Handle special backup needs like huge quantities of photos, or backing up several Macs in a home.
-
Restore backed up data after disaster strikes!
As we have learned all too many times over the years, when a Mac breaks down it can be a major inconvenience, but when it breaks down and takes irreplaceable data with it, it’s a heart-breaking disaster. With Joe’s highly considered and time-tested guidance in “Take Control of Backing Up Your Mac”, you can avoid calamity without busting your budget or wasting your time. And if you want to hear more about backups and the book, tune into Joe’s MacVoices interview with Chuck Joiner!
Global Delight Sponsoring TidBITS
We’re pleased to welcome as our latest TidBITS sponsor Global Delight, an Indian company that has been making a name for itself in the Apple world over the last few years. Their first program was Voila, a screenshot utility that has evolved from a rather simple program into a full-featured package that enables you to capture still and video images of your screen, organize them, annotate and edit them, and share them through a variety of methods.
More recently, Global Delight has come up with Boom, a one-trick pony that boosts the volume of sound played through your Mac. While that may not seem compelling at first glance, I found Boom essential just recently while straining to hear the audio track of a Netflix movie streamed to my 13-inch MacBook — some Netflix streamed movies just aren’t loud enough without Boom or powered speakers, which weren’t available in this situation. I’ve also experienced similar volume problems on occasion with voice-over-IP programs. (On the Mac App Store, Voila costs $29.99, and Boom is $8.99.)
On the iOS side, Global Delight is best known for Camera Plus Pro, which provides a wide variety of welcome features for photo and video recording from recent models of the iPhone and iPod touch. You can now apply live filters while taking photos or video, edit and retouch photos, share photos via a number of Web services, keep a private collection of photos and videos, take up to 40 photos in burst mode, use the anti-shake option to reduce blur, and much more.
The company also makes the colorizing app Photo Delight. (On the App Store, Camera Plus Pro is on sale for only $0.99 through 6 October 2011, and Photo Delight costs $1.99.)
Thanks to Global Delight for their support of TidBITS and the Apple community!
Amazon’s Kindle Fire Lights Tablet Competition
Amazon doesn’t go in by halves. The company’s announcement of a tablet device designed to compete with — but not “kill” — Apple’s iPad also included details on two other new Kindles available in three models. The big reveal, of course, was of the Kindle Fire, a 7-inch, full-color, touchscreen model with Wi-Fi retailing for $199 and shipping 15 November 2011. The Kindle Touch, a grayscale touchscreen model, ships a week later, while a new entry-level Kindle is available now.
As expected, the Kindle Fire isn’t a direct competitor to the iPad. It’s more of an alternative, or perhaps even a complement. Its smaller screen and Amazon’s emphasis of reading, watching, listening, and gaming features make it clear how much this slate is designed to compete as a device to consume media. It also lacks a camera, microphone, and Bluetooth networking. How creative one can be with a Fire will emerge when people get their hands on it.
Oh, and it runs Flash.
Lighting Up — The Kindle Fire is a 7-inch full-color tablet with a capacitative touchscreen like other tablets, and an IPS (in-plane switching) LCD for wide angles of viewing. It weighs under 15 ounces (a bit over 400g), and uses Amazon’s cloud services for downloading and streaming media. It includes only Wi-Fi in this first version, which also has a fixed 8 GB of storage, and the retail price (the only price, since it’s sold exclusively by Amazon) is $199. Amazon says the Fire allows 8 hours of continuous reading or 7.5 hours of video playback — with Wi-Fi turned off. The first version is available for only U.S. customers.

The Kindle Fire is also notable for what it lacks. There is no camera. It has a headphone jack and built-in speakers, but no microphone. And there’s no Bluetooth for use with external audio devices or keyboards. It does sport a micro-USB port, but it won’t be clear until the device is released if that can be used for purposes other than connecting to a computer (to mount as a drive) or for charging.
While the Kindle Fire runs Google’s Android operating system, a fact confirmed by Amazon, you will not see a bit of Google or Android branding on the device or in its interface. While I suspected Amazon would opt for a full operating system fork, in which it took a specific version of Android and then went down its own path, it appears that the changes are all at the top level where users interact with the device. (You can read my take on what I thought Amazon would do in a piece for The Economist, “Forking Android.”)
This approach with Android keeps Amazon at arm’s length from Google, while still allowing it to work with all existing Android developers. Assuming the Kindle Fire sells well, which is a reasonable expectation, developers will have a reason to make sure that all their apps work perfectly on the Fire, perhaps to the detriment of other Android models.
Because Amazon isn’t buying into Android-as-an-ecosystem, the Kindle Fire will not feature the Android Marketplace as an app, since Amazon has its own Android app store. But many Android models allow “sideloading,” in which an app is purchased in one place, and then loaded through a few steps onto the device on which it is to run. Amazon could facilitate this to make sure to tap into the larger market and emphasize the one aspect of Android’s openness that’s legitimately open in comparison to Apple’s closed app installation process. However, a New York Times article says
that Amazon will allow only “Android apps approved by Amazon and distributed through its Amazon Android Store.” Some Android phone makers and carriers also prevent sideloading.
Apple claimed in the past that a 7-inch screen didn’t meet its smell test for being useful, but that might be merely a convenient excuse from a firm that has a ready supply of 10-inch touchscreens, and that wanted to develop a programming framework around just a few sizes of device: the original iPhone/iPod touch dimensions, the iPad size and resolution, and the four-times-denser Retina Display upgrade to the iPhone and iPod touch.
Amazon, by contrast, is coming out of several years of selling mostly 6-inch screen devices, and it has seemingly good feedback about what you can do in that amount of space. Amazon has also been able to watch the missteps of early Android and other tablet competitors, and avoid many of those problems.
Notably, at least from the images released, the Kindle Fire doesn’t have a Springboard-style home screen interface like that in iOS; a similar interface is also found in most other mobile platforms, including Android. Instead of presenting the user with a grid of app icons, Amazon focuses the Fire on media and tasks. The home page has a Cover Flow-style presentation of everything that’s available on the device. A menu bar at the top lets you choose among media types, viewing documents, listing apps, and browsing the Web.

With the Kindle Fire, Amazon has eschewed physical connections in favor of its cloud services. There’s no computer component for the Fire, as noted amusingly in the technical specs part of the product page: “System Requirements: None, because it’s wireless and doesn’t require a computer.” All media is downloaded over Wi-Fi from Amazon’s cloud. You can delete and restore items at will, and either download or stream programming. (Amazon typically prevents books from being resident on more than six Kindle devices at once.)
The 8 GB of included storage and lack of a memory expansion slot, along with the Wi-Fi–only wireless connectivity, means you need to plan what items to keep on your Kindle Fire for those times when you’re not connected to a Wi-Fi network. Amazon claims the Fire can hold 10 movies, 80 apps, 800 songs, or 6,000 books. A two-hour movie would need to fit into about 700 MB for that to work, which assumes optimized compression for the 7-inch screen and its resolution.
The Kindle Fire comes with a 30-day free trial of Amazon Prime, which was introduced years ago as a way to get free 2-day shipping on any item stocked in an Amazon warehouse. It’s normally $79 per year. But Amazon Prime now includes free streaming of over 11,000 movies and TV shows from Amazon’s much larger catalog of video. I imagine many Fire buyers will already be Amazon Prime customers, and many of those who aren’t will find the video and shipping compelling. (My wife and I use Amazon Prime a ridiculous amount, because when you eliminate shipping charges, even items such as toothpaste are cheaper from Amazon than the local drugstore or Costco. We pay sales tax, as Amazon is headquartered in our home state of Washington.)
I expect that Amazon decided to hold off on a 3G model of the Kindle Fire before the holidays to get the Fire to market faster, and to avoid the complexity of 3G service plan deals with carriers. While all the Kindle devices that include 3G incorporate data charges into purchases, the Fire is a multi-purpose tablet that will use 3G connectivity for much more than purchases, and cloud-based synchronization plus Web browsing mean that a 3G model of the Fire will have to work within carriers’ service plans.
Smooth as Silk — Amazon also claims time (and thus bandwidth) savings in browsing. Instead of having the built-in browser directly connect to Web sites, Amazon is introducing Silk with the Kindle Fire, a sort of Web proxy with optimization that has a resemblance in part to Opera Software’s Opera Turbo. Where Turbo focuses on compressing images and reducing
unnecessary data flow to a browser, Silk does quite a bit more.
In the simplest explanation, Silk uses Amazon’s Elastic Compute Cloud (EC2), its high-performance virtual machine system, to retrieve requested Web pages and repackage them for more efficient delivery to the Kindle Fire. An EC2 proxy will shoot the entire page as an optimized single stream to the Fire browser, and it will apparently keep that connection open between the browser and EC2 all the time. Silk will also apparently predictively load pages based on the behavior of other Fire users as to what page you might click on next.
By contrast, a normal Web browser opens a connection to the remote Web server when a page is requested, and has to pull down most or all of an HTML page before it can start grabbing JavaScript files, images, and other embedded content. The connection may persist for just a single request, or sometimes for multiple files. Amazon has said, in response to privacy concerns about the firm having its fingers on all the browsing performed by its customers, that the Silk browser can be configured to work just like a normal browser and bypass EC2 entirely.
Amazon’s Silk job listings — thanks, Shawn Medero! — show that Silk programmers use Google’s SPDY, an open-source method of making Web connections vastly more efficient, and WebKit, the underlying browser rendering engine used in Safari and Android’s browser, to which Apple has contributed enormous resources. (Silk might be a joke on the Web and on Google’s SPDY, which sounds like “Spidey” when pronounced aloud. Take that, webslingers!)
The Other Kindles — Let’s not ignore what have suddenly become the Kindle Fire’s little siblings. Amazon also introduced two new Kindle readers while retaining the two existing models. Both new models omit keyboards, making them smaller and lighter. They’re also both cheaper. All the Kindles except the DX and the Fire use a 6-inch E-Ink grayscale screen.
The basic Kindle now costs $79, and has only Wi-Fi. With no keyboard and no touchscreen, a few buttons on the front enable you to navigate. It weighs a smidgen under 6 ounces (170g), and is about 80 percent of the size of the previous smallest Kindle. It has 2 GB of storage, compared with 4 GB for all other Kindle e-reader models.
The new Kindle Touch uses an infrared touch-sensitive screen, and retails at $99 in a Wi-Fi-only model . It’s nearly as small, and weighs under 8 ounces (under 225g). The Wi-Fi+3G Kindle Touch model works in 100 countries and costs $149. The Touch addresses one of the most irritating parts of touch-based reading, which is hitting the next page area. With a touchscreen, it was simple matter to fix: Amazon has made most of the book’s page into a next-page tap, so books can be easily read right- or left-handed.
The Kindle Touch has one exclusive feature. Called X-Ray, it incorporates a kind of skeleton of the book as easily available graphical metadata. Using Wikipedia and Shelfari (owned by Amazon), you can tap to see where ideas, characters, places, and other sorts of information are referenced throughout the book. It’s an intriguing idea, especially for long Russian novels, in which characters recur after absences of hundreds of pages. And I am the only one who can’t recall which Bennett sister is which in “Pride and Prejudice”?
The former base-level Kindle has been rebranded as Kindle Keyboard, and comes in Wi-Fi-only ($99) and Wi-Fi+3G versions ($139). The Kindle DX remains on sale, too, with its 9.7-inch E-Ink screen and built-in 3G (no Wi-Fi).
Now a proviso on the pricing. Amazon is promoting these Kindle models at the prices mentioned, but there’s a catch: all prices include savings based on the Special Offers editions in which advertising and sponsored messages are shown. That may sound irritating, but ads don’t interrupt you while reading; they appear only when a Kindle is in sleep mode, a state in which the E-Ink display shows a static (and non-battery-draining) image.
Amazon’s Special Offers reduce the price of a Kindle by a significant amount: $30 (Kindle), $40 (Kindle Touch, Kindle Keyboard with Wi-Fi), and $50 (Kindle Keyboard with 3G). Former TidBITS contributor and current Macworld editor Lex Friedman said on Twitter the ads aren’t bad. “The ads are really, really minimal though — and generally even worth it. They never interrupt the reading process.”
Nevertheless, a $79 Kindle brings the price down to that of a stocking stuffer in some families, or a nice gift for a student or dear friend. Amazon CEO Jeff Bezos openly said they would sell millions of them, something a publicly held company CEO would hold his mouth over unless he was confident of such a prediction. Having sold millions at much higher prices, I think he’s right.
We’re Number Two — The Kindle Fire occupies a new and different niche in the mobile device environment. It can’t kill the iPad because of its form factor and lack of inputs for audio and video. But it’s likely to become the second-best-selling tablet device quickly, and it will certainly attract those for whom the cost and size of the iPad are deterrents to purchase. I can also see people owning a smartphone, a Kindle Fire, and an iPad, all intended for slightly different purposes, trips, and occasions. The lack of media recording and low price might make the Fire more appropriate than iPod touch for parents concerned about children sharing inappropriate audio and
video.
The reason I’m so confident about Amazon, where I have been so scornful of the Samsung Galaxy S, Motorola Xoom (4G coming only several months later than promised), HP TouchPad (dead), and RIM BlackBerry PlayBook (dying), is because none of these devices that were ostensibly great for viewing video had a media ecosystem behind them. How do you buy or load the movies and TV shows you want to watch? The answer was always a silence interrupted by crickets, a nervous mention of Netflix, and future partnerships. But Amazon? Amazon has apps, music, books, TV shows, and movies already in place.
Dragging School Papers into the 21st Century with a ScanSnap
I bought a Fujitsu ScanSnap S1300 because I want to have less paper piling up in my house and more access to documents when I’m not at my desk, whether I’m in Staples working through the list of required school supplies for my 7th grader, being the secretary at a PTA meeting, or putting in work hours while traveling away from home.
The ScanSnap is addictive, and I’ve hardly begun to learn how to use it. Here’s how cool it is: My son comes home from the first day of school with a fistful of forms and handouts. I open the scanner, stick them in, choose an option from the ScanSnap icon in the Dock, and push the big blue button on the scanner. Within moments (or minutes if I chose to run OCR) the entire pile is onscreen, even the double-sided forms and the pages that emerge from the backpack slightly crumpled.
(OCR stands for “optical character recognition,” a fact that I mention here only because at least one smart person at my recent PTA meeting didn’t know it, so obviously it’s a geek term that’s not as widespread as I had thought. When you run OCR on something, you convert its scanned image into actual text that you can edit, copy and paste, and search.)
For forms that obviously need to be filled out again and again, I fill in the bits that won’t change and then print them as needed. These include medical permission forms that come home a half-dozen times each year, and the school district’s repeated requests for permission to put my son’s photo on the Web. Yes. It’s fine. But if you ask one more time, I’m gonna say no for variety’s sake.
(I haven’t yet worked up the courage to ask if I could, you know, return these forms via email. Our school district is big on “preparing students for the 21st century,” which is a buzzphrase for “helping them graduate with real-world technology skills,” so I think we adults could set an example here, since we’re already well into the 21st century.)
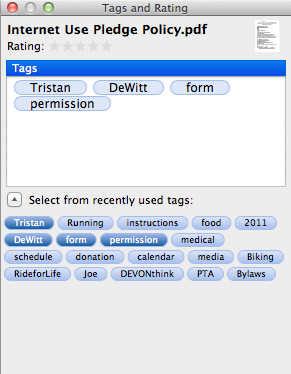
I then tag each file with a handful of tags using Tagit, a free utility from Ironic Software, to make it even easier to find them later, and then I stick the files in a shared Dropbox folder that my husband can access from any computer or from his iPhone or iPad. If a document seems like something my son might want, I stick a copy in his Dropbox folder. Some of these paper documents now land in the recycling box, but others go back to my son, who will likely crumple them up and store them in his backpack for the rest of the school year.
(Something that’s new this year is that my son may be allowed use a portable digital device in school, but only for a specific approved educational purpose, such as sharing a favorite song from his iPod touch during music class. It would be neat if he could load some of the documents into his iPod touch and generally carry it around — or even load them onto an iPad or one of the old Kindles kicking around the house, but the school hasn’t reached the point of generally allowing a piece of hardware to
replace a paper notebook. But, it feels funny turning papers into digital objects and then giving them back to my son to carry around in perpetuity in his backpack — like many students, my son is locker-adverse, because, apparently, you never know when a teacher will want you to produce a protractor or a purple pen.)
To do all the above with flair, it helps that I know how to use Smile’s PDFpen, which makes it easy to combine PDFs and to move individual pages out of PDFs. I chose the $295 ScanSnap S1300 because I read Joe Kissell’s “Take Control of Your Paperless Office,” and his descriptions of various scanners made me think that it would be a good choice for my modest needs and small desk. If I had a bigger desk, larger budget, and more papers to scan, the $495 ScanSnap S1500M would be a better choice, since
it appears more robust overall for handling a lot of paper. Also, the ScanSnap’s Amazon reviews are excellent, and the unit was available via Amazon Prime. (Disclaimer: I didn’t just read “Take Control of Your Paperless Office,” I edited it. Twice.)
You may be wondering why I chose Dropbox and the Finder as my filing repository for scanned documents. After all, there are many alternatives. You can put your scanned files into all sorts of software, including favorites like EagleFiler, Yojimbo, and DEVONthink (about which Joe Kissell has also written a book — “Take Control of Getting Started with DEVONthink 2”), and that list only skims the surface of the possibilities. In fact, you could spend months
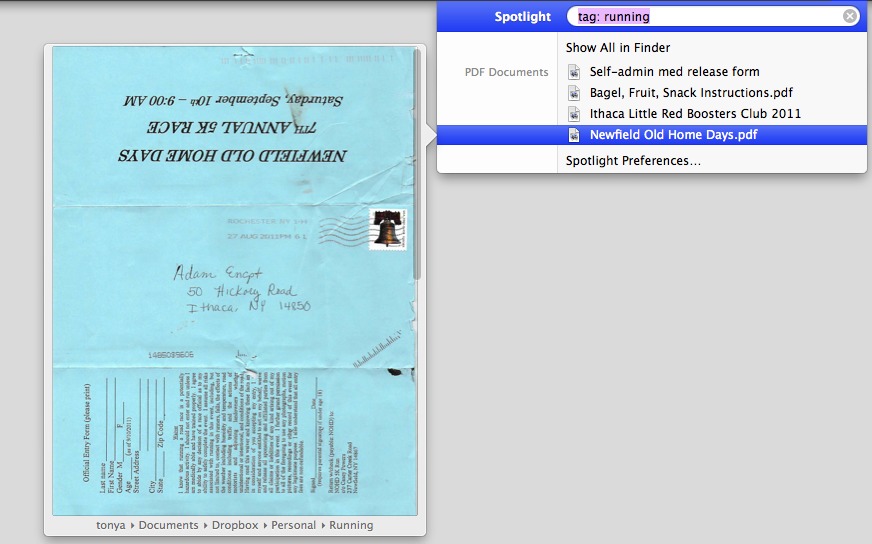
evaluating the options and learning how to use your eventual choice. And, in a case like mine, you could spend even more time discussing options with your spouse and teaching your homework-laden 12-year-old how to use it. That’s just not happening. In our household, we all know how to use the Finder, we have modest needs, and the extra boost of tagging that I’m adding with Tagit should help us find stuff if the simple folder hierarchy that I’m using proves insufficient (another ebook that I edited recently, “Take Control of Spotlight for Finding Anything on Your Mac,” taught me how to type queries like the one in the screenshot below). If we find that we need a
more sophisticated tool, we can always switch later.
A downside of the Dropbox iOS app is that it doesn’t load all your files onto the device all the time, so the app can be slow to access a file over a cellular data network. Also, the iOS app can’t find a file based on the tags that I apply with Tagit. Two of the programs that I mentioned above, Yojimbo and DEVONthink, have mobile apps that can sync stored documents on a Mac to an iOS device, so it’s possible that we’ll want to move to one of those in the future; however, I worry that three people attempting to
share a single data repository will complicate matters. Also, Code 42 Software just announced a CrashPlan iOS app that offers remote access to files in CrashPlan Central backups, and although it currently won’t help us (since we back up to a friend’s computer, not to CrashPlan Central), it’s possible a future version will provide access to our backed-up data.
Meanwhile, the only thing that would be better than the ScanSnap is to not have to use it at all because the information was all online and presented in a lovely way. Maybe that’ll happen in the real world outside the technology industry by the 22nd century.
Group Photo Sharing Grows Up with ZangZing
[Update: ZangZing was unable to stay in business; see “ZangZing and QOOP Closing Their Doors” (29 June 2012) for details. -Adam]
With the proliferation of digital cameras and cell phone cameras, some events may seem to have more photographers than participants. But with our imperfect memories, it’s hard to argue with the value of a photograph for helping to jog recollection of those special days. Plus, the low barriers to taking digital photos mean that parties, weekend outings, and sporting events can generate many hundreds of snapshots. Luckily, we have decent tools for managing oodles of photos on our own computers, and there are numerous online services to which we can upload photos and show them off to friends and family. As suggested to me by various friends, Flickr, Shutterfly, Picasa Web Albums, SmugMug, Posterous, and Facebook would all work for this, as would even Google+ and Dropbox.
But what I hadn’t found — until now — is a Web site that’s designed explicitly for group photo sharing, enabling multiple people to upload photos of a shared event for all to see, without needing a central administrator to manage usernames and passwords. I went looking for such a tool because a friend recently left my High Noon Athletic Club running group after 30 years, and his traditional last run was well documented by a number of people. At the end, one friend taking photos handed me his camera’s SD card and said, “Here, you take this, since you’ll get the photos up for everyone to see way sooner than I would.” Possibly true, but I’m equally at fault for sitting on event photos for months before uploading them,
largely because the traditional sites feel like they’re missing the mark for me.
Here’s what I realized I wanted from a group photo sharing site:
- Easy upload of photos. For me, that means uploading from iPhoto, but it should be equally easy to upload from any folder. If uploading is too hard, it simply won’t happen. Ideally, uploading photos shouldn’t even require an account, since that’s a significant hurdle for many people.
- The capability for multiple people to upload to the same album. This should be the killer feature, since the entire goal is to collect photos from different photographers.
-
URL-based sharing of individual albums. I want to be able to share the album with people via email, often on mailing lists, so I want to be able to send it myself rather than relying on the service to do it for me.
-
Simple access controls for both viewing and uploading. Some events are completely public, like a major festival. Others are public, but the participants may behave (and thus be photographed) in ways they wouldn’t want just anyone seeing — consider a large Halloween party. And while posting compromising photos (“Our Trip to the Brothel!”) is clearly just dumb, it’s still conceivable that you might want to share photos with a small group and password-protect access to them.
-
The capability for anyone to edit a photo’s metadata. Here, I’m mostly thinking about the names of people in the photo — at many events, only some people will know who certain people are.
-
Social features, such as commenting. Many photos are improved with the context that can be provided by a brief description, and photos may also serve as launchpads for conversation.
Enter ZangZing — After I posted on Google+ and read through the responses I got, I went looking for a site that would come closer to meeting my desires. Rather quickly, I ran across a new site inexplicably called ZangZing that comes extremely close to meeting all my needs. Founded by Kathryn Corro, Mauricio Alvarez, and Joseph Ansanelli (Joseph’s first company was bought by Apple/Claris as the basis for Claris Organizer and he went on to work on the Newton at Apple), ZangZing appeared in public beta only in April 2011. It received attention from the technology press at launch, but I haven’t seen significant mention of it in the
intervening months.
ZangZing may be new, but it is for the most part exceptionally well thought-out and implemented, and using it is more like using a standalone app than nearly any other Web site I can think of. Most impressive is that it doesn’t rely on Flash, so it works surprisingly well on iOS devices despite not being optimized for smaller screens. I imagine even better mobile support is on ZangZing’s development list.
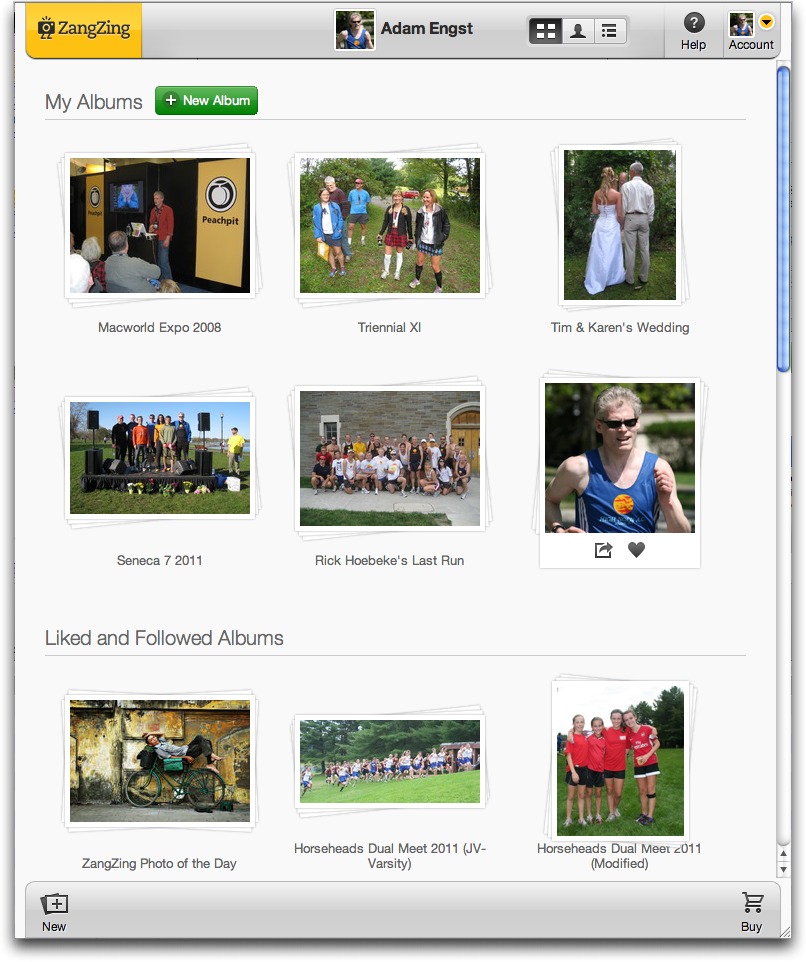
ZangZing’s interface is based around the concept of albums, presumably under the assumption that you would create an album per event, and indeed, most of what you’ll do in ZangZing involves albums (and more on that shortly). The main part of the interface is sandwiched by top and bottom toolbars, and the controls in each remain relatively consistent as you move through the different views. But before I explain the rest of the interface, let’s look at how you upload photos.
Uploading Photos — To get started with ZangZing, you’ll want to set up an account, which is tremendously easy and just requires a quick email verification. It is worth putting some thought into your username, since it will appear in all the URLs to your shared albums.
Once you’re logged in, you create a new album by clicking the New button in the lower left corner of the interface, which starts a four-step process of creating a new album.
- In the first screen, you select the source of your photos, which can be a folder on your computer, iPhoto, Picasa, Facebook, Flickr, Instagram, Picasa Web, Shutterfly, Kodak Gallery, SmugMug, Photobucket, Dropbox, or even another ZangZing album.
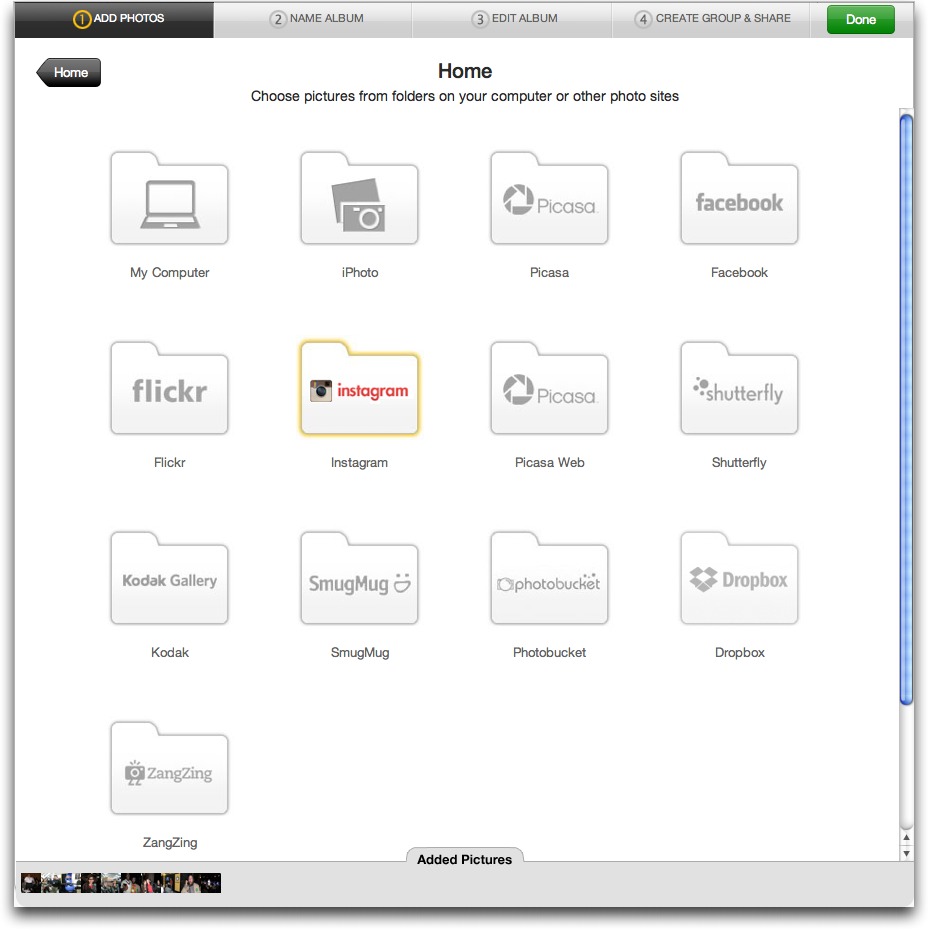
In each case, ZangZing then lets you navigate within the source to select an album or individual photos; I’m quite impressed that they can look inside iPhoto from a Web browser, for instance. Once you can see the photos you want, you click an individual photo to add it, or an Add All Photos button to snag everything.
At this point, ZangZing will upload photos via your Web browser, which can be a lengthy process. If you don’t want to sit and wait, you can instead download the ZangZing Desktop Photo Uploader (for Mac OS X and Windows). Contrary to what you might expect, it does nothing but handle the uploading process in the background; you still initiate the upload from the ZangZing Web site. In Mac OS X, it puts a small icon in the menu bar; a pair of green chasing arrows indicates when it’s uploading, and you can click it to reveal a menu item that tells you how many it has left.
-
Once your photos are uploaded, it’s time to name the album. The name is important, since it’s used in the URL to the album that you’ll share with others, and for the email address to which photos can also be sent to be uploaded. ZangZing automatically removes characters that aren’t appropriate for URLs and email addresses.
-
Although ZangZing lets you pick albums or individual photos and brings titles over from the originals, it’s not uncommon to want to upload all the photos in an album or event, except for one or two. And you might discover that some titles are missing or wrong. That’s what you can fix in Step 3, where you edit your album, changing titles, deleting unwanted photos, and rearranging the sort order manually. If everything is as desired, you can just move on to the next step quickly.
-
Lastly, you need to adjust privacy, sharing, and access control settings. Albums can be Public, at which point anyone who visits your account can see them; Hidden, such that no one will stumble across them without knowing the URL; or Invite Only, at which point you must set up and invite a group.
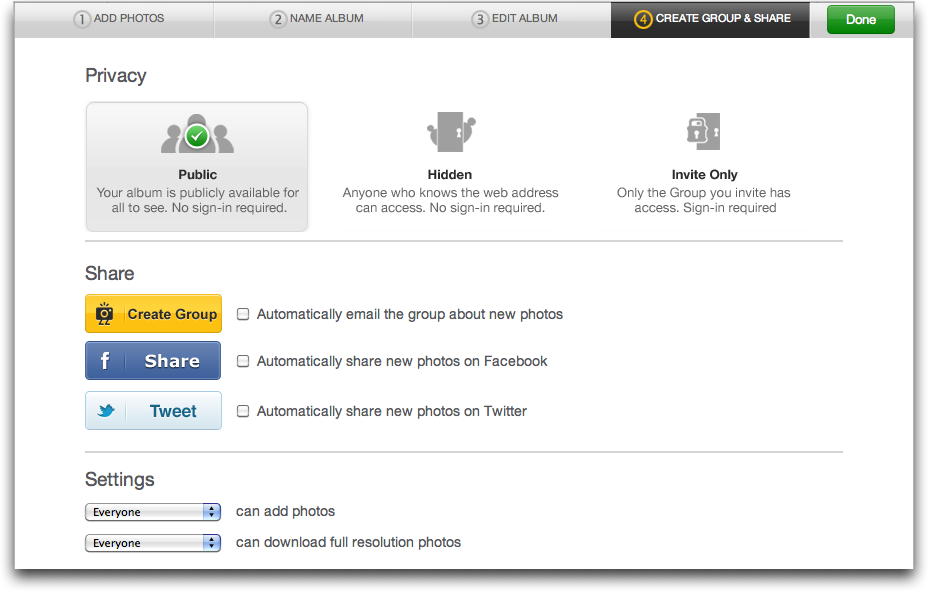
In terms of sharing, you can have a preset group receive email about new photos, and you can automatically share new photos on Facebook or Twitter. Frankly, those worry me a bit — I don’t want to post willy-nilly.
The access controls are next, and control who can add photos to your album (either Everyone or just people you’ve designated in the group as Contributors), and who can download full-resolution photos (Everyone, Contributors, or No One).
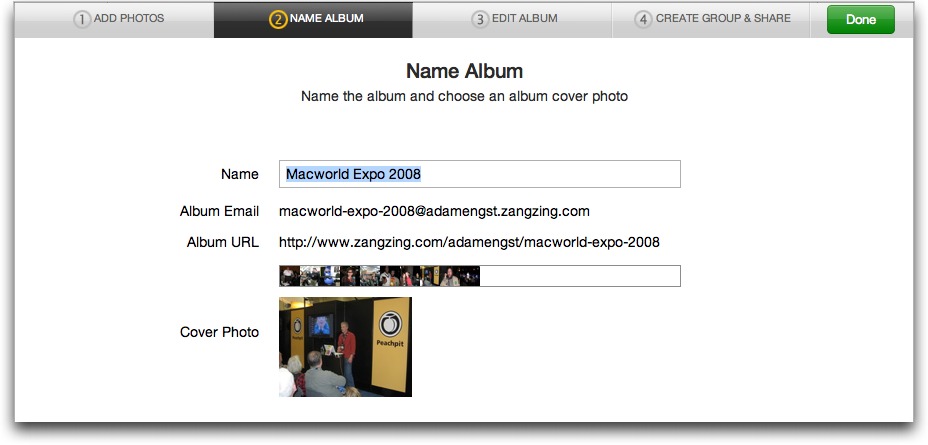

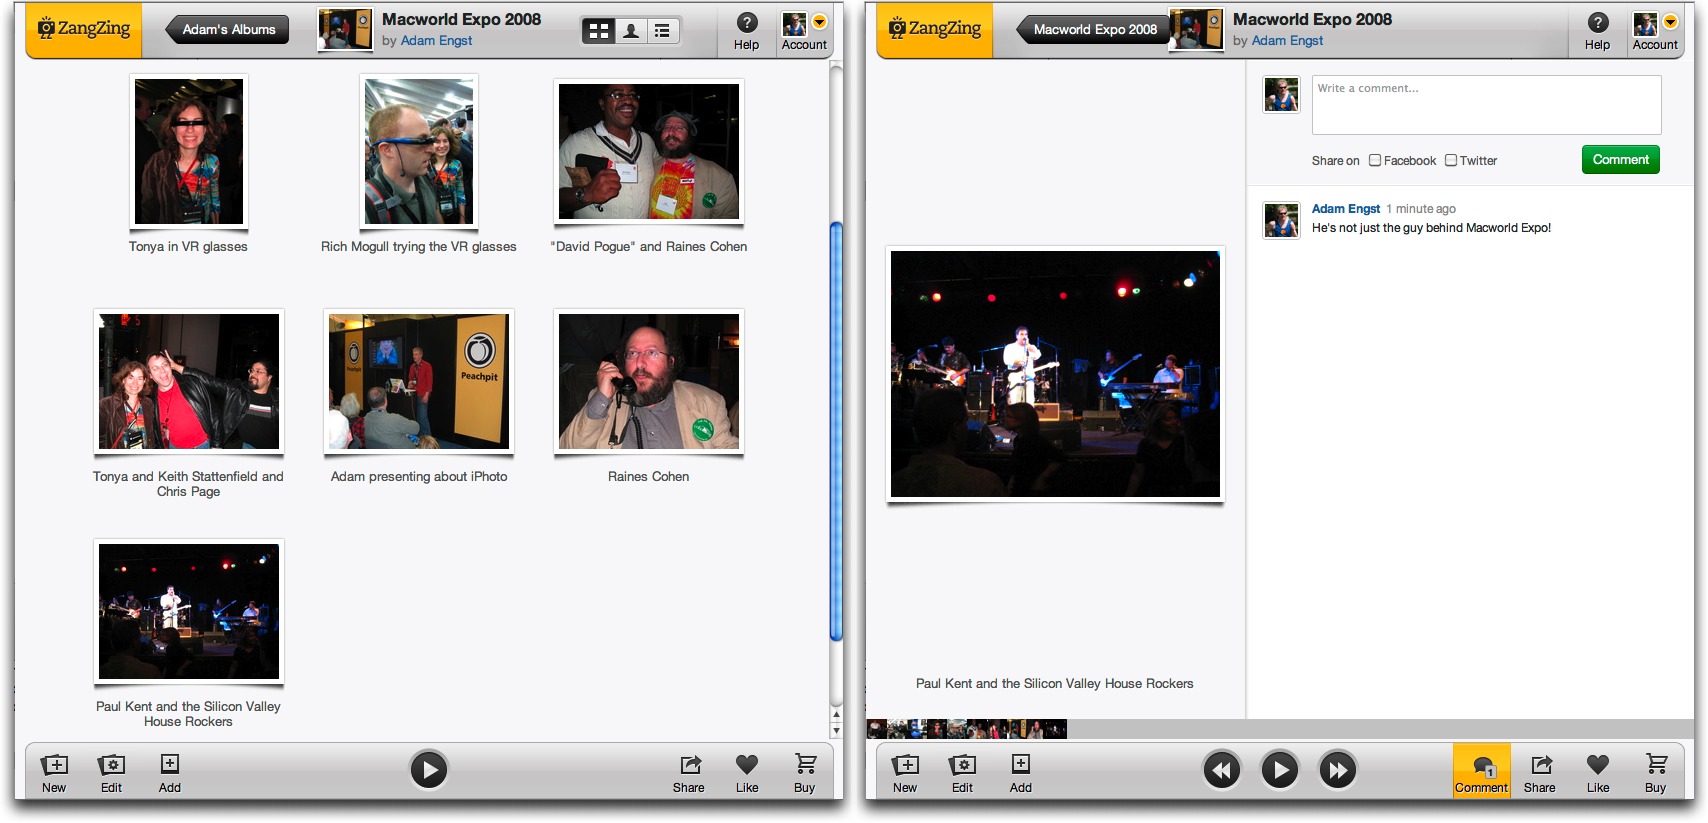
So far, I’ve made most of my albums hidden, since they fall into the category of pictures from a Halloween party. They’re from Ithaca school cross-country races (and hence include pictures of children), or other running events I’ve participated in (some involving costumes), and so on. However, for the purposes of this article, I posted a public album of photos I took at Macworld Expo 2008; if anyone wants to add a few photos from that year to test the experience, feel free, since I’ve set the access controls so anyone can add.
The only worry I have is that, because this is a public album and anyone can upload, it’s conceivable I could end up with spam photos (photos of spam?). I can delete those, but obviously, if it gets out of hand, I’ll just restrict uploads. With my hidden albums, I’m not concerned about spam photos because only people involved in the event are likely to have access.
Once you’re done uploading photos, you can share the album (if it’s Public or Hidden) merely by copying the album’s URL and sending it to interested parties. Invite Only albums are accessible only to the group you create.
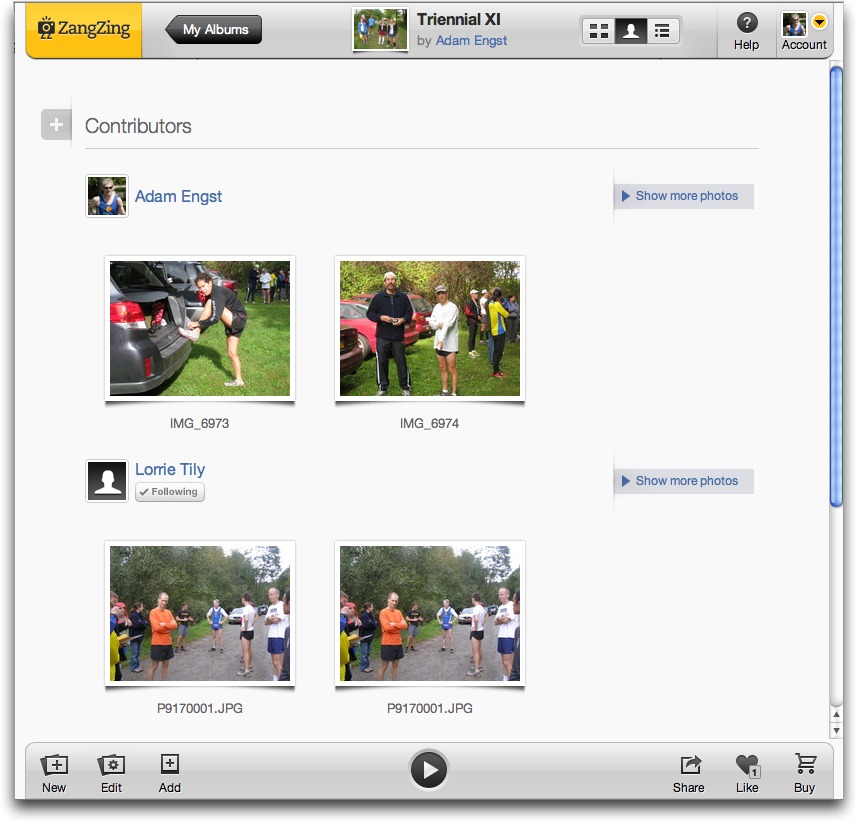
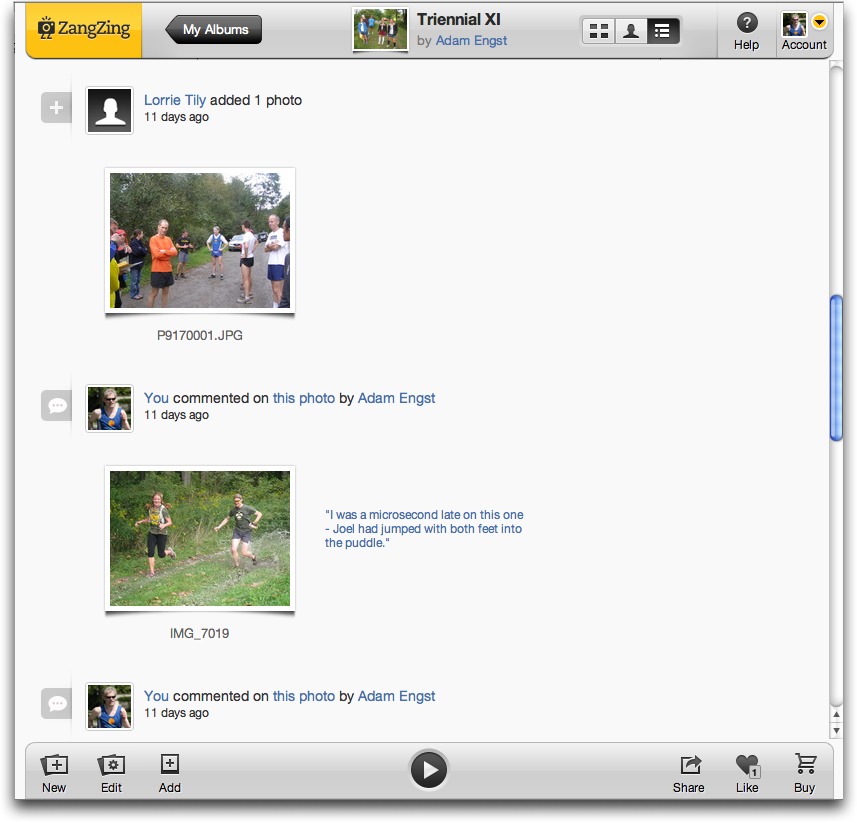
Viewing and Working with Photos — Whenever you’re viewing an album or a photo, the top-left area provides a button to move back up the hierarchy to the photo’s album, or to the list of all your albums. On the top in the middle is an icon and the name of the person whose photos you’re viewing, and if it’s not you, there’s a button that lets you follow that person, such that you’ll be alerted to new public albums that person creates.

The top-right area provides a Help button that pops up an integrated Zendesk-based knowledgebase along with an Account button that’s actually a menu providing access to settings and the option to sign out. But most interesting in this top-right area is a segmented button that toggles the content of the main part of the window between photos, people, and activity. More on that shortly.
In the bottom-left area are one to three buttons, depending on context: New, Edit, and Add. Whenever you’re logged in, the New button starts the four-step album creation process. If you’re viewing an album you’ve already created, Edit brings up the same interface so you can modify an album’s settings or tweak its contents. Finally, Add appears if you’re viewing either one of your own albums or someone else’s album to which you’re allowed to add photos.

In the middle of the bottom toolbar is a graphical play button that starts a slideshow; if you’re viewing a single photo, it’s joined by forward and back buttons that move to the next and previous photos. In the bottom-right area are three or four buttons, again depending on context: Comment, Share, Like, and Buy. Comment appears only if you’re viewing an individual photo, and clicking it toggles the visibility of a pane where you can add a comment to the photo. The Share and Like buttons appear whenever you’re viewing
an album or a photo, and let you share the album or photo via email, Facebook, or Twitter, or just note that you like it. “Liked” photos are called out in the activity stream for that album, and you can share the fact that you like the photo on Facebook or Twitter. If you click the Like button accidentally, you can click it again to undo. Lastly, the omnipresent Buy button does nothing now, but will shortly enable you to purchase prints in various forms.
The main part of the ZangZing window is reserved for content, which comes in three forms: albums and photos, people, and activity, switched via that segmented button I mentioned earlier. Albums and photos are quite obvious — at the top level you see all your albums, and albums you have either liked or public albums of people you are following. Click an album and you see the photos in it, click a photo and it takes up the entire window. Notice the strip of tiny thumbnails at the very bottom of the photo window!
When you’re viewing the photos in an album, hovering over a photo reveals photo-specific controls that let you share it, “like” it, comment on it, buy it (soon), like it on Facebook, or tweet it. These controls are self-explanatory because they duplicate features in the toolbars; the one that’s not is the little “i” button that displays a menu from which you can choose to download the photo (in full resolution, if the album is so enabled) and, if it’s in an album you own, rotate it, set it as the
cover photo for the album, and delete it. One important tip: if you click the heart ♥ icon to “like” a photo (or an album, for that matter), and wish to take it back, just click the icon a second time.

When you’re viewing an individual photo, clicking it moves you to the next one; you can also use the left and right arrow keys to navigate through the strip of photos. Or, if you prefer not to control the movement manually, you can click the triangular play button to start a slideshow that blacks out the window and displays just the photos. On computers, you can make the slideshow take over the entire screen; that button doesn’t appear on an iOS device. Graphical slideshow controls are provided,
the Space bar pauses and restarts the slideshow, and both clicking and the left and right arrow keys continue to work as they do when viewing an individual photo. The only remaining option is that you can hide or show the photo’s title; this button is the same as the one used elsewhere for commenting, in an unusual lapse of interface consistency.

If you want to see who has uploaded which photos, click the silhouette button in the segmented button in the top toolbar to switch to people view. It lists the contributors to the album, and lets you see all the photos they’ve uploaded, at least in thumbnail view. One problem, and this is something ZangZing needs to address in general, is that if you click a thumbnail of another person’s photo and then navigate to subsequent photos, the sorting can be sufficiently random that there’s no guarantee you’ll see only that
person’s photos. Similarly, in the album view, the photos sort seemingly randomly; in both cases, ZangZing is actually sorting by time, but people often fail to set the date and time in their cameras correctly. Ideally, you as the user would want to sort by contributor, by time, or by photo title.
The final view is activity view, accessed from the rightmost button in the segmented control. It lists activity in the album, such as people “liking” photos, adding photos, commenting on photos, and so on. If you’re the owner of an album, or in the group for an album, you’ll also receive email whenever these actions occur. Nonetheless, activity view is key, since without it, it can be difficult to determine which photos have comments, or which are most popular. I’d like to see ZangZing reveal some of that metadata
in the album view without requiring the user to hover over a photo.
Speaking of email notifications, in the Settings screen accessible from the Account button, you can control which events — invitations, social actions, upload confirmations, news, and marketing messages — will send you email. You can also tweak your personal information here, and link your account with other photo and social networking services for uploading and posting of social activities.
Rough Edges — I’ll be honest: I like ZangZing immensely. But it’s not surprising that such a new service would still be working through a few rough spots. Here are some I’ve encountered.
- The Buy buttons that appear throughout the interface aren’t yet wired in. Once they are, you’ll be able to buy prints, framed prints, gallery-wrapped canvases, and framed poster prints of the photos you see. I wouldn’t be surprised to see ZangZing let you print on various other objects as well. This is part of ZangZing’s eventual business model.
-
Right now, ZangZing is free, and it will remain so. However, at some point, there will be limitations on how much you can upload with a free account, and a fee will be necessary to regain unlimited uploads. I don’t believe the fee has been decided on yet, but since Flickr and similar sites are in the $25 per year range, I’d expect something similar from ZangZing.
-
There’s no provision for a true group account, at the moment, which would be ideal for a club. For the Ithaca cross-country teams, I created a new account that I control with the expectation that I could give the password to someone else if they were going to take over the task of creating a new album for each race. That’s a fine workaround, but not entirely ideal; ZangZing is pondering the concept of a group account that would be linked to a personal account, but with additional access privileges.
-
Better sorting is essential. As noted previously, it’s chronological or manual at the moment, which can feel random, and thus disorienting in an album containing hundreds of photos.
-
Although you can see who uploaded a photo in the people and activity views, there’s no way when viewing an album or an individual photo to know who uploaded it (apart from the photo’s title, which often gives it away). It would be nice to have that as optional information displayed along with the photo title.
-
There aren’t any options for what metadata displays, so most uploaded photos just have the ugly camera default names associated with them, and there’s no way to hide them. Similarly, as I noted above, it would be nice in the album view to be able to see at a glance which photos had been liked or commented on.
-
Although the owner of an album can rotate and delete photos, and the contributor of an album’s photos can do the same to their photos after the fact, there’s no option for anyone who’s viewing the album to be able to rename photos. Album owners can rename photos in Step 3 of the Edit Album process. Ideally, anyone who has access (at least in Hidden and Invite Only albums) should be able to rename a photo directly from the album view.
-
Currently, even if you set an album to accept uploads from Everyone, people who want to upload via the Web still need to have an account. Not surprisingly, anyone can submit photos via email, regardless of whether or not they have an account. It would be ideal to allow Web uploads from people who don’t want accounts.
-
Videos aren’t supported right now, though ZangZing has told me that they’re on the list to be added.
As much as the ZangZing team has their work cut out for them, the service as it stands right now is extremely usable, and by far the best solution I’ve seen for group photo sharing. The Ithaca cross country teams previously used to trade photos around manually on USB flash drives, with the goal of getting everything on a DVD that could live in the library at the end of the season. Now parents can upload all their photos immediately after every race, parents and runners alike can view them, and the yearbook adviser is ecstatic about having such a collection to choose from. Everyone’s happy.
TidBITS Watchlist: Notable Software Updates for 3 October 2011
Adobe Photoshop Lightroom 3.5 and Camera Raw 6.5 — After seeding release-candidate versions of Photoshop Lightroom and Camera Raw a few weeks ago, Adobe has now made the final versions available. Photoshop Lightroom 3.5 and Camera Raw 6.5 add raw support for several new cameras, such as the Fuji FinePix F600EXR, Nikon Coolpix P7100, Olympus E-PL3, and Sony SLT-A77. New lens profiles are also added, making it easy to correct distortion and chromatic aberration inherent in those lenses, and bugs have been fixed. (Free
updates: Lightroom 3.5: 103 MB; Camera Raw 6.5: 93.1 MB)
Read/post comments about Adobe Photoshop Lightroom 3.5 and Camera Raw 6.5.
Firefox 7.0 — Continuing their new silly version numbering, Mozilla has released Firefox 7.0 (think of it as 4.3 in the real world), once again adding no real new features to the organization’s Web browser. Memory handling is supposedly “drastically improved” for certain use cases, Firefox Sync is faster, the http:// URL prefix is hidden by default in the address bar, MathML support has been enhanced, and there are a few other minor changes. Walk, don’t run, to download it. Also note that the just-released Firefox 7.0.1 fixes a rare bug that could hide add-ons after the 7.0 update
was installed; if you’re not seeing the problem, it’s safely ignored for now. (Free, 28.2 MB, release notes)
Read/post comments about Firefox 7.0
PopChar X 5.3 — If you find yourself regularly needing to find and enter special characters in different fonts, that task has now become easier in Mac OS X 10.7 Lion, with Ergonis Software’s release of PopChar X 5.3. The new release supports colored symbols in the new Apple Color Emoji font; these can now be browsed and searched for, and inserted as characters in applications that know how to handle color fonts. Some additional tweaks, such as reduced CPU load in the background and better compatibility with Lion’s desktop spaces, round out the update. (€29.99 new, free update, 2.3 MB, release notes)
Read/post comments about PopChar X 5.3.
Teleport 1.1 — For those who would like to control multiple networked Macs from a single mouse and keyboard, Julien Robert of Abyssoft has now updated his donationware utility Teleport to be compatible with Mac OS X 10.7 Lion (for a review of an earlier version, see “Tools We Use: Teleport,” 27 August 2007). Other new features in Teleport 1.1 include the capability to jump directly to a controlled Mac by pressing a keyboard shortcut, significantly faster file transfers, multiple item file transfers, support for all available screens on Macs with more than one, full
support for gestures, encrypted file transfers, and more. (Free update, 706 KB)
Read/post comments about Teleport 1.1.