TidBITS#1212/03-Mar-2014
OS X 10.9.2 Mavericks is out, and our coverage dominates this week’s issue of TidBITS. It’s an important update from the security perspective, since it addresses the critical SSL/TLS vulnerability fixed in iOS and Apple TV last week, and 10.9.2 also adds FaceTime Audio and iMessage blocking. Perhaps more important from an everyday usage standpoint, 10.9.2 features a number of Mail improvements, and Joe Kissell ferrets out a number of changes beyond those Apple lists. Joe is deep in Mail this week, since we also published his “Take Control of Apple Mail,” and he has another article that shares some of the tips he didn’t have room for in the book. Rich Mogull digs deep into iCloud Keychain, and tells you how to make yours so secure that even the NSA can’t access it. Finally, Nick Mediati joins us for this week’s FunBITS to explain how blurry photos can be a good thing. Notable software releases this week include Mellel 3.3.1, Downcast 1.0.10, Mac Pro SMC Firmware Update 2.0, iTunes 11.1.5, Safari 6.1.2 (Mountain Lion and Lion), and Security Update 2014-001 (Mountain Lion and Lion).
10.9.2 Fixes Critical SSL Security Bug, Adds FaceTime Audio
Apple has released OS X Mavericks 10.9.2 Update, which finally brings to the Mac FaceTime audio, introduced in iOS 7 back in September 2013, and fixes a nasty security vulnerability in SSL/TLS (see “Apple Updates iOS and Apple TV to Fix Critical SSL Security Bug,” 24 February 2014). If you’re using Mavericks, we strongly encourage you to install the free update, either via Software Update (460 MB) or from Apple’s Support Downloads site (733 MB). If you skipped the 10.9.1 update, you can also grab a combo update (859.7 MB) to upgrade
directly from 10.9 to 10.9.2.
![]()
The SSL/TLS bug was caused by a faulty “goto” line, which prevented iOS 6 and 7 and OS X 10.9.1 Mavericks from checking signatures in TLS Server Key Exchange messages, which could have allowed attackers to use man-in-the-middle attacks to spoof SSL-protected sites. According to Apple’s security notes, the vulnerability does not affect 10.8 Mountain Lion and earlier versions of Mac OS X. Although the SSL/TLS bug was particularly important to address, 10.9.2 also patches numerous
vulnerabilities in app sandboxing, ACLs in the Finder, font handling, image display, Nvidia drivers, Quick Look, QuickTime, and the system clock, along with the Apache Web server, curl data transfer tool, and PHP scripting language.
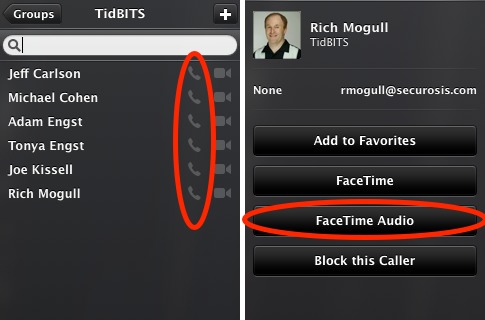
To place FaceTime Audio calls to fellow 10.9.2 users or users of iOS 7, open the FaceTime app, and then either click the phone handset icon next to a contact’s name or click a contact’s name and click FaceTime Audio. You now also have the option to activate call waiting for both FaceTime audio and video calls.
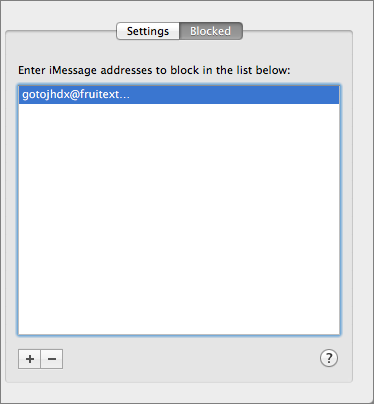
In another welcome addition, Messages in 10.9.2 now lets you block iMessages from specific senders. To do so, choose Messages > Preferences, select the Accounts tab, and then click Blocked in the right pane. Once there, you see a list of blocked senders, which you can edit with the plus and minus buttons.
Happily, 10.9.2 claims a number of improvements to Mail, including more accurate unread counts, a fix for a bug that prevented Mail from receiving new messages from certain email providers, better compatibility with Gmail Archive mailboxes, improvements to Gmail labels, and “general improvements to the stability and compatibility of Mail.” Joe Kissell has more to say about this in “Mail Improvements in OS X 10.9.2” (25 February 2014).
Also included in 10.9.2 is Safari 7.0.2, which improves AutoFill compatibility and browsing when using an authenticated Web proxy, and fixes a WebKit vulnerability that could lead to arbitrary code execution.
Although the security fixes, FaceTime Audio additions, and iMessage sender blocking are the main reasons to move from previous versions of Mavericks to 10.9.2 — which we highly recommend! — the update also:
- Fixes an issue that may cause audio distortion on certain Macs
- Improves reliability when connecting to a file server using SMB2
- Fixes an issue that may cause VPN connections to disconnect
- Improves VoiceOver navigation in Mail and Finder
- Improves VoiceOver reliability when navigating Web sites
- Improves Software Update installation when using an authenticated Web proxy
- Fixes an issue that could cause the Mac App Store to offer updates for apps that are already up to date
- Improves the reliability of diskless NetBoot service in OS X Server
- Fixes braille driver support for specific HandyTech displays
- Resolves an issue when using Safe Boot with some systems
- Improves ExpressCard compatibility for some MacBook Pro 2010 models
- Resolves an issue which prevented printing to printers shared by Windows XP
- Resolves an issue with Keychain that could cause repeated prompts to unlock the Local Items keychain
- Fixes an issue that could prevent certain preference panes from opening in System Preferences
- Fixes an issue that may prevent migration from completing while in Setup Assistant
- Provides a fix for SSL connection verification
Mail Improvements in OS X 10.9.2
It seems to happen like clockwork: I release a book about some Apple product or service, and within a week, Apple updates its offerings in such a way as to invalidate what I wrote. But this time I had a tiny bit of luck: Apple’s 10.9.2 update (see “10.9.2 Fixes Critical SSL Security Bug, Adds FaceTime Audio,” 25 February 2014) was released hours before we planned to publish my new book, “Take Control of Apple Mail,” and that gave me just enough time to revisit problems in previous versions of Mail and edit the manuscript to reflect the changes.
I’m pleased to report that the new version of Mail in 10.9.2 (version 7.2, build 1874) is far better than its predecessors, about which I complained mightily in “Mail in Mavericks Changes the Gmail Equation” (22 October 2013) and (to a slightly lesser extent) “Mail in Mavericks: Is It Safe Yet?” (11 November 2013). That meant I was able to delete quite a few paragraphs from my book detailing bugs and other infelicitous changes. But, to keep this in perspective: Mail is now at the point where it should have been when Mavericks was released.
Since those paragraphs will no longer be in the book, I wanted to report what I’ve found. I’ll begin with the usual disclaimers: not every problem has disappeared, and what works for one person doesn’t necessarily work for everyone. As evidenced by the long list of comments on this article, plenty of people are still experiencing significant problems. Even so, this is the first version of Mail in Mavericks that feels reasonably reliable, and it’s about time!
As always, Apple’s own claims about what has changed are vague and incomplete. The relevant lines from the release notes are as follows:
- Includes general improvements to the stability and compatibility of Mail
- Improves the accuracy of unread counts in Mail
- Resolves an issue that prevented Mail from receiving new messages from certain providers
- Improves VoiceOver navigation in Mail and Finder
- Improves compatibility with Gmail Archive mailboxes
- Includes improvements to Gmail labels
That all sounds encouraging, if not terribly clear. So, take Apple’s list with a grain of salt. Here’s what my tests have shown:
- Unified mailbox behavior: In 10.8 Mountain Lion and before, you could drag a message from any mailbox to the unified Inbox icon (which contains the Inboxes for all your accounts), and Mail would move it to the Inbox of the account where the message was stored — unless it was stored locally and thus not in any account, in which case it would be moved to the account shown first under the unified mailbox. The same went for other unified mailboxes — Drafts, Sent, Junk, Trash, and Archive. However, in 10.9.0 and 10.9.1, this convenience feature was gone; when dragging a message to any unified mailbox, you had to expand it and select a specific account underneath. Now, in 10.9.2, we’re back to the more convenient Mountain Lion
behavior. - Gmail special mailboxes: In the first two releases of Mavericks, although you could uncheck the Store Draft Messages on the Server, Store Sent Messages on the Server, Store Junk Messages on the Server, or Move Deleted Messages to the Trash Mailbox checkboxes on the Mailbox Behaviors view of your Gmail account preferences, as soon as you reopened the Preferences window, you’d see that they were checked again. In other words, you were obligated to store Gmail drafts, sent, junk, and trash email on the server whether you wanted to or not. Furthermore, Mail forced you to use the default locations for Gmail’s Drafts, Sent, Junk, and Trash mailboxes. (That is, if you selected another mailbox and chose Mailbox > Use This Mailbox For,
the submenu was dimmed.) Both of those annoyances are now gone; you can store special Gmail mailboxes on the server or not, and if you do, you can choose nonstandard mailboxes if you prefer. -
Gmail mailbox order: Previously, you could not rearrange Gmail mailboxes in Mail’s sidebar; those at the top level of your Gmail account were always in alphabetical order (although, strangely, mailboxes nested within another mailbox could still be reordered). Now you can reorder Gmail mailboxes, but not the special-purpose mailboxes Gmail creates automatically, such as Important and Chats.
-
Gmail AppleScript problems: If you had an AppleScript that targeted a Gmail mailbox other than Inbox or Archive/All Mail, it would fail, because AppleScript saw all the other Gmail mailboxes as being empty. Now AppleScripts can again see into Gmail mailboxes properly.
-
Exchange reliability: Users with Exchange accounts had found that Mail checked for new messages on launch, but not afterwards; you had to either quit and reopen Mail or take your accounts offline and then check for new messages manually (as described in this Apple support article). That has now been fixed, at least for most users.
-
Addressing to Smart Groups: The Contacts app lets you create groups of addresses — for example, a Family group that contains the contact records of your family members. You can type a portion of a group’s name and Mail autocompletes it just as it would for an individual name. Autocomplete does not work for Smart Groups (so, that much hasn’t changed since 10.9.1), but now, if you type the entire, exact name of the Smart Group and type a comma or press Tab or Return, Mail at least displays the group name in a nice blue bubble, and the Smart Group does in fact work — Mail sends the message to the correct addresses.
That’s as much as my testing has revealed so far. I wouldn’t be surprised to find more improvements (or new bugs, for that matter). I can’t yet say whether other issues with Gmail or Exchange have been dealt with. And although Apple may have improved the accuracy of unread counts (perhaps for Smart Mailbox badges), I’ve read multiple reports that the badge on Mail’s Dock icon still isn’t accurate. Numerous other issues remain, as well, but on the whole the bugs seem to be fewer and less severe than before.
If you’ve noticed additional improvements, things that are still broken, or new bugs, please share them with us in the comments. And if you ever feel as though your email is out of control, my brand new 175-page book “Take Control of Apple Mail” will help you become more productive with Apple Mail in 10.9 Mavericks and iOS 7, providing essential advice for Gmail, iCloud, IMAP, and Exchange accounts. It reveals hidden interface elements, shows how to customize Mail, explains my strategy for avoiding email overload, demystifies encrypted email, and provides solutions to common problems, among many other things.
How to Protect Your iCloud Keychain from the NSA
Apple has released a massive update to its “iOS Security” white paper for IT professionals. It contains more information on iOS security than Apple has ever shared publicly before, including extensive details on Touch ID, Data Protection, network security, application security, and nearly all security-related features, options, and protective controls.
For the first time, we have extensive details on iCloud security. For security professionals like myself, this is like waking up and finding a pot of gold sitting on my keyboard. Along with some of the most impressive security I’ve ever seen, Apple has provided a way to make it impossible for agencies like the NSA to obtain your iCloud Keychain passwords.
The paper is incredibly dense, even getting to the level of detail of which flavor of particular encryption algorithms are used in which security controls. I will likely be digesting it for months, but one particular section contained an important nugget that explains why the NSA can’t snoop on your iCloud Keychain passwords.
iCloud Keychain Background — iCloud Keychain includes three key features, specifically, the capability to:
- Create strong, random passwords for Web sites right from within Safari
- Sync your keychain (and thus your stored passwords) between different devices
-
Back up that keychain to Apple’s servers
While strong, random passwords are essential for protecting your digital life, if you were to lose them, you’d be locked out of everything. It is thus in Apple’s interest to ensure that these passwords sync consistently, and that they are as protected from loss as is possible, for both you and Apple.
This means Apple needs to keep a backup copy of your keychain. Especially with recent fears of government snooping, trusting the keys to your digital life to a large company is a daunting prospect.
Apple uses different, but related, security methods to protect both keychain syncing and keychain escrow and recovery (backup). In Apple’s words:
Apple designed iCloud Keychain and Keychain Recovery so that a user’s passwords are still protected under the following conditions:
- A user’s iCloud account is compromised.
- iCloud is compromised by an external attacker or employee.
- Third-party access to user accounts.
Secure Sync — When you sync your keychain, Apple doesn’t actually keep a master copy in iCloud. The first device to enter the circle of trust (like an iPhone) creates a syncing identity using paired public and private keys (called asymmetric cryptography, which is very well understood and widely used). A key pair is generated, the public key is signed by the private key, and then the public key is encrypted by a key derived from your iCloud password. The signed circle of trust is placed in iCloud, but your private key never leaves your device.
At this point, iCloud has the public key from your device, encrypted with your iCloud password, and signed (so no one can fake it or modify it) with the private key on your device, but your keychain itself isn’t in iCloud.
When a new device is approved, the same process happens on that device, and the approved public key is signed and added to the circle of trust on each device and in iCloud (using yet more encryption). This is tied to notifications sent to existing devices in the circle and yet more cryptographic signing (and your iCloud password) to ensure someone can’t cheat the process and register their own device.
When passwords are added or changed, Apple syncs only the individual keychain items to other devices that need the update, one at a time. In other words, each keychain item is sent only to each device that needs it, the item is encrypted so only that device can read it, and only one item at a time passes through iCloud.
To read it, an attacker would need to compromise both the key of the receiving device and your iCloud password. Or re-architect the entire process without the user knowing. Even a malicious Apple employee would need to compromise the fundamental architecture of iCloud in multiple locations to access your keychain items surreptitiously. Even stealing your iCloud username and password wouldn’t provide an attacker access to your keychain. The attacker would also need a device currently in the circle of trust to approve the new one, and for you to not notice the approval notifications on every other device already in the circle.
Apple could technically subvert the process, for malicious reasons or at the behest of a large government agency, but not easily, not without changing the architecture (the notification and approval piece), and not without incurring serious legal liability now that the details have been published.
Secure Recovery — Unlike sync, which sends only one keychain item at a time, iCloud Keychain Recovery does back up your entire keychain in iCloud.
Apple created a secure escrow service to handle this complex process in a highly secure way. Your keychain is encrypted with a strong key and stored in iCloud. The strong key needed to decrypt it is then itself encrypted with a new iCloud Security Code and the public key of special encryption hardware known as an HSM (Hardware Security Module). In my work as a security analyst, I write a lot about HSMs, which are tamper-resistant, highly secure hardware devices used by banks, governments, and major corporations to manage encryption and keys.
This gets a little complicated, but the easy way to think about it is that only the HSM can read the key encrypted with the iCloud Security Code, but since it doesn’t store the iCloud Security Code, it can’t read the actual key used to protect the keychain. If the right conditions are met, the HSM (actually a cluster of HSMs in case one breaks) will release the key, which can then be decrypted with the iCloud Security Code. Only then can the key be used to unlock your keychain.
Don’t feel bad if it’s hard to understand. It took me a while to figure this out, despite Apple’s clear documentation and the fact that I earn my living in part by advising HSM vendors.
The recovery process also requires your phone number, since Apple sends a text message you must reply to as part of the recovery process. You also need your iCloud username and password to request a recovery, and your iCloud Security Code to unlock your keys. That’s three pieces that are required before the keychain is opened. If someone tries to compromise your account but fails a few times, your account locks up and the only way to try again is to call Apple support. After that, 10 failures and the HSM destroys your escrow record, locking your keys away forever.
Just to be safe, Apple destroyed the administrator access cards for the HSMs, and set them to delete all the keys if any unauthorized access is detected. Then, all users are sent a notification to re-enroll before they lose their keys, and re-enrolling moves them to a different HSM cluster.
As I mentioned, part of my day job is advising large businesses and security vendors. I rarely see this level of security, and it’s especially rare to destroy the administrative smart cards required to access the HSM.
How to NSA-proof Keychain Recovery — Despite all this, there is still the possibility Apple could, at the behest of law enforcement agencies, modify the process or compromise the HSMs and use that to access keychains and all the stored passwords. However, thanks to the destruction of the admin access cards, this could only affect new enrollments.
The reason for the HSMs is that neither a four-digit value for the iCloud Security Code (the default), nor a long user code (a second option), is good enough to generate a cryptographically sound key, because there simply isn’t enough entropy. Apple was worried that someone could guess your iCloud Security Code, and the HSMs and key escrow process defend against that.
Apple thus added a third option to allow your device to generate a cryptographically secure iCloud Security Code. If you select this option when setting up your iCloud Security Code in the process of turning on iCloud Keychain (tap Settings > iCloud > Keychain, turn on iCloud Keychain, and then follow the steps in the screenshot), iCloud Keychain Recovery uses a completely different process to protect your keychain.
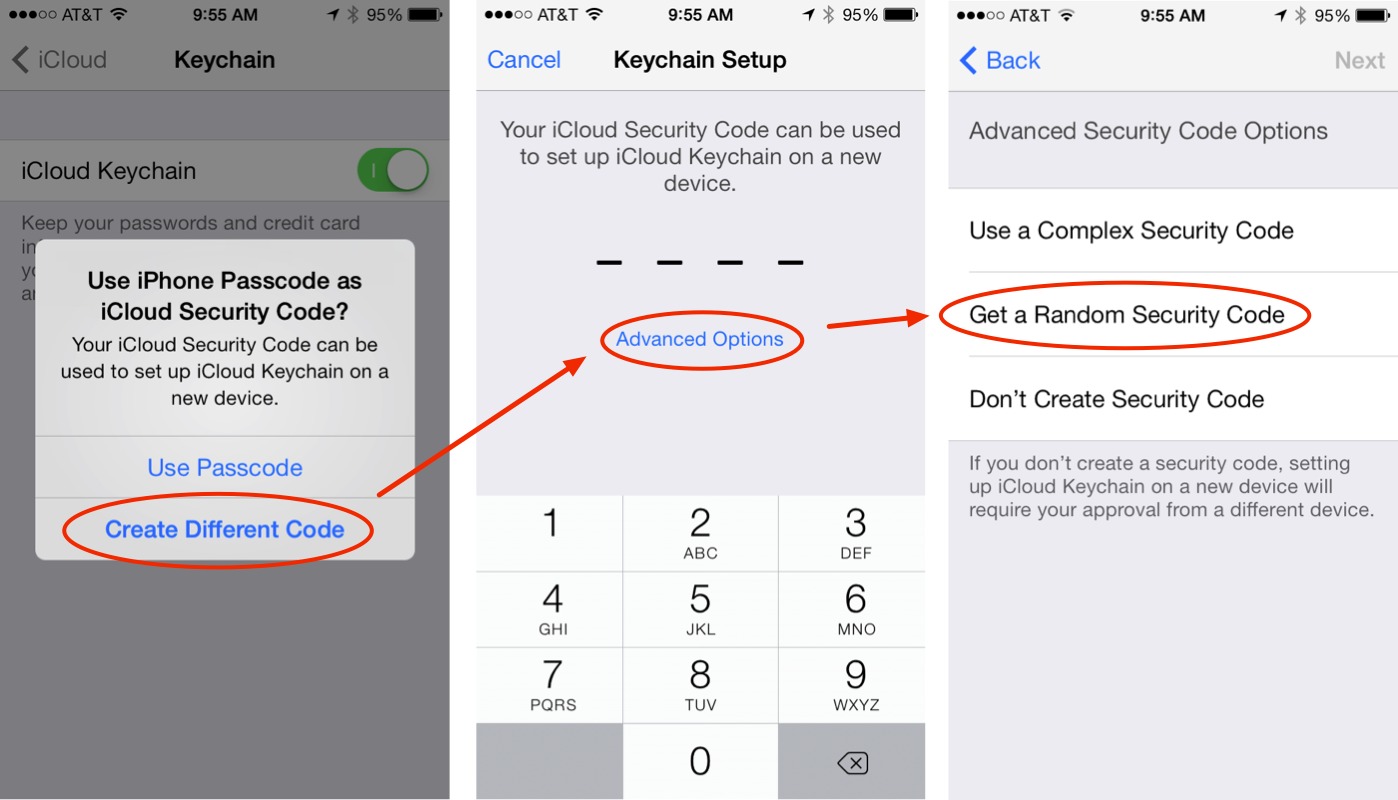
When you do this, your device generates a totally random iCloud Security Code that contains so much entropy that you don’t need the HSMs, since it is theoretically impossible to break via brute force using current (and foreseeable) techniques and technology. Select this option and the original random key protecting your keychain is wrapped with a key generated using this random iCloud Security Code, is never sent to Apple, and can’t be intercepted.
Without this random iCloud Security Code (store it in a password management tool like 1Password or LastPass, and make a paper backup — with good handwriting! — and store it securely), there is no way to decrypt your keychain from iCloud, and it is protected even if you-know-who steals a copy.
This entire process is impressive, with options to satisfy even the most paranoid, and it’s reassuring to see Apple putting so much thought and effort into maintaining the security of our data.
There are many more interesting details in the full iOS Security white paper that we hope to share with you in the future.
Bonus Tips for Apple Mail
My new book “Take Control of Apple Mail” was a somewhat quixotic undertaking. I was attempting to take the most important information from the book’s two predecessors (“Take Control of Apple Mail in Mountain Lion” and “Take Control of Mail on the iPad, iPhone, and iPod touch”), update it for OS X 10.9 Mavericks and iOS 7, and add lots of new material that neither of the previous books covered — all without making the new book outrageously long.
As I went along, I kept encountering pieces of information that I thought were interesting and useful, but out of scope for what I wanted the book to contain. Most of these were mentioned in one of the previous books, but for anyone who hasn’t read them, think of this as bonus material.
Group Members with Multiple Email Addresses — Let’s say you have a group in Contacts, such as all the officers of your local Mac user group. You can easily enter the group’s name in the To, Cc, or Bcc field when addressing a new message in Mail, but what if some of those people have more than one email address in their contact records? Which one will Mail use?
To find out, open the Contacts app and choose Edit > Edit Distribution List. Select a group on the left (you may need to expand a category, such as iCloud or On My Mac) to see its constituents on the right. When a member has more than one email address, the address used for group email messages is shown in bold. If you want to switch to a different address for that person, simply click the desired address, which then becomes bold.
Editing Received Messages — It has never been possible in Mail to change the subject line (or any other text) of an incoming email message you’ve saved, as some other email clients (notably Eudora) let you do. Ordinarily, Mail considers received messages to be set in stone; all you can do is file or delete them.
If you really need to change something about a received message (perhaps a misleading subject that could prevent you from finding the right message later on), there are two tricks, each of which has drawbacks.
The first method is one I learned from a comment to this article by Richard Smith:
- Move the message in question to your Drafts mailbox.
- Double-click the message in Drafts, make whatever changes you like, close it, and save it.
- Move the message back to the mailbox you want it to be in.
- If the Drafts mailbox still contains the original copy of the message, delete it.
The big problem with this approach is that the revised message shows you as the sender, not the original sender. (So, you wouldn’t be able to reply to it without manually changing the address.) Doing this also alters the message’s timestamp.
The second method involves redirecting a message:
- Select the message and choose Message > Redirect.
- Put your own email address in the To field.
- Make whatever edits you like.
- Send the message.
When the redirected message arrives moments later, it will still have the original sender’s From address (that’s the whole point of Redirect). However, this process may add new headers to the message, and in some situations can change the message’s date, both of which may cause confusion later on.
Attachment Settings — As I explain in the book, I recommend avoiding attachments when possible. (Putting a file in the cloud using a service such as Dropbox, and emailing a link, works much better for many recipients.) However, it’s not always possible to avoid attachments, so when you must include them, you should at least be as careful as possible to use settings that will avoid grief for your recipients. For example, you should be sure Always Send Windows-Friendly Attachments is checked in Edit > Attachments (even if the recipient isn’t a Windows user — don’t worry, Mac users will still be able to view the attachments).
Equally important is making sure another command on the Edit > Attachments menu is unchecked: Include Original Attachments in Reply. When this command is checked, every time you reply to a message that includes an attachment, that very same attachment is sent right back to the person who sent it to you. (I honestly don’t know why Mail even gives you the option to do this, but anyway… please don’t.)
Navigating in Classic View — If you prefer the layout used in much older versions of Mail to the more modern three-column layout that’s now the default, you can switch by going to Mail > Preferences > Viewing and selecting Use Classic Layout. While in that layout, you can (if you like) hide the preview pane, so that all you see are the list of mailboxes on the left and a list of messages in the selected mailbox on the right.
However, in classic view with the preview pane hidden, Mail offers no built-in command to close the window of the current message and open the window of the next unread message in a single operation, as many people would prefer to do from the keyboard. (The quickest way to approximate this effect is to press Command-W, followed by an arrow key, followed by Return.) However, it’s possible to accomplish this using AppleScript; see this tip at Mac OS X Hints.
Conversation Outlines — In Mail’s default view, as long as View > Organize by Conversation is checked, Mail groups all the messages within a thread (including ones you’ve sent) as a single item in message lists. When you select a thread, you can scroll through its constituent messages in the preview pane on the right.
But what if you want to see an outline of the conversation right in the message list, without scrolling through all the messages themselves? To do this, select a conversation and press the Right arrow key. The conversation expands within the message list to display the sender of each constituent message. Once the list is expanded in this way, you can use the usual keyboard shortcuts to select and open individual messages. Press the Left arrow key to collapse the conversation again. (You can expand or collapse all conversations in the current mailbox at once by choosing View > Expand All Conversations or Collapse All Conversations, respectively.)
Link to a Specific Mail Message — Suppose you’ve been invited to a party and a friend emailed you directions. You add the event to Calendar, but you also know that when the time comes, you’ll want to refer to that email message. If only there were a way to link from within Calendar directly to a specific message! In fact, there are at least three ways to do this. And you can use this trick not just with Calendar, but with BusyCal or pretty much any Mac app that can open URLs.
If you use Mail’s Data Detectors feature to create an event from details in an email message — that is, hover the pointer over a date or time in the message, click the little triangle that appears, and click Add to Calendar in the popover — Calendar automatically includes a URL to the message. Just click Show in Mail in that event’s detail view.
However, if you added the event manually, you can still add a URL to Calendar. First, open the message in question in its own window. (You can do this by double-clicking the message in the message list; or, if it’s part of a thread, hovering your pointer in the message’s header area so that it turns into an open hand, and then double-clicking.) Then drag the message’s proxy icon (the tiny icon to the left of the message subject in the window’s title bar) to the Calendar event or another destination. Doing so creates a special URL that, when clicked, opens that message in Mail! If you drag the proxy icon to your Desktop or to another folder in the Finder, it creates a .inetloc file
that you can double-click to open the Mail message. (To learn more about this trick, read Lex Friedman’s Macworld article “Create message links with Mail proxy icons.”)
As Tom Robinson pointed out in the comments, it’s also possible to get a message’s URL via AppleScript. John Gruber offered such a script in ‘message:’ URLs in Leopard Mail.
Yet another way to do this: If you have the excellent $29.95 MailTags plug-in installed, it adds an Edit > Copy URL command to Mail that can put the special link URL on the Clipboard for you.
Where Attachments Live and How to Delete Them — When you receive a message with an attachment, Mail stores the raw source of the attachment inside the .emlx message file, but it also keeps a separate copy of the attachment alongside the message file in an Attachments folder for that message (both are buried deep within ~/Library/Mail/V2/). If you remove attachments from a selected message (by choosing Message > Remove Attachments), Mail modifies the .emlx file on disk that contains the message and also deletes the separate attachment file — but only when you
quit Mail, not immediately.
However, if you open the attachment from within Mail (for example, by clicking the attachment icon or using Quick Look), Mail stores yet another copy of that attachment — in its “real” format — in a separate folder inside ~/Library/Containers/com.apple.mail/Data/Library/Mail Downloads. Removing attachments from a message doesn’t delete them from this folder! Deleting the entire message does — but again, only after you quit Mail.
You can choose when Mail deletes attachment copies in the Mail Downloads folder with the Remove Unedited Downloads pop-up menu in Mail > Preferences > General. Choose Never to retain the files indefinitely, or When Mail Quits (my recommendation) to delete them when you quit Mail.
Which Account Messages Are Sent From — Shortly after 10.8 Mountain Lion was released, I wrote an article called “Mountain Lion Mail Perturbs Sending Behavior” (7 August 2012) in which I described how Mail had changed the rules it uses to determine which account should be used for outgoing messages — it had been more or less reasonable in 10.7 Lion, but it was weird and unpredictable under 10.8 Mountain Lion.
Mail in Mavericks has changed the equation back to the way Lion did things, which is a mixed blessing:
- When replying to messages, Mail always sends replies from the account to which the message was addressed. This is true regardless of your preferences (in particular, Mail > Composing > Send New Messages From) or where the message was stored. This is much simpler than Mountain Lion’s convoluted approach.
-
When composing new messages, Mail uses the account specified in the Mail > Composing > Send New Messages From pop-up menu. As in Lion and Mountain Lion, the default choice is Account of Selected Mailbox; it means that the account associated with whatever mailbox is currently selected in Mail’s sidebar is the one that should be used for outgoing messages.
However, that’s true only for server-based mailboxes (such as those used by IMAP and Exchange accounts). If a local (On My Mac) mailbox is selected, or if no mailbox at all is selected, Mail chooses a From account according to some rule I’ve been unable to nail down, even after many tests. (For example, it’s not necessarily the account whose Inbox appears first under the unified Inbox in Mail’s sidebar, nor is it necessarily the account that appears first in Mail > Preferences > Accounts.) And, if you have a particular message selected, then regardless of where it is, Mail may choose yet another From account — again, without any immediately obvious logic.
Because of this indeterminacy, I recommend choosing a specific default account for outgoing messages in Mail > Composing > Send New Messages From. That way, you never have to worry about Mail’s inscrutable logic, and you can always override the choice for individual messages if necessary.
Adding an Address to Contacts — In the OS X version of Mail, it’s easy to add a message’s sender to your Contacts list. Simply select the message and choose Message > Add Sender to Contacts. You can accomplish the same thing in the iOS 7 version of Mail (even with another recipient of the message, not just the sender), but the procedure is less obvious. Tap the person’s name in the header portion of the screen (tap Details if the desired headers aren’t showing). If the email address matches one already in Contacts, that person’s card appears; if not, tap Create New Contact to make a new card with the current name and address, or tap Add to Existing Contact to
add the email address to a contact you already have.
I hope you’ve found these tips useful, and if you haven’t yet seen “Take Control of Apple Mail” and would like much more along these lines, it’s only $15 for 175 pages of advice. Thanks for the support — sales of the book help me justify the amount of time I put into researching and sharing how Mail works (or doesn’t!).
FunBITS: How Out-of-Focus Photos Can Be Works of Art
Meet bokeh.
“Bokeh” is a general term used to described the blurred, out-of-focus portions of a photograph. It’s typically used to describe the blur that occurs in the background of a photo, and aside from its aesthetic qualities, it can also help your eyes focus on the subject of the photo.
But there’s a second application of bokeh, where you use it as the main subject of your photo. For example, maybe you want to capture the colors of a scene, or a particular shape or contour, like a strand of lights draped over a tree. So what may have been a nighttime street scene becomes a colorful mosaic of spherical points of light that overlap and blend into each other.
To give you a better example of what I mean, here are a couple of example photos I’ve taken that use bokeh as a focal point. While this bokeh is typically round, it doesn’t need to be: depending on your lens or your camera settings, it may also appear as a hexagon or pentagon, among other shapes. Some photographers even make filters that let them produce bokeh in all sorts of shapes.


A quick search for “bokeh” on Flickr provides many more examples of how photographers put bokeh to good use in their photos.
Making Bokeh — Creating bokeh in your photos doesn’t necessarily require special equipment, but the sorts of effects you can achieve vary depending on the type of camera you have.
A DSLR — or other interchangeable-lens camera — will give you the best results and the most flexibility when working with bokeh (“advanced” point-and-shoot cameras that let you adjust the aperture or focus the lens manually should work as well). If you want background bokeh, switch to Aperture Priority mode (or Manual mode if you feel comfortable with it), and set the camera to a lower aperture setting, which will increase the amount of background blur in your photos. (If you don’t know how to change the aperture setting on your camera, refer to your camera’s manual — it’s different for every camera.)
If you need to get a feel for how aperture settings work, try taking photos of objects around your house or your neighborhood. Take multiple photos at different aperture settings and at different distances, and make note of the differences between the photos. (For a preview of how your shots would look without actually snapping a bunch of test photos, use your LCD viewfinder and hold down your shutter button halfway once you frame your shot.)
Now frame your shot, focus on your subject, and shoot away. Don’t be afraid to experiment with the aperture setting to get a feel for how different settings impact the photo.
For photos that use bokeh of lights as the main subject (which I call “foreground bokeh”), you need to shoot at night. For best results, use a tripod or monopod if you have one. To pull off this effect, switch your camera’s lens to manual focus (if it isn’t already), and scope out the scene you want to shoot. Street scenes make good subjects, as do buildings or light displays. The lights on carnival rides make for interesting subjects, too.
Next, make sure you adjust the focus so the subject is blurred out to your liking, and press the shutter button to take your photo. The aperture setting will affect the shape of your bokeh. For large, spherical blobs, use a lower aperture setting; for smaller, polygon-shaped bokeh, use a higher aperture setting. There’s no right or wrong way to use bokeh, so again, experiment with it to get a feel for how different settings change how your photos turn out.
If you have a point-and-shoot camera that lacks manual focus or aperture settings, you may not be able to achieve foreground bokeh in all your photos without resorting to some trickery, but it’s certainly possible.
With a point-and-shoot that lacks manual controls, you need fool your camera into putting the subject of your photo out of focus. While using your point-and-shoot’s Macro mode, point the camera at an object close up, lock the focus by holding the shutter button down halfway, pull away from the close-up object and frame your shot, and finally press the shutter button the rest of the way down to take your photo.
Getting background bokeh on a point-and-shoot is an easier proposition. When you shoot objects close up using your camera’s Macro mode, you might be able to get some good bokeh effects in the background. Consider, for example, this photo of a strawberry I took a few years ago. Note the blurring in the backdrop.

Take a similar style of photo at night with multicolored lights in the background, and you can get something like this shot from Flickr user Robert S. Donovan.

If you have an iPhone, you can toy around with the same sort of techniques you’d use on a point-and-shoot to achieve background bokeh on a close-up “macro” photo of an object. Like a point-and-shoot, though, you won’t be able to pull off foreground bokeh.
Another option is to simulate bokeh on your iPhone after the fact using an app. Bokeh Lens ($0.99) lets you apply bokeh effects to any photo in your iPhone’s Camera Roll reasonably quickly and easily. It can be a little tedious because you must manually set a “focus mask” — basically, the area of the photo that the app will not apply the bokeh effect to — and it takes a little work to get it just right. Once you get that down, though, the app is fairly straightforward to use, and the results aren’t bad, either.

Bokeh Lens is designed to simulate background bokeh, but you can make it apply the bokeh effect to almost the entire image by setting the focus mask to a small dot in a dark, non-obvious portion of the photo.
No matter what method you use, remember the basics of composing a photo: Think about the Rule of Thirds, experiment with different angles, and keep it simple — don’t try to cram too much into your shot. Good luck, have fun, and please, share links to your best shots in the comments!
TidBITS Watchlist: Notable Software Updates for 3 March 2014
Mellel 3.3.1 — RedleX has released Mellel 3.3.1, a fix-filled follow-up to the previous update that added several new features (see “Mellel 3.3,” 9 February 2014). The word processing app rejiggers the opening and closing behavior of the Find strip (a much requested fix), with Command-F now always opening or focusing on the strip and Command-J closing and scrolling to the correct spot in your document. The update also fixes several bugs associated with RTF files (from detecting bold and italics in Cocoa-based RTF files, such as from TextEdit and Scrivener, to a crash caused by pasting
RTF text), puts an end to a problem with palettes being repositioned incorrectly after connecting to an external monitor while in full screen mode, and fixes an issue that caused a selection to “misbehave” and become slow and unresponsive when editing a comment while the Statistics palette was open. ($39 new from RedleX and the Mac App Store, free update, 100 MB, release notes)
Read/post comments about Mellel 3.3.1.
Downcast 1.0.10 — Jamawkinaw Enterprises has released version 1.0.10 of its Downcast podcatcher app with new options for sorting local episodes by time remaining and file size. It also adds a 1.25x playback speed option and an episode count to the Local and Available episode lists. The release also fixes a bug that prevented episode duration from displaying, an issue that prevented sharing via email, a problem that caused authentication failures for password-protected podcasts (which may require you to re-enter your credentials), and a couple of bugs associated with playback speed settings. As of this writing, the Mac App Store
had not updated Downcast to version 1.0.10. ($9.99 new from the Mac App Store, free update, 6.4 MB, release notes)
Read/post comments about Downcast 1.0.10.
Mac Pro SMC Firmware Update 2.0 — Apple has released Mac Pro SMC Firmware Update 2.0 for Mac Pro models released at the end of 2013. The System Management Controller (SMC) update enables most Power Nap activities to proceed without running the Mac Pro’s fan, and it fixes a rare problem that prevented low-speed USB devices from being detected at boot. As always, be careful not to interrupt the update process when applying a firmware update. (Free, 585 KB)
Read/post comments about Mac Pro SMC Firmware Update 2.0.
iTunes 11.1.5 — Apple has released iTunes 11.1.5, a slim update that fixes an issue that caused iTunes to quit unexpectedly when a device was connected. The release also improves compatibility with iBooks for OS X 10.9 Mavericks. iTunes 11.1.5 is available as a direct download from Apple’s iTunes Web page or via Software Update. (Free, 222 MB)
Read/post comments about iTunes 11.1.5.
Safari 6.1.2 (Mountain Lion and Lion) — For those who haven’t updated to OS X 10.9 Mavericks and its associated Safari 7, Apple has released Safari 6.1.2 with fixes to AutoFill problems on a variety of Web sites, including united.com and americanairlines.com. The update also addresses a problem that caused Safari to freeze when installing extensions while VoiceOver is on and plugs a number of WebKit-related security vulnerabilities that could lead to application termination or arbitrary code execution. Safari 6.1.2 is available for 10.8 Mountain Lion and 10.7 Lion, but not 10.6 Snow Leopard or earlier, and only through
Software Update. (Free, 53 MB)
Read/post comments about Safari 6.1.2 (Mountain Lion and Lion).
Security Update 2014-001 (Mountain Lion and Lion) — Along with OS X 10.9.2 (see “10.9.2 Fixes Critical SSL Security Bug, Adds FaceTime Audio,” 25 February 2014), Apple has released Security Update 2014-001 with security fixes for those still using OS X 10.8 Mountain Lion, 10.7 Lion, and 10.7 Lion Server. Alas, it seems that people running 10.6 Snow Leopard are now out in the cold, since this is the first security update to drop Snow Leopard-specific fixes. Security Update 2014-001 doesn’t need to address the recently discovered SSL/TLS security vulnerability (see “Apple
Updates iOS and Apple TV to Fix Critical SSL Security Bug,” 24 February 2014) because it doesn’t affect versions of Mac OS X prior to 10.9. But the fixes it provides are still significant, addressing vulnerabilities in app sandboxing, font handling, image display, Nvidia drivers, Quick Look, QuickTime, and the system clock, along with the Apache Web server and PHP scripting language. (All updates are free. For 10.8 Mountain Lion, 115.8 MB; for 10.7 Lion, 123.4 MB; for 10.7 Lion Server, 173.6 MB.)
Read/post comments about Security Update 2014-001 (Mountain Lion and Lion).
ExtraBITS for 3 March 2014
In the latest ExtraBITS, Apple appeals the ebook price-fixing case ruling, Tim Cook lashes out at activist investors, Jeff Atwood explains everything that’s wrong with the age’s unhealthy focus on apps, Apple’s shareholders vote against an anti-spying measure, and we get a look at Tim Cook’s childhood hairdo.
Apple Appeals Ebook Antitrust Case Ruling — As expected, Apple has filed formal papers appealing U.S. District Judge Denise Cote’s ruling in the 2013 ebook price-fixing case. In the filing with the U.S. Court of Appeals for the Second Circuit, Apple claims that Judge Cote’s ruling was “based on a fundamentally incorrect theory of antitrust liability” and that the lower court did not prove there was an actual conspiracy between Apple and the publishers. The government has said it will respond in May 2014. Here we go again.
Tim Cook Chooses the Environment Over Profit — Bryan Chaffin of The Mac Observer witnessed a visibly angry Tim Cook lash out at a National Center for Public Policy Research representative at this year’s Apple shareholder meeting. The NCPPR had pushed a proposal that would have required Apple to disclose the cost of sustainability programs and be more transparent about its relations with sustainability-related groups. After the measure failed, the representative questioned the effect of Apple’s sustainability programs on its bottom line and
demanded that Cook promise to do only things that are profitable. Cook responded angrily, concluding with, “If you want me to do things only for ROI reasons, you should get out of this stock.”
The App Apocalypse — Developer Jeff Atwood, co-founder of Stack Exchange, has penned a brilliant diatribe against the current app economy. Atwood rails against the flood of useless apps, and tackles the problems of having different interfaces for each device, not knowing what you’re getting when you buy an app, the lousiness of both free apps and in-app purchases, and having to learn wildly inconsistent interfaces. Atwood compares the state of apps to computing before the dawn of the Web, and hints at an upcoming solution.
Apple Shareholder Proposal to Lock Spies Out Fails — On 28 February 2014, Apple’s shareholders voted down a measure to harden the company’s defenses against intelligence agencies, with the proposal earning less than 1 percent of votes. The proposal was drafted with the help of the Electronic Frontier Foundation, encryption expert Bruce Schneier, and Lavabit attorney Ian Samuel; it suggested stronger encryption measures, immediate and frequent revocation of potentially compromised SSL keys, more transparency, and the removal of equipment that was used for mass surveillance.
A Look at Tim Cook’s Alabama Childhood — From humble origins in Robertsdale, Alabama, Tim Cook rose to become CEO of Apple. In an AL.com profile, Michael Finch II talks to those who knew Cook as a child, describing him as meticulous from an early age. Be sure to check out the yearbook photos!