TidBITS#1334/22-Aug-2016
Cellular carriers are tweaking their plans in the lead-up to the next iPhone, with AT&T abandoning data overage charges and Sprint and T-Mobile offering new unlimited data plans. A new version of virtualization app Parallels Desktop is out, and with it comes a new Take Control book from Joe Kissell — Joe explains what’s new in Parallels and why you want “Take Control of Parallels Desktop 12.” If you’ve had trouble transferring a Take Control book or other file to your Kindle, Adam Engst has some solutions. Finally, get ready for new iPhones by learning about Find My iPhone: why you need it, how to turn it on, and when to turn it off. Notable software releases this week include LaunchBar 6.7.2 and OmniFocus 2.6.2.
AT&T’s New Cell Plans Eliminate Data Overage Fees
AT&T has introduced a set of new wireless plans, called Mobile Share Advantage, that eliminate the $15 per gigabyte data overage fees. Instead, when you reach your data cap, your speed will be reduced to a maximum of 128 Kbps for the rest of your billing cycle. That’s painfully slow, but at least you won’t have surprise data charges on your bill. Those who find the speed reduction problematic can jump to the next highest plan; we presume you can switch back at a later date.
Although AT&T hasn’t said anything to this effect, generally speaking, you must explicitly switch to one of the new plans to take advantage of it; AT&T doesn’t usually switch you automatically.
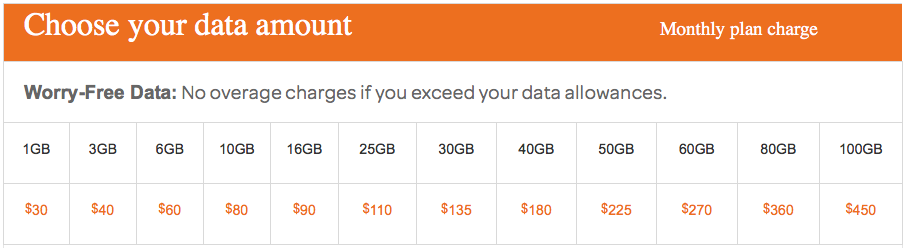
The new Mobile Share Advantage data plans start at 1 GB for $30 per month, with 3 GB for $40, 6 GB for $60, and 10 GB for $80. Unlike competitors T-Mobile and Sprint (see “T-Mobile and Sprint Announce Unlimited Data (for Higher Prices),” 19 August 2016), AT&T isn’t offering an “unlimited” option, but the company’s new plans go all the way up to 100 GB for $450 per month.
All Mobile Share Advantage plans include Rollover Data (unused data in one month remains available for the next), support for iOS’s Personal Hotspot, unlimited domestic talking and texting, and unlimited texting to 120+ countries. The 10 GB and higher plans also include unlimited talking and texting with Mexico and Canada, as well as free roaming in Mexico.
You can add up to 10 devices on one plan. All of AT&T’s plans require a per-device access charge of $10–$40 per month, but AT&T has simplified these fees as well. With Mobile Share Advantage plans, contract-free smartphones on non-business plans incur a $20-per-month access charge; adding a cellular-capable iPad or other tablet costs $10 per month. Smartphones still under 2-year contracts retain their $40-per-month access charge.
It’s likely that the new Mobile Share Advantage plans will either save you money or provide more data for roughly the same amount that you’re paying now. To determine the specific details for your situation, call AT&T or visit an AT&T store.
T-Mobile and Sprint Announce Unlimited Data (for Higher Prices)
With typically hyperbolic language, T-Mobile has announced T-Mobile ONE, a new wireless plan for smartphones and tablets that eliminates data caps. Not to be outdone, Sprint has launched a competing plan, called Unlimited Freedom. But, of course, there are catches, not the least of which is that the overall prices are likely to be higher for many people.
ONE Is the Loneliest Number — T-Mobile ONE launches on 6 September 2016. While not all T-Mobile customers will be pushed to T-Mobile ONE immediately, CEO John Legere made it clear that it’ll be the way everyone will do business with T-Mobile going forward. Despite the claims of simplicity, ONE has a lot of variables and additional charges.
Legere boasts that a family of four will get unlimited talk, text, and data for only $40 a line, but that’s a bit misleading. The first line on the plan is $70 per month, the second is $50, and additional lines, up to eight, are $20 per month. And you’ll pay $5 more per month if you don’t sign up for auto pay. So, yes, a family of four will pay $40 per line, but a single person will pay $70, and a couple will each pay $60. You can add tablets for $20 per month each.
There are also limits to how “unlimited” T-Mobile ONE is. Video is restricted to standard definition; if you want HD video, that will cost an additional $25 per month per line. If you exceed 26 GB in a month, T-Mobile might throttle your speeds. And while ONE includes tethering, it’s only at 2G speeds; 5 GB of data via high-speed tethering will cost $15 per month.
T-Mobile ONE will feature all the standard T-Mobile perks, such as unlimited text and data roaming in 140+ countries, free roaming in Mexico and Canada, and Wi-Fi calling.
For many average users, T-Mobile ONE is likely to be a price increase. Based on the analysis we performed last year in “Comparing U.S. iPhone Plan Costs in a Contract-Free World” (11 September 2015), an individual who pays for 1 GB of high-speed data per month (T-Mobile throttles data speeds instead of charging overages), would pay $20 more per month with the ONE plan. While a couple with 2 GB of data would pay $80 before, ONE increases that monthly cost to $120. A family of three with 3 GB of data had to pay only $90 before; with ONE the bill would hit $140.
T-Mobile would argue that this approach compares apples to oranges, since ONE offers unlimited data (or at least 26 GB before throttling). However, T-Mobile already excludes a number of streaming services from data caps, meaning that many T-Mobile customers never actually hit those caps.
Sprint Does It Cheaper — Sprint’s new Unlimited Freedom plan launched on 19 August 2016, and unlike T-Mobile, it doesn’t appear as though Unlimited Freedom will be the only option going forward.
Unlimited Freedom offers unlimited LTE data, talk, and text for $60 per month. A second line costs $40, and additional lines, up to ten, are $30 per month.
The catch is that, like T-Mobile, Sprint will “optimize” certain types of data, such as video, gaming, and music. Video will be limited to 480p resolution, gaming is throttled at 2 Mbps, and music streams are capped at a quality rate of 500 Kbps. For tethering purposes, customers get 5 GB of high-speed data per month; if you go over that amount you can either accept throttled speeds of 32 Kbps or purchase more data at the rate of $15 per 1 GB.
For those who travel or communicate with others around the world, Unlimited Freedom includes international texting to the United States, unlimited text and data at 2G speeds, and calls at $0.20 per minute in covered countries. The free Sprint Open World plan includes unlimited talk and text, plus 1 GB of data in Canada, Mexico, and most countries in Latin America. Or, with Sprint Global Roaming, you can buy high-speed data access in 1-day, 1-week, and 2-week increments.
Sprint’s Unlimited Freedom is cheaper than T-Mobile ONE. An individual would pay $70 per month on T-Mobile, but $60 on Sprint. A couple would pay $120 to T-Mobile, but only $100 to Sprint. A family of three would pay $140 to T-Mobile, but only $130 to Sprint. Couples do the best in this comparison.
However, compared to last year’s price points for the Sprint Family Share Pack, Unlimited Freedom is a price increase for families. An individual still pays $60 per month, the same as before, but a couple would pay $25 more per month while a family of three would pay up to $30 more each month. But Sprint hasn’t offered all of the free data perks that T-Mobile has, so the math for your particular situation might be different.
Between these changes and the recent ones at AT&T, (see “AT&T’s New Cell Plans Eliminate Data Overage Fees,” 18 August 2016), cellular competition is heating up in the prelude to the next iPhone. T-Mobile and Sprint’s CEOs quickly got into a war of words on Twitter, with T-Mobile’s John Legere accusing Sprint of “copy-paste,” while Sprint’s Marcelo Claure accused Legere of being a “con artist.”
We’ll merely note that the numbers speak for themselves. Now that ever more iPhones are contract-free, you should compare plans at all the carriers and pick the plan that makes the most sense for your actual data usage.
New Parallels Desktop 12 Improves Speed, Gains Take Control Book
Ten years ago, Apple began putting Intel processors in Macs, making it possible to run Windows on a Mac using either Boot Camp (which requires rebooting to switch operating systems) or a virtualization app (which lets Windows run side by side with OS X). Although earlier (and much slower) emulation apps existed, including Virtual PC, Parallels Desktop was the first true virtualization app for OS X, and it’s still going strong. Version 12 has just been released, with improved performance and unique new features. The new version has something else going for it, too: my new book, “Take Control of Parallels Desktop
12.”
Parallels Desktop 12 improves performance in several specific areas, including access to shared folders, suspending virtual machines, and taking snapshots, all while extending battery life on notebook Macs. The new version has been optimized for macOS 10.12 Sierra as both host and guest (with full, official support planned for an update soon after Sierra ships). Although Parallels Desktop can run versions of OS X as old as 10.5 Leopard Server in a virtual machine, the Mac you use to run Parallels Desktop itself must now have 10.10 Yosemite or later installed; version 12 drops support for 10.9 Mavericks as a host operating system.
A number of the changes in the new version involve display support. For example, virtual machines can now use Split View in 10.11 El Capitan and later, Parallels added a gaming-specific full-screen option, and virtual machines running OS X as a guest operating system now support Retina resolutions. If you have multiple displays, Parallels Desktop 12 can now use a different resolution for each one. In addition, for Macs with Retina displays, a new Native (or “Best for External Displays”) mode lets Windows manage each display’s pixel density.
Parallels Desktop 12 includes a set of utilities called Parallels Toolbox — a bunch of handy, single-purpose Mac utilities, most of which can be used either in your virtual machine or in OS X (even if Parallels Desktop itself is not running). You can access these tools either in a system-wide menu or in the /Applications/Parallels Toolbox Tools folder. Among the 20 tools offered initially are apps for screenshots and screen recording (in both cases, by area, window, or full screen), archiving and unarchiving, a timer and stopwatch, video conversion for iOS devices, a video downloader (for YouTube and the like), and an audio recorder. Parallels plans to add more tools to the collection
periodically.
In case you don’t already have a backup app you’re happy with (and that can handle gigantic virtual machine files gracefully), you can install Acronis True Image from within Parallels Desktop 12 and take advantage of a free, one-year subscription, which includes 500 GB of online storage. (The offer takes effect on 23 August 2016.)
Among many other smaller changes, Parallels Desktop 12 also does the following:
- Supports Optimized Storage in Sierra
- Uses the OS X Keychain for storing passwords from Windows, Internet Explorer, and Microsoft Edge
-
Lets you schedule daily maintenance tasks (such as running Windows Update) at convenient times
-
Automatically pauses Windows virtual machines when they’re in the background and idle
-
Lets you vary resource usage settings (including CPU and disk I/O) and enable or disable Real Time Virtual Disk Optimization individually for each virtual machine
-
Enables you to save your virtual machine’s state when restoring a snapshot
Pricing and Availability — Anyone with Parallels Desktop 10 or 11 can upgrade to version 12 now. Those who already have an active subscription to Parallels Desktop (or who purchased Parallels Desktop after 1 August 2016) get the new version for free. For those who bought non-subscription licenses, upgrades to Parallels Desktop 12 Standard Edition are $49.99, while upgrades to the Pro Edition, which normally costs $99.99 per year, are being offered at $49.99 per year for a limited time (with a guarantee that the renewal price will remain $49.99 in future years). The Pro edition adds a number of features useful to developers, plus the option to assign up to 64 GB of
virtual RAM and 16 virtual CPUs to each virtual machine (Standard Edition limits you to 8 GB of virtual RAM and 4 virtual CPUs).
The full (non-upgrade) release of Parallels Desktop 12 will become available to the general public on 23 August 2016. The Standard Edition costs $79.99 as a one-time purchase or $79.99 per year as a subscription. Parallels Desktop Pro costs $99.99 per year. One-time purchases of the Standard Edition include three months of the remote control app Parallels Access, while Pro Edition subscriptions include a full year of Parallels Access (which costs $19.99 on its own) plus free upgrades to new versions of Parallels Desktop during that year.
Parallels Toolbox, which comes with the Standard and Pro editions of Parallels Desktop, is also available as a stand-alone product for $9.99 per year starting on 23 August 2016. A 14-day free trial will also be available.
Take Control of Parallels Desktop 12 — I wrote a bit about Parallels Desktop in the very first edition of “Take Control of Running Windows on a Mac,” way back in 2006. (I later wrote a separate Take Control book about VMware Fusion; both titles are now far out of date.) For years I had wanted to write a standalone book about Parallels too, but the planets didn’t align until now. For the past few months I’ve been running beta versions of Parallels Desktop 12 while working on the book, and the 170-page “Take Control of Parallels Desktop 12 is now available for $15.
Running one operating system inside another is an inherently complex undertaking. Even though Parallels Desktop does a remarkable job at simplifying the process, there are many potential sources of confusion. In particular, one strength of Parallels Desktop is its wealth of preferences and options, but understanding the practical implications of all those settings — and determining just which combination of them will give you the results you want — can be daunting. So my book helps make sense of it all. It guides you around potential pitfalls, helps you solve problems, and exposes some helpful tricks that you may not have discovered on your own.
Although the main focus of the book is on running Windows on your Mac, I also cover running one version of the Mac operating system inside another (for example, running beta versions of Sierra on a Mac that has El Capitan installed), and even tell you how to install Linux, Android, Chromium OS, and other operating systems if that’s your thing. And I provide instructions for using all 20 of the tools in Parallels Toolbox.
We’ve come a long way since I was first working with Parallels Desktop back in 2006. Back then, the mere fact that a Mac could virtualize Windows was technically impressive. Today, virtualization software like Parallels Desktop 12 is a boon for anyone who wants to play Windows-only games, and almost a necessity for those who rely on Windows productivity software or who develop or test Web sites and cross-platform apps.
Dealing with Send to Kindle’s 50 MB Limit
We release all Take Control ebooks in three formats: PDF, EPUB, and Mobipocket. PDF is the format we started with back in 2003, and it remains the best option for reading on a computer or a large-screen iPad, since we put significant effort into keeping text and associated screenshots together on pages, avoiding widows and orphans, and creating an attractive two-column layout for our Crash Courses. EPUB gained popularity after Apple’s release of iBooks, and it’s best for small-screen iOS devices because it reflows to match the screen and your desired font size. Mobipocket, generally abbreviated to just Mobi, is similar to EPUB, but is relevant only for those who prefer to read on one of Amazon’s Kindle devices or apps.
How popular would you expect each of these to be? We tracked some downloads recently and found that about 55 percent of the downloads were PDF, about 35 percent were EPUB, and about 8 percent were Mobi. (These numbers are a bit rough because people can download multiple formats.)
Since Mobi is our least used format, and since issues that affect the EPUB generally apply to the Mobi as well, we put less effort into checking and tweaking the Mobi version of each book. Nonetheless, we were a little surprised recently to get email from a reader complaining that the Mobi version of “Take Control of iTunes 12: The FAQ” was too big to copy to a Kindle. Could it really have been that much larger than our other books? Some research was necessary.
It turns out that 50 MB is the magic file size over which Amazon’s Send to Kindle app and Send to Kindle email service refuse to work. Only three of our books had ever exceeded that size, with “Take Control of Preview” and “iOS 9: A Take Control Crash Course” joining the iTunes book. “Photos for Mac: A Take Control Crash Course” snuck under the wire at 49.6 MB.
File Format Background — Why were the Mobi files so large? The Mobi file for the iTunes book was 53.4 MB, but the EPUB was only 21.9 MB, and the PDF weighed in at a svelte 6.4 MB. A little background about each format will explain the difference.
- PDF: Since PDF was first released in 1993, when networks were much slower and storage devices much smaller, reducing the size of PDF files was important. As a result, Adobe has long provided tools in Acrobat Pro to reduce the size of images automatically by downsampling and compressing them. Those capabilities are extremely effective, dropping the source PDF of the iTunes book from 28.2 MB to 6.4 MB, a savings of 77 percent.
We use Apago’s PDF Enhancer to optimize our PDFs in a variety of ways while still keeping the quality high. (PDF Enhancer hasn’t been updated in years, but it continues to work well for us. Many of its capabilities are also available in Acrobat Pro, albeit in a form that requires more manual intervention.)
-
EPUB: At its heart, an EPUB is actually a Web site made up of HTML files and images, all Zip-compressed into a single file. Unfortunately, lossless Zip compression may not do a lot for what is essentially a Web site. The files that make up the EPUB of the iTunes book are 23 MB, but the EPUB itself is only 5 percent smaller, at 21.9 MB.
-
Mobi: Mobipocket was purchased by Amazon in 2005 and has changed quite a bit since then. Nowadays, a Mobi file contains the book in two formats, the original Mobipocket version (actually Amazon’s AZW format, which is very slightly modified Mobipocket) and Amazon’s KF8, also known as AZW3, which debuted alongside the first Kindle Fire tablet. Since most Mobi files are created from an EPUB source document by Amazon’s KindleGen tool, bundling two versions of the book into the same file means that the Mobi is generally roughly twice the size of the EPUB.
Working around the 50 MB Problem — Now that we’re aware of the Send to Kindle 50 MB limitation, we’ll try to ensure that our books don’t exceed this size. The solution to that is quite simple.
We take our screenshots in PNG format, which is ideal for images with large areas of solid color. However, screenshots that show the Mac’s Desktop or the iPad’s Lock screen, for instance, are essentially photos, and converting those PNG files to JPEG can drop the size significantly without a perceptible loss of quality. Converting the five or six largest images in the iTunes book to JPEG and then regenerating the Mobi file were all that was necessary to bring it down in size. (We did the same with the Preview book, so neither should cause problems anymore.)
Should we have a book that can’t easily be brought under 50 MB, or if you should run into a Mobi file from another source that’s larger than 50 MB, there are other ways you can load the files onto a Kindle or into the Kindle app.
- Kindle: For a Kindle tablet, connect the device to your Mac via a USB cable. A KINDLE disk appears on the Desktop. Open it, and then copy the Mobi file to the Documents folder inside. Eject the KINDLE disk and then look for your file in the Docs part of the Kindle interface. Don’t put files in the Books folder; that won’t work.
-
Kindle Apps: If you prefer to maintain your ebook library in the Kindle app on an iOS device, the trick is to use your Mac to put a copy in Dropbox, Google Drive, or iCloud Drive and then download it in the corresponding app on the iOS device.
In Dropbox, once you’ve loaded the document, tap the triple-dot More button, tap Export in the popover, tap Open In in the bottom row in the Share sheet, and then tap Copy to Kindle in the top row of the Share sheet.
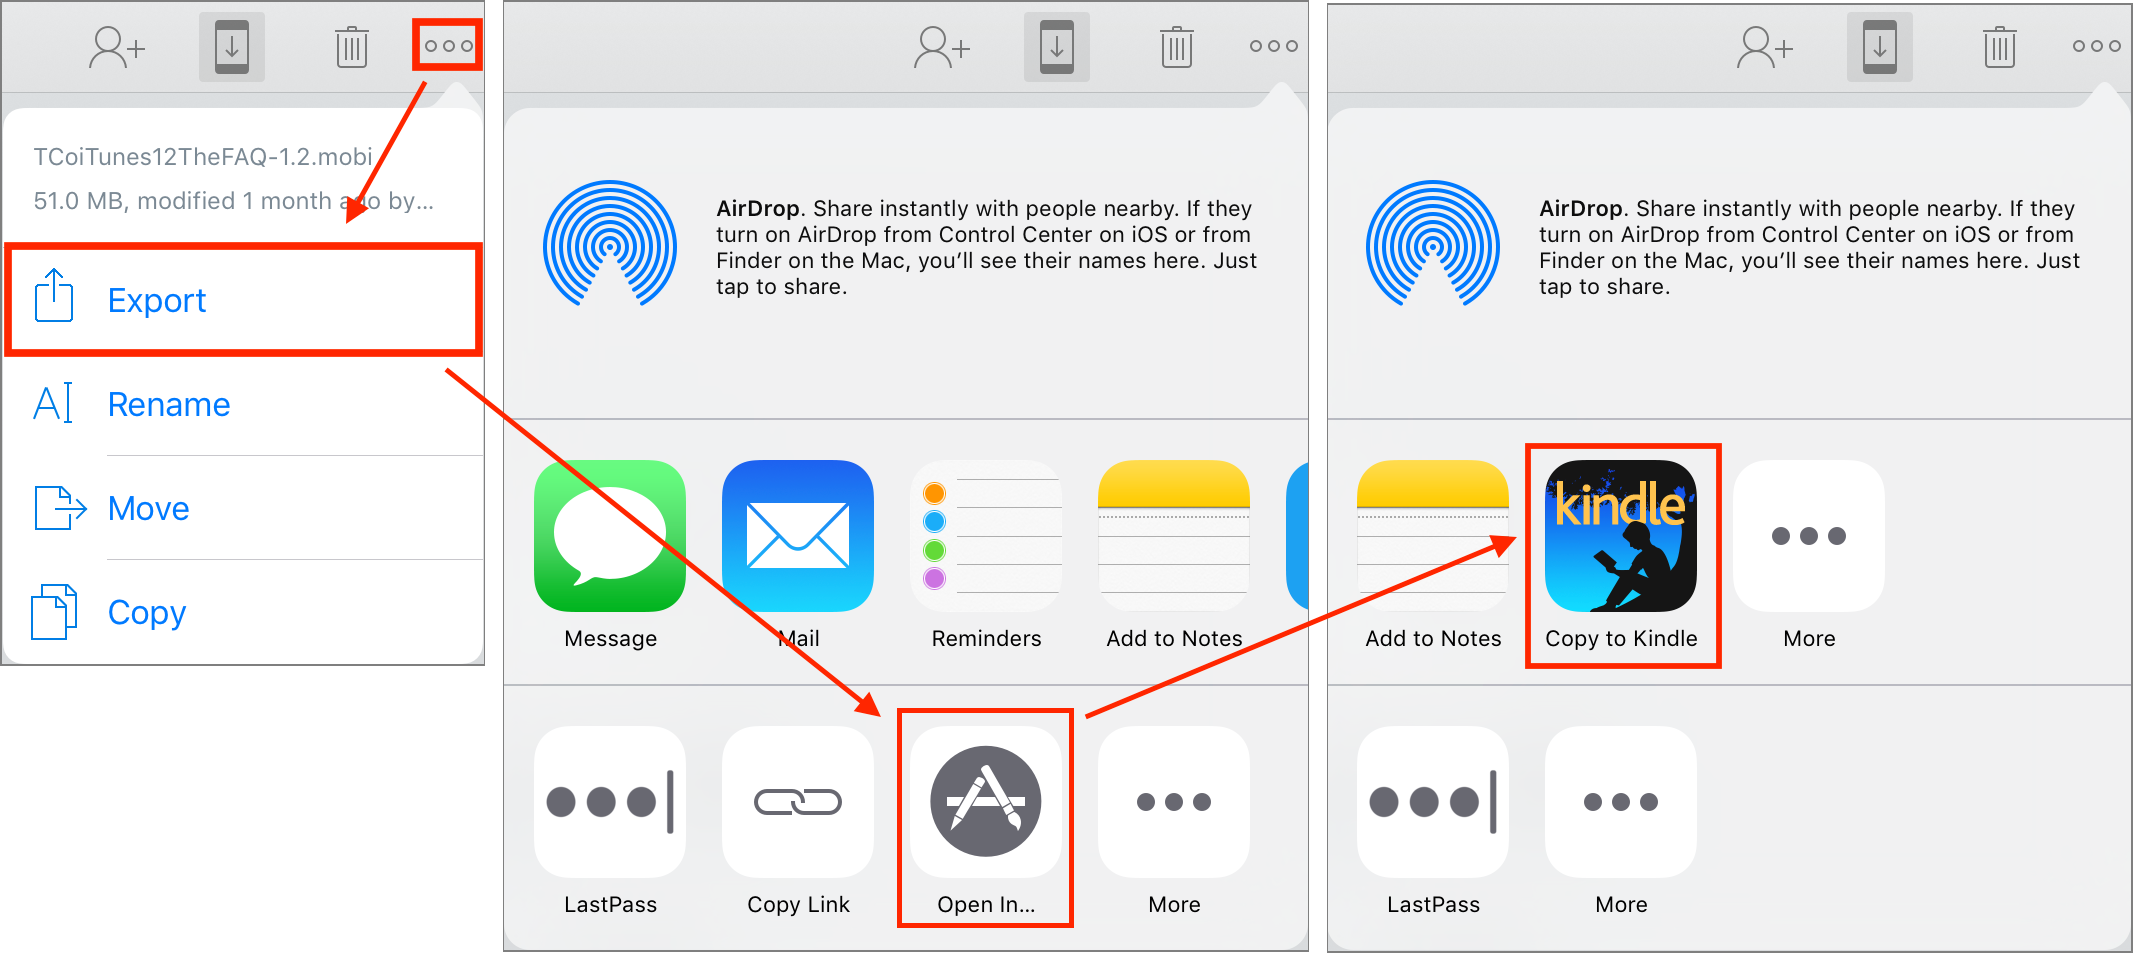
The process is essentially the same in Google Drive; in iCloud Drive, Copy to Kindle appears in the top row of the first Share sheet, eliminating the need for the Open In step.
You might wonder why I don’t recommend downloading from your Take Control library to a Kindle Fire. The reason is that downloaded files end up in KINDLE/Download and must be moved into KINDLE/Documents manually, using an app like File Expert. The instructions in “How to Download EPUB, PDF, and Mobipocket to the Kindle Fire” (22 April 2012) are still accurate, although File Expert doesn’t seem to be available any longer, so you’ll need to find another file management app to move downloaded files if you want to use this technique.
I suspect that Amazon limits the file size to 50 MB for historical reasons related to the low-throughput Whispernet network that the early Kindles used. My understanding is that when the Send to Kindle app or email service transfers the actual file to a particular Kindle, it sends only the format that makes sense for that device. But in a world of fast Wi-Fi, this limitation seems annoyingly quaint — here’s hoping that Amazon lifts it soon.
In the meantime, you can work around the restriction with a USB connection or an Internet file sharing service.
Setting Up and Using Find My iPhone
Once a selling point for Apple’s premium MobileMe service, Find My iPhone went free with the advent of iCloud and is now an essential tool in protecting the privacy of your digital life.
Find My iPhone isn’t limited to the iPhone — it’s also available for the iPad, iPod touch, Apple Watch, and Mac, and the name changes for each platform. A little confusingly, Find My iPhone is both an iCloud-based service controlled by a setting on your device and an app for iOS and iCloud.
As its name implies, Find My iPhone helps you find your iPhone by displaying its GPS location on a map. You can also use Find My iPhone to play a sound on your device (handy for finding a misplaced iPhone around the house) or display a status message (perhaps to offer a reward for a lost iPad). You can also use Find My iPhone to lock or wipe a device remotely.
Even more importantly, Find My iPhone enables Activation Lock, which prevents a thief from activating a stolen iPhone with a cellular carrier. It also prevents anyone from disabling Find My iPhone or erasing the device, rendering a stolen device useless. Activation Lock is credited with worldwide drops in iPhone thefts of up to 50 percent! For that reason alone, you should keep Find My iPhone enabled at all times unless you plan to sell your phone or take it to Apple for service. For more on Activation Lock, see “What You Need to Know about Activation Lock” (8 October 2014).
New iPhones are coming soon, so now is a good time to understand how to activate and use Find My iPhone if you aren’t already doing so, or turn it off if you plan to sell your existing iPhone.
Enabling Find My… — Both iOS and the Mac prompt you to enable Find My… during setup, but if you skipped it for some reason, here’s how to set it up.
In iOS, go to Settings > iCloud > Find My iPhone, and turn on Find My iPhone (or Find My iPad). It’s that simple, assuming that you’re already signed into iCloud. You should also enable Send Last Location, which sends Apple the device’s last known location when the battery is critically low. This way, even if your iPhone dies before you can find it, you’ll at least have a lead on where it is.
As long as Find My iPhone is enabled, Activation Lock is also enabled, making the device useless to anyone who doesn’t know your Apple ID and password. If you have an Apple Watch running watchOS 2 or later, enabling Find My iPhone also triggers Activation Lock on any paired Apple Watches.
Turning off Find My iPhone in Settings > iCloud > Find My iPhone is a bit more involved than turning it on because you have to enter your Apple ID password to do so. You will also receive an email informing you that Find My iPhone has been disabled.
Be sure to disable Find My iPhone if you sell or give your phone to someone else, or if you take the device to Apple for service. Apple won’t repair a device that has Find My iPhone enabled. Of course, if you’re going to pass on an iPhone to another person, be sure to clean it off first with Settings > General > Reset > Erase All Content and Settings.
To enable Find My Mac, go to System Preferences > iCloud, select Find My Mac, and allow Find My Mac to use your Mac’s location when prompted. Wi-Fi must be on, since comparing accessible Wi-Fi networks to Apple’s database that ties Wi-Fi networks to locations is the only way a Mac can determine its location. As in iOS, you must enter your Apple ID password to disable Find My Mac.
Also be sure to set a firmware password. As Adam Engst explained in “Disable Find My Mac by Resetting NVRAM” (22 July 2016), a thief can otherwise easily disable Find My Mac with a simple NVRAM reset.
Using the Find My… Apps — Using the Find My iPhone app on an iOS device is straightforward. The app displays a map showing your devices, along with a list of your devices. If you belong to a Family Sharing group, you should also see family members’ device locations.
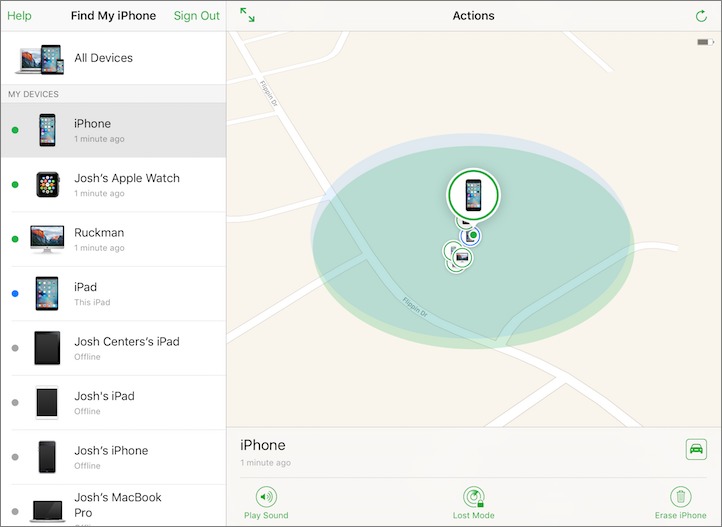
Tap an iOS device or Apple Watch on the map to see the following options. If you don’t see them, tap Actions:
- Play Sound: This command causes your lost device to begin playing a sound at full volume until you find and unlock it. The sound plays even if the device is set to mute. It’s handy if you forget where in the house you left your iPhone.
This isn’t related to Find My iPhone, but for many people, one of the best features of the Apple Watch is that you can ping your iPhone from the watch. Swipe to the Settings glance and tap the ping button to play a homing sound on your iPhone. (In watchOS 3, Apple moved the ping button to the new Control Center, which you access by swiping up from below the bottom of the screen.)
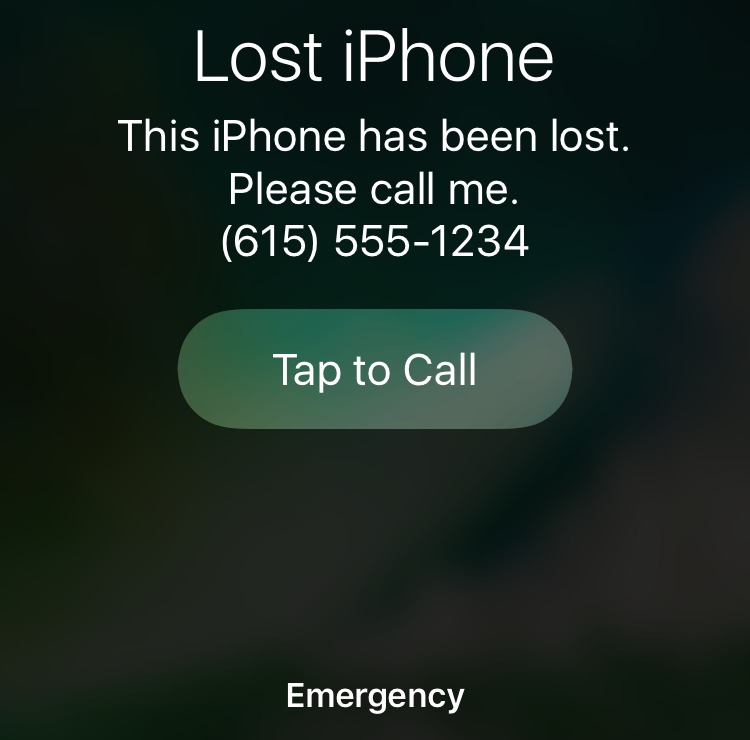
- Lost Mode: If your device is so lost that playing a sound won’t help find it, Lost Mode locks the device, displays your phone number and a message, attempts to suspend any Apple Pay payment methods, and sends you regular location updates via email.
To begin, tap Lost Mode. On the next screen, tap Turn On Lost Mode. Next, enter a phone number at which you can be reached. After that, you can enter a message for the person who finds your phone.
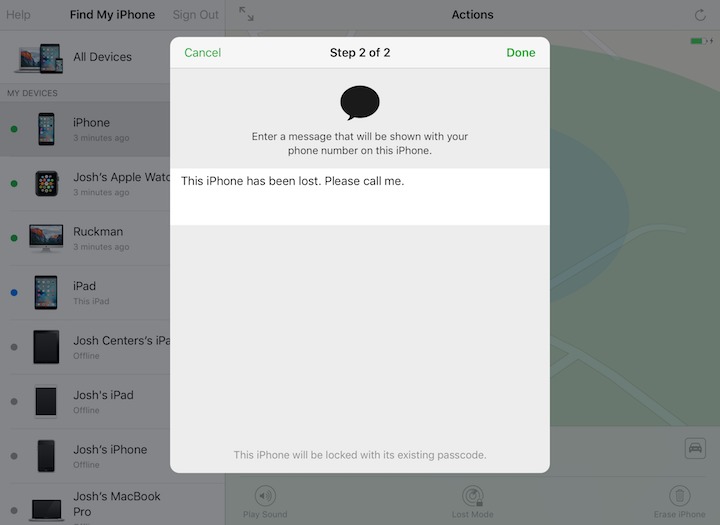
Your device will then be locked. Anyone who finds it will see Lost iPhone, your message, your phone number, and buttons to call you or place an emergency call.
To disable Lost Mode, you either need to tap Turn Off Lost Mode in the Find My iPhone app or unlock the device with your passcode. After unlocking a lost iOS device, you must also enter your Apple ID password to finish disabling Lost Mode.
- Erase: As a last resort, you can erase the device entirely, which still leaves it unusable by anyone else. You’ll no longer be able to see your device in the Find My iPhone app after you do this. You must enter your Apple ID password to erase the device. You can also add a phone number and message to be displayed on the screen after the device is erased.
In the event that you manage to recover the device, you can restore the device using an iCloud backup. You have been backing up to iCloud (via Settings > iCloud > Backup) and/or iTunes all along, haven’t you?
Should your device be unrecoverable, and if it has a cellular plan, be sure to contact your carrier and have service cut off or transferred to another device. However, if you’re on a contact or payment plan, you may still be on the hook for the monthly bill.
- Navigate: Tap the car icon to get directions to your device in Maps, which could be useful if you left your iPhone behind at a bar the night before, but be careful with this if your device has been stolen! Jeremy Cook of Ontario, Canada was shot to death after trying to retrieve his iPhone from thieves. Even if you think you’re Charles Bronson, Find My iPhone might lead you to the wrong house! In the event of theft, contact the police.
Tracking a Mac offers slightly different options: Play Sound, Lock (instead of Lost Mode), and Erase Mac. Lock differs from the iOS-specific Lost Mode in that you cannot erase a locked Mac. You set a PIN and confirm it, and then enter an optional message.
Once you lock the Mac remotely, it reboots into a special locked mode. To unlock it, you have to enter the PIN you set, after which the Mac reboots into normal operation. You cannot unlock a Mac remotely with the Find My iPhone app.

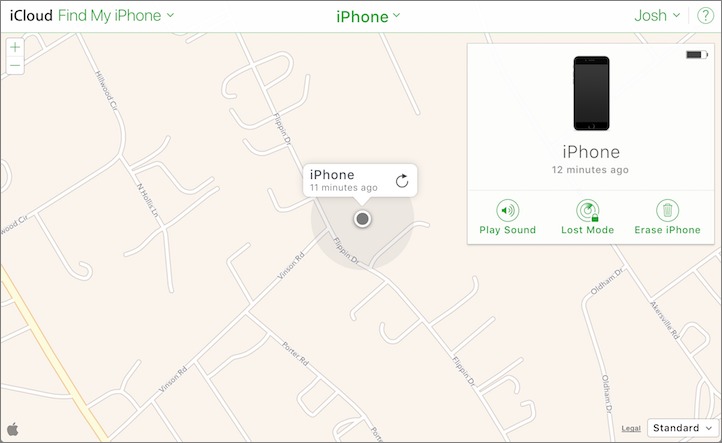
While there isn’t a Find My iPhone app for the Mac, iCloud.com offers a Web app that’s almost as good. The chief differences from the iOS app are that you access your device list from a menu, and the Web app doesn’t provide directions to the device.
Now that you know the ins and outs of Find My iPhone and Find My Mac, there’s no excuse not to use them! They should be enabled on all of your devices until the time comes to get rid of them or have them serviced.
TidBITS Watchlist: Notable Software Updates for 22 August 2016
LaunchBar 6.7.2 — Objective Development has released LaunchBar 6.7.2, fixing bugs and improving compatibility with macOS 10.12 Sierra. In addition, the new version gains a Preferred Input Source option that lets the user choose a keyboard input source to be used instead of the currently active input source while LaunchBar is active. This could be useful to those who work with numerous different keyboards. Fixed bugs include an incompatibility with the Git client Tower, an incorrect checksum calculation for large files, a broken Browse Ulysses action, and a crash in LaunchBar’s Action Editor. ($29 new with a 20
percent discount for TidBITS members, free update, 14.1 MB, release notes, 10.9+)
Read/post comments about LaunchBar 6.7.2.
OmniFocus 2.6.2 — The Omni Group has released OmniFocus 2.6.2, which fixes a bug that could introduce corruption when editing repeating items on multiple devices. The Getting Things Done-inspired task management app also reduces the possibility of receiving a “No Key in Slot” encryption error, a bug that appeared in version 2.6. If you do encounter this error on the Mac (or when running OmniFocus for iOS 2.15 or later), see this Omni Group support document for recovery steps. ($39.99 new for Standard and $79.99 for Pro from the Omni Group
Web site, $39.99 for Standard from Mac App Store (with in-app purchase option to upgrade to Pro), 28.5 MB, release notes, 10.10+)
Read/post comments about OmniFocus 2.6.2.
ExtraBITS for 22 August 2016
We have just two ExtraBITS for you this week: famed New York City Apple shop Tekserve is auctioning off its Mac collection and a developer survey paints a dark picture of the Mac App Store.
Tekserve Auctioning Historic Mac Collection — Legendary New York City Apple shop Tekserve has closed its doors for retail business and will be auctioning off items from the store on 23 August 2016. The jewel of the auction will be Tekserve’s Macintosh collection, which is valued at between $12,000 and $14,000. The collection of 35 computers includes a first-generation Macintosh signed by Steve Wozniak, a NeXTcube, a 20th Anniversary Macintosh, an original iMac, a G4 Cube, and more. The collection also includes miscellaneous other bits of technology, like cameras, radios, and
typewriters.
Developer Survey Dings Mac App Store — DevMate, a development and distribution platform for Mac developers, conducted a survey of 679 Mac developers to get their thoughts on the Mac App Store. Interestingly, 42 percent of respondents sell both in the Mac App Store and outside of it; however, those who sell both ways see roughly equivalent revenue from both channels. Overall, developers were overwhelmingly negative in their appraisal of the Mac App Store, leading to astonishingly low Net Promoter Score ratings. What ticks developers off the most? The Mac App Store’s unclear and unwieldy review process, the 30 percent
transaction fees, the lack of upgrades and trials, and no two-way communication with customers. DevMate isn’t exactly unbiased in this area since it competes with the Mac App Store, but the results do map to what we’ve heard from developers as well. If only an interviewer would ask Tim Cook about these findings!