TidBITS#1360/13-Mar-2017
In this issue of TidBITS, we bid a fond adieu to our friend and long-time Mac writer Tom Negrino, who will soon take his life in the face of terminal cancer. In happier news, Jeff Carlson tells you how you can improve your MacBook Pro’s battery life by identifying apps that are using the high-performance graphics processor. Adam Engst reviews two inexpensive Bluetooth earbuds that are easier to find and way cheaper than Apple’s AirPods, and he also explains how to use iOS’s Wallet app to manage airplane boarding passes. Notable software releases this week include 1Password 6.6.2, Hazel 4.0.9, Lightroom CC 2015.9 and Lightroom 6.9, and ChronoSync 4.7.4.
Thinking about Tom Negrino
The saddest part of having published TidBITS for almost 27 years now is watching people in our peer group ebb away. It’s depressing enough when the reason is professional, as when Macworld laid off many of its staffers after shuttering the print edition (see “Macworld Lays Off Staffers, Closes Print Edition,” 10 September 2014). But even more gut wrenching is when someone in our extended circle dies.
In the case of veteran Mac writer Tom Negrino, that hasn’t happened yet, although it will in the very near future. Tom was diagnosed with kidney cancer in 2010, and despite surgery, the cancer reappeared in 2014, having metastasized all over his body. A few years ago, Tom and his wife Dori Smith told us and other colleagues about it, and the inevitable outcome, and Tom went public with the news on his blog last May. His health has continued to decline since, to the point where he’s now sleeping about 20 hours per day, and he plans to take advantage of California’s physician-assisted dying law, the End of Life Option Act. Ray Holley of the Healdsburg Tribune has written a good story about Tom and Dori and how they’ve dealt with the situation.
In 1996, Tom wrote me an email message about my article “But You Didn’t Mention…” (23 September 1996) and I published his response in “And You Still Forgot…” (14 October 1996). It’s possible that we had been introduced at Macworld Expo before then, but that was my first email from him, and after that, we often met up with him and Dori at industry events. The best of those was the Mac Mania Geek Cruise in 2002, on which we were both speakers. Since we live 2400 miles away from them, we last saw Tom and Dori in March 2014 at the Ink-Stained Wretches dinner that we organized for fellow writers at Macworld/iWorld during the last few
years of that show — Tom particularly enjoyed those informal gatherings.
Although Tom never wrote any articles for TidBITS, he and I once collaborated on a sidebar for an article about email clients I was writing for Macworld. Tom was an unabashed fan of Microsoft Entourage, whereas I was devoted to Eudora. So at the urging of our editor, Scholle McFarland, we wrote the E-Mail Grudge Match: Entourage Versus Eudora. I later took advantage of one of my digs against Entourage — that Microsoft didn’t provide a manual — to lure Tom into writing “Take Control of What’s New in Entourage 2004” for our fledgling Take Control series. That was in a career of writing about
Apple and the Mac that spanned some 30 years, during which Tom wrote innumerable articles and some 50 books.
I’m impressed with Tom’s fortitude in sticking with his convictions and choosing to end his life with dignity, on his own terms. And Dori’s staunch support through what has been an agonizing few years is truly splendid.
Tom, those of us who know you will miss your humor, skill, professionalism, and courage. And to echo our mutual friend and colleague, Jason Snell and the sentiments of Andy Ihnatko, the world will be an appreciably worse place without you in it.
How to Identify High-Performance GPU Apps on the MacBook Pro
Shortly after the 2016 MacBook Pro with Touch Bar began shipping, battery life became a hot topic. Although Apple boasts up to 10 hours of performance per charge, I wasn’t seeing anything near that on my machine. I’d get maybe 4 hours. For a while, Consumer Reports refused to recommend the MacBook Pro because of battery life, although their testing methodology was questionable (see “Why We Should Care about the Consumer Reports MacBook Pro Rating,” 12 January 2017).
The upside of the tempest was that Apple was able to fix some graphics and battery life issues in the macOS Sierra 10.12.2 and 10.12.3 updates. One of those problems centered around the way macOS switched between the built-in Intel graphics processor and the discrete AMD Radeon Pro graphics card available in the 15-inch models.
(Although I’m writing specifically about the 2016 MacBook Pro with Touch Bar, the following discussion applies equally to any MacBook Pro with a discrete graphics card.)
When you launch a graphically demanding app, such as Adobe Photoshop, macOS switches to the Radeon processor, which consumes more power. When you quit the power-hungry app, the machine is supposed to turn off the discrete card and switch back to the integrated graphics processor, which offers less graphical power but doesn’t chew as much battery life.
Before 10.12.3, macOS wouldn’t accurately sense that the changeover had happened and would continue to drive the display using the discrete GPU. Since applying that update, my battery life has dramatically improved.
Even still, though, there are times when it seems as if my battery level is slipping away faster than I would expect given the work I’m doing. If you’re experiencing something similar, here’s how you can determine which apps are using which graphics processor and potentially track down the culprit. You have a couple of options:
First, click the Battery menu bar item, which will tell you which applications are “Using Significant Energy.”
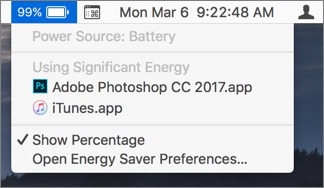
That’s a fuzzy indicator, however. You can be running an application that’s using significant energy and still be using the integrated graphics processor. So, a quick trip into Activity Monitor is more helpful.
Launch Activity Monitor (located in the Utilities folder in the Applications folder; you can get there quickly in the Finder by choosing Go > Utilities) and click the Energy tab.
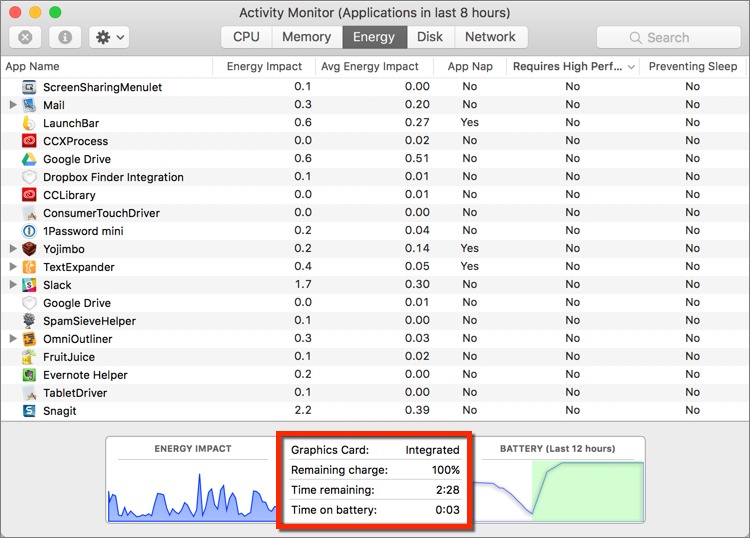
At the bottom of the window, see which graphics card is currently in use: Integrated (the Intel GPU) or “High Perf” (the high-performance Radeon GPU). If it’s the latter, you may be burning energy faster than you want.
To determine which application is causing the discrete GPU to run, click the Requires High Perf GPU column to sort the list of running processes based on that attribute. You may have to click the heading twice to sort it correctly; the caret to the right of the column title should be facing down to indicate that you’re sorting in descending order. At the top of the list, the apps that say Yes are your culprits.
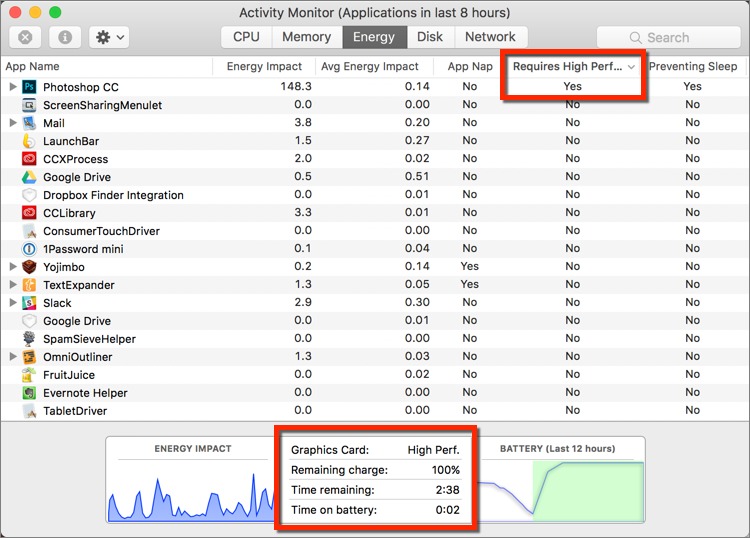
Quit those apps. Even if you’re not actively using them, their presence can keep the discrete GPU active. The Graphics Card indicator at the bottom of the screen should switch back to Integrated.
You’ll notice that Activity Monitor also includes a Time Remaining estimate. When Apple released 10.12.2, it took the unusual step of removing this information from the Battery menu bar item (see “macOS 10.12.2 Sierra Focuses on New MacBook Pros,” 13 December 2016). Happily, you can still get that information in Activity Monitor. The estimate is still just an estimate, though, and shouldn’t be taken as gospel because macOS adjusts its energy
management features frequently. Nevertheless, the Time Remaining estimate can be a helpful guideline if you’re getting close to the wire.
Of course, if you have to use even a single app that requires the discrete GPU, your battery life will suffer, and there’s nothing you can do about it. Similarly, even if no apps are using the discrete GPU or reporting as using significant energy, the battery may drain faster than you expect due to other factors. Especially on the MacBook Pro with Touch Bar, I’ve found that turning off keyboard illumination (expand the Control Strip on the Touch Bar to reveal the keyboard brightness buttons) and reducing screen brightness can make a big difference.
Half the AirPods for a Tenth the Price
Tim Cook called them a “cultural phenomenon.” They’re backordered for six weeks on the Apple online store right now, and some independent Apple resellers tell me they can’t get any to sell.
Apple’s new AirPods wireless earbuds are unquestionably an engineering feat, and while reviewers such as our own Julio Ojeda-Zapata and Josh Centers have identified a few weak points, the AirPods are generally well-received (see “Apple’s Wireless AirPods Were Worth the Wait,” 20 December 2016).
The main negative is the $159 price, which makes the likelihood of losing or damaging one of the AirPods all the more worrying. While that price may seem high, most of the full-fledged competitors to the AirPods are at least as expensive, if not more so (see “CES 2017: Gadget Finds on the CES Show Floor, Days 3 and 4,” 11 January 2017).
So what if I told you that you could buy a competing product for less than a tenth the price? Seriously. Don’t expect it to be as good as the AirPods, not by a long shot, but for somewhere between $5 and $20, you can buy a single Bluetooth earbud that does basically what the AirPods do — put a speaker and microphone in your ear without awkward wires.
I first heard about this product category from a Cornell running buddy, Rob Kurcoba, who bought his first earbud from a Chinese reseller on eBay. At only $6.99, it was incredibly cheap, but he had to wait six weeks for it to arrive via slow boat. He paired it with an Android Wear smartwatch that could play music, the Sony Smartwatch 3 SWR50, and started wearing it on his solo runs. Soon, he was evangelizing it to the rest of us when we ran with the High Noon Athletic Club.
Amused by his excitement, I looked on Amazon and was amazed to discover that the single-ear Bluetooth earbud had become almost a generic item, with numerous companies selling products that look nearly identical. I chose a $15 Nocobot model that had slightly better reviews than the others and got it a few days later — no need to wait for the slow boat with Amazon.
It paired with my iPhone and my Apple Watch, and worked fine for listening to podcasts while doing yard work and a few times while running. This was all before the AirPods came out, and I lost track of it once yard work stopped for the year. But after the AirPods were announced and finally started to trickle out to users, I was a guest on MacBreak Weekly and mentioned the earbud while we were talking about the AirPods. That comment hit a nerve with listeners, generating lots of requests for more details. So here we are!
Nocobot Bluetooth Earbud — The earbud I bought and recommended on MacBreak Weekly was manufactured by a company called Nocobot and sold by another firm called Duto. It cost $14.99 and came with a custom four-inch USB charging cable with a needle-like tip that plugs into a tiny hole in the earbud. In my testing, battery life is about 3.5 hours of audio; I’m not entirely sure how quickly it recharges because there’s no way to check how fully charged it is.
The earbud itself is black, and shaped like an old-style hearing aid, in the sense that it’s designed to fit snugly into your right ear. That’s either a plus or a minus, depending on your ear. It fits tightly in my ear — so well, in fact, that I have to pop it out by pulling up on the top of my ear and pushing gently from the back. It feels a little odd initially, but after a few minutes, I stop noticing it. I could easily see it not fitting in someone else’s ear. It fits only in your right ear, and in case my use of the singular hasn’t made this clear, it’s only a single earbud — your left ear remains uncovered. I consider that a plus for running or biking, where covering both ears is dangerous, but it’s a liability for
when you want to block the outside world.
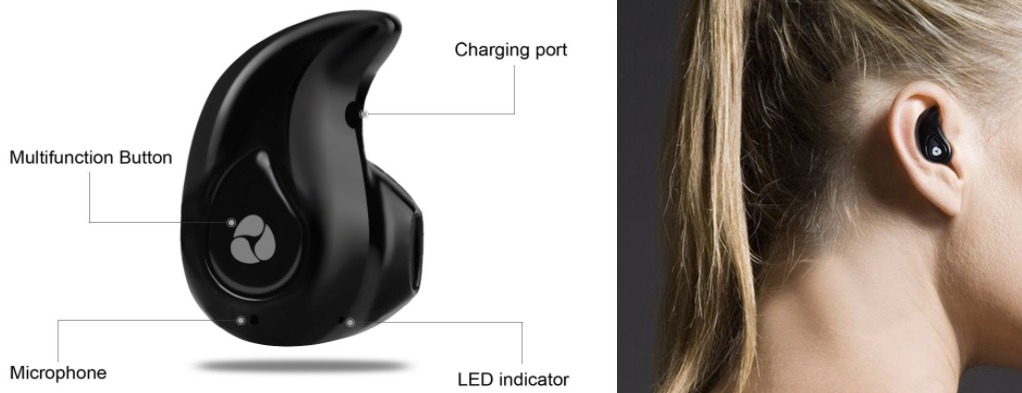
The earbud has a single button that you use for pairing, toggling power, and starting and stopping audio:
- Press and hold the button for 5–10 seconds to put it into pairing mode.
- Press and hold the button for 3–4 seconds to turn it on or off.
-
Press and hold the button for 1–2 seconds to switch its audio feedback between Chinese and English.
-
Press the button quickly to start or stop the audio, or to answer and hang up calls.
-
Press the button twice quickly to redial the last number called.
The annoying part of the button is that it’s somewhat stiff, and pressing it means pushing in on your ear, which can be a bit uncomfortable. On the plus side, it’s unlikely to be pushed accidentally in your pocket or bag.
Its only other interface is a recorded voice that tells you that it’s powering on or off, that the device is connected, if it’s ready to pair, and when you end a call. It also tells you when the battery is getting low, and I once heard it say “Battery high.”
The quality of the audio is good, but not great. I mostly use it for podcasts while working outside, where it’s totally fine. When I first used it to listen to music while running, I experienced some skips and dropouts. I was able to resolve those by moving the Apple Watch to my right wrist or, when I’ve had the iPhone in a waist belt, sliding it around to the right side or front. The volume is loud enough for most environments, but some additional power would have been nice at times. Put bluntly, this is not an audiophile solution.
I hadn’t used the Nocobot earbud’s microphone for calls of any sort until writing this article since I very seldom talk on the iPhone. When I called Josh, he reported that I sounded OK, but not great. For me, his audio was nice and clear, though not quite as loud as I would have liked. Using the iPhone’s built-in speaker and mic worked noticeably better for both of us. Our Skype test was less successful, likely due to the slow hotel Wi-Fi network I was using. The earbud can’t invoke or be used with Siri, unfortunately.
You’ve probably noticed that I haven’t linked to this earbud yet. That’s because the particular one I bought isn’t available on Amazon anymore. Nor can I find any indication that Nocobot and Duto are even in business. We’re talking about sketchy Chinese companies here — that’s why it’s so cheap. However, the $14.99 G-Cord Ultra Lightweight Wireless Bluetooth Hands-Free Earbud looks identical, down to the logo on the button, so if you’re looking for one of these, give the G-Cord a try.
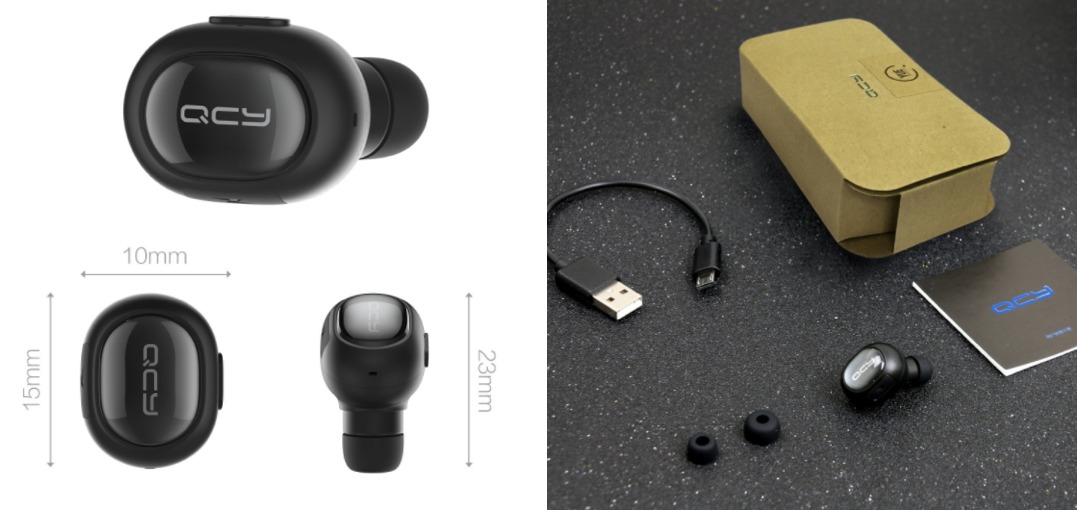
QCY Q26 Bluetooth Earbud — After I mentioned the Nocobot earbud on MacBreak Weekly, a listener recommended a competing product from QCY, which is a higher profile brand, to judge from a Google search. At its heart, the QCY Q26 is extremely similar to the Nocobot, being a single-ear Bluetooth earbud controlled by presses on a single button and responding via audio feedback. It costs $13.59 from Amazon and comes in a variety of colors.
The QCY Q26 uses a stalk-like industrial design that has pros and cons. On the plus side, it should fit in anyone’s ear, and it comes with three sizes of rubber ear tips so you can choose the one that best matches your ear. That design also enables it to block sound better than the Nocobot earbud. Although it’s designed to go in your right ear, with the button on the top, you can flip it over and put it in your left ear, with the button facing down. It might not work well for calls in that orientation. Either way, the button is easier to press than the Nocobot’s button because you can pinch the QCY Q26 between your fingers while pressing.
It’s not all good, though. The stalk design means that it doesn’t fit into your ear nearly as snugly as the Nocobot, and I’d be more concerned about it falling out accidentally. Plus, I find that the rubber ear tip blocks so much external noise that it almost feels like my ear has water in it — it’s somewhere between disconcerting and uncomfortable. (The Nocobot doesn’t block the ear canal as much, avoiding that situation.) The QCY Q26’s button is easily pressed in your pocket or bag, which can turn it on and run the
battery down inadvertently or even pocket dial if it’s pressed twice in quick succession.
Battery life isn’t quite as good as the Nocobot, at about 3 hours in my testing. The QCY Q26 comes with a micro USB cable for charging, and it plugs into a port on the other side of the earbud from the button. The port has a cover that’s devilishly hard to open; I can get it open only with the sharp point of a safety pin.
Controlling the QCY Q26 is almost identical to the Nocobot, with a long press to put it into pairing mode, shorter presses to turn it on and off, quick presses to control audio or answer/hang up calls, and double presses to redial the last number. The audio feedback is similar too, though it doesn’t seem to talk in Chinese.
Audio quality in comparison with the Nocobot is both better and worse. The QCY Q26 has a bit more oomph, and when Josh and I tested the microphone quality, he reported that it was a little better, but still reminiscent of AM radio. The rubber ear tip does block more ambient noise too. However, music sounded a bit muddier, and at least in my test unit, there’s a quiet background hiss. You don’t hear it when audio is playing at any significant volume, but it’s noticeable when the volume is very low or off. Plus, when I tried to use it while running with my iPhone in a waist belt, audio cut in and out enough that I stopped and swapped it for the Nocobot. It was fine when I used it to listen to music while standing at my desk,
however.
Making a Choice — I won’t pretend that either of these earbuds is anywhere near as good as Apple’s AirPods. Their Bluetooth pairing can be annoying, audio quality isn’t as good, battery life is shorter, it’s more difficult to plug in their charging cables, their microphone quality is weak, and neither supports Siri or voice commands. And heck, you only get one, something that AirPods allow but don’t require.
But these earbuds are so cheap that you may not care. I wrote this while at the ASMC Summit, a conference for independent Apple resellers, and when I showed these two little earbuds to one attendee, he said that he didn’t even bring his AirPods to the conference for fear of losing them. Just as the best digital camera is the one in your pocket, the best earbud is the one you have with you.
Also, I’m talking about a category that contains much more than these two entrants. When you search for “Bluetooth earbud” on Amazon, you’ll see a variety of comparable products with slightly different industrial designs that you might find more compelling. Some are as cheap as $5, and there’s no reason I can see to spend more than $20 given how similar they look. I wouldn’t expect any of them to last for all that long, and they’d be easy to lose, but a super low price makes up for a lot of sins.
My friend Rob, who got me started with these earbuds a year ago, tells me that he has since bought eight more, four of which he’s given away to family and friends. Of those he kept, he lost two and one broke, but at $7 each, he doesn’t feel bad about it.
So hey, if you’re looking for a cheap wireless audio solution for one ear, give one of these earbuds a try. It’s not a big investment if it doesn’t work, and you might be pleasantly surprised.
How to Set Up and Use Airline Boarding Passes in Wallet
When Tonya and I first started taking airline flights back in the early 1990s, I found it almost overwhelmingly stressful. It stemmed from the fact that flying was so expensive for us, but I also dreaded the byzantine process of buying tickets, checking in repeatedly, and dealing with security. So much seemed to hinge on not losing tickets, boarding passes, or identification cards. We never made any mistakes, though, and in retrospect, misplacing a ticket or boarding pass likely wouldn’t have been a big deal. (The first time I flew to Canada, pre 9/11, I forgot my passport but was still allowed through customs with a stern talking-to. Who knows what would happen today!)
I still don’t enjoy airline travel, but I’ve done it enough that it no longer stresses me out to the same extent, even as dealing with invasive and unpleasant security requirements has gotten far worse. Plus, thanks to the Internet and the iPhone, the logistics have become vastly simpler. Being able to buy tickets, check in, and print boarding passes online was the first step, and the next major improvement came when Apple released the Passbook app, since renamed Wallet.
I’ve been using Passbook/Wallet as long as has been possible — it took smaller airports like Ithaca a while to get the necessary scanners — but as much as I liked eliminating the need for paper, there were many problems early on. Getting passes into Passbook was difficult, due to horrible airline apps, and bringing up the passes quickly and reliably was also hard. Even during our trip to MacTech Conference in Los Angeles in November 2016, when I was using an iPhone 7 running iOS 10, I had problems. I eventually realized the Raise to Wake option kept swapping the boarding pass for the lock screen every time I lowered my iPhone while waiting in line to board.
But on my most recent trip, to Austin for the ASMC Summit for independent Apple resellers, everything just worked. The United app knew about my itinerary once I was logged in, and the Delta app figured it out once I entered the ticket number. Both notified me when I could check in, and made it easy to do that and add my boarding passes to Wallet. iOS 10 and Wallet were smart enough to display a constant notification on the lock screen during the time I needed it, a single swipe brought up the boarding pass, and it stayed on screen while I waited in line, regardless of Raise to Wake.
I’m sure many of you are nodding your heads in agreement, or wondering why I’m telling you all this. I’m no frequent flyer, so I’m sure that these improvements have been obvious to road warriors for a while. But I wanted to document how to do all this because I saw a lot of people still relying on paper boarding passes on that last trip. The experience of relying on an iPhone is so good, and so much better than dealing with paper, that if you’ve avoided it so far, I urge you to give it a try next time. But feel free to print a paper boarding pass as a backup until you’re comfortable with using your iPhone instead!
Get the Airline App — The first step is perhaps the hardest. It’s not that finding or downloading airline apps is difficult or expensive — they’re all free, and you can download them from the App Store like any other app. Here are links for the main U.S. airlines: Alaska Airlines, Allegiant Air, American Airlines, Delta Air Lines, Frontier Airlines, Hawaiian Airlines, JetBlue, Southwest Airlines, United Airlines, and Virgin
America.
In my experience, the tricky part, particularly for those of us who have been traveling for many years, is logging in. I strongly recommend taking some time well before your next flight to set up the airline apps you might use. Do them all at once, since it can be a fussy, annoying process if you have old accounts, or if airline mergers have confused matters. It’s far easier to figure out your login information — usually some combination of frequent flyer number, email address, or username, plus a password or PIN — via the airline Web sites while working calmly on a Mac at home.
You may need to ask for new passwords in some cases, and regardless, I’d encourage you to change your password to a 20-character random password and store it in a password manager like 1Password or LastPass. You have to assume that airline Web sites are under attack all the time, given the value of the information they store, and I imagine that identity theft surrounding airline travel could cause a world of hurt. So set strong passwords and make sure to use a password manager that you can access on your iPhone too.
Check In and Add Boarding Passes — Once you’re logged in to the airline app, it should be relatively obvious how you can check in for your flight, which you can usually do 24 hours beforehand. If you booked the flight through the same airline, the app might even know about your itinerary already. If not, you may have to enter a confirmation number or ticket number — I had to do that when using the Delta app to check in for the return leg of my last trip, which had originated on United.
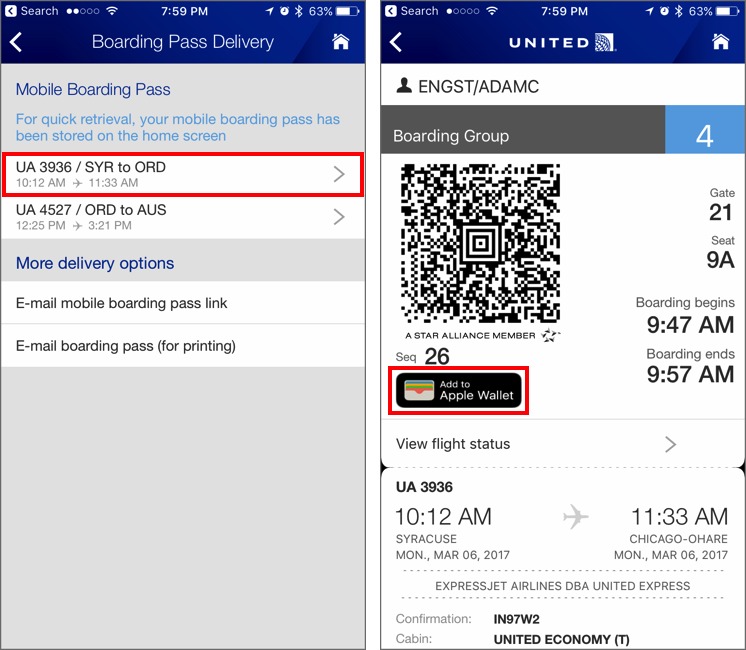
At the end of the check-in process, the apps I’ve used have provided a relatively clear Add to Wallet link or button. Tap it, and when it hands you off to Wallet, make sure everything looks correct in the boarding pass and then tap the Add link in the upper-right corner. You may or may not need to do this for each boarding pass; check to see what’s in Wallet after the first one. Now you’re ready for when you go to the airport.

Call Up a Boarding Pass — As you’re waiting in the security line, you’ll want to get your iPhone ready to display the boarding pass to the first security checker. Since Wallet knows your flight times, it starts displaying a notification on the iPhone’s lock screen some hours before.
That notification appears every time you wake the iPhone, and you can swipe it to the right to display the boarding pass. Those with an iPhone 6, 6s, or 7 can also 3D Touch it and then tap a Show Pass button, but that’s a bit clumsier than the swipe. The boarding pass will stay on screen even beyond the time set in Settings > Display & Brightness > Auto-Lock, but as you approach the head of the line, check to make sure you haven’t inadvertently pressed the Sleep/Wake button on your iPhone.

If you have an Apple Watch, you can instead bring up the Wallet app there — you might want to tap the Keep in Dock button to make it easier to get to for your return flight. The watch’s Wallet app shows the same passes that are in Wallet on the iPhone, and tapping the boarding pass shows you the same information, although you have to scroll down (or rotate the digital crown) to get to the QR code required for the scanner. While the Wallet app is up on the Apple Watch, the screen doesn’t turn off, so
you don’t have to struggle with it when you get to the desk.

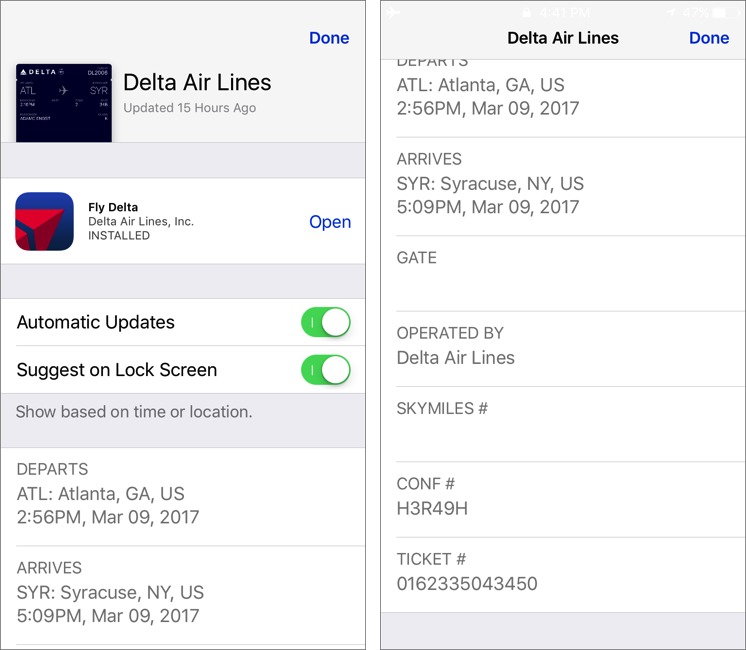
Although I can’t imagine a scenario where this makes sense, you can prevent a boarding pass from appearing on your lock screen. Swipe right on its notification, tap the i button in the lower-right corner, and in the next screen, disable Suggest on Lock Screen. You can turn off automatic updates here too, but again, I can’t think of when it would be useful to have a boarding pass not update automatically.
One final note. Since many flights have multiple legs, each with a separate boarding pass, note that Wallet seems to try to keep them together. If you see multiple dots at the bottom of a screen showing a boarding pass, try swiping left and right to move between them. The same applies if you’re traveling with a family and you have boarding passes for multiple people in your iPhone.
Speaking of which, if you and your traveling companions all have iPhones and airline accounts, it’s usually possible for each person to manage their own boarding passes. But if not, you can check in for multiple travelers and add all their boarding passes to your iPhone, though that will require some swiping back and forth whenever you need to present them.
Delete Passes — Back in the day, you sometimes wanted to hold on to boarding passes to prove that you’d flown the miles for a frequent flyer program. In today’s world, unless you’re a tech writer who wants to keep a few boarding passes around to document how Wallet works, there’s little reason to retain them.
To delete an expired boarding pass, open Wallet, tap the boarding pass, tap the i button in the lower-right corner, and then tap the Remove Pass option.

Anything Else? — It was difficult to document how all this works since I had to do it live, while juggling luggage and making sure I ended up on the right flight and in the right seat. There’s no way to simulate different scenarios or test something again. So, if I’ve missed something in this description of using boarding passes in Wallet, please let me know in the comments.
Finally, what if you lose or break your iPhone, with all your travel documents on it, during your trip? If that happened to me while en route, I’d go to the nearest airline desk to see if they could print me a new boarding pass. And if it happened in the middle of my trip, which seems more likely, I’d try to get to the airport early for my departure, so there would be extra time to check in for the flight and get a printed boarding pass. If you have ever experienced such an iPhone disaster, leaving you without a boarding pass or information about your itinerary, tell us in the comments how you worked around the problem.
TidBITS Watchlist: Notable Software Updates for 13 March 2017
1Password 6.6.2 — AgileBits has released 1Password 6.6.2, enabling 1Password Watchtower by default and clarifying the sync options shown during initial setup. The update also fixes a layout issue where the Trash would float halfway up the sidebar, resolves a bug that prevented the Watchtower database from updating automatically, and eliminates a crash when adding a 1Password.com account by signing in using a Web browser. AgileBits also ensures that those who purchased 1Password via the Volume Purchase Program on the Mac App Store won’t be put into read-only mode.
As of version 6.6, the Mac App Store edition of 1Password is now free to download and works for 30 days in trial mode. After that, it prompts you to subscribe to 1Password — see this AgileBits blog post for details. ($64.99 new from AgileBits or free with a $2.99 or $4.99 per month subscription, free update, 47.4 MB, release notes, 10.10+)
Read/post comments about 1Password 6.6.2.
Hazel 4.0.9 — Noodlesoft has released Hazel 4.0.9 with bug fixes for the file cleanup utility. The update eliminates crashes that could occur while editing or saving a rule or when editing a rule using unsupported attributes, ensures that the Pattern editor window no longer appears in the lower-left corner of the screen, and resolves an issue with the pattern field not expanding when you drag an item into it. ($32 new or $49 for five-member family pack, free update, 7.9 MB, release notes, 10.10+)
Read/post comments about Hazel 4.0.9.
Lightroom CC 2015.9 and Lightroom 6.9 — Adobe has released the standalone Lightroom 6.9 and Lightroom CC 2015.9 (available as part of Adobe’s Creative Cloud) with bug fixes and added support for new cameras and lenses. The professional photo cataloging and editing applications fix erratic cursor movements on Point Curves, resolve a problem with Lightroom unexpectedly exiting Full Screen mode in macOS 10.12 Sierra, improve the speed of exporting, fix a bug that caused iPhone Capture Time to shift after import, and patch a memory leak. ($9.99 monthly subscription or $149 for the standalone app, free
update, release notes, 10.8+ for Lightroom CC 2015.9 and 10.9+ for standalone Lightroom 6.9)
Read/post comments about Lightroom CC 2015.9 and Lightroom 6.9.
ChronoSync 4.7.4 — Econ Technologies has released ChronoSync 4.7.4 with enhanced cloud sync performance (via parallel operations working to copy and destroy multiple objects — see “Investigating ChronoSync 4.7 for Cloud Backup,” 22 December 2016, for why this is important) and improved responsiveness of the Analyze panel. The synchronization and backup app also improves memory usage and sync document save performance, enhances recognition and mounting of relocated volumes, tunes memory management options to reduce memory consumption when
syncing to Amazon S3, eliminates a memory leak in the push notification delivery procedure, and fixes a bug that generated erroneous errors when syncing files containing resource forks to Amazon S3 and Google Cloud. (Free update, $49.99 new for ChronoSync with a 20 percent discount for TidBITS members, 41.2 MB, release notes, 10.8+)
Read/post comments about ChronoSync 4.7.4.
ExtraBITS for 13 March 2017
In ExtraBITS this week, Jamf’s enterprise survey reveals gains for macOS and iOS, Apple says that it has patched most of the vulnerabilities revealed in a recent WikiLeaks dump, a judge has ruled that you cannot be compelled to unlock your devices with Touch ID, and we learn that Steve Jobs initially thought the Genius Bar was an idiotic idea.
Apple Gaining Ground in the Enterprise — Apple may be slipping in the education market, but the company is doing well in the enterprise. In a survey of 300 IT professionals, managers, and executives in large commercial organizations, Apple device management firm Jamf found that 91 percent of respondents use macOS and 99 percent use iOS. Jamf says, “Apple is gaining ground in the enterprise because employees prefer devices they use in their personal lives.” It’s hard to know quite what to make of Jamf’s findings since the fact that one department in a
multinational conglomerate might rely on the Mac doesn’t necessarily mean that the company “uses” macOS in a significant way. Nevertheless, given Apple’s recent partnership with IBM and other enterprise initiatives, it’s good to see indications of growth.
Apple Says It Has Already Patched Most WikiLeaks Vulnerabilities — WikiLeaks has published an extensive collection of vulnerabilities that the U.S. Central Intelligence Agency reportedly uses to infiltrate computer systems, including iOS. However, Apple says that it has already patched most of these security holes, telling TechCrunch, “While our initial analysis indicates that many of the issues leaked today were already patched in the latest iOS, we will continue work to rapidly address any identified vulnerabilities.” Stories like this illustrate
why, even if you don’t install every update immediately, it’s a good idea to keep your devices up to date.
Judge: FBI Can’t Force Touch ID Unlocks — Apple has scored an indirect victory in its ongoing skirmish with the FBI. A U.S. magistrate judge has ruled that the FBI cannot force potential targets to provide fingerprints to unlock Touch ID-equipped devices. The long-accepted rule of thumb in the security world has been that passcodes are more secure than fingerprints because you could be compelled to place your finger on the scanner but not to provide a passcode. This is a narrow decision, but it’s good to see the judicial system starting to catch up with the tech
world.
Steve Jobs Initially Thought the Genius Bar Was Idiotic — On the Recode Decode podcast, former Apple Senior Vice President of Retail Operations Ron Johnson, who pioneered the Apple Store, revealed that Steve Jobs initially called the Genius Bar “idiotic.” Jobs argued that people who know technology don’t know how to connect with people, but the next day he ordered Apple Legal to file a trademark for “Genius Bar.” It’s a good reminder that Jobs not only didn’t come up with all of Apple’s good ideas, he also rejected many of them at first. But it also shows how
Jobs was willing to be persuaded by people whose opinions he trusted.