TidBITS#1108/09-Jan-2012
With little happening in the way of actual news this week, we focus on the practical, leading off with Adam’s examination of Lumin, a simple iOS app that turns your iPhone into an illuminated magnifier. Then Michael Cohen looks at Snapseed, a photo-enhancement app that displays some innovative interface techniques. Moving into the Mac and networking worlds, guest contributor Marshall Clow explains how to set up a simple blog with the Markdown- and Dropbox-driven service Calepin, and Matt Neuburg shares how he used iTunes Match to gain access to a subset of his music on all his devices.
Lumin Turns Your iPhone into an Illuminated Magnifier
My eyes aren’t terrible, at least if I’m wearing the corrective lenses that fix my massive myopia. But there are plenty of times when I need to read something that’s too small to make out in the current lighting conditions — a serial number on the back of a device, a restaurant menu in dim lighting, the details on some piece under the car dashboard. I’ve become fond of my Petzl Tikka 2 head lamp for throwing bright light on whatever I’m working on, but I can’t go out in public with LEDs glaring from my forehead, and even then, it doesn’t help with things that are too small to see well.
The deceptively simple solution for such situations is Mahboud Zabetian’s $1.99 iOS app Lumin. It performs two basic tasks: magnification and illumination, but when you combine them on an iPhone, you end up with a device that can help anyone whose eyes aren’t what they used to be.
Lumin uses your iOS device’s camera to display a magnified image of whatever you point it at. Most of the time you’ll want to use the higher-resolution rear-facing camera, but you can switch to the front-facing camera (to make sure you don’t have lettuce in your teeth). Lumin’s magnification goes beyond what the Camera app allows, perhaps because Lumin’s goal is just to let you read something, rather than stressing about whether or not it would be a good photo. And if you want to magnify even further, the normal pinch-to-zoom feature of the iPhone works fine.
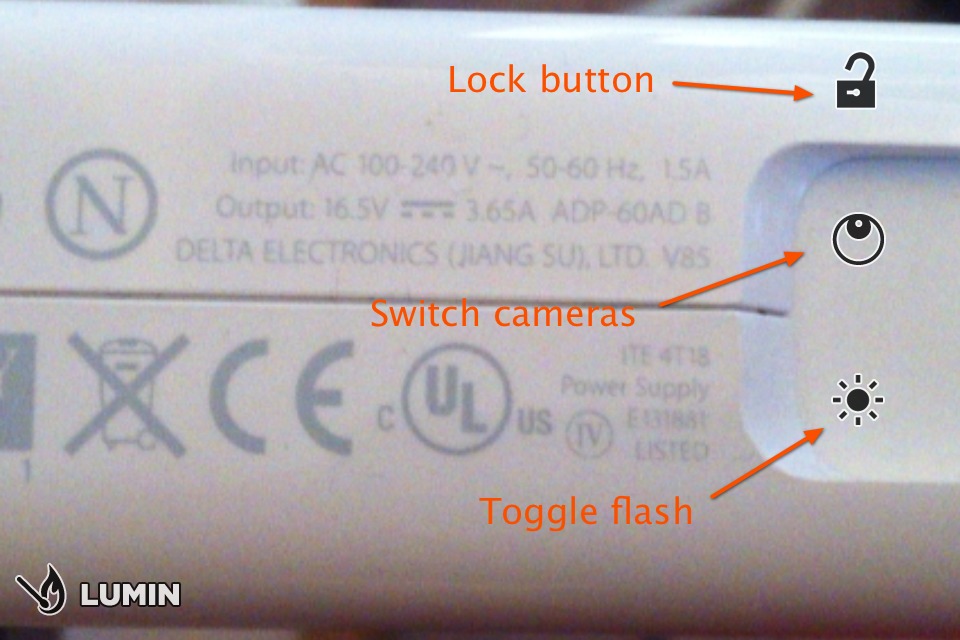
If you’re using an iPhone 4 or 4S, a tap on an onscreen button turns the flash into a little LED flashlight, illuminating whatever you’re looking at. There’s nothing new here — Apple is rejecting flashlight apps because there are too many in the App Store already — but being able to shine a constant light on small print in a dark area is way easier than using the flash normally, when it’s on only for the instant the picture is being taken.
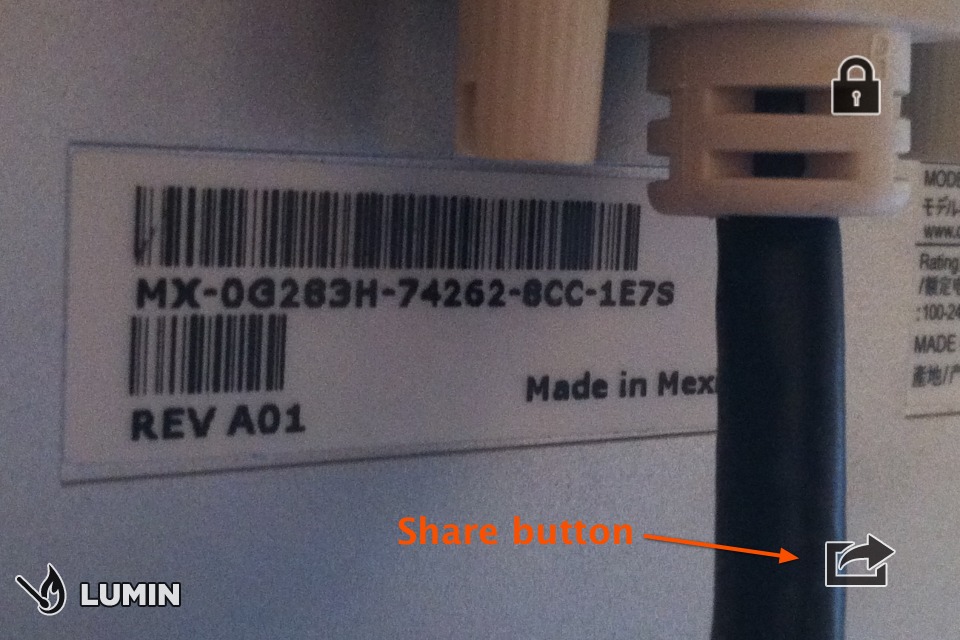
In most situations, you’ll use Lumin in real time as a live magnifying glass. But when you want to transcribe a serial number or look at something carefully, a tap on Lumin’s lock button freezes the image. You can even pinch to zoom further, if the magnification level of the frozen image isn’t sufficient. The image sticks around until you tap the lock button again, unless you instead use the share button to save it to the Camera Roll, share it via email, or post it to Twitter. And when you’re saving a picture to
the Camera Roll, Lumin gives you the option of saving the magnified image, the original unmagnified photo, or both.
The only problem I had with Lumin is that because of the extreme magnification level in the camera, holding the iPhone steady long enough for Lumin to focus sometimes proved tricky. You won’t want to use it for reading a bunch of stock prices from the newspaper, for instance, unless you could make a little stand that would hold it steady at the right distance from the page. Having to tap the on-screen lock button was also difficult in some situations; it would be great if Lumin could freeze the image when the volume up
button was pressed, as the Camera app can do in iOS 5.
You’d be hard pressed to find a normal illuminated magnifying glass for less than $5 (most I found were in the $20-and-up range), much less one that can take photos and is always in your pocket or purse. So if you find yourself wishing small things weren’t so hard to see, give Lumin a try.
Snapseed Displays Innovative Touch Techniques
I’m old enough to remember the first Macintosh keyboard and the now-forgotten widespread consternation that it lacked cursor keys. At the time, critics and developers considered that lack to be as big a break with the past and obstacle to programming-as-we-know-it as the Mac’s strange, boxy mouse and bitmapped screen.
Eventually, initially guided by some examples from Apple (and eventually followed by actual published guidelines), along with boundless inventiveness from third-party developers, the point-and-click interface became accepted as the new programming-as-we-know-it paradigm. (Of course, cursor keys soon made their way back to the Mac keyboard, but that’s another story.)
We’re now just a few years into the touch-interface revolution instigated by the original iPhone. Once again, we’ve seen some programmers fail to adapt to both the limitations and the opportunities presented by the touch interface, while others have not only adopted Apple’s conventions gracefully, but have also expanded upon them in interesting and useful ways.
I was reminded of this a few days ago when, on a recommendation I saw flow by in my Twitter stream, I bought a photo-enhancement iOS app: Snapseed by Nik Software. Snapseed was an impulse purchase because I seldom bother with photo enhancement on my iPhone or iPad; for quick fixes, iPhoto on my Mac is often good enough, and, when it isn’t, I have more powerful image editing applications. Furthermore, the mouse and keyboard on my Mac make it much easier for me to home in on the parts of the image I want to change and to set an application’s various image adjustment controls precisely. But, hey, Snapseed was only $4.99, and the laudatory tweet had come from someone
whose opinion I tend to trust, so why not?
Like many other photo-enhancement iOS apps (including a very nice one, Camera Plus Pro by TidBITS sponsor Global Delight), Snapseed offers a variety of separate enhancement features organized into groups. For example, Snapseed’s Details group provides filters for sharpening (edges) and structure (texture) enhancements, while its Black & White group not only removes an image’s color but also provides ways to adjust contrast, brightness, graininess, and other image characteristics. What sets Snapseed apart is its innovative interface techniques.
As a universal iOS app, Snapseed has separate interfaces for the iPhone/iPod touch and the iPad, but both use similar techniques for providing help, selecting tools, and manipulating those tools. Here are the interface techniques implemented in Snapseed that I found particularly innovative.
First, many apps commonly use an interface element known as a popover for offering options or tools: tap an icon and a panel appears with a list of options; tap the option, and the option goes into effect and the popover panel vanishes. This convention is familiar (it’s similar to drop-down menus on a Mac) and easy to use. However it has one notable drawback when screen space is limited: the popover requires a visible icon for the user to tap.
Snapseed circumvents this requirement by presenting tool choice via a swiping gesture: swipe up or down and a temporary option selection widget appears, from which you can choose an option by sliding your finger to it. The widget vanishes as soon as you lift your finger. No triggering icon is required; the widget appears only when you gesture for it.

Next, for those tools that change their intensity or characteristics in a linear way, such as adjusting contrast, brightness, or color cast, simple left or right swiping gestures are all that are needed to make changes.
In case you can’t remember how to access or operate various tools, Snapseed, by default, provides a Help overlay that appears whenever you choose a new group of tools. The overlay disappears as soon as you touch the screen, and it can be turned off once you have become familiar with the Snapseed way of doing things.
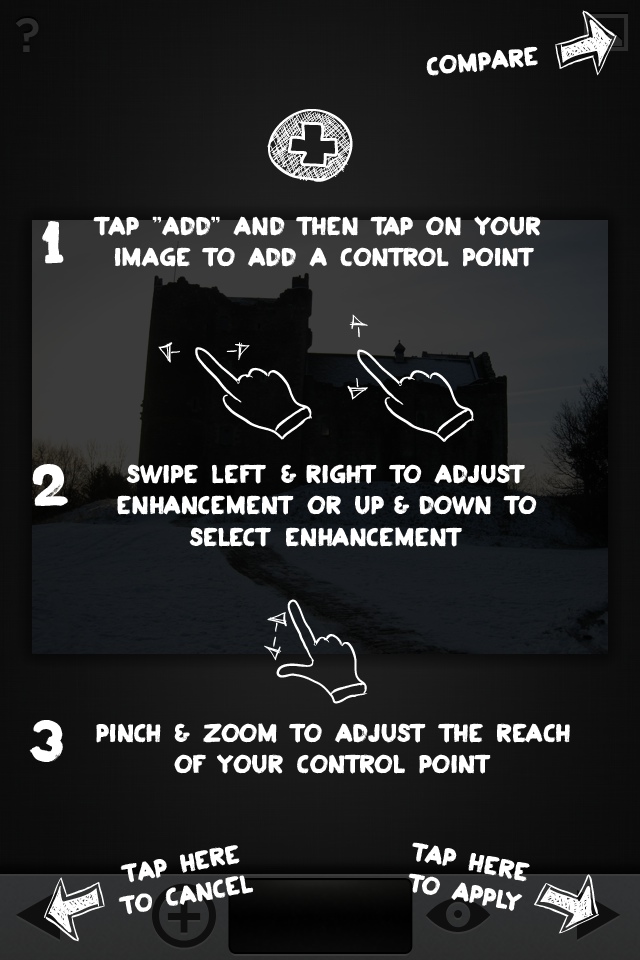
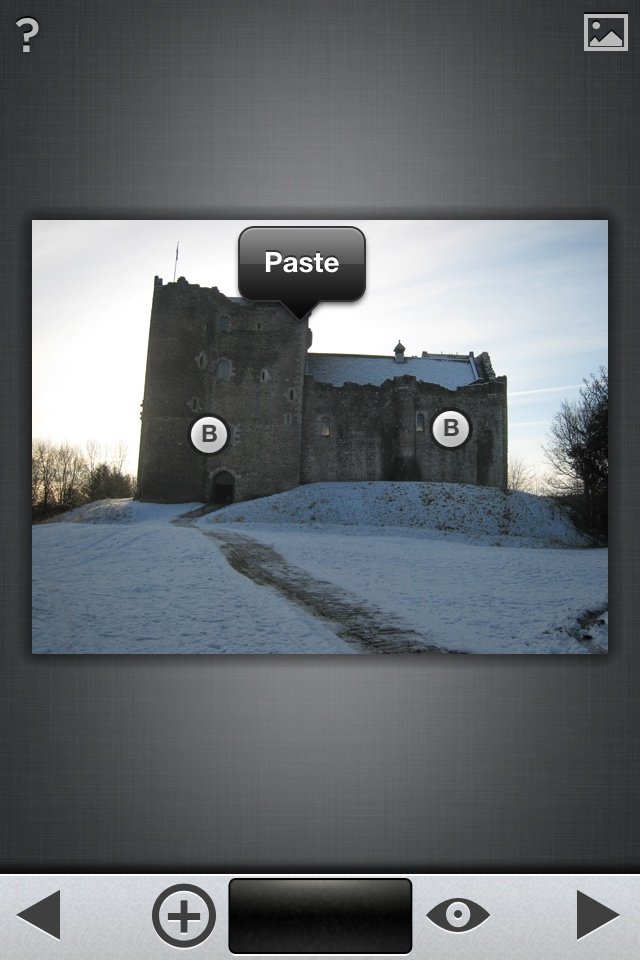
Finally, there’s a third technique that Snapseed implements for adjusting parts of an image: a movable “control point” that can be copied and pasted within an image. For example, to lighten up part of an image, you can place a control point on part of an image, adjust it to your liking, then hold down on it to get a popover that offers a copy option. Then, tap anywhere else on the image and choose Paste from the popover to put a copy of that point, along with its settings, at that location.
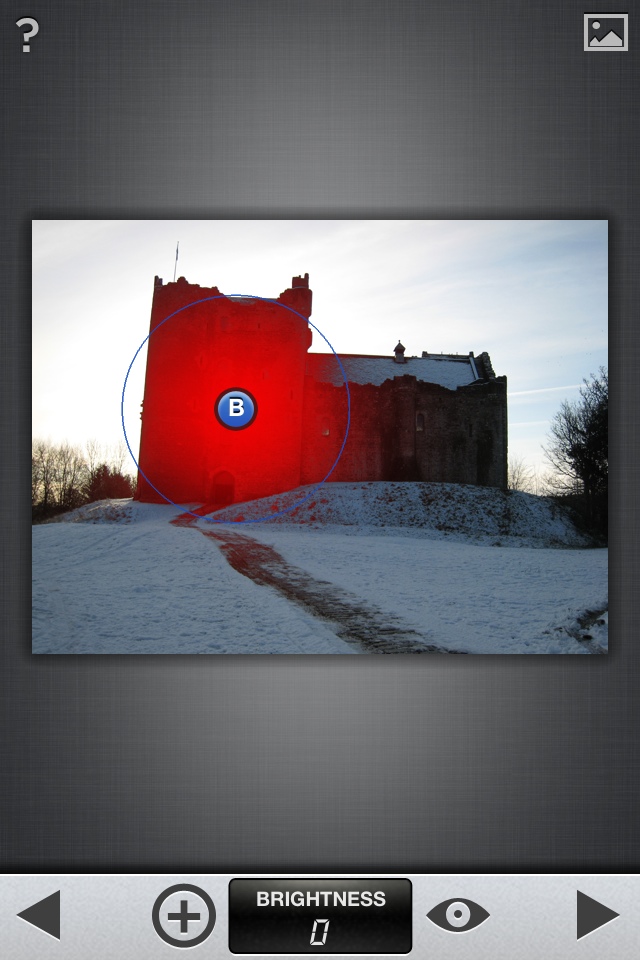
The range of the control point’s effect is adjusted by tapping the point to select it and then pinching to adjust its range. In most cases the control points are smart enough to limit their effects only to those parts of the image that resemble the area upon which the point is placed. For example, a control point can brighten up the backlit portion of an image without affecting the nearby brightly lit background: as you pinch, a red overlay indicates what parts of the image will, and won’t, be affected.
The interface techniques that the Snapseed developers have implemented are clever variations and expansions of the basic iOS gestural interface. They provide easy discoverability without imposing clutter, and are consistent enough among the various tool groups in the app to seem natural and obvious after very little time using them.
Like the early days of the Mac OS, iOS is seeing a creative period of interface exploration and expansion, led by third-party developers. Not all of those experiments will survive and be adopted by others, of course. But the interface designers at Nik Software have come up with a few that look like keepers.
Calepin: Simple, Minimalist Blogging with a Twist
Occasionally, I want to write a short essay and share it with people. Blogs make this easy, but for the kind of essays that I write, full-featured blogging platforms like Blogger and WordPress are overkill. I’m not looking for a serious Web presence; I just want to post the infrequent essay without configuring software or fiddling with themes.
Besides, I have a fear of losing my data; storing (the only copy of) my deathless prose on someone else’s server, only a sysadmin’s mistake away from oblivion, is not my idea of how to go about things.
Enter Calepin.co — a clever blending of two existing technologies: Markdown and Dropbox. Markdown is a simple formatting language that makes it easy to specify markup using an easy-to-read, easy-to-write format that can be turned into HTML by Markdown-savvy parsers. Dropbox is a Web service that enables you to share a folder on your hard disk with others over the Internet (see “Dropbox: A Collaborator’s Dream,” 3 February 2009). Combine them, and you have a recipe for simple blogging.
The idea behind Calepin is simple — you write posts as straight text files in the Markdown language, and save them in a special folder in your Dropbox folder. All your files stay on your local machine; they can be indexed with Spotlight and backed up just like any other files, using Time Machine, CrashPlan, or any other backup regime that you want.
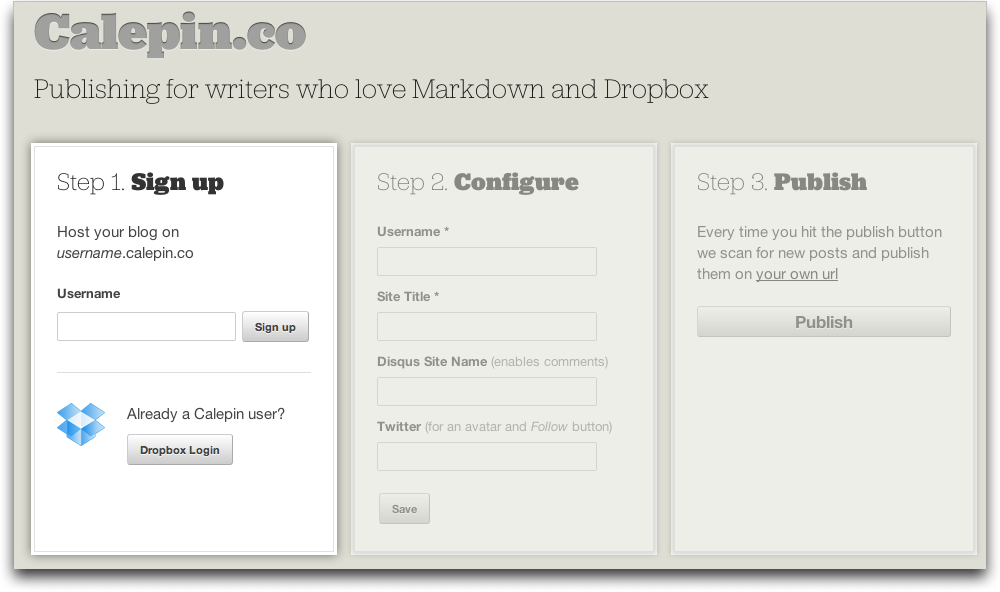
The first step to getting started with Calepin is to sign up on the Calepin Web site; you specify your desired username (which becomes part of the URL to your blog) and set a site title. If you want to enable comments, you can enter your Disqus site name, and if you want to show an avatar and have a Follow button, you can enter your Twitter username. Calepin asks for permission to connect to your Dropbox account, and once that’s granted, it creates the special Dropbox/Apps/Calepin folder for your blog posts (Calepin has access only to this folder, so you don’t have to worry about exposing other folders).
Once you have created your post in Markdown and saved it to your local Calepin folder, you visit the Calepin Web site and click the Publish button. Calepin reads the contents of your Calepin folder, determines if any of the text files in the folder are new (or have changed), converts the Markdown into HTML, creates a post for each file, and updates the top-level list of your posts.
Since Markdown files are just plain text, you can use whatever text editor you prefer to create them. I prefer BBEdit, because it doesn’t suck, and because it can preview Markdown files — so I can see what my posts will look like. But there’s no reason you have to use BBEdit, or even limit yourself to a single tool. You could start a post in BBEdit at work, head for home, and use a Markdown- and Dropbox-savvy editor like Elements on your iPhone or iPad to continue working while commuting. Since your posts are stored in Dropbox, they’ll be waiting for you wherever you have Dropbox
installed.
Adding an image or a video to your Calepin post is easy. You just insert a reference to the image, and Calepin generates the HTML necessary to reference it. Calepin does not host your images, instead relying once again on Dropbox. This means that you have to put the images in your Dropbox Public folder, and embed the “public link” (Control-click the file and choose Copy Public Link from the contextual menu). Fortunately, the Calepin Guide makes it clear how to do this, in the section “Adding a Photo to Posts.” You can put an Images folder in Dropbox/Public and store all the images in there, to keep them separate from other public
files.
Calepin’s visual display of blog posts is spartan; they have a single style for all posts, which you can see here. There are no plans to add themes either; their policy is: “Think of it like submitting a short story to a newspaper: the writer’s identity isn’t portrayed through a look and feel — it’s portrayed through their words.”
Calepin provides free hosting, and their copyright policy is delightfully blunt:
“You retain copyright to everything you post with Calepin, and always will. We won’t reuse it, sell it, or try to take your rights away from you. And if we want to use anything you’ve created in our publicity materials, we’ll ask your permission before we do it.”
Calepin is certainly not for everyone. People who like WYSIWYG editing will not be happy, those who want fancy blog themes will be disappointed, and bloggers who want precise control over how their posts appear should look elsewhere — Markdown is a simple language, designed to make it easy to write primarily text articles with some structure. But for those who want to use text-based tools to create blog posts that are displayed in a simple layout, Calepin is a free, easy way to get your feet wet in the blogging world.
How I Dared to Try iTunes Match and Actually Enjoyed It
After the initial public unveiling of iTunes Match (see Adam Engst’s “iTunes 10.5.1 Unveils iTunes Match,” 14 November 2011), I went through the six stages of denial: I was confused about what it was, I was certain it was something I’d never want to try, and so on. My main objection was that it looked to me as if a lot of stuff was going to happen automatically, and I found that scary. Whatever iTunes Match is, it has something to do with my music, and I’ve spent years collecting and tagging that music; I don’t want anything bad to happen to it. I like to be in control. So I decided to ignore iTunes Match.
Then, after a while, I got over it and started doing my homework. In particular, I read a really splendid article over at Macworld. At first, I didn’t understand it. Then I read it again. And again. And after a while I started to get the idea.
What I chiefly understood was this: The main benefit of iTunes Match is, exactly as Adam had said in his article, that it “enables you to store [your music] in the cloud and then play it from any of your computers or iOS devices.” So I could keep, say, 50 GB of music in the cloud, and listen to it on a 16 GB iPhone, even though there isn’t room for it all on the iPhone. In fact, there hardly has to be room for any of it on the iPhone; it’s in the cloud. That is something I did want to be able to do. At the very least, I wanted to try it.
But I wanted to try it gradually. I certainly wasn’t going to approach iTunes Match with my entire music library and say, “Here, iTunes Match, stick this in the cloud.” For one thing, I have 200 GB of music and a rather lame, slow-on-the-uptake DSL connection. For another, there’s a 25,000-track limit, and my library goes way over that. Finally, I didn’t want to hand iTunes Match my real music, because I didn’t want it to come to any accidental harm.
So I started out with a simple goal: get the complete works of Mozart into the cloud, safely, as an experiment. Here are the steps that I followed.
Copy the Music — Everything starts on my computer, with iTunes. What’s going to be important here are the music files. I didn’t want to hand my normal music files to iTunes Match; I wanted to hand it copies.
So, in the Finder, on the Desktop, I created a folder called Mozart. In iTunes, I opened the playlist containing all my Mozart, selected all the tracks, and dragged them from iTunes to the Mozart folder on the Desktop. The result is that all my Mozart tracks were copied to the Mozart folder. Those are the copies I wanted to hand over to iTunes Match.
Make a Separate Library — It’s a little-known but crucial fact that you can have more than one iTunes library — they just can’t both be active at the same time. If you launch iTunes while holding down the Option key, it asks what folder contains your iTunes library, along with an offer to make you a whole new iTunes library folder. So I did that. I had iTunes make a new library in a new folder called iTunes Match, in my Music folder, right next to my normal iTunes library folder, which is called simply iTunes.
At this point I was running iTunes and it had no music at all — because the iTunes Match library was totally new. The new library folder contains all the various files and folders that make up a complete iTunes library, plus it has its own preferences. So, in the Advanced preferences, I turned off the option that says “Copy files to iTunes Media folder.” My goal was to show iTunes some music, and have it put that music in the cloud, but no more; I didn’t want it to keep an additional copy of my music.
Make Some Temporary Music Storage — In the Finder, I created a new folder in my Music folder called Music Temporary. Into Music Temporary, I dragged the Mozart folder that I’d previously created on the Desktop. From there, I dragged the Mozart folder into the sidebar in iTunes.
The result was that the new iTunes library, iTunes Match, now knew about my Mozart tracks and nothing else. And what it knew about was a copy, living in a specific location (the Mozart folder in Music Temporary). That was going to be crucial later on, as you’ll see.
Turn On iTunes Match — Still working in the iTunes Match library, I signed up for iTunes Match. That’s very easy: you click the iTunes Match listing in the sidebar under Store and tell it your Apple ID and password. Instantly it sucks the money ($25) right out of your iTunes account, and voilà: iTunes Match is running.
(I also later discovered that I had received a nice email informing me about the money being sucked out of the account.)
Go To Bed, Twice — The exact details of this step are optional, but you’re going to want to do something time-consuming at this point, because iTunes is now going to analyze your music and start uploading it to the cloud. I reckoned that, given the size of my Mozart collection and the narrowness of my upload bandwidth, this could easily take all night, so I went to bed. In the morning I discovered that I was perfectly right: in fact, iTunes hadn’t even half-finished uploading my Mozart.
Since I needed my Internet connection not to be bogged down with uploading music during the day, I quit iTunes. Then, that night, before going to bed, I launched iTunes again and chose Store > Update iTunes Match. iTunes picked up where it had left off previously, and continued uploading my Mozart for a second night.
Be Amazed on an iOS Device — The next morning I woke up feeling as if it were Christmas. Okay, that’s because it really was Christmas. But I also had found that iTunes was finished uploading my Mozart. I was ready to discover What Hath iTunes Match Wrought.
With trembling fingers I picked up my iPhone and launched the Settings app. Under Music are two switches: iTunes Match and Show All Music. I set them both to ON. iTunes threatened to delete all my existing music on the device, but I just laughed fiendishly, since that was all part of my cunning plan. I had already signed up for iCloud on this device, using the same Apple ID I had used to sign up for iTunes Match on my Mac. So my iPhone should now magically see all that Mozart. Would it?
(I think that right around this moment the iPhone asked me for the password that goes with my Apple ID — I’m sorry I can’t remember exactly when that was. Anyway, I entered it when asked.)
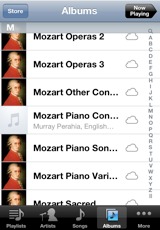
I quit Settings and launched the Music app, and switched to Albums. I could see from the activity indicator in the status bar that the Music app was communicating across the Internet. I waited, and after a while… there it all was! My Mozart tracks are carefully tagged and organized into albums; well, there were all those albums, apparently sitting in my Music app — except that each album had a little cloud icon in its listing. I tapped an album and there were the tracks; and each of them had a little cloud icon as well. Then I tapped a song, and, after a heart-stopping pause, it started to play.

What’s more, it kept on playing. I had started in an album, so the Music app did what it always does when you play a song in an album: it went seamlessly on to the next track in the album.
The really amazing part is that this also works with apps that were written before iTunes Match came along, and that know nothing of its existence. Take, for example, my own Albumen app. Its purpose is to overcome the truncation limitations of Apple’s Music app interface, by showing me the full titles of all my albums, and the full titles and artists of all their tracks — as well as letting me play and pause a track. Well, incredibly, after I’d run the Music app once to update the device’s library, Albumen then showed me all my Mozart albums and tracks, even though none of them were actually present on the device; and if I tapped a track, it started to play.


The only thing Albumen gets wrong is this: Behind the scenes, the way all this cloud-based playing works on an iOS device is that when you start playing a track from an album, iTunes starts downloading that track (so it can play it) and the next track (so it can segue seamlessly into it when it reaches the end of the current
track). Those two tracks, the current and subsequent track, are always missing from Albumen’s display. I presume that eventually Apple will provide new ways for app developers to have their apps survey the Music library so as to take account of this new cloud-based behavior.
Throw Away the Music — My Mozart was now in the cloud. That was where I wanted it. So I no longer needed that special copy of all my Mozart songs that I had made merely for the purpose of handing them to iTunes Match.
So now I did something very bold. I returned to iTunes on my computer, which was still sitting there displaying my special iTunes Match library consisting of all my Mozart. I selected all that Mozart and pressed Option-Delete to remove it from my iTunes Match library! iTunes presented a confirmation dialog containing a checkbox asking me whether I also wanted to remove those tracks from the cloud. But of course that was exactly what I did not want to do, so I didn’t check that checkbox.
My iTunes Match library in iTunes was now empty once again. But those Mozart copies were still sitting in the Mozart folder in Music Temporary, taking up a lot of space. So now I threw caution to the winds and put that Mozart folder into the Trash, and emptied the Trash. (Remember, even they were duplicates of my real music files, which are backed up every which way from Tuesday.)
Meanwhile, back in my special iTunes Match library, I got another surprise, and a very pleasant one at that. The Mozart tracks that I had just deleted were all still listed here under Music — marked with a cloud icon, just like the tracks on the iPhone! And there they remained, reminding me that these tracks, though no longer present on my computer (as far as this iTunes library knows), are stored in the cloud; indeed, if I wanted to, I could actually play them from the cloud, or even, by clicking that cloud icon, download them back to my computer.
Finally, I quit iTunes, started it up with the Option key held down, and told it to open my normal iTunes library once again.
I had done it! Everything on my computer was exactly as it was before. iTunes looked the same as before; and remember, this iTunes library knew nothing of iTunes Match. The amount of space on my hard disk was not reduced; I had made copies of all the Mozart, but then I had deleted those copies. But my Mozart was now in the cloud, and I could play it from any iOS device, or even from some other Mac.
Lather, Rinse, Repeat — Over the next few days I followed the same steps all over again, except that now I didn’t need to make a new iTunes Match-aware library (I already had one) and I didn’t need to sign up for iTunes Match again (I’m good for a year). I quit iTunes and launched it again with Option held down, and opened my special iTunes Match library. I handed it a copy of some other composer’s music. I chose Store > Update iTunes Match. I went to bed.
The result is that all my Beethoven, Mozart, Brahms, and Dvorak are now in the cloud. On future evenings, I’ll probably be uploading the works of a few more of my favorite composers.
Music Management on the Device — Okay, now here’s a problem. Apple’s interface for managing music on an iOS device, when that music is cloud-based music, is not very good. Each time you play a track, it is not only streamed but downloaded and stored on the device. (That’s different from what happens on a Mac, where you can just stream from the cloud to listen.) This is exactly what we were trying not to do: gradually, as you listen to music from the cloud, the iPhone is filling up with actual tracks for which there isn’t enough room.
What you’d like to do, from time to time, is to delete from the iPhone the tracks that are actually present on it. That’s not easy because Apple hasn’t provided a good way of locating them. Here’s my admittedly somewhat awkward solution: Go back to Settings, and under Music, turn off iTunes Match. Now open the Music app again. Under Songs, only tracks that are physically present on the device are displayed. Swipe to delete each of them. The track remains, but it is then marked with a cloud icon, indicating that it isn’t really on the device. Finally, in the Settings app, turn iTunes Match back on.
Dude, Where’s the Matching? — You may have noticed that I’ve said nothing about the “match” in iTunes Match. The idea is that instead of uploading all your music to the cloud, for some of your tracks, at least, Apple may be able to supply a copy of the very same tracks from its own vast music holdings, thus saving you some time and bandwidth.
That aspect of iTunes Match doesn’t interest me very much, however. Some people may be happy that those matched copies are 256 Kbps AAC, which may be better than the quality of the copy on your computer; but my music is already ripped at that bit rate (I can hear the difference when it’s compressed further).
Also, my music is not the kind that Apple generally keeps a copy of. Of about 5500 tracks that I’ve handed over to iTunes Match so far, only about 3500 were matched automatically; the other 2000 had to be uploaded over a series of several nights. I’m not saying that’s insignificant; after all, it’s better than half, which makes the difference between, say, three nights of uploading and six nights of uploading. But in general I wasn’t expecting to be terribly impressed with this aspect of the procedure, and sure enough, I’m not. Your mileage, as they used to say, may vary.
What I am impressed by is, as I’ve already said, the virtual presence of all that music on my iOS devices that in reality are too small to hold it. The seamless display of the cloud-based material exactly as if it were sitting on the device is an utterly successful illusion. I can hardly wait to whip out my iPhone during a discussion of some musical phrase and say, “You know the piece I’m talking about, it goes like this! What? You don’t carry the complete works of Beethoven, Brahms, and Mozart wherever you go?” I’m already practicing a withering look of pity mixed with contempt. Of course, if my interlocutor is a Spotify Premium subscriber, or has iTunes Match as well, that look may have to go unused.
ExtraBITS for 9 January 2012
We have lots of great additional reading for you this week, with an in-depth article from James Fallows about what it was like to have his wife’s Gmail account hijacked, Amazon’s “Best of 2011” lists, a Web site that relives the startup sequences of vintage computers, and the EFF’s guide to defending your privacy at the U.S. border, plus Adam’s podcast appearance on the Tech Night Owl Live.
What It’s Like to Experience Email Account Hijacking — In the November issue of The Atlantic, James Fallows shares the story of how his wife’s Gmail account was hijacked and what they went through to recover years of stored messages. It’s a compelling tale that will hopefully bring home the need for secure passwords and offline backups of cloud-based data.
Amazon’s Best of 2011 Lists — It’s always interesting to calibrate one’s view of the world against the aggregate behavior of others, and Amazon’s recently released “Best of 2011” lists offer just this sort of insight. They compile Amazon’s best-selling, most wished for, most gifted, and most positively reviewed products of 2011, and it’s particularly fascinating to see which products appear multiple times. No Apple products make the cut, unless you count Walter Isaacson’s “Steve Jobs” biography.
Relive Vintage Startup Sequences with The Restart Page — Do you long for the days when your Mac would start with a smiling Mac logo and a row of INITs along the bottom of the screen? Or perhaps you miss watching a NeXT machine perform its initial memory scan? Pine no more for the past, because The Restart Page will transport you there. Choose from 17 Restart dialogs belonging to vintage versions of the Mac OS, Windows, NeXT’s OPENSTEP, ProDOS (on the Apple IIgs), a developer build of Rhapsody, and others. Some sequences even include the old startup chimes.
Adam Discusses SOPA and Santa on the Tech Night Owl — In his latest Tech Night Owl podcast appearance, Adam and host Gene Steinberg ended up discussing how to be a Freecycle Santa, issues surrounding the Stop Online Piracy Act, the continuing story of Quicken, and some of the top 10 TidBITS stories of 2011.
EFF Guide to Defending Privacy at the U.S. Border — When you cross the U.S. border, government officials can confiscate your electronic devices, search them, and keep them for a while for additional scrutiny, even when there’s no suspicion of wrongdoing. If you travel out of or into the United States, do yourself a favor and read the EFF’s comprehensive guide to what can happen, and what you can do about it.