TidBITS#1045/20-Sep-2010
Practicality reigns in this issue, with an article from Sharon Zardetto about how to use Keyboard Viewer to access special characters and Matt Neuburg’s review of Fake, a Web browser that can be used in an Automator-like fashion to automate actions on a Web page. Also, Adam examines EPUBReader, a Firefox add-on that makes it easy to take a quick look at an EPUB file, and Glenn Fleishman shares details about a pair of iPad apps that take RSS feed reading to a new graphical level. Finally, we have a new Take Control ebook for you: Kirk McElhearn’s “Take Control of iTunes 10: The FAQ.” Notable software releases this week include Dialectic 1.7, Transmit 4.1.1, MarsEdit 3.1, Savescreenie 2.0, and 1Password 3.4.1.
“Take Control of iTunes 10: The FAQ” Answers 100 iTunes Questions
We’re excited to announce a completely new Take Control ebook – “Take Control of iTunes 10: The FAQ.” Written by iTunes expert and music enthusiast Kirk McElhearn, the 146-page, $10 ebook is up-to-date and bursting with answers to all your iTunes questions. Along with authoring a number of Take Control titles and other books, Kirk has written for TidBITS and is a Senior Contributor to Macworld, with numerous submissions to their Playlist column.
Beyond the broad goal of transforming you into an iTunes power user, Kirk’s intent with this ebook is to help you appreciate and understand the process of adding media to iTunes, tagging it, adding album artwork, and organizing it into playlists. With that setup completed, you can enjoy your music, movies, audiobooks, ebooks, and more without hassles when it’s time to find a particular item or you want to do something special like sync a select subset of music to your iPod, create a party playlist, identify music you haven’t heard in a while, or listen to the chapters in an audiobook in the proper order. If your iTunes library is anything like mine, it’s a mess, which makes using iTunes all the harder. But it doesn’t have to be that
way, and with Kirk’s advice, you can regain control over your media in iTunes.
Speaking of media, if you’re a current or future iPad owner, you can also buy Kirk’s ebook in a 25-percent-off bundle with Jeff Carlson’s “Take Control of Media on Your iPad.” The two ebooks would normally cost $20, but bundled together, they’re only $15.
To sweeten the deal, the ebook ends with a pair of coupons. You’ll save $5 on Equinux’s SongGenie tool for automatically filling in missing album artwork, fixing incorrect song titles, adding lyrics, and identifying unknown songs. And if you have an AirPort Express base station, you can save $3 on Rogue Amoeba’s Airfoil software for playing audio wirelessly from any source, such as the Pandora Web site running in Safari.

Feeds into Reads: Transforming RSS into Beauty
Newsreader software takes RSS feeds and presents the latest news articles, blog posts, and other items in a newest-first list layout. But many people I know either have never cared for the email-like organization scheme of RSS readers, or never got into RSS at all because they prefer to see a Web page. (And then there’s Adam Engst, our fearless leader, who finds the vastness of innumerable headlines that he feels he should read overwhelming and thus avoids newsreaders entirely.)
Newsreader naysayers take heart, however. The iPad is bringing a new approach to feed reading that may transform our relationship with the myriad updates we get. It could win some converts.
Two programs in particular are promising, and I expect if they perform well in the App Store marketplace, we’ll see many more alternatives for the iPad and its smaller brethren, as well as osmosis from the iOS side back into Mac OS X.
Times for iPad and Flipboard take streams of updates and create newspaper and magazine layouts automatically. This approach works better than it may sound at first. Automatic layout seems like an iffy proposition, but both programs produce interesting results.
All the RSS That’s Fit to Print — The $7.99 Times for iPad from Acrylic Software comes populated with science, technology, arts and entertainment, and sports tabs. Each tab reveals a view of multi-column news briefs. You can set the display of each column, make it wider or narrower, and add your own RSS feeds. (There doesn’t appear to be a way to rearrange feeds from top to bottom in the current version, unfortunately; you have to delete and re-enter them in the order you want.)

You can also set how many articles are displayed. Each view’s pages can extend further to the right, too, to add more columns.
Tap an item, and it opens the RSS preview, with any associated images or media. In landscape view – but not portrait view, oddly – buttons appear to open the item in Safari, add the item to a global shelf of articles in the app (a kind of news clipping area), and share the item via email, Twitter, and Facebook.

The makers of Times for iPad already plan a Mac OS X version.
Flip-Flying Away — The free Flipboard is far more limited in what you can add, but it’s also more beautiful and varied in its presentation – it’s more magazine than newspaper. It comes preset with several feeds. You can have up to 9 source feeds, shown in a grid of squares, on the first page and 12 on subsequent pages.

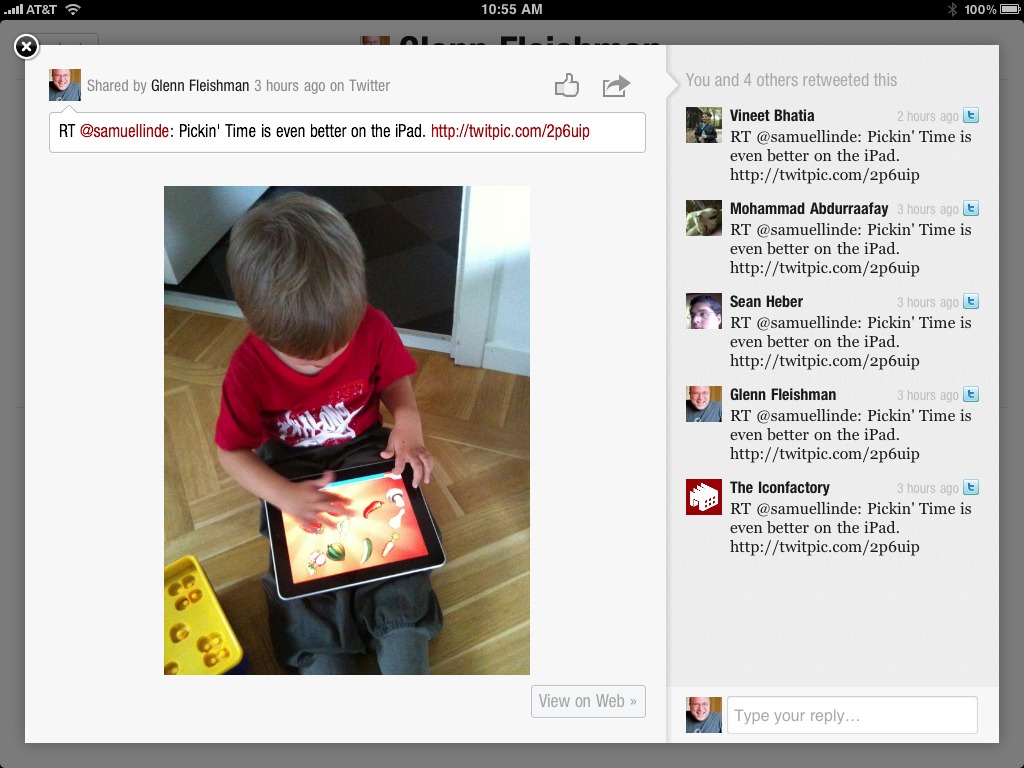
When you launch the program, it shows an image at full-screen size like a cover. Swipe from the right edge to the left, and the contents page opens up with the nine squares. Any source can be changed, but at the moment, you can choose only among feeds provided by Flipboard Inc., or you can add Twitter lists or individuals.
When you tap a source’s square, Flipboard opens a page that includes teaser text of linked items, along with images. For Twitter, that’s rather remarkable, because any item someone links in a 140-character-or-less tweet is turned into the full item itself.

Tap the item, and it opens up into its own page, and shows any other references to the destination or tweet in a sidebar as commentary. You can also tap a Read on Web button to view the full article in its original Web context (that’s how Flipboard avoids displeasing news sources).
Articles and items can be shared via email and Twitter, and you can mark a tweet as a favorite within the item view.
Both apps have opened my eyes about the way in which streams of information can be dealt with graphically. Although I follow hundreds of feeds in my RSS reader, I find myself using it less and less, because the sheer volume, even when I scan and mark as read, is overwhelming. (I can hear Adam chortling even as I type this.)
By giving me a varied look and showing me items in some context, rather than in isolation, I find reading RSS feeds in these apps much easier on both my eyes and my brain. In the end, I’m reading again, instead of scanning.
EPUBReader Displays EPUBs in Firefox
With Apple’s release of the iBooks app and the iBookstore, EPUB-formatted ebooks have become increasingly prevalent. Surprisingly, though, there aren’t many good ways to read an EPUB other than iBooks, especially if all you want is a quick look on your Mac.
O’Reilly Labs hosts Threepress’s online Bookworm service, but it requires uploading a book and storing it online, which may be more effort than you want to expend, and the same is true of Ibis Reader, written by some of the same people. There’s also a cross-platform, open-source application called Calibre that can convert and display EPUBs, but it’s clunky and awkward to use. And there’s a version of Stanza for the Mac, but unlike the Stanza iOS app, the Mac version strips all formatting and graphics from an EPUB, rendering some titles unreadable. Lastly, there’s Adobe Digital Editions, an Adobe AIR-based application that’s designed in part to help deal with DRM-protected ebook files across multiple machines; it’s not terrible, but I’m not a big fan.
So I was happy to run across EPUBReader, a free add-on for the Firefox Web browser (whether running on the Mac, Windows, or Linux). Although most Firefox add-ons modify the Web experience in some way, EPUBReader simply takes advantage of Firefox’s rendering engine to provide a custom display of an EPUB’s contents within a Firefox window or tab. (Remember, EPUB files are XHTML and CSS inside a Zip archive.)
To install EPUBReader in Firefox, click the Add to Firefox button on the EPUBReader home page; you’ll have to restart Firefox to complete the installation.
EPUBReader tweaks Firefox’s settings so clicking a .epub file on a Web page downloads it, processes it, and displays it. You can also drop a local EPUB file on Firefox’s window, or double-click one, if you change the Open With application for .epub to Firefox in an EPUB’s Get Info window in the Finder.
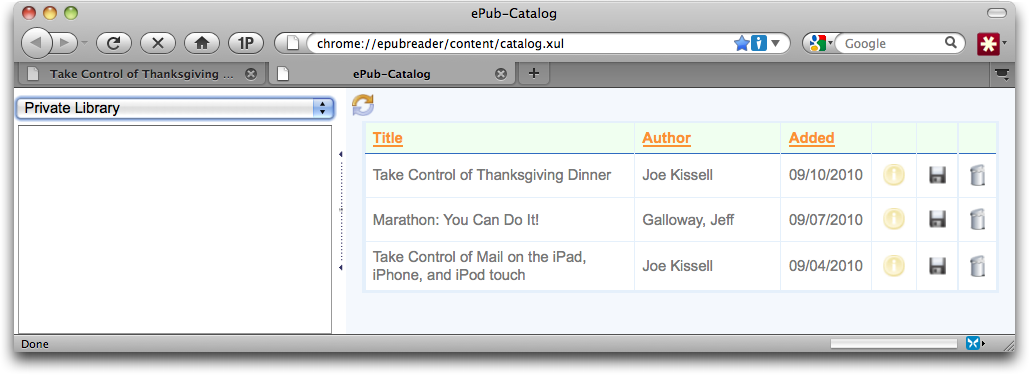
Unlike downloaded PDF files that you view in a Web browser and then “lose” once you close the tab containing the file, EPUBs downloaded or displayed by EPUBReader are kept in local storage called ePub-Catalog, which you can access from Firefox’s Tools menu, the Bookmarks menu (at the bottom of the list), or via a button at the bottom of any EPUB you’re reading. Even better, the ePub-Catalog window has a pop-up menu listing a few sites from which you can download additional EPUB-formatted titles.

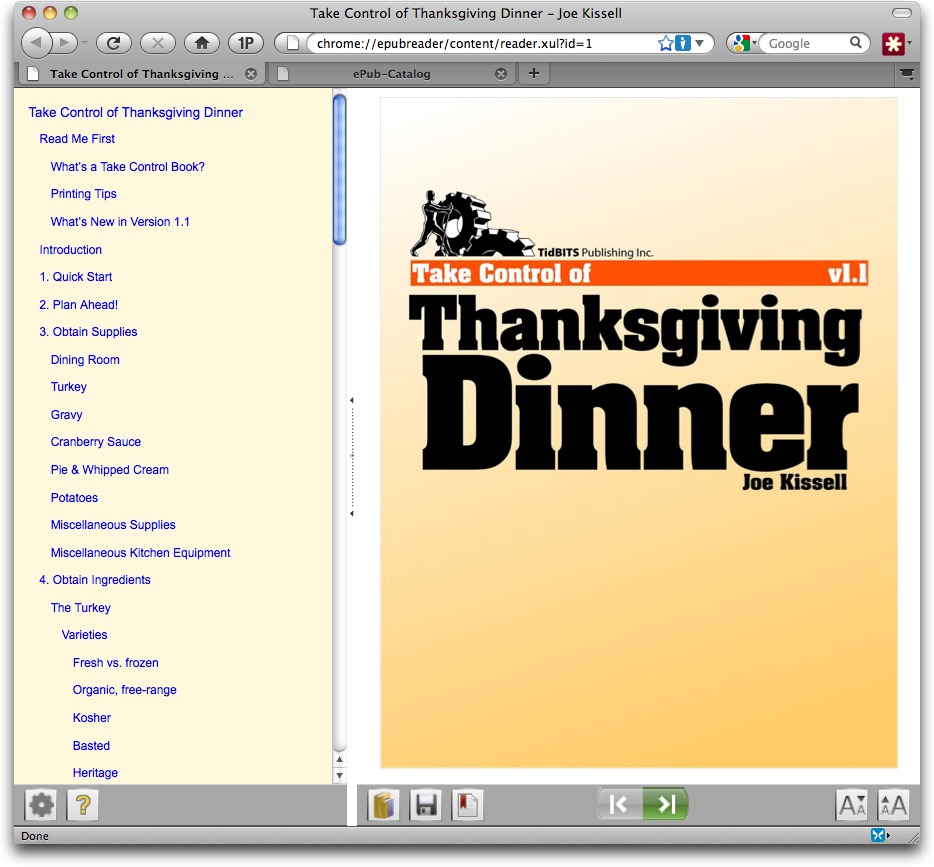
Once you have an EPUB open within EPUBReader, the mechanics of reading it are nicely obvious. The table of contents appears in a resizable pane on the left side of the window and the actual book appears in the right side. Clicking an item in the table of contents displays the associated content on the
right, and if there are navigation links within the content, clicking them moves you around in the text as well.
Most EPUBs will have their own formatting, specified by internal CSS files, but if you prefer, you can modify a number of display options in EPUBReader’s preferences. In the table of contents, you can set the background and link colors, along with font and font size. The same background color and font options are available for the content, along with margin width and minimum column width. And if you just want to change the font size, a pair of buttons are available for increasing and decreasing size. (Oddly, Firefox’s Zoom
In command also works for increasing the size of all the text – table of contents and the actual book text. But the Zoom Out command works only on the book content pane unless you first click in the table of contents pane.)
Other buttons let you access the ePub-Catalog window, save the file to a separate location on your hard disk, and set a bookmark (although I couldn’t figure out how the bookmark feature worked). Finally, a pair of big green buttons lets you jump to the previous and next chapters. All of these commands are also available as keyboard shortcuts (Control-click the toolbar to access a menu that lets you display the keyboard shortcuts; you can also hide the toolbar entirely this way).
There’s no question that EPUBReader’s interface elements are ugly – no Macintosh developer would be caught dead using such awful buttons – but for normal usage, EPUBReader gets out of the way and just displays an EPUB with a clickable table of contents. And whether I’m checking the EPUB version of one of our Take Control ebooks or taking a quick look at something I’ve found online or been sent, a quick click or drag to Firefox is all that’s necessary to load the EPUB in EPUBReader.
Fake Scriptable Web Browser Is the Real Deal
It isn’t often these days that a new application makes me slap myself on the side of the head and say, “Wow! Why didn’t someone think of this sooner?” But that was my reaction when I heard about Fake, a new Web browser from Todd Ditchendorf. And after I’d recovered from stunning myself, I said, “Wow! I can’t believe someone implemented this so brilliantly!”
Before you run for cover, wondering why anyone would need yet another Web browser, hear me out. Fake isn’t just any Web browser, and it isn’t really intended to replace your current browser. It has a special purpose, and you might use it only for that purpose. But when you need it, there’s nothing else like it.
Fake is a programmable Web browser. Its goal is to make it easy for you to write a script that can drive the Web browser itself, and that can be run against the currently displayed Web page, operating on its interface. There are other ways to write such a script; for example, you could code it in JavaScript. And there are other ways to run such a script against a Web page, more or less automatically; for example, that’s what Greasemonkey does in Firefox. But remember, I said “easy.” Exploring a Web page’s HTML to work out how to access an element within it through JavaScript, and then writing and maintaining the JavaScript code to
do that, hardly counts as easy. Fake lets you assemble your script with a point-and-click interface.
Fake’s interface is deliberately reminiscent of Apple’s own Automator (see “Meet Automator,” 2 May 2005), where you assemble prefabricated but configurable “actions” into a “workflow,” usually as a substitute for writing code in AppleScript. But Fake goes Automator one better; Apple never did give Automator any decent programmatic logic, such as loops and conditions and error handling, whereas Fake’s actions include these. Basic actions include clicking a link or other element, setting values of an element or form, and submitting a form; you can also control the browser more generally, going to a given URL, opening and closing browser tabs, and so forth. Programmers can also build
snippets of JavaScript, AppleScript, or Unix shell script into a workflow.
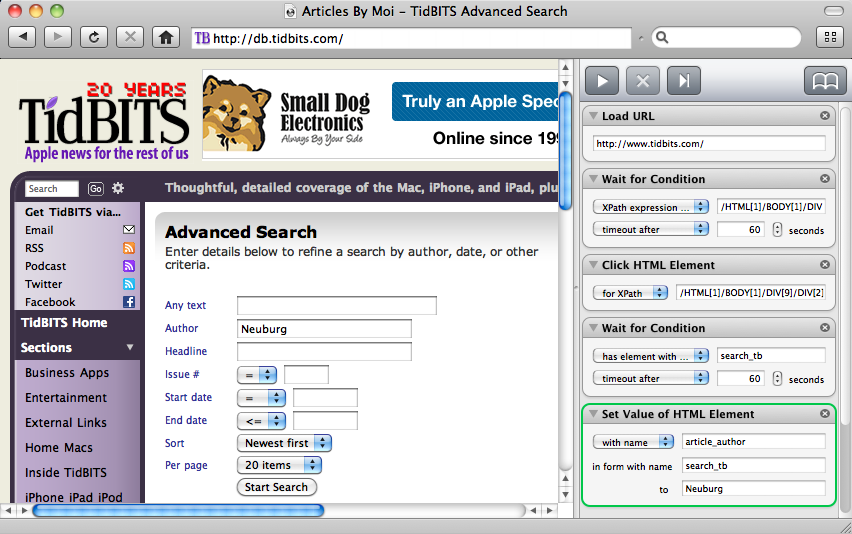
Here’s an example of how easy it is to construct a basic workflow. I often want to search TidBITS for past articles I’ve written. I want these to be articles where I’m an author, not articles where I’m mentioned in some other way. We have an Advanced Search page with an Author field I can fill out; to get there, I must click the little gear symbol next to the search field at the upper left of our main page. Now I’ll construct a workflow to go to the Advanced Search page and put “Neuburg” in the Author field.
I start with a Load URL action, pasting in our home page URL: http://www.tidbits.com/. Now I add a Click HTML Element action. This has a field where I can put in an identifier for the little gear icon. But which element is the little gear icon? I don’t need to know the answer; I just Control-drag from the action to the gear icon itself, and an expression identifying it appears in that field. Finally, I add a Set Value of HTML Element action; once again I Control-drag, this time to the Author field, to set the first field of that action, and then I type “Neuburg” into the second field of that action.
So far, all I’ve done is drag some actions into my workflow, configure them by Control-dragging right to the elements I want to operate on, and type my name once. Not too difficult! However, I also need to provide a way of waiting until each desired page has loaded the element I’m going to operate on. No problem; I intersperse two Wait For Condition actions between the three actions I already have, copying and pasting from my existing actions the information about the element that needs to exist before proceeding. My workflow is finished!
Finally, I save my workflow as a file called “Articles By Moi.” Presto, I now have a double-clickable file that goes to the advanced search page and fills in my name in the Author section, ready for me to enter additional information to search on and then perform the search. And the amazing part is that I wrote it in just a few moments, with no need to consult any manuals or learn any programming languages.
Of course, if you do know some programming languages, you can incorporate your knowledge into a workflow. Here’s an example that extracts the date of publication from a TidBITS article. All of our article Web pages (such as this one) start with a little header giving the article category followed by its date (followed by some further information). To get that header into Fake, I start with a Set Variable action and (you guessed it) Control-drag from the action to that header. I also assign the action a variable name; let’s
call it “meta_article”. So now when I run that workflow, I end up with a variable “meta_article” whose content is something like this:
Blog Post | 04 Aug 2010 | Listen | Print | Comment (27)
Now I want to extract the “04 Aug 2010” part. It turns out that JavaScript can see Fake’s variables, and since JavaScript has regular expressions, it can easily extract that bit. So my second action in this workflow is a Do JavaScript action. It extracts the date from the “meta_article” variable, and returns it as the “date” variable:
var meta = window.fake.get(“meta_article”);
var res = meta.match(/\| (.*?) \|/);
window.fake.set(“date”, res[1]);
Finally, I want to move that information to the clipboard. I can do that with a simple Unix shell script, so my next action is a Run Unix Script action. Unix shell scripts can see Fake variables too, in a different way:
#!/bin/sh
echo ${date} | pbcopy
Now the date from that article is sitting on the clipboard, ready for me to paste into whatever article I’m writing. Okay, big deal, I hear you thinking: I could have just selected it and copied it. But that example can be worked into a larger workflow that copies the title and date of an article and assembles it into one of our standard references, like the one referring to my Automator article above.
Fake comes with lots of other cool features. It takes advantage of Apple’s WebKit to provide element-level analysis of a Web page; select a bit of a Web page and choose Window > Web Inspector to see the same pane you see in Safari by choosing Develop > Show Web Inspector (or choose Inspect Element from the contextual menu). It enables scripts to be run, and stylesheets to be applied, against a Web page after it loads (like Greasemonkey). And it is itself scriptable, so instead of writing a workflow, you could drive Fake, using AppleScript or the equivalent, to perform a series of actions that you’re defining in real time.
I imagine that Fake would be a heaven-sent boon to developers who need to automate interactions with a Web browser (for example, to test a Web application, such as the Take Control ordering process). But it’s so insanely easy to use – at its most basic, just drag an action into a workflow, and drag from that action to the thing on the Web page that it operates on – that I’d think it would help anyone who does any kind of repetitive browser activity where Safari’s auto-filling of forms doesn’t cut it. If you think Fake wouldn’t be any use to you, reread the examples above and think again about your own browser life. I bet there’s some Web form or repeated sequence of Web pages where
Fake could condense many mouse-clicks into one for you.
As I’ve already said, I think Fake is a brilliant idea, brilliantly implemented. It’s the culmination of years of work by its developer, who has generously given away many tools resulting from his labors along the way (such as the other specialized browsers Fluid and Cruz, plus much of the code on which they depend), and is responsive, active, and extremely patient and helpful on a Google group devoted to Fake. Fake costs a very reasonable $29.95, with a feature-limited trial version (notably, it can’t save workflows) available as a 4.9 MB download, and it requires Mac OS X 10.5 or later. I recommend it.
Use Keyboard Viewer to Type Special Characters
Character entry? Isn’t that what we used to call “typing”? Yes, but how can you type characters that aren’t printed on your keyboard, or aren’t available at all through any key combination? There is of course the venerable PopChar X from Ergonis if you need to insert special characters frequently, but what if you need just the occasional copyright symbol, checkmark, cents sign, or does-not-equal symbol?
It turns out that Apple provides some useful character discovery and entry tools, and in this excerpt from “Take Control of Fonts in Snow Leopard,” I’ll share what you need to know about one of them: Keyboard Viewer.
If you’re interested in Mac OS X’s font handling in general, I hope you’ll take a look at the book, which has 225 pages of details on font history and architecture; how fonts work in Mac OS X; how to organize fonts; how to deal with fonts from Adobe Creative Suite, Microsoft Office, and Apple’s iLife and iWork suites; and much more. It’s only $15, and is the definitive book about fonts in Mac OS X.
Turn on the Keyboard and Character Viewers — Mac OS X provides two text-input tools, Keyboard Viewer and Character Viewer, to help handle the problems resulting from three issues: not all characters are printed on your keys (where the heck is ©?); most accented characters need to be generated with a special key sequence; and many fonts have characters that can’t be typed with any key combination.
(Note that among the minor changes from Mac OS X 10.5 Leopard to 10.6 Snow Leopard was the renaming of Character Palette to Character Viewer. When I refer to “Character Viewer,” translate that to “Character Palette” if you’re still using Leopard.)
Turn on the tools in Snow Leopard:
- In the Keyboard system preference pane, click the Keyboard button.
- Check Show Keyboard & Character Viewer in Menu Bar to put the Input menu in your menu bar with both items listed.
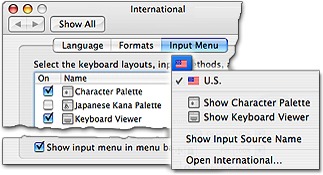
Turn on the tools in Leopard:
- In the International preference pane, click the Input Menu button.
-
Check Character Palette and Keyboard Viewer in the list.
-
At the bottom of the window, check Show Input Menu In Menu Bar to add the Input menu to your menu bar. Checking items in the list populates the menu, which includes a shortcut back to the International preference pane.
Character Viewer is also available from several other places, in both Leopard and Snow Leopard. In the Finder, TextEdit, and other programs that strictly follow Apple guidelines, Edit > Special Characters opens Character Viewer. This command works whether or not you’ve added the Input menu to the menu bar.
If you have an Input menu for foreign language keyboards but haven’t put Keyboard Viewer and Character Viewer in the menu, the Special Characters command not only opens Character Viewer but also adds both Viewers to the menu.
Keyboard Viewer’s Font Menu — Not all evolution is an improvement, and that of the Keyboard Viewer is a case in point. The original version was useful for more than just finding accented characters; it had a Font menu so you could see where every character lived in each font. With all fonts assumed to be Unicode compliant, however, characters should be in the same place no matter what the font. By the time Leopard showed up, Keyboard Viewer lost its menu bar Font menu.
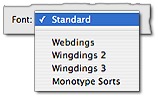
In Leopard, Keyboard Viewer has a pop-up Font menu (which is more likely short for “font mapping”), with choices limited to Standard, which shows character placement for the currently selected language and a short list of PiFonts – picture fonts – that Mac OS X considers worthy of the label. The screenshot below shows an example of Mac fonts that are so worthy; if you have Microsoft Office 2008, the list includes Bookshelf Symbol 7, Marlett, MS Reference Specialty, and MT Extra. Unfortunately, Keyboard Viewer is of no help if you’re using a picture font not listed – such as, oh, say that seldom-used, little-known Zapf Dingbats.
Snow Leopard’s Keyboard Viewer evolution goes even further: no Font menu at all!
Find Option Characters — Since the dawn of the Mac, we’ve been able to access up to four characters from each key on the keyboard: with and without the Shift key, with Option, and with Option-Shift. Many of the Option and Option-Shift characters – especially the ones you’re likely to use often – are easy to remember because some thought went into their placement: there’s often a relationship between at least one of the characters printed on a key and the Option or Option-Shift character.
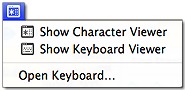
You can check out the entire Option and Option-Shift character sets, and look up characters whose positions you can’t remember, with Keyboard Viewer: open it from the Input menu, and hold down Option or Option-Shift to see the characters those modifiers produce.
Click Keyboard Viewer keys, or just type, to enter a displayed character. The best approach, however, is to learn what key combinations produce the characters you use often, and use mnemonics like those in the table below to help remember them.
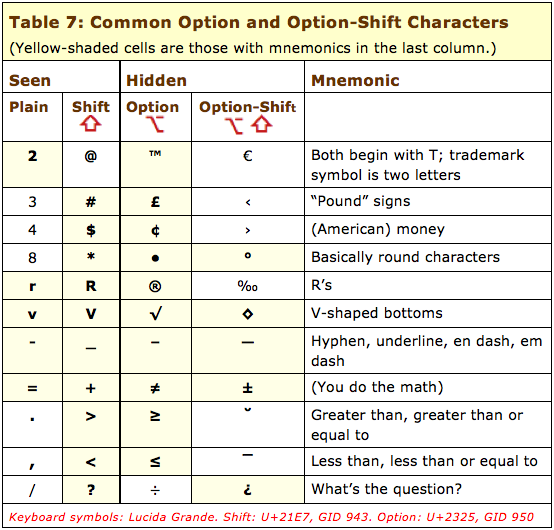
(Note that the key combinations in this table and described elsewhere in this section hold for only the U.S. keyboard. With a different input keyboard or a different Mac OS X system language, even some common characters can be in different places.)
Type Accented Letters — The Mac has always provided an easy way to type a letter with one of five common accent marks (for use in words like déjà vu, naïve, rôle, and El Niño) through the use of dead keys: keys that don’t produce anything until you hit another key. The Mac’s dead keys are Option-key combinations, and typing a subsequent letter produces the accented letter:
- Press the Option key combination that produces the accent.
The dead keys are only half-dead in Mac OS X, so you’ll see the accent in your text, with a squiggly line under it – or some other type of highlighting, depending on the program – to signify that you must type another letter.
-
Type the letter to be accented.
Accenting is restricted to certain letters – you can’t just put an umlaut on the letter x because you feel like it. The accents and their key combinations are as follows in this screenshot:
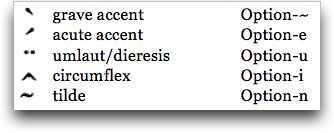
To get é, for example, all you have to do is press Option-e for the acute accent and then type e. The final accented letter is a single character generated from what you typed, so a single backspace erases it.
Using dead keys is just a clever way to type characters that are otherwise unavailable from the keyboard. You could enter é in other ways – through Character Viewer, for instance, or with a foreign language keyboard – but why bother when this method is so easy?
When you need one of these accents but can’t remember the key combination, Keyboard Viewer can help. It shows both the accent keys and the accentable letters, as shown in this screenshot.
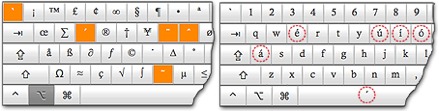
Holding down Option in Keyboard Viewer highlights the accent keys (left); the available accented letters show up when you type or click one of the accent keys (right). This figure shows the accented letters that can be produced using Option-e. I added the red circles – Keyboard Viewer is not as enthusiastic about showing you the accented letters.
If you keep Keyboard Viewer open while you’re typing, you have the option of clicking its keys to enter the accents and letters:
- With Keyboard Viewer open, hold down the Option key.
Keyboard Viewer highlights the accent keys.
-
With Option down, press one of the accent keys or click it in Keyboard Viewer.
-
Release the Option key.
The Keyboard Viewer display changes, showing the accent over the letters that can use it.
-
Type (or click) one of the accented letters to enter it.
To type an accent by itself, type a space after using the accent’s Option-accent key combination.
Type More Accents with the U.S. Extended Keyboard — Roman-based languages use many more accents than the five basic ones that Mac dead keys have always provided. In keeping with the Unicode lots-of-characters spirit, Mac OS X provides 19 dead-key accents with the special U.S. Extended input keyboard. (I explain input keyboards in more detail in “Use Different Keyboards for Foreign Languages or Other Special Input” in the book.) Here’s how to activate the U.S. Extended input keyboard:
- Open a preference screen:
- Snow Leopard: In the Language & Text preference pane, go to the Input Sources screen or choose Open Language & Text from the Input menu.
-
Leopard: In the International pane, go to the Input Menu screen or choose Open International from the Input menu.
-
In the list of “input methods,” check U.S. Extended; this automatically checks U.S., as well.
-
Open Keyboard Viewer from the Input menu.
-
Choose the U.S. Extended keyboard from the Input menu. (Its menu bar icon differs from the standard U.S. keyboard by the little add-on U, for Unicode.)
Sometimes Keyboard Viewer doesn’t update when you choose an input keyboard from the Input menu. If the Keyboard Viewer’s title bar doesn’t reflect your keyboard choice, close and reopen it.
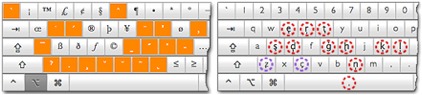
Now you can use Keyboard Viewer to access the larger selection of accents and accentable letters the same way you use it for basic accents with the standard U.S. keyboard: hold down Option to see the accents, type the one you want, and then type the letter; see the screenshot. This example shows the results for Option-C, the cedilla accent.
Not all fonts include all the accented characters you see in Keyboard Viewer. If you type a character that’s not in your current font, it’s entered in your document in a different font – one that actually contains the character.
Why not always use the Extended keyboard? Because it giveth with one key and taketh away with the other. With all those accents given over to the Option key, you’ve lost standard Option characters like the √ from Option-V and π from Option-P.
Apply After-the-Fact Accents — In some applications, and with certain fonts (yes, that’s vague, but with so many variables the best I can give you is a “more often than not”), you can type a letter first and then use an Option-Shift-accent combination to add the accent when you have the U.S. Extended Keyboard active.
So, in TextEdit, for instance, you can choose Helvetica, type o and then press Option-Shift-U, and wind up with an umlaut over the o (this is needed to spell the names of heavy metal bands like Mötley Crüe properly). For a list of the Option-Shift combinations you can use for applying accents this way, see Tom Gewecke’s diacritics page.
More about Character Entry — While Keyboard Viewer is helpful for entering Option- and Option-Shift characters, and accented characters, what if you want to enter a character that can’t be typed from the keyboard at all? That’s where Character Viewer comes in, and the full “Take Control of Fonts in Snow Leopard” has 16 pages showing you how to find and enter such characters via Character Viewer. Along the way, it devotes 12 pages to explaining the glyph approach to font characters, describing how characters that lack Unicode IDs are handled, and showing why you should care about alternative characters. Plus, if you’ve
ever felt limited by the characters in Zapf Dingbats and Webdings, you’ll have fun exploring all the dingbats available in other fonts, including the dingbat-rich Hiragino Kaku Gothic Pro.
TidBITS Watchlist: Notable Software Updates for 20 September 2010
Dialectic 1.7 — JNSoftware has released Dialectic 1.7, a significant update to its popular telephony software for Mac OS X. Dialectic is a TidBITS favorite (see “Dialectic Simplifies Dialing Any Type of Phone,” 10 April 2008) that lets you manage the telephone calls you make, regardless of what type of phone you use. New features in version 1.7 include 64-bit compatibility (under Mac OS X 10.6 Snow Leopard); support for Exchange, CardDAV, and LDAP accounts; and more and better support for a wide range of devices like the MagicJack and Aastra IP phones. The software requires Mac OS X 10.4 Tiger or
higher; full release notes are available. ($25 new, free update, 7.8 MB)
Read/post comments about Dialectic 1.7.
Transmit 4.1.1 — Panic has updated its file-transfer software Transmit to version 4.1.1. The full release notes list nearly five dozen fixes, but here’s the overview: Transmit Disk – the feature that lets you mount remote FTP, SFTP, Amazon S3, and other servers on your desktop as if they were connected hard disks – has been vastly improved, offering full compatibility with 64-bit kernels, improved MobileMe support, better deletion, and ending its reliance on MacFUSE. The update also adds more language localizations, reduces memory usage during file transfers, fixes a slew of cosmetic bugs,
and plays more nicely with symlinks and redirected items. ($34 new, free update, 22 MB)
Read/post comments about Transmit 4.1.1.
MarsEdit 3.1.1 — Red Sweater Software has updated their blog editing software MarsEdit to version 3.1.1. The new version is now 64-bit compatible. Additionally, a variety of new features have been introduced, including a new, per-blog setting to constrain uploaded images to pre-set sizes, support for Lightroom 3 media libraries, and plug-in support in the rich text editor (so you can view embedded movies, for instance). The update also fixes bugs, including one that caused a blank preview window and another that prevented the ejection of external media volumes. Full release notes
are available at Red Sweater’s Web site. ($39.95 new, free update, 6.0 MB)
Read/post comments about MarsEdit 3.1.
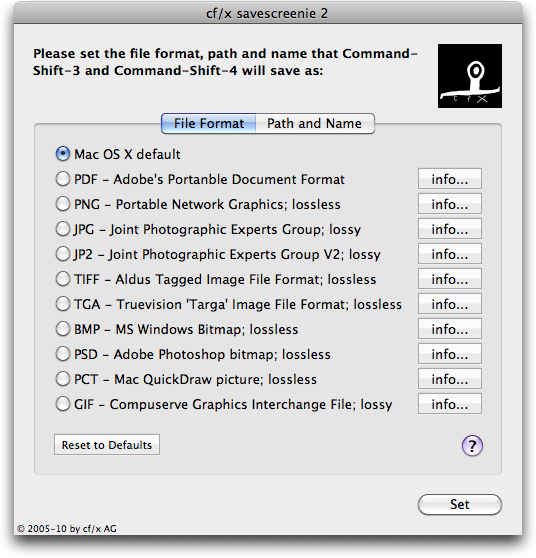
Savescreenie 2.0 — Long ago, our article “How to Change Screen Capture Formats” (27 June 2005), prompted Christian Franz to create a small utility called Savescreenie to ease the process of changing Mac OS X’s default screenshot format. Five years later, Christian’s cf/x Software has released the free Savescreenie 2.0. It now supports a number of additional file formats (10 in all), and enables you to set the default location and base name for screenshots. Savescreenie 2.0 requires Mac OS X 10.5 Leopard or later and works on both Intel- and PowerPC-based Macs. So if you
prefer a screenshot format other than Mac OS X’s default of PNG, or would prefer that your screenshots end up somewhere other than on the Desktop, give Savescreenie a try. (Free, 1.0 MB)
Read/post comments about Savescreenie 2.0.
1Password 3.4.1 — The fine folks at Agile Web Solutions have released 1Password 3.4.1, an incremental update to their popular password management utility. Among the included updates is partial support for Firefox 4 betas, but note that Autosave and HTTP Authentication don’t yet work. The update also greatly improves the Sync Conflict Resolver, making it far simpler to diagnose and repair conflicts, including Dropbox syncing issues. Other fixes include improved localization, optimizations for 1PasswordAnywhere, and more; full release notes are available.
($39.95 new, free update, 17.3 MB)
Read/post comments about 1Password 3.4.1.
ExtraBITS for 20 September 2010
Did Google pressure handset makers to use its own geolocation features? A lawsuit by Skyhook Wireless claims the Android platform isn’t as open as Google says it is. If you’re headed to the MacTech Conference in November, check out new sessions on virtualization and Apple Certification Exams. While there, you can carry your iPad (and everything else) in a Scottevest, and dream up clever effects like the 3D light painting achieved by Dentsu London. And take heart, our friends at the Joy of Tech have identified the 12 most annoying types of Twitter users. Lastly, an in-the-wild security exploit in Adobe Acrobat 9.3.4 can lead to arbitrary code execution in Windows, but the vulnerability is present in all platforms. If you’re worried about
malware and see this in time, you can get MacScan for free on 20 September 2010.
MacScan Available for Free Today — In honor of yesterday’s Talk Like a Pirate Day, SecureMac is offering their $29.99 MacScan security software for free today, 20 September 2010 (through midnight, Pacific time, and apologies in advance if you see this too late – there was nothing we could do to alert you sooner). MacScan detects, isolates, and removes malware like keystroke loggers and Trojan horses, and also helps clean up Web tracking cookies. Though avoiding seedy Web sites and dubious software is the best prevention, if you’re worried about what’s running on your Mac, it wouldn’t hurt to give MacScan a try.
Google Sued for Pressuring Android Phone Makers — Google makes Android out to be an open platform, in contrast to Apple’s closed one. But a lawsuit filed by Skyhook Wireless, a firm that turns Wi-Fi signals into geographic coordinates for mobile devices, alleges that Google pressures handset makers by threatening to withhold access to the Android app marketplace, use of the phrase “Android-compatible,” and full access to Google apps on the phone. Skyhook says Google forced Motorola and another phone maker to break deals or risk those losses.
Wear Your iPad Around Town — If you find yourself carrying your iPad around town a lot, there are plenty of cases that will hold it. But what if you just want to drop it in your pocket and go, as you would an iPhone? For that you’ll need a jacket or vest from Scottevest. They look pretty normal, but you’ll still rack up a lot of geek points.
MacTech Adds Virtualization Panel, Apple Certification — The organizers of the MacTech Conference, coming up in early November, have announced the addition of a panel on trends in virtualization, to be moderated by Macworld VP and Editorial Director Jason Snell, along with a study hour and exam session for all current Apple Certification Exams that will take place at the close of the conference.
How Not to Use Twitter, by the Joy of Tech — Thanks to Snaggy and Nitrozac for this Joy of Tech comic identifying 12 of the most annoying types of Twitter users – we promise to think before we tweet!
3D Light Painting with an iPad — Marketing firm Dentsu London uses stop-motion photography and custom 3D software to create a movie that features animations in light, projected using iPads (you know, that limited entertainment device that can’t be used for anything creative).
Adobe Acrobat/Reader 9.3.4 Vulnerable to Malicious TTF Font — Opening a PDF containing a maliciously crafted TrueType font in either Adobe Acrobat or Reader 9.3.4 could result in arbitrary code execution or a crash. Although the vulnerability affects all the platforms on which Adobe Acrobat and Reader run, the current exploits in the wild target only Windows. To be safe, rely on Apple’s Preview, Smile’s PDFpen, or another PDF application until Adobe closes the vulnerability with a 4 October 2010 release.