TidBITS#1246/27-Oct-2014
In this extra-long issue of TidBITS, jam-packed with important articles, Glenn Fleishman looks at Wi-Fi changes in OS X 10.10 Yosemite and the new Transmit file transfer client for iOS 8. Adam Engst dives into what’s new with BBEdit 11 and why it’s good that it’s a paid upgrade. Josh Centers then explains how to use the new Apple Pay service and suggests that Apple is intentionally rolling it out slowly. However, some merchants are heading Apple Pay off at the pass, and Rich Mogull explains why this has little to do with Apple and a lot to do with credit cards. Rich also provides an analysis of how the new Spotlight Suggestions feature impacts your privacy. Finally, in FunBITS, Josh takes a look at Pedometer++, which unlocks the motion-processing capabilities of the latest iPhones. Notable software releases this week include Fetch 5.7.4, Sandvox 2.9.1, Security Update 2014-005 (Mountain Lion and Mavericks), SpamSieve 2.9.17, Hazel 3.3, and TextExpander 4.3.4.
Welcome Wi-Fi Changes under Yosemite’s Hood
Wi-Fi is a mature part of OS X, but Apple likes to tinker, and OS X 10.10 Yosemite brings a tinkling cascade of tiny changes, from new information and a new way to display data in the Wi-Fi menu to removing the last vestiges of the long-outdated and completely broken WEP (Wired Equivalent Privacy) encryption protocol.
With iOS 8.1 installed, Yosemite also adds a nifty way to activate Personal Hotspot from your Mac instead of your iOS device.
An Expanded Menu of Hidden Data — The Wi-Fi menu (previously known as the AirPort menu) has long concealed a hidden treasure trove of performance and connection data that’s revealed when you press the Option key before clicking the menu bar icon. For the last few releases, it has contained seven pieces of data about any network to which you’re connected and five items about others, visible when you hover over their names.
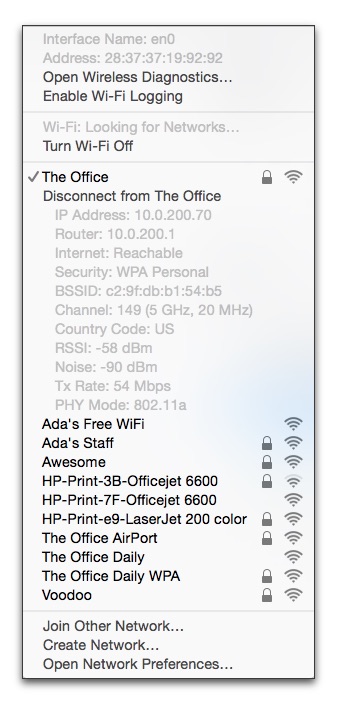
Yosemite adds a new option to the hidden menu as well as several new bits of network data. These help you diagnose network problems quickly, without the need for other software.
- Network information is now scattered about. At the top of the menu, the Unix-based interface name (like
en0) appears, along with the Wi-Fi adapter’s factory-set unique MAC (Media Access Control) address. Below a currently connected network, in addition to the previously available details, you see the Mac’s assigned IP address, the router’s address, and whether or not the Internet is reachable. - The Disconnect from [Network Name] item is a nice addition. Previously, the only way to sever a Wi-Fi link was to turn Wi-Fi off and on or join another network.
-
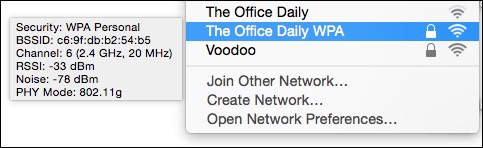
The Channel item now shows not just the channel (such as 149) and band (like 5 GHz), but also the “width” of the band. With 802.11n, a base station can use 20 MHz or 40 MHz in 5 GHz. In 802.11ac, that can jump to 80 MHz. The same extra information also appears in other networks when you hover over their names.
-
The menu also now displays the country code of the base station, which could be useful if it has been set up wrong, and the noise measurement. Available signal is the ratio of signal to noise, and the lower (further away from zero) the noise value, the better. The -90 dBm (decibels below 1 milliwatt) figure here is pretty good. Noise is the only new item in the hover-over display for non-connected networks.
Taken together, this information can help you sort out network difficulties. If you always see 20 MHz in the Channel line, but the PHY (physical protocol mode) is 802.11ac, you have other networks in the vicinity on the same or adjacent channels that are forcing the base station and client to negotiate a slower rate; moving the base station or forcing a different channel could help.
If your noise value is very high (like -30 dBm instead of -90 dBm), there’s interference from other devices, Wi-Fi or otherwise, in the same band, and you again may need to move the base station or pick a different channel.
(Apple also added a number of tweaky options in its Wireless Diagnostics program, which you can open from the hidden Wi-Fi menu. I’ll go into the particulars in the next edition of “Take Control of Your Apple Wi-Fi Network.” Apple has a perverse need to fiddle with this app: this is the fifth distinctly different version across four operating system releases.)
The Final Death of WEP — WEP was Wi-Fi’s first encryption standard and was almost intentionally designed to be weak. It had to work on the slow silicon of the day, and couldn’t be too robust due to issues surrounding U.S. export policies related to encryption. Starting over a decade ago, effective attacks rendered WEP protection essentially useless, and it was abandoned beginning in 2003 with WPA and then in 2004 with the full-fledged WPA2. The only encryption that may be used with 802.11n and 802.11ac networks is WPA2. Every Wi-Fi adapter released starting in 2003 included or could be upgraded to use WPA2. (A lot of point-of-sale systems continued to use WEP until
recently — some still do!)
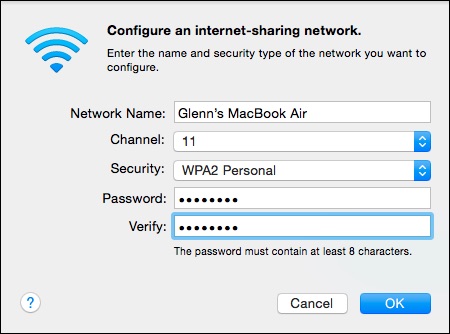
Apple persisted for the longest time in allowing only WEP encryption for ad hoc computer-to-computer networks (a special Wi-Fi mode) and in the software base station mode available by sharing a networking connection in the Sharing preference pane. Finally, in 10.8 Mountain Lion, Apple let the software base station use WPA2, but had a hidden Option-click trick to bring up WEP (see “Software Base Station in Mountain Lion Adds Modern Encryption,” 30 July 2012).
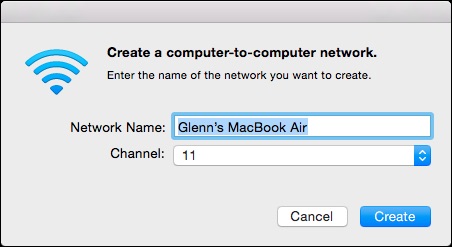
Yosemite kills WEP once and for all. Ad hoc networking offers only unencrypted connections, which I can recommend only if there are no other computer users in your vicinity. There is now no way to prevent someone from joining an ad hoc network or sniffing the traffic passing by. Use other approaches to sharing files, like AirDrop or Dropbox. The software base station now exclusively offers WPA2. I think users have had enough time to make the transition.
Hands-free Hotspot — Personal Hotspot dates back to iOS 4 as a way to use your iPhone (and later an iPad) as a Wi-Fi bridge to a cellular data connection. The feature improved substantially in subsequent releases, but it still requires a few steps to enable unless you both leave the feature turned on in iOS and tether via USB or Bluetooth.
The combination of Yosemite and iOS 8.1 removes that pain — oh, the pain of a few taps, I know! — with Instant Hotspot, if you have a recent Mac that supports the Continuity suite of features. The cutoff is mid-2012 for some models and later for others; Apple has a complete list of which Macs support which Continuity features.
Instant Hotspot shows nearby iOS devices in Yosemite’s Wi-Fi menu as long as the Mac and the iOS device are logged in with the same Apple ID in iCloud. The device appears with its battery life, cellular network connection type, and signal strength. Choose it from the Wi-Fi menu, and you’re connected.
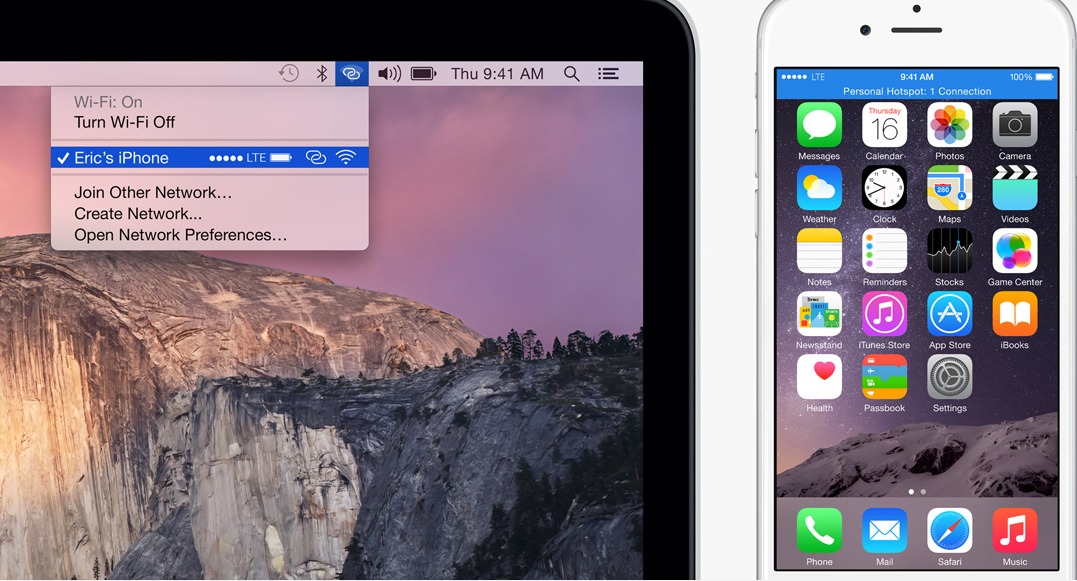
Instant Hotspot is pretty clever, too: it disconnects when the network isn’t in use to save battery life (both of your Mac, if it’s a laptop that’s not plugged in, and your iPhone or iPad), and it skips downloads of system updates and other large files to avoid using up data transfer allocations on cellular data plans.
Overall, these features aren’t groundbreaking, but for those of us who work with Wi-Fi networks, they’re entirely welcome, particularly the passing of WEP. At long last, I can say with confidence, “It’s dead, Jim.”
BBEdit 11 Overhauls Features for Existing Customers
Bare Bones Software has released BBEdit 11, a notable upgrade to the venerable text editor that, I’m extremely pleased to say, requires an upgrade fee. Why would I be happy about the opportunity for current users to spend money? Because it reinforces the fact that we are Bare Bones’ customers. We’re the ones that Rich Siegel and company are trying to please.
Think about it. It’s often said that if you use a free service like Gmail, you’re the product, not the customer. (That’s not really true; in fact, some minuscule amount of information about you is aggregated with similar information about a vast number of other people to make the product. But I digress.) There’s a corollary, which is that if you use a product that promises free upgrades for life, like Apple requires of everything in the App Store and Mac App Store, you cease to be the customer as soon as you purchase. The developer has no further incentive to make you happy and has no financial incentive to do anything but chase additional potential customers. That certainly explains iTunes.
BBEdit 11 is in some ways the anti-iTunes. It has a small number of marquee changes, and even those won’t change how you work with the app. If you’ve been using BBEdit for years, like I and most loyal customers have, why would you want that? What we want are changes that we can exploit immediately to work faster and more productively. I proved this to myself by launching BBEdit 11 and starting writing this article, without the least stumble over anything unfamiliar.
(As an aside, these changes required far more coding work behind the scenes than is obvious to the user, because BBEdit has such a long history. Rich told me he found himself replacing code that had been working fine since 1989 but that couldn’t support the new features Bare Bones wanted to add. It’s a bit like replacing parts of a building’s foundation while it’s still being inhabited.)
Let’s look at the new version’s key changes.
Editing Enhancements — I betray my calling as a writer of prose here, but BBEdit’s editing improvements are more important to me than anything else. BBEdit 11 now features automatic highlighting — via a subtle underline — of words or phrases that match selected text or the word containing the insertion point. This is surprisingly interesting; I merely have to arrow over or select the word “BBEdit” and all other instances of that word in the document are automatically underlined. Since varied word choice is important in keeping writing fresh, I’m psyched to use this capability — did I really write “features” that many times?
Those who use BBEdit for coding or authoring HTML will probably appreciate the next features even more than we prose writers, due to the focus on lines. New commands in the Edit menu enable you to move the current line up or down (Control-up arrow and Control-down arrow make it more fluid), and Delete Line (Control-Shift-Delete) removes the current line instantly. These aren’t ground-breaking, but they’ll make certain tasks faster. Similarly, New Line Before (Command-Shift-Return) and New Line After (Command-Return) are just faster ways of inserting lines above and below the current line, without having to arrow to the correct location first.
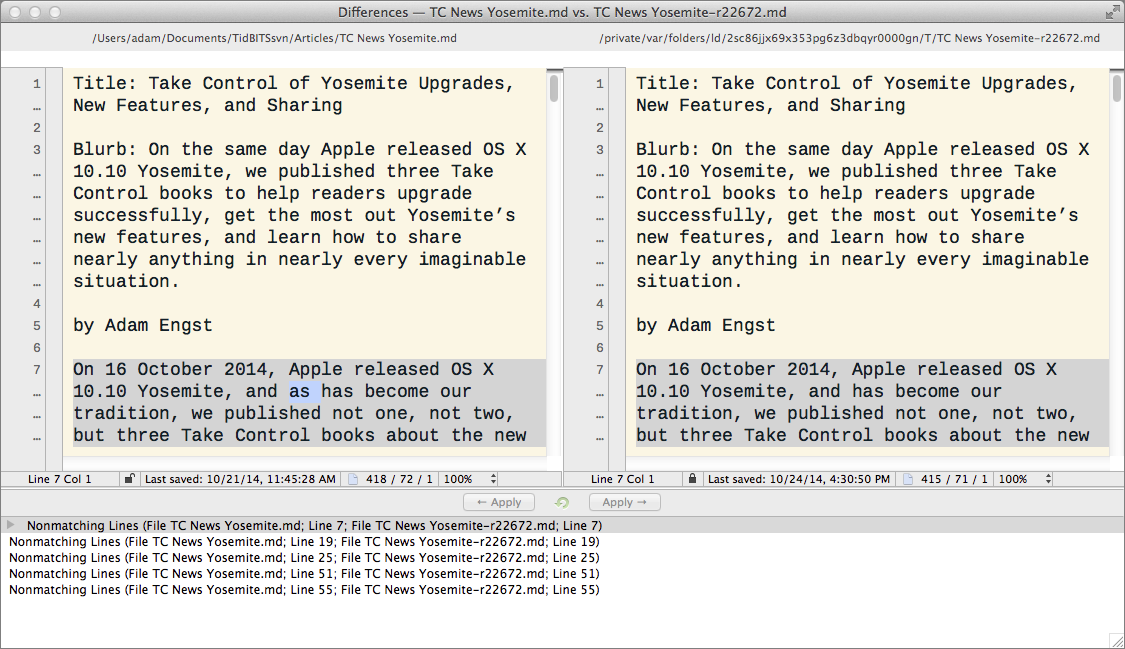
Faster, Easier Find Differences — As we write and edit TidBITS articles in BBEdit, saving versions with Subversion, we often need to compare different versions. Previous versions of BBEdit had a somewhat wonky way of showing the current file, the previous file, and a list of differences in three separate windows that tiled themselves on the screen. It worked, but opening additional documents while diffing could thoroughly confuse everything. BBEdit 11 replaces all those Find Differences windows with a single triple-paned window. Everything is still in the same place, so it looks and works like you remember, but is more coherent.
If you want to compare folders of text files, a new sidebar displays the list of differences between files and lets you copy files missing in one folder from the other.
Text Extraction — BBEdit has long had a command in its Text menu called Process Lines Containing. Many people probably don’t think about using it, but it’s fabulous, since it enables you to enter a search string (probably using grep pattern matching) and then operate on just those lines that match the string. You can delete the lines, copy them to the clipboard, or copy them to a new document. I don’t use this feature every day, but it’s one I return to regularly, such as when I want to see all the lines in my email log that show Comcast subscribers not receiving TidBITS mailings (sorry folks, it’s Comcast’s fault, and I’m still trying to get through to
their highest-level techs).
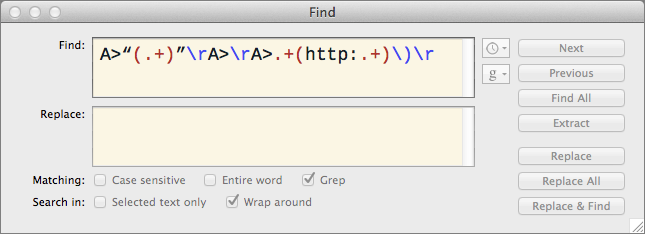
In BBEdit 11, Bare Bones extended the concept behind Process Lines Containing to all searches, by adding an Extract button to the Find dialog. Now, when your search string matches multiple bits of text in a document (or in multiple documents, if you’re using Multi-File Search!), you can extract all the matched text to a new document. This Extract button works differently from Process Lines Containing in that it’s just the matched text, not the entire line, but that’s not a bad thing, since with Process Lines Containing, I often extract the matched lines and then whittle them down further with additional find/replace steps.
Improved Syntax Coloring — One of those features that required a huge amount of work under the hood is BBEdit 11’s new syntax coloring. Previously, you could set what seemed like a fair number of colors (the left screenshot below), but the choices were really quite limited. Now you can change colors on a far more granular basis (the right screenshot), with each language getting its own specific options.
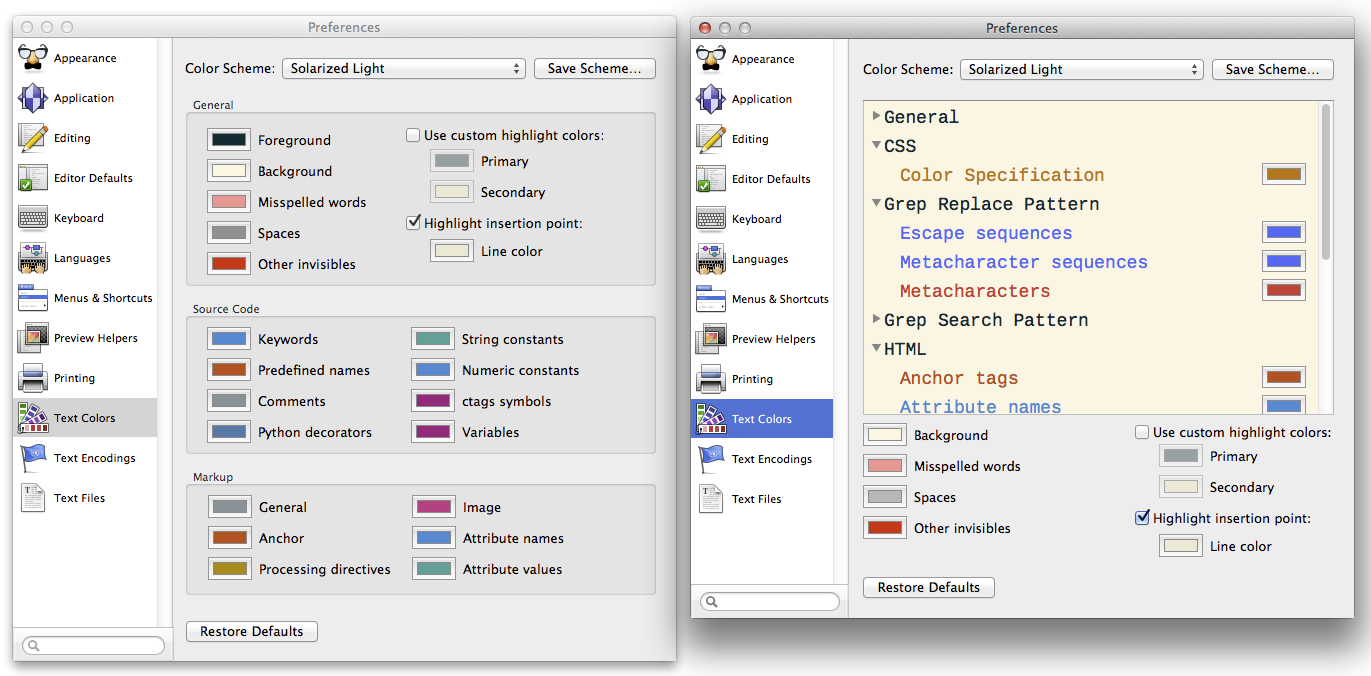
A number of preset color schemes have been provided, and custom schemes can be saved and loaded, making them easy to share (see “Make Text More Readable with Solarized and Cousine,” 2 August 2013).
Enhanced Clippings — Finally, BBEdit’s Clippings system, which you can use to create, manage, and insert frequently used snippets of text, has seen a complete overhaul. Clipping sets can now be made available universally or on a per-language basis (in case you don’t want your C clippings available at the same time as your Markdown clippings).
The interface has changed a bit to accommodate the new capabilities, with a new pane in the BBEdit > Setup window where you can choose the languages for which a particular clippings set will be enabled. Plus, the Clippings palette itself is a bit easier to use, with a single unified list of available clippings. Otherwise, the feature remains familiar to anyone who relies on it.
Upgrade Details — BBEdit 11 retains its price of $49.99, but users of BBEdit 10 can upgrade for $29.99 and anyone still using BBEdit 9 or earlier can upgrade for $39.99. Those who bought BBEdit 10 on or after 1 May 2014 are eligible for free upgrades.
It’s worth noting that if you bought BBEdit via the Mac App Store, you cannot get an upgrade there, and in fact, Bare Bones Software is pulling BBEdit from the Mac App Store entirely. All upgrades and new copies must be purchased from Bare Bones directly.
Why is this? Rich Siegel gave a talk at the recent Çingleton conference where he explained. His presentation was a masterpiece of building suspense, as he went through the litany of complaints he (and most Mac developers) have, dismissing each with “It’s not that.” In the end, Rich concluded that the added stress and frustration just weren’t worth it.
I think the fact that Rich cares deeply about meeting the needs of his current customers also has something to do with it — the Mac App Store doesn’t encourage that in any way. Whether BBEdit’s disappearance from the Mac App Store is indicative of a growing trend remains to be seen, but with BBEdit 11 today, Rich and company are happy to have full control of their release schedule and to be able to support their customers directly.
How Spotlight Suggestions Handles Privacy
Back in 2005, Apple added Spotlight to Mac OS X 10.4 for finding files. Rather than merely searching through filenames, Spotlight could also find files based on metadata, and it could even look inside common file types, like PDF. Although often a source of frustration (thanks to spotty results and performance-eating indexing), Spotlight has improved with every version of OS X to provide better results with fewer performance hits. iOS even gained a simplified version of Spotlight, capable of finding apps, contacts, events, and email messages.
New in iOS 8 and OS X 10.10 Yosemite is Spotlight Suggestions, a new feature that extends Spotlight to the Internet, enabling it to search common information sources like Wikipedia and even the Web at large, via Microsoft’s Bing search engine. Welcome as this is for providing a single search interface for finding whatever you need, it’s not new — independent search applications have offered similar features for years.
However, building such a feature into iOS and OS X opens it up to added scrutiny, and on 20 October 2014, the Washington Post reported that Spotlight Suggestions was a major privacy concern, leaking your information to Apple and potentially other sources. Unfortunately, the article contained multiple factual errors, many of which could have been avoided had the authors read Apple’s iOS 8 security documentation and Apple’s privacy page, which
includes a section on Spotlight Suggestions.
Semi-Anonymous Search — To save you the time of reading those documents, and to add some details provided by other Apple sources, here’s how Spotlight Suggestions works, and how it manages your privacy.
The primary concern most people likely have is the possibility of a local file search revealing private information to Apple, but various privacy mechanisms prevent that.
When you open Spotlight and start typing a search string, Spotlight uses predictive search to start generating results. This is the same technique used by nearly every modern Web browser and search engine. Spotlight simultaneously searches its index of your local files while checking with multiple Internet sources via a connection to Apple’s own servers. The requests go to Apple first, not directly to Internet sources like Wikipedia.
To manage your session, Apple uses a one-time session ID that lasts for 15 minutes. Neither the session ID nor the search query contain your IP address or any other device identifier. Session IDs also aren’t coordinated or correlated, so there is no way for Apple to track historical usage by chaining session IDs together. In short, your query exists within a 15-minute bubble that isn’t tied to you directly. This is different from Siri, which uses a more persistent device identifier since it requires more context over time (due in large part to the overhead of voice recognition).
Queries do include location information, but Apple added a “fuzzing” feature to mask your exact location. The degree of fuzzing varies based on the density of the area you are in. In a city, it will likely be relatively precise, down to the block, in order to direct you to the closest coffee shop (really, what else matters?). In a suburban or rural area, it might be no more specific than the town. Fuzzing happens on your device, not Apple’s servers, so they never see your exact location.
You can disable Spotlight Suggestions location tracking on your Mac in System Preferences > Security & Privacy > Location Services > System Services. Click the Details button, then deselect Spotlight Suggestions. Even if you do this, your IP address will still be used for higher-level location tracking, since Apple needs to know at least what country you are in. In iOS 8 the setting is under Settings > Privacy > Location Services > System Services (scroll all the way to the bottom to find it).
It’s important to remember that Spotlight Suggestions and Siri use different search mechanisms, with different privacy settings.
To provide Bing search engine results in the Spotlight window, Apple keeps track of “common queries.” Apple does not pass every search query to Bing, merely those identified as common. For example, I search for “US Airways” a lot due to constant work travel. That query pops up the airline’s Web site (and Wikipedia entry) since it’s relatively common. But when I search for the title of a Keynote presentation that I need to edit on my upcoming flight, I don’t get any Web results, even though I would if I searched for it directly in Bing (since I’ve used that presentation at conferences and in blog posts).
When these queries are sent to Bing, they come from Apple’s servers, not your computer, so Bing can’t track them. If location is sent (e.g. you are performing a search for local movies) it is provided to Bing only at the level of the city you are in, not even the fuzzed location Apple uses. Lastly, Apple’s contract with Microsoft prevents Microsoft from retaining queries and results.
Keeping It Local — Apple doesn’t view or share your local device index, but the queries themselves will always hit their servers. Apple does track what you select in Spotlight search results. If it’s a local file, Apple tracks only the file type, not the filename or other specifics (the company may track a little more; we don’t have an exact list, but names, contents, and other personalized metadata are explicitly excluded). This is still tracked only to the session ID level.
If you don’t like any of this, you can disable Spotlight Suggestions completely via System Preferences > Spotlight in Yosemite, or Settings > Spotlight Search in iOS 8. Spotlight searches will then be limited to the contents of your local device’s index.
Apple doesn’t always get security and privacy right as it continues to tighten the links between Apple devices, software, and services, as I recently highlighted in “You Are Apple’s Greatest Security Challenge” (14 October 2014). But aside from Tim Cook’s privacy message, it’s clear that Apple not only sees privacy as a competitive advantage, but is doubling down on the engineering to support it.
As a security analyst, I worry constantly about becoming biased, especially with a company like Apple whose products are so deep a part of my life. To avoid this, I spend a tremendous amount of time researching and validating my findings before publishing them. While this may be pie-in-the-sky thinking, I believe journalists and publications should make similar efforts to avoid bias, and tamp down the desire for explosive headlines that leads to inaccurate reporting, particularly when such articles increase paranoia unnecessarily.
While Apple has made, and continues to make, security and privacy mistakes worthy of criticism, the original Washington Post story in this particular case was not only factually wrong, but incorrect in ways even basic research would have revealed. On the upside, we all now have a better understanding of how Spotlight Suggestions works, and it’s certainly important to continually evaluate how — and if! — Apple is keeping its privacy promises.
Transmit for iOS 8 Provides File Transfer Everywhere
Despite the existence of Box, Dropbox, and myriad other cloud-based file synchronization services, many of us wind up with files stored hither and yon on more traditional Internet file servers. A Web server may require SFTP to upload attachments referenced by HTML pages. We may be using Amazon’s Simple Storage Service (S3) to deal with assets that are pushed out through Amazon’s CloudFront content distribution network. Or perhaps we need to manage files on a WebDAV server for access by iOS apps.
In Mac OS X, Transmit has been my preferred file-transfer app for the last few years, offering a high degree of sophistication that has improved over time, especially with some of Amazon S3’s many peculiarities (see “Transmit 4 Improves on File Transfers,” 21 January 2011). For instance, upload a CSS file to S3 without sending a Content-Type header of text/css and it may not be fed out correctly to Web browsers; Transmit added a way to handle that a few years ago.
When I heard that Transmit was coming to iOS, I initially thought it might be a bit of a goof; the makers, Panic, are known for humor. There are already plenty of server-access apps of varying kinds for iOS, and Transmit’s strength on the Mac is largely related to it being file-transfer glue, enabling users to preview, open, edit, and manage files stored on a variety of remote servers. But I quickly realized that iOS 8’s addition of extension support meant that Transmit’s capabilities would be available throughout iOS without explicit integration by other app developers.
Transmit iOS ($9.99 in the App Store) is a powerhouse tool for anyone who needs to access remote files within iOS apps and who previously spent inordinate amounts of time moving things around and employing workarounds to access them. (Transmit does not include Dropbox support, which is integrated directly into many iOS apps.)
Files as a Service — Since I’m ancient, I remember when FTP (File Transfer Protocol) was the only option to move files to and from a server. It has since been joined by many others, but remains surprisingly common. As with the Mac version of Transmit, the iOS version supports plain, unencrypted FTP (Bad, bad, bad! Get your hosts to upgrade!), as well as two forms of secured FTP: the now-deprecated implicit SSL, which uses a different port and encrypts everything using TLS/SSL certificate-based key exchange and encryption; and FTP with TLS/SSL, also known as explicit SSL, which uses the same port as a regular FTP
connection.
Transmit can also create connections with the widely available SFTP (Secure FTP), which uses SSH for encryption; WebDAV, a file-service standard with both open and secured versions that uses HTTP for interactions; and Amazon S3, the online retailer’s vast storage farm, as well as DreamHost’s S3-compatible DreamObjects service.
![]()
You can add connections manually or import settings from Transmit for Mac OS X. While Panic has developed its own synchronization feature called Panic Sync that’s already built into Transmit iOS, it hasn’t yet updated the Mac version. (Transmit’s site has all the details about how data ownership and encryption keys for Panic Sync are handled.) When Transmit 5 for Mac ships, you’ll be able to keep all your connections and other settings up to date with
no effort. You can currently sync between Transmit iOS running on multiple iOS devices.
Until Transmit 5 comes out, you must work through a simple six-step process to export your connections from Transmit for Mac and then import the file into Transmit iOS. Panic has posted the steps in its FAQ. For security’s sake, passwords are not transferred, so you’ll need to enter them again. 1Password is a big help if you also have that installed (see “1Password 5 Touches New Heights in iOS 8,” 1 October 2014, for more about 1Password’s new iOS version).
Transmit’s user interface is divided into Local and Remote screens. The Local screen shows files and folders stored in the app. You can transfer files into the app from remote servers or from other apps using iOS’s Share button functionality.
![]()
The Remote screen is where you manage servers and connect to them. Tap the + button and you can pick the type of server and enter credentials, paths, and other details. I won’t run through that here, as it’s both simple and well-documented elsewhere.
Local and Remote views have most features in common. Tap a folder to navigate down into it, and swipe right to jump up one directory level. Tap a hierarchical indented view (in the upper left) to pick a level to jump up to.
Once viewing a directory, you can tap the + button to add an empty file, create a folder for grouping, pull in an image from your photos, take a picture or shoot a video, or import from iCloud Drive.
![]()
Tapping a file reveals all available details, including a preview for supported media and document types (Transmit even renders HTML!); tap Open in Transmit to pull up a full-screen or scrollable preview. For large remote files, you have to wait until the file is retrieved to view or play back. Tap Permissions to change access control.
![]()
Further down, you can tap:
- Send To in order to pass the file to any Share-compatible app or operation
- Download To for adding the file to Transmit’s local file storage
- Add to iCloud Drive if you have upgraded to that service
- Add to Photo Library, for appropriate media types
You can also copy the path, move a file within its server or local storage, duplicate it, or delete it. (All these options depend on proper permissions to allow you to do so, of course.)
Tap the Eject button at the lower right to exit the file server view in Remote.
Working with Robust Security — We should rightly expect well-implemented security from Panic, especially for an app that, if lost and improperly locked down, could expose lots of remote assets. The company obliges, as always. For starters, as noted above, exporting favorites omits passwords, and the design of Panic Sync enables secure exchange among your devices.
While you can type or paste passwords, the integration with 1Password makes everything better. When setting up a connection that you’ve already added to 1Password, or when entering a password for a favorited item you imported, you can tap the key icon in the password field to get it from 1Password. Panic has clearly made room for integration with other password apps, such as LastPass, as 1Password appears in a list. Tap 1Password in the list, and then tap the icon in the sheet that appears to display a list of appropriate passwords.
Because of iOS sandboxing and 1Password’s current approach, 1Password displays only those passwords that match the domain name of the currently selected server in Transmit iOS. Thus, if you’re using a server that doesn’t have a domain name associated with it, or if you’ve stored credentials in 1Password without also adding the domain name (like s3.amazonaws.com for Amazon S3), 1Password won’t know which passwords to fill in. You can work around this by creating a Login entry that has its Web Page field set to the domain of the remote server, and the credentials in the username and password fields. (S3 uses an access string and a key, which correspond.)
Many SSH users like to bypass the username/password login by stashing a public key on the remote server. This works with SFTP as well, and Transmit iOS supports this feature, which can be set up natively in Mac OS X, and it doesn’t require extra configuration. (If you have no idea what I’m talking about, read this explanation! It’s a nifty shortcut with a different set of security issues.)
In Transmit’s Settings screen, tap Keys, and then tap the + button. You can generate a new key, or import one from the Pasteboard (copied from another app), from a locally stored file, or via the File Transfer tab in iTunes. (For this last option, connect your iOS device to iTunes, click the Apps button in iTunes’s top toolbar, select Transmit in the File Sharing list, and then drag the keys into the right pane.)
![]()
For instance, I wanted to use my SSH key to connect to one of my servers. I followed these steps in Transmit iOS to import id_rsa, the public/private key file used by SSH.
- Create a connection to my MacBook Air via SFTP. (See Panic’s FAQ for those steps.)
- Tap View Options and enable Hidden Files.
-
Tap the .ssh directory, where SSH keys are stored.
-
Select id_rsa, and tap Download to Documents.
-
Tap Settings > Keys.
-
In Keys, tap the + button and then Import from Local.
-
Select id_rsa to import it. (Note: In Transmit iOS 1.0.1, the import succeeded, but reported as failed.)
-
Give the id_rsa key file a unique name to differentiate it from any others. Tap it and then tap its name, at which point you can modify it and tap Done.
Once you’ve imported the SSH key, you can use it when making and saving a secure connection. Connect to a remote server, tap the key icon in the Password field, and choose Keys from the drop-down list, which lets you pick among stored SSH keys. Once you select a key, the Password field name changes to Key and the key icon switches from gray to blue. Remember to tap Save when done to store this connection.
To set up how you secure all this data within Transmit iOS, tap Settings > Touch ID & Passcode. (For devices without Touch ID, the option just reads Passcode.) You can opt for a duration up to 30 minutes after which a passcode is required, and choose a “complex” code that’s not just the four-digit PIN otherwise required. Enable Touch ID, and the passcode is bypassed in favor of a fingerprint, regardless of how you access Transmit.
Panic has put in a failsafe, too. If Erase Data is enabled in Settings > Touch ID & Passcode, the app will delete its local set of files, settings, and passwords after 10 failed passcode attempts. As long as you have synced your data or have backups of your keys and passwords, it’s a good option to turn on. Remember that physical coercion will likely render all Touch ID and passcode security moot — don’t depend on it if you traffic in truly sensitive information.
Sharing To and From — The app by itself works well for viewing files, but that’s all preamble for using Transmit with other apps through iOS 8’s Share and Document Picker capabilities. Any iOS app that includes support for either or both can work with Transmit iOS. Share pushes a file to Transmit; Document Picker pulls one from Transmit.
For instance, let’s say I’m in Tweetbot and a friend posts a photo of her dog looking particularly adorable that I want to save to my Mac using iOS 8’s Share tool. Here are the steps I’d follow:
-
I touch and hold on the image, and a Share sheet pops up.
-
In the list of apps at the top, Transmit appears. I tap it.
-
If I’m past Transmit’s Touch ID timeout, I authenticate with my fingerprint.
-
The Local/Remote Servers list appears, from which I can select any configured item or local storage in Transmit iOS.
-
Let’s say I want to push this image to my MacBook Air. I tap the MacBook’s item in my stored list, and navigate to the folder in which I want to store it.
-
Now I tap Upload, and the file is transferred.
On the Document Picker side of things, let’s say I want to add a file to Dropbox from my Amazon S3 account while I’m out and about. The latest version of Dropbox supports Document Picker, although you have to do a bit of configuration first.
-
In Dropbox, tap the More button at upper right, and tap Add Files.
-
The first time you do this after installing Transmit, you need to tap More, and then enable Transmit in the Manage Storage Providers screen to appear in the list. Once you do, Transmit appears whenever you tap Add Files in the future.
-
Tap More > Add Files > Transmit, and the Transmit picker view appears. As with sharing, you can use any preconfigured Transmit connection, such as an Amazon S3 account.
I can then, for instance, connect to an S3 server and select an image I’ve uploaded, after which it’s downloaded by Transmit and transferred to the Dropbox app, which immediately syncs it with the Dropbox servers.
With apps that allow editing documents, the Document Picker theoretically offers a round trip: when you select the file in the Document Picker, you can save your changed version back to the same source, using Transmit as a conduit. I wasn’t able to test this, since few apps have Document Picker support so far.
What’s Left to Come? — As noted earlier, Panic Sync is terrific and works among iOS devices, but once Transmit 5 ships for the Mac, Panic Sync will dramatically improve moving connections and settings between Macs and iOS devices.
Many of the tweakier preferences available in the Mac version of Transmit aren’t yet available in Transmit iOS, and I imagine they will migrate in the future, based on demand. Most notable is setting default permissions for different server protocols based on file extensions. For instance, in the Mac version of Transmit, you can set .html files to be given World-readable and Owner-writable permissions when uploaded to an S3 server — that would be useful in Transmit iOS too. And, as noted earlier, I’d like to see Transmit iOS gain support for the Mac version’s custom S3 content headers.
These are minor omissions, and Transmit has immediately become an essential tool for me, in large part because it reduces my reliance on Dropbox as the hub through which I transfer files back and forth to iOS via my Mac. Dropbox remains useful, of course, but Transmit iOS enables me to cut out Dropbox as the middleman when I need to work with a file that’s not already in Dropbox or that lives on one of my many servers.
Along with Instapaper, 1Password, and the Swype keyboard, Transmit iOS makes working in iOS 8 a vastly more seamless experience than was possible in any previous version of iOS.
How to Use Apple Pay
iOS 8.1 brought Apple Pay to Apple’s most recent iPhone and iPad models (see “OS X 10.10 Yosemite, iOS 8.1, and Apple Pay Have Arrived,” 20 October 2014), but unless you were waiting for the feature, you weren’t even given a clue that it’s now a thing, much less how to use it.
For those not in the know, Apple Pay is Apple’s new payment service, which lets you securely store credit card information to make purchases using the iPhone 6, iPhone 6 Plus, iPad Air 2, and iPad mini 3 (for more, see “Apple Pay Aims to Disrupt Payment Industry,” 9 September 2014). The iPhone 6 and 6 Plus allow in-store and online purchases, while the new iPads support only online purchases (see “iPad Air 2 and iPad mini 3 Expand the Line,” 16 October 2014).
In the physical world, Apple Pay relies on a technology called near-field communication (NFC). To use it in a store, a few conditions have to be true:
- You must have an iPhone 6 or 6 Plus with iOS 8.1 or later.
- The merchant must have an NFC reader.
- The merchant must have a relationship with Apple. (Or at least we thought that was true before the news about Rite Aid and CVS broke; now we’re less sure — see “The Real Reason Some Merchants Are Blocking Apple Pay… for Now,” 26 October 2014.)
But first, you have to set up Apple Pay.
Setting Up Apple Pay — To use Apple Pay, you must have a credit or debit card whose issuer has signed up to support Apple Pay. Whether your card will work with Apple Pay is a bit of a guessing game. For example, the Amazon Chase Visa didn’t work with Apple Pay at first, but it now does. Apple has a short list of participating banks, but it doesn’t help much. This Apple support document is more specific, but still confusing.
To manage Apple Pay, you use the Passbook app, which you may never have opened before. Tap the plus button in the upper right, or if you don’t see it, drag the visible cards down until you do.
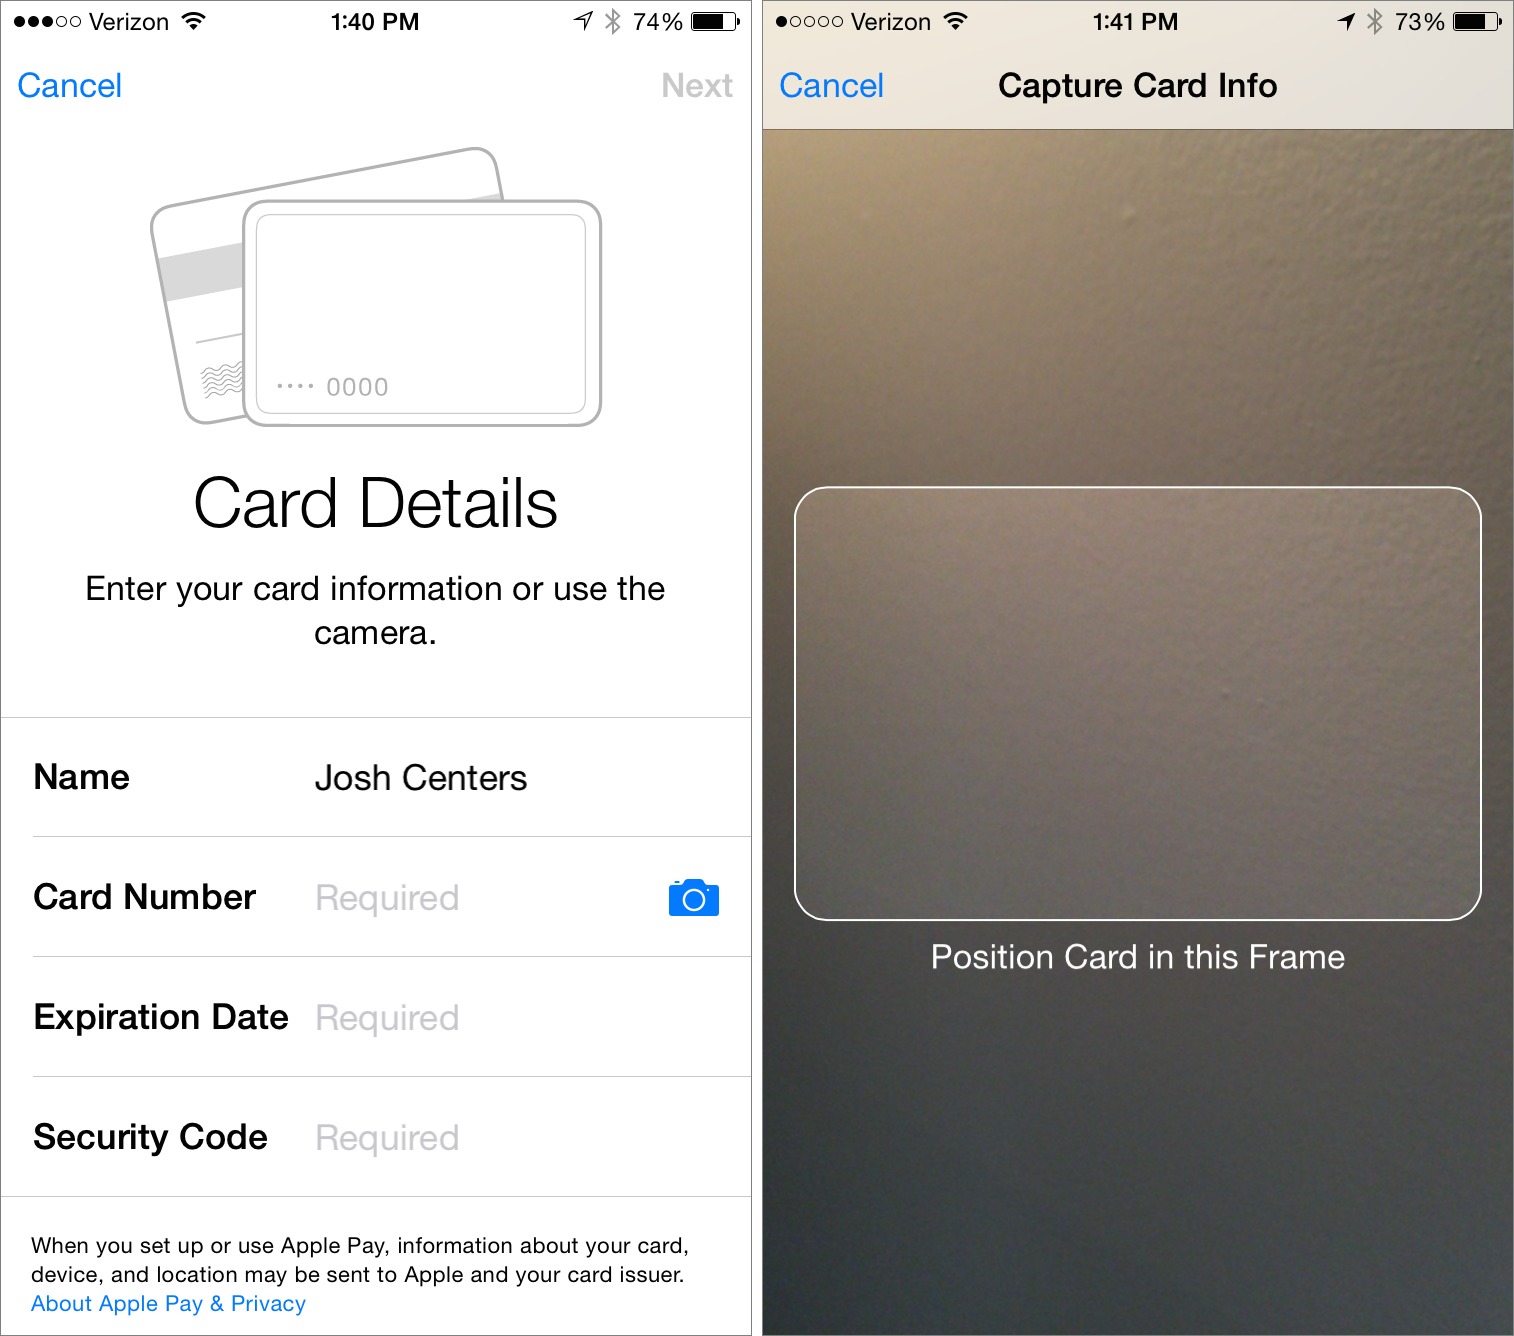
Under Credit and Debit Cards, tap Set Up Apple Pay, and enter your Apple ID password if prompted. You now have two options: Use Card on File with iTunes (easiest) or Use a Different Credit or Debit Card.

If you choose to use a card already on file, you merely need to enter the security code from the back of the card and tap Next. Agree to the Terms and Conditions (twice), and then select a verification method.
If you want to add a card other than what’s on file with iTunes, you can either enter the information manually (boring) or tap the camera icon to scan your credit card’s information with the camera (cool). Make sure there’s plenty of light in the room and position your card so that it fits in the on-screen frame. When recognized, the card should be added automatically, but you must still add the security code manually.
After adding your card, you need to verify it with a secondary code from your bank. How the verification proceeds depends upon your bank, but in the case of Chase, they wanted to provide me with a verification code via email, a text message, or a phone call. I first tried email, but Passbook told me the code was expired. I tried again with a text message and it worked fine. So if one method doesn’t work, try another.
Back at the main Passbook screen, you’re prompted to tap Enter Code and input your verification code. If you want to change methods, tap Select a Different Verification Option.

Once you have received and entered your verification code (or have called your bank to verify), you should be good to go.
I tried three cards: a Chase Visa, an Ally MasterCard, and a MasterCard from a regional bank. Only the Chase Visa was accepted. Unfortunately, despite Apple working out deals with the major credit card networks, each institution must sign up individually, so if you use a small bank or credit union, expect a long wait before you can use Apple Pay. Even some cards that seem like they should be supported, such as the Citi-managed AT&T Universal Card that TidBITS publisher Adam Engst has, aren’t.
Using Apple Pay in the Real World — If you’re lucky enough to have a compatible card, it’s time to hit the town!
But where can you use Apple Pay? Again, the Apple Pay Web site has a list of partners, but that’s not convenient to reference when you’re out and about.
Apple also says to look for one of two icons: one that looks like a sideways Wi-Fi icon with a hand, and another that specifies Apple Pay. But the first icon merely indicates that the point-of-sale (POS) terminal is NFC-compatible, and isn’t a reliable indicator that you can use Apple Pay. Apple Pay requires NFC, but the NFC payment infrastructure can handle services other than Apple Pay as well.

To test Apple Pay, I visited a few locations in my small town that I knew either had NFC-compatible POS terminals or were Apple Pay launch partners:
- Speedway gas station
- Walgreens
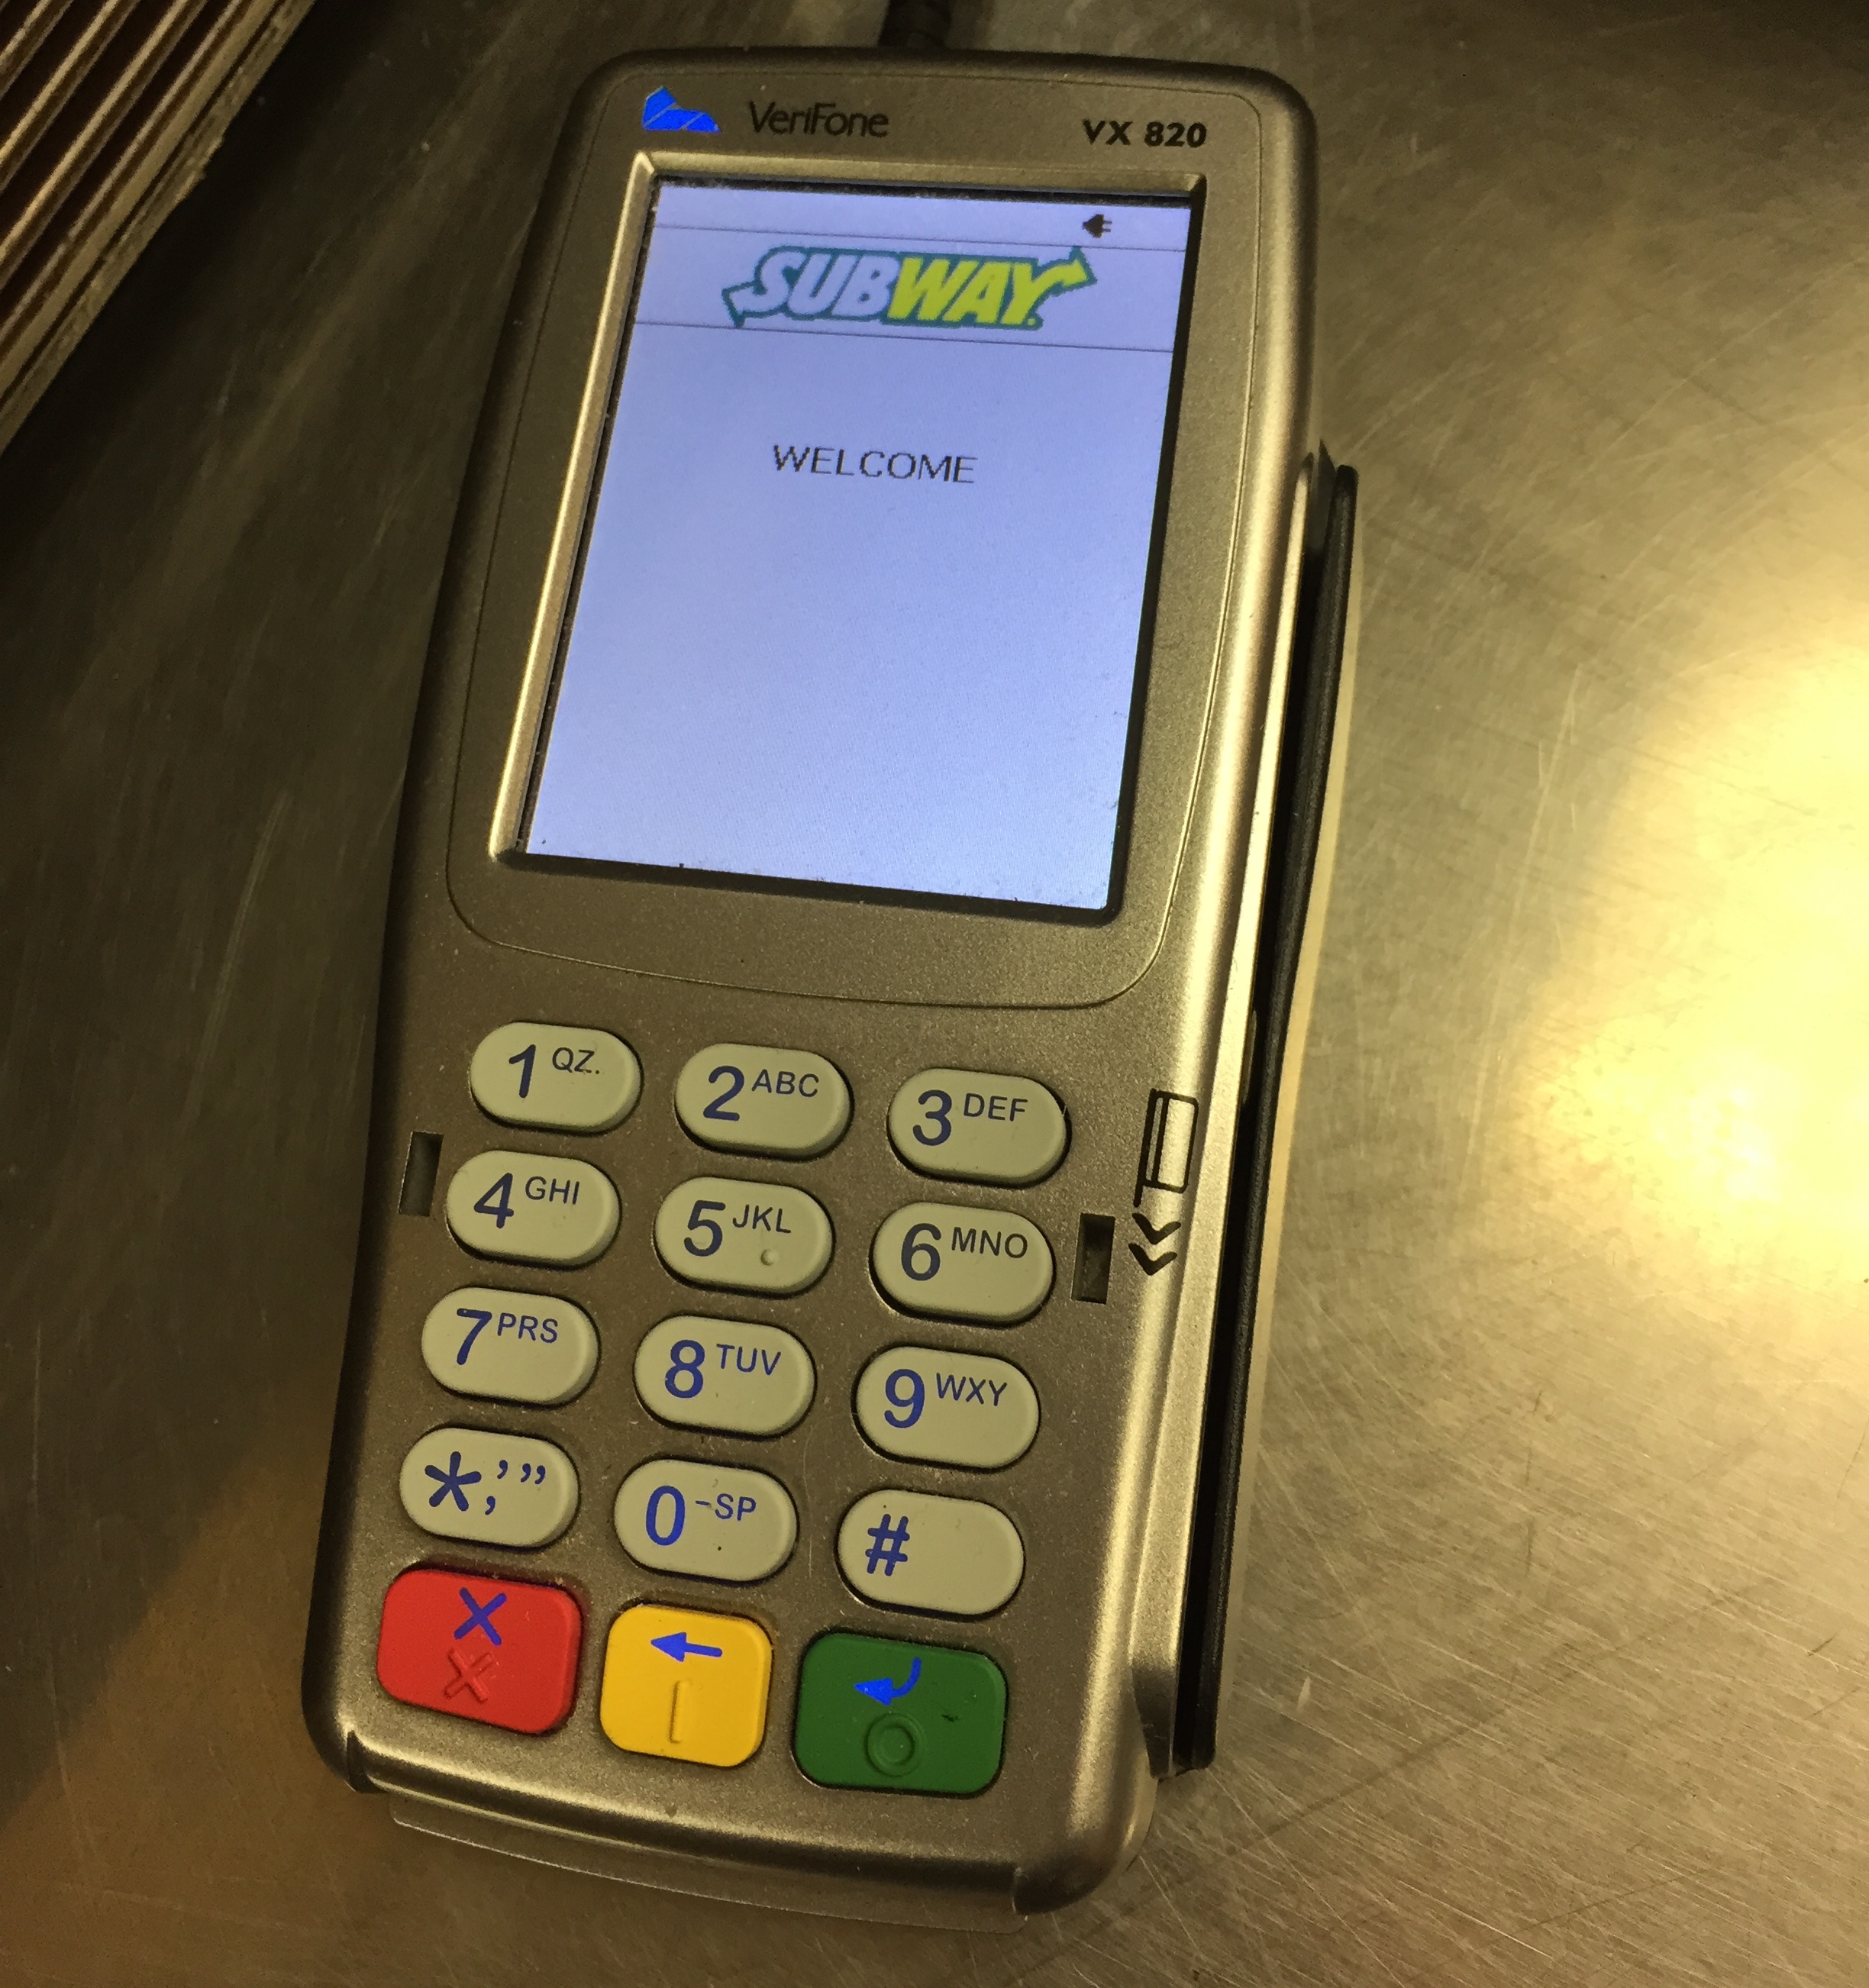
- Subway
- McDonald’s
My first stop was the Speedway around the corner. Despite it not being listed as an Apple Pay partner, it had NFC-compatible POS terminals installed recently, so I was curious if Apple Pay would work.
First, a brief explainer of how you actually use Apple Pay when checking out. It’s dead simple: hold your iPhone up to the terminal, which automatically wakes up the phone. If you have more than one card registered, tap it on the iPhone’s screen, and then place your finger on the Touch ID sensor. You can also opt to enter a passcode instead. Plus, if you place your finger over the Touch ID sensor before scanning, it automatically uses the top card in Passbook.
After your fingerprint is scanned (or you enter a passcode), Apple Pay goes through an authentication routine. If all goes as planned, the payment processes and you receive a notification on your phone displaying the payment location and amount.

Alas, that’s not what happened the first time I tried Apple Pay. The charge was declined, just as though I were over my spending limit. I wasn’t expecting it to work, since Speedway is not an Apple Pay partner, but I was a bit frustrated by the lack of a detailed explanation. I quickly explained myself to the confused clerk, paid with my debit card, and moved on.
The next stop was Walgreens, a chain I’m fond of because it’s always on top of the latest tech developments. It’s the only store where I frequently use Passbook (for my loyalty card) and it has had NFC-compatible POS terminals for years. Despite a warning from the cashier than an earlier attempt at Apple Pay failed, I successfully purchased a Mountain Dew and rubber walking-cane tips (I feel healthier already!).
It was long past dinner time, so next I rolled into Subway, another Apple Pay launch partner. When it came time to check out, I was confused, as there was no NFC symbol on the credit card reader. I warned the cashier in advance and gingerly placed my iPhone 6 to the reader. Surprise, it worked, and I left with my steak and bacon sub and cookies (I’ll be Jared-fit in no time!).
Finally, I visited McDonald’s, arguably Apple Pay’s flagship partner. The company even developed a wacky drive-through POS system for Apple Pay. I wasn’t feeling brave enough to try the drive-through, so I walked in. The purchase of a McDouble (I had missed lunch!) went smoothly, and the cashier actually knew what was happening.
After several purchases with Apple Pay, I can say that the process feels magical — when it works. But one problem, at least for now, is that most of what I can buy with Apple Pay is garbage.

You may be curious what the receipts show, since one of the key advantages of Apple Pay is privacy. Apple claims that the cashier won’t know your name or see your card number. My receipts from Walgreens and Subway appear just as if I had used my credit card, showing that I used a Visa, along with the last four digits of the device number. The McDonald’s receipt shows the same and also indicates that it was a contact-less payment. However, none of the receipts show my name, which is a privacy plus.
Using Apple Pay Online — An overlooked aspect of Apple Pay is that it can be used to pay for physical goods and services within iOS apps (but not via the Web). Some apps that support Apple Pay are: Apple Store, Target, Uber, OpenTable, and Groupon. Unlike physical payments, you can use in-app Apple Pay with the new iPad Air 2 and iPad mini 3, both of which have Touch ID.
I think this aspect of Apple Pay has been woefully downplayed. For kicks and giggles, I downloaded the Target app and bought some paper towels. The entire process took, at most, two minutes, and didn’t require me to set up an account. It was the most frictionless online purchase I’ve ever made (factoring in account setup time).

It’s as simple as tapping the Apple Pay option when it’s time to pay, then placing your finger on the Touch ID sensor. Apple Pay fills in your shipping details, and you’re done.
Online retailers who provide iOS apps would be stupid to not get on board with Apple Pay. Setting up new accounts is my biggest barrier to entry, and one reason why I shop at Amazon so frequently. But Apple Pay makes it just as easy to buy from any other retailer. If Amazon doesn’t want to be left behind, it had better get on board, too.
Managing Apple Pay — As I mentioned above, you receive a notification whenever an Apple Pay payment is processed. You can view these in Notification Center.
To see more information, open Passbook and select your card. It lists your most recent transactions.
![]()
Tap the info button for additional settings. If your financial institution has an iOS app, it will be linked to here. Other settings enable you to disable notifications, contact your institution, and remove the card.
The Verdict on Apple Pay — My early impressions of Apple Pay are positive. Like any good Apple innovation, it feels magical when it works, and it promises a solution to what seems to be a never-ending stream of credit card number thefts (the most recent being Staples, which has signed on with Apple Pay). But like any fledgling technology, it has challenges that must be overcome.
The first, and most obvious, challenge is participation by both financial institutions and retailers. For me to pull out my iPhone instead of my debit card, I need to know that Apple Pay is going to work every time, and that demands ubiquity. Unfortunately, I don’t see that happening in the near future. Two of the largest U.S. retailers, Walmart and Best Buy, are flat-out rejecting Apple Pay for a competing system that doesn’t require NFC. Best Buy has tried NFC in the past, but said it was too expensive to maintain.
The other end of that equation, financial institutions, doesn’t look much more promising. Sure, the banks are enthusiastic about Apple Pay as a way to prevent fraud, but if each has to sign an individual agreement with Apple, it could take years before they’re all on board. I’m hoping Apple can work out some arrangement with the credit card networks to speed up adoption.
The second, equally crucial challenge is education. After installing iOS 8.1, I had no idea how to set it up. Unlike setting up Touch ID when I got my new iPhone 6, there were no prompts to set up Apple Pay. I found it in Passbook by sheer guesswork, but how many normal users would think to do that? Who even opens Passbook enough to remember it’s there?
And once it’s set up, there’s no clues about how or where to use it. I had seen Apple’s original announcement, so I knew it involved touching the phone to… something. But what do you touch it to? The credit card scanner? The register? Do I hand my phone to the clerk? How do I know it’s compatible? I have yet to see a sign or banner that says, “Apple Pay accepted here!” If I were a normal person who doesn’t stay on top of tech news, I’d have no idea how to use Apple Pay.
It’s not just the customer who’s confused: the cashiers seem equally uninformed. The cashier at Subway acted as though I were a wizard. And I don’t blame her! If I had been in her shoes, I would probably have been a bit flabbergasted as well. Cashiers at Walgreens and McDonalds seemed equally awestruck, even though they at least understood what I was doing. (As a side note, I’m waiting for a clueless manager somewhere to think an Apple Pay customer is “hacking” the register and call the police.)
If Apple is serious about Apple Pay taking off, it’s going to have to help businesses educate customers and employees. Employees should know what Apple Pay is and know how to help customers use it. Customers shouldn’t have to guess if they can use Apple Pay or not. There should be clear signage, both on the door of the business and at the POS terminal, with brief instructions.
My prediction is that Apple Pay will be a success, but not in the way most analysts have imagined. The focus has mostly been on the in-store aspect, but I think that end will take years to achieve widespread adoption, because not every retailer will want to shell out for NFC readers, and if Apple Pay isn’t ubiquitous, users will forget about it as soon as the novelty wears off, unless they have additional incentive to use it. (There is already talk of integrating Apple Pay with loyalty programs, which would at least guarantee that I’d use it at Walgreens.)
Where I do think Apple Pay will succeed is with apps. One of Amazon’s biggest advantages in the retail space is that just about every online shopper has an account and associated payment method. If I have the choice between buying an item from Amazon or a competitor, I almost always choose Amazon because it’s more convenient.
Apple Pay removes that friction entirely, putting every online retailer who participates in Apple Pay on equal footing with Amazon (potentially better footing, since Apple has more credit card numbers on file than Amazon).
There are two potential snags in Apple Pay’s online dominance. The first is that it works only through iOS apps, and not on standard Web sites, which is limiting. The greater snag is that Apple Pay requires the latest iOS hardware: an iPhone 6, iPhone 6 Plus, iPad Air 2, or an iPad mini 3. Great as these devices are (well, except for the utterly boring iPad mini 3), even loyal Apple customers won’t necessarily upgrade their existing devices for another year or two.
The reason for this hardware requirement is that Apple Pay stores your credit card information not in flash storage or (heaven forbid!) iCloud, but in the A8 and A8X processors’ Secure Element. The A7 featured a Secure Enclave to store fingerprint data, but it presumably is incapable of storing credit card data.
While it’s good that Apple is taking security with the utmost seriousness, I fear that this limited device compatibility will hobble Apple Pay out of the gate. Or, perhaps that’s why Apple isn’t saying much about it now — perhaps the big push will come in another year or two once the bulk of iOS devices support Apple Pay.
Think about that. Maybe, just maybe, these snags have been left in intentionally. Apple has a chicken-and-egg-and-frying-pan problem: it needs to lure banks, retailers, and users while also keeping things manageable.
Apple is notoriously bad at the things it doesn’t excel at. Take cloud services. The company has struggled with them for nearly fifteen years between iTools, .Mac, MobileMe, and iCloud.
But people are willing to put up with problems with online services. We may squawk, but we’re not that perturbed by servers going down, spotty connections, and other things that go bump in the net. When Facebook founder Mark Zuckerberg declared, “Move fast and break things,” he encapsulated the cloud development philosophy perfectly.
With Apple Pay, though, Apple is offering a financial product, which is different from anything the company has created so far. I know, I used to work in finance, where the philosophy is: “move slow and don’t touch anything!” The world of finance is tightly regulated. One mistake could cost Apple a lot of money, or even worse, land someone in jail. And while users might forgive and forget that email outage, they’ll break out the tar and feathers if Apple Pay loses track of their money.
Apple Pay has to scale up slowly, but there’s no such thing as a “beta” financial product. No one would use it. So what does Apple do instead? Make Apple Pay sort of difficult to figure out. That won’t slow down the small pool of early adopters who will breathe life into the system while Apple works out the kinks. But it will keep the masses in the dark.
Those early adopters will explain Apple Pay to their friends and family, and if Apple is lucky, Apple Pay will trickle down through the technical literacy ranks at a pace Apple can keep up with while learning the financial industry ropes.
In a year or two, once Apple has figured out the Apple Pay business, and how to scale it properly, then the company can unleash a wave of marketing and education to corner the market. With enough customers demanding Apple Pay, even the most stubborn retailers will have a hard time balking.
If Apple Pay works, it couldn’t be a better side business. Apple reportedly gets a 15-cent cut out of every $100 it processes. That doesn’t seem like much, but scaled up, it means a nice chunk of mostly passive income. Apple doesn’t have to design anything, build high-tech factories, buy raw materials, or do anything but track the virtual money we send through its servers.
Whether Apple Pay survives in the long run or fades into history, it’s still a neat system with a lot of promise, and is one of Apple’s coolest new initiatives in years. Here’s hoping it insinuates itself into our lives more than, say, iBeacon.
The Real Reason Some Merchants Are Blocking Apple Pay… for Now
Over the past few days, news emerged that some retailers, most notably Rite Aid, CVS, and Best Buy, started actively blocking Apple Pay at their cash registers, even though the hardware and software actually supported it. This didn’t just block Apple Pay, but also all other near-field communication (NFC) payments systems, such as Google Wallet. The point-of-sale (POS) terminals — that’s the technical name for credit card–capable cash registers — fully support all NFC payment options that meet industry standards, so to block Apple Pay the retailers had to completely disable NFC, in either hardware or software.
It rapidly emerged that these retailers are all members of the Merchant Customer Exchange (MCX), which backs a competing mobile payments system known as CurrentC, which doesn’t use NFC. CurrentC isn’t available yet, and it won’t be released until next year.
As someone who has followed the payments industry and its tension with merchants for years, I’m not surprised. It’s a fight the retailers will lose in the long run, and their short-term goals have nearly nothing to do with Apple, and everything to do with years of mistreatment (real or perceived) by the credit card brands.
Customers are merely an afterthought in this battle, as they are being pushed toward using a system that is less convenient than either cash or credit card, never mind Apple Pay or Google Wallet. Worse, the companies doing the pushing are the same ones who have suffered massive security failures over the past few years. And now they want direct access to our bank accounts.
A Dish Best Served Cold — Credit cards may be a convenience for consumers (though arguably one that keeps us spending beyond our means in a state of perpetual debt), but they are often a bane for retailers. Card-issuing banks and the card brands themselves charge a percentage on every transaction, which can sometimes exceed 5 percent. Even with more standard costs closer to 2–3 percent, keep in mind that retail margins are extremely low, so accepting credit card payments makes earning a profit all the more difficult for retailers. This interchange fee has never declined, and has even sparked lawsuits. The fee covers transaction and risk costs, but some of it also goes to fund reward programs.
Aside from the interchange fee, the card brands also enforce a set of security requirements known as the Payment Card Industry (PCI) Data Security Standard. PCI pushes liability back onto retailers and processors, who can be fined for not meeting the security requirements or for suffering a breach.
That level of accountability might be viewed as beneficial, except that when a company is breached, even if it has previously passed its PCI assessments, it is always found retroactively non-compliant. The council that manages the PCI program has said, on the record, that no PCI-compliant organization has ever been breached. Yet nearly every breach you read about these days was of an organization that passed its PCI assessment.
It’s a bit of a racket, and one that’s well known in the security industry. Plus, when there is credit card fraud, those costs are often pushed back to the merchants, depending on the origin.
As a result, you can see how the retailers would be unhappy. They feel that they’re paying excessive fees without seeing significant benefits, they were required to increase their security spending dramatically in recent years, and they’re hung out to dry if (or when) something goes wrong.
Not that retailers are completely innocent. Credit cards outside of the United States generally use secure payment systems, which are just beginning to roll out here. One major reason for the delay, according to my industry sources, is direct pushback from retailers unwilling to pay for the hardware upgrades.
And despite the high-profile security breaches that seem to happen every few weeks, many merchants continue to turn a blind eye to security risks (based on my direct experience). While I empathize with the difficulties of protecting a weak transaction system in the first place, quite a few executives willfully ignore security and fail to support even basic precautions that will still be required by more modern systems.
It’s no exaggeration to say that most merchants hate the credit card brands and the banks that support them, but consumer demand forces them to accept credit cards anyway. Retailers have been looking for a way out for decades.
Rock, Meet Hard Place — One problem merchants have is that they lack good alternatives to credit cards. They can’t get a foothold on mobile devices since they don’t have relationships with manufacturers, and the wireless carriers would likely block them to support their own mobile payment systems (as many did with Google Wallet).
Merchants do issue their own credit cards, but that isn’t a cross-merchant solution and most customers will have only so many cards at one time.
They can accept debit cards, but that system is full of risks to consumers since accounts don’t have the same protection, and despite years of support, adoption is still low.
Really, the only option available to retailers, as they see it, is to build their own app and payments system, which is precisely what they’re doing.
Enter CurrentC — When you get down to it, CurrentC is a bit of a hack. Here’s how it works. You as a shopper download the app, sign up for the service, and connect the service directly to your bank account. When you want to make a payment at a participating retailer, the POS terminal displays a QR code that you scan with your phone. That act generates the tokens and payment transaction details (see my Macworld article on Apple Pay to understand the role of payment tokens). The cloud service then reconciles the transaction and transfers the
funds from your account.
CurrentC provides two advantages to the merchants. They completely avoid the credit card system, and they’re able to track transactions and tie them directly to loyalty programs or marketing initiatives. But it faces three huge hurdles: security, usability, and consumer risk.
I don’t have enough details to evaluate the CurrentC system fully from a security perspective, but it could be relatively secure at the technical level. I do worry about CurrentC on Android phones, which have proven susceptible to malware.
In general, NFC can be more secure that CurrentC’s app-based approach since there are ways to design the hardware that largely circumvent the operating system when making transactions. Without hardware security support, I don’t see any way CurrentC can be as secure as Apple Pay or some other NFC systems. And some of the retailers behind CurrentC don’t have the best security reputations.
Worse, usability of CurrentC is a mess, thanks to the need to pull out your phone, open an app, and scan a QR code. It takes more effort than using cash or a credit card. The primary reason I predict Apple Pay will succeed is because it’s easier to use than nearly any alternate payment option.
The final elephant in the room is consumer risk. In the United States, we have zero liability when using credit cards. Fraud is covered by the banks and merchants. In contrast, CurrentC requires direct access to your bank account, which doesn’t have anything close to the fraud protections offered by credit cards. That’s why I never use my PIN-based ATM card for debit transactions, even when it’s supported. If something bad happens, I am far more likely to be on the hook for fraud if someone steals my card number and PIN.
MCX will have to cover this risk if CurrentC is to have any chance of success. Without such guarantees against fraudulent usage, you would be foolish to use the system.
Wrong Motivations — By refusing to use Apple Pay and focusing on CurrentC, merchants are acting more out of a sense of revenge, with a nod toward profits, than in the interests of their customers. (Were CurrentC to be wildly successful and kill off credit cards entirely, I’d be shocked to see merchants pass the savings on to customers by lowering all prices by 2–3 percent.)
CurrentC may be more secure than current magnetic-swipe credit cards, but it’s less usable and less secure than Apple Pay. There really aren’t many benefits to customers, unless merchants force everyone to use CurrentC instead of existing loyalty cards.
It’s also hard to build consumer trust when we see near-weekly reports of massive merchant credit card breaches in the headlines. Unfair or not, these losses make us much less trusting of a merchant system with direct access to our bank accounts.
The merchants aren’t primarily dismissing Apple, they’re taking on the entire credit card system. Their main chance of success would be to partner with Apple and Google directly, but it’s hard to see that happening any time soon — Apple isn’t about to hamstring its new product by angering its partners. Consumers like credit cards, for better or worse. CurrentC isn’t even close to what would be necessary to take down such an entrenched system.
Merchants aren’t blocking Apple Pay to collect data on us. They aren’t doing it to spite Apple, or to pressure Apple into giving them a split of the profits. While those might be factors, the real reason is a deep-seated, and possibly well-deserved, hatred of credit cards.
Unfortunately, none of this has anything to do with improving the customer experience. That’s why it’s hard to see these retailers sticking to their guns in the long run, and I anticipate that I’ll eventually be able to use Apple Pay in their stores.
FunBITS: Pedometer++ Tracks Your Steps on the Cheap
Studies have shown that fitness trackers, like traditional pedometers, Fitbits, the Jawbone UP, and the upcoming Apple Watch (see “Apple Previews the New Apple Watch,” 9 September 2014), help motivate exercise.
But fitness trackers have their share of problems. One is cost. Cheap pedometers can be had for a few bucks, but I’ve never found them to be particularly accurate. A more advanced tracker will set you back $50 or more, and there’s a good chance you’ll forget to wear it regularly or charge it. Been there, done that.
Here’s the thing: If you own an iPhone 5s or newer, you’re already carrying a fitness tracker. The iPhone 5s is equipped with Apple’s M7 motion coprocessor, while the iPhone 6 and 6 Plus have the slightly more advanced M8 motion coprocessor. These chips track your movement at all times, without putting additional strain on the battery. You just need the right software to access the data.
Fortunately, developer David Smith (affectionately known as Underscore David Smith, due to his Twitter handle) has just the thing: Pedometer++, which is free in the App Store. It’s ad-supported, but a $0.99 in-app purchase dispenses with the ads. Naturally, an iPhone 5s, iPhone 6, or iPhone 6 Plus is required (sorry, iPhone 5c users).
Pedometer++ is painless to use. Open the app for the first time, and it has already pulled your steps and distance from your iPhone. It shows a bar graph for each day recorded, with steps taken and miles traveled, and it even denotes if you’ve climbed stairs (on the iPhone 6 and 6 Plus).
From Pedometer++’s settings, you can set a daily step goal. The popular 10,000-step goal is the default, which I’ve come nowhere near reaching yet. You can also export your information, but only via email. However, from the main screen, you can share a screenshot of your day’s progress to the usual services and apps.

What’s great about Pedometer++ in iOS 8 is that it includes a Today View widget. Add it to your Today View in Notification Center, and you can see your daily steps taken alongside weather, your calendar, and whatever else you’re tracking there. There’s no need to open the app!

Pedometer++ doesn’t currently integrate with the new Health app in iOS 8. However, Health pulls step data directly from the motion coprocessor, so the step count is the same. Frankly, I find the way Health displays step information to be confusing. It measures steps not by day, but by minute, and then displays a daily average instead of letting you see distance per day. The organization of Pedometer++ is much more useful. However, David Smith told me via Twitter that he might consider Health integration in the
future.
If you’re looking for a cheap, simple way to track your activity level, Pedometer++ is worth a download.
TidBITS Watchlist: Notable Software Updates for 27 October 2014
Fetch 5.7.4 — Fetch Softworks has released Fetch 5.7.4, a bug-squishing update that also deals with a couple of cosmetic issues when running in OS X 10.10 Yosemite. The venerable file transfer client fixes compatibility problems with some versions of the Bulletproof FTP server (as well as with the LIST -al command and some FTP servers), resolves problems with creating folders on and uploading files to some SFTP servers, fixes a problem with slow scrolling on 10.9 Mavericks, stamps out an issue with choosing a default shortcut, improves the stop button appearance on Yosemite, and adopts
Mavericks code signing. Unfortunately, the Mac App Store edition is still stuck on version 5.7.3 as of this writing. ($29 new from Fetch Softworks or the Mac App Store with a 20 percent discount for TidBITS members and free for educational users, 11.9 MB, release notes, 10.5+)
Read/post comments about Fetch 5.7.4.
Sandvox 2.9.1 — Karelia has released Sandvox 2.9.1, a maintenance update that squashes a bug that produced infinite login failures when browsing folders on a server — potentially resulting in a ban from the server. The Web site authoring tool also improves detection and handling of hosting providers that require permissions to be set on files after Sandvox uploads them, improves detection of long uploads caught out by an idle timeout issue on FTP, and fixes several designs to avoid an unnecessary horizontal scroll bar. ($79.99 new, free update from Karelia or the Mac App Store, 42.1 MB, release notes, 10.6.6+)
Read/post comments about Sandvox 2.9.1.
Security Update 2014-005 (Mountain Lion and Mavericks) — Apple has released Security Update 2014-005 with a Secure Transport-related fix for OS X 10.8 Mountain Lion and 10.9 Mavericks. The Security Update patches the so-called POODLE vulnerability that could enable an attacker to decrypt data protected by SSL. Plus, the security update includes the contents of OS X Bash Update 1.0, bringing the Bash patches to everyone (see “Apple Updates Bash for the Shellshock Vulnerability,” 29 September 2014). It’s available via Software Update or via direct download from Apple’s Support
Downloads Web site. (All updates are free. For 10.8 Mountain Lion, 152 MB; for 10.9 Mavericks, 6.8 MB.)
Read/post comments about Security Update 2014-005 (Mountain Lion and Mavericks).
SpamSieve 2.9.17 — Michael Tsai of C-Command Software has released SpamSieve 2.9.16, which adds support for Apple Mail in OS X 10.10 Yosemite. (If you’ve already updated to Yosemite or don’t see the SpamSieve commands in Apple Mail’s Message menu, be sure to choose Install Apple Mail Plug-In from the SpamSieve menu.) The spam filtering utility also improves the crash reporter’s error reporting, fixes a bug where SpamSieve could crash if there was an error writing to its log file, and adds several updates to the user manual. Plus, it works around a change in OS X that could cause the “Quit when mail client quits”
option to fail in the Japanese localization. (C-Command Software has a call out for help in keeping SpamSieve’s Japanese localization up to date.) ($30 new with a 20 percent discount for TidBITS members, free update, 14.1 MB, release notes, 10.6+)
Read/post comments about SpamSieve 2.9.17.
Hazel 3.3 — Noodlesoft has released Hazel 3.3, with a number of new additions. The file cleanup utility can now match files against multiple rules, and conditions can now use custom attributes defined in earlier conditions. The update also enables you to monitor whether an attribute has changed without knowing what it changed from or to by using the new “did change” operator, enables AppleScripts in conditions to export custom attributes as they already can in actions, and adds support for using JavaScript in OS X 10.10 Yosemite (in addition to AppleScript). User interface changes include a variety of cosmetic changes
for Yosemite, new graphics and icons, a fix for various erratic behaviors with tag fields, and various VoiceOver fixes. Hazel 3.3 now requires 10.8 Mountain Lion or later. ($29 new, free update, 8.9 MB, release notes, 10.8+)
Read/post comments about Hazel 3.3.
TextExpander 4.3.4 — Smile has released TextExpander 4.3.4, a maintenance release that squashes a variety of bugs. In addition to adding support for Dark Mode on OS X 10.10 Yosemite, the update fixes minor memory leaks, resolves an issue with expansions in the ClarifyIt screen recording app, avoids a potential hang caused if the TextExpander Helper fails during suggesting or searching, and fixes several crashes (such as when deleting group via AppleScript, editing fill-ins using popovers, and accessing or editing a snippet as it is being deleted). ($34.95 new with a 20 percent discount for TidBITS members, free update, 9.8 MB, release notes, 10.7+)
Read/post comments about TextExpander 4.3.4.
ExtraBITS for 27 October 2014
In its tear-down of the iPad Air 2, iFixit found some surprising hardware; Steve Wozniak is heading to the Land Down Under; and Managing Editor Josh Centers joins the MacJury to debate Apple’s recent moves.
iFixit Reveals Secrets of the iPad Air 2 — The tinkerers at iFixit have torn apart the new iPad Air 2 and discovered that it contains NFC hardware, which would theoretically allow for in-store Apple Pay transactions. Whether that ever happens or not, rest assured that your iPad Air’s Smart Cover is compatible with the new model. However, it appears that the battery is slightly smaller than the previous generation, and early reports indicate that battery life has suffered for it. If you had hopes of repairing your own iPad Air 2, forget it: just about everything inside the iPad Air 2 is glued in
place.
Woz Heads Down Under — Apple co-founder Steve Wozniak is heading to Australia. He has accepted a position as adjunct professor at the University of Technology, Sydney (UTS). Wozniak has long professed his love for Australia, and he’ll be working in the UTS Magic Lab, which researches robotics and artificial intelligence.
Josh Centers Joins the MacJury to Discuss Recent Apple Releases — Managing Editor Josh Centers joined host Chuck Joiner, TUAW’s Michael T. Rose, and Smile’s Nat Osten to discuss recent Apple releases, including Apple Pay, the iPad Air 2, and the iMac with 5K Retina display. Josh explained why he thinks the new iPads are lame, pondered the plateaus of computing, and confirmed that he is not a communist.