TidBITS#1287/31-Aug-2015
In this extra-helpful issue of TidBITS, we tackle three common problems. First, if you’re troubled by auto-play videos on social networks showing you offensive acts, Josh Centers has the advice you need to disable them. Second, if you anticipate migrating to a new Mac from a Time Machine backup, Michael Cohen offers solutions to many of the potential pitfalls that you might encounter, based on his own recent migration to a new iMac. Third, if your Wi-Fi network is dropping out or suffering from slow throughput, Glenn Fleishman explains how you can use a pair of Mac utilities to optimize its range and performance. Finally, Josh goes retro with a review of Pac-Man 256 in FunBITS. Notable software releases this week include VMware Fusion 8.0 and Fusion 8.0 Pro and PopChar X 7.2.
How to Disable Auto-Play Videos on Social Media
You’re scrolling through your Facebook or Twitter feed, minding everyone else’s business, when suddenly a video starts playing on its own. Most of the time, these videos are distracting, or perhaps annoying, but as we’ve learned in recent events, they could show something gruesome, like a murder. To ensure that you have control over what you see, here’s how to disable those auto-playing videos on at least Facebook and Twitter.
Google+ doesn’t seem to have such a setting, but I didn’t see any videos that played automatically there either. If you’re an aficionado of Instagram or Vine, you’re more or less out of luck.
Facebook — On the Facebook desktop Web site, click the arrow in the upper-right, and then click Settings in the menu that appears. On the Settings screen, select Videos in the left sidebar, and then set Auto-Play Videos to Off.
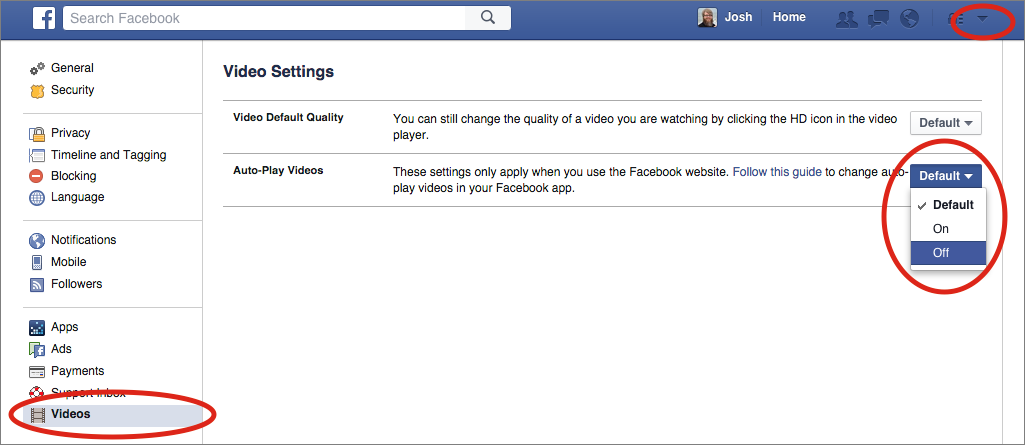
To play videos on the Facebook Web site in the future, you will need to click the play button in the center of the video.
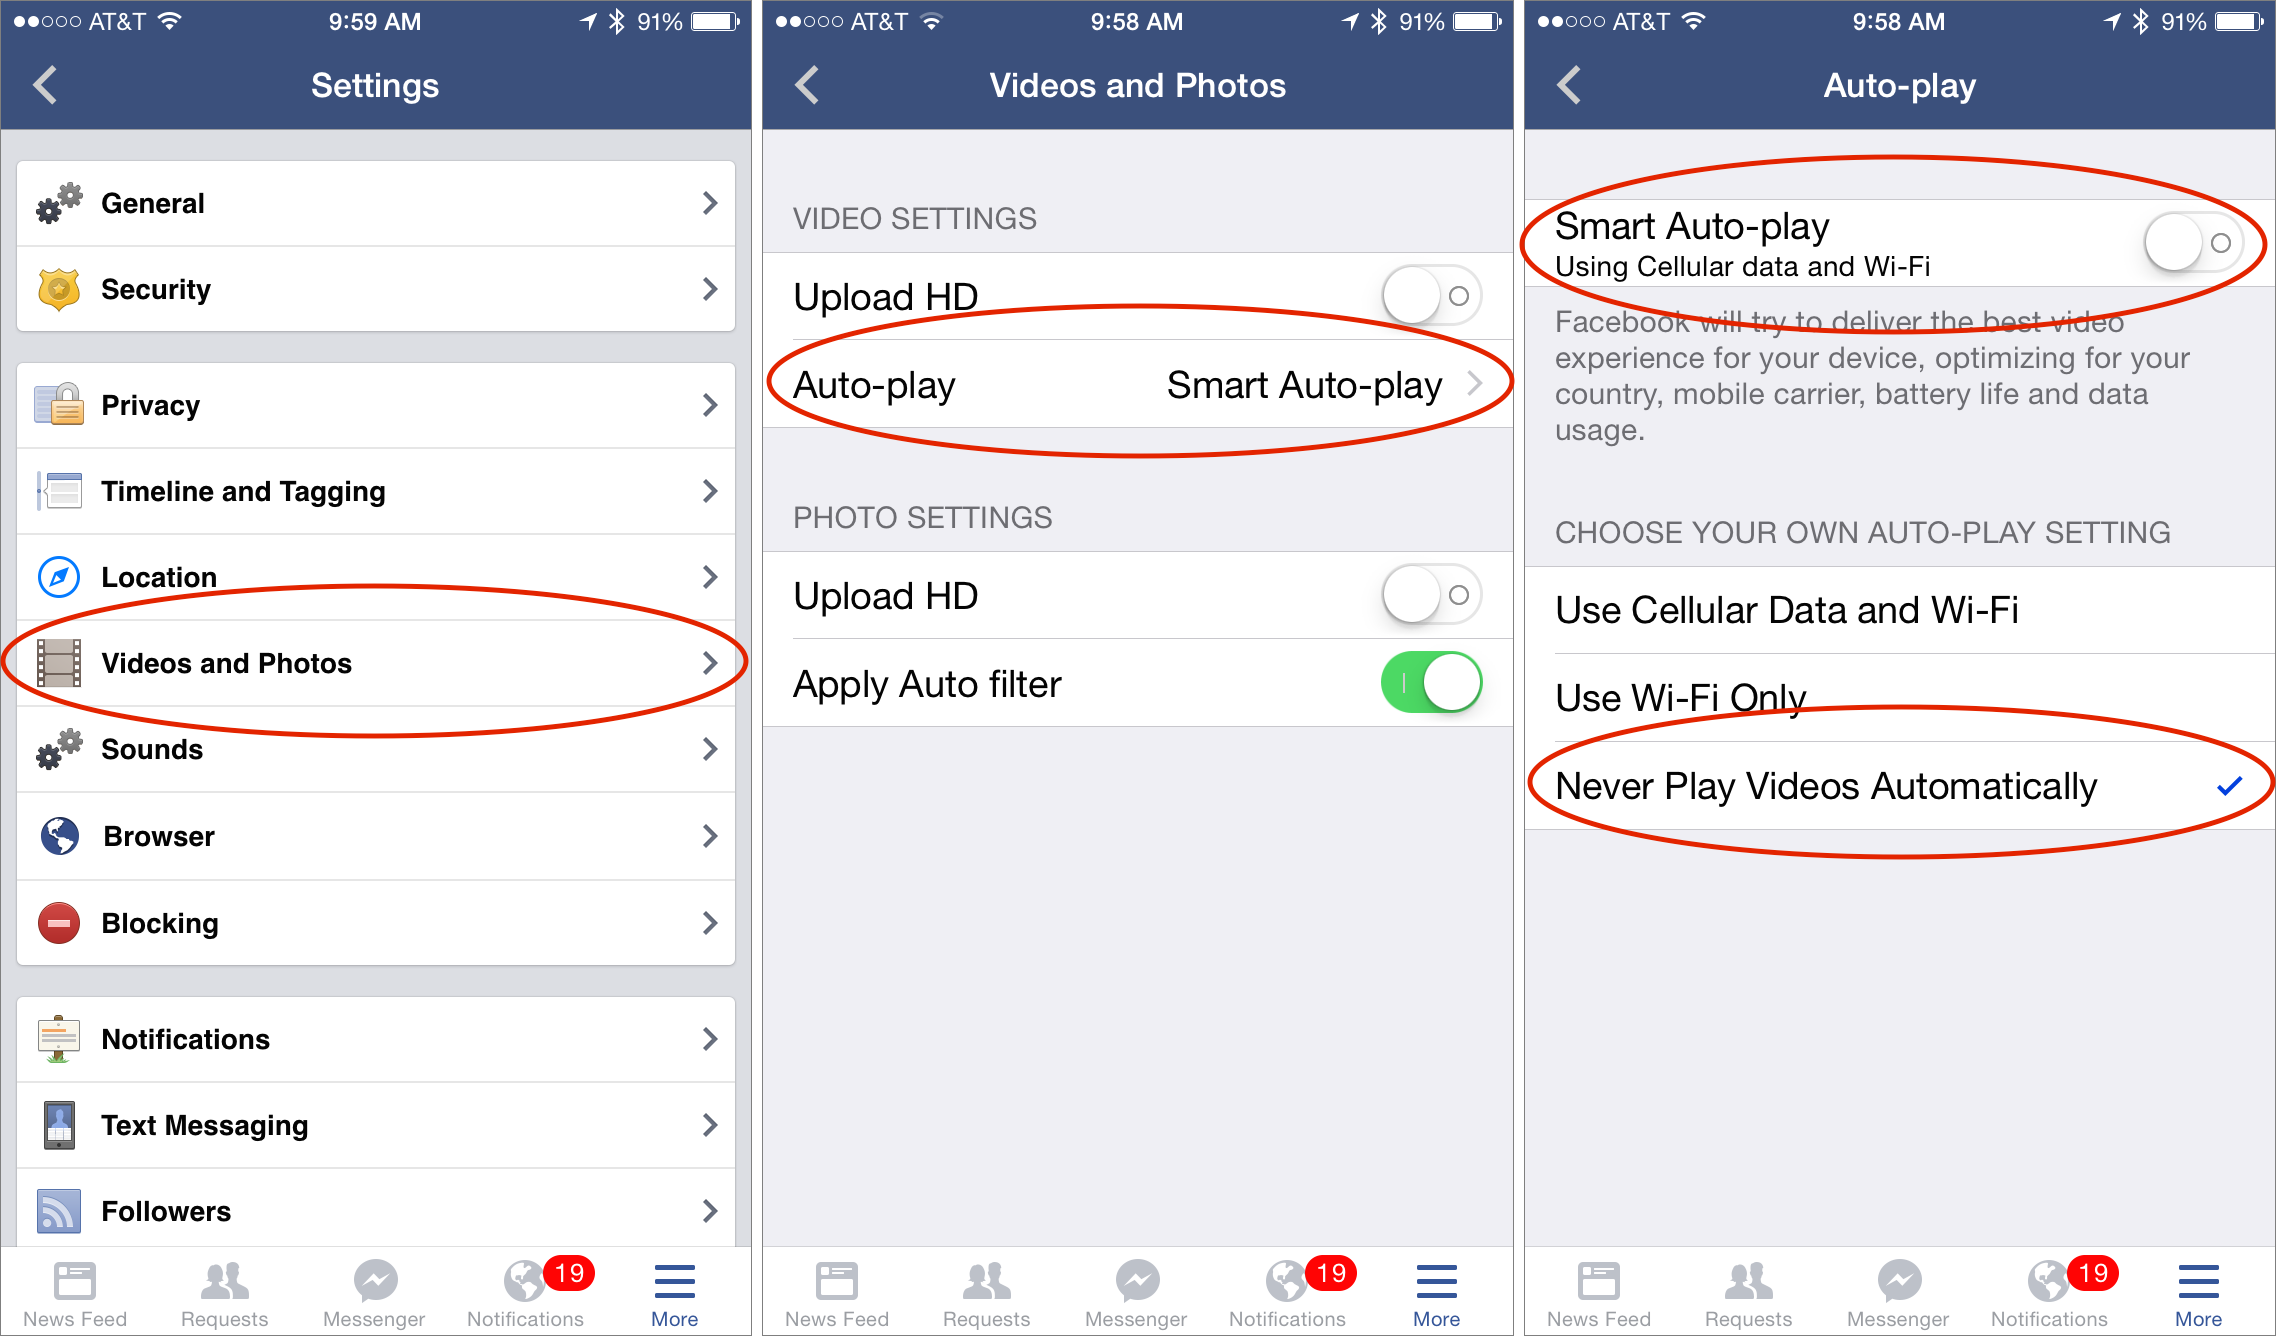
However, the Facebook iOS app will continue to auto-play videos in your feed. To disable that, tap More in the lower right, scroll down, tap Settings, and then tap Account Settings. Tap Videos and Photos, tap Auto-Play, disable Smart Auto-Play, and then select Never Play Videos Automatically.
Twitter — Thankfully, most Twitter clients don’t do auto-play videos. However, Twitter’s Web site and iOS app do. Here’s how to disable them on both.
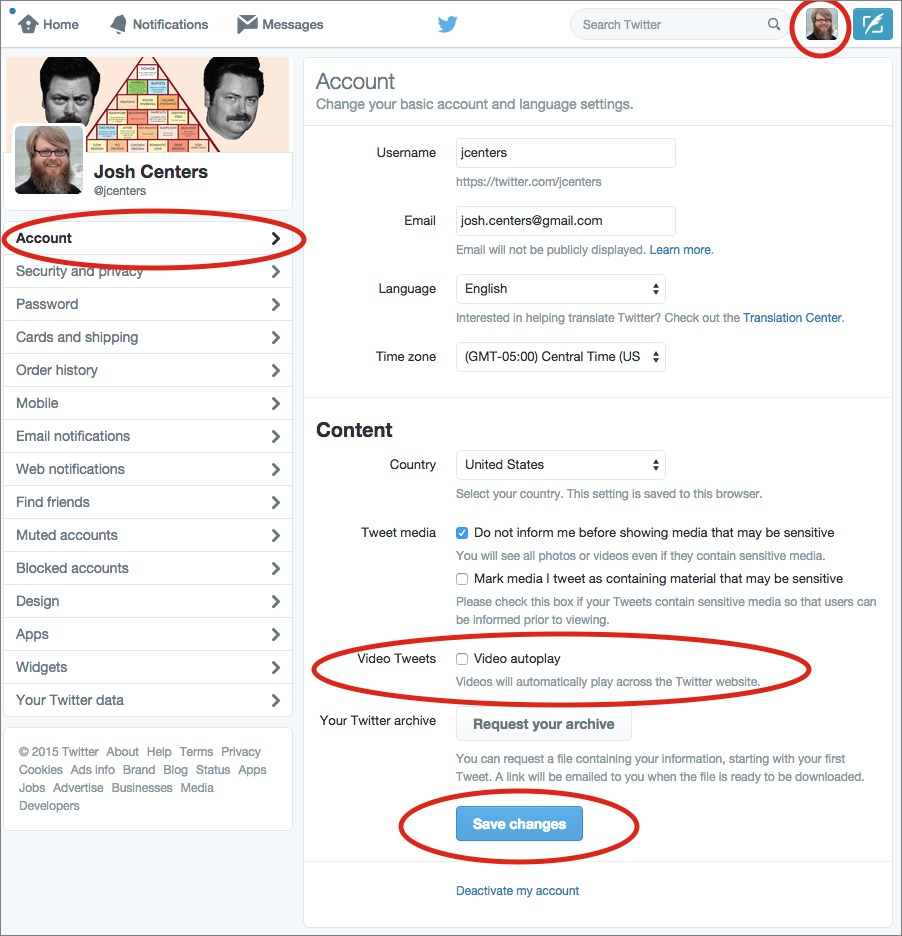
On Twitter’s Web site, click your avatar in the top right and choose Settings. Under Account, uncheck Video Autoplay, and click Save Changes (you’ll likely have to enter your password to confirm). Again, to play videos in the future, you’ll have to click a play button manually.
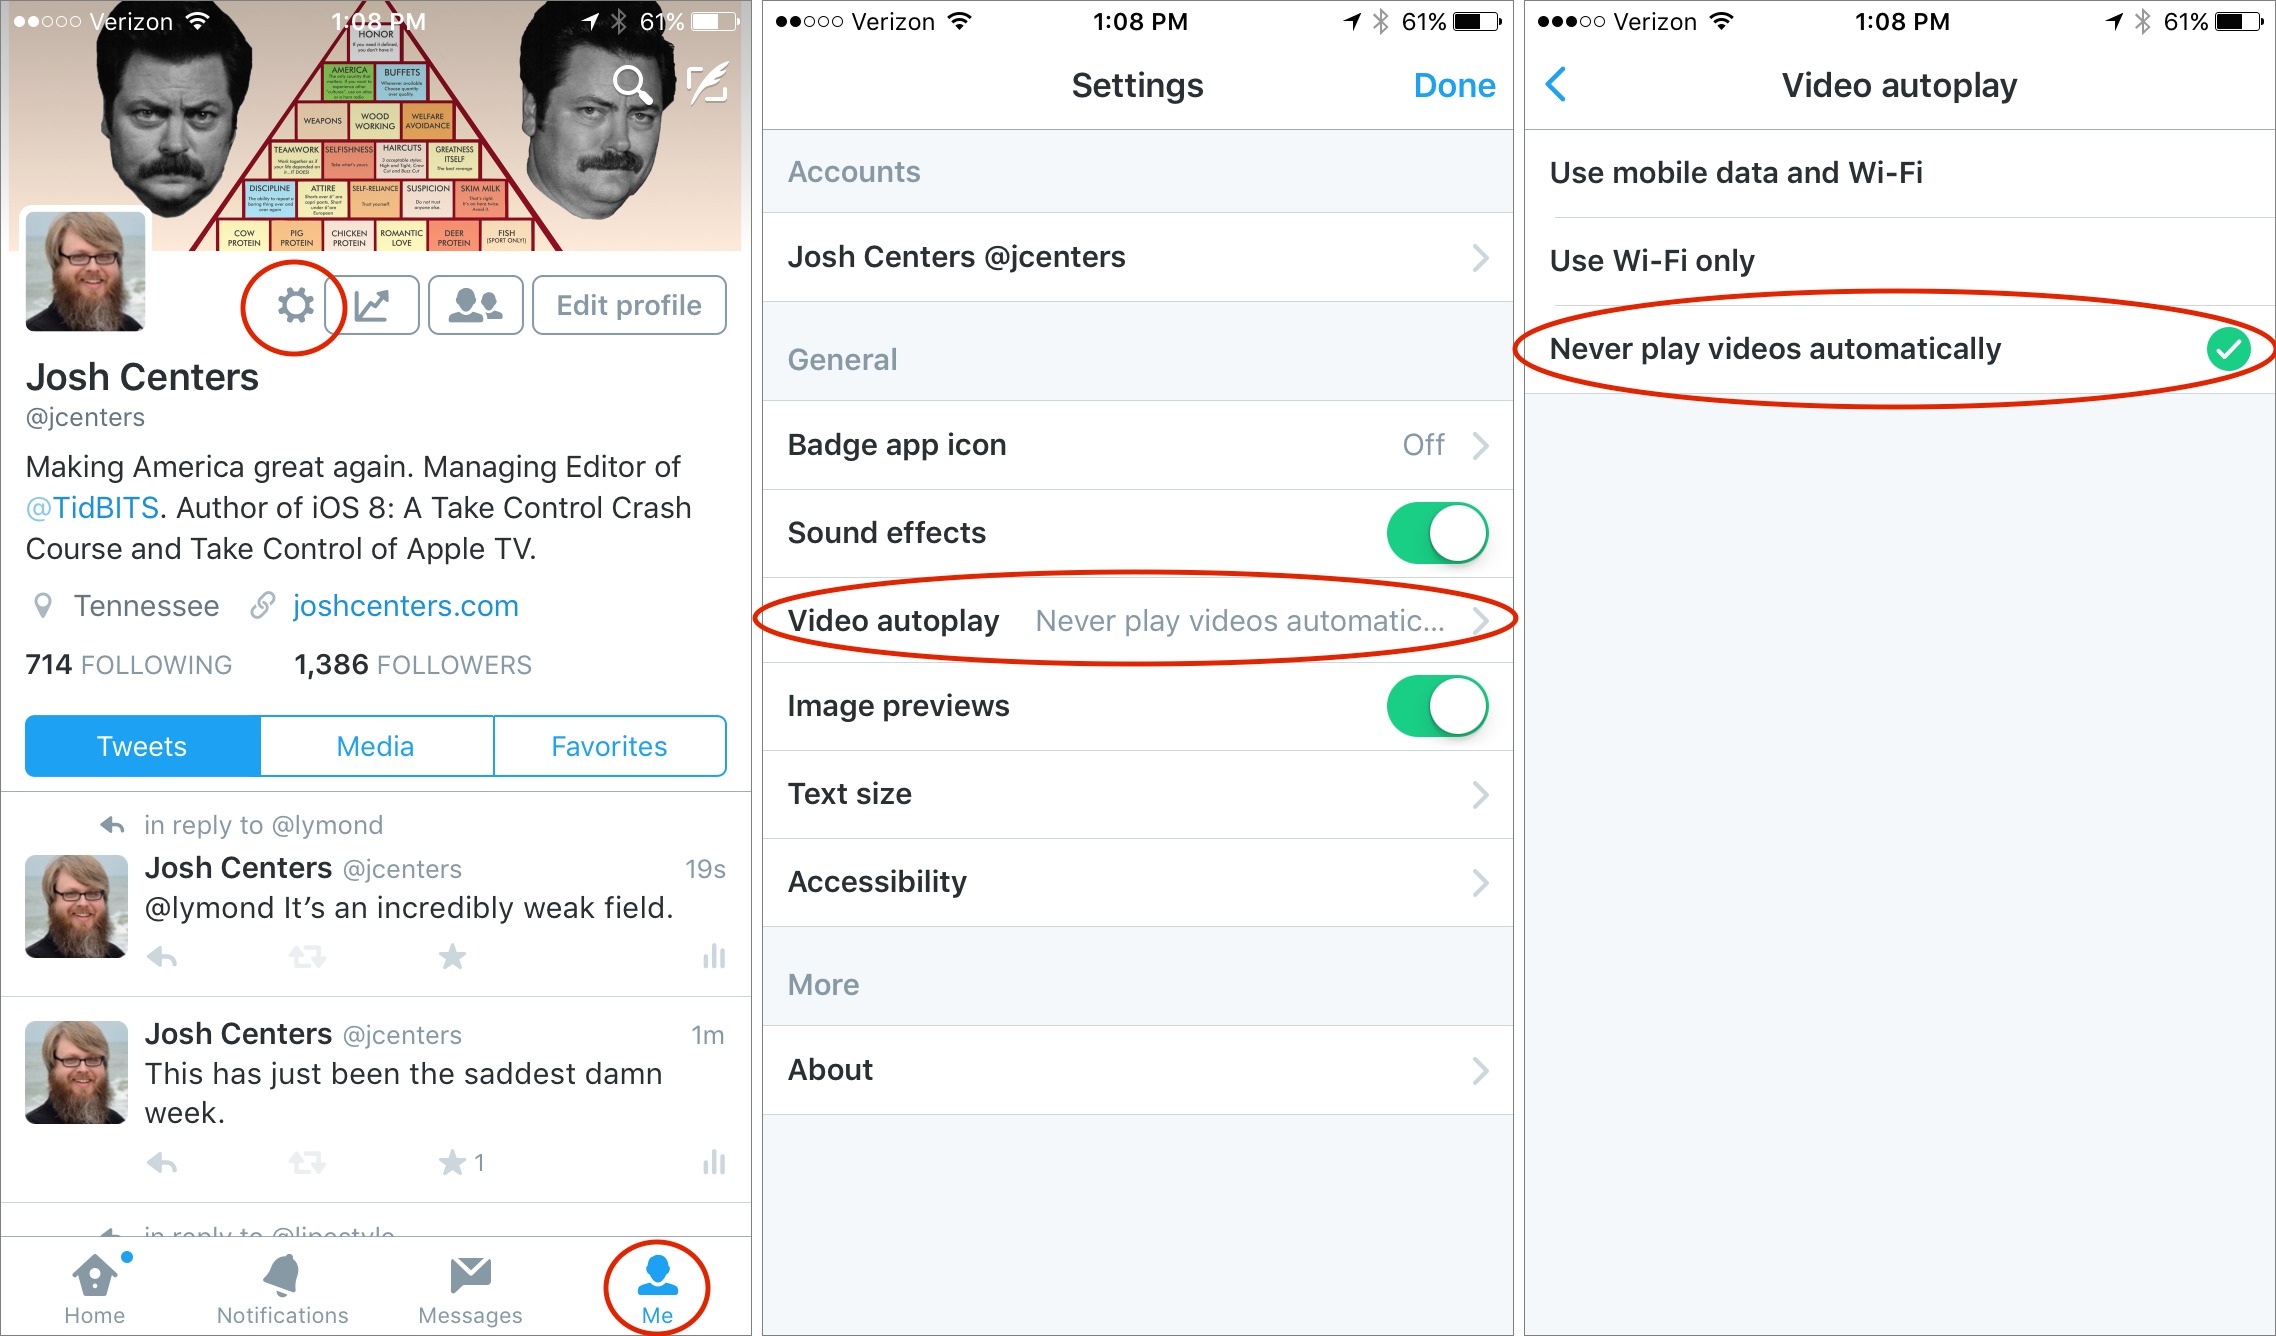
As with Facebook, Twitter’s iOS app will continue to auto-play videos even if they’re disabled on the Twitter Web site. In the app, tap Me in the toolbar, tap the gear, and tap Settings. Tap Video Autoplay, and then tap Never Play Videos Automatically.
Instagram and Vine — Unfortunately, Instagram removed the option to disable video auto-play in 2013. However, you can block users who post offensive videos. To do so, open a person’s profile, tap the … button, and then tap Block User.
Likewise, Vine, which is based almost entirely on auto-play videos, doesn’t offer an option to disable them. If you don’t want to see auto-play videos on Vine, your best bet is to avoid the service altogether.
Thankfully, Web browser makers are starting to acknowledge the problem. The Google Chrome team is working on a feature that will prevent videos from playing unless they’re in the active tab. It’s a start, and a feature we look forward both to having and seeing mimicked in other Web browsers.
Migrating to a New Mac in the Real World
It all began earlier this month with a soft, extremely high-pitched intermittent whine from the upper-right corner of my mid-2011 iMac. Then, a few evenings ago, I heard about a dozen clicks and my Mac shut down. I couldn’t get it to reboot normally, from a safe boot (hold down Shift at the startup chime), nor even from a recovery boot (hold down Command-R). An Internet recovery boot (hold down Command-Option-R) did work, but its included Disk Utility app had a grim tale to tell: my Mac’s internal drive could not be found.
A trip to my local Apple Store Genius Bar confirmed that the Mac’s drive had rung down the curtain and was now an ex-drive. Although the Apple Genius told me they could install a new drive, it would take a week, and since I had been planning to buy a new iMac next year, I decided I’d just push that purchase forward a few months (besides, I can always connect an external drive to the old iMac and use it as a test machine). So I packed up my old iMac, took out a credit card, and within minutes walked out of the Apple Store with both my old iMac and a new iMac with 5K Retina display. I drove home, anxious to discover whether Time Machine really would do what it was supposed to do. Would it “just work”?
The answer is “more or less”; I did get all of my backed-up files restored, and most of my settings as well, but there were more than a few loose ends and hiccups along the way.
I strongly suspect that my experiences restoring my Mac’s contents to a new Mac from Time Machine are similar to those of other users who have had to do the same thing. I present the following tale for those of you who haven’t (yet) had that experience: what I encountered may help prepare you for what could lie ahead.
The Time Capsule Migration — My Time Machine backup resides in a 2 TB Time Capsule that sits near my desk. Pack-rat that I am, I keep an Ethernet cable in my Cupboard of Arcane Connectors: I strung that between my new iMac and the Time Capsule before I started the migration. I could have used the Time Capsule’s Wi-Fi connection instead, but restoring a backup that way would have taken considerably more time — the last time I did a migration over Wi-Fi, it consumed a full weekend. Crossing my fingers, I booted my new iMac for the first time. It was 7:20 PM on a Saturday evening.
Upon starting up, my new iMac recognized the Time Capsule and offered me the opportunity to set it up from a Time Machine backup. I chose that option and we were off to the races… though, as races go, it was a marathon, not a sprint.
The first obstacle was the appearance of a dialog that told me the Mac was “preparing” to transfer my backup: it had no progress indicator and, as minute after minute passed, it gave no impression that any progress actually was being made. In my younger, more impatient days, I would have forced a reboot and tried again, but that night I told myself to wait an hour before giving up. After “only” 30 minutes, though, the “preparing” dialog was replaced by one with a progress gauge, and, what’s more, a time estimate! It told of 6 hours remaining — that estimate quickly became more than 8 hours, then fell to 7, then to 4, then to 3.5 before stabilizing at 5 hours. Files and settings began transferring and I walked away.
I checked in an hour later and saw the estimated time to completion was now 36 hours! As I watched, it jumped to 40, and soon got as high as 72 hours. I resolved not to panic and walked away. A few fretful minutes later I came back for another look and relievedly saw that the estimated time remaining in the migration was once again under 5 hours.
In fact, the data migration from my Time Capsule to my iMac via Ethernet, involving some 300 GB of data, took just under 6 hours: close to the original estimate!
The moral of this episode: patience is a virtue. Progress gauges are notorious liars, so don’t hasten to pull the plug if you worry things are hung up, and don’t be disheartened by interim time estimates that may be wildly incorrect.
Back to My Desktops — With the data migration completed, my new iMac asked me some of the usual new Mac questions (pick a time zone, choose a language), and then it rebooted and asked me to log in to one of my migrated user accounts (they all seemed to have transferred). It was now well after midnight, but I couldn’t go to bed without seeing if my old familiar desktops were truly back in my main user account (I use Mission Control and have seven desktops that I move between). They were.
But I couldn’t move among them with a flick of my fingers as I was accustomed to because the new iMac, which came with a Magic Mouse, didn’t recognize my trackpad: the Bluetooth setting for the trackpad didn’t migrate so I had to pair my trackpad manually with the new machine. Not surprising, really: the trackpad itself knew that it was paired already with a different device than my new iMac, but with the help of the Bluetooth pane of System Preferences I soon got the two talking.
Before I could even get to that, though, I had to deal with a flurry of requests for my iCloud password. Dialog after dialog came up requesting it, four or five in a row. This flurry was finally followed by an alert telling me that some of my apps required app-specific passwords, and the alert offered to help me create them. The alert didn’t tell me which apps needed those passwords, but I noticed that it sported a Messages icon.
The light eventually dawned: a few months ago I had enabled two-step authentication for my Apple ID, which required me to create an app-specific password to be used by both FaceTime and Messages (why any of Apple’s own apps require this is another question). It occurred to me that the flurry of iCloud password requests might really be very poorly worded requests for the app-specific FaceTime/Messages password. Fortunately, I had that app-specific password stored in 1Password and could retrieve it with the 1Password app on my iPad. So I cancelled the alert, and, on the
next iCloud password request, I fed it the FaceTime/Messages app-specific password. The flurry stopped.
It was now heading toward 1 AM, but before I went to bed I wanted to make sure that my email had survived the migration. When I opened Mail, though, I saw a dialog telling me that Mail would have to process all my saved messages, several hundreds of thousands of them, a process that would take at least another hour. I decided to let Mail have its way and toddled off to bed. After a few hours of restless sleep, I returned to my new iMac and saw that, indeed, all of my mail was in place. What’s more, Mail had found a couple of messages that had gotten lost in its bowels on my old Mac last year and had never been sent; while I was sleeping Mail sent them for me, no doubt confusing the recipients.
Happily, I found that the migration had preserved all my mail accounts — one account seemed to have had its settings mangled, but it turned out later that the problem was actually at the mail server: the settings were intact.
Next, I wanted to see if my Photos library had also made the leap to my new machine. When I went to the Dock to launch Photos, however, there was a great big question mark where the Photos icon should have been! It turns out that the version of Yosemite on my new iMac was the one that came out prior to the release of Photos. Although Time Machine had backed up my old Mac’s system along with the rest of my data, the migration did not replace the installed version of the operating system or any Apple apps on my new iMac. So it was off to the Mac App Store to upgrade Yosemite. When the upgrade to OS X 10.10.5 was complete, Photos was back on my Dock, and my Photos library was accessible once more — and it was intact.
Finally, I got a prompt asking me if I wanted my Time Machine to “adopt” the previous backup for my new machine, warning me that if I chose to do so, I wouldn’t be able to use it again with my old Mac. I chose to do so, which means I can seamlessly use Time Machine to retrieve files from before the crash as well as after: as far as Time Machine is concerned, my new Mac and my old Mac are the same Mac.
The moral of this episode: Be prepared for the unexpected. You will still have a lot of things left to set up, and updates to install, when you migrate from a Time Machine backup to a new Mac. Furthermore, Migration Assistant may say that it is transferring your settings, but it doesn’t transfer all of them. If you haven’t saved the passwords for your Mac’s services and accounts somewhere that you can get to as needed, do it. Do it right now.
Loose Ends and Hiccups — Even after my new iMac was finally set up, there were still a few problems that I had to resolve.
One of them was the matter of third-party software licenses. Some survived the migration intact, while others, such as for Smile’s PDFpen and TextExpander, and for my copy of Microsoft Office 2011, did not. Smile has a lookup service that allows you to retrieve purchased license keys, but for the Microsoft Office key, you may need to make a phone call. Fortunately, I had my Office key squirreled away in 1Password. Unfortunately, Smile’s lookup service didn’t work for me because I had received my keys directly from Smile when I was writing “Take Control of
PDFpen 7” and “Take Control of TextExpander,” but since the good folks at Smile know me, I was able to resolve that problem with a quick email. (Note: In case you are wondering, yes, the Smile licenses are now in my 1Password archive.)
I had one other TextExpander problem: all my snippets were missing! It turns out that was because I have them stored in Dropbox, and because my Dropbox settings didn’t transfer for some reason, they were inaccessible to TextExpander. Once I reauthorized my Dropbox account for my new iMac, I was able to relink TextExpander to its settings and my snippets came back.
But there was still one more Dropbox hiccup: none of my Dropbox notification settings made the migration, so once I authorized my new Mac to use Dropbox, I began seeing notifications every time someone changed something in one of my shared Dropbox folders (and, as a Take Control author/editor, I share a lot of Dropbox folders with my colleagues). A quick trip to the Notifications pane of System Preferences cleared that up.
Then there was iTunes. When I opened it, I was warned that some of my media was inaccessible because my Mac was not authorized for my iTunes account (thank you, DRM!). What’s more, I had no more authorizations left: I had previously used all five that iTunes makes available. Fortunately, Apple does allow you, once each year, to deauthorize all the computers authorized for a specific iTunes account. Since I couldn’t deauthorize my old Mac (no hard drive, remember), I deauthorized all the computers using my account, and then authorized my new one. My media was once again accessible.
I also encountered a weird Mail hiccup. For some reason, even though all of my mail had transferred, none of my smart mailboxes seemed to work, nor did any new ones that I created. It turns out that Spotlight was the culprit: even though Mail had processed all my migrated mail, for some reason Spotlight, upon which smart mailboxes depend, hadn’t indexed that mail. The solution for this was simple: once I forced Spotlight to re-index my new iMac’s hard drive, the smart mailboxes began working again. (Though the process can take hours, reindexing a hard drive is easy: in the Privacy view of the Spotlight preference pane, add your hard drive to wipe its index, wait a few seconds, and then remove the drive.)
Finally, I found that I was no longer able to make phone calls from my Mac using my iPhone over Wi-Fi. Every time I enabled the iPhone Cellular Calls setting (which you can find in FaceTime’s preferences) it immediately disabled itself, with an alert telling me that my Mac and iPhone had to be using the same iCloud account. Frustratingly, they already were! Fixing this, though, turned out to be simple too: I logged my Mac out of my iCloud account, and then logged it back in. After that, the iPhone Cellular Calls setting worked.
The moral of this episode: It’s not over until it’s over. Even if you get your Mac successfully migrated, you will likely find a few things that need tweaking and readjusting in the days and weeks ahead.
Final Thoughts — Few of us are lucky enough never to encounter the unexpected loss of a hard drive or even a Mac. Stuff inevitably happens. But if you have at least one good up-to-date backup, and if you keep track of all of your software licenses and service passwords, you can usually turn a disaster into nothing more than a time-consuming inconvenience.
Developing a backup strategy is not hard (read Joe Kissell’s “Backing Up Your Mac: A Joe On Tech Guide”), and recording new logins and licenses may be a chore, but it takes only seconds for each one. Do these things, and if you ever find yourself standing in the smoking crater of what was once your Mac, you can climb out again, secure in the knowledge that your most irreplaceable stuff — the pictures, documents, mail, and media you have accumulated over the years — is intact.
Solve Wi-Fi Coverage Problems with WiFi Explorer and NetSpot
As someone who has written about Wi-Fi for many years and tested hundreds of pieces of gear, I’m always looking for affordable, useful tools that let me analyze my home network. In the past, companies have loaned me spectrum analyzers, which examine all the radio signals on ranges of frequencies. But while IT professionals may find those useful, they’re overkill for home users and small business: they’re just too expensive.
That’s why I was excited to stumble across the $15 WiFi Explorer. It was first released in 2012, but didn’t appear on my radar until the 2.0 release in May 2015. With a combination of graphic visualizations, lists of information, and the capability to drill down into super-technical details, WiFi Explorer has become my top recommendation for anyone trying to sort out a local Wi-Fi environment.
WiFi Explorer pairs beautifully with NetSpot, an OS X Wi-Fi signal-mapping program I reviewed way back in 2011 for Macworld. NetSpot has matured since then, and does its job even better now, while also adding some serious (and expensive) professional options above the free, non-commercial level.
Let’s start with Netspot, even though we’ll only use a fraction of its power. It’s a great way to get a two-dimensional lay of the land.
Paint a Wi-Fi Picture — Netspot starts with a map. You can import a house or office plan, sketch one, use a sample map, or start with an empty page. You measure the distance between two points you mark on the map and it uses that to scale the rest of the map. Then you wander around your premises with a laptop, clicking to measure at various points.

You can mark just a handful of sampling points, but I like to use many for greater insight. Once you’ve finished sampling, you have an interactive map. One of the absolute neatest features of NetSpot, and one reason I was immediately impressed with it originally, is that it can accurately calculate where your access points are located.
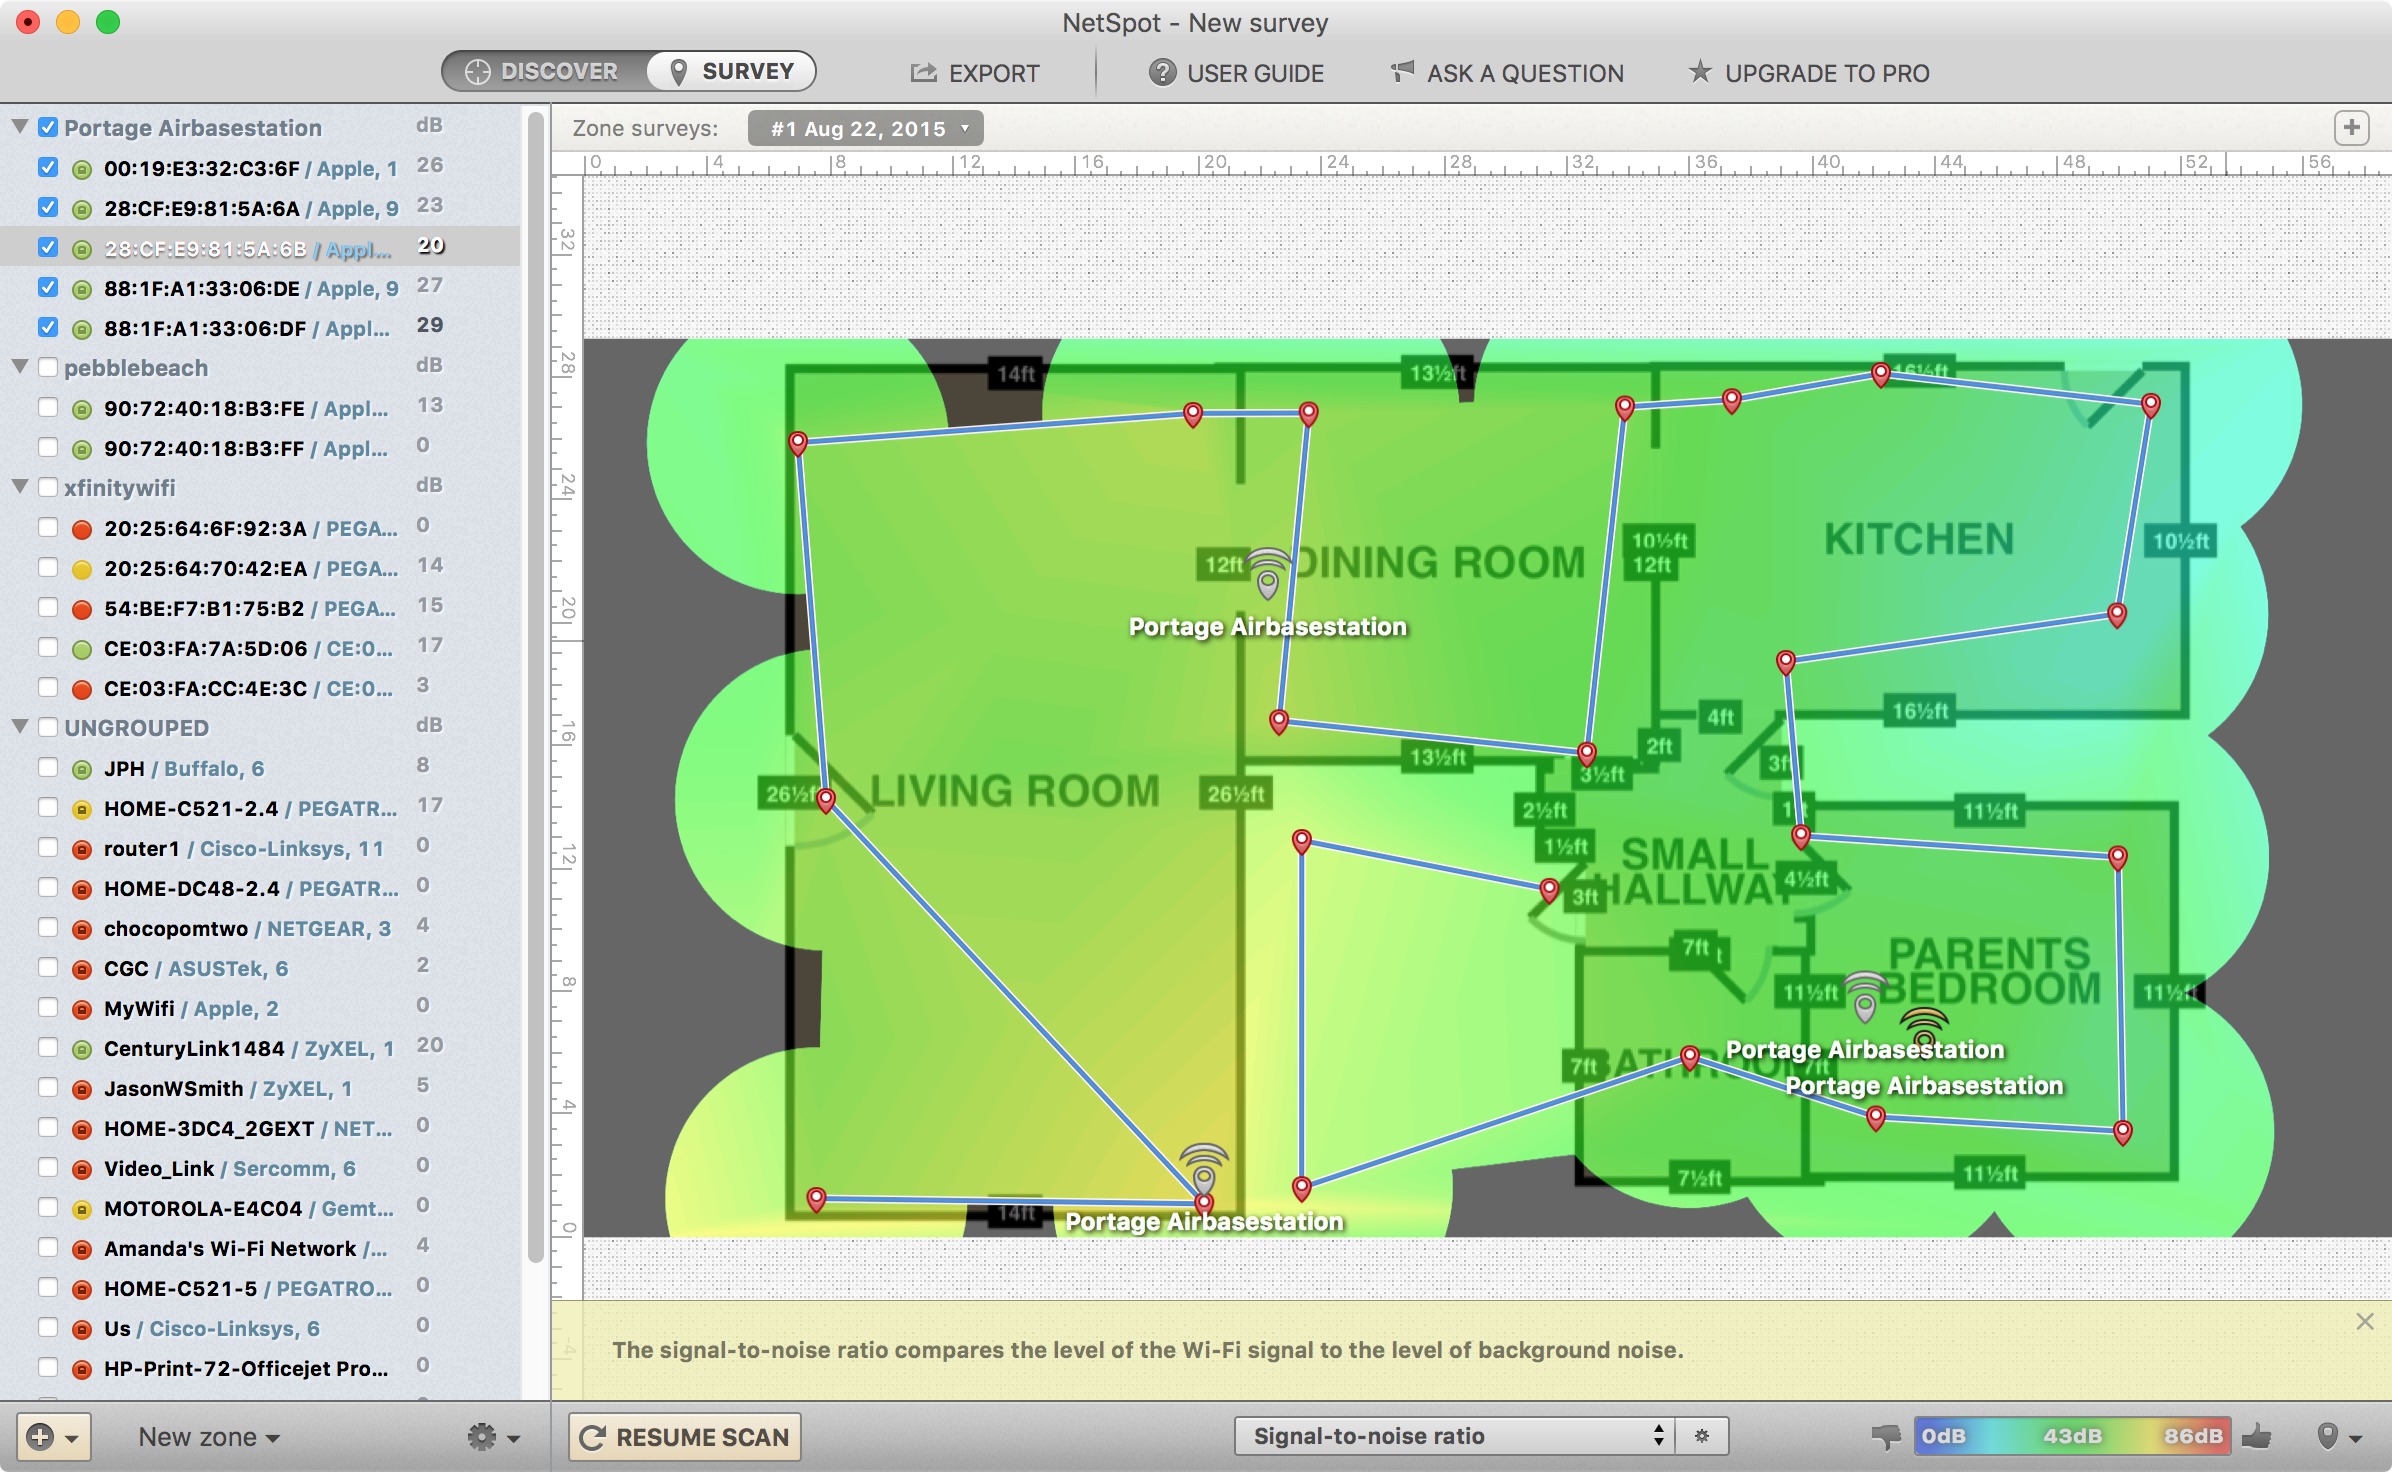
In my case, I have an 802.11ac AirPort Extreme on our main floor, and then a single-band-at-a-time 802.11n AirPort Extreme in the basement near my desk. At the other end of the house, in a guest room, I have an 802.11n AirPort Express. The upstairs base station was placed within several inches. The downstairs units, sampled through the floor, were only a few inches further off.
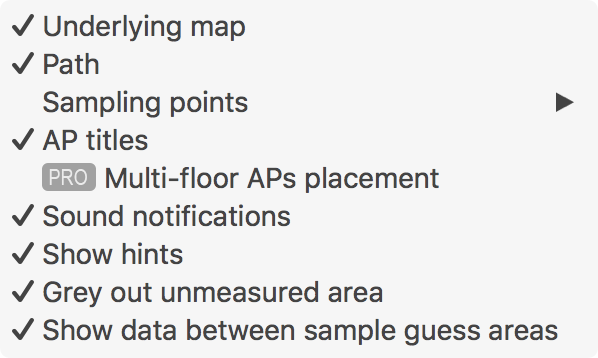
The interactive map lets you select and deselect base stations in a list, so you can see in isolation and together what your best coverage is. As noted in my 2011 review, the spectrum of colors ranges from blue (terrible) through cyan to green (good) through yellow to red (best). This provides a lot of granularity at a glance, but just remember green, yellow, and red are good, better, best. You can also use a pop-up menu to toggle what’s overlaid on the map as a whole.
The free version lets you visualize only up to five access points at a time, which includes each radio on a multi-band router. I have three routers, two of which are simultaneous dual-band models, and thus I was able to see my whole network within the five-unit limit. In addition, the free version is intended for non-commercial use with personal computers.
For offices, Netspot Pro costs $149 for a single-user license, and the 10-user Netspot Enterprise license is $499. These prices are reasonable if you’re maintaining multiple large networks, and you get a lot more features to boot.
Once you have a completed map, print it out to use as a guide, so you can consider improvements while you use WiFi Explorer to measure and analyze both the signals in the air and the radio choices you and your neighbors have made.
Sniff the Air Around You — WiFi Explorer helps tremendously with understanding interference from adjacent networks by providing both comprehensive details and graphical insight. It also lets you see at a glance precisely how your network is configured. Apple doesn’t offer that in AirPort Utility, which shows connections and base station names, but requires you to hover over each base station to see channel assignments and other details.
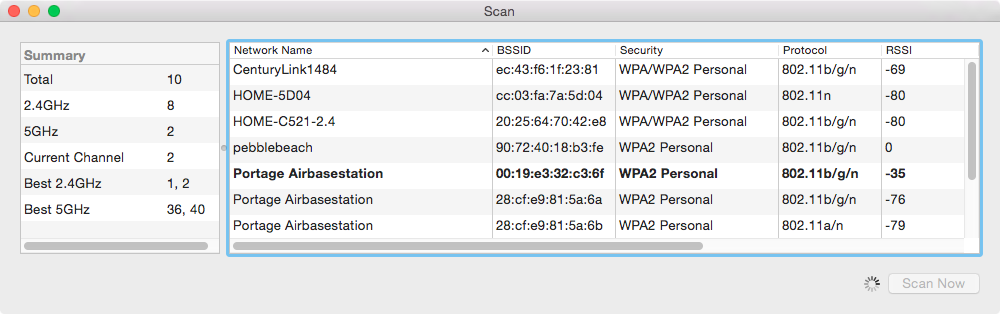
WiFi Explorer has just one window with four views at the bottom, three of them visualizations. When launched, the app starts scanning. If you don’t see updates, make sure the top display says “scanning.” The scan is updated every five seconds. A left navigation bar lets you filter networks discovered in the vicinity by Wi-Fi mode, network name, and other parameters.

The list at top is typical of Wi-Fi scanners, including the one built into OS X. (Hold down the Option key, click the Wi-Fi menu, choose Open Wireless Diagnostics, and choose Scan from the Window menu.)
WiFi Explorer packs a lot of information into a well-designed space. But click any entry, and the area below the list lights up. The app assigns a color to each base station in the list, which is useful in the visualizations.
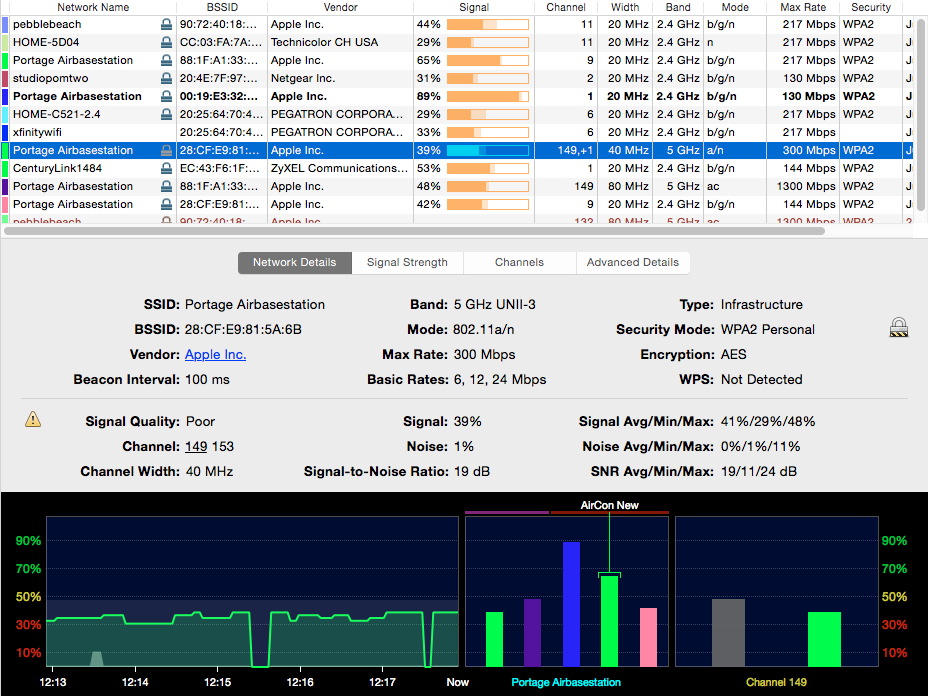
In the Network Details view, selecting any base station shows a rundown of technical details specific to that base station, and at the left a continuously updated scan of network quality, which can be viewed as signal, signal and noise, or signal-to-noise ratio. At the right, WiFi Explorer shows a color-coded bar based on signal strength of all other base stations using the same Wi-Fi channel.
If multiple base stations use the same network name (or SSID, Service Set Identifier), selecting any one of them adds a display between signal strength and channel occupancy that shows each base station’s power on the same signal axis, split by frequency band (2.4 GHz and 5 GHz). You can hover over any bar and WiFi Explorer shows its individual base station name. Click any bar, whether in the middle or right displays, and the base station is selected in the list at top. These collections of networks are shown under Service Set in the Results bar at left, too.

You can see an overlay of all networks’ signal strengths by clicking the Signal Strength button. Selecting one or more items in the list fills in the color below the line in the graph to make them more visible.
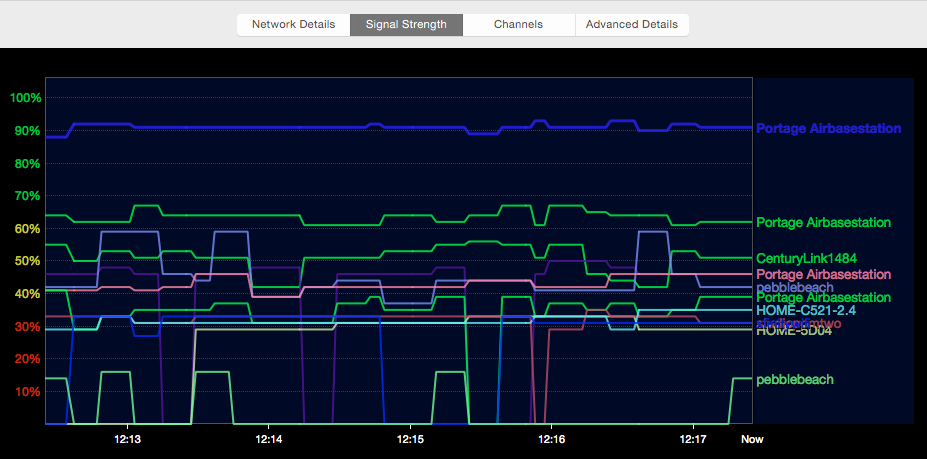
Note that this view doesn’t show network throughput, which would require software installed in different devices to check the link between them; this is just the capability of a Wi-Fi network to work within the parameters of a given network speed. The Max Rate column in the access point list shows you the current data rate at which a device is operating. Access points drop through a large combination of modulations and channel uses between the lowest and highest data rates; the higher the
data rate, the closer your computer running WiFi Explorer is to the base station while being unimpeded by other networks spreading signal over the same space.
The Channels view is remarkable. It shows how different base stations are occupying swaths of frequencies. In 2.4 GHz, you can see where networks overlap. Channels 1, 6, and 11 are considered non-overlapping — the central frequency for each channel is offset by 25 MHz, or more than a full channel.
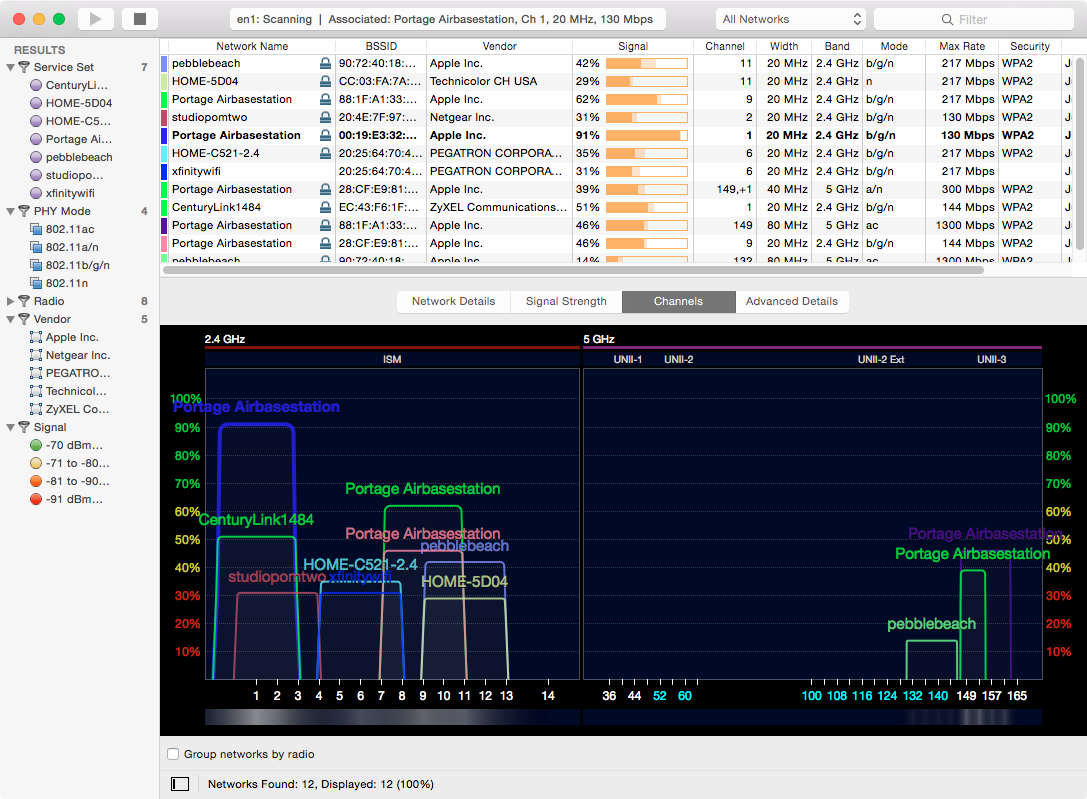
However, I’ve been told by IT professionals that one of the nastiest problems with Wi-Fi interference in 2.4 GHz networking comes from devices that are preset to use other channels, which includes some portable hotspots. Two networks on overlapping channels can try to avoid each other without losing too much throughput. But networks on adjacent channels (like channels 1 and 2) have to employ different, less-efficient mechanisms to overcome interference, which can dramatically reduce the amount of data that
gets through or cause inconsistent performance.
In the 5 GHz range, things are more civilized: base stations can only occupy channels exactly 20 MHz apart. With 802.11n, a Wi-Fi access point can span two channels (40 MHz), if there’s no detectable use on the extended portion; 802.11ac can grab a whopping 80 MHz. Each doubling of channel width doubles the effective top throughput rate, too. (WiFi Explorer shows all 5 GHz bands, which includes the little-used UNII-2 and UNII-2 Extended bands. For obscure reasons, few consumer base stations allow their selection; read “Improve Wi-Fi Performance in the 5 GHz Band,” 14 December 2009, if you’re interested. WiFi Explorer lets you suppress them in this view via Preferences > Hide DFS
Channels If No Networks Are Using Them.)
Finally, an Advanced Details view gives access to an incredible amount of minutiae that a wireless guru might love, or a home network installer might be delighted to have when troubleshooting a problem.
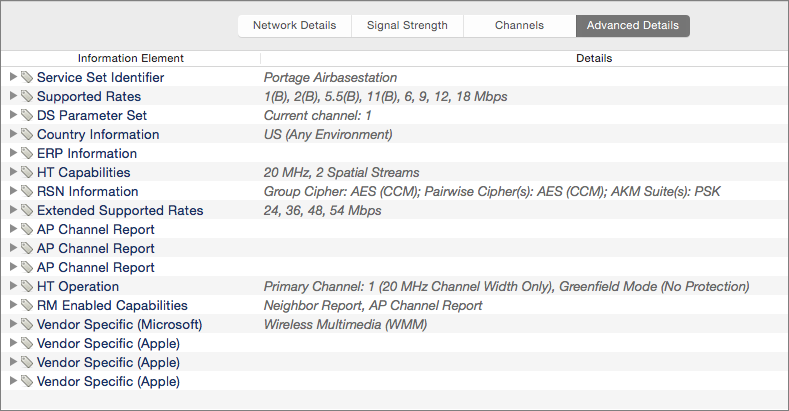
The signal strength information is gathered over time, and clicking the stop button or quitting the app results in a prompt to save the results. The data is stored in a static snapshot that you can re-open in WiFi Explorer to review later, whether offline or to compare with current network environment details.
Acting on this Practical Information — Netspot and WiFi Explorer provide a whole lot of information. But how can you turn a map and scanning into something you can act on to sort out interference or improve placement?
The NetSpot map should help you figure out whether your problems are purely related to a signal strength or if interference is at fault. For a signal problem, you’ll see your base stations showing cyan or blue or no coverage at all. Take WiFi Explorer to these locations and monitor what’s going on with your networks and those in the vicinity to see what the signal strength is across networks, including those run by other households, and the max rate for your networks, which can help you sort out if your network is being drowned out by other networks on the same or adjacent channels in a given band.
(Critical side note: all this may work for a while, but most base stations are designed to select a channel automatically every time they’re restarted intentionally, through a power outage, or by someone unplugging it and plugging it back in for whatever reason. This means that your own channel selections may suddenly disappear. And of course, you have no control over what your neighbors may do with their base stations.)
Once you have a longer analysis of each point, you can try one or more of the following and then re-test in NetSpot and drill down in WiFi Explorer to see what happens:
- Make sure your 5 GHz network is using channel 149 or higher (called UNII-3, to be technical); you can use WiFi Explorer to determine that, as well as any overlaps. If it’s using a lower-band channel (UNII-1), the base station may be using as little as five percent of the power allowed for an upper-band channel! This is a common problem, although Apple’s automatic channel selection will almost always pick channel 149 or above. (802.11n can manage its fastest 5 GHz rates with 149 or 157; 802.11ac winds up using 149 so it can span 80 MHz when it can clearly do so.)
- Remove obstacles to your Wi-Fi signal. Is your partner or roommate regularly camped out in a big stuffed chair in front of a base station on the floor? 802.11n and 802.11ac both use reflection as one way to improve throughput, but they aren’t as good as Superman at seeing through objects. Wi-Fi isn’t purely line of sight, but anything in the line of sight can reduce a network’s throughput and consistency. (People absorb 2.4 GHz very efficiently.)
-
Reposition your base station(s) and rescan to see if the new locations better overlap where you need signal. This may involve drilling holes to route Ethernet cables or using powerline networking — high-throughput versions with a raw rating of 1200 Mbps are now available — to pass a broadband connection through brick walls or ones you can’t drill in a rental (for more on powerline networking, see “Trading In-Home Wi-Fi for Powerline Networking,” 9 July 2007).
-
Add a base station. This is often the best scenario, and you don’t need either an Apple model or an expensive one. As long as you connect to the main base station via Ethernet, not through Wi-Fi — which works reliably only among Apple-made devices — you could purchase any well-reviewed $50 base station. At $99, the AirPort Express isn’t cheap, but it’s a powerhouse.
If your network’s base stations are coming in loud and clear (green, yellow, or red) in NetSpot but you’re still having connection problems in those areas, use WiFi Explorer to sort out what’s happening on the interference and channel assignment side:
- It might seem counterintuitive, but you might switch to a lower-band channel to reduce power usage if you have plenty of signal strength and don’t want your network to extend into adjacent homes, offices, or apartments. (You might talk to your neighbors about doing the same thing.)
-
In the 2.4 GHz range, change channels to find an unoccupied swath. As noted, channels 1, 6, and 11 (in the United States) are considered the ideal spread, but you might have to chart out different territory if channel usage is clumped around one part of the band.
-
Does the entire frequency map fritz out from time to time for seconds or longer? Someone may be running competing 2.4 GHz devices — which can include ham radios, ham television (yes, it exists), microwave ovens, badly designed video baby monitors, and industrial sealers. In the 5 GHz band, the most likely culprit is an older cordless phone. All of these can drive you to distraction because they may make your Wi-Fi network function intermittently. In 5 GHz, you can pick other channels, subject to the power limits noted above; in 2.4 GHz, you may be out of luck if you’re seeing garbage across all channels.
It’s a Wi-, Wi-, Wi-Fi World — Wireless networking isn’t rocket science. Well, it involves a lot of radio technology and calculations — okay, maybe it’s not far off from rocket science. But if you have your feet on the ground, you’ll appreciate any set of tools that let you survey the invisible world around you.
Pairing WiFi Explorer with NetSpot gives you effective insight into what’s happening with your Wi-Fi network and those legally making an incursion into the public airwaves through which you also broadcast. With their visualizations, you might be able to fix persistent problems and reduce dropouts.
FunBITS: Pac-Man 256 Retools Classic Fun for iOS
Released in 1980, Pac-Man is one of the genuine classics of gaming. I don’t think it’s an exaggeration to say that it is to video games what the Gutenberg Bible was to publishing. You’d be hard-pressed to find anyone on the planet, regardless of age, who hasn’t played it or isn’t at least familiar with it. And its gameplay concepts changed the course of gaming history.
But developer Namco never recaptured that magic. Pac-Man’s hugely successful immediate sequel, Ms. Pac-Man, was actually created by another company, and Namco’s own Super Pac-Man wasn’t a hit. Nevertheless, the Pac-Man character has been squeezed into platformers, racing games, educational titles, and even fighting games with usually only modest success at best. Nor has the original game, with its need for quick controls and a large screen, translated well to mobile.
After more than three decades, developer Hipster Whale has figured out how to revive that Pac-magic. After last year’s Crossy Road, which resurrected Frogger for the iPhone generation, Hipster Whale has respun Pac-Man as Pac-Man 256, again designing it from the ground up for mobile devices. It’s free with in-app purchases for the iPhone and iPad, but isn’t compatible with the iPhone 4 or iPhone 4S. Check out the trailer.
Why is it called Pac-Man 256? Have they really made that many sequels? Possibly, but the real reason hearkens back to a bug in the original game. In Pac-Man, the level counter was stored as an 8-bit integer, which meant that the highest value it could hold was 255. A bug caused the counter to advance to 256, jumbling the right side of the screen in a mess of ASCII gibberish and making the level impossible to beat.
Hipster Whale cleverly riffs on this infamous bug to convert Pac-Man into a sort of infinite runner. You start your maze chase by swiping up, and you need to keep moving up, because The Glitch slowly advances upon you, consuming everything it touches. Unlike the original Pac-Man, which had multiple maze levels, Pac-Man 256 is one never-ending maze.

Other changes to the Pac-Man formula help Pac-Man 256 adapt to smartphones and tablets. Instead of a top-down view, the camera sits at an angle, which gives it a more modern look. The controls are based around swipes, which work quite well.
The basics of the Pac-Man formula are still there. You still eat dots, get chased by ghosts, and eat power pellets that let you turn the tables on the ghosts. But, of course, Hipster Whale has mixed things up. Ghosts now use a variety of tactics. Some patiently wait to ambush you, while others band together to form moving obstacles.

Where Pac-Man 256 gets wild are in its power-ups, which go far beyond the plain-vanilla power pellet. As Pac-Man consumes dots, you unlock various power-ups, such as lasers that can blast an entire row of ghosts, ice blocks that slow ghosts down, and bombs that blow up any ghost that bumps into Pac-Man. You can have up to three different power-ups on the board at a time, which you activate by crossing over their icons. But only one can be active at a time; any other power-ups on the board turn into white cubes that
extend the duration of the active power-up. (Thanks to Richard Anderson for that tip!)

Pac-Man 256 is a lot of fun, but unfortunately, touch controls and an infinite maze aren’t the only things that update Pac-Man for the iPhone generation. This is a “free to play” game with in-app purchases, and includes all the scummy practices that come with that approach.
To play a game of Pac-Man 256 with the new power-ups, you have to spend one credit. You get six credits by default, and they take about ten minutes each to recharge, whether or not you’re playing the game. You can opt for a “free play” with none of the new power-ups available, but that kind of takes the fun out of it.
If Pac-Man dies, you can spend a credit to continue once. If you run out of credits, you can watch an unskippable 30-second ad to carry on. You can also buy more credits: either 12 for $0.99 or unlimited credits for $7.99.
There are also coins to collect, which you can spend to make each power-up last longer. You can pick up a few coins in the maze, earn coins by eating five or more power pellets, or tap an Earn Gift button after a game, which again subjects you to a 30-second ad, but randomly awards you coins or credits. You can also buy a coin doubler for $4.99 that doubles the coins you earn.
When you upgrade a power-up, that power-up becomes unavailable for a set amount of time: the first upgrade takes 5 minutes, the second one takes 10 minutes, and so on. Such arbitrary waiting periods are yet another “feature” of “free to play” games.
While it’s nice that I can pay once and have all the credits I want, there are still the ads, waiting periods, and coins to deal with. I’d like to be able to pay just a little bit more and eliminate all the annoying vestiges of a “free to play” game. As it stands, I never feel like I truly own the game. In that sense, I suppose Pac-Man 256 is true to its quarter-munching arcade roots.
But if you play Pac-Man 256 casually, you’ll likely never be asked to pay money, and the ads are easily avoided. All in all, Pac-Man 256 is a fun and refreshing reboot of the historic Pac-Man franchise for the mobile era. Too bad it also brings the worst of today’s gaming business model with it.
TidBITS Watchlist: Notable Software Updates for 31 August 2015
VMware Fusion 8.0 and Fusion 8.0 Pro — Adding over 50 new features as well as compatibility with OS X 10.11 El Capitan and Windows 10, VMware has updated its popular virtualization package VMware Fusion to version 8.0, with standard and Pro editions. VMware Fusion 8 enables you to take advantage of Cortana (Microsoft’s speech-enabled virtual assistant) in Windows 10, adds support for DirectX 10 and OpenGL 3.3 to deliver up to 65 percent faster graphics, and improves power efficiency when running VMware on battery power. VMware connects its VMware
vCloud Air cloud computing platform to Fusion 8 Pro, enabling users to securely back up local virtual machines to the cloud or recreate complex cloud architectures to demonstrate or validate design before implementation. Fusion 8 Pro users will receive $600 in vCloud Air service credit to use for up to 6 months. Ars Technica discovered a bug when testing VMware Fusion 8, which causes the Windows Start screen to be unavailable when running Windows 10 in Unity mode, and VMware has stated this bug will be corrected in a maintenance release.
VMware continues its upward pricing trajectory, with the standard edition moving to $79.99 (up $10 from last year’s VMware Fusion 7.0) and VMware Fusion Professional moving to $199.99 (up from $149.99). You can upgrade from version 6.0 and later for either $49.99 (standard edition) or $89.99 (Pro edition). If you purchased version 7 of either edition between 29 July 2015 and 25 August 2015, you are eligible for a free electronic upgrade. ($79.99/199.99 new, $49.99/$89.99 upgrade, 362 MB, release notes)
Read/post comments about VMware Fusion 8.0 and Fusion 8.0 Pro.
PopChar X 7.2 — Ergonis Software has released PopChar X 7.2 with improved support for OS X 10.11 El Capitan and added support for Unicode 8.0, which introduces 7,716 new characters, including letters to support African languages, lowercase Cherokee symbols, new emoji symbols, and more. The character discovery utility works around a problem on El Capitan that resulted in empty font tables, includes searchable descriptions and Mandarin pronunciations of Chinese characters, speeds up loading of character names, improves handling of font families with inaccessible font members (which also solves a problem with fallback
fonts on El Capitan), and produces fewer console log messages when searching for shapes. (€29.99 new with a 25 percent discount for TidBITS members, free update, 3.8 MB, release notes, 10.6+)
Read/post comments about PopChar X 7.2.
ExtraBITS for 31 August 2015
In this week’s collection of ExtraBITS links, Adam Engst discusses the mythical Apple Car with The Tech Night Owl, Apple plans to show off something new on September 9th, Best Buy and Apple get chummier, and Joe Kissell identifies the best online backup service.
Adam Engst Goes Automotive on The Tech Night Owl Live — Is Apple setting its sights on the car market, as the next “mobile” platform? That’s where Adam Engst and Tech Night Owl’s Gene Steinberg ended up in this podcast, segueing from CarPlay to the rumors of Apple’s self-driving car project.
Apple Event Set for September 9th — Apple’s next big media event is set for 9 September 2015 at 10 AM PDT, and you can watch it live in Safari for Mac and iOS, in the Apple TV’s Apple Events app, and surprisingly, in the new Edge browser in Windows 10. If you’re busy at that time, the recording usually remains available afterwards. Apple is expected to announce new iPhone models, and other possibilities include updated iPads and an Apple TV refresh.
Best Buy to Offer AppleCare — Best Buy CEO Hubert Joly has announced that his company’s ties to Apple are deepening, with Best Buy beginning to offer AppleCare plans and service this quarter. Best Buy is also testing out an Apple Authorized Service Provider program at 50 of its stores, plus expanding its existing Apple store-within-a-store approach. The retailer recently began offering the Apple Watch, and Joly said that demand has been strong.
Joe Kissell Finds the Best Online Backup Service — Our own Joe Kissell teamed up with review site The Wirecutter to identify the best online backup service. In this exhaustive guide, Joe covers what you should look for, how each service performs, how to set them up, and how to restore data. Joe’s top pick is former TidBITS sponsor CrashPlan, with competitor Backblaze as the runner-up.