TidBITS#1326/27-Jun-2016
The multi-developer SummerFest sale is going on now, offering 25 percent savings on Take Control books and 14 great Mac apps. In sad news, Apple has suddenly discontinued the 27-inch Thunderbolt Display, while failing to announce a replacement. On a happier note, Josh Centers looks at CiderTV, which offers a Notification Center widget to control your Apple TV even when your iPhone’s screen is locked. Michael Cohen explains how Apple’s forthcoming APFS file system will affect you — it’s all good, but not due until late 2017. Finally, Adam and Josh delve into the topic of copy and paste on the Mac, exposing some features that may surprise even Mac veterans. The only notable software release this week is BusyCal 3.0.1.
SummerFest 25%-Off Sale Discounts Take Control Books and 14 Mac Apps
We have once again joined forces with the makers of some of the best Mac apps for a simple, gimmick-free sale. Through 8 July 2016, you can save 25 percent on all Take Control titles, each going far beyond simple articles to help you in a variety of ways:
- Get more out of your apps: We want to make you better at what you do, perhaps via our books about group messaging phenomenon Slack or recently updated titles covering favorites like 1Password, Audio Hijack, Dropbox, and PDFpen. We also focus on Apple’s Photos and Mail apps, and provide comprehensive documentation of Pages, Numbers, and Keynote.
- Make your Mac work better: Our friend Joe Kissell has just released some new and updated Joe On Tech titles that explain how you can back up, speed up, maintain, and troubleshoot your Mac.
-
Control your Apple devices with confidence: Apple’s hardware lineup has expanded far beyond the Mac, and our authors can help you set up, use, or solve problems with your iPad, iPhone, Apple Watch, or Apple TV.
-
Stay current with Apple’s OSes and services: Whether it’s El Capitan or iCloud, iOS 9 or OS X Server, we have books that both explain the basics and delve into Apple’s latest changes.
The SummerFest sale also includes a curated collection of 14 apps, some of which we rely on daily. If you take your writing seriously, do yourself a favor and invest in the tools that let you most effectively convey your ideas to the world:
- You can plot out the chronology of any story with Aeon Timeline.
-
Every TidBITS article is edited in the powerful text editor BBEdit.
-
If references are essential in your writing, check out Bookends for help with collecting, annotating, curating, and citing published information.
-
DEVONthink Pro Office is a superb tool for storing notes and research materials, and it’s a key part of Joe Kissell’s paperless office strategy.
-
Build precise searches and find your files faster with HoudahSpot.
-
For long, complex documents and macro-driven text, the word processor Nisus Writer Pro is unparalleled — we rely on it for all Take Control books.
-
When it comes to editing PDFs, Smile’s PDFpen hits the sweet spot between Apple’s free Preview and Adobe’s pricey Acrobat Pro.
-
Literature & Latte’s Scapple helps you record and connect ideas, and Scrivener enables you to turn your research and ideas into a manuscript.
-
Create plain text to-do lists with the outlining capabilities of TaskPaper.
-
TextExpander saves you from typing out frequently used words and phrases, and Tonya and I both use it heavily.
-
Eastgate Systems’ Tinderbox helps you organize, plan, and map your thoughts, and Storyspace is the app in which I wrote my senior honors thesis about Hypertextual Fiction at Cornell University way back in 1989.
-
When you need to eliminate distractions while setting your thoughts down, try the minimalist writing environment WriteRoom.
For more information about each app and to take advantage of the 25 percent discount, visit the main SummerFest page. Make sure you use the SUMMERFEST2016 coupon code when ordering.
Thanks for supporting Take Control and these artisanal software developers!
Apple Discontinues Thunderbolt Display with No Replacement in Sight
Apple has issued a statement saying that the company is discontinuing its 27-inch Thunderbolt Display, which was last updated in 2011 and featured a resolution of 2560-by-1440 pixels.
We’re discontinuing the Apple Thunderbolt Display. It will be available through Apple.com, Apple’s retail stores, and Apple Authorized Resellers while supplies last. There are a number of great third-party options available for Mac users.
This move leaves Mac users without an Apple-branded display to pair with a Mac Pro or a Mac mini as a primary monitor or with an iMac or any of Apple’s notebook models as a secondary screen.
The way Apple recommends third-party options suggests that it has no plans to release a 5K Retina Thunderbolt Display, as most people had expected the company to do after the October 2014 debut of the 27-inch iMac with 5K Retina display.
That’s disappointing for those who, like Tonya and me, insist on working on dual-screen Macs. We have both paired a 27-inch iMac with a Thunderbolt Display, and while the screen real estate is essential, the quality difference between the screens is easily noticeable. Even buying from Apple didn’t ensure a perfect match. While the Thunderbolt Display compares well with the physical look of the iMac, it has to be raised an inch or so to equal the iMac’s height — I accomplished that with one of my old books.

If you want a Thunderbolt Display, act quickly before Apple sells through its remaining stock. However, it’s hard to recommend, given that you’ll pay $999 for 5-year-old technology and an inflexible industrial design. In comparison, the Dell 27 Ultra HD 4K Monitor P2715Q features a resolution of 3840 by 2160 pixels for about $500 on Amazon. Plus, it’s height-adjustable, tilts and swivels, and can even be pivoted to portrait orientation. If you’ve purchased this
or another third-party display for use with a Mac, tell us how well it works in the comments!
Some have tallied the loss of the Thunderbolt Display alongside the lack of updates to the Mac Pro as evidence that Apple is deemphasizing professional use of the Mac. I suspect that Apple instead sees the 27-inch iMac with 5K Retina display as sufficient for most professional use.
Control Your Apple TV from CiderTV’s iPhone Widget
As we learned at this year’s WWDC keynote, iOS 10 will include a new Remote app that can emulate all the functions of the fourth-generation Apple TV’s Siri Remote (see “tvOS 10 to Get Improved Siri, Single Sign-on, iOS Remote App,” 13 June 2016). Add this to all the other ways of controlling an Apple TV documented in “Take Control of Apple TV,” such as the Siri Remote, the old Apple Remote, Bluetooth keyboards, and just about any remote you have around the house, and you have no lack of options.
Now there’s one more: CiderTV, an alternative to Apple’s Remote app that works in iOS, OS X, and watchOS. The CiderTV apps are free, but if you want to pair the iOS version with more than one Apple TV, you’ll have to shell out either $3.99 for a second Apple TV or $9.99 for unlimited pairing with multiple Apple TVs.
I had problems with both the OS X and watchOS variants of CiderTV. The OS X version was impressive at first, but later stopped connecting to my Apple TV for reasons I couldn’t figure out, and I found the watchOS version to be utterly inscrutable. So, I’m covering only the iOS version, with a focus on one particular feature.
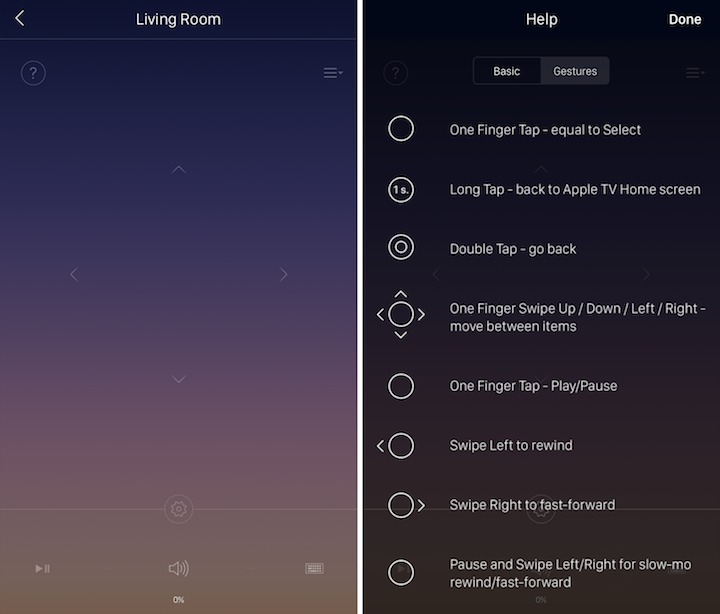
The key question is: with a snazzy new Remote app on the way, why would you bother with a third-party alternative? The answer is that it offers a Today View widget for Notification Center. Even though the widget isn’t the ideal way to control an Apple TV, requiring individual button taps rather than touchpad-like swipes, what’s fantastic about it is that you can access it from the Lock screen. That solves the common problem of fumbling around on your iPhone, trying to access the Remote app, when you need to pause a movie quickly.

CiderTV’s setup is simple. Just as with Apple’s current Remote app, you go to Settings > Remotes and Devices > Remote App, select the CiderTV app under Pairable Devices, and enter the code the CiderTV iOS app provides.
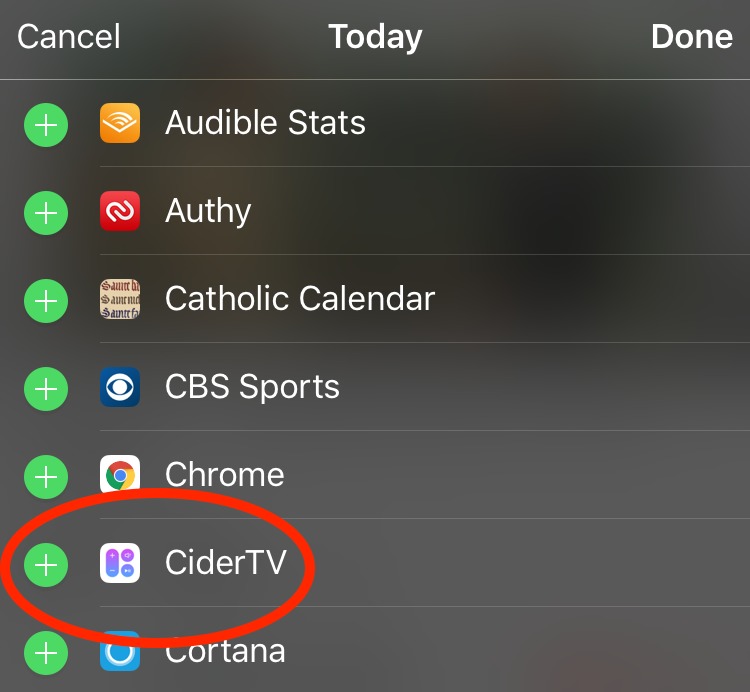
To set up the Today View widget on your iPhone, pull down Notification Center by swiping down from above the top edge of the screen. Tap the Today tab, swipe down, and tap the Edit button. Swipe down until you see the listing for CiderTV, and then tap the green plus button to add it to your Today View. To access the widget, pull down Notification Center again, go to the Today View, and scroll down until you see the CiderTV widget.
By default, the widget saves space by displaying only two buttons: one to open the CiderTV app and another for Play/Pause. Tapping the down-pointing arrow reveals navigational arrows, the OK button (which acts like pressing the touchpad on the Siri Remote), and the Menu button.

The iOS app itself is not terribly interesting. Just like Apple’s official Remote app, CiderTV offers a touchpad-style swiping surface, the requisite buttons, and it lets you type searches with the onscreen keyboard. One difference is that it offers a few additional gestures. For instance, you can double-tap the touchpad to simulate the Menu button, though it would have been just as easy if the developers had provided a Menu button. They included a Menu button in the widget, but not in the app itself, which is odd.
CiderTV offers another potentially useful feature: if you have a certain type of network-connected smart TV, you can use the app to control both the Apple TV and your TV’s volume. That’s nifty in theory, but it doesn’t work with my very recent TV, and chances are that it won’t work with yours. If it does, CiderTV is that much more compelling for you.
The CiderTV apps aren’t spectacular, but the Today View widget is great. Since it works fine side-by-side with the official Remote app, those who want to manage a fourth-generation Apple TV from an iPhone or iPad should give it a try.
What Apple’s Forthcoming APFS File System Means to You
Among the tidbits Apple revealed to its developer audience at the recently completed Worldwide Developers Conference was a new file system for the whole range of its products (see “macOS 10.12 Sierra to Succeed OS X 10.11 El Capitan,” 13 June 2016). Dubbed “APFS” (an acronym that Apple doesn’t completely spell out even in its developer documentation), the file system is meant to replace HFS+, the file system that in turn replaced 1985’s HFS (Hierarchical File System) in 1998. (HFS+ has received numerous updates since 1998, so don’t get the impression that it’s completely obsolete.) Apple released a developer preview of APFS with macOS 10.12 Sierra, and the company says APFS
will become the default file system in all of its operating systems — macOS, iOS, watchOS, and tvOS — by late 2017.
Changing the default file system for an operating system is a big deal, since the file system is responsible for keeping track of all of the data on the device. But what does such a change mean for users?
The Finder Is Not the File System — Unless you’re one of those rare individuals who lives on the Terminal command line and who can type ls -la faster than you can double-click a folder icon, the Finder, along with the Mac’s Open and Save File dialogs, is normally how you see what’s on your Mac and how you navigate among your files and folders. This won’t change when APFS takes over from HFS+.
That’s because the Finder is a client of the file system. The Finder shows you a view of the items you have stored on your Mac and lets you arrange files and folders in a manner that works for you. The Finder, along with its folder and file icons, has been on the Mac since before even HFS came around, and has worked more or less the same from the user’s point of view since the first Mac came out of a bag and said “Hello” back in 1984.
The file system works behind the scenes, providing information to the Finder and to applications about the files and directories that are stored in some fashion on a device connected to your Mac — whether in magnetic fields recorded on a spinning platter or charged cells in a solid-state device. The file system keeps track of how much storage capacity files take up on the device, where on the device the data that make up the files are stored, and all sorts of metadata about those files, such as their names, when they were created and last changed, which users are allowed to open them, and a great deal of other stuff.
The Finder is thus an intermediary. Its job is to present us ordinary mortals with an easily understandable view of the data that the file system actually manages, and to instruct the file system about what you want to do with that data. As long as the Finder can communicate adequately with a file system to enable that view and pass along your instructions, the actual file system being used on a storage device doesn’t matter much.
In fact, if you have ever used a thumb drive or an SD card with your Mac, you may have already seen the Finder working with a file system other than HFS+. Most thumb drives and SD cards come formatted for Windows computers and use the FAT (File Allocation Table) file system, and yet you can still see and manipulate the files and folders on them with the Finder.
APFS is designed to understand nearly all of the same instructions and information requests that the Finder, or any other Mac application, issues regarding storage devices managed by HFS+. You’ll still be able to move files, rename files, copy files, open files, delete files, tag files, and so on just as you always did.
But You Will Notice Some Differences — However, APFS does provide some benefits over HFS+, and they’re significant enough that you will likely notice them in action.
HFS+ came along well before large storage devices containing gigabytes, let alone terabytes, were common, well before flash memory was commonly used for file storage, well before file encryption was something that ordinary users cared about, and well before Mac OS was replaced with OS X and its virtual-memory-enabled multi-tasking capabilities.
Support for large data volumes, encryption, flash drives, and virtual memory was more or less bolted onto HFS+ instead of being integrated into it. APFS has that support, and more, built in and will thus have an impact on your experience as a user.
- Faster file copying and saving: Saving files and duplicating them on the same device will happen much more quickly and without using as much space. That’s because APFS has been designed to reduce data duplication by sharing data between files as necessary. When you copy a file to another folder in APFS, no data is moved. Instead the copy points to the original file’s data on the device. If one of those copies is later changed, only the changes are stored: APFS handles which bits belong to which files. APFS’s capability to change only parts of files also speeds up file saving, and, especially, automatic saving using versions. Viewing and restoring from a previous version in an app should be faster too.
Apple’s goal of optimizing APFS for flash storage and solid-state storage devices (SSD for short) is behind this shared data approach. When you save a file repeatedly over time, the actual data making up the file can’t be stored in one contiguous chunk on the drive, and thus it becomes “fragmented.” That’s normal, but on a spinning disk, file fragmentation reduces performance by forcing the read/write heads to seek more in order to access the widely separate parts of the file. On a spinning disk, the shared data approach will mean more disk fragmentation.
But fragmentation on an SSD does not affect speed nearly as much. On an SSD, rewriting memory cells is much more costly, both in terms of speed and in terms of the cells’ usable life: rewriting SSD cells gradually wears them out. Writing just the changed file contents, and doing so in scattered physical locations on an SSD, is an efficient way to increase wear-leveling as well as to reduce the number of write operations. That’s a win-win now that most Apple devices, including Macs, rely on flash storage.
However, APFS is designed to work with spinning disk drives as well and should be smart enough to take disk location and rotational latency into account when choosing locations to store file changes on such devices.
- Snappier backups and restores: APFS can create read-only snapshots of a volume’s file contents. Once again, this capability comes courtesy of the shared data approach. Since file changes are scattered in different locations on a device, APFS can keep track of the data locations that comprise a file at any given time and make sure they are preserved. New versions of Time Machine, as well as other backup utilities, should be able to take advantage of APFS snapshots, making incremental backups that much more snappy.
-
Flexible partitions: APFS creates physical containers on a device, which can then be subdivided, or partitioned, into individual storage volumes. Unlike the partitions managed by HFS+, APFS partitions share their space with each other within the same container. This means that if you have a 500 GB APFS container, you can create multiple volumes within it that each will show up in the Finder as having 500 GB capacities. As a consequence, the amount of free space shown for each volume reflects the free space available in the container, not the individual volumes.
Although this approach could lead to user confusion, it might be mitigated by one other APFS feature: fast directory sizing. Under APFS you will no longer have to wait for seconds or even minutes while the Finder shows you the exact amount of storage used by a folder in a Get Info window. Fast directory sizing makes that information much more quickly available — useful if you want to know if your photo library will fit on the portable drive you’re bringing on your vacation.
-
More encryption options: macOS Sierra, like versions of OS X since 10.7 Lion, offers full disk encryption via FileVault 2. Similarly, although this isn’t obvious to the user, iOS has offered individual file encryption since iOS 4 and has encrypted all user files created by third-party apps since iOS 7. APFS provides both full-volume and individual file encryption: you can use full volume encryption on one volume in an APFS container and use individual file encryption on another volume in the same container.
In addition, APFS provides not only single-key file encryption but multi-key encryption, allowing a file’s data and its metadata to be encrypted separately. For example, you could have a volume that allowed a file cataloging utility to decrypt metadata about a file, such as its name and creation date, but not to decrypt the actual file contents.
Regardless, although it’s difficult to know how Apple and other developers will take advantage of these capabilities, it’s safe to say that you’ll have more encryption options available to you when APFS is in charge of your device storage. Plus, since Apple built encryption into APFS, encryption should be snappy.
Transition to APFS — Apple intends the transition to be as painless as possible. When you buy a new Mac once APFS is the default file system, you should have no transition hassle at all: Setup Assistant should move your data from your old Mac to the new one pretty much as it has all along. And, since macOS will continue to support HFS+ as well as APFS (just as it supports other file systems), you’ll be able to mount and use older HFS+-formatted external drives with no problems.
Apple also plans to provide an in-place APFS migration utility for users who upgrade older Macs to a macOS version that uses APFS as its default. Most likely, the migration process will take some time (minutes or hours) to convert an existing HFS+ device to APFS, but Apple’s goal is to make the process as simple and as safe as possible.
Let’s all hope Apple meets that goal: APFS is a big deal, offering notable performance, space-saving, and security benefits to users while promising to work its magic unobtrusively behind the scenes — as any good file system should.
OS X Hidden Treasures: Copy and Paste
Copy and paste may be the most important computing technology of the past 30 years. That may sound odd, but just think how much you rely on it. Most of us use the Copy and Paste commands multiple times every day, probably hundreds of times per week, without even realizing it.
If we didn’t have copy and paste, vast amounts of work would have to be done from scratch, rather than starting from previous bits of text, graphics, or entire documents that just need minor modifications. It would also be far harder to share links to Web pages. Sure, there are share buttons now, but would Twitter and Facebook have gotten off the ground if everyone had to link to cat videos by hand?
Surprising as this may be, some people still don’t understand the basics. And many others are missing out on advanced techniques with copy and paste, not to mention related ways of moving data between documents and apps.
Cut, Copy, and Paste Basics
To understand what the Cut, Copy, and Paste commands do, you first must understand the concept of the clipboard, a virtual container that holds whatever data you copy or cut. Although the clipboard is generally invisible to the user, you can view its contents in the Finder — just choose Edit > Show Clipboard. A small window appears, displaying whatever text or image is currently on the clipboard.
Before you can use Copy or Cut, you must first select some data. That might be text ranging from a character to an entire book, an image or a portion of an image, a file in the Finder, a column of data in a spreadsheet, or a chunk of an audio recording. How you select varies with the situation and the data, but it usually involves clicking once, or clicking and dragging over an area. (Don’t forget the Command-A shortcut for Select All!) Once you have something selected, you can copy or cut it.
When you copy selected data, OS X duplicates it on the clipboard for later pasting. You might copy a street address to paste into a mapping app, copy a photo from Safari to share with a friend, or copy a file in order to move it to another folder.
Closely related to Copy is Cut, which combines the copy action with a delete action. When you cut selected data, it disappears from its original location and moves onto the clipboard. Cut is thus handy for rearranging things. For instance, if you’re writing a report, and you decide that you want to move a paragraph higher up, you can select that paragraph, cut it, and paste it in the new place.
How do you cut, copy, and paste? Once you select the content you wish to cut or copy, choose Edit > Cut or Edit > Copy. To paste the clipboard’s contents, make sure the destination document or folder is active, and then choose Edit > Paste.
But navigating to the menu bar every time you wish to cut, copy, or paste is mind-numbing. Every Mac user should memorize these commands’ keyboard shortcuts — invoking them should be as second-nature as typing:
- Cut: Command-X
- Copy: Command-C
- Paste: Command-V
Paste with Style, or Style with Paste
Copying and pasting of text is simple, but it can get tricky when font styles are involved. You won’t have any problems when copying from or pasting into a plain-text editor like BBEdit. But let’s say you copy some text from a Web page and paste it into Apple Mail — it will transfer the typeface, text color, and even background color! All this style info can be useful in some cases, but most of the time, you probably just want the text to take on the look of the text around it, or to use the app’s default style.
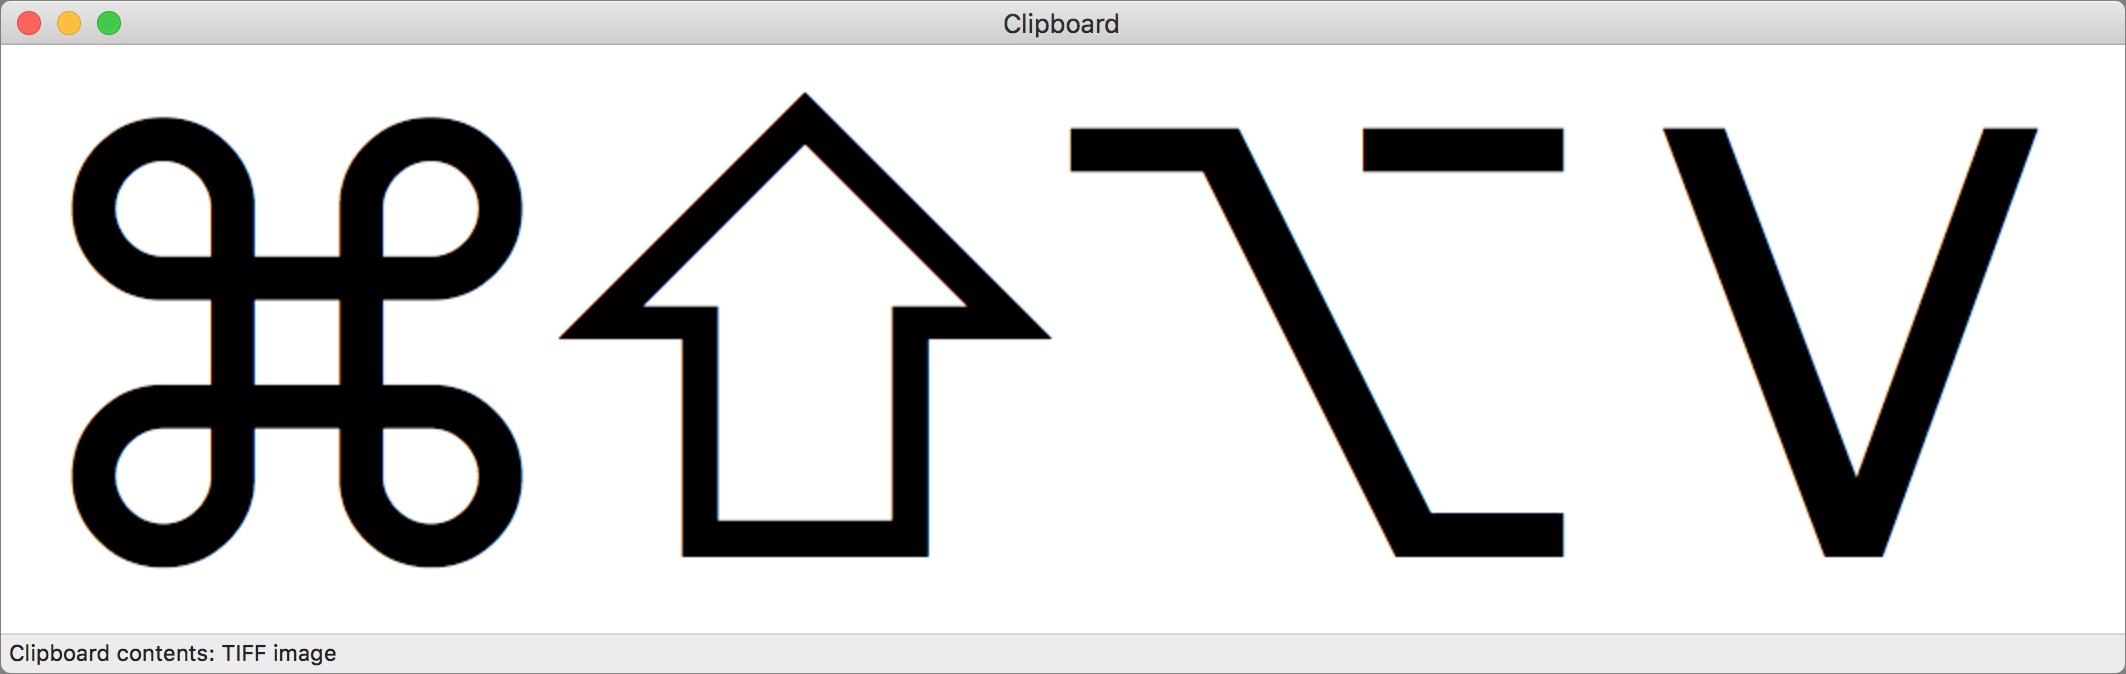
In most apps, the command to paste text without any additional formatting is Edit > Paste and Match Style (Command-Option-Shift-V). Some apps might call it Paste Text Only or Paste Without Formatting.
Unfortunately, not all apps have such a command, even when it might be useful. To work around that limitation, turn to utility software, which you may already own. Macro utilities like Keyboard Maestro, launchers like LaunchBar, and clipboard utilities like Copy’em Paste can all remove formatting from text when pasting. For more details on these and other clipboard-related tricks, see Joe Kissell’s “Take Control of Automating Your Mac.”
Some apps (like Pages, TextEdit, and Messages) let you do the opposite, and copy and paste not the actual characters but instead the style of the source text. This capability is less common, and the location of the necessary commands varies widely.
In Pages, for instance, the Format menu contains Copy Style and Paste Style commands. In TextEdit, they’re in Format > Fonts. And in Messages, they’re in the Edit menu. Happily, the keyboard shortcuts remain the same, at least in Apple’s apps: Command-Option-C for Copy Style and Command-Option-V for Paste Style.
OS X’s Little-Known Secondary Clipboard
Whenever you copy or cut something, the new data overwrites whatever is on the clipboard. That can be annoying at times, forcing you to shuttle back and forth to move discrete chunks of data between apps. We don’t want to get sidetracked away from our focus on built-in capabilities of OS X here, but know that if you want access to your clipboard history, all the utilities mentioned just above provide those feature as well. You won’t go wrong with any of them, and if you want to work with multiple named clipboards, Keyboard Maestro and Copy’em Paste can help.
However, back in OS X, there is a secondary clipboard that’s accessible only via keyboard shortcuts: Control-K performs a kill, while Control-Y does a yank.
“Kill” and “Yank” are odd terms, but they come from the venerable command-line Emacs text editor. In practice, Kill and Yank are largely equivalent to the Cut and Paste commands, but with a few differences. Most notably, they have their own clipboard, which is known as a “kill ring” in Emacs, so cutting something with Control-K doesn’t replace whatever is on the main system clipboard. This special keyboard is specific to each app, so it can’t be used to move text between apps, but is helpful for rearranging text within an app.
There are other notable differences. Unlike Command-X, if you press Control-K when no text is selected, it affects everything from the insertion point to the end of the paragraph. If you perform multiple kills with no text selected, each bit of killed text is appended to the kill ring, such that a yank pastes all of them back at once. Finally, when you paste with Control-Y, all styles are automatically stripped from the pasted text.
Kill and Yank work in most OS X apps, but not all, and only seemingly in text-editing areas. Plus, some apps, particularly word processors and text editors, implement the Kill and Yank keyboard shortcuts in slightly different ways. For instance, in BBEdit, they seem to use the system clipboard, so you can kill text with Control-K and then paste with Command-V. And in Nisus Writer Pro, Yank can paste the text in the kill ring multiple times no matter how it got there, and it pastes with styles.
Copy and Paste in the Finder
So far, we’ve focused on copying and pasting text, but many people don’t realize that you can also copy and paste files and folders in the Finder. Dragging is often easier, but there are situations where copy and paste can be more efficient.
To copy a file or folder, select it and choose Edit > Copy filename (Command-C). Make sure you’re selecting the icon and not text in its name. Using Shift-click or Command-click, you can select and then copy multiple items at once. Next, open the window showing your desired location and choose Edit > Paste (Command-V) to paste the items in that spot.
While you can’t use the Cut command on files or folders to move them, the Finder enhances the Paste command to enable you to move items instead of copying them. First, copy one or more items normally and, once you’ve navigated to the destination, press and hold the Option key, and then choose Edit > Move Item Here (it replaces Paste). The keyboard shortcut for Move Item Here is, unsurprisingly, Command-Option-V.
Remember, if you make a mistake and paste in the wrong place, regardless of whether you’re copying or moving the items, you can always press Command-Z to undo the action.
One final tweaky Finder tip. Sometimes you need to tell someone where to find a file or folder that’s nested deeply within the directory structure, such as this folder:
/Library/Application Support/Apple/Automator/Workflows
Rather than type all that, you can copy the item’s pathname. With a file or folder selected, press and hold the Option key and choose Edit > Copy filename as Pathname (Command-Option-C). This copies, as text, the full pathname to the file or folder.
If you’re copying a pathname to paste it into the Terminal app as part of a command line invocation, there’s an even better way to do so: just drag the item into the Terminal window. This approach has the added benefit of reformatting the pathname as necessary.
Copying from Safari
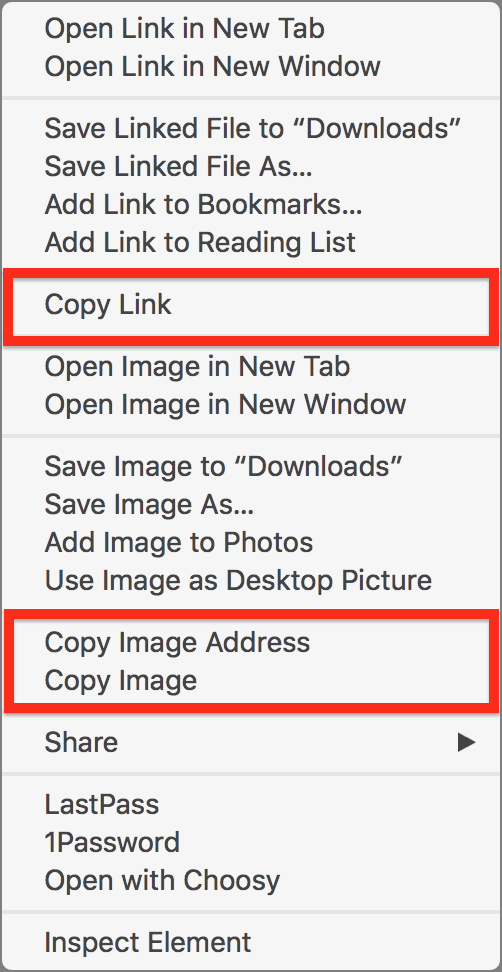
Although we’ve focused primarily on uses of copy and paste that work anywhere, many apps use the commands in particular ways as well. In particular, Web browsers make it possible to copy a variety of things. The details vary slightly between browsers, but in Safari, there are a few different things you can copy from a Web page:
- Text
- Destination URLs from hyperlinks
- Images
- Image URLs
Copying text works just as in any other app. However, for the other types of data, you need to Control-click (or right-click, or however you usually bring up a contextual menu) the link or image. Depending on what you’ve clicked, you can copy a URL or the entire image. (If you remember “The Power of Preview: Pulling Files into Preview” (25 February 2016), you can open a copied image in Preview by choosing File > New from Clipboard.)
Text Clippings and Drag-and-Drop
This tip doesn’t use the clipboard precisely, but it offers similar functionality. After selecting text in almost any OS X application, you can drag it to your Desktop to create a “text clipping” — a special sort of file that contains the selected text. Text clippings aren’t standard text files, and double-clicking them opens them directly within an unusual window in the Finder. You can’t edit a text clipping, but amusingly, you can select text in one clipping and drag it to the Desktop to create another clipping.
Creating a text clipping is like copying the text; to “paste” the text in a clipping, drag its icon from the Finder into an app’s window. In a sense, text clippings solve the problem of OS X having only a single clipboard, since you could make a number of text clippings, and then drag them in all at once. (You can select multiple clippings and drag them into a document simultaneously.)
Text clippings can contain either plain text or “rich text” in RTF format. Plain text clippings take on the formatting of the surrounding text when dragged into a document, whereas rich text clippings retain their styles.
Some text editors and word processors — like BBEdit and Nisus Writer Pro, though not TextEdit and Pages — can open text clippings as documents, but said documents are new, and there’s no way to save changes back to a clipping. You cannot edit a text clipping in any way.
But wait! If you just want to move some text from one document to another, or even from one app to another, you don’t have to create an intermediary text clipping. Instead, just select the text and drag from one window to the other. This drag-and-drop trick works with graphics too.
What if the document into which you want to drop isn’t visible, or even open? Try this excruciatingly neat set of steps:
- In an app like Safari, select some text and start dragging.
- Drag the text to the Dock icon of an app that accepts text drops, like TextEdit or Pages.
- Continue the drag (don’t let up on the mouse button) and pause while the Dock icon is highlighted; everything on the screen will disappear, except for smaller windows representing that app’s open windows and thumbnails at the bottom of the screen representing recent files.
- Continue the drag to one of the open documents or thumbnails, and once your pointer is over it, pause again. The screen returns to normal, and the document you paused over opens.
- Still continuing the drag, move the pointer to the top or bottom of the document to scroll within the document until you’ve located the spot where you want the dragged text to appear. (With your other hand, you can even use navigation keys like Page Up and Page Down at this point!)
- Once you’ve positioned the insertion point as desired, let up on the mouse button to “paste” the text in that location.
You can start a drag and then use the Command-Tab application switcher to switch between apps as well, but that approach doesn’t provide any way to select recently used documents that aren’t open, as dragging to the Dock does.
It’s Pasteboards All the Way Down — Text clippings and drag-and-drop don’t use the clipboard, but we mention them because they rely on the same underlying technology, which Apple calls “pasteboards.” In OS X, pasteboards are a standardized mechanism for exchanging data within an app or between apps. The clipboard is just one standard public pasteboard that all applications share; drag-and-drop operations use a different public clipboard, and the Kill and Yank commands presumably use yet another. Apple’s developer documentation about
pasteboards actually makes for some interesting reading.
While pasteboards are conceptually simple, implementing them well can be quite complex. For instance, different apps can handle various types of data, and it’s up to each app to put all the appropriate types of data on the shared pasteboard so as many other apps as possible can access it. That doesn’t always happen, so, for instance, you can drag a picture from Photos to Apple Mail, but you can’t drag one to Mailplane because Photos isn’t giving Mailplane a representation of the picture that Mailplane understands.
Should you want to connect clipboard data with Unix apps, check out the pbcopy and pbpaste commands. Explaining how to use them is beyond the scope of this article, but you can start at their man pages.
Here’s a final bit of geeky trivia. Since you can copy data, quit the source app, launch the destination app, and then paste, it’s clear that copy and paste has to rely on yet another background app to work its magic. That pasteboard server process is called pbs, so if you see it in Activity Monitor, you’ll know that it’s powering your clipboard and drag-and-drop, not prepping for the next pledge drive.
Needless to say, you don’t need to know anything about pasteboards, but it’s a testament to Apple’s OS X engineers that moving data between apps with copy and paste, text clippings, and drag-and-drop is so easy. Now let’s show our appreciation by putting these subtle features to use! And, of course, if you have any other clipboard- or pasteboard-related tips, let us know.
TidBITS Watchlist: Notable Software Updates for 27 June 2016
BusyCal 3.0.1 — BusyMac has been living up to its name while working on BusyCal 3, a major update to the company’s full-featured alternative to Apple’s Calendar app. BusyCal 3 features a modern look, smooth navigation via trackpad swipes, the inclusion of travel time in event alerts, timed to-dos that appear inline with calendar events, and an improved Info panel. A quick 3.0.1 update addressed a few crashes and other bugs. Joining the Mac version of BusyCal is the $4.99 BusyCal for iOS, which offers the same calendaring features in a version optimized for the iPhone and
iPad. ($49.99 new, $29.99 upgrade, 10.7 MB, release notes, 10.11+)
Read/post comments about BusyCal 3.0.1.
ExtraBITS for 27 June 2016
In ExtraBITS this week, we get a comparison of Apple Maps and Google Maps, a look into what Apple’s Advanced Computer Vision can identify, and news that Bank of America is rolling out Apple Pay-compatible ATMs.
Cartographic Comparison of Apple Maps and Google Maps — Maps are but representations of reality, and how Apple and Google have interpreted that reality has led to surprisingly different representations of it. Former Apple cartographer Justin O’Beirne has started a detailed comparison of the two mapping systems, looking at how each shows cities, roads, and places (points of interest, if you will). O’Beirne is careful not to anoint a winner, but a summary of his findings shows that Apple labels more cities and Google labels more roads. Plus, while the two show a similar number of places, they have
only 10 percent of their places in common, thanks to Apple focusing on landmarks and Google prioritizing transit.
Looking Inside Apple’s Advanced Computer Vision — Advanced Computer Vision, a technology coming to the Photos app in macOS Sierra and iOS 10, scans your photos for searchable keywords and to assemble themed collections, called Memories. Kay Yin has analyzed what currently exists of Advanced Computer Vision, compiling a list of 7 facial expressions, 33 Memories categories, and 4432 different scenes and objects that Photos can recognize. Despite not being trained to recognize specific landmarks, like St. Martin’s Maho Beach, it can still identify
them, first determining that Maho is a beach and then paring down the results.
Bank of America Offering Apple Pay ATM Withdrawals — Bank of America (BoA) is rolling out Apple Pay compatibility to its ATMs, making it possible to use Apple Pay on your iPhone to withdraw cash from over 2400 ATMs that support the technology. You can’t get cash from just any NFC-equipped BoA ATM, though, only those with the Apple Pay branding. So far, the system works only with BoA debit cards linked to Apple Pay.