TidBITS#1328/11-Jul-2016
Verizon Wireless is raising its data caps, but also its prices. Josh Centers evaluates the wireless carrier’s new plans, which come with some new features as well. It’s bittersweet news as Adam Engst bids farewell to Apple news site MacNN and legendary reseller Tekserve before wishing happy anniversaries to EveryMac.com and Mactracker. Julio Ojeda-Zapata takes another look at Sling TV, which now boasts an app for the fourth-generation Apple TV. Finally, in our latest installment of OS X Hidden Treasures, Josh and Adam explain how to type emoji, accented letters, and other exotic characters on your Mac. Notable software releases this week include BBEdit 11.6, PDFpen and PDFpenPro 8.0.2, Mellel 3.5, Audio Hijack 3.3.1, and Capto 1.0.2.
Verizon Wireless Offers More Data for More Money
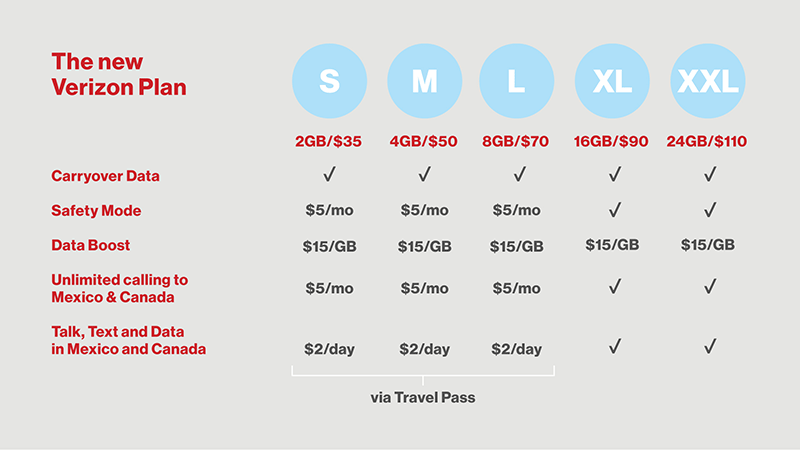
First, the good news: Verizon is changing each of its data plans so that they will offer at least 30 percent more data than before. Now the bad news: Verizon Wireless customers who opt for the new plans will pay more. Here’s what the differences will be for each of the company’s plans:
- Small: Data allowance doubles from 1 to 2 GB; price increases from $30 to $35 per month.
- Medium: Data allowance jumps from 3 to 4 GB; price goes up from $45 to $50 per month.
-
Large: Data allowance goes from 6 to 8 GB; price rises from $60 to $70 per month.
-
X-Large: Data allowance grows from 12 to 16 GB; price increases from $80 to $90 per month.
-
XX-Large: Data allowance climbs from 18 to 24 GB; price inches up from $100 to $110 per month.
Verizon is also matching competing carriers by introducing rollover data on all of its plans, a feature called Carryover Data. As with AT&T Rollover Data feature, unused data rolls over only one billing cycle before expiring. T-Mobile, in contrast, lets you accumulate rollover data for up to 12 months.
Also, Verizon offers a new feature, called Safety Mode, that prevents $15 per GB overage charges by instead throttling data throughput to 128 Kbps after you run through your monthly allotment. Verizon’s XL and XXL plans will include this feature for free, but for others, it will cost an additional $5 per month.
The XL and XXL plans also include unlimited calling to Mexico and Canada, along with voice, text, and data while in those countries. For those on the S, M, and L plans, unlimited calling to Mexico and Canada costs $5 per month and getting talk, text, and data while in Mexico and Canada requires a $2-per-day Travel Pass plan.
Overall, these are decent changes, certainly better than straight price increases. However, if you’re not thrilled with the new plans, Verizon says that you can keep your existing plan for now.
MacNN and Tekserve Close, EveryMac and Mactracker Carry On
Apple celebrated its 40th anniversary in April 2016, and the Mac has been changing the world for 32 years. Our 26 years of continuous Internet publication means that we’ve been online longer than any other Mac periodical, but it’s not surprising that other Apple-related organizations have shown similar longevity.
It is thus with mixed emotion that we report two closings and two notable anniversaries. Sadly, the Mac news site MacNN, founded in 1995, has announced that it will no longer be publishing regularly, and the venerable New York City Apple reseller Tekserve will be closing its doors for retail sales and service. On the upside, particularly for those trying to establish the technical particulars of some older Mac model, the Apple spec site EveryMac.com celebrated its 20th anniversary on 2 July 2016 and the spec app Mactracker marked its 15th anniversary back on 14 May 2016.
On 20 June 2016, MacNN announced that it would be ceasing regular publication. Editor Charles Martin gave no specific details in his article about the closure, saying:
It’s kind of amazing we made it this far — only TidBITS and Macworld are older and still around — but we’ve been told we’re packing it in. We’ve joked before that Apple becoming a huge mainstream company is the worst thing that ever happened to us, but it’s true: there’s less need for an Apple-specific news site when news about Apple is plastered everywhere, on every site, all the time. This is not the sole reason why we’re having to give up our comfy home (and just after repainting it, too!), but it’s part of the reality we’ve been working in.
We appreciate the nod, and I remember MacNN as being a notable player in the Apple news world particularly back around 2000, when Adobe sued MacNN for publishing details about the upcoming versions of Photoshop 6.0 and ImageReady 3.0 (see “MacNN Sued by Adobe, News at 11,” 12 June 2000). That was also around the time that Apple brought lawsuits against 25 anonymous defendants for posting trade secrets on the Internet (see “Apple Gets Serious About Plugging Leaks,” 7 August 2000). We wish the staff of MacNN the best.
Even sadder in some ways is the closing of Apple reseller Tekserve’s retail store on 15 August 2016. The company had been a stalwart of the Apple world in New York City, operating out of spaces on 23rd Street in Manhattan since 1987. It became such a fixture of the New York landscape that even the Carrie Bradshaw character in the “Sex and the City” TV show took her laptop there (“When was the last time you backed up?”).
Unlike MacNN, which was presumably struggling against the near-infinite competition for online attention and a market that no longer favors advertising-supported publications, Tekserve’s competitive problems were more physical. Apple has six stores in Manhattan alone, one not far from Tekserve. Plus, there’s a Best Buy nearby and all the usual online options. With rising rents, Tekserve’s retail operation simply didn’t make business sense anymore. At least Tekserve isn’t going away entirely; the company will continue to provide corporate sales and professional services.
Although it’s clear that Apple’s rising tide does not float all boats, other sites and apps continue apace. EveryMac.com, a Web site devoted to documenting detailed specs about Apple products, has been around for 20 years now, an impressive feat on the part of founder Brock Kyle. EveryMac.com provides details on all Macs from the vintage 68000 and PowerPC lines to the latest Intel models, and it covers all of Apple’s mobile devices, too. It’s a treasure trove of information, featuring the original prices of Macs around the world, specs on the largely forgotten Mac clones, and Q&As for many Mac models that go beyond mere specs. The site is still evolving too — last month, EveryMac.com
launched a new version of its Ultimate Mac Lookup feature that adds thousands of identifier specific tips and details.
Finally, though it’s the baby of this roundup, I also wanted to acknowledge the efforts of Ian Page, whose donation-ware Mactracker application has been a must-have for over 15 years now. First developed in 2001 for both Mac OS 9 and Mac OS X, Mactracker has evolved over time, adding an iOS version in 2009. Its internal database has grown too, from information on 243 models in version 1.0 to detailed specs on over 700 models today.
Mactracker and EveryMac.com are a boon to support techs, journalists, and anyone who needs to unearth specific characteristics of older Mac or other Apple hardware. Thanks to Brock Kyle and Ian Page for keeping them going all these years!
Sling TV, a Cord Cutter’s Delight, Arrives on Apple TV
For cord cutters seeking to ditch ever-costlier cable and satellite TV, Sling TV is a compelling alternative, which I first wrote about in “FunBITS: Sling TV Is Made for Cord Cutters” (20 February 2015). It’s a cable-style service, with enticing and affordable packages of leading networks, but delivered online, with no need to set up a special box.
I have at times been tempted to jettison my Comcast TV service largely on the strength of Sling TV’s offerings. I’ve hesitated for a number of reasons, not least of which is that I could not access Sling TV on an Apple TV, my preferred video-streaming box.
Now that barrier has been removed. Sling TV has finally released an app for the fourth-generation Apple TV to complement its iOS and Mac apps. Sling is also offering a 32 GB Apple TV for $89, compared to the usual $149 price tag, for those who prepay three months of Sling TV.
Sling TV’s new Apple TV interface is pretty good. I don’t think it quite matches up to the Comcast X1 interface, another reason I’ve hesitated to cut the cord, but Sling has made great strides in usability since I last reviewed it.
Sling Content — Sling also has significantly expanded its content offerings. It once had only 20 or so channels, and that number is now up to about 100.
The company largely divides this lineup between two bundles, the $25-per-month Sling Blue, and the $20-per-month Sling Orange. The two have a good deal of overlap, but also differences.
Blue is a “multi-stream” service – meaning you can watch on up to three devices at once – with 42 channels, including new ones like USA, Bravo, and Syfy. It also includes local NBC stations in some markets, with more markets to come eventually.
Orange is a single-stream service with 29 channels, including new addition BBC America. Sling also offers an option to combine Blue and Orange (Sling Gray?) for a single $40-per-month fee.
If that’s not enough, you can add themed bundles, each $5, that focus on sports, children’s shows, comedy, world news (including recent addition BBC World Service), and more. HBO and Cinemax each cost an additional $15 and $10, respectively.
Sling also emphasizes Spanish-language programming, and the company has just augmented its longstanding “Best of Spanish TV” bundle with a “Caribe” bundle focused on Cuba and Puerto Rico, along with a “Colombia Extra” bundle. Such add-ons also cost $5 apiece, but Spanish speakers who want only this content, and nothing en inglés can also purchase them for $10 entirely on their own.
Interface for the Live and the Canned — Sling’s vast program options are a blend of live and on-demand content, and various networks have made different decisions as to what ratio of live and canned shows they make available.
Accordingly, Sling TV’s Apple TV interface attempts to cluster its content into corresponding sections. It doesn’t do this perfectly, but making sense of it all isn’t hard. To get started, you access the main menu by swiping downward from the top of the TV screen.
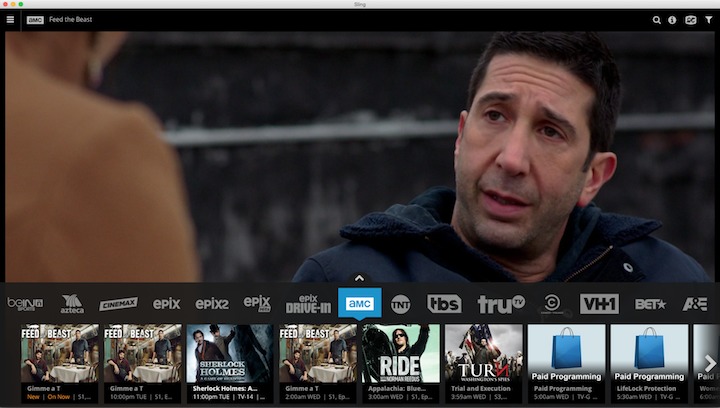
One menu option, dubbed Guide, is the busiest and a bit tricky to navigate by way of the Apple TV’s touch-based Siri Remote. All available channels appear in a strip near the top. That’s a lot of sideways thumb scrolling to find the channel you want, but you can refine selections by criteria – like sports, news, or family – via a menu underneath the channel strip.

Once you select a channel, a host of options appear below. These vary by channel. In some cases, you can select live content and see a schedule of upcoming live airings. In other cases – such as HBO and Cinemax – there’s a wealth of on-demand content that you can watch at any time. It includes movies and TV shows like HBO’s “Silicon Valley” and “Game of Thrones,” for those who like Netflix-style binge watching.

But, again, Sling organizes its content into horizontal strips that require endless sideways scrolling. It is torture, for instance, to move rightward alphabetically through dozens of films available from HBO alone.
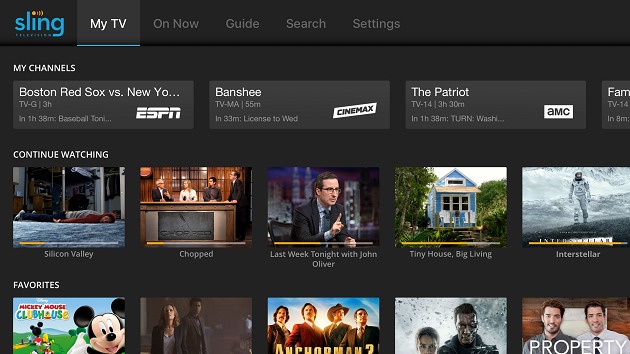
Elsewhere in the Sling TV interface, you can pick the My TV option to see your partially viewed programs and content you’ve favorited for later viewing. Faved offerings include most-watched shows, on-demand movies, and entire channels for a customized and convenient personal menu that bypasses that awkward main channel strip.
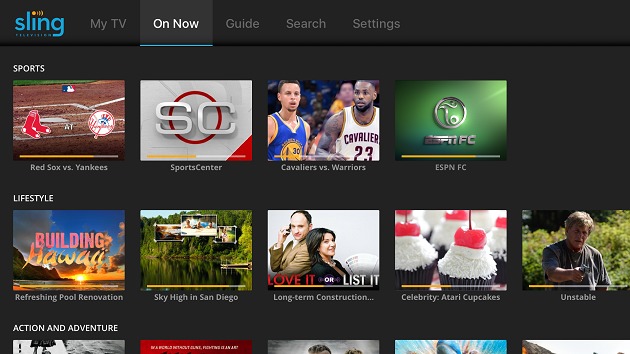
On Now shows programs that are currently playing live.
A redesigned Mini Guide lets you browse through available live content without interrupting what you are currently watching. It takes up less space than the previous Mini Guide, according to Sling. To access the Mini Guide on the Apple TV, swipe upward from the bottom of the screen.

Sling TV has a search engine, which you can harness either via an on-screen alphabet interface or by using voice commands spoken to the Siri Remote. The app also provides simple parental controls that let parents prevent access to particular program ratings — along with unrated content.
Sling’s Apple TV interface is different from that on the iPad and the Mac, though not exponentially better in terms of interface design. The Apple TV app seems more reliable, though; I’ve struggled to pull up content like HBO’s “Silicon Valley” on my iPad, but that has been far less of an issue on the Apple TV. However, the Mac version has always performed reliably for me.
Still, Sling said the redesigned interface debuting on the Apple TV will eventually become its standard look and will migrate to other platforms in coming months. As I was finishing this article, it had already debuted on the Roku.
SlingTV provides apps for a variety of other platforms – like Google Chromecast and Amazon Fire TV streaming devices. This broad platform compatibility makes Sling TV an enticing option for those who are tempted to cut the cord amid skyrocketing cable and satellite bills.
OS X Hidden Treasures: Typing Exotic Characters
It’s easy to look at your keyboard and assume that its keys represent all the characters you can type. But nothing could be further from the truth. You can press the Shift key to get uppercase letters, and the Option key provides access to numerous other characters. Even that’s just the tip of the iceberg, thanks to Apple’s support of Unicode, which makes it possible to enter more than 128,000 characters. Those characters come from modern and historic scripts, plus multiple symbol sets. Emoji? Just another symbol character set in Unicode.
So whether you’d like to insert an eggplant ? emoji in a text message, give a price using the euro € symbol, or just use the Command key ⌘ symbol in a keyboard shortcut, it’s good to know how to access all the characters you can type on your Mac. (That said, we’re not going to get into how to type in languages that use different scripts.)
Everything we talk about here applies to OS X 10.11 El Capitan; in earlier versions of OS X, menu commands, keyboard shortcuts, and interface controls may differ.
Option Characters
Historically speaking, the main way you used to access special characters was by holding down a modifier key or two while typing, and that’s still possible. Many people memorize a few key shortcuts, such as Option-8 for the bullet • character or Option-G for the copyright © symbol. You could even add Shift to get more characters, so Shift-Option– (minus) gives you an em-dash — character.
The Option key also helps you type accented characters like the umlauts necessary for a proper rendering of metal band Mötley Crüe’s name. The trick is to type the keyboard shortcut for the accent, such as Option-U for an umlaut, followed immediately by the character you want underneath. So Option-U, followed by u, gives you ü.
It was hard to remember all the combinations, so starting in Mac OS X 10.7 Lion, Apple added an easier way, the Character Picker. Just press and hold the key for the character until the Character Picker appears. Then click the accented character you want, or press its corresponding number.
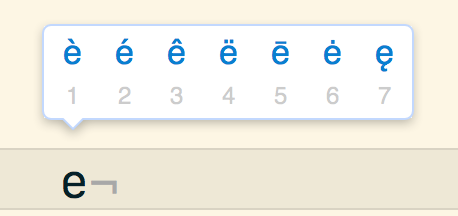
The Character Picker suffers from two problems. First, it can be flaky, and the recommended fix is to add a French or Spanish keyboard to System Preferences > Keyboard > Input Sources and then restart. Second, it prevents you from holding down a key and having it repeat. To re-enable that functionality, enter this command into Terminal and relaunch the app in question (revert the setting by changing false to true at the end):
defaults write NSGlobalDomain ApplePressAndHoldEnabled -bool false
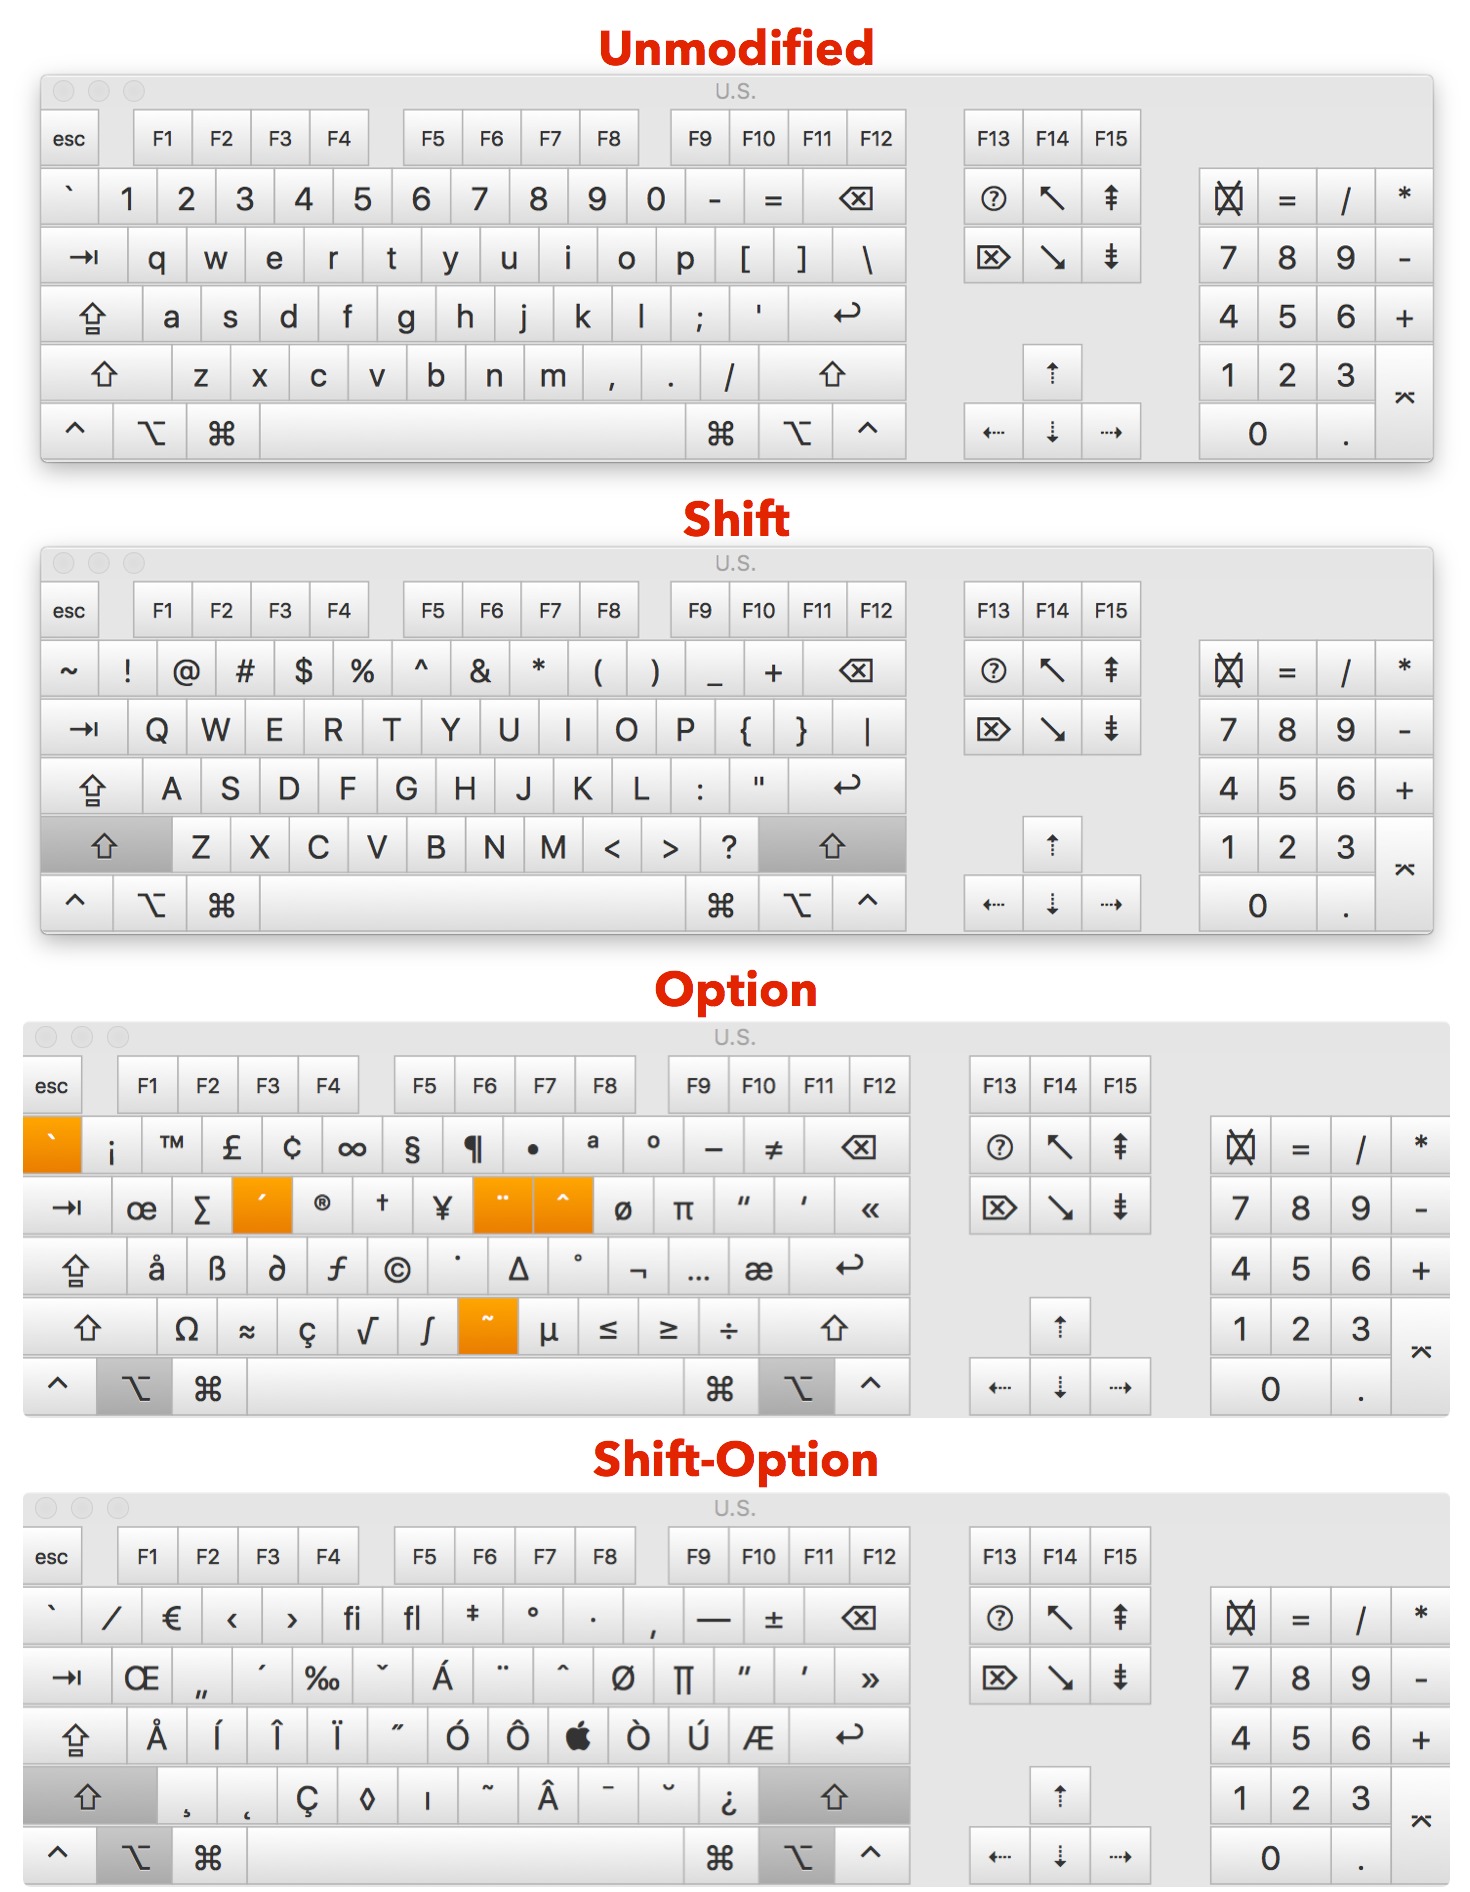
Using the Option key to type special characters remains the fastest and easiest way to enter commonly used ones. How can you learn those shortcuts? With the Keyboard Viewer, a floating window that shows what pressing any combination of keys will insert.
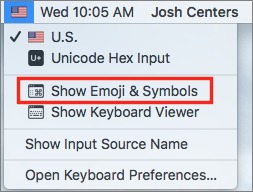
To access it, open System Preferences > Keyboard > Keyboard and select “Show Keyboard, Emoji & Symbols Viewers in menu bar.” That puts a new icon in your menu bar, either a flag representing your language or a square icon with a ⌘ symbol in it. Click that menu and choose Show Keyboard Viewer. Whenever you press a key, Keyboard Viewer gives you feedback, and if you press Shift, Option, or Shift-Option, it shows you what characters you can type. How else would you figure out that Shift-Option-K gets you an ?
The Emoji & Symbols Viewer
The problem with entering special characters from the keyboard is that, even with modifier keys, you can type only so many (there is another trick that we’ll share later, but it’s largely not helpful).
Starting in OS X 10.10 Yosemite, the primary way to insert special characters of any sort is via the Emoji & Symbols Viewer. In most Mac apps, you can find it in Edit > Emoji & Symbols (Edit > Special Characters in earlier versions of OS X) or bring it up by pressing Command-Control-Space.
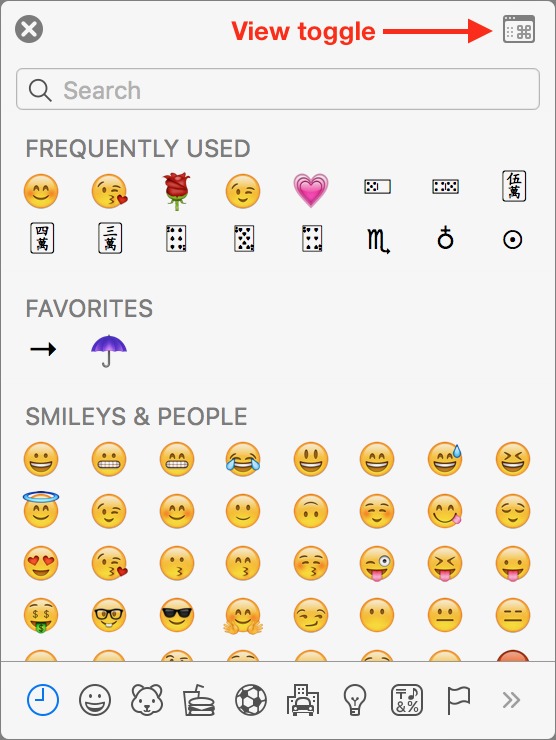
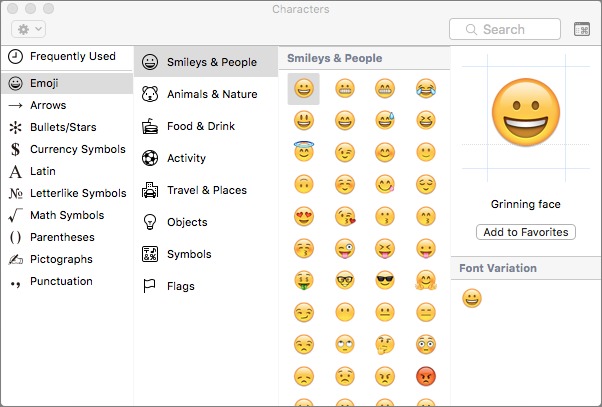
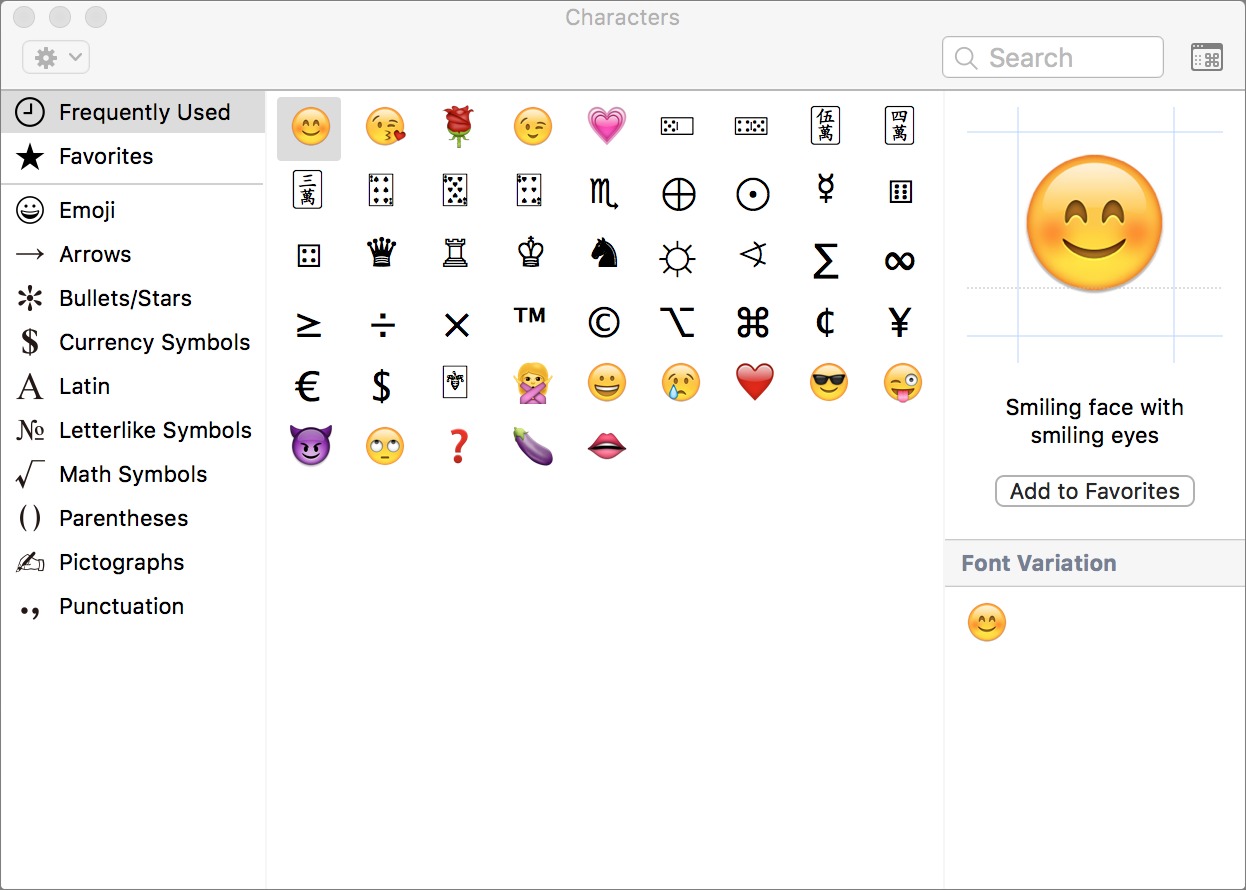
By default, it comes up in the compressed form you see above, but unless space is at a premium, we recommend you expand it to its full glory (below) by clicking the square button at the top right. Click that button again to shrink it, if you prefer the thinner look.
There’s another way to access the Emoji & Symbols Viewer even if the app you’re using lacks the Edit menu command. If you enabled the menu bar icon that provides access to the Keyboard Viewer as discussed just above, you could also use it to bring up the viewer in any app — just choose Show Emoji & Symbols.
Unlike the Keyboard Viewer, which floats over all windows and shows keys typed regardless of the current app, the Emoji & Symbols Viewer is tied to the app that’s frontmost when you open it. Open Emoji & Symbols in BBEdit, then switch to the Finder, and the Emoji & Symbols window disappears. Switch back and it reappears. The window also remembers its state, position, and size per app, so you can configure it for one app and have it look different for another.
In the Emoji & Symbols Viewer, the far left column contains several categories, but for the sake of simplicity, let’s break it down to two: emoji and other Unicode characters. When Emoji is selected, as it was in the screenshot above, three more columns appear: one for emoji categories, another with the actual emoji characters, and a third that displays a large preview of the selected character with additional information and variations in other loaded fonts. When selected, the non-emoji categories show only two columns: the character and preview columns.
You can insert a character from the viewer in four ways:
- While the cursor is active in a text area, double-click a character in the viewer to enter it at the insertion point.
- Drag a character out of the viewer and into the text area.
- Drag a character out of the viewer to the Desktop to create a text clipping with it. Then drag that text clipping anywhere you can type. For more on text clippings, see “OS X Hidden Treasures: Copy and Paste” (11 June 2016).
- Control/right-click a character and choose Copy Character Info from the contextual menu. When you later paste, you’ll get that character along with its Unicode name and ID, which you can delete.
Once you insert a character, it appears in the Frequently Used category in the left-most column, which makes it easy to find and enter again later. You can also add your most used characters to a Favorites category: while a character is selected, click the Add to Favorites button in the right-hand preview column.
Browsing might work for emoji, but for other characters, you often know which character you want. To find a specific one, search for it using the Search field in the upper-right of the Emoji & Symbols window. Alas, not all characters are named what you might think, so don’t be afraid to fall back on a Google search with some words that you think describe the character along with the word “Unicode.” If you find the desired character on
the Web, copy and paste it into the Emoji & Symbols Viewer’s search field, after which you can add it to your Favorites list.
While you’re looking at the top of the full Emoji & Symbols Viewer, check out the gear button at the left. Clicking it displays a pop-up menu that lets you customize which symbol categories appear and the size of the symbols; you can also use it to clear your list of frequently used characters.
The Emoji & Symbols Viewer provides access to even more character variations. For instance, when you first click on some emoji of people or body parts, a popover menu appears that lets you choose a skin tone. To change the skin tone later, click and hold on the emoji. If you have an appropriate trackpad, a Force Touch will also bring up the popover.

There are other variations, too. With a character selected, take a look at the preview column. You’ll see a section called Font Variation that’s uninteresting with emoji because the variation is usually the same as the original. However, most other Unicode characters have at least a few variations, and some have dozens. It’s worth scrolling through because a variation in a different font may fit your typographic needs better than the one from your current font.
![]()
Here’s another neat trick. If you select a Unicode symbol that has a corresponding emoji, like ✂︎, when you switch to Emoji in the left-hand column, the corresponding emoji appears automatically.
Finally, if you find yourself looking for an emoji that doesn’t exist, you can submit a proposal to the Unicode Consortium to have it added.
That’s about it for the Emoji & Symbols Viewer. Let’s take a look at some of the interesting characters it offers.
Fun with Unicode
Now that you know how to access these characters, what can you do with them? Emoji need no introduction; their increasing popularity has led Apple to make them a prominent part of the upcoming iOS 10. But other Unicode character sets might offer some characters you would find handy.
For instance, have you ever wondered how to type the symbols for the Command ⌘ and Option ⌥ keys, which you see all the time in OS X’s menus? The Option character is easy to find, just search for “option” in the Emoji & Symbols Viewer. Finding the Command character is harder, since its Unicode name is “place of interest.”
The Emoji & Symbols Viewer offers numerous categories of characters to explore. Here are some of the most interesting ones:
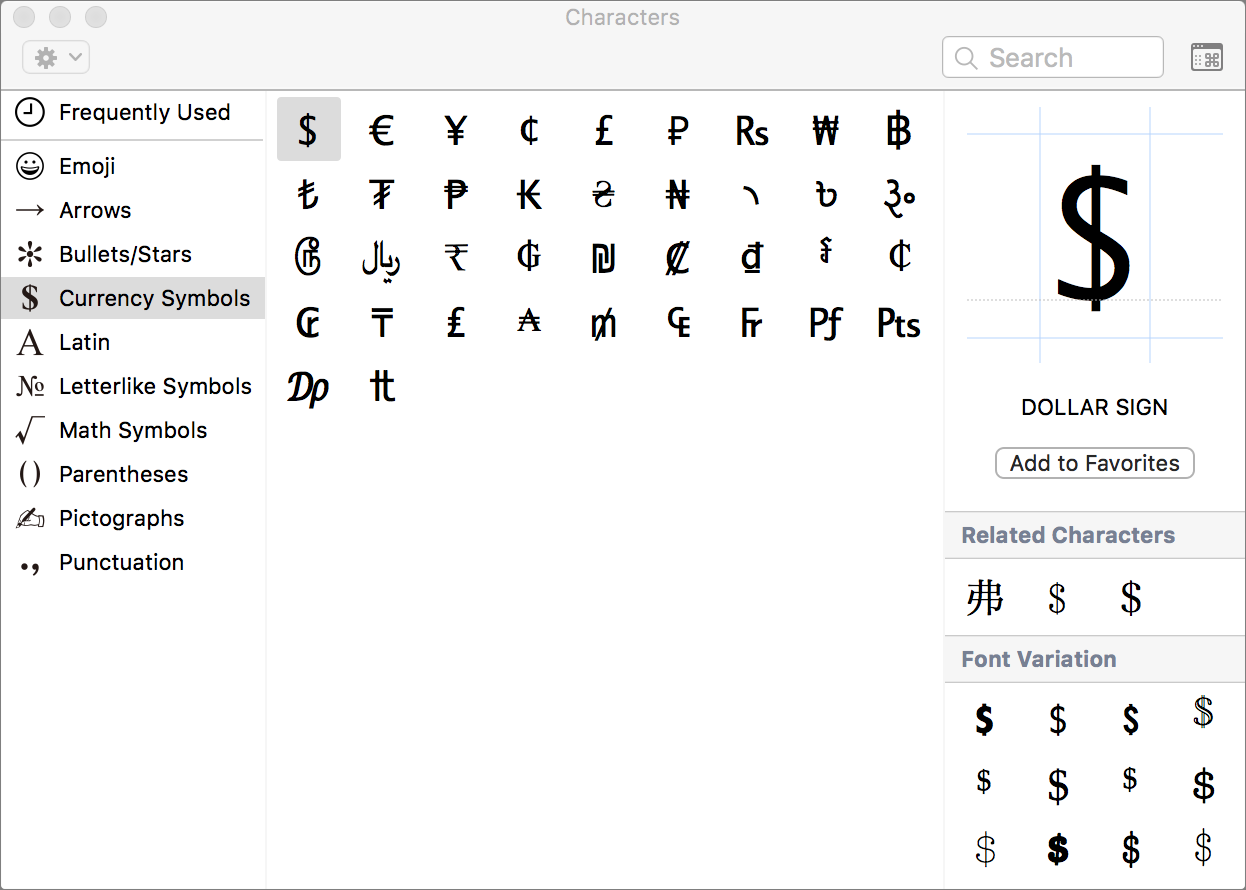
- Currency Symbols: If you’re using a U.S.-centric keyboard, the dollar sign is easy to type, but symbols for things like cents ¢, euros €, pounds £, and yen ¥ require more effort. If you can’t remember their Option-key shortcuts, you can find them in the Currency Symbols category.
- Letterlike Symbols: The Letterlike Symbols category contains things like the copyright © and trademark ™ symbols, which are both commonly needed, but not easy to find. You’ll also find some typographic niceties, such as the ”care of” ℅ symbol. Be sure to play with the font variations for these.
- Math Symbols: Here, you’ll find all the mathematical symbols you need, from basic multiplication × and division ÷ symbols to more obscure things like greater-than-or-equal-to ≥ symbol. It also includes advanced symbols like infinity ∞, spherical angle ∢, and sigma ∑.
- Pictographs: This category is a lot of fun. It contains characters for things like the sun ☼, chess pieces (♞♔♖♛), dice (⚃⚅), astrological symbols (☿☉), playing cards (???), mahjong tiles (???), and even dominoes (??).
- Technical Symbols: Although this category isn’t enabled by default, it’s worth adding if you want access to the all the various symbols for Mac keys (⌘⌥⇧⌫), along with the power ⌽ button.
That’s just a taste of what the Emoji & Symbols Viewer has to offer, but what if you don’t want to fool with the viewer? There are other ways to type these characters…
Other Ways to Insert Special Characters
Those who find themselves needing to enter a wide variety of special characters should take a look at Ergonis’s PopChar X, which has been helping Mac users find special characters since 1987, making it one of the oldest continuously developed Mac utilities.

PopChar X provides roughly the same capabilities as the Emoji & Symbols Viewer but adds numerous additional features. For instance, you can use it to find similar characters based on shape, find characters by drawing them, and figure out which font contains a particular character variation. It also boasts a magnifier tool that shows characters at a large size so you can see fine details and lets you preview fonts in paragraphs of text so you can get a sense of whether a font will work before committing to it.
We haven’t used it, but Ultra Character Map also comes highly recommended. It has many of the features of PopChar X, and also lets you apply colors and 3D effects to characters.
Even if PopChar X or Ultra Character Map is overkill for your needs, using the Emoji & Symbols Viewer to access a small number of characters that can’t be typed from the keyboard gets old fast. Luckily, if you already own a macro utility like Keyboard Maestro or a text expansion tool like TextExpander, it’s easy to set up a shortcut to any character you wish.
If you don’t own either of those apps, or something like them, OS X provides its own text expansion feature. Go to System Preferences > Keyboard > Text, click the plus button, type a shortcut into the Replace column, and then paste your character in the With column.

Another way to insert Unicode characters is via the Unicode Hex Input keyboard. To enable it, go to System Preferences > Keyboard > Input Sources, click the plus button, and search for “hex.” Select Unicode Hex Input and click Add to make it a selectable keyboard. If you haven’t previously enabled another keyboard, adding Unicode Hex Input gives you a new menu bar icon — an American flag if you’re using a U.S. keyboard layout. Click it and choose Unicode Hex Input to enable the keyboard.
Now you can hold down the Option key and type in a four-character hexadecimal code for a character to insert it. How do you find the hex code for a character? The Emoji & Symbols Viewer shows it to you in the right-hand column, or you can scan through Wikipedia’s full list of Unicode characters. Just look up the character you want, find its code under the Code column, hold Option, and type that code, minus the U+ character. For instance, 00BF is an inverted question mark ¿, 2673 is the recycling ♳ symbol for Type 1 plastics, and so forth. This isn’t the most practical way to enter Unicode characters, but it might be useful at times.
Unfortunately, when you switch to the Unicode Hex Input keyboard, you can no longer use the Option key to enter characters as discussed earlier, and even using it to navigate within text may fail. Unless you work with obscure Unicode characters regularly, we can’t recommend using Unicode Hex Input.
There is one important reason to enable Unicode Hex Input, and that’s to help someone who has put an emoji in their account password. Since the login screen doesn’t let users bring up the Emoji & Symbols Viewer, emoji can’t be entered in its password field. However, Unicode Hex Input does work there. But it gets even trickier. Some emoji require five hex characters, and for them you must look up and enter two UTF-16 hex codes. (Thanks to Tom Gewecke for the solution to this unusual but sticky problem, and for other advice in preparing this article!)
Regardless of how you choose to enter special characters, remember that they’re available and more flexible than you might think. For instance, there’s no need to go looking for a skull and crossbones graphic when you can just find its ☠ symbol and then bump up the font size until it’s as large as you want.
TidBITS Watchlist: Notable Software Updates for 11 July 2016
BBEdit 11.6 — Bare Bones Software has released BBEdit 11.6, a significant update to the venerable text editor that adds support for Kite, an “artificial pair programmer” that evaluates code as you write. Kite also provides advanced code completion, error correction, and contextual documentation of library and API calls. Bare Bones has also tweaked BBEdit’s demo model, making it easier to try out the app’s advanced features. For 30 days, all features are available, after which BBEdit remains permanently functional with a reduced feature set along the lines of the company’s
free TextWrangler editor — unavailable commands are badged with a Demo icon. Purchasing a license at any time brings back the complete feature set.
Notable changes in BBEdit 11.6’s interface include a location field in the file info panel along with buttons to copy the full path and URL, a popover for navigating by line number, and a New Text Window command in the Dock menu. Bare Bones has tweaked the editing view, shrinking the toolbar, moving the document icon to the right side of the toolbar, and condensing the text in the bottom status bar. Plus, a new Edit > Lines > Duplicate command duplicates the current line or selected lines, and Find Differences can now ignore blank lines and all whitespace. Be sure to read the voluminous release notes for more changes and details on numerous bug fixes. ($49.99, free update, 14.0 MB, release notes, 10.9.5+)
Read/post comments about BBEdit 11.6.
PDFpen and PDFpenPro 8.0.2 — Smile has pushed out version 8.0.2 of PDFpen and PDFpenPro, a maintenance release for the PDF editing apps that fixes bugs related to displaying incorrect colors, AppleScript access for page and document properties, and more. ($74.95/$124.95 new with a 20 percent discount for TidBITS members, $30 upgrade, free update from version 8.0, 73.8/74.5 MB, release notes, 10.10+)
Read/post comments about PDFpen and PDFpenPro 8.0.2.
Mellel 3.5 — RedleX has released Mellel 3.5, a notable update that improves the word processor’s layout capabilities through the addition of independent text boxes. You can customize these text boxes via a popover that lets you set width, height, padding, fill color and transparency, frame type and color, and corner radius. You can also style the text inside text boxes, and set text boxes to float or anchor to a position. A Smart Snap feature lets you align both text boxes and images to the edges and center of the page or to each other. Mellel 3.5 also enables you to round the corners of images, set dashed or dotted frame types, and
edit the weight of lines. RedleX also promises that “many, many bugs were securely removed from Mellel.” ($39 new from RedleX and the Mac App Store, free update, 105.2 MB, release notes, 10.6+)
Read/post comments about Mellel 3.5.
Audio Hijack 3.3.1 — Rogue Amoeba has released Audio Hijack 3.3.1, which adds preliminary support for the Instant On component in macOS 10.12 Sierra, which is currently in public beta. Additionally, the company modernized the audio capture utility’s Install Extras window and fixed bugs related to timer conflict detection, editing tags in iTunes, using VoiceOver, and more. ($49 new with a 20 percent discount for TidBITS members, free update, 16.2 MB, release notes, 10.9+)
Read/post comments about Audio Hijack 3.3.1.
Capto 1.0.2 — Global Delight has issued Capto 1.0.2, a worthwhile update to the screen capture utility formerly known as Voila. The release adds a new Highlighter image editing tool to mark and highlight sections, an option to customize the countdown timer before recording, and a new tool to capture floating windows. Capto 1.0.2 also fixes an issue with remembering the last selection. If you have a Voila or Boom 2 license, you are eligible for a 50 percent discount on Capto through Global Delight’s storefront. Capto is free for those who purchased a license to Voila on or after 1 October 2015. ($29.99 new from Global
Delight with a 25 percent discount for TidBITS members or from the Mac App Store, 20.2 MB, 10.10.5+)
Read/post comments about Capto 1.0.2.
ExtraBITS for 11 July 2016
In ExtraBITS this week, Walmart Pay becomes available at thousands of Walmart stores throughout the United States, we learn why some apps are intentionally slow, the EasyDoc malware targets unsuspecting Mac users, and iOS 10 will help you register for organ donation.
Walmart Pay Now Available at All Walmart Stores — CurrentC may be dead, but retail giant Walmart isn’t giving up on the dream of a mobile payment system that doesn’t involve Apple or Google. Walmart’s proprietary Walmart Pay system is now accepted at more than 4600 Walmart stores in the United States. Like CurrentC, Walmart Pay relies on scanned QR codes for transactions instead of NFC, but instead of linking directly to a checking account, it can connect to a credit or debit card or a Walmart gift card. We hope Walmart Pay will be more secure than CurrentC,
but it’s hard to imagine it becoming a viable competitor to Apple Pay without support from other retailers.
Some Apps Are Slow by Design — Mark Wilson, writing for Fast Company, reveals that many apps — both those that run locally on your devices and Web apps — are intentionally slowed down, because users don’t trust apps that work too quickly. For instance, Facebook displays a fake loading bar when performing a security checkup, giving the impression of deep thought. Similarly, Wells Fargo had to slow down its mobile app’s retinal scanner because customers didn’t realize that it had worked so swiftly. Designers believe that they’ll gradually be able to remove the
artificial speed bumps as users become accustomed to the technology.
Beware the EasyDoc Mac Malware — Bitdefender Labs has issued a warning about an app called EasyDoc Converter, saying that it’s dangerous malware that could give an attacker complete control of your Mac. EasyDoc Converter was available at the reputable MacUpdate Web site, and testers at Tom’s Guide were able to install it despite Gatekeeper being set to allow apps only from the “Mac App Store and identified developers.” Interestingly, the malware will not install if you have Objective Development Software’s Little Snitch network-monitoring utility installed. Read this as yet
another reminder to be extra careful about what you install on your Mac — stick to software from reputable developers.
Organ Donation Registration Baked into iOS 10 — Apple has announced that it is teaming up with Donate Life America to offer organ donor registrations from within iOS 10’s Health app. Users will be able to use Health to sign up for the National Donate Life Registry as organ, eye, and tissue donors. Organ donation is an important issue for Apple because its founder, Steve Jobs, received a liver transplant in 2009 that extended his life by a few years.