TidBITS#1341/10-Oct-2016
If you know you should get to bed earlier, give iOS 10’s new Bedtime timer a try — Josh Centers explains how to use it. He clearly has sleep on the brain this week, given his review of the Studio Neat Material Dock, which holds both an iPhone and an Apple Watch by your bedside. For those lamenting the eFax acquisition of Internet faxing service MaxEmail, or anyone who needs to send or receive the occasional fax, Randy Singer joins us to provide some recommendations for alternative services. Finally, Julio Ojeda-Zapata takes a look at the Instagram photo-sharing social network and makes the case that it’s more interesting than many veteran Apple users may have thought. Notable software releases this week include iFinance 4.1.3, PDFpen and PDFpenPro 8.2, and DEVONthink 2.9.5.
Using the Bedtime Timer in iOS 10
If you’re like me, and you’re bad at going to bed when you should, iOS 10 has a feature that could help. The Clock app now features a Bedtime timer to help you figure out when bedtime should be, remind you to go to bed, and track how much sleep you get.
First, open the Clock app and go to the Bedtime screen. Tap Get Started and set a wake-up time.

Next, select on which days you’d like to be woken up. Perhaps you like to sleep in on weekends, but if I don’t wake up at the same time every day, my sleep schedule gets all out of whack. Then select how many hours of sleep you’d like every night — the National Sleep Foundation recommends 7 to 9 hours.

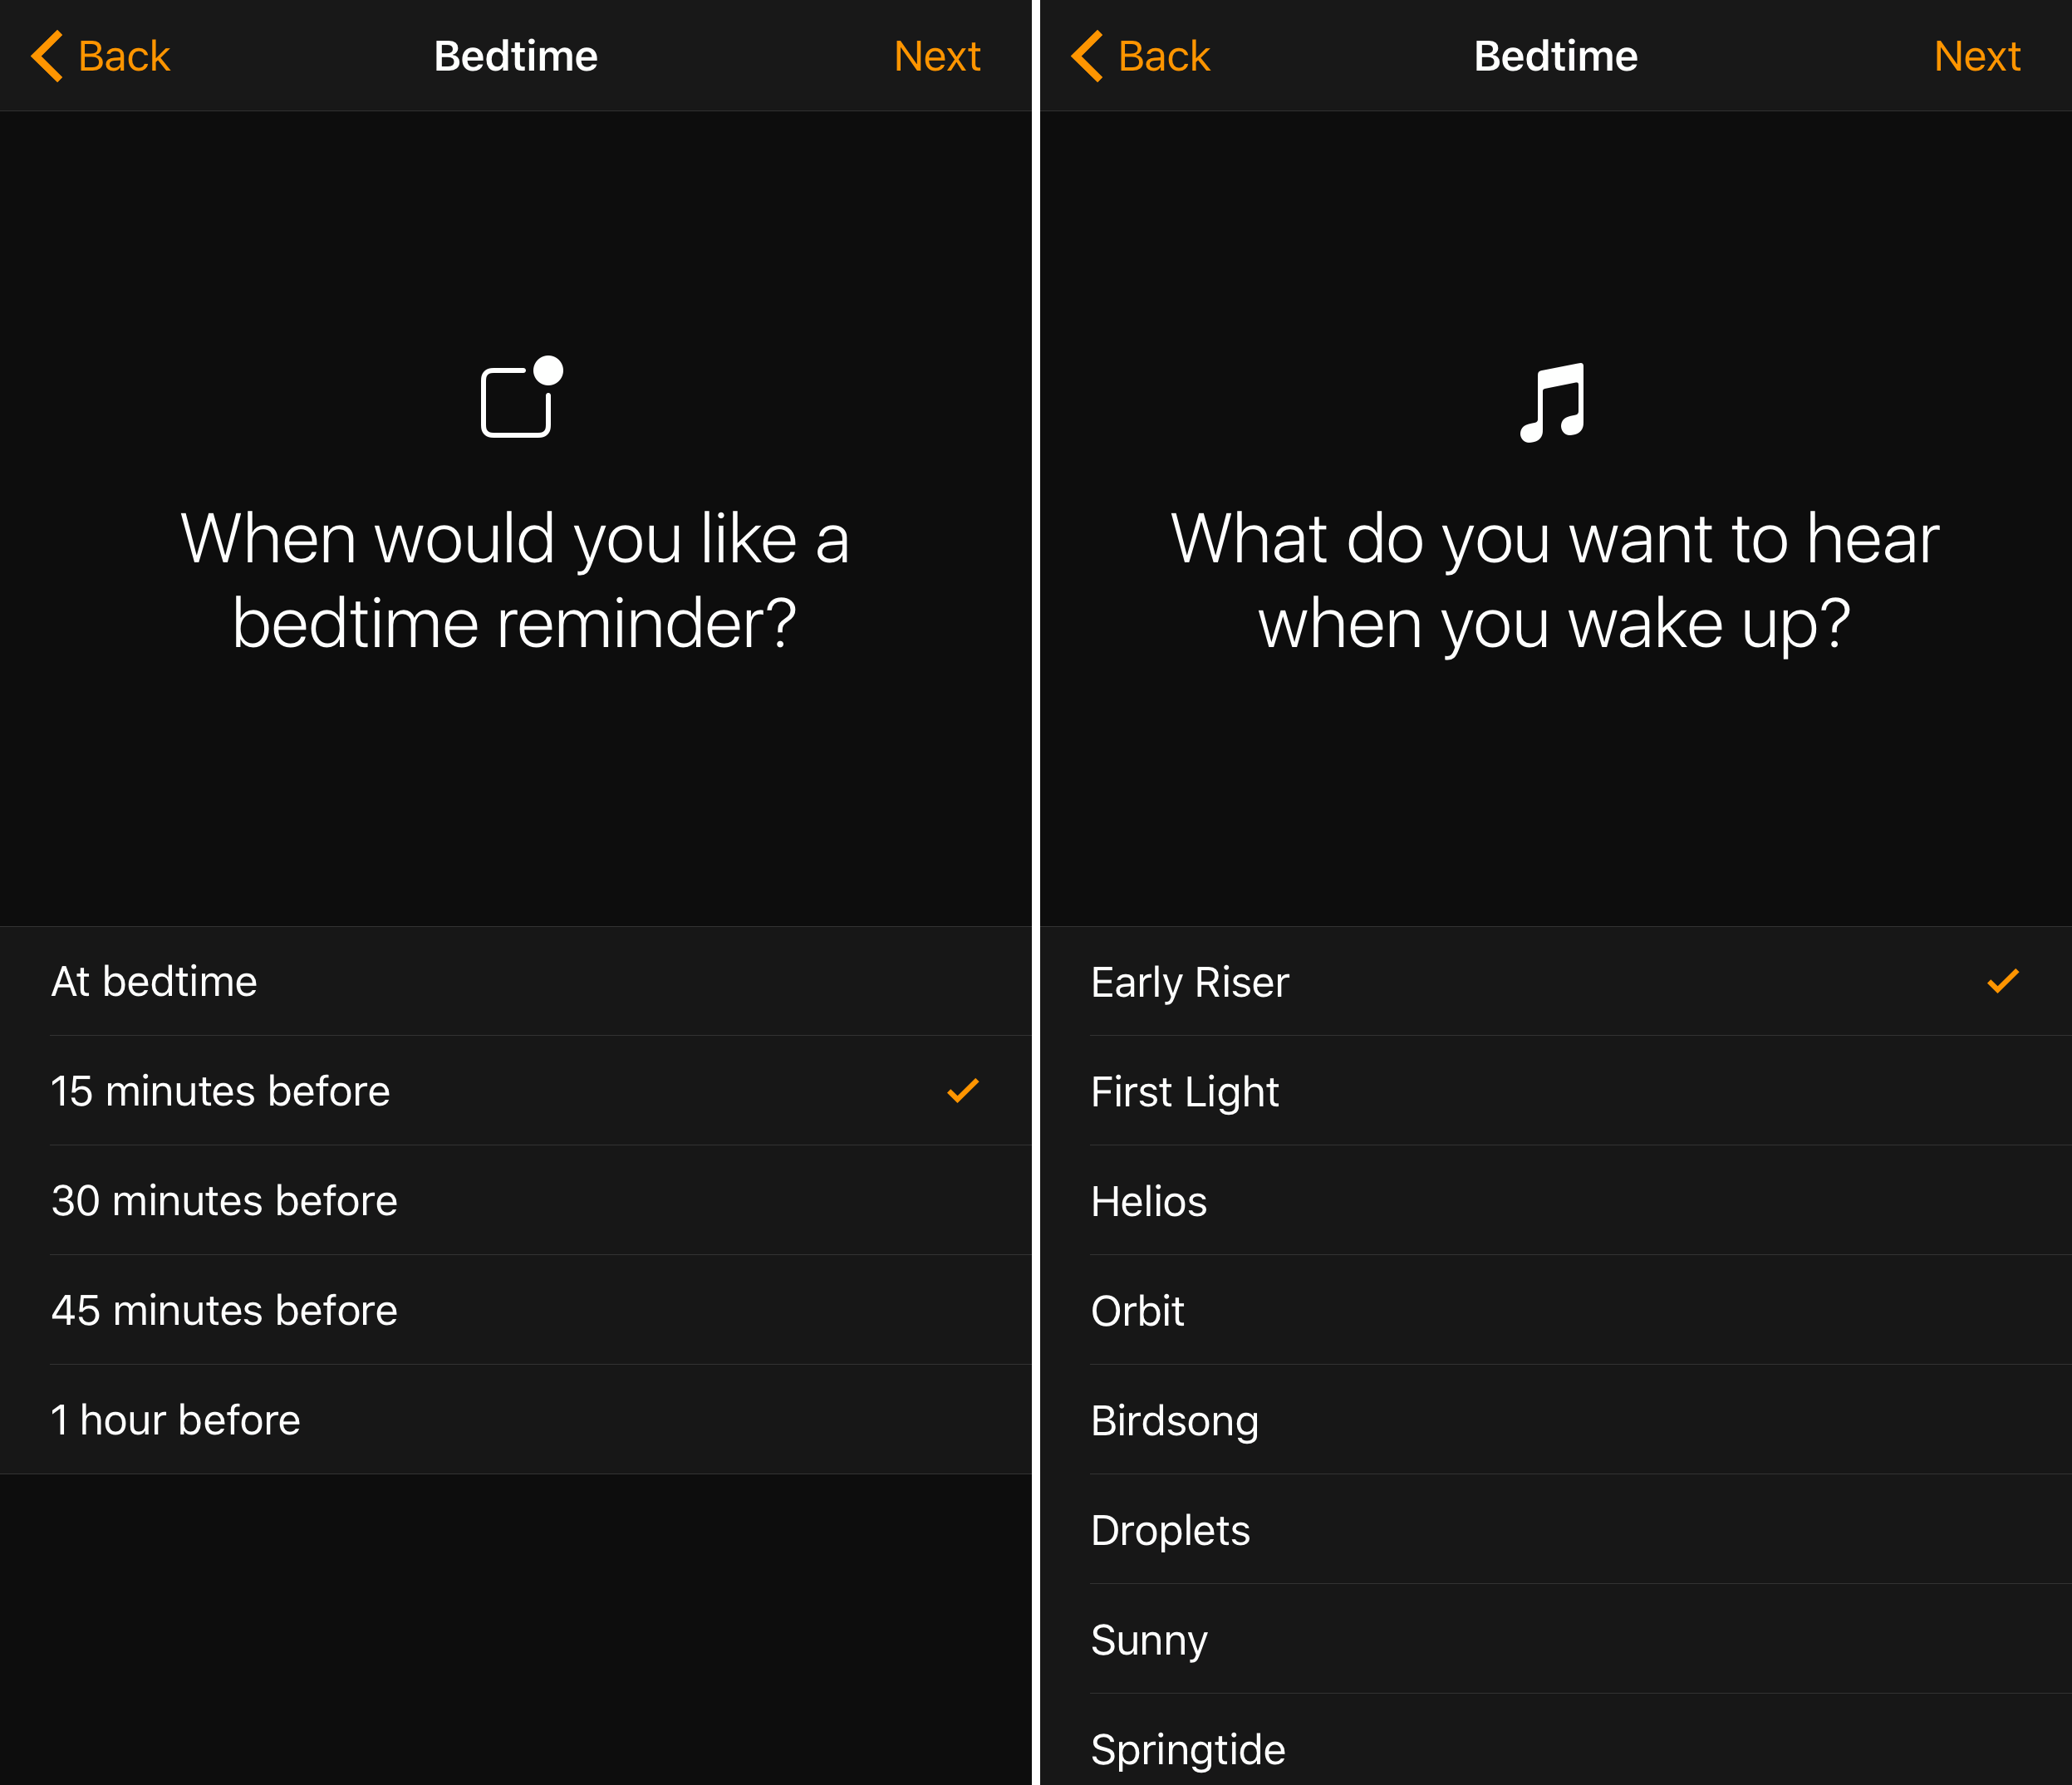
Your next step is to select when to be reminded to go to bed — 15 minutes before bedtime is the default. Then pick a wake-up sound — Early Riser is the default, and you can tap each sound to hear it.
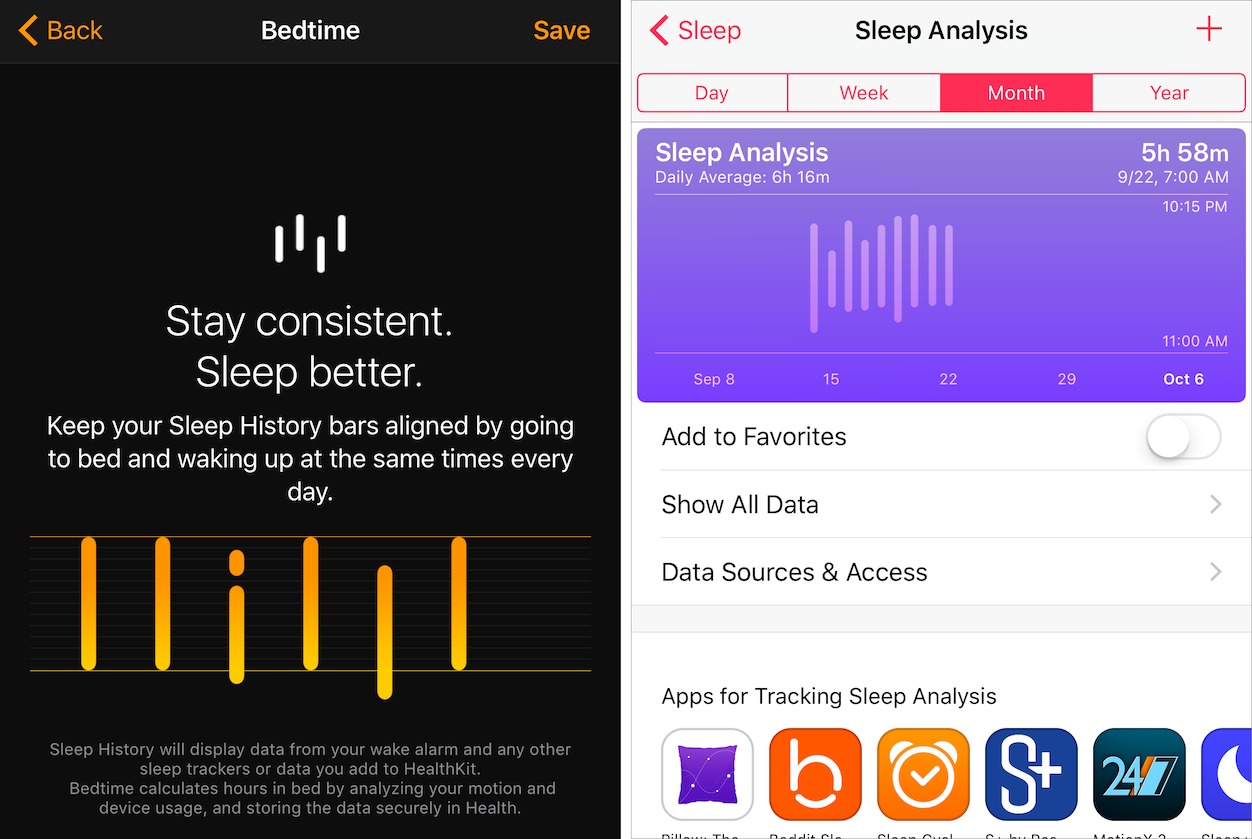
Finally, Clock will tell you about how it tracks your sleep and shares the sleep data with the Health app. You can find your sleep data in Health > Health Data by tapping the large Sleep button at the top. I find the Health data display largely incomprehensible, but maybe you can make some sense of it.
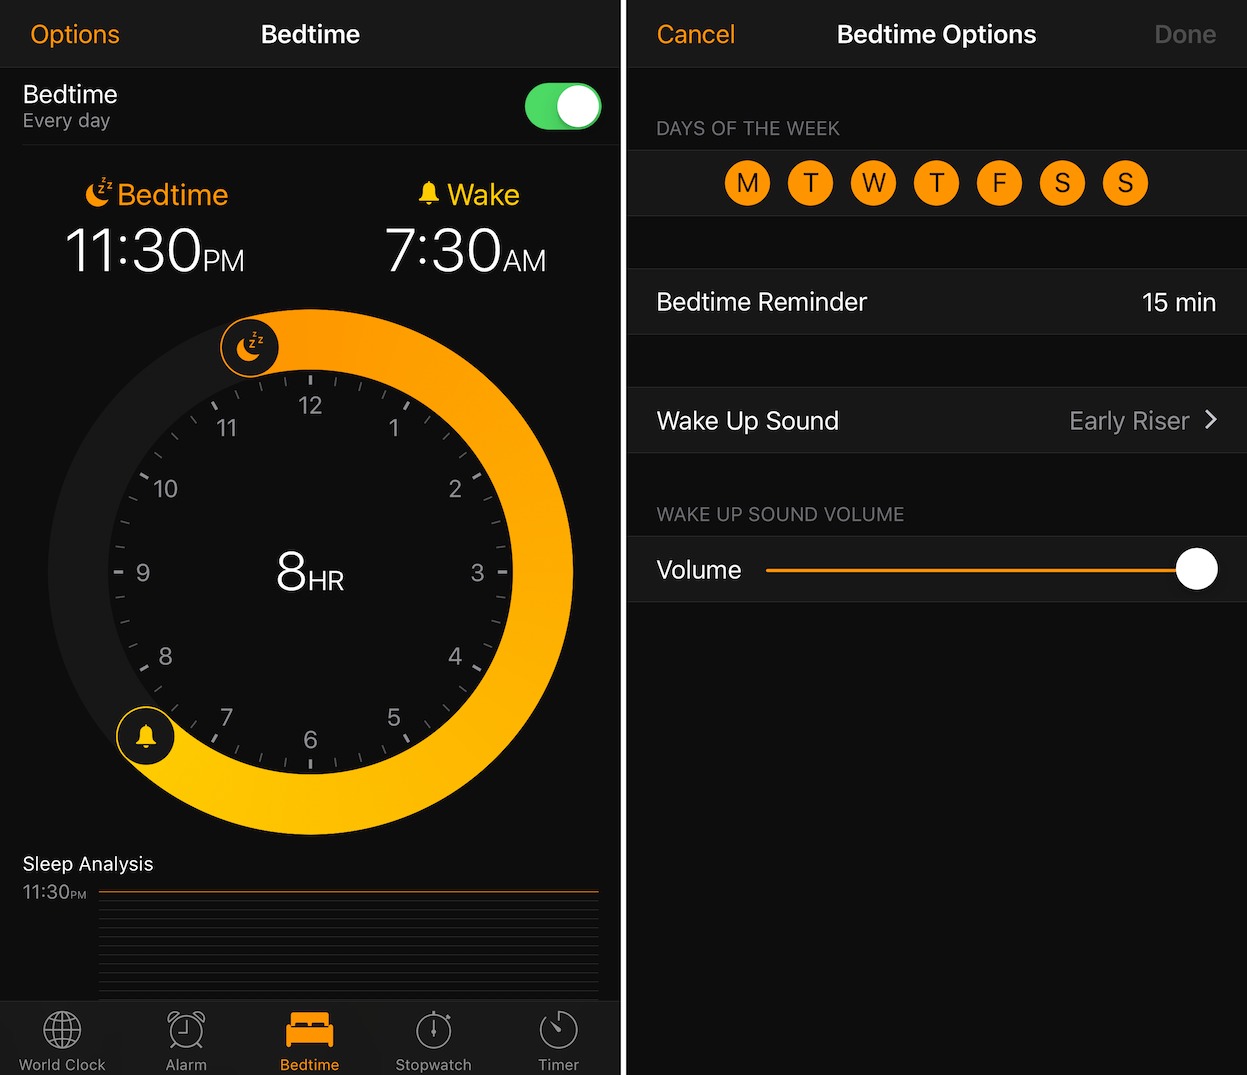
To adjust the Bedtime timer later, return to the Bedtime screen in the Clock app. A neat circular bar lets you change your sleep (moon icon) and wake (bell icon) times — drag an icon to adjust its time.
Tap Options in the upper left to change your alarm days, bedtime reminder, wake up sound, and alarm volume.
When you’ve set everything, your iPhone will notify you with an alarm 15 minutes before it’s time to go to bed, or whatever you’ve set as your bedtime reminder time. Tap Going to Bed Now or Remind in 10 Min to dismiss the alarm.

The Bedtime timer sets its own alarm for waking you up in the morning, so you don’t need to set one in the Alarm screen unless you need to make sure you’re up at a particular time.
Hopefully, the Bedtime timer will help you manage your sleep better. I’d like to say that it has done so for me, but all too often, my best intentions are trampled by book deadlines or the call of my PlayStation 4.
SRFax and Other Internet Faxing Alternatives to MaxEmail
As amazing as this may be to people under 30, many Mac users still need to send and receive faxes. That’s especially true for people who regularly deal with government agencies that won’t accept email, or email attachments, because of security concerns, or those bound by HIPPA guidelines. Certain industries, like construction, also still rely heavily on faxes. Yes, it’s silly to use 19th century fax technology in 2016, but you try convincing a government agency to change its ways.
Lots of these folks have been using an Internet-based fax service to send and receive faxes via email, as faxing via email is easier and faster than using a standalone fax machine or modem. Plus, faxing via the Internet doesn’t require that you maintain a separate fax telephone line or that you keep your computer on all the time.
One of the most popular of these Internet fax services was MaxEmail, which Adam Engst recommended over a decade ago in “Replacing eFax with MaxEmail” (4 April 2005). But MaxEmail was recently purchased by J2Global, the people behind eFax, and many MaxEmail subscribers have had bad experiences with J2Global/eFax.
Many MaxEmail users aren’t happy about suddenly becoming eFax customers — particularly those who already switched once from eFax to MaxEmail. Some have already received an email notification from MaxEmail because their contracts are nearing an end, telling them that their prices will be rising precipitously. Some users are reporting a price increase of over 500 percent!
Lots of MaxEmail users are now looking for an alternative Internet fax service that’s reliable and easy to use. I’ve been using such a service for years now: SRFax.
As a long-time user of SRFax, I wanted to see if I could get a deal for Mac users who want to switch. The company offered me a $20 credit for every Mac user I could convince to sign up (the same offer is available to any SRFax subscriber), but I don’t want any compensation for this. So instead, SRFax offered to give the $20 as a credit to each new user. Once again, I have no financial stake in this. I’m just a happy SRFax customer.
SRFax Plans and Pricing — To receive this $20 credit on any of the company’s plans, sign up using this link.
How much a subscription to SRFax costs depends on your expected fax volume, and whether you’re a home or a business.
For a home user with minimal faxing needs, SRFax charges $36 per year, which includes 25 inbound or outbound pages each month, with additional pages priced at 10 cents each. The next plan up costs $66 per year and provides 200 pages per month with additional pages billed at 6 cents per page. The highest level business plan costs $435 per year for 2500 pages per month.
SRFax does not charge any fees for setup, but does charge a one-time fee of $25 to port an existing fax number to SRFax.
SRFax Signup and Usage — Signing up for SRFax takes only a few minutes. On the signup page there is a radio button to indicate if you would like to port your existing fax number to SRFax. If you select that option, your account will be set up with a temporary toll free number until SRFax ports your old number, which will then replace the temporary number.
Not all fax numbers are portable to SRFax, but the company’s Fax Number Portability page lets you check if your number can be ported. At least one MaxEmail number I checked was portable.
If your fax number is portable, you can download the documents required for porting. The porting process takes 10 to 15 business days to complete. You won’t experience any downtime during this process and SRFax’s staff will inform you of the day that the port will take place.
Faxing using SRFax couldn’t be easier. You don’t need to download or install anything. Follow these steps:
- In your standard email app, create a new message just like you normally would.
- In the To field, enter the destination fax telephone number followed by
@srfax.com. -
Attach the document(s) you want to send as a fax to your email message.
Supported file types include Microsoft Word, Excel, PowerPoint, PDF, plain text, HTML, and many others. You can attach as many documents as you like to one message and SRFax will fax them in the order they’re attached.
That’s it! Once your fax has been sent successfully, SRFax notifies you with an email receipt.
If you have any questions about SRFax that their Internet Fax FAQ doesn’t answer, ping them via their contact page.
Alternatives for Infrequent Faxers — If you send only a handful of faxes per year, you probably don’t want to pay an annual fee.
The following services allow you to pay per outgoing fax without any contractual commitment. They all provide Web-based interfaces, rather than letting you send faxes via email. Unfortunately, you can’t receive faxes with them (but read on for solutions to that problem):
- FaxFresh: This service is perhaps the simplest, asking for the recipient’s fax number and the PDF file you want to fax. It charges $0.25 per page, with a minimum of $1.99 per transaction. FaxFresh even has a free Mac app!
-
FaxZero: Your cover pages will have FaxZero branding, but the service is free for up to five faxes per day, of 3 pages max. If that’s not sufficient, you can pay $1.99 per fax of up to 25 pages and avoid the brand on your cover pages. FaxZero accepts PDF and Word files.
-
GotFreeFax: This service lets you type your fax without having to upload a document, although it also takes PDF, Word, and JPEG files. It’s free for up to two faxes per day, of 3 pages max. If you need more, you can pay $0.98 for up to 10 pages, $1.98 for 11–20 pages, or $2.98 for 21–30 pages.
If you need to receive the occasional fax, there are a few other options as well:
- eFax Free: eFax will try to get you to upgrade to the paid eFax Plus, but if you need to receive 10 or fewer pages per month, the eFax Free service should let you do that at no cost.
-
FaxBetter: This service provides a toll-free number and charges nothing for receiving up to 20 pages per month, but it takes 24 hours to set up a new number and you must receive a fax every 7 days to keep the number.
-
FaxBurner: For those who mostly use an iPhone or iPad, check out the free FaxBurner app for iOS. The company’s free service provides a toll-free fax number that’s good for 24 hours, and it lets you receive up to 25 pages per month and send up to 5 pages per month. It also offers email-to-fax support. For $9.97 per month, you can send and receive up to 500 pages and you get a permanent fax number.
If you have another favorite Internet fax service, let us know in the comments!
[Randy B. Singer has been writing about the Macintosh for close to 30 years. He has several Web sites, the most popular of which is currently Mac OS X Routine Maintenance.]
An iPhone and Apple Watch Dock Living in a Material World
I used to think Apple Watch docks were pointless, but after reading Julio Ojeda-Zapata’s dock roundup (see “Eight Apple Watch Stands That Stand Out,” 5 August 2015), I decided to try an inexpensive one, settling on the $9.99 Orzly Compact Stand.
That cheap little stand was an eye-opener. By putting the charger in a fixed position, I was able to tuck the Apple Watch’s absurdly long charging cable behind the nightstand. It made charging easier too, since I just had to set my Apple Watch on the dock at night. Also, I no longer had to worry about my watch sliding around my nightstand, the charger coming loose, or the watch falling off the nightstand. It was $10 well spent.
I wasn’t looking for an upgrade, but when I saw the Material Dock by Studio Neat, I immediately wanted one. I’ve long admired the company’s products, but the Material Dock is the first that solves a real problem for me, by docking both an iPhone and an Apple Watch. It’s not the first dock to handle both, but it’s the first I’ve seen that deals with both in a sensible fashion by placing the watch edge-down in front of the iPhone. This way, you can use the watch in Nightstand mode while also being able to see most of the iPhone screen. It’s also adjustable to accommodate different iPhone sizes, even those in cases.
On the downside, the Material Dock’s design makes controlling the iPhone more difficult while it’s on the stand — activating Control Center is difficult, though higher screen elements are still easy to reach. This design also makes turning off alarms tricky, since the Stop button appears at the very bottom of the iPhone’s screen. Personally, I find this to be a fringe benefit, since requiring a little more effort reduces the chance I’ll go back to sleep. However, the Snooze button is easy enough to reach, and you could always set alarms on your Apple Watch instead.
The Material Dock comes in two variants: an iPhone-only model for $45 and the combined iPhone and Apple Watch dock for $70. Studio Neat provided me with a review unit of the latter.
The quality of the materials and construction account for the price. The base is made of solid walnut, and the bumpers are cork. You must supply your own charging cables, which you install yourself and route through channels milled in the bottom of the base.
That’s right, as with the Twelve South HiRise stand for iPhone (see “A Game of Docks: Apple Versus Twelve South,” 25 September 2013), some assembly is required. This annoyed me three years ago when I reviewed the HiRise, but I’ve since wised up to the virtues of “hobby kit” stands: they can be adjusted to fit any size iPhone and case, and you can replace the cables if something goes on the fritz.
Assembling the Material Dock took less than 10 minutes, even with some fumbling on my part. You need a screwdriver, but the package includes a rather nice one.

The Material Dock requires an official Apple Lightning cable. Unfortunately, I don’t have many of those with their insulation intact. I decided to put a worn-out, yet functional cable in the Material Dock, figuring that if the cable survived the installation process, it would then be stationary and not suffer more damage. So far, that’s been a smart choice, and saved an otherwise unusable cable.

Studio Neat’s directions are pretty clear, and most of the assembly is common sense, but I’ll add a few tips:
- Look closely at the photos, because they’re often more helpful than the written directions.
- Give the Lightning cable a good tug to seat it well. Otherwise, the bend in the cable will stick out and make the Material Dock wobbly.
-
Test every step of the way. When you get the iPhone section assembled, make sure your iPhone fits correctly and gets a charge. You can adjust the position of the cork bumpers and the height of the Lightning cable to get an exact fit for your iPhone and case.
-
Don’t push the Apple Watch charging puck in too far or the Apple Watch may have trouble staying connected.

Once you’ve assembled the unit, it’s time to put it in its semi-permanent resting place. The sticky pads on the bottom come covered in plastic, which you can easily remove with a piece of tape.
My advice is to play with the dock’s location before removing that plastic, because once you set it in place, it sticks well. The sticky pads have a micro-suction surface — little sponge-like holes that act like hundreds of little suction cups.
The Material Dock perhaps sticks a little too well. I had to remove it to make some adjustments, and it took some of my nightstand’s finish with it! My nightstand is kind of beat up anyway, but you might not want to place the Material Dock on any family heirlooms.

If you get gunk on the sticky pads, like your nightstand’s finish, you can wash it off with soap and water. However, that’s a little trickier than I’m making it sound because you first need to remove all of the cables. Plus, the micro-suction surface soaks up soap and water, making it hard to get them totally clean. Some tips:
- Use the smallest amount of soap possible. A drop is too much.
-
Push out all remaining soap residue with your finger
-
Employ a cotton swab to dry hard-to-reach places on the dock, such as the cable channels and around the sticky pads.
-
When finished, let the pads air dry for an hour or two. They won’t stick if they’re damp.
Once clean and dry, the pads should be as sticky as they were out of the box. The upside of this mega-suction is that you can easily lift your iPhone from the dock without placing any downward pressure on the dock itself. Simply lift the iPhone, tugging as hard as necessary.
Placing your devices on the Material Dock requires a little more care than removing them. As I mentioned above, getting the Apple Watch puck placement right is key. Otherwise, it will ding at you all night as it connects and disconnects — that’s as much the fault of the weak magnet in the puck as the dock. The other difficulty involves setting the iPhone in place, since the Lightning connector is so small. It’s easy to do in a well-lit room, but more difficult when the lights are out.
Despite these quirks, I like the Material Dock. It’s handsome, it stores my iPhone 7 Plus and Apple Watch tidily, and Studio Neat was quick to respond to my questions and concerns. If you want a premium wooden dock for your Apple Watch and iPhone, the Material Dock is worth a look.
Instagram Has Apple (Including Mac) Appeal
Many a veteran Apple user might be tempted to dismiss the photo-sharing service and social network Instagram as a millennial’s playpen. The many selfie-posting celebrities on Instagram also might cause some hardcore Apple geeks to avoid the service like the plague.
Instagram’s audience does skew young – typically 35 and under. What’s more, the service officially works only on smartphones, seemingly leaving Mac users out in the cold. Moreover, with Facebook and Twitter dominating social media for many, finding time for another social network might seem impractical.
I once felt sure Instagram was not for me. I used it only to upload an occasional picture, and I ignored its social aspects almost entirely. And, yes, the celebs got on my nerves.
But I’ve had a change of heart. As a reporter, I began to use Instagram in a journalistic capacity. Also, a year ago, I became a caretaker of @pipress, the Instagram account of my employer, the St. Paul Pioneer Press daily newspaper.

In this role, I took a closer look at Instagram activity in the St. Paul region and engaged in an exhaustive search for notable users with exceptional photo posts.
In doing so, I met users of all ages (including those like fiftysomething me). I even wrote a Pioneer Press story that profiled six local shutterbugs ranging in ages from 24 to 58.

These users and I have since banded together into a loose user group we hope will continue to grow. We’re even planning some meetups at the Pioneer Press.
This has convinced me that Instagram is for everyone, or at least for anyone who takes iPhone photography seriously while possibly also craving another social outlet.
What Is Instagram? — For those who have only a cursory familiarity with Instagram, here is a quick primer.
Like Flickr and Google Photos, Instagram is a place to post photos. It’s radically simpler, though, with no albums or other advanced capabilities typically found in photo services.
Instead, uploaded shots appear within the Instagram app as a minimalist grid of squares (the shots themselves don’t have to be square).
Once you post pictures, or videos up to 60 seconds long, your friends can “like” your shots and post comments. In this regard, Instagram helps friends keep up with each other via endless “feeds” of images. Each user’s feed shows the pictures posted by those they’re following on Instagram, much like on Flickr.
Filters are Instagram’s other huge claim to fame — one that other photo services and apps such as Apple’s Photos have emulated. Instagram’s filter collection is one of the best around, enabling you to change the character of pictures and videos in dramatic ways. It also has other image-tweaking tools to make photos pop.

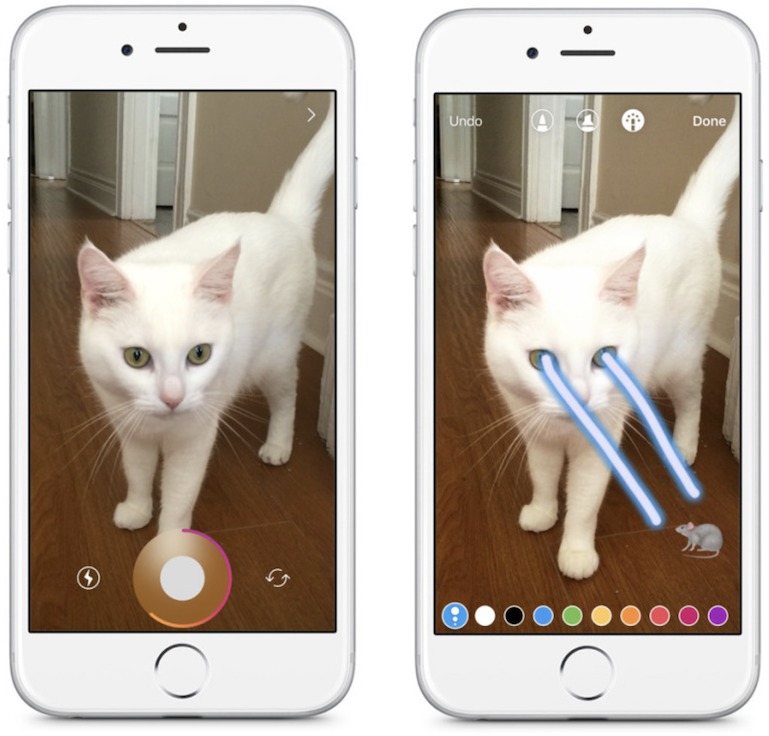
Instagram’s newest feature, Stories, lets users share the moments in their days with pictures and videos presented in slideshow form, and with the option to annotate imagery with text and drawings. The content vanishes after 24 hours — much like another social app called Snapchat — and does not appear in the main Instagram grid, instead appearing as an indicator on someone’s icon in a bar above your feed.
More Instagram features, some tailored specifically to iPhone users, are on the way. At Apple’s September iPhone and Apple Watch press event, Instagram announced the following future features:
- Control of the iPhone 7 Plus’s new telephoto lens by dragging a finger up and down in the Instagram camera window.
- A new Instagram filter that will tap into the wide color gamut on the new iPhones’ screens, thereby revealing a broader range of hues.
-
A new 3D Touch action in the Instagram app that will add a photo to a Story.
-
Support for iOS 10’s new Live Photos API to allow conversion of the videos into Instagram Boomerang GIFs that run continuously back and forth.
This video gives an overview of the new features coming to Instagram.
Instagram, though owned by Facebook, is Twitter-like. User handles begin with the @ symbol; hashtags begin with the # character. You can search for usernames, hashtags, and locations to help you find interesting accounts. Plus, you can see which of your contacts and Facebook friends are on Instagram, and follow them easily. Instagram also suggests users to follow.
Everything I’ve described happens within Instagram’s iPhone app. You can also access Instagram on the Web, but in basic form with no image posting – just browsing, searching, commenting, and liking.
Did You Say “Mac”? — Apple users aren’t restricted to their iPhones when using Instagram. You can engage in a surprising amount of activity on your Mac too, which even includes posting pictures by way of third-party apps.
This fact makes Instagram a lot more interesting, since using it on an iPhone can be a pain. As someone who interacts with Instagram in a professional capacity, Mac access is a godsend for enhanced productivity.
There are quite a few Instagram-related offerings in the Mac App Store, but I’ve come to rely on a handful. They include:
- Uplet: This basic, elegant app has a single function: posting photos to an Instagram account of your choosing.
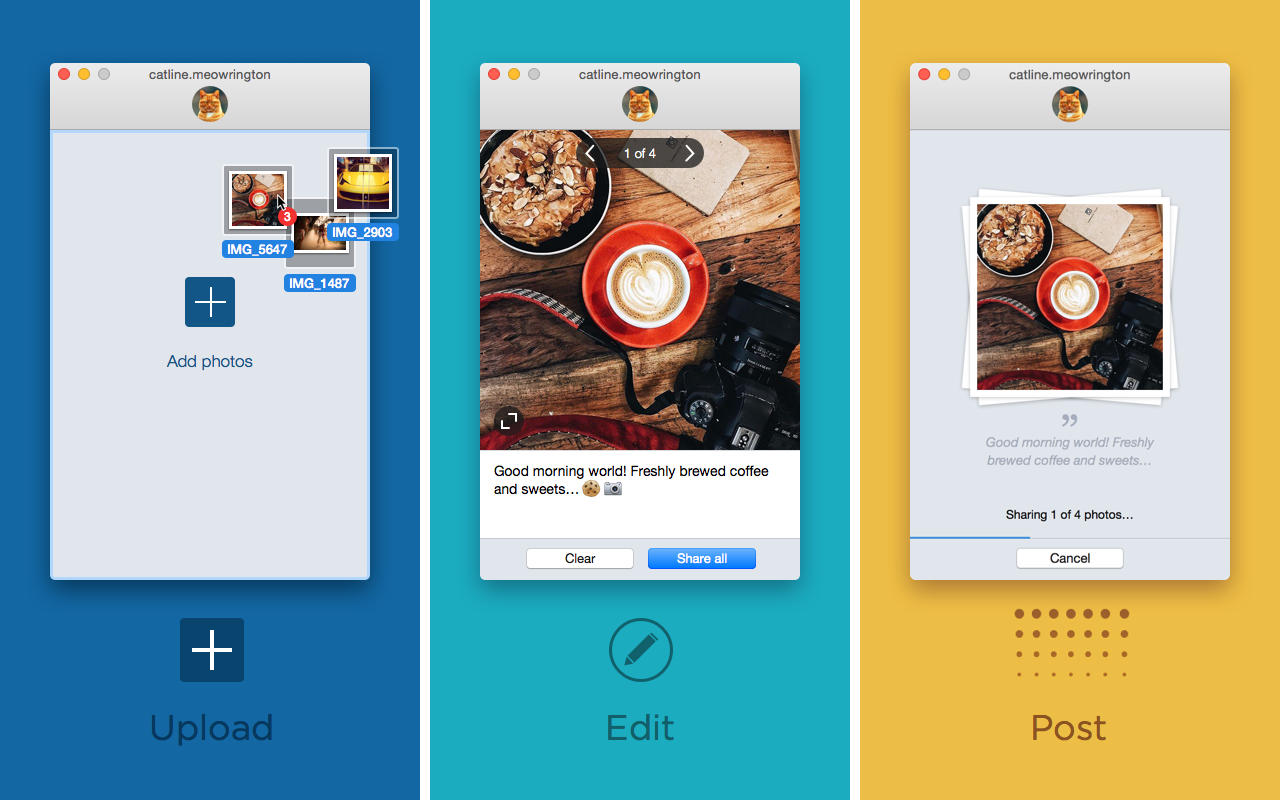
Drag one or more pictures into Uplet’s window, or click the + button. If a photo is not square, you can decide whether to post it in a square form or upload as is. Type a caption. Click the share button. That’s it.
Uplet has performed dependably for me, and I like its interface polish. I do have two gripes. First, I would like support for multiple accounts. Second, in my experience, Uplet has a tendency to darken photographs slightly as it is posting them. The developer said it couldn’t reproduce the issue.
Uplet does not support Instagram (or any other) filters, so you need to edit your pictures before posting.
-
Uploader HD+: Another upload utility, Uploader HD+ offers a different approach.
Once installed, Uploader HD+ appears in the Mac OS share menu accessible by Control- or right-clicking any picture in Apple’s Photos app or within a Mac folder. When you select its sharing option, an Uploader HD+ posting window appears.
Pick an Instagram account (Uploader HD+ supports multiple accounts), optionally add Facebook posting (only one Facebook account is supported), type a caption, and click Post. That’s it.
But Uploader HD+ is awkwardly constructed and buggy. It occasionally forgets its Instagram and Facebook settings, for instance, forcing me to set up my accounts repeatedly.
Also, although its posting window is small, it’s modal, preventing you from working in any other app until you close it, unlike the free-floating Uplet. Even weirder, tapping Uploader HD+’s menu-bar icon to access the settings pane causes the Dock to disappear.
So, while Uploader HD+ has all the features I require, I default to the simpler, more elegant, dependable Uplet most of the time.
-
Photodesk: Rather than helping you upload, Photodesk is more of a souped-up browser for navigating Instagram in a faster, more flexible manner than the minimalist service normally permits.
Photodesk’s interface, which vaguely resembles Apple’s Photos, provides a big window for showing pictures in a variety of grid and column arrangements, plus a sidebar for accessing Instagram account features such as comments, followers, places, liked pictures, and so on. Photodesk supports multiple accounts, with each visible as a circular avatar on the app’s left edge.

If you like a photo and want to save it, drag it to the Desktop. Such a maneuver isn’t possible with Instagram’s native Web interface.
Photodesk is highly searchable – like Instagram itself – with the added option to bookmark places, images, tags, and users. It’s big on analytics, too, with dashboards showing how a user account is performing in a variety of categories.
Photodesk has some deficiencies, but these are Instagram’s doing. Not long ago, Instagram made API tweaks that crippled third-party Instagram apps to varying degrees and even killed some off. Notably, Photodesk lost its capability to show a user’s feed – the stream displaying the images posted by those the user is following. This is now possible only with Instagram’s own apps and its Web interface, which is a shame.
Even so, Photodesk is a godsend for Mac-based Instagram power users who want to bypass the service’s simplistic interface and access its content with greater speed and efficiency.
Power Up on iPhone — Instagram users using the iPhone also recently gained the capability to post pictures from third-party apps with ease. Instagram made this possible with its new share sheet extension, a long-overdue feature. As a result, posting from Photos and scads of other apps now involves just a few taps.
There are limitations. Photos are posted as-is, and you cannot modify them during posting with Instagram’s filters and image-editing tools. As with the Mac uploaders, Instagram assumes you’ll tweak images using other photo-editing apps before uploading them.
Many such photo-editing apps exist, but I have come to rely on just a few to make my Instagram posts distinctive.
- Google Photos: This app (and its back-end picture-sharing service) has a limited but highly effective suite of filters and editing tools. They’re also found in identical form in the Google Photos Web app, making them my go-to for fast picture tweaking on iOS and Mac alike.

Google recently updated Photos for iOS to version 2.0 with new features. Users can save their Live Photos as video clips or image-stabilized animated GIFs. Videos also can be shared on YouTube. Also, photos in albums can be sorted chronologically or by add date.
-
Snapseed: Part of Google’s acquisition of Nik Software (see “Google Gives Away Its Nik Collection Photo-editing Apps,” 31 March 2016), this Google Photos sibling has a powerful and flexible suite of tools marred somewhat by a non-intuitive interface.

Snapseed is iPad-native, too, which is vital for productivity because Google killed off the Mac and Web variations of the Snapseed editing suite a while back.
Because Google Photos and Snapseed are related, the former has an option to open a photo in the latter for more sophisticated edits.
-
Hipstamatic: This is my favorite iPhone picture-editing app, and not just because it was spawned in my hometown of St. Paul before its progenitors headed off to California.
Hipstamatic mimics old-style photography equipment by enabling its users to mix and match a wide range of digital films, lenses, and flashes for results that are endlessly satisfying and surprising.
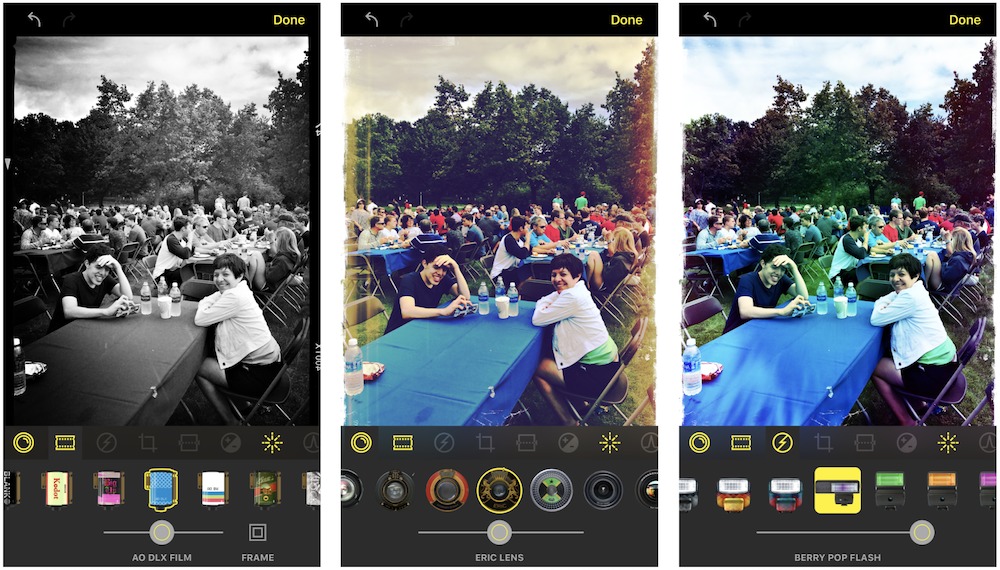
One of my great frustrations with Hipstamatic was resolved recently when the publisher made the app tablet-native, thereby turning my iPad Pro into a far more powerful image-editing workstation. Now, if the Instagram app would also go iPad-native, all my photo-related prayers would be answered.
-
Camera+: This popular photo-editing app has a lackluster collection of filters, but it’s a killer replacement for Apple’s Camera app that can also work editing wonders. Its Clarify Pro setting alone is worth the price of admission.

A separate iPad version recently received a much-needed overhaul, too, and the two versions sync content with one another.
Embracing Instagram — Instagram has become a permanent part of my life. It’s consistently rewarding now that I am using it the right way – not just as a place to put an occasional photo, but also as a way to interact with real-world friends and relations. Like Facebook when it’s working well, Instagram supports community building.
And for those who are into iPhone photography or photography in general, Instagram also is a place to find stunning images posted by talented shooters and befriend like-minded shutterbugs.
So give Instagram a try. It’s free, easy, and you may be surprised how much you end up liking it.
TidBITS Watchlist: Notable Software Updates for 10 October 2016
iFinance 4.1.3 — Synium Software has released iFinance 4.1.3, fixing a couple of issues related to iCloud synchronization. The financial management app ensures that databases synchronized via iCloud are only opened if all data has been downloaded, and it lets you disconnect databases from iCloud. The update also improves importing of iFinance 3 databases, fixes an issue computing French RIB numbers, and adds the Namibian dollar as a currency selection. Synium has extended the 50 percent discounts for both iFinance for Mac and iFinance
for iOS through 30 October 2016, with the Mac app priced at $19.99 (normally $39.99) and the iOS app priced at $4.99 (regularly $9.99). ($39.99 new from the Mac App Store, free update, 25 MB, release notes, 10.10+)
Read/post comments about iFinance 4.1.3.
PDFpen and PDFpenPro 8.2 — Version 8.2 of PDFpen and PDFpenPro from Smile adds a couple of welcome new features to the PDF editing apps. Both editions now support iCloud sync, enabling you to sync documents automatically with other Macs as well as PDFpen for iOS, and the feature works with licenses purchased from either the Mac App Store or the Smile Web site. According to this Smile blog post, you will likely find duplicate items in your library after launching version 8.2, but you can delete those duplicates. Additionally, both editions now support tabbed windows in macOS 10.12 Sierra — turn them on by selecting View > Show Tab Bar. ($74.95/$124.95 new with a 20 percent discount for TidBITS members, $30 upgrade, free update from version 8.0, 70.4/71 MB, release notes, 10.10+)
Read/post comments about PDFpen and PDFpenPro 8.2.
DEVONthink 2.9.5 — DEVONtechnologies has updated all three editions of DEVONthink (Personal, Pro, and Pro Office) to version 2.9.5 with workarounds for a variety of issues introduced with the overhauled PDF library in macOS 10.12 Sierra. The three editions of the personal information manager also now include thumbnails in notifications, enable you to zoom videos to 25 or 50 percent, add recurring schedule for every X minutes, allow you to bring back dismissed alerts (see Preferences > General), speed up cleaning of Dropbox and WebDAV sync stores, and improve reliability of moving items to external
folders. To avoid data loss, DEVONthink Pro and Pro Office no longer let you create and synchronize databases in the Desktop and Documents folders in Sierra if these folders are synchronized by iCloud Drive. (All updates are free. DEVONthink Pro Office, $149.95 new, release notes; DEVONthink Professional, $79.95 new, release notes; DEVONthink Personal, $49.95 new, release notes; 25 percent discount for TidBITS members on all editions of DEVONthink; 10.9+)
Read/post comments about DEVONthink 2.9.5.
ExtraBITS for 10 October 2016
In ExtraBITS this week, Fujitsu has published an initial schedule for addressing the ScanSnap problems in Sierra, Jason Snell explains how Sierra calculates free space differently, “Good Eats” host Alton Brown’s new cookbook uses only iPhone photography, and Apple has officially discontinued the third-generation Apple TV.
ScanSnap Offers Fix Schedule for Sierra Compatibility — Fujitsu has published a schedule for addressing problems with its ScanSnap software running in macOS 10.12 Sierra. A fix for scanning using ScanSnap models iX500, iX100, SV600, S1300i, and S1100i in Sierra became available on 6 October 2016, and the company promises an additional update on 17 October 2016 for ScanSnap models S1500, S1500M, S1300, and S1100. The ScanSnap Evernote Edition will receive an update by the end of October. Still to come, and with no estimated release date, are fixes
for older PDF content created by ScanSnap scanners so those PDFs can be modified in Sierra. In the meantime, if you’re using Sierra, work on copies of older scanned PDFs and keep good backups.
The New Math: How Sierra Calculates Free Space — Over at Six Colors, Jason Snell reveals that macOS 10.12 Sierra calculates free space on your drive differently than in the past. Along with drive space that doesn’t contain any data, Sierra now includes in the calculation “purgeable space,” which holds data that can be deleted from your drive because Sierra can redownload it if necessary. This purgeable data includes stuff like files stored in iCloud, certain large fonts, and unused dictionaries, along with purchased video content from the iTunes Store and photos and videos you have in iCloud
Photo Library (those last two require you to have enabled the appropriate settings in iTunes and Photos). Keep this in mind, or you could get confused when trying to determine how much space you have left on your drive!
Alton Brown’s Latest Cookbook Photos Shot with an iPhone — Cookbooks often feature elaborately staged food photography designed to make the recipes seem as compelling as possible, which is why it’s notable that the photos in Alton Brown’s latest cookbook were shot with an iPhone 6s Plus. The “Good Eats” host’s latest project is EveryDayCook, a cookbook featuring recipes he regularly prepares for himself. In the preface, Brown explained that all the photography for the book was shot with an iPhone because he’s “a
bit of a control freak.” Aren’t we all?
Apple Discontinues Third-Generation Apple TV — In a move that should surprise no one, Apple has discontinued the third-generation Apple TV. Apple has been phasing out the four-year-old streaming device for months, and it has been a long time since Apple updated its pre-tvOS software. You may still be able to buy a refurbished third-generation Apple TV, but with no future support planned, we can’t recommend it. Those looking for a streaming video box should instead look at the fourth-generation Apple TV or a streaming video device from Amazon or Roku. We hope Apple will reduce the price of the
fourth-generation Apple TV to make up for the loss of the $69 older model and get it into more homes.