TidBITS#902/29-Oct-07
With the release of Apple’s latest major operating system version, this week’s issue focuses on Mac OS X 10.5 Leopard, about which we’ve also published five Take Control ebooks. Joe Kissell leads off with a look at the installation process and then climbs into Time Machine to note what ended up in the final version compared to what was promised earlier this year. Glenn Fleishman digs into the major changes in Leopard’s file sharing, and shows how screen sharing can work between Macs running Leopard and those running Tiger. Matt Neuburg introduces Spaces and explains why Apple’s virtual desktop implementation may be the most important feature of Leopard. As much as he likes Spaces, Matt also finds numerous frustrations with Leopard to share. We also note some important early updates, such as Login and Keychain Update 1.0, an installation problem with Unsanity’s Application Enhancer, a problem with Time Machine and Aperture, a possible security vulnerability in the Back to My Mac feature, and a slew of Leopard compatibility updates in iLife and other components.
Take Control News: Five Ebooks Launch You into Leopard: Save 30%!
Mac OS X 10.5 Leopard is finally here, and we can now share with you the fruits of an incredible amount of work over the last few months: five of our most popular ebooks completely updated for Leopard, all available right now. You can get help upgrading to Leopard, customizing all of Leopard’s new features, sharing files much more elegantly than in the past, managing your fonts with Leopard’s new font activation capabilities, setting up user accounts, and much more.
To the thousands of you who pre-ordered our Leopard ebooks, thanks! You can now click the Check for Updates link (or red starburst) on your pre-order PDFs to download the full versions. If you haven’t yet ordered, we have three options for you:
- Buy just the ebooks you want individually. They’re all $10, except for the 217-page “Take Control of Fonts in Leopard,” which is $15. If you’ve bought the Tiger or Panther versions of any of these ebooks, click the Check for Updates button in your copy to save 20%.
- Buy our core “Take Control of Upgrading to Leopard” and “Take Control of Customizing Leopard” titles for $15, saving 25%. This bundle is linked on the left side of these books’ pages on the Take Control Web site.
- Buy our “I Love Leopard” bundle of all five ebooks – over 650 pages in all! – for only $38.50, saving 30% off the cover price. Again, the bundle is accessible from the left side of each book’s Web page.
You can read more about each of the ebooks on our Web site, but in short:
- “Take Control of Upgrading to Leopard” is the latest edition of the title that launched Take Control back in 2003 with Panther. In it, Joe Kissell shares his hard-won advice about the best ways to install, test your installation, troubleshoot problems, get going in Leopard, and more.
- “Take Control of Customizing Leopard” provides a tour of new and revamped features in Leopard by the ever-opinionated Matt Neuburg. Matt demystifies Time Machine, shows you how to use Spaces effectively, and explains why Spotlight in Leopard is so much improved over Tiger.
- “Take Control of Users & Accounts in Leopard” describes different types of accounts in Leopard, which ones are right for the different people who use your Mac, how to share files between accounts, and what you can limit with new features in Leopard’s parental controls. Kirk McElhearn also explains how to create and use a troubleshooting account should problems crop up.
- “Take Control of Sharing Files in Leopard” makes file sharing easy between two Macs, among a mixed-platform office workgroup, or between far-flung computers on the Internet. Wi-Fi guru Glenn Fleishman explains each of Leopard’s file sharing technologies and helps you connect to file servers from a variety of major operating systems.
- “Take Control of Fonts in Leopard” explains everything you need to know about how fonts work in Mac OS X and what has changed with Leopard. In particular, veteran Mac author Sharon Zardetto looks at Leopard’s new and updated fonts, along with Leopard’s new font activation capabilities, font previewing via Cover Flow, and font sample printing.
Leopard Early Fixes and Warnings
Now that Mac OS X 10.5 Leopard is released, we're starting to see an expected set of updates and incompatibilities. Login and Keychain Update 1.0 corrects issues with accounts created in early versions of Mac OS X; the new Back to My Mac feature could allow someone with access to your .Mac account to take control of your machine; Apple warns Aperture users not to run the software while Time Machine is performing a backup; and a slew of compatibility updates are also available.
Evaluating the Leopard Installation Process
Right after Tiger shipped, two and a half years ago, I wrote an article here about my impressions of the upgrade procedure (see “Evaluating the Tiger Installation Process,” 2005-05-02). I began by saying that the installer was much better than its predecessor, so much so that I might not be able to sell as many ebooks about upgrading as I had when Panther was released! Nevertheless, I found enough surprises that I could say, with all sincerity, that the average Mac user is likely to have an easier and more successful upgrading experience with a bit of expert guidance.
Well, today I’d like to sing another verse of the same song. Yet again, Apple has made substantial improvements to the installer, and in general, the Leopard installation is easier and more reliable than the Tiger installation was. Also, yet again, some aspects of the upgrade process can cause unexpected problems. Based on the feedback I’ve received from readers of “Take Control of Upgrading to Leopard,” the many additional pages of advice and instructions I added about preparing your Mac to run Leopard – and solving problems before, during, and after upgrading – have been more than worthwhile.
System Requirements — Apple always increases the minimum threshold for hardware compatibility when they release a major upgrade to Mac OS X. But most people assumed Leopard would run on any Mac with a G4 or better processor. Not so: if you have a G4-based Mac, it must be faster than 867 MHz. A question I’ve heard numerous times is, “What about my dual-800 MHz Power Mac? Isn’t that faster than 867 MHz?” The answer, as far as the Leopard installer is concerned, is no. It doesn’t matter if your computer is almost fast enough, or if it has multiple processors, each of which is almost fast enough. If the installer doesn’t see an 867 MHz or faster processor, it won’t let you install. I have
heard of some hacks that could let some users of older Macs run Leopard, but I can’t recommend them because Apple won’t have tested Leopard on those machines, so you may encounter other problems, such as video card incompatibilities and software update failures.
Installation Methods — Apple has made some improvements to the Archive and Install upgrade method. Specifically, it copies many more folders and files from your old /Library folder to your new one, meaning you’ll have less work to do afterward to restore everything to its proper place. The net result is that if you use Archive and Install, with the Preserve Users and Network Settings option selected, you’ll get virtually the same result as if you use Erase and Install along with the option of transferring old files from a backup drive at the end. I still think Erase and Install is better, because even if the sets of files you end up with are the same with either method, Erase and Install can wipe out lots
of random disk gremlins, as well as reducing disk fragmentation (for what that’s worth).
Most people, of course (at least those who don’t read my book) will stick with the default Upgrade method. It works reasonably well – in fact, it seems to be more robust than the same method in Tiger. However, as ever, it isn’t smart enough to disable all of the innumerable doohickeys you may have installed that could conflict with Leopard. I’ve read reports, for example, of old versions of Unsanity’s Application Enhancer causing blue screen hangs after an Upgrade installation; a variety of other system add-ons, especially those that hack Mac OS X in ways Apple officially discourages, could also cause problems. As long as you have a fresh, bootable duplicate, though, you risk little by trying the Upgrade method – except the expense of
time to redo the installation if it fails. Speaking of which…
Make a Backup — Do not under any circumstances even consider thinking about upgrading to Leopard without a complete, recent, and verified backup of your drive, preferably a bootable duplicate. (Two backups would be even better.) You should do this not only in case something goes wrong during the upgrade itself, but so that you can go back to your previous system, later, if you find out in a few days or a week that something simply isn’t working for you in Leopard. Even for people who have no trouble with Leopard at all, a bootable duplicate is extremely helpful in that it lets you use the Erase and Install method without losing any of your old data or applications.
AirPort in the Installer — For reasons I can’t comprehend, when you’re running the Leopard installer from the DVD, the AirPort status icon appears in the menu bar. Initially it indicates that AirPort is off, but you can turn it back on and join a wireless network right there, in the installer. I can’t think of any reason why you’d want or need to do this, Apple doesn’t mention it in their documentation, and I’ve read several reports of people having difficulties with the installation process after attempting to join a wireless network while booted from the DVD. Why would Apple include this seemingly useless feature, which can only tempt people to take an unnecessary action that might actually cause
problems?
Differently Disabled — When I wrote about the Tiger installer, I complained that it didn’t automatically disable login items on the disk you’re upgrading, an obvious source of potential conflicts. The Leopard installer has the same problem, regardless of which upgrade method you choose. On the other hand, it may in some situations disable certain software (such as Now Up-to-Date & Contact) without giving any explanation of why it did that, or what components specifically were affected.
Boot Camp Drivers — Now that Boot Camp is officially part of Mac OS X, Apple includes the latest version of their Boot Camp Windows Drivers on the Leopard DVD itself. So if you’re using Boot Camp, you should reboot in Windows right after installing Leopard, reinsert your Leopard DVD, and let the installer run to update your Apple drivers to the latest version.
You Can Take Control — The Leopard installer isn’t bad; it’s definitely an improvement over the Tiger installer, and nicer even than the much-improved installer Microsoft offers for Windows Vista. Nevertheless – and I’m speaking as someone who has installed Leopard dozens of times, using many different options, on several machines – that “just-run-it-and-it-works” experience that Apple wants you to believe in may or may not be a reality. If you have a relatively clean system, it could be just that simple. But the more modifications you’ve made under Tiger or Panther, the greater your chances of glitches when upgrading. And, even the most scrupulous Mac user could fall victim to random disk errors or other
unforeseen problems. So although upgrading to Leopard is not difficult, and is not something you should fear or avoid – not even in the initial, 10.5.0 release – make sure you do it right. For detailed guidance in getting your Mac ready for Leopard, performing that crucial full backup, choosing an upgrade method, and working through problems you could encounter in the process, read “Take Control of Upgrading to Leopard,” a 125-page ebook that spells out everything you need to know to make the transition as smooth as possible.
Screen Sharing with Leopard Extends to Tiger
Screen sharing is the nifty new craze sweeping the nation – but Leopard users only need apply, right? No! You, too, if you’re a Tiger user, can hop on the electric funk train. (Yes, I’m punchy following Leopard’s release.) All it requires is a checkbox and maybe an extra piece of free software.
Screen sharing enables remote control of another Mac OS X system running Leopard. You turn the feature on in System Preferences by selecting the Sharing preference pane and checking the Screen Sharing box. (You can choose to limit access to certain users, too.) You can access a remote screen in one of four ways with Leopard – and a fifth trick works for Tiger:
- With iChat, any other iChat user running Leopard can share your screen with your permission (just as though they were initiating video chat), although you can control that behavior, too. Screen sharing via iChat can automatically traverse NAT gateways that handle private addressing for networks created by Wi-Fi and broadband routers; NAT otherwise stymies access from outside the local network.
- With the Screen Sharing program, which you can find hidden in the /System/Library/CoreServices folder (a folder chock-a-block with other nifty doodads, too). Launch Screen Sharing and then enter the IP address or domain name for the computer you want to connect to. With this method, the system you’re trying to reach must have a routable IP address.
- On the local network via the new Sharing section on the Finder’s sidebar. Select any server in the list, and then click Screen Sharing in the upper right, to the left of Connect As, if file sharing is also enabled on that same server, or by itself if just Screen Sharing is turned on.
- With a .Mac account that you use on multiple computers, the Back to My Mac feature provides access to both network volumes (via File Sharing) and remote control. (Back to My Mac, in turn, is activated in the .Mac preference pane in the Back to My Mac tab.) Back to My Mac, too, can handle NAT traversal.
The fifth approach couples Leopard’s Screen Sharing feature with Mac OS X 10.4 Tiger. It turns out that you can make it possible to control a Mac running Tiger remotely from a Leopard-based Mac by turning on the Apple Remote Desktop service in the Sharing preference pane’s Services tab on the Tiger Mac. That enables just Tiger-from-Leopard control.
For the Leopard-from-Tiger direction, you need a separate, free application. Screen Sharing is based on, and compatible with, VNC, a widely used remote-control protocol. You can thus use a VNC client under Tiger to connect to Leopard systems. First, on the Leopard Mac, in the Sharing preference pane’s Screen Sharing item, click Computer Settings, and then check the VNC box and enter a password; note that VNC doesn’t rely on or integrate with Mac OS X user accounts. Back on the Tiger Mac, install the free Chicken of the VNC, and use it to connect to and control the Leopard Mac. (A VNC client on Macs running older versions of Mac OS X or computers running other
platforms can also work with Leopard’s Screen Sharing.)

Chicken of the VNC can discover local systems, including those running Leopard, that are sharing screens by using Bonjour; or you can enter a remote, routable IP address.
Screen Sharing plus NAT traversal simplifies having remote access to your own system or systems, as well as providing tech support to colleagues and your family members.
Time Machine: The Good, the Bad, and the Missing Features
In “Take Control of Upgrading to Leopard,” I spent a few pages talking about how to turn on and configure Time Machine, but I didn’t go into much detail because I already have another book, “Take Control of Mac OS X Backups,” which is all about backups and is therefore the proper place to put a full explanation of if, when, why, and how to use Leopard’s new built-in backup feature. I am at this very moment working hard on a new version of that book that will tell you everything you want to know about Time Machine, and though I can’t project an exact release date yet, we will
certainly make it available as soon as we possibly can.
However, my work on the new book has been slowed down considerably by having to take time out, on at least a dozen occasions in the last few days, to answer email messages about what I think of Time Machine, how well or poorly it accomplishes some task, whether it’s appropriate for enterprise backups or a suitable replacement for Retrospect, and so on. (The messages usually start, “I know you’re probably going to cover this in an update to your backups book, but…”) I am, of course, always happy to answer messages from readers, but I never dreamed Time Machine would turn into such a drain on my productivity! So, in the interest of heading off more inquiries for a few more days so that I can actually get the book finished, I’d like to
take a moment here to offer my initial impressions of, and suggestions regarding, Time Machine. For more information… wait for the book!
Out of Time — First, some bad news. At the Worldwide Developers Conference in June 2007 – just four months ago – Steve Jobs announced that Time Machine would work with an AirPort Disk (a USB hard drive attached to an AirPort Extreme N base station). As recently as two weeks ago, the same claim appeared on the Time Machine page on Apple’s Web site. But then it mysteriously disappeared, and sure enough, the shipping version of Leopard offers no support for AirPort Disks. For whatever reason, presumably technical difficulties of some sort, Apple dropped that feature at the last minute. So, while it’s still possible to back up multiple Macs in your home or office over a network, even wirelessly, doing so
requires a host Mac (running Leopard or Leopard Server) – a step backward in convenience. The same limitation applies to NAS (network-attached storage) devices from other vendors. Although it may be possible to work around this problem, I wouldn’t trust my backups to an unsupported hack, and I strongly discourage you from doing so as well.
That’s not the only missing feature. Apple had previously claimed that Time Machine would support encryption, but it doesn’t. It does keep FileVault archives encrypted, but the cost of doing so is not being able to back them up until you’re logged out of your account – a significant inconvenience. Yet another missing feature is the capability to specify a time limit beyond which older files will be deleted from your backup disk; now Time Machine simply keeps going until it nearly fills up your disk, and then starts purging older files – with an optional warning, but without an option to offload those older files to other media for long-term storage.
Apart from things many of us expected because Apple had told us about them, Time Machine lacks numerous important features common in other backup programs. A biggie: it can’t make bootable duplicates; if your hard drive dies, you’ll spend long hours restoring your Time Machine backup to a new drive before you can get back to work. It doesn’t let you schedule times when it won’t run, though you can manually turn it on and off whenever you want. You can’t specify more than one destination disk and switch between them automatically (as you might want to do, for example, to keep an extra backup offsite – something I recommend). (It is possible to work around this in various ways, but I have to do more experimentation before I can provide
reliable advice.) You can’t back up to an iDisk or to optical media. You can’t compress your backups – you’re going to need, at a bare minimum, free disk space 1.2 times the size of the data you want to back up. And although you can manually specify files, folders, or volumes to be excluded from your backups, Time Machine offers no intelligent filtering (for example, excluding all disk images or all downloaded videos).
Go Forward to Go Back — I started with the bad news not to diss Time Machine or persuade you that you shouldn’t use it, but to put it in perspective. It’s the very first version of a brand-new technology. It has limits and bugs (such as a problem with Aperture – see “Leopard Early Fixes and Warnings“), and seemingly lost some features just before its initial release. So despite the one-click setup (very nice) and the groovy 3-D interface for restoring files (extra super nice), it is not the Ultimate Mac Backup Program. At least, not yet.
On the other hand, I can think of at least one excellent reason you might want to start using Time Machine right now: it’s guaranteed to be compatible with Leopard! Some of your existing backup software may not be. For example, the developers of SuperDuper are working hard on a Leopard update, but it’s not quite there yet. EMC has announced that a Leopard compatibility update for Retrospect will be available within 30 days, and Prosoft says that they’re preparing an update to Data Backup 3. Among the backup software already
working under Leopard is CrashPlan, thanks to an update on 27-Oct-07. A new version of Carbon Copy Cloner released last week appears to work with Leopard, but may have a few glitches left. And Apple’s own Backup just had a minor update for Leopard compatibility (among other things). If you’re using any of the dozens of other backup utilities out there, check with the developer for information on its support for Leopard.
Time Machine Impressions — I’ve been using the final version of Leopard on my main Mac for the past few days, and based on what I’ve seen so far, Time Machine appears to work approximately as advertised. It does back up and restore files correctly when I ask it to. However, a few things are not quite as I expected:
- Hourly backups, even to a fast external hard drive with a FireWire 800 interface, often take as long as a half hour! So basically, Time Machine is actively copying files at least half the time. Why does it take so long? It appears that several factors are involved. First, I have .Mac Sync turned on, which results in quite a few files being modified (and therefore, marked as needing backup) every time it runs, whether manually or on a schedule. Ditto for iDisk Sync – since I have a local copy of my iDisk, every time I modify a file there, Time Machine wants to back up that (very large) disk image again. Also, I have Mail checking six IMAP accounts, and every time I get new mail, not only the messages themselves but also Mail’s
envelope index file and junk mail filter statistics are updated. A number of other background processes on my machine also change files fairly frequently. The net result: on my Mac, Time Machine backs up tens of thousands of files, totaling hundreds of megabytes, every single hour. - Disk images are a bit of a problem. If you use Parallels Desktop or VMware Fusion, you probably have a very large disk image to hold your Windows installation. Every time you change even a tiny file in Windows, Time Machine is obliged to back up that entire huge file again. The same goes for PGPdisk or even an encrypted disk image you create with Disk Utility to hold confidential files: any small change marks the entire large file as needing to be backed up again. This results in a tremendous waste of space on your backup disk, not to mention a longer time spent performing each backup. Several newer backup programs, including CrashPlan and QRecall, can back up just the changed portion of a
large file, but Time Machine’s approach makes doing so fundamentally impossible. - If I activate Time Machine while in Mail, I immediately see dozens of spam messages in my Inbox that were never there before! Mail’s junk mail filter intercepted them as soon as they arrived and routed them to my Junk mailbox, but apparently Time Machine doesn’t care; Junk is, in fact, the only mailbox that’s dimmed when in Time Machine’s restore mode, so I can’t look at how just that one folder was in the past. I think Apple is trying to be helpful here by highlighting the fact that a “missing” email message may not be missing at all but merely mistakenly filed in your Junk mailbox. But I don’t want Time Machine to second-guess me like that.
- Third-party support for Time Machine is still lacking. It’s great that I can restore individual items from Mail, Address Book, iPhoto, and so on. But I’d like to restore individual keychain items from 1Password, individual snippets from DEVONthink Pro Office or Yojimbo, and individual records from FileMaker Pro databases. So far, very few non-Apple applications support Time Machine at the record level. If and when they do, Time Machine will become vastly more useful.
Ultimately, I expect I’ll continue using Time Machine, but only as one part of a broader backup strategy. Time Machine is pretty good at what it does, and may get even better over time. Even in the best case, though, I’ll need some other software to make bootable duplicates, an additional strategy to deal with offsite backups, and probably some fiddling to deal with problem areas like disk images and never-ending hourly backups. And now, if you don’t mind, I must get back to my testing, so that I can explain exactly how to do all these things in that book I’m writing!
Leopard Simplifies File Sharing
I’m a jaded Mac OS X user. Since 10.2, when Apple made a host of basic functional improvements over 10.1, I’ve expected mostly incremental changes with each new system release. iChat AV and Spotlight – but, for me, not Dashboard nor Exposé – were notable marquee exceptions. So it was with a heavy heart that I prepared to work on “Take Control of Sharing Files in Leopard” with a beta of Leopard obtained through my membership in the Apple developer program a few months ago. I expected that Apple would refresh interfaces and add a few new items, but nothing more.
I was pleasantly surprised. Apple not only consolidated file sharing options for Apple Filing Protocol (AFP), Samba (or SMB), and FTP into one place, but they added back folder sharing, a feature never seen in Mac OS X, even though it was widely used in Mac OS 9 and releases before that.
Apple’s changes allowed me to cut more than 30 pages from the book while improving its utility: no longer do you need to edit text configuration files and change obscure settings. It’s mostly check a box, click a button, and choose a value from a pop-up menu. As Steve Jobs would say, boom.
Major Streamlining — Let me give you a quick overview of what has changed in file sharing.
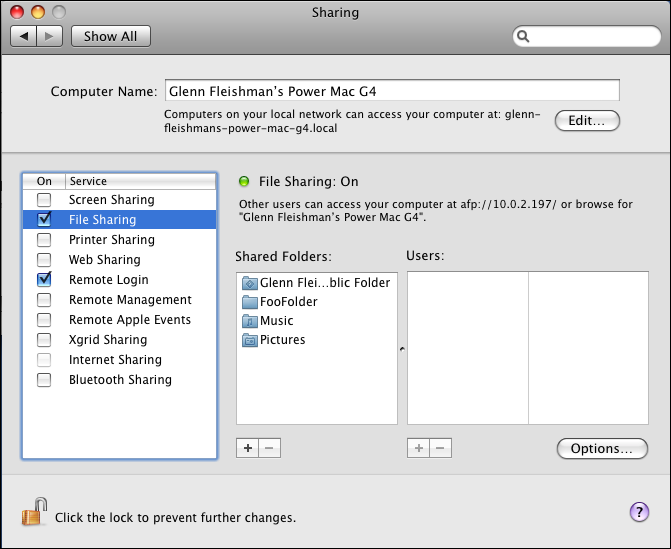
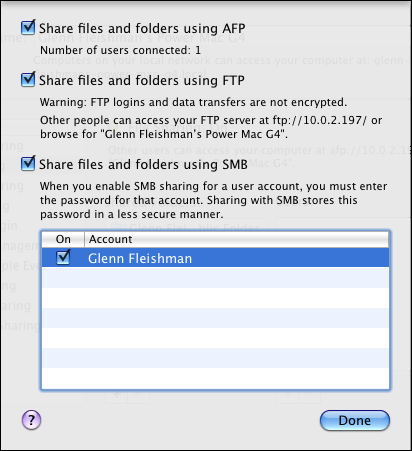
- AFP, Samba, and FTP are all controlled from one place. In Tiger and before, Apple gave its own names to AFP and Samba (Personal File Sharing and Windows Sharing), and assigned them to three separate checkboxes in the Sharing preference pane’s Services tab. In Leopard, there is a single File Sharing service in the Sharing preference pane that consolidates access for all three services.
-
Folder sharing. It’s a blast from the past! You can take any folder or mounted drive and share it as though it were a volume. Share like it’s 1999! Or 1997.
-
Granular access permissions. The File Sharing service lets you assign specific read and write permissions for users and groups to each volume.
-
Sharing Only accounts. Apple neatly added a way to create accounts that are enabled only for sharing, and lack a home directory or permission to log in via SSH.
-
Guest account. There’s a guest account that has a separate choice for allowing password-free server access to specific folders. It has some limits that I’ll discuss later.
-
Finder access to sharing. Apple rejiggered how servers appear and how volumes are mounted in the Finder to make life much better for average users and power users alike.
Let’s look at how this works for setting up file sharing.
File Sharing Setup — With File Sharing selected in the Sharing preference pane, you might be briefly baffled as to where you go to turn on any of the three sharing protocols. Click the Options button, and you’ll find a checkbox for each of AFP, Samba, and FTP, which can be enabled in any combination. Samba access is enabled for specific accounts due to concerns about its method of storing passwords being easier to crack than Apple’s very strong method. (This is unrelated to AFP, Samba, and FTP passwords being transferred over a network; only Samba passwords are encrypted by default.)
The main File Sharing dialog linked previously shows two lists: Shared Folders and Users. Any mounted volume or folder that you’re sharing as a network volume appears in the list at left. To add a folder to that list, either drag it in, or, in the Finder, select a folder or volume, choose Get Info, and check Shared Folder. You can also click the + sign below the list and then navigate to and select folders or volumes.
When you select a shared folder – you can only select one at a time – the associated access rights show up in the Users list. The Unix users already assigned to a folder appear, and you can add or remove users and groups.
For each user or group, you can choose one of three types of access: Read Only, Read & Write, and Write Only (Drop Box). With the write-only option, Leopard creates a Drop Box folder in the volume to which the specified remote user or users with access can copy files, but whose contents they can’t view – it can’t be opened. (The special Everyone user, which encompasses all users including the Guest account, has an extra status of No Access. It’s a way to disable access without removing the folder from the Shared Folders list.)
To add users, you click the + sign below the list, and then choose named users under Mac OS X or people in your Address Book. For Address Book selections, Leopard prompts you to create a password, which it uses to then make a Sharing Only user account, if you haven’t already done so.
The File Sharing options all take effect right away – you don’t need to restart anything or click other buttons to make the changes available immediately. Shared volumes can be accessed by any other system – with AppleTalk enabled on the appropriate network interface, you can even discover shared folders from Mac OS 9. (See the postscript at the end of this article for a discussion on AppleTalk.)
Making the Right Kind of Drop Box — There’s one multi-step process worth walking through: Creating a drop box. A drop box is a folder with special permissions that lets a remote user with write-only privileges drop files into the folder, but not open the folder to view or copy its contents. (This can be used among users on the same computer; it is what each user’s Public folder’s Drop Box folder is partly for.)
You can set user permissions for a shared folder to be Write Only (Drop Box), but that makes the entire volume write-only. When a user mounts that volume, they’re told that they can’t read the contents, which could be confusing.
Instead of making the volume a drop box, create a nested folder, inside which you put the drop box. First, create a folder that will be the volume; let’s call it “Put Files Here”. Next, share that folder by dragging it into File Sharing’s Shared Folders list. Select it in that list, and choose Read Only for all the users who need access. Don’t put any files in that folder.
Now create a new folder called “Drop Box” inside “Put Files Here”. Select “Drop Box” in the Finder, choose File > Get Info, and in the Sharing & Permissions section, set all the users you want to limit to Write Only (Drop Box) access. (You may need to click the lock icon and enter an administrator password to make this change.)
When users mount “Put Files Here” as a volume and open its window in the Finder, all they’ll see in that window is the “Drop Box” folder with a downward-pointing arrow indicating it can only be written to.
Finder Tune-up — The way that volumes are mounted in the Finder and appear on the Desktop has hardly changed since we moved from the Chooser in the classic Mac OS to the often-problematic network browsing in Mac OS X. Leopard reworks this, partly by combining some of the aspects of the Chooser with Mac OS X – no kidding!
You can still use Go > Connect to Server in the Finder to type in an AFP name, an IP address, a domain name, or the name by which Windows identifies a shared volume, or to pull up a server you’ve added to favorites. But the browsing option is what’s new and improved in Leopard.
In any Finder window, you can now see available network servers and connected servers in the sidebar. You can choose whether servers visible over the network and connected servers appear in the sidebar by selecting Finder > Preferences, clicking the Sidebar button, and unchecking Connected Servers or Bonjour Computers. (The list of Bonjour Computers includes Windows servers advertised via NetBIOS servers, too.)
Select a server in the sidebar, and Leopard automatically tries to connect as Guest using AFP, and shows you the available volumes in such a case. Click the Connect As button in the upper right of the window, and you can use a standard server login dialog to enter a username and password. If you store your login details in the Keychain, the server automatically logs on the next time you click it after unmounting.
Networked volumes no longer appear on the Desktop by default unless you use the Finder’s preferences to make them appear. Choose Finder > Preferences, click General, and check Connected Servers. Otherwise you will, like me, be scratching your head, wondering where those volumes went to!
In an extremely welcome change, Apple has added a bit of underlying magic called AutoFS to eliminate the Finder lockups (complete with the spinning pizza of death) that we’ve all grown to loathe when mounted network volumes become inaccessible for some reason. With AutoFS, Leopard spawns a separate thread – a separate thought process, as it were – to handle mounting the volume. You no longer wait for it to mount, and your system shouldn’t lock the Finder if the volume suddenly becomes unavailable. I have yet to test this extensively, but AutoFS has worked in this way on other Unix systems for quite a while.
Administrators and File Sharing — Mac OS X has always had an issue with the relationship between users who had been granted administrator privileges in the Accounts preference pane and file sharing. Until Leopard, if you turned file sharing on, an administrative user could access all mounted hard drives, and any folders within those drives that they had permission to access. That typically included everything but the contents of folders in other users’ home directories.
Leopard doesn’t share anything automatically except the Public folder in each user’s home directory, which is typically empty. To share your startup drive, for instance, you add the drive to the Sharing Folders list and its default permissions are pre-filled in the Users list.
Here’s where it gets tricky. Three entries appear in the Users list: System Administrator, which is the Unix root account, set to Read & Write; Administrators, a group comprising all users on the system with administrator access, set to Read & Write; and Everyone, a Unix group comprised of all user accounts on the system, set to Read Only.
You might think, well, I’d like to remove administrative users’ access, so I’ll just select Administrators in the User list and click the – (minus) button below the list. Wait! You can hear the spooky music starting as you move toward that button. Removing Administrators from the Users list doesn’t affect just the sharing permissions attached to the shared volume, but also the underlying file permissions used for local access.
In my test, my startup volume’s icon shifted from a hard disk to a folder with a red circle icon on it with a horizontal line. If I’d restarted the machine at that point, I would not like to think about what might have happened. Adding the Administrators group back in restored the drive’s icon and access.
My advice? Don’t share entire drives or partitions unless you’re sure you want all administrator-level users to have access to the files they would if they were sitting in front of the computer with direct access.
What’s Missing — While Leopard is a big step forward, Apple made a few choices I hope to see improved upon or at least explained in future updates:
- The Guest account can’t access FTP. For some reason, the Guest account can access only AFP and Windows servers. This might be a security feature, but I’ve not yet found a way to override this limitation; I’m still looking. (It probably requires a configuration change, but Apple has changed how it creates configuration files for services in Leopard, too.)
-
Secure FTP (SFTP) isn’t integrated with File Sharing (nor has it been in the past). The encrypted FTP server option requires that you turn on Remote Access in the Sharing preference pane. SFTP is technically a component of SSH, a way of securely connecting to remote systems for command-line sessions. So SFTP honors Mac OS X accounts, but doesn’t honor the shared folders you’ve set up. Any Mac OS X user can connect via SFTP to any drive or mounted volume that they have permission to access, which typically means almost every one outside of system resources and individual users’ home directory contents. It would be nice to see SFTP more fully integrated with File Sharing, although Apple is working with constraints that are designed
into SSH. -
AFP login options have disappeared. Most of these options had to do with secure logins, and my colleagues in the worlds in which secure AFP was used say that setup was always somewhat wonky. TidBITS friend Chris Pepper reports that they aren’t available in the Leopard Server administration tool, either.
More Information — If you’re looking for more information about sharing files in Leopard, check out my new book on this topic, “Take Control of Sharing Files in Leopard.” The 89-page book is full of step-by-step instructions for working with everything mentioned above, plus a detailed section on sharing iTunes and iPhoto libraries among users on the same computer or users connecting across the network. The book starts with a set of sections on how to figure out what kind of file sharing best fits your needs and the challenges that face you – along with their appropriate solutions.
A Postscript about AppleTalk and AFP — AppleTalk has a tricky history relative to AFP. While Apple enabled AFP-over-IP or AppleShare-over-IP using Internet networking instead of AppleTalk as the transport mechanism starting with Mac OS 9, it didn’t disable AppleTalk as an option until Tiger. Further, the way that AFP volumes are advertised on the local network under Mac OS X since 10.2 isn’t backwards compatible with earlier system versions. In brief, and I believe I now have all the nuance in here:
- Mac OS 8 can access Tiger and Leopard AFP-shared volumes and see those volumes in the Chooser if AppleTalk is enabled on Leopard on the network interface feeding the network that the Mac OS 8 computer is connected to, such as an Ethernet network.
-
Mac OS 9 and Mac OS X 10.1 to 10.3 can access AFP-shared volumes via either AppleTalk or AFP-over-IP. (Mac OS X 10.0 doesn’t allow AppleTalk connections, but I can’t imagine anyone in their right mind still running 10.0.)
-
Mac OS 9 and Mac OS X 10.0 to 10.1 can’t discover AFP volumes that are shared without AppleTalk on the network they’re connected to, but they can connect by IP address or domain name.
-
Mac OS X 10.2 and later can use Rendezvous (10.2, 10.3) and Bonjour (10.4, 10.5) to discover AFP-shared volumes.
Apple’s technical note on the matter has quite a lot of additional detail that should help people using networks with different versions of the Mac OS sort it all out.
In short, if you’re still using a variety of older versions of Mac OS on your network, you should enable AppleTalk. Tiger and Leopard can’t connect to an AFP server via AppleTalk, but they can serve it up for older machines.
To enable AppleTalk in Leopard, open the Network preferences pane, select the interface – like Ethernet – and choose the AppleTalk tab. Check the Make AppleTalk Active box. You can have AppleTalk active on only a single interface at a time under the regular version of Leopard; the server version lets you activate AppleTalk on multiple interfaces.
Six Things I Hate about Leopard
Let’s all do the Leopard Moan. Yes, Time Machine is cool, Spaces is neat, but oh (moan!), the interface! What were these people thinking? Yes, you’ve got a rant inside you, waiting to howl to the moon, and so do I; it’s a full moon right now, so let’s take this opportunity to get it out of our systems (pun intended). Herewith, then, some things I just can’t stand about Leopard.
The Dock — The Dock now expresses itself as a silly reflective shelf. My objection to this is not merely the business of “wasting CPU cycles drawing trendy 3D junk.” In order to accommodate the reflection, the Dock icons have to sit considerably higher than before, robbing the user of valuable screen real estate. Even worse, the indicators of an icon’s status, in particular the marker that tells you that an application in the Dock is currently running, are darned near invisible, lost in the reflective shelf’s shiny suckitude. Luckily, at the last minute, after the last seed but before the Golden Master, Apple relented and provided an alternative mode of Dock display; this alternative is now the default if
you move the Dock to the left or right side of the screen, and can be applied even to a Dock at the bottom of the screen by using some Terminal trickery. In short, issue these two commands in Terminal:


defaults write com.apple.dock no-glass -boolean YES
killall Dock
The Grey — Remember when your Mac had a 9-inch screen and every pixel was either black or white? It looks like Apple does, too, with nostalgia. This system declares war on color. The result is just plain ugly. That’s right, folks, you heard it here: the “unified textured look” of windows in Leopard, for which iTunes was evidently the incubation laboratory all along, is ugly. The title bar of a window is big and grey. The title bar of a window that isn’t frontmost is a lighter grey, which is backwards: surely it’s the frontmost window which should light up, not all the background windows? In the Finder, they’ve also slapped a grey background behind the sidebar; since the text and icons in
the sidebar are also now tiny (with no preference to make them any larger), they are both ugly and illegible. An empty folder icon is no longer a lovely shaded three-dimensional-looking blue filing folder; it’s a flat grey rectangle. Plus, standard folder icons, as for the Applications, Library, Users, and other built-in folders, are now uniformly blue-grey as well; there does seem to be some kind of icon drawn on each of these folders, but it’s tiny and in another grey, so it’s virtually invisible. I had no idea how much I relied on the subliminal cues of the large, colorful icons on these folders, until they vanished and I found myself lost in a uniform Finder.

The Menu Bar — The menu bar is now somewhat transparent. So if your desktop picture is purple, the menu bar is also slightly purple. If your desktop picture has stripes or bright dots, the menu bar has stripes or bright dots. Menus that drop down from the menu bar are also somewhat transparent; they were before, too, but the native stripes that used to mask that fact are gone, so they inherit the problem. The result is that the menu bar, along with the menus themselves, is less prominent, harder to read, and has a somewhat unready or disabled look, entirely inappropriate to its function.

The Stacks — Let’s pause to remember how a folder in the Dock used to work, as we kiss it goodbye forever. In Tiger, the story is like this. You have a folder in the Dock. It looks like a folder. Click it and it opens in the Finder. Command-click it and you view it (in its containing folder) in the Finder. Control-click it and you get a hierarchical menu of its contents, the contents of its folders, and so on. Just about all of that is now gone. Gone! What was wrong with it? Nothing! It was great. But now, a folder in the Dock, if it has any files in it, doesn’t look like a folder; it looks like a file (in particular, it takes on the preview of one of the files it contains). The hierarchical menu of the
folder’s contents is completely missing. Worst of all, clicking on the folder icon doesn’t open the folder; instead, it pops up a lot of icons representing the contents of folder. That’s okay, I guess, if any of those preview icons represents a document that you wanted to open, and if you can tell that from the preview icon; in that case, just click it. But I can’t usually tell anything from preview icons, and anyhow, the main thing I want to do with a folder is usually not to open a document within it. What I want is a Finder window listing the folder’s contents, so I can study that list, or sort it, or navigate further into the hierarchy, or whatever. In Leopard, arriving at such a Finder window is now a two-step process: first click the
folder icon in the Dock; then find and click the “Show in Finder” button. Or, hold the mouse button down on the folder icon in the Dock to make the menu appear; then click the Open menu item. Yeeesh! Talk about making something hard that should have been easy.

The Help — When you choose something from the Help menu in any application, what opens is no longer the Help Viewer application. It’s an orphan window that floats over, and blocks your view of, everything else on the screen. It belongs to no application, so you can’t hide it or switch away from it. Now, what’s the most common thing to do while you’re reading an application’s help documentation? You read something in the Help, you switch to the application to try it; you see something in the application, you switch back to the Help to learn about it. No more. Now, as soon as the help window opens, you’re stuck: you’re in the help window and that’s the only place you can be, until you close the window (or
minimize it into the Dock). I suppose this is no problem at all if you have massive tracts of screen real estate, as in Al Gore’s triple Cinema Display setup; but for most of us, it’s horrible. This is going to be a disaster for professional authors of online help, such as, uh, me, because it makes our carefully written documentation effectively unusable. I’ve already started to make plans for writing my own alternative help application that will act like an ordinary application. The irony is that it took from Mac OS X 10.0 right through to 10.3 (Panther) before Help Viewer even started to become a pretty good application; now Apple has thrown all of that progress right out the window. The floating window, that is.
The Classic — Apple might not like to condone or even to believe this fact, but there is a large installed user base out there consisting of people who, every now and then, have to run a Mac OS 9 application. Some of us have data in a Classic format, such as a HyperCard stack, and now and then we like to peek at that data. Some of us even make a living out of running a Classic application, as I do with FrameMaker. (It’s still the best way on earth to create first-rate PDFs, or large structured documents; it’s also an absolutely brilliant XML editor.) I was able to accept, when I acquired my first Intel-based Mac a few months ago, that it wasn’t going to run Classic; I can well believe that there might be
something about an Intel processor that inherently makes Classic emulation prohibitively difficult. But there is nothing about a new system version, running on a PowerPC-based Mac, that blocks Classic from running; Apple’s decision not to support it in Leopard is arbitrary (and feels not a little spiteful).
There, I’ve done my screaming. The Great Moan is over. I had to do it, just this once. I’ve said what I had to say, and now I won’t have to mention any of these things again. And maybe, just maybe, Apple will see fit to address some of these complaints in a forthcoming update to Leopard. I’m not holding my breath, but you never know.
Spaces: A First (and Very Happy) Look
When Apple posted its list of 300 features that are new in Leopard, your eyes may have glazed over. Many of these new features won’t mean anything to you until you’ve tried them, and, in Apple’s list, you can’t readily distinguish something small and cute from something massive and profound. (Let’s face it, the “Arabesque Screen Saver,” while pleasant, is hardly on a par with being able to “Back Up Everything” with Time Machine.) Furthermore, some new features are just hard to describe in a sentence or two, so a proper sense of their implications doesn’t come across to the reader. In my view, Spaces is one of those features: It’s massive and profound, but Apple’s own
explanation fails to do it justice. If someone asks you, “Why upgrade to Leopard?” the three little words, “To get Spaces,” could be a sufficient reply. For sheer productivity potential, making your computer easier and slicker to work with, Spaces may be the single most important benefit of upgrading to Leopard. In this article, I’ll try to help you see why.
So… what is Spaces?
Well, it’s a “virtual desktop” implementation. Now, all you Unix X Window virtual desktop users can stop reading right here, or at least skip the next few paragraphs. Those of you who have tried VirtueDesktops (abandoned early in 2007) or the commercial CodeTek VirtualDesktop also have a sense of what Spaces is about (though these, to be clear, were effectively hacks; the only clean way to implement a virtual desktop feature is to integrate it at system level into the windowing system, as Apple has now done with Spaces). Right now, I want to talk mostly to the
virtual desktop newbies who haven’t a clue. You others, stick your fingers in your ears and go “La la la,” okay?
Okay, clueless newbies – we’re all alone together. Come closer. Closer! Good. Here’s the deal.
Spaces is all about straightening out the clutter of windows on your screen. What is the biggest problem with windows? It’s that there are always too many of them, and most of them are covered by other windows. Thanks to Mac OS X’s great memory management, you can run lots of applications at once, and you can have lots of windows open at once; but, no matter how big your screen is, you usually can’t actually see all of more than one or (at most) two windows at the same time. Everything else is just a big overlapping mess. And on Mac OS X, as opposed to earlier Macintosh systems, it’s even more of a big overlapping mess because the windows of different applications can end up all intertwingled with one another.
The result is that when you’re trying to get anything done that involves working in more than one window at once, things get difficult. There’s a window in front, and then there’s everything else, little corners and title bars sticking out here and there, like the aftermath of a wild game of Fifty-Two Pickup. Where is the precise other window you need to be able to see at this moment? You have no clue.
Notice, please, that I keep talking about windows – not applications. When you come down to the nitty-gritty, getting complex stuff done on your computer is not really about applications; it’s about particular windows. Those windows might come from any applications: they could be different windows of the same application, or windows from various different applications.
That’s why the simple tools available to you for switching between applications are never quite enough. For example, you can simplify the display on your screen by choosing Hide Others from the frontmost application’s menu. Now only the windows of this application are showing. But perhaps you really want to see just one of this application’s many windows, plus one window from some other application. So first you might scurry around minimizing the windows from this application that you don’t want to see. Then you have to switch to the other application, making it visible, and find its desired window and bring it to the front and position it. Then you have to switch back to the first application. Now you can work in both
windows. Great, but what happens when you suddenly need a different window from the first application? You have to hunt for it in the Dock, and when you expand it, there it is, blocking everything and complicating the picture. Or perhaps you need a window from a third application: you bring that application to the front, and presto, all of that application’s windows are plastered all over the screen, blocking everything and complicating the picture. Is it any wonder tabs have become so popular?
Spaces is all about this problem. It lets you work with sets of windows. That’s all a space is – a particular set of windows. When you are “in” this space, just this set of windows is visible. When you switch so that you are “in” a different space, a different set of windows is visible. In the previous paragraph, I was trying to make two points: (1) it’s hard to arrange things to see just the small set of windows you need for Task A, and then, (2) when you want to perform Task B, bringing different windows into play complicates the whole picture. With Spaces, Space A could consist of just the windows you need for Task A, and Space B could consist of just the windows you need for Task B. You can then switch between spaces,
meaning visible window sets, and everything stays simple: you are always seeing all and only the windows you want to see.
So the main thing Spaces is about is switching spaces. In fact, you can turn Spaces on and never switch spaces, and then you won’t even know or care that Spaces is on! You’ll be living in exactly the same world you always lived in. In fact – oh my gosh! We’d better actually turn Spaces on, or all the rest of this discussion is going to be pointless! So, do this:
Choose Apple Menu > System Preferences. Click Exposé & Spaces. Click Spaces. Check “Enable Spaces.” Whew! Now Spaces is on.
So how do you switch spaces? There are four (count ’em, four) ways:
- All Spaces mode. This is what you get when you press F8, or click the Spaces icon in the Dock. (If you don’t see the Spaces icon in the Dock, drag it in from the Applications folder.) It behaves a little like Exposé, in that it provides a reduced, schematic version of the world: all your spaces are shown at once, in a grid, and now you can click one to switch to that space. This is nice because you can sort of see what windows are in each space. Plus, if you want to get really cool, while you’re in All Spaces mode you can press F9 to enter Exposé’s All Windows mode, and now each individual space shows each of its individual windows (which are getting pretty tiny at this point) and you can click a window to pick
a space and a particular window all at once! (Note: I’m saying “F8” and “F9”, but those might not be your actual shortcuts for these actions, because they are customizable.) - Use the Spaces menu. If you don’t see the Spaces menu, check “Show Spaces in menu bar” in the Spaces preference pane in System Preferences. It displays nothing but numbers: the numbers of your spaces (1, 2, and so on). Choose one to switch to that space.
- Use a number. By default, the number shortcuts for switching between spaces involve the Control key. So, press Control-1. Now press Control-2. Congratulations, you just switched spaces.
- Use an arrow key. This is trickier, because it relies on a concept I haven’t introduced yet. You see, your spaces are imagined as lying in a grid. You can see this imaginary grid in the Spaces preference pane where we just were a little while ago. By default, there are four spaces, and the grid is a 2-by-2 rectangle. (This grid is customizable – you can change how many spaces you have and how the grid is arranged – but for this example I’m pretending you haven’t yet departed from the default.) So if you are in space 1, you can switch to space 2 by pressing Control-Right arrow, because space 2 is imagined as being to the right of space 1; but, again, if you are in space 1, you can switch to space 3 by pressing Control-Down arrow,
because space 3 is imagined as being below space 1. Feeling a bit seasick? Maybe it would better not to use this way of switching between spaces until you are a certified expert (or just plain certified).
There is one more elementary concept connected with Spaces that we need to get clear on: How does a window come to be in a particular space to start with? Well, there are two ways:
- You created the window while you were in that space. For example, you are in space 2, and you start up TextEdit. TextEdit wasn’t running before, and when it launches it creates a new window. So you are in space 2 and you are creating a new window, and therefore that new window will be in space 2. Of course there are many other ways to create a new window in various applications.
- You moved the window from one space to another. Huh? Since you can only be in one space at a time, how can you possibly do that? Well, if you’re in All Spaces mode, you can actually drag a miniaturized window directly from one space to another. Or, while you are in one space, hold the mouse down on a window’s title bar and switch directly to another space with a keyboard shortcut; the window will travel with you to the new space. Or, drag the window to the edge of the screen and pause with the mouse still down and at the screen’s edge; you’ll switch spaces automatically, bringing the window with you. Keen, eh?
That’s all there is to know about elementary use of Spaces. I’m not going to talk about “application bindings” right now; it’s too advanced for this discussion (you can learn more about that by experimentation, or you can check out my new ebook, “Take Control of Customizing Leopard,” for more info). But there is just one point that I want to leave you with as you start experimenting with Spaces, and it’s this: Spaces is complicated but simple. It’s complicated because there are lots of different scenarios, but it’s simple because Spaces always does “the right thing.”
For example, let’s say you’ve opened TextEdit in space 2, and that’s the only place where any TextEdit windows are. And let’s say you’re now in space 1. And let’s say you use the Dock, or Command-Tab, to switch to TextEdit. What will happen??? Well, what’s the right thing? TextEdit’s windows are all in space 2, so the only sensible thing is that you should automatically be switched into space 2 so you can see them. And sure enough, that’s exactly what does happen. I could go on and on positing various scenarios of greater and greater complexity, but that’s pointless; all you need to know is that Spaces will behave sensibly and simply, and that you’ll catch on to its logic almost immediately with a little experimentation.
So, congratulations: You are no longer a clueless newbie. You’re a clued-in newbie! With a little practice, you will soon find ways to use Spaces that will make your computer life simpler and easier. I can’t tell you what they are because I don’t know what kind of thing you do. Perhaps you’ll usually have a space for all your Internet apps and another space for all your writing apps. Perhaps you’ll have spaces for certain particular tasks that you typically perform. It’s all up to you. I do have one piece of advice, though: Try it, you’ll like it! Whether you’ve got a big multi-monitor setup or a tiny portable screen, Spaces has the potential to make your life a lot easier. You simply have to remember to use it. With a little practice,
you will.
Hot Topics in TidBITS Talk/29-Oct-07
Radio on the iPod touch — Will Apple’s iPod Radio Remote work with the iPod touch? Apparently not. What other solutions exist for listening to the radio? (14 messages)
Apple Board Member Al Gore Awarded Nobel Peace Prize — Our news item about the former U.S. vice president elicits complaints that TidBITS is being political; does merely mentioning Gore’s name imply something, or was it straightforward reporting? (14 messages)
Apple Education Discount — When people abuse the education discount (a man got a student to buy Leopard for him at a steep discount), does it jeopardize the program for legitimate users? (2 messages)
It’s Official: Leopard DELIVERS on October 26th, 2007 — Initial shipping reports sounded as if Amazon.com was going to deliver Leopard on its opening day, but for some people that didn’t pan out. Readers also share their impressions from the Leopard launch at Apple retail stores. (16 messages)
How Leopard Will Improve Your Security — Rich Mogull’s article on the changes in Leopard security raises other questions, such as how to secure your data when using Time Machine. (15 messages)
Are Your Fonts Ready for Leopard? Our article on preparing fonts for Leopard brings up questions of how to extract Font-DA Mover from its outdated self-extracting archive wrapper. (6 messages)
iPhone battery indicator — The iPhone battery indicator changes colors depending on which screen you’re on, a change that appears to have arrived in the iPhone 1.1.1 update. (2 messages)
Talking Your Way Out of a Plastic Bag — The next time you’re in the middle of the wheat harvest, a plastic bag over the iPhone will help. “Be prepared to farm” is our motto. (2 messages)
Speaker system for iPod — Which of the current crop of iPod speakers are recommended? (5 messages)
GMail and IMAP — Google is rolling out IMAP access to its Gmail service, and readers share their experiences and workarounds. (14 messages)
Wait for 10.5.1? With every new major operating system update, the question becomes: jump right in, or wait for the first big bug fix release? (4 messages)
MacLive Expo London — Apple doesn’t appear to be exhibiting at this event, and there are questions about the future of a Macworld conference in London. (2 messages)
ALS and the Mac — What resources are available for someone with ALS (amyotrophic lateral sclerosis) or other disabilities to use the Mac? (3 messages)
Leopard Install Issues — Readers share their experiences (and frustrations) with upgrading to Leopard. (7 messages)
Can you finally share the Shared folder? Sharing is greatly improved in Leopard, but what’s the line between convenience and security? (5 messages)
Looking for PDA suggestion — A reader who has been using a Palm Tungsten E2 is looking to move to a smartphone. Which models are worth investigating, and which features are important when considering them? (4 messages)
Help Viewer Window doesn’t inhibit other Programs — A reader takes issue with Matt Neuburg’s complaint that the floating Help window gets in the way. (2 messages)
Leopard: iCal issues — The new iCal gives one reader trouble with shared calendars, but the problem might be local. (2 messages)
Booting separate computers from one drive — Is it possible to boot two Macs, one Intel and one PowerPC, from the same external drive? (1 message)