TidBITS#1134/16-Jul-2012
While we all wait for Apple to release Mountain Lion, we have a slew of practical articles for you this week. Adam Engst explains how you can control your Apple TV with the same remote you use for your TV, and how to make sure you’re getting the bandwidth from your ISP that you’re paying for. Also, Agen Schmitz delves into the dark world of MPAA ratings and iTunes metadata to figure out how to apply them to videos he would prefer his five-year-old didn’t run across on the iPad. Plus, Adam covers the story about how Dropbox’s Public folder will be going away (but can be re-enabled) for new accounts, and we’re looking to find out which day of the week would be best for our upcoming TidBITS Presents: “Upgrading to and Using Mountain Lion.” Notable software releases this week include Microsoft Office for Mac 2011 14.2.3, iPhoto ’11 9.3.1, and Audio Hijack Pro 2.10.4.
TidBITS Presents “Upgrading to and Using Mountain Lion”
We’re planning our next big TidBITS Presents event, but this one is going to be a bit different from the previous one (see “Watch Joe Kissell and Adam Engst in TidBITS Presents: Adieu MobileMe,” 16 June 2012). Most notably, it won’t be about MobileMe’s final days, but about the hottest thing slated to come from Apple this month: OS X 10.8 Mountain Lion! And while Joe Kissell will once again be presenting, he’ll be joined by Matt Neuburg. Joe will talk about issues related to upgrading to Mountain Lion, based on his “Take Control of Upgrading to
Mountain Lion,” and Matt will demonstrate some of Mountain Lion’s new features that he’s been writing about in “Take Control of Using Mountain Lion.”
Everyone will be able to watch this TidBITS Presents after the fact, but to thank them for their financial support, we’re restricting participation in the live event to TidBITS members and to those who have purchased either of our Mountain Lion ebooks. For people who fall into one of those categories, we’ll be in touch via email when we have final details, such as the date and time of the event.
In the meantime, though, we’d appreciate it if you could help us figure out which days are best for you to participate in TidBITS Presents events so we can take that into account when scheduling this and future ones. At the moment, we anticipate that presentations will be 60–90 minutes long at the most, and will typically take place in the middle of the day, Eastern time, to accommodate as many time zones as possible. Please vote on the TidBITS Presents page. Thanks!
Dropbox Public Folder Leaves and Returns
One notable feature of the Dropbox file-sharing service is the Public folder. Put any file or folder in that folder, Control-click the item, and choose Dropbox > Copy Public Link to get a download URL for it, while not exposing any other items in the Public folder or having to set up explicit sharing. When clicked, the file loads in the user’s Web browser, which means, for everything other than the file types that Web browsers display internally (HTML, JPEG, GIF, often PDF), that the file downloads immediately.
It’s a great way to let someone — or better yet, an arbitrary group — download a file without sending it in email or fussing with a specialized service like YouSendIt. (Such services have their place, since they offer additional features such as time-limited downloads, password protection, and so on. But they’re often overkill, and Dropbox is super easy.)
You can even use Dropbox’s Public folder as a way of publishing a simple Web site; just put all your site files in a folder, copy that folder to the Public folder, and use the same technique to get the URL to the index.html file of the site. As long as your site uses relative links for internal navigation, everything will just work.
A few months ago, however, Dropbox made it possible to share any file or folder from any place in the Dropbox hierarchy in much the same way. Control-click the item and choose Dropbox > Get Link. This nominally does the same thing — enables you to share a single file or folder via a URL without sharing the enclosing folder with that person. But there’s a difference. This new method always takes you to a Web page on the Dropbox Web site, displaying the content if the browser can do so. But if it can’t display the content, instead of downloading the file as happens with files in the Public folder, Dropbox displays a custom Web page that lets the user download the file or add it to their own Dropbox. And as a result, you can’t
publish a simple Web site that way.

You might think that these two features sound quite similar, and that’s where our story starts, about a month ago, when word appeared on the Dropbox forums that Dropbox would be eliminating the Public folder from new accounts. Current accounts would retain the Public folder, Dropbox said, but the company claimed that many users were confused by the Public folder and shared files offering essentially the same functionality.
This announcement provoked a storm of protest — and even a “Save the Public Folder” petition that garnered over 900 signatures — since even if only a small percentage of Dropbox users rely on the Public folder, some of those who do have use cases that require direct file access rather than an intermediate Web page. Plus, some developers had built software that assumes the presence of a Public folder.
About a week after the initial announcement, Dropbox pulled back, with another forum post saying that new users wouldn’t have the Public folder enabled by default, but that there would be a way for them to get one. That post also said that developers should still avoid relying on the Public folder, since not every Dropbox user would necessarily have one, and that the company wants to provide equivalent functionality through the API where possible. It’s not quite clear if that is true at the moment, but progress is being made.
It’s easy to see this as a tempest in a teapot, but there’s no way for us to know if the public outcry was key for the company making the Public folder an option for new users and extending the Dropbox API for developers. It’s entirely possible that Dropbox simply underestimated the desire for the Public folder and some of its associated features, and the hue and cry from users and developers alike caused the change in policy. If so, there’s no reason to assume negative intentions anywhere — Dropbox removed the feature to make the product easier for new users, and after hearing customer feedback, reinstated it for those who want it and extended the API to compensate further.
The moral of the story would seem to be that all’s well that ends well, and if you’re helping a new user set up Dropbox in the future, you may need to poke around in the settings to enable the Public folder.
Control Your Apple TV with Another Remote
I’m relatively new to everyday use of the second-generation Apple TV, since we just got one, along with a modern TV, for Christmas last year. Before that our video viewing was almost exclusively via Netflix, first on an elderly 15-inch MacBook Pro and then on an iPad when the MacBook Pro started freezing during video playback. The TV we settled on, a 50-inch Panasonic Viera ST30, has its own fully functional Netflix client built into its Viera Connect smart TV platform, and if it wasn’t in my interest to know what Apple is up to with the Apple TV, I would have no problem relying solely on the
Viera Connect Netflix client.
But the Apple TV’s Netflix implementation is prettier, and just a touch easier in everyday use; it was also easier to set up, but that’s a one-time task that wasn’t hard on either. We tend to work our way through TV shows (currently enjoying “Star Trek: Enterprise” with Tristan), so we use Netflix’s Recently Watched collection a lot. The Viera client requires seven button presses to get there, whereas the Apple TV requires only three; if you’re more of a movie fan, the Viera client requires only four button presses to get to your Instant Queue, whereas the Apple TV requires nine. Slightly annoyingly, those button presses with the Apple TV always require the Viera’s remote as well, since only it can turn the TV on.
That got me wondering if the Viera remote could be used to run the Apple TV. The Viera remote is a traditional black plastic bar with a ton of buttons, most of which I’ve never used or even figured out what they do. It’s not nearly as elegant as Apple’s sleek aluminum remote, but it has a very similar four-way controller with a central OK button and a separate Return button that does the same thing as Apple’s Menu button.

In fact, Apple did have the foresight to enable any remote to control the Apple TV, as documented in this support article. The process is the reverse of the way programmable remotes work, in that the Apple TV itself learns to associate buttons you press on the other remote with actions on the Apple TV. It’s a simple process, which you work through on the Apple TV in Settings > Remotes > Learn Remote. Basically, all you do is follow along as the Apple TV asks you to press a
button on your other remote that corresponds with the Up action on the Apple TV, followed by Down, Left, Right, and so on. It takes just a minute or two to complete, and worked nearly perfectly.
I say “nearly perfectly” because there’s one trick on the Apple TV that seems to work only with Apple’s aluminum remote. You can put your Apple TV to sleep by pressing and holding the center Select button for a few seconds; this saves a bit of power and cuts down on network usage if you have a photo screensaver bringing photos in from a linked computer. When I press and hold the equivalent OK button on the Viera remote, the Apple TV goes to sleep, but wakes up again nearly instantly. However, it’s easy to set Settings > General > Sleep After to 15 minutes in the Apple TV, which will eliminate most unnecessary power and bandwidth usage too.
What I don’t know, and can’t really advise on, is if other TV and universal remotes will work equally as well with the Apple TV. With the exception of the Skip Back and Skip Ahead actions in the Apple TV (which we’ve seldom used), the Viera remote has keys that match every Apple TV action, so it’s a particularly good fit. If your remote lacks a four-way controller, you could use the 2-4-6-8 keys on the numeric keypad to simulate it, for instance, with 7 mimicking the Menu button and 5 acting as the Select button.
(In case you’re wondering, both Apple and Panasonic have iOS apps. Apple’s Remote app runs the Apple TV, but I find it awkward to haul my iPhone out of my pocket, find the app, connect to the Apple TV, and use it. Except, that is, if I need to type any text on the Apple TV, where the Remote app’s virtual keyboard is far easier than the hunt-and-press approach necessary with any physical remote. Panasonic’s Wi-Fi-based Viera app can’t turn the TV on, not surprisingly, nor can it enter the Viera Connect interface, but once you’re in Viera Connect, the app does work and could be useful for entering text, which is again the only thing it does notably better than the dedicated remote.)
In the end, there’s nothing horribly wrong with using both remotes, or even supplementing them with the iOS apps — they all work well enough. But I’m enough of an interface connoisseur that I appreciate reducing the number of interface actions to the absolute minimum whether I’m using my Mac or my TV, and being able to use only a single remote scratches that itch. If you’re like me, it’s worth a few minutes to try; you can always delete the learned remote from the Apple TV’s list of remotes if you don’t like it.
Are You Getting the Bandwidth You’re Paying For?
Not long ago, I was invited to participate in a post-session Google Hangout On Air at the Le Web conference in London. When the organizer asked me to report on my bandwidth, though, there was much head-shaking as to whether my roughly 1 Mbps upstream bandwidth would be sufficient to provide high-quality video (my 15 to 20 Mbps downstream bandwidth wasn’t a problem). After a couple of brief Internet outages several weeks before this, Time Warner had replaced both my cable modem and the entire cable from the street, so I was pretty certain all the hardware was working within spec.
I hadn’t revisited Time Warner Cable’s service offerings in years, but some quick research online showed that I had the Turbo Internet plan, which promises up to 20 Mbps downstream and up to 2 Mbps upstream. Ignoring the fact that I wasn’t ever seeing the 2 Mbps upstream I should have been getting, I decided that an extra $20 per month to upgrade to the Extreme Internet plan (30/5 Mbps) was worthwhile, since we upload a fair amount of data and the 5 Mbps of upstream bandwidth would be welcome for video conferencing in particular. But since downstream bandwidth has never been our problem, the Ultimate Internet plan (50/5 Mbps) didn’t seem worth
the extra cost. Time Warner made it easy to click a link to chat with an online customer service rep, who was only too happy to help me upgrade. While we were chatting, I explicitly asked if my current cable modem — which had just been replaced, remember — would be sufficient for the Extreme Internet service level, and I was assured it would be. Some 20 minutes later, everything was done, and I was told that I’d start seeing improved performance either immediately, or within 2 to 4 hours.
(In fact, what happened was that 2 hours later, the entire connection went down, and I had to call support and get them to do something. It’s always a little unclear what they do, although I believe it involved properly linking my cable modem to the updated account. Luckily, they managed to fix it just as my iPhone dropped the call because I was in a low-reception part of the house.)
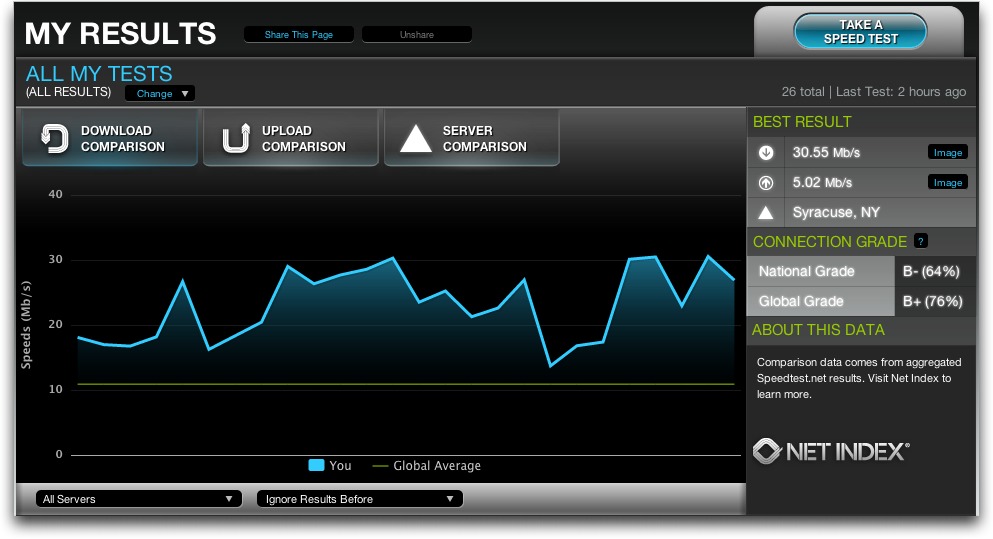
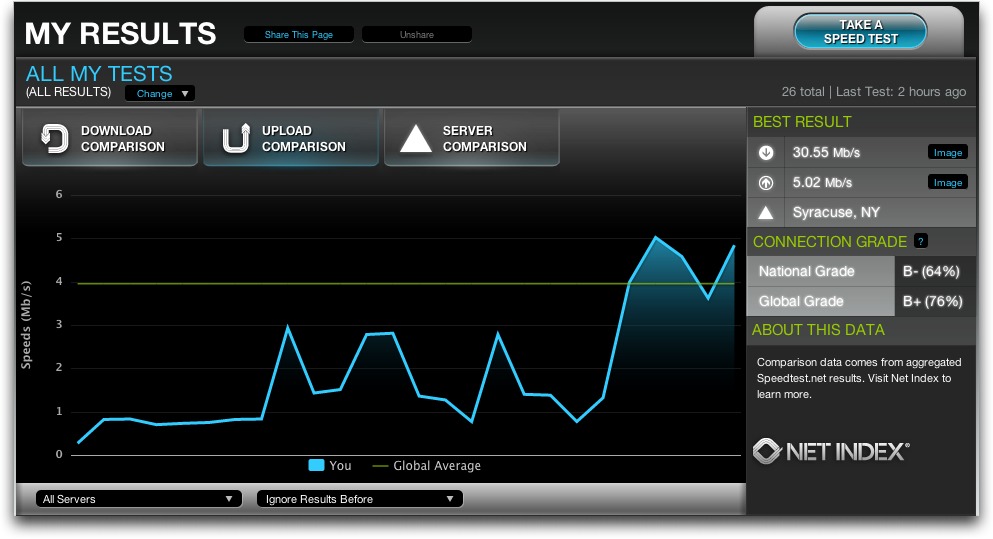
When I started testing the performance again, Speedtest.net reported consistently that I was getting between 20 and 30 Mbps downstream, and while my upstream performance wasn’t 5 Mbps, it was regularly between 1.5 and 2.5 Mbps. Bandwidth is very often shared, so it’s entirely common to get a bit less than your promised bandwidth, and while 2.5 Mbps was less than the 5 Mbps I’d been promised with the Extreme Internet plan, it was good enough for the Le Web conference hangout (with Kevin Rose of Google, if you want to watch). But as the days went by afterwards, that 2.5 Mbps upstream maximum nagged at me, and when some ebook uploads were
taking way too long, Speedtest.net reported I was seeing only about 800 Kbps upstream.
Frustrated, I called Time Warner once again, the support rep agreed that I should be seeing better performance, and he dispatched a tech to my house. As with the first tech who had replaced my cable, the second tech was extremely amiable and knowledgeable, but he had some choice words for the online customer service rep who had upgraded my account. Apparently — and this is so common that the techs have a word for it: “office-only’d” — the change had been made only in the office, and there was no way my cable modem could support 5 Mbps upstream bandwidth. Making this even more obvious was the fact that the Extreme Internet plan includes wireless clients — the cable modem also acts as a wireless gateway — and the cable modem
I had didn’t have any wireless capabilities at all (I didn’t notice this discrepancy when ordering, since I was focused on the bandwidth and had no desire to replace my AirPort Extreme).
After trying two cable modems that he’d been told were new (the first had a locked wireless network named “We no speak Americano” configured on it, and the second didn’t advertise any wireless network or allow wired connections), he grew irritated and gave me one straight from a shrink-wrapped box. It worked properly and provided the full 30 Mbps downstream and 5 Mbps upstream, as you can see in my graphs below, which also show the improvements over time.
(Or, rather, it worked for about 2 hours, at which point the entire connection went down again, and I had to work my way through three levels of Time Warner phone support before I got to a guy who was able to link my fancy new cable modem to my account properly and get it all to work again. It seems clear that the Time
Warner system has some disconnects between what happens in the office and what happens in the field.)
So the moral of this story is that it’s absolutely worth using Speedtest.net (or a similar service) to check your downstream and upstream bandwidth. Performance does vary throughout the day, so be sure to run multiple tests in Speedtest.net over a number of days and at different times of day. Also be sure to test from a computer — although I like the Speedtest.net Mobile Speed Test app for testing general connectivity, its download numbers are often way too low and its upload numbers are often a bit high. Speedtest.net will keep track of your results (as you can see in the screenshots above), assuming you keep the same IP address, or you can set
up an account to ensure that your tests are collected regardless.
Once you have a pretty good sense of your average downstream and upstream bandwidth, compare that against what your Internet service provider promises you. Based on my experience, here’s what I’d advise:
- Internet plans are a bit like phone plans — they’re always changing, and there are often limited-time signup discounts — so what you signed up for a few years ago (or more) may not be the best plan that’s available to you now.
- If you decide to change plans, I recommend calling rather than using online chat, if that’s available. Online chat is fine for determining service levels and asking questions (and it eliminates issues with heavy accents from offshore phone banks), but I think it’s better to have quick interaction with someone while actually making changes.
-
While you’re talking to the rep, make absolutely certain that your cable or DSL modem will be able to handle the new service level. Be insistent on this point, and make sure that the rep understands how long you’ve had your current hardware if it’s old. Modems are generally identified by their unique MAC addresses, but there might be several such numbers on your device, so it’s worth taking pictures of all the appropriate labels ahead of time so you can read out numbers easily if requested.
-
If a tech comes to your home or office to troubleshoot problems, stick with them while they’re working and tell them whatever you can think of that might help. For instance, my house was wired with coaxial cable in the walls, and while we originally had to use it, the first tech found that it was adding interference. Relocating the cable modem to avoid the internal wiring helped with upstream bandwidth. Also ask them to check your cable’s connectors, since corrosion there can cause loss of signal.
-
Don’t let the tech leave until you have tested the connection with Speedtest.net and can prove to your satisfaction that you’re getting the promised bandwidth. Although I had two good techs, the second one grumbled that there were a number of others in the organization who did shoddy work and ended up having to be bailed out later.
-
If trenching is necessary, be certain to talk with the crew doing the work and tell them if you know where any underground wires are located. And, regardless, ask them to try to locate whatever electric, phone, invisible fence, or other wires might be buried in the trenching area, since trenching machines can slice right through existing cable with little or no indication (speaking from hard-won experience here). Personally, I plan to photograph the area and mark up the photos for future reference, now that we know what wires go where.
-
Lastly, whenever you talk with anyone from the Internet service provider, make sure to write down a case number or get contact information, so it’s easier to get back into the support queue should you need additional help. In my case, both the service level upgrade and the second cable modem swap required phone follow-ups to bring the connection back online, so be aware that such efforts might be necessary.
I certainly wasn’t expecting my Internet connection — which is generally quite reliable — to require so many phone calls and truck rolls to my house, but I’m glad I stuck with it in the end, since I appreciate actually getting the full bandwidth that I’ve been promised. It’s easy to imagine someone who’s not particularly network-savvy suffering with a lousy Internet connection, just because they don’t realize what they should be getting.
Hunting the Elusive MPAA Rating Field in iTunes
I recently had a lightbulb moment in regards to the family iPad that we let our five-year-old son use for video entertainment around our home. Rather than having to remember to manually sync his current slate of favorite videos to the iPad, I would use the Home Sharing capabilities of the iPad’s Videos app to tap into our complete library of movies and TV shows. This would save me time, prevent heartbreak from our son upon realizing that Dad forgot to sync a cherished title, and free up space on our video-bloated iPad.
First, I ensured that appropriate parental controls were set on the iPad for restricting accessible movies and TV shows to just those with family-friendly ratings (found in Settings > General > Restrictions). Then, after turning on Home Sharing for videos (Settings > Video), I opened the Videos app, tapped the newly displayed Shared pane button at the top, selected our home’s master iTunes library… and was met by Louis C.K. Not exactly the family-friendly fare I was envisioning.
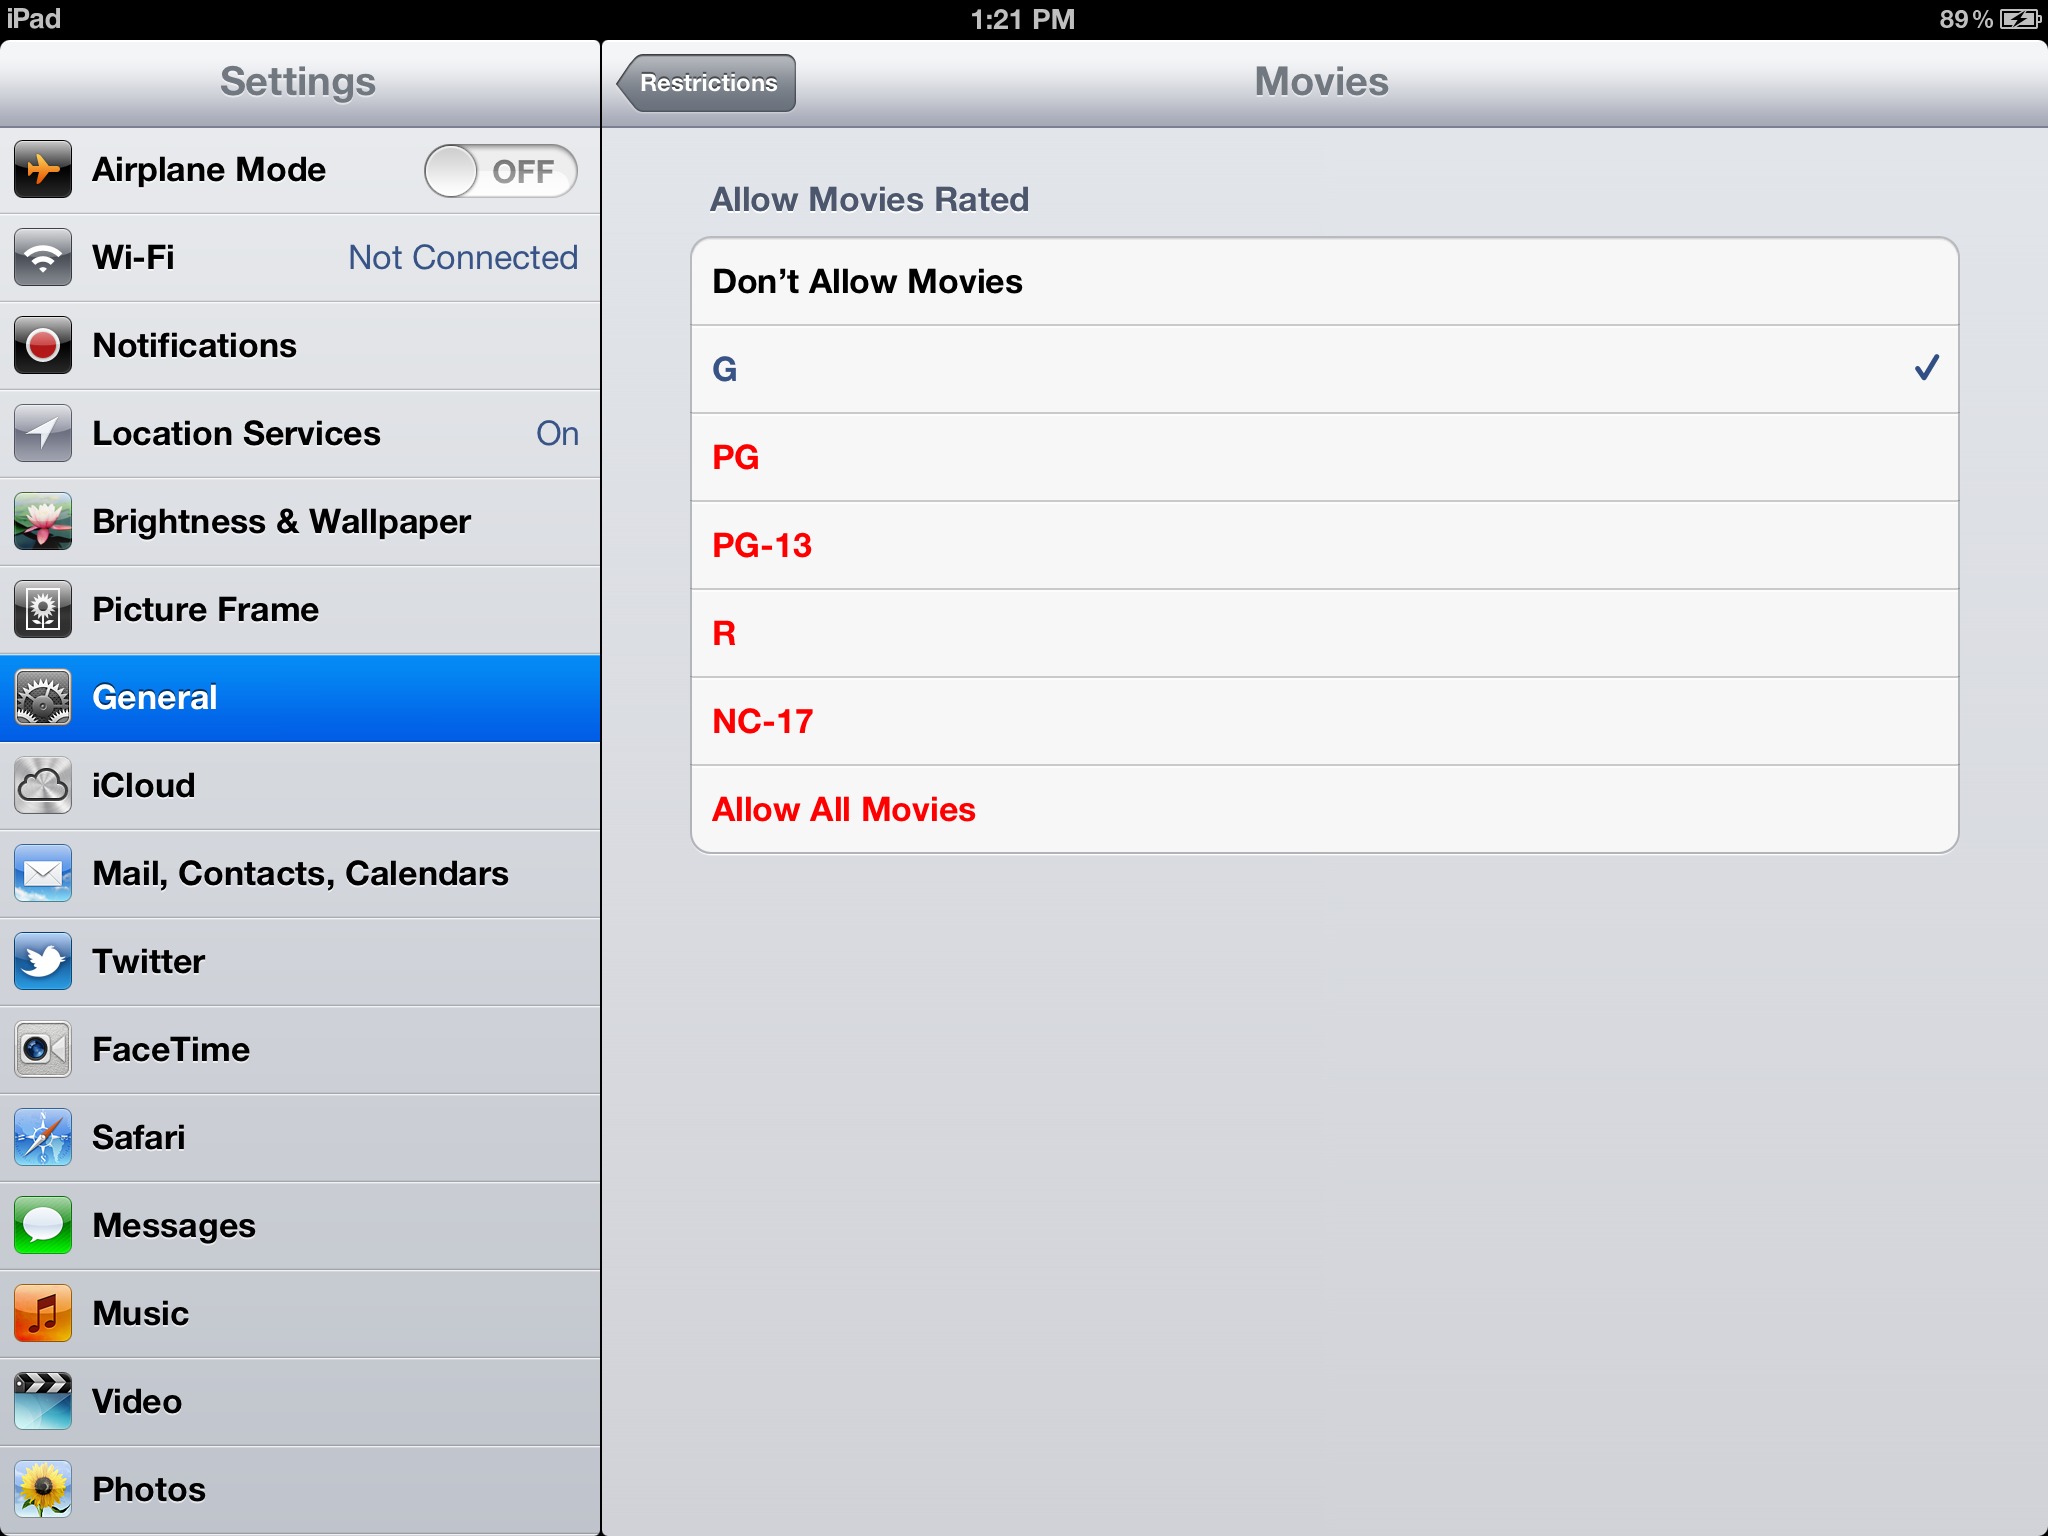
I could tell the iOS restrictions were working because several movies that we’d purchased from the iTunes Store with MPAA ratings stronger than G no longer appeared in the list, such as “Star Trek” (PG-13) and “Hot Fuzz” (R). (The MPAA rating, as bestowed upon films by the Motion Picture Association of America, is the industry standard to advise content suitability, and what you’ll see on just about every movie you see in the theater or
purchase through the iTunes Store).
However, movies that I had encoded myself from our DVD collection or purchased from other sources in an iTunes-compatible format (such as Louis C.K.’s “Live at the Beacon Theater”) were there for the watching by anyone — even with the most restrictive restrictions in place. Similarly, TV show episodes that I had encoded on my own and that didn’t include TV Parental Guidelines ratings (like the original BBC version of “The Hitchhiker’s Guide to the Galaxy”) were also displayed for viewing.
The easy solution to this would be to go into iTunes and modify the errant video files by entering the appropriate MPAA rating for movie files or TV Parental Guidelines ratings for TV show episodes. However, I was gobsmacked to discover (after hunting high and low through the Get Info metadata fields) that there’s no way to edit parental control ratings within iTunes. (There is a Ratings field, but this is used for assigning one to five stars to a video or music file to denote favorites in your library.)
In fact, the only way to determine if a video file in iTunes has been accorded a parental control rating is to view the Summary pane in the Get Info window (where the rating appears at the bottom of the left column of data), or to scan your videos using either the List or Album List views, where the rating is displayed to the right of the file’s name, still in the Name column. (If you’re in another view, such as Grid or Cover Flow, press Command-Option-3 to switch to List view or Command-Option-4 to switch to Album List view.)

I did a bit of research and found a few options in the Mac App Store that could do both encoding and metadata tagging in videos, such as iFlicks and Magic Media Marker. But because I prefer to do my video encoding with Handbrake, I settled on the well-regarded iDentify 2 shareware app from Justin
Pulsipher, as its sole purpose was tagging and I could try it for free before plunking down any cash. (While you can use the main tagging features of iDentify for free, a $9.95 donation adds a few features such as automatic file renaming and auto processing.)
While lightweight in size (it’s just 1.1 MB), iDentify is a powerful tool for managing video file metadata — but it’s restricted to just video files. If you’re interested in managing the metadata tagging in your music library, you’ll need a separate app such as Tagalicious or TuneUp. Oddly, I couldn’t find any apps that can swing both ways for video and music metadata editing.
If you’re using iDentify to add metadata to video files you’ve just encoded, I recommend using its default automatic lookup setting, which pulls tag data from three sources: The Movie DB for movies, The TVDB for TV shows, and tagChimp as a fallback. After a lookup is performed, all metadata — from title and description to genre and artwork and, yes, parental control rating — are automagically filled in. You can then adjust fields to suit your needs or add more data that was missed in the automatic lookup. When finished, click the Done Editing button to return to the file list view, then click Save to set the
metadata in the file. You can choose to add the file automatically to your iTunes library in iDentify’s preferences, or leave it unchecked to save that manual task for later.

iDentify does a good job of looking up metadata for movie files as long as the name of the file is close to the title of the movie. However, for some titles that have multiple versions (such as “Robin Hood”), you can add the correct title’s identifier from the IMDB Web site (just copy the portion of the URL that starts with “tt”, such as “tt0070608” for the Disney version of “Robin Hood”). For TV shows, it’s best to title encoded files with the season and episode numbers formatted as “S01E01”
(denoting season one, episode one) to get the best lookup returns from iDentify.
If you’re working on files that have already been added to your iTunes library, I recommend turning off the automatic lookup function (found in iDentify’s Lookup preferences under the General pane) as well as deselecting lookups for existing tags and artwork. This enables you to manually modify just the metadata that needs attention — such as parental control rating — without changing the carefully calibrated tags and artwork you’ve already put in place.
iDentify also enables you to open and edit multiple files. Add files by dragging them to the file list view from the Finder, or by clicking the Add File(s) button, Shift- or Command-selecting a set of files, and then clicking the Edit Tags button. Modify the metadata fields to taste, and save by pressing Command-S, or by returning to the file list view and clicking the Save File(s) button.
For my little project, I turned off the automatic lookup functions before opening the movie and TV show files I already had in my iTunes library, and then proceeded to apply my desired parental control ratings to the files either individually or in groups. Back on the iPad, I re-opened our main iTunes library from the Shared pane in the Videos app and found that the offending videos had indeed been correctly swept away by my selected iOS Restrictions settings.
iDentify isn’t perfect. I wish it could show more information in its file list view, and pressing Command-S suddenly closes you out of the file you’re working on (making you wonder if the work you put into editing your metadata was actually saved). But it’s a fairly easy way to get the correct metadata into new files you’ve encoded from your DVD library before adding them to your iTunes library, as well as bulk editing metadata for files already in your iTunes library. And, if you’re looking to make sure that your kids are safe from your Louis C.K. collection, it’s essential for adding MPAA and TV Parental Guideline ratings to ensure that your parental controls work as you want them to.
TidBITS Watchlist: Notable Software Updates for 16 July 2012
Microsoft Office for Mac 2011 14.2.3 — Offering a number of improvements and fixes, Microsoft Office for Mac 2011 14.2.3 more importantly resolves a security vulnerability with folder permissions in certain Office for Mac 2011 14.2 versions, which could enable an attacker to run a malicious executable and take control of your Mac. Apart from the beefed-up security, the release also improves stability in Excel when dragging to move a PivotTable row or column, improves Full Screen View integration with Word, and fixes an
issue with some SkyDrive folders displaying as zero-byte files. The update also addresses several IMAP issues in Outlook, resolving a problem where some configurations repeatedly displayed “Cannot create mailbox” errors, fixing duplication of email messages when connecting to Gmail using IMAP, and adding a setting to control the polling interval used with IMAP servers to avoid intermittent “Too many simultaneous connections” errors. (Free update through the Microsoft Web site or Microsoft AutoUpdate, 110 MB, release notes)
Read/post comments about Microsoft Office for Mac 2011 14.2.3.
iPhoto ’11 9.3.1 — While MobileMe is officially gone, Apple continues to deal with its remnants with the release of iPhoto ’11 9.3.1. The update fixes a problem with MobileMe Gallery album migration that caused photos to be moved from their original events to a new event titled “From MobileMe.” It also fixes a rare bug that caused iPhoto to hang when upgrading libraries. Remember that starting with version 9.3, iPhoto now requires Mac OS X 10.7.4 or later. ($14.99 new from the Mac App Store, free update through Software Update or the Mac App Store,
630.4 MB via Software Update or 599.65 MB via Apple’s support page)
Read/post comments about iPhoto ’11 9.3.1.
Audio Hijack Pro 2.10.4 — Offering preliminary support for OS X 10.8 Mountain Lion, Rogue Amoeba’s Audio Hijack Pro gets bumped up to version 2.10.4 with an updated Instant On component (now version 6) that improves overall system audio capture. In fact, the Instant On component is now required for capturing audio from Safari and QuickTime Player when running Mountain Lion, as well as when snagging audio from a Fluid app. ($32 new, free update, 5.2 MB, release notes)
Read/post comments about Audio Hijack Pro 2.10.4.
ExtraBITS for 16 July 2012
Two quick ExtraBITS for you this week: news of Apple withdrawing from, and then immediately rejoining, the EPEAT program for environmental stewardship; and the strange story of a Russian hacker who figured out how to trick iOS into allowing free in-app purchases.
Hacker Exploits iOS Flaw for Free In-App Purchases — Over at Macworld, Lex Friedman does an excellent job running down the strange story of a Russian hacker who figured out how to trick iOS such that users could make some in-app purchases for free. Apple should be able to fix the problem, but it’s an interesting example of the classic “man in the middle” attack because, in this case, the man in the middle is the user, rather than some bad guy.
Apple Back in EPEAT with Vague Explanation — They’re out! No, they’re back! A few days after pulling all of its products out of the EPEAT program for environmental stewardship (which put into question numerous government and institution purchases, since many of those entities require EPEAT-labeled products), Apple returns to the group’s list with a note from outgoing hardware chief Bob Mansfield. An explanation of the departure and return were not included.