TidBITS#1123/23-Apr-2012
Security continues to weigh heavily on our minds, as Mark Anbinder encourages Java and Word updates to protect against the SabPub malware, and Glenn Fleishman explains how to report text message spam to AT&T. Glenn also reviews DropKey 1.0, a new utility for Mac OS X 10.7 Lion that simplifies exchanging encrypted files. In other news, Jeff Carlson notes Adobe’s just-announced Creative Suite 6 and the new Creative Cloud, a subscription service for using Adobe applications. And Instagram may be happy about being acquired by Facebook for $1 billion, but not all Instagram users are as excited, so Agen Schmitz looks at how you can back up your Instagram photo portfolio, in case you decide to jump ship. Lastly, Adam Engst delves deeply into Android to share the best ways — Amazon doesn’t make it easy! — to download and read EPUB and PDF ebooks on a Kindle Fire. Notable software releases this week include Quicksilver ß67, LaunchBar 5.2, and Suitcase Fusion 4.
SabPub Malware Infects Unpatched Word and Java Installations
Although security-related updates sometimes introduce other problems, it is becoming all the more important to install them quickly regardless. In particular, Mac users who haven’t installed Apple’s Java updates for Mac OS X 10.7 Lion and 10.6 Snow Leopard, and users still using unpatched copies of Microsoft Word 2004 and 2008, are vulnerable to recent variants of malware. That’s the warning from Mac security firm Intego, whose VirusBarrier malware definitions dated 12 April 2012 or later can detect and remove these variants.
As we wrote in “How to Detect and Protect Against Updated Flashback Malware” (5 April 2012) and “Apple Releases Flashback Malware Removal Tools” (12 April 2012), Apple has released updates to its Java software for Lion and Snow Leopard that eliminate the Java vulnerabilities and remove the most common variants of Flashback. If you haven’t already installed the appropriate Java update for your Mac, do so immediately, or disable the Java plug-ins in your Web browsers (instructions are in the first article linked above). Disabling Java is the best solution for those using versions of Mac OS X older than 10.6 Snow Leopard.
Intego says the original SabPub malware exploited the same Java vulnerability as Flashback and “seeks to connect to remote command and control servers, presumably to harvest information on infected Macs.” A newer version of SabPub takes advantage of a vulnerability in older versions of Microsoft Word to infect Macs with the malware.
The company says unpatched versions of Microsoft Word 2004 and Word 2008 are vulnerable, but Word 2011 is not. (Microsoft fixed the vulnerability in 2009, and it’s telling that the bad guys think it’s worth trying very old vulnerabilities to infect users who haven’t kept their software up to date.) In addition, files in Microsoft Word’s current .docx format are not vulnerable, just those using the older .doc format. To be clear about what “unpatched” means, users of Word 2004 and Word 2008 who have installed the security update described in Microsoft’s Security Bulletin MS09-009 are not vulnerable. If you’re not certain if you have installed that
update, run the Microsoft AutoUpdate application, typically found in the Microsoft Office folder or the Applications folder, and allow it to install any available security updates. You may need to install multiple updates sequentially.
And, as always, be careful about opening Word documents — or any attachments, really — from unknown sources. The Quick Look feature in Mac OS X (select the file and press the Space bar) is probably a safer way to peek inside many common file types if you’re uncertain as to what the file might contain.
Adobe Announces Creative Suite 6 and Creative Cloud
After releasing some teasing public betas, notably one for Adobe Photoshop CS6, Adobe has formally announced Creative Suite 6 (CS6), a major update to its entire line of creative content applications. However, the biggest news this time isn’t new versions of Photoshop, InDesign, Illustrator, Dreamweaver, Premiere Pro, After Effects, and the rest (14 applications in all). Adobe is also announcing Creative Cloud, a subscription service that not only provides cloud storage for CS projects, but also enables anyone to use the applications for a monthly fee. (Adobe says
CS6 and Creative Cloud will be available within 30 days.)
As with previous releases, the Creative Suite will appear in a handful of bundles containing different mixes of the applications: Design & Web Premium ($1899), Design Standard ($1299), Production Premium ($1899), and Master Collection ($2599). Individual CS applications can also be ordered separately, and upgrade pricing is available, depending on which versions of the apps you currently own.
Formerly, that would be it. If you wanted the latest version, you ponied up the cash to buy it. But Creative Cloud presents an alternative. After you sign up for a subscription, you can download any of the CS apps — and others, including Lightroom 4, Adobe Muse, and Adobe Edge — and install them on your computer. The applications check in every 30 days to make sure you have an active subscription, so you don’t need a live Internet connection just to launch an application.
Creative Cloud costs $50 per month if you sign up for a full year (so, $600), or $75 per month if you want to stick to a month-to-month subscription. (Adobe is also offering introductory pricing for the first year to registered customers of Creative Suite 3 or later for $29.99 per month; you need to enter your Adobe ID to check for eligibility. Much more information is available at Adobe’s Creative Cloud FAQ.)
Creative Cloud initially looks like a good idea for freelancers or contract employees to get access to the latest CS tools without having to shell out for the full retail price of the software.
In terms of what features are new in the suite, allow me to refer you to our friends at Macworld and InDesign Secrets for in-depth coverage.
Report Text Message Spam to AT&T
If you thought your iPhone was safe from the predations of spammers, think again. Because U.S. carriers know that unhappy customers will complain to state attorneys general, the FCC, and legislators about receiving and being charged for unsolicited commercial (and often totally fraudulent) cell phone calls and text messages, mobile companies have policed such activity quite closely.
But if you’re like me — and reports indicate you are — you’ve started to receive more unwanted calls and messages in the last year. Calls are the harder of the two to deal with: AT&T and other carriers charge for a blocking service that’s quite inconvenient to use. It’s not integrated into an iPhone’s call system, for starters. AT&T’s is $4.99 per month, and lets you block only 30 numbers. Hardly a solution, although it’s meant mostly to control kids’ use of phones.
My uncle has a better solution. Create a “Sir Spam-a-Lot” entry in Contacts, and add any spam callers as alternative numbers to that entry. It’s surprising how often scammers re-use the same number. Your phone rings, shows “Sir Spam-a-Lot” is calling, and you just double-tap to send it to voicemail or ignore it. Even better, take the advice of a commenter and set a silent or extremely innocuous ringtone for the Sir Spam-a-Lot contact so spam calls and texts don’t interrupt you.
AT&T offers a way to report unwanted SMS/MMS messages, but I had to ask on Twitter for the instructions, as the steps are not obvious to those of us who don’t use SMS/MMS regularly. The free AT&T Mark the Spot app for reporting bad cell coverage or calls also includes a button for reporting SMS spam that explains, with too little detail, how to do it. Perhaps a Report This Message button in the Messages app would be abused.
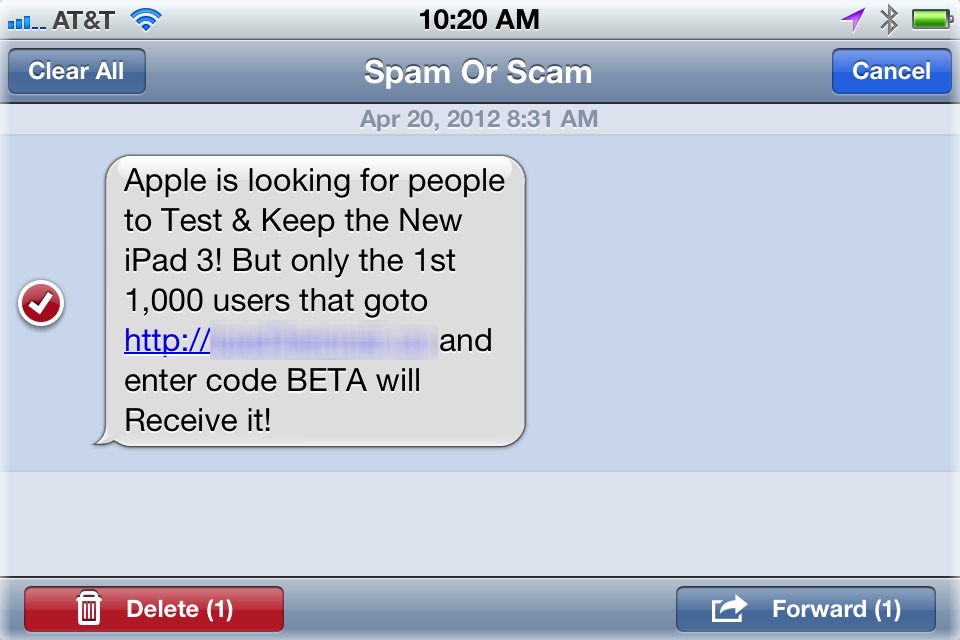
Here are the steps for AT&T. Although I only have an AT&T account, my understanding is that other U.S. carriers use the same 7726 reporting number and have similar approaches.
Note that AT&T waives all charges for reporting spam messages for those on limited messaging plans, but the company does not automatically credit you for the spam message itself. You can request a credit from AT&T customer service, but it may not be worth the effort for twenty cents. Of course, it’s not worth AT&T’s effort either, so perhaps if lots of people request credits, they’ll figure out how to provide automatic credits for reported spam messages. It’s unreasonable for AT&T to benefit financially from allowing customer accounts to be abused by spammers.
- Bring up the text message in Messages and be sure not to click any URLs embedded in the message.
- Tap Edit.
-
Tap the empty circular (radio-style) button to the left of the unwanted message. The Forward button activates.
-
Tap the Forward button.
-
Enter
7726(the numeric equivalent of the lettersSPAMon a telephone keypad) and tap Send. -
AT&T responds with a message asking you to send the number from which the message originated.
-
You can write down the number of the spam and then tap it in, but you can also use my uncle’s trick here too. Back at the spam message, tap Add Contact > Create New Contact, and either make that “Sir Spam-a-Lot” entry or tap Add to Existing Contact if you already have one. (If this number is already in an entry, tap Contact.)
-
Now tap the number that was added (or is already there in the Edit screen), tap Select All, and tap Copy.
-
Tap Done to close the Contact view.
-
Navigate back to the message you received from AT&T, tap in the Text Message field, tap Paste, and tap Send.
-
You will receive a response from AT&T that they “appreciate your assistance.”

Some of this reporting is purely in your self-interest, particularly if you pay per text or have a grandfathered limited-message plan (I still have my 2007 plan that includes 200 SMS/MMS messages per month). By reporting, you can theoretically reduce future unwanted use of your limited plan, as well as the annoyance factor of repeat spamming. But you’re also helping the world at large. If enough people constantly report text message spam, the crooks and abusers will be shut off more quickly, and we will all receive less spam.
Back Up Your Instagram Photo Portfolio
Instagram, the wildly successful photo sharing service that started as an iOS-exclusive app, launched its first Android app on 3 April 2012, and garnered 5 million Android app downloads in its first six days. But that news was a mere spark compared to the following week’s bombshell announcement of Facebook’s intent to buy Instagram for $1 billion, which briefly pushed the free iOS app to the top of the charts in the App Store the following day.
However, much like when a beloved indie band signs with a major label and subsequently alienates some of its core fan base, Instagram found some of its loyal users turning against it. Anticipating this, Facebook CEO Mark Zuckerberg used his Facebook post announcement of the deal to assuage Instagrammers that the strengths of the service would remain:
“We plan on keeping features like the ability to post to other social networks, the ability to not share your Instagrams on Facebook if you want, and the ability to have followers and follow people separately from your friends on Facebook.”
Still, many Instagram users took to Twitter (using the #instablack hashtag) to announce that they would be deleting the app, and not just because their indie darling (with 30 million users) was going corporate. It’s still unclear how Facebook will be using images captured by the Instagram app, and that fact combined with Facebook’s reputation for shifting privacy policies has fueled much of the backlash.
If you are considering deleting your Instagram account, the process is actually fairly painless. However, be warned that deactivation permanently removes all photos (as well as all comments and friendship connections). So before you pull the trigger, you’ll first want to make sure you have all the photos from your Instagram portfolio safely tucked away somewhere locally.
You may already have all of your Instagram photos in the Photos app on your iPhone or iPad depending on your Instagram preferences (found in Settings > Instagram), which can save either (or both) the original snapped image or the filtered photo. However, if you want to export a complete snapshot of your portfolio (or you haven’t been saving images to the Photos app), several third-party options can hook into your Instagram account to download the image files to your computer’s hard drive. Surprisingly, Instagram doesn’t have a Web interface that can access your photos.
Instaport Internet Tool — Recommended by Instagram in its support center, the free Instaport service (donation suggested) enables you to download your entire Instagram history in a single Zip archive. Additionally, it offers some advanced options that enable you to filter photos based on recent history or date range. It can also filter for specific hashtags, as well as other users’ photos that you’ve “liked” (though Instaport notes that the like filter is unstable).
After logging in to Instagram and allowing Instaport to access your data, choose to download a Zip archive or click Advanced Options and select your filtering method, then click the Start Export button. If you have an extensive library, the export might take some time. When it’s ready, a download link appears above your account name. If you want to try exporting photos that you’ve liked from your Instagram friends, you can repeat the process and start a new export. In my test, I got 13 photos that I recently liked — far fewer than the total that I’ve liked over my Instagram history.

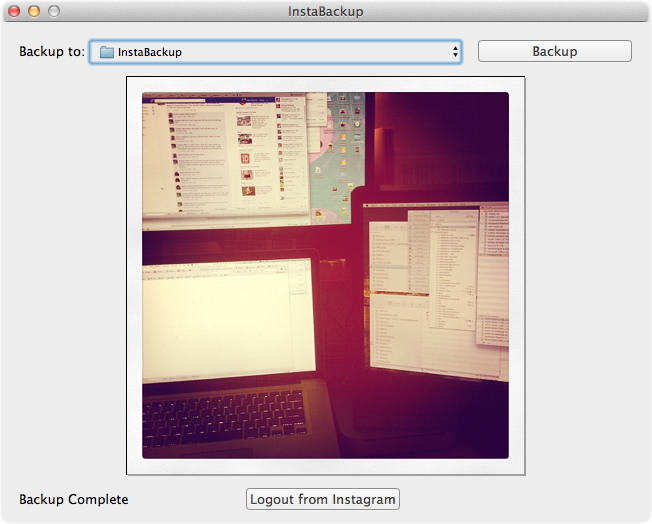
InstaBackup Mac App — David Smith’s free InstaBackup app does one thing and one thing only — it backs up the entirety of your Instagram photo library to your Mac’s hard drive. The only thing you can configure is where the photos will land (by default, it saves them to a folder on your Desktop). But it does the job simply and effectively.
InstaBackup is a good tool for all Instagrammers — whether you’re leaving the fold or staying — as it’s an easy way to create a local backup of your Instagram photos. The app compares the photos that reside in your selected backup folder with what’s in your Instagram library, and downloads only those photos that are missing (i.e., most recent photos, but also any image files you may have deleted from this directory — so make sure not to delete or move any photos or they’ll download again).
Via.me Social Network — One part Tumblr and one part Pinterest, the recently launched Via.me social publishing platform is inviting current Instagram users to port their photos into a Via.me profile. You can choose to sign up for the Via.me service from its front page using either your Facebook or Twitter login credentials, or you can create a unique Via.me login on its Instagram import page. After creating a Via.me account, sign into Instagram and authorize Via.me to access your photos. When the porting is complete, you’ll find
your Instagram photos have automagically appeared in your Via.me profile.
Note, however, that the Via.me iPhone app is frustratingly limited to accounts that have been linked to either Facebook or Twitter. Thus, if you create a Via.me account on the Instagram import page and then don’t subsequently set up links to those services in Via.me’s Account Settings page, you won’t have access to Via.me through the iPhone app.
DropKey Makes Exchanging Encrypted Files a Snap
I know what you’re thinking: you need more encryption in your life. Of course, you’re not really thinking that. No one but security wonks like me and TidBITS Security Editor Rich Mogull has any interest in the stuff that makes transactions and communications safe from snoopers. Rather, you know you want privacy and security, but you likely don’t care about the details.
A new software product, DropKey 1.0 from WellRedApps, should therefore merit your attention, at least if you’re running Mac OS X 10.7 Lion, which it requires. It’s a dead simple way to exchange encrypted files with other people without a lot of overhead or fuss in making the exchange work securely. DropKey is also secure and powerful enough that security wonks will like it, too. (Note: I offered the developers free advice while beta testing DropKey, especially about key verification, but received no compensation and have no financial or other interest in the success of the application.)
DropKey and Public Key Crypto Basics — After you install and launch DropKey, it appears as an icon in your menu bar. Click it, and a dialog reveals a drag-and-drop area into which you can put files and a space to enter recipients, who are matched from your Address Book. Other controls include a share button (the iOS-like arrow coming out of a box) for handing out your public key in various ways, and a gear icon that provides access to preferences, a key manager for viewing and verifying other people’s public keys, online help, and the Quit command.

DropKey uses public-key cryptography, which starts with a process that creates both a public key that you can share and a private key to which only you have access. DropKey stores your private key in your system keychain, and you never need to manage this at all. When someone wants to send you a file, they encrypt it with your public key, and you decrypt it with your private key. Since only you have your private key, no one else can snoop on the contents of the file. Similarly, when you send someone a
file, you encrypt it with their public key, and they decrypt it with their private key.
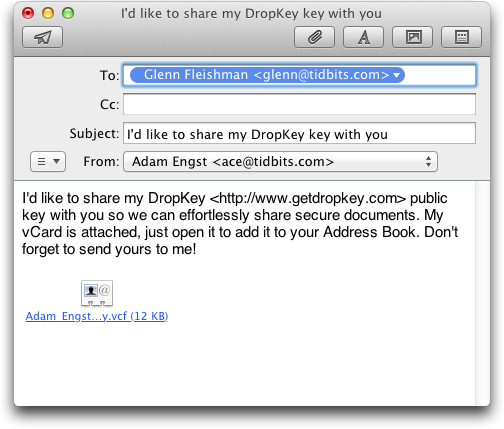
For other people to be able to send you encrypted files, they need to have your public key. DropKey stores your public key as a custom field in your personal contact record in Address Book, and it shares your public key with recipients within a vCard (.vcf) file attached to an email message created in Apple Mail. (vCard is the standard for encoding contacts for export and import; it’s what you get when you share a contact from Address Book on the Mac or Contacts in iOS.) A recipient can import your vCard (via a menu or by dragging) into Address Book, where either a new record is created, or the program prompts to merge the imported vCard with an existing entry. You likewise need the DropKey public keys from those to whom you wish to
send files. It’s a one-time hassle to exchange keys.
(A privacy warning about your personal Address Book entry: if you store data in there that you don’t want shared, you should disable the export of those private fields. In Address Book, click Edit for your entry, and then uncheck the boxes to the right of the fields you want to keep private. In general, I recommend against storing private data in your Address Book entry, but you might also consider not sharing your birthdate or partner’s name.)
If exchanging public keys is too much trouble for some reason, DropKey also offers a less-secure password mode. To use it, click the skeleton key icon in DropKey’s dialog; you’ll have to share the password with the recipient in some other fashion. The password mode also works with an unregistered copy of DropKey even after the 30-day-trial ends.
DropKey compresses the files you’ve dropped into its dialog into a Zip archive and then encrypts the archive. It can create a message in Apple Mail (click the Encrypt and Send button below the file list) in a single step, or you can set its preferences to encrypt only (or hold down Option, which changes Encrypt and Send to just Encrypt). That lets you save the encrypted archive to your hard drive, after which you can attach it to a message in any other email program, transfer it via iChat, sync it via a shared Dropbox folder, share it via Dropbox’s Public folder, or use some other means to hand it off.
DropKey Verification to Prevent Man-in-the-Middle Attacks — It’s worth pausing briefly here to note exactly what DropKey is good for, and what it’s not good for. DropKey is not a local encryption solution — while you certainly could encrypt a file locally and delete the original securely, such that the encrypted version was all that existed on your hard disk (and your recipient could do so as well), that’s not the point of the program. Instead, DropKey is designed to protect files in transit between you and a recipient, along the entire path of networks to which you’re connected and servers that might handle your message. (Using SSL/TLS in your email
program is good, but protects the communication only between your computer and your SMTP server, leaving attachments vulnerable to snoopers along the way and at the recipient’s email provider.)
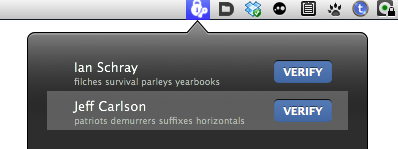
Nevertheless, public-key cryptography can still be subject to “man-in-the-middle attacks,” in which a bad guy eavesdrops on your communications and sends you his public key instead of the one that your recipient would send, presumably forging the email such that you aren’t aware of the substitution. To foil this attack, you use an “out-of-band” method to verify your recipient’s public key. For example, after you send someone your DropKey public key via email, you then make sure it’s the right key using the telephone or secure chat or even an in-person conversation — any method other than email that you feel assured is free of interception or compromise. To make this verification easier, encryption software can create a
so-called “fingerprint” that uniquely identifies a very long key with a small number of bytes. Unfortunately, fingerprint verification is rather tedious in practice.
DropKey can help here, too. WellRedApps has created a small dictionary of words that DropKey uses to let you verify just four bytes of the fingerprint. It turns those four bytes into four words that you can use for verification using any other out-of-band method, like Messages, Skype, or a normal telephone call. I confess to suggesting this idea to the developers, and it makes saying “My key verification is ‘encumbrance stake Zs chum’” rather hilarious.

In DropKey’s Key Manager, you view the entry for a person whose key you’ve received, make sure the words they tell you match, and click Verify. This is almost perfect. (You can have perfect verification only if you confirm the entire fingerprint, but while the odds of a man-in-the-middle being able to compromise this system are not zero, they are infinitesimal.)
The Key to the Future? — DropKey is a strong product, but it’s also a version 1.0. Its biggest weakness out of the gate — apart from requiring Lion in a world where many Mac users are still using Snow Leopard — is that the private key that it generates for you at launch is stored in a system keychain, and can’t easily be synced to multiple Macs. If you send and receive email on multiple machines and install DropKey on each, you will confuse senders (as they would need multiple keys for you) and be able to decrypt received files on only the machine that matches the particular key that the sender used. WellRedApps says that it is working on a better approach to
this issue. (I don’t know how many people use multiple machines for email. I use two: a desktop and a laptop.)
I also experienced some minor problems with verifying keys and decrypting files on first launch. After quitting and re-launching DropKey, these problems went away, although a few cosmetic issues with the program persist. I’ve submitted bug reports to the company, and based on past performance, I expect they will be addressed soon.
For strong encryption without burdensome management of keys, DropKey is a solid solution, and anyone who needs to share encrypted files will appreciate its ease of use — in particular, I can imagine lawyers relying on it heavily to ensure confidentiality when trading drafts of legal documents back and forth with clients, so long as they’re all Lion users.
DropKey will retail for $29.99, but WellRedApps is offering a $19.99 introductory offer for a limited (but unspecified) time, both directly and from the Mac App Store. There’s also a free 30-day trial version that you can get from WellRedApps (since Apple refuses to allow trial versions in the Mac App Store). In a particularly welcome move, when you purchase a copy of DropKey directly from WellRedApps, you also get a coupon for a free second license, since it’s impossible to use DropKey without someone with whom you can exchange files. Those who purchase from the Mac App Store can contact WellRedApps at support@wellredapps.com to receive the coupon for the free second license.
How to Download EPUB, PDF, and Mobipocket to the Kindle Fire
It’s almost hard to remember, but when it came out, iBooks could read only EPUB files, not PDFs, and the only way to load them was by syncing with iTunes. Over a number of releases of both iBooks and iOS, Apple finally arrived where we are now, where you can load ebooks (purchased or downloaded outside the iBookstore) into iBooks from Safari, Mail, and any other iOS app with the necessary document copying support. From our perspective as publishers trying to make our ebooks available to iOS users, support for Web-based downloading was the most important, since it enabled us to let users download ebooks from their Take Control accounts.
But what about the Kindle? Until the release of the Android-based Kindle Fire, the only way to load ebooks purchased or downloaded outside Amazon’s Kindle Store was via a manual Finder copy to a USB-connected Kindle. The E-Ink versions of the Kindle are remarkably limited in their capabilities beyond actually reading a book (they do have Web browsers, but good luck actually using one for anything beyond the simplest of pages), but the Kindle Fire has an entirely acceptable Web browser and touch interface.
So that raises the question of how Kindle Fire users will interact with our ebooks. The most obvious answer, as with the iBookstore, is that many of our titles can be purchased from the Kindle Store. But it’s hard for us to recommend that because we make vastly less for each copy and because it’s difficult or impossible for readers to create Take Control accounts, get their ebooks in different formats, learn about and download free updates, and get discounts on new editions.
If you’re a Kindle Fire user, then, you have three basic options: download our ebooks to your computer and copy them to the Kindle manually, download them to the Kindle directly and perform some magic to move them into the proper location, or send them to your Kindle via email. Muddying the issue is the fact that while the Kindle Fire prefers the Mobipocket format, it can also open PDFs and, with some more effort, EPUBs.
Get a New Reader — First off, let’s make sure you can read all three major ebook formats: EPUB, PDF, and Mobipocket. The Kindle Fire handles Mobipocket and PDF internally (it’s actually a Kindle app that’s doing the work), but for EPUB, you’ll need another app. Plus, although the Kindle app can open PDFs, it doesn’t support PDF links, so I recommend using another app for PDFs. Luckily, there are Android ebook reading apps that can read both EPUB and PDF files, with full support for internal PDF links and many other features beyond what the Kindle app can do.
I tried a number of these apps, and ended up settling on Aldiko Book Reader, which is free, does a good job rendering both EPUB and PDF, supports internal links, and makes it easy to access downloaded or copied ebooks. A close second was Mantano Reader, whose ad-supported free version had essentially the same feature set (there’s also a $4.99 premium version that drops the ads). Bluefire, which also has an iOS version (see “OverDrive, Bluefire, and the EPUBlic Library,” 18 February 2011), works well for reading, but
requires serious hoop jumping to import downloaded ebooks.
Getting Aldiko Book Reader onto your Kindle Fire takes some effort. In a protectionist move that puts even Apple to shame, Amazon prevents EPUB reading apps from being accessed from the Kindle Fire, even though the company allows EPUB reading apps to be in the Amazon Appstore for Android for other devices. Plus, the Kindle Fire isn’t compatible with Google Play (previously known as the Android Marketplace), so I was unable to get Aldiko Book Reader from there (though at least one commenter was). But since Android is much less locked down than iOS, you can install anything you can download, as long as you run through these steps first:
- Tap the gear button in the upper right corner of the screen to access the Kindle Fire’s settings.
- Tap More > Device.
-
Turn on Allow Installation of Applications From Unknown Sources.
(A brief aside: Given the prevalence of malware in Android apps acquired through “alternative markets,” I strongly recommend you turn that setting back off after you install Aldiko Book Reader. And if you do want to install other apps not available from the Amazon Appstore for Android, go directly to the company in question and avoid random app stores that might come up with a simple search.)
Luckily, Aldiko Book Reader is relatively easily downloaded from the company’s Download page using the Kindle Fire’s Web browser; just enter your email address in the field and click the Grab It button. (When I did this, I got an error about the server not being able to send me email, but it provided a link to download directly, which worked fine — zoom in on the page and tap and hold on it if you have trouble tapping it.) Then tap the Menu button at the bottom of the screen, tap Downloads in the pop-up button menu, and tap aldiko-standard-200160.apk (or whatever yours ends up being called) to install Aldiko Book Reader.
For the most part, opening a book in Aldiko Book Reader is self-explanatory — from its main screen, tap Shelf View or List View to see your loaded ebooks, or tap Files to show the Kindle Fire’s file system and open or import ebooks from any local location. Reading is similarly obvious: tap on the right or left side of the screen to page forward or backward, or swipe left or right. However, two tips will improve your experience:
- While reading an EPUB book, tap Menu > Settings > More and turn off Advanced Formatting so the publisher’s styles and formatting are honored. (Obviously, this is optional, but in my admittedly biased opinion, our ebooks look better when our styles are honored.) This is a global setting and will be remembered.
-
When tapping links in Aldiko Book Reader (and this was true in other apps I tried as well), you have to be a little careful, since a tap on the screen generally brings up controls. My experience was that very quick, light taps worked the best for following links without invoking the control display.
With that done, the next question is, how do you get a book into the Kindle Fire, either to read in its native Kindle app (for Mobipocket files) or in Aldiko Book Reader (for EPUB and PDF)? There are three approaches: direct USB transfer from a Mac or PC, direct downloading via the Kindle Fire’s Web browser, and email via the Kindle Personal Documents Service.
Load Ebooks via USB — Copying an ebook to the Kindle Fire via a USB cable is simple, but it does require that you have access to a Mac or PC and a micro-USB cable. Assuming both of those are true, follow these steps:
- Connect the Kindle Fire to your computer with the micro-USB cable. If necessary, wake the Kindle Fire up and swipe the slider to get to the page that tells you that you can transfer files. Once the Kindle Fire is properly mounted as a USB disk, you’ll see it in the Finder window sidebar, under Devices, as KINDLE. Click it to view the Kindle Fire’s file system.
-
Open a second Finder window, and navigate to wherever you keep the ebooks you want to copy to the Kindle Fire.
-
Drag the desired ebook to the desired spot in the Kindle file system. Where it goes depends on the file type and how you plan to read it.
- Mobipocket: Drag the file to
KINDLE/Documentsto have it appear in the Docs page in the Kindle Fire’s home screen. You can also drag Mobipocket files toKINDLE/Books, but they will still appear in the Docs page, not the Books page. Copying files to the Books directory goes against Amazon’s instructions; presumably Amazon wants it to hold only purchased ebooks. (Technically, you can put a PDF file inKINDLE/Documents, but then tapping it will open it only in the Kindle app, which isn’t nearly as good a PDF reader as Aldiko Book Reader.) -
EPUB and PDF: Although some ebook reader apps (notably Bluefire) have a special import directory, Aldiko Book Reader can load EPUB and PDF files from anywhere in the Kindle Fire’s file system (at least the user-writable space). So, it doesn’t matter where you copy the files, but for sanity’s sake, I recommend you put them in the
KINDLE/eBooksdirectory that Aldiko Book Reader creates.
- Mobipocket: Drag the file to
-
Click the eject button in a Finder window’s sidebar, and tap the Disconnect button on the Kindle Fire’s screen.
-
If you’re copying files for use in the built-in Kindle app, you’re done. Mobipocket and PDF files copied to the Documents directory appear in the Docs page and can be opened in the Kindle app from there.
-
If you’re copying files for use in Aldiko Book Reader, one more set of steps is necessary:
- In the Apps page, launch Aldiko Book Reader and tap the Files button on the main screen to view the Kindle Fire’s file system.
-
Navigate into the eBooks directory.
-
Tap a book and tap either Open or Import to open it temporarily or import it permanently into Aldiko Book Reader’s library.
Either way, the file remains in the eBooks directory, so if you import it, you may want to delete it from the eBooks directory later.
Load Ebooks via the Web — Downloading an ebook from the Web requires a slightly different approach, because although the Kindle Fire’s Web browser can download files of any type, they end up in KINDLE/Download, and the Kindle app is inexplicably incapable of opening even Mobipocket files from the browser’s Downloads page. So, if you’re downloading Mobipocket files to read in the Kindle app, follow these steps after you have downloaded one or more files.
- Tap Apps on the Kindle Fire’s home screen, then tap Store to go into the Amazon Appstore for Android.
-
Search for “File Expert” (it’s a free file management app that lets you browse and manipulate files on the Kindle Fire — a radical concept for iOS users!). When you find it, tap the Free button, and, once it morphs, the Get App button.
-
Once File Expert has downloaded, tap the Open button (or just open it from the Apps page like any other app). File Expert displays a list of top-level collections.
-
Tap Folders > SD Card > Download and tap and hold on the file you want to work with. A File Operations dialog appears.
-
Tap Cut (you’re going to move the file), tap the Back button at the bottom of the screen to navigate up a level in the file system, tap Documents, and tap Paste. File Expert moves the file from the Download directory to the Documents directory.
-
Return to the Kindle Fire’s home screen, tap Docs, and see if the file you just moved appears. If it doesn’t (it didn’t in my tests), restart your Kindle Fire by pressing and holding the physical Sleep button for several seconds, tapping the Shut Down button, and then pressing the Sleep button again to power up the device.
(Honestly, I was shocked that this restart was necessary, but apparently the Kindle Fire’s interface software isn’t smart enough to detect file system changes that take place behind its back — in other words, that don’t occur via Amazon’s preferred direct USB method.)
Luckily, thanks to Aldiko Book Reader’s capability of opening or importing files from any directory on the Kindle Fire, none of this fuss is necessary for downloaded EPUB and PDF files. Instead, follow these steps after downloading the files:
- Launch Aldiko Book Reader.
-
Tap the Files button on the main screen to view the Kindle Fire’s file system.
-
Navigate into the Download directory and tap a book to open it (for a quick peek) or import it (for repeated reading) into Aldiko Book Reader’s library.
Either way, the file remains in the Download directory, so if you import it, you may want to delete it from the Download directory later, which you can do from either File Expert or the browser’s Download page.
Load Ebooks via Email — This final approach — email via Amazon’s Kindle Personal Documents Service — works only for a small set of file formats, including Mobipocket and PDF, but not EPUB. Though there is a fee for sending documents to E-Ink Kindles that rely on Whispernet, Wi-Fi-based transfers, which are all that are possible on the Kindle Fire, are free.
There are other requirements too. Email attachments must be sent from an address you have added to an approved list, must be sent to your special kindle.com email address (it’s listed in the Kindle Fire’s Docs page), must be less than 50 MB, and must be in one of the following formats (note the lack of EPUB). And you can send no more than 25 attachments at once.
- Documents: AZW, TXT, PDF, MOBI, PRC, DOC, DOCX
- Audio supported within Music: MP3, DRM-free AAC, MIDI, OGG, WAV
- Images: JPEG, GIF, PNG, BMP
- Video: MP4, VP8
Mobipocket and PDF files that you send to your Kindle Fire via email show up in the Documents directory and appear in the Docs page. Unsupported file formats like EPUB are dropped in transit — they never arrive on the device, and Amazon sends you email telling you that they’re not accepted.
To read a PDF sent to a Kindle Fire via email, assuming you’re using Aldiko Book Reader, just navigate to the Documents directory and open or import the file as you would a document loaded in any other fashion.
[Update: The day after this article was published, Amazon released the Send to Kindle app for the Mac. It’s an easy-to-use interface to the Kindle Personal Documents Service that enables you to send a file to your Kindle Fire by dropping it on Send to Kindle’s Dock icon or main window, by Control-clicking a file and choosing Services > Send to Kindle, and by printing to Send to Kindle (as a PDF). Like the email interface to Kindle Personal Documents Service, the app supports only a small set of file formats, including PDF, but not EPUB. Although Amazon doesn’t acknowledge this, Mobipocket files also work. Files end up in the Documents directory and appear in the Docs page. In short, Send to Kindle is useful for transferring Mobipocket files into your Kindle Fire, but isn’t useful for EPUB, nor for PDF if you want to use Aldiko Book Reader. -Adam]
Final Recommendations — Some publishers restrict themselves to certain formats, but if you have a choice, as you do with our Take Control ebooks, I recommend that you standardize on the EPUB format and Aldiko Book Reader (or some other competent EPUB reader).
When comparing with Mobipocket, I prefer EPUB because it’s more likely that a publisher will convert an EPUB to get a Mobipocket file (that’s what we do). As a result, the Mobipocket versions of ebooks may suffer from conversion artifacts and other issues.
When comparing with PDF, I also prefer EPUB because PDF is not a reflowable format, and the small screen of the Kindle Fire makes reading a full-page PDF an effort unless you have extremely good vision. You can zoom in, of course, but then it’s more difficult to navigate around in the PDF.
Regardless, though, with the instructions here, you should be able to use your Kindle Fire to access and read any DRM-free ebook you want, in EPUB, PDF, or Mobipocket format.
TidBITS Watchlist: Notable Software Updates for 23 April 2012
Quicksilver ß67 — The resurrected Quicksilver utility lives to launch another day with an update to version ß67. It has a smattering of additions and improvements, including monitoring of running applications and processes in real time, improved catalog search speed, and rejiggering and simplification of preferences. But ß67 is largely a maintenance release that squashes a number of bugs, including a fix for “odd behavior” when grabbing multiple items in the Finder, correct resolution of wildcards in paths and restoration of docked panels, and putting a stop to duplicating objects in the catalog when added to the object history.
(Free, 2.4 MB, release notes)
Read/post comments about Quicksilver ß67.
LaunchBar 5.2 — Objective Development has released LaunchBar 5.2 with a vast number of improvements and fixes to the keyboard launching utility. You can now create calendar entries without iCal running as well as specify multiple alerts (separating each one with a space). It also offers improved performance with iTunes, including playback from large iTunes libraries, compatibility with iCloud remote tracks and iTunes Match, and improved detection of classical genres. The update improves the Recent Items list to include browsed folders, adds invoked text actions to the text input history for use in subsequent text
actions, uses the Spotlight index for retrieving the locations of all installed applications, and retains the menu bar display of the currently active application when LaunchBar is opened via hotkey. The release also fixes placement of the LaunchBar window in fullscreen mode, ensures the bar opens when switching to LaunchBar via Command-Tab, corrects an issue with displaying search results when the LaunchBar window is positioned at the bottom of the screen, and more. LaunchBar 5.2 now requires Mac OS X 10.6 or later (but LaunchBar 5.1 remains available for those running an older version of Mac OS X). ($35 new with a 20-percent discount for TidBITS members, free update, 2.1 MB, release notes)
Read/post comments about LaunchBar 5.2.
Suitcase Fusion 4 — Font management utility Suitcase Fusion from Extensis has been updated to version 4 with a wealth of new features. It introduces the Extensis Font Panel to Adobe InDesign, Illustrator, and Photoshop, enabling you to activate fonts on the fly. Additionally, WebINK users can use the Font Panel in Photoshop to create design comps and previews using WebINK fonts. An auto-activation plug-in has been added for Adobe InCopy CS4, CS5, and CS5.5, ensuring that shared InDesign documents will display the same fonts. Other additions include the capability to set font and background colors used in the
Previews pane, easier selection of fonts for grouped sets and favorites, display of both PostScript font names and font names as they appear in your app’s Fonts menu, and free access to over 500 font families from Google Web Fonts. ($99.95 new, $49.95 upgrade from previous versions, 63 MB, release notes)
Read/post comments about Suitcase Fusion 4.
ExtraBITS for 23 April 2012
Two quick bits this week: Michael Cohen’s Tech Night Owl Live podcast appearance to discuss the antitrust lawsuit against Apple and major publishers, and an Apple promotion that gives copies of Snow Leopard away to Leopard-using MobileMe holdouts.
Ebooks and the DOJ Suit on the Tech Night Owl Live — On the Tech Night Owl Live podcast, host Gene Steinberg and TidBITS contributor and Take Control author Michael E. Cohen discuss the Department of Justice’s price-fixing lawsuit against Apple and five major publishers and consider what it may mean for the future of ebook publishing.
Free Copy of Snow Leopard for Leopard-Using MobileMe Holdouts — Thanks to Macgasm for pointing out that Apple is now giving away free DVD copies of Mac OS X 10.6 Snow Leopard to MobileMe users still running on 10.5 Leopard. This is to aid those users in making the jump to 10.7 Lion (which must still be purchased from the Mac App Store for $29.99) and thus iCloud before MobileMe’s 30 June 2012 shutoff date. Of course, a copy of Snow Leopard won’t help those still using PowerPC-based Macs, which can’t upgrade past Leopard, but if you’ve simply been
dragging your feet, this is a nice enticement to make the switch.