TidBITS#1200/18-Nov-2013
Apple has released iOS 7.0.4 and iOS 6.1.5 to fix issues with FaceTime calls, but note that the iOS 6.1.5 update is only for the fourth-generation iPod touch. The tiny Doxie Flip flatbed scanner has hit the market, but what could you possibly use it for? To Michael Cohen’s surprise, quite a bit, actually. If you haven’t started working with Finder tags in OS X 10.9 Mavericks, Josh Centers offers a detailed guide on how to create, apply, and manage them. TidBITS members take note — we’ve just published Chapter 4 of “Take Control of Apple TV,” which describes all of the Apple TV’s built-in content options. Josh wraps up the issue with the latest installment of FunBITS, in which he looks at Bitstrips. What the heck are Bitstrips, how do you create them, and how do you get them off your Facebook news feed? Notable software releases this week include Mellel 3.2.7 and Keyboard Maestro 6.3.
iOS 7.0.4 and iOS 6.1.5 Fix FaceTime Calls
Apple has released iOS 7.0.4 to fix an issue that caused FaceTime calls to fail for some users, as well as the usual, unspecified “bug fixes and improvements.” On the security side, Apple also beefed up the enforcement of purchase authorization, since it was possible for a signed-in user to complete a transaction without providing a password when prompted. You can download the 17 MB update in Settings > General > Software Update.
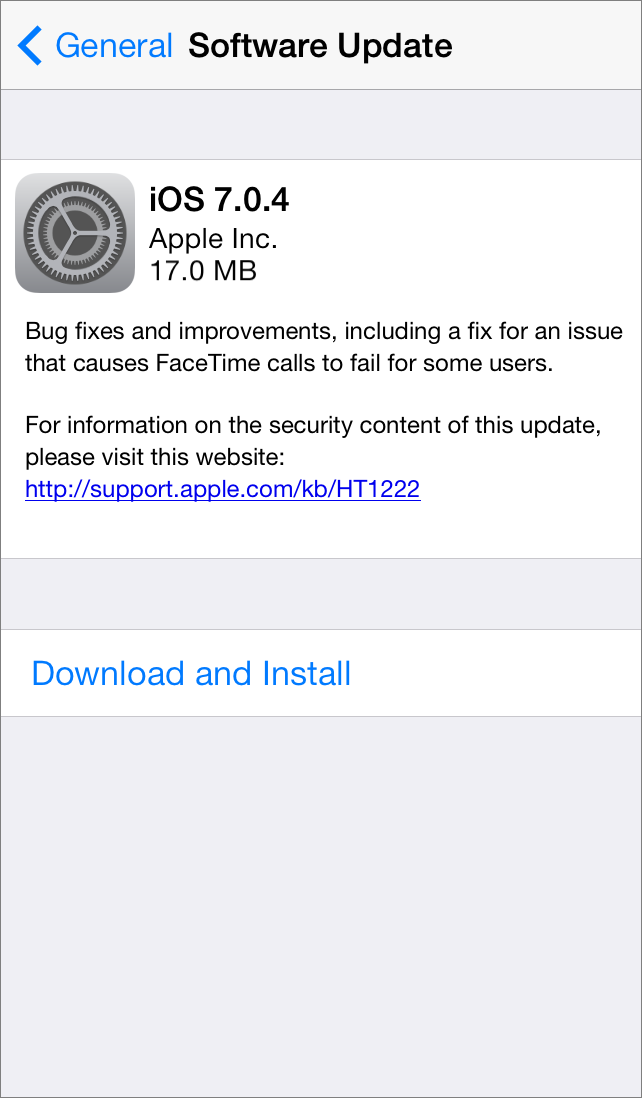
Interestingly, Apple has also updated iOS 6, which you can no longer install (see “Lion and Mountain Lion Still Available, Unlike iOS 6,” 25 October 2013), to iOS 6.1.5 to address FaceTime issues. However, iOS 6.1.5 is specific to the fourth-generation iPod touch — no other iOS 6 devices will be offered the update.
See any new feature or other changes in these updates? Let us know in the comments!
Chapter 4 of “Take Control of Apple TV” Available
Although iTunes content is front and center in the Apple TV’s interface, Apple offers lots to watch from numerous other sources as well, some of which may be a better deal than renting or buying from the iTunes Store. In Chapter 4, “Discover What’s on Offer,” of “Take Control of Apple TV,” Josh Centers provides capsule descriptions of each of the Apple TV’s current “apps,” which provide movies, TV shows, sporting events, concerts, music videos, news, weather, and even your home movies. It’s not all video, though, since you can listen to your music from iTunes via the Apple TV, plus enjoy iTunes Radio and podcasts. And if you want something showing on screen while
you’re rocking out, or just want to share your vacation pictures with friends, the Apple TV can access your photos from iCloud and Flickr.
One note. As we progress in the book, you’ll start to see links to future chapters where certain topics are explained in more detail. Since that text hasn’t yet been published online, the links won’t work, and will appear just in italics for now.
As with Chapter 3, “Control Your Apple TV” and Chapter 2, “Set Up Your Apple TV,” this chapter is available for free, but only to TidBITS members; everyone is welcome to read Chapter 1, “Introducing Apple TV,” to see what Josh plans to cover. Please leave comments — we’re already planning tweaks based on questions readers have asked! Everyone will be able to buy the full ebook in PDF, EPUB, and Mobipocket (Kindle) formats once it’s complete, and TidBITS members can save 30 percent on this and all other Take Control titles.
Publishing this book in its entirety for TidBITS members as it’s being written is one of the ways we thank TidBITS members for their support. We also hope it encourages those of you who have been reading TidBITS for free for years to help us continue to bring you carefully considered, professionally written and edited articles each week (for more details, see “TidBITS Needs Your Support in 2013: Join Our Membership Program,” 17 December 2012).
Cute Doxie Flip Scanner Has Its Uses
I received a review unit of the new Doxie Flip scanner just as MacTech was kicking in (see “MacTech Conference 2013 Abounds with Networking and Fun,” 11 November 2013), so I put the unopened box aside until this week. I hadn’t read about the device and didn’t know anything about it at all, which might explain why I was puzzled when I opened the box.
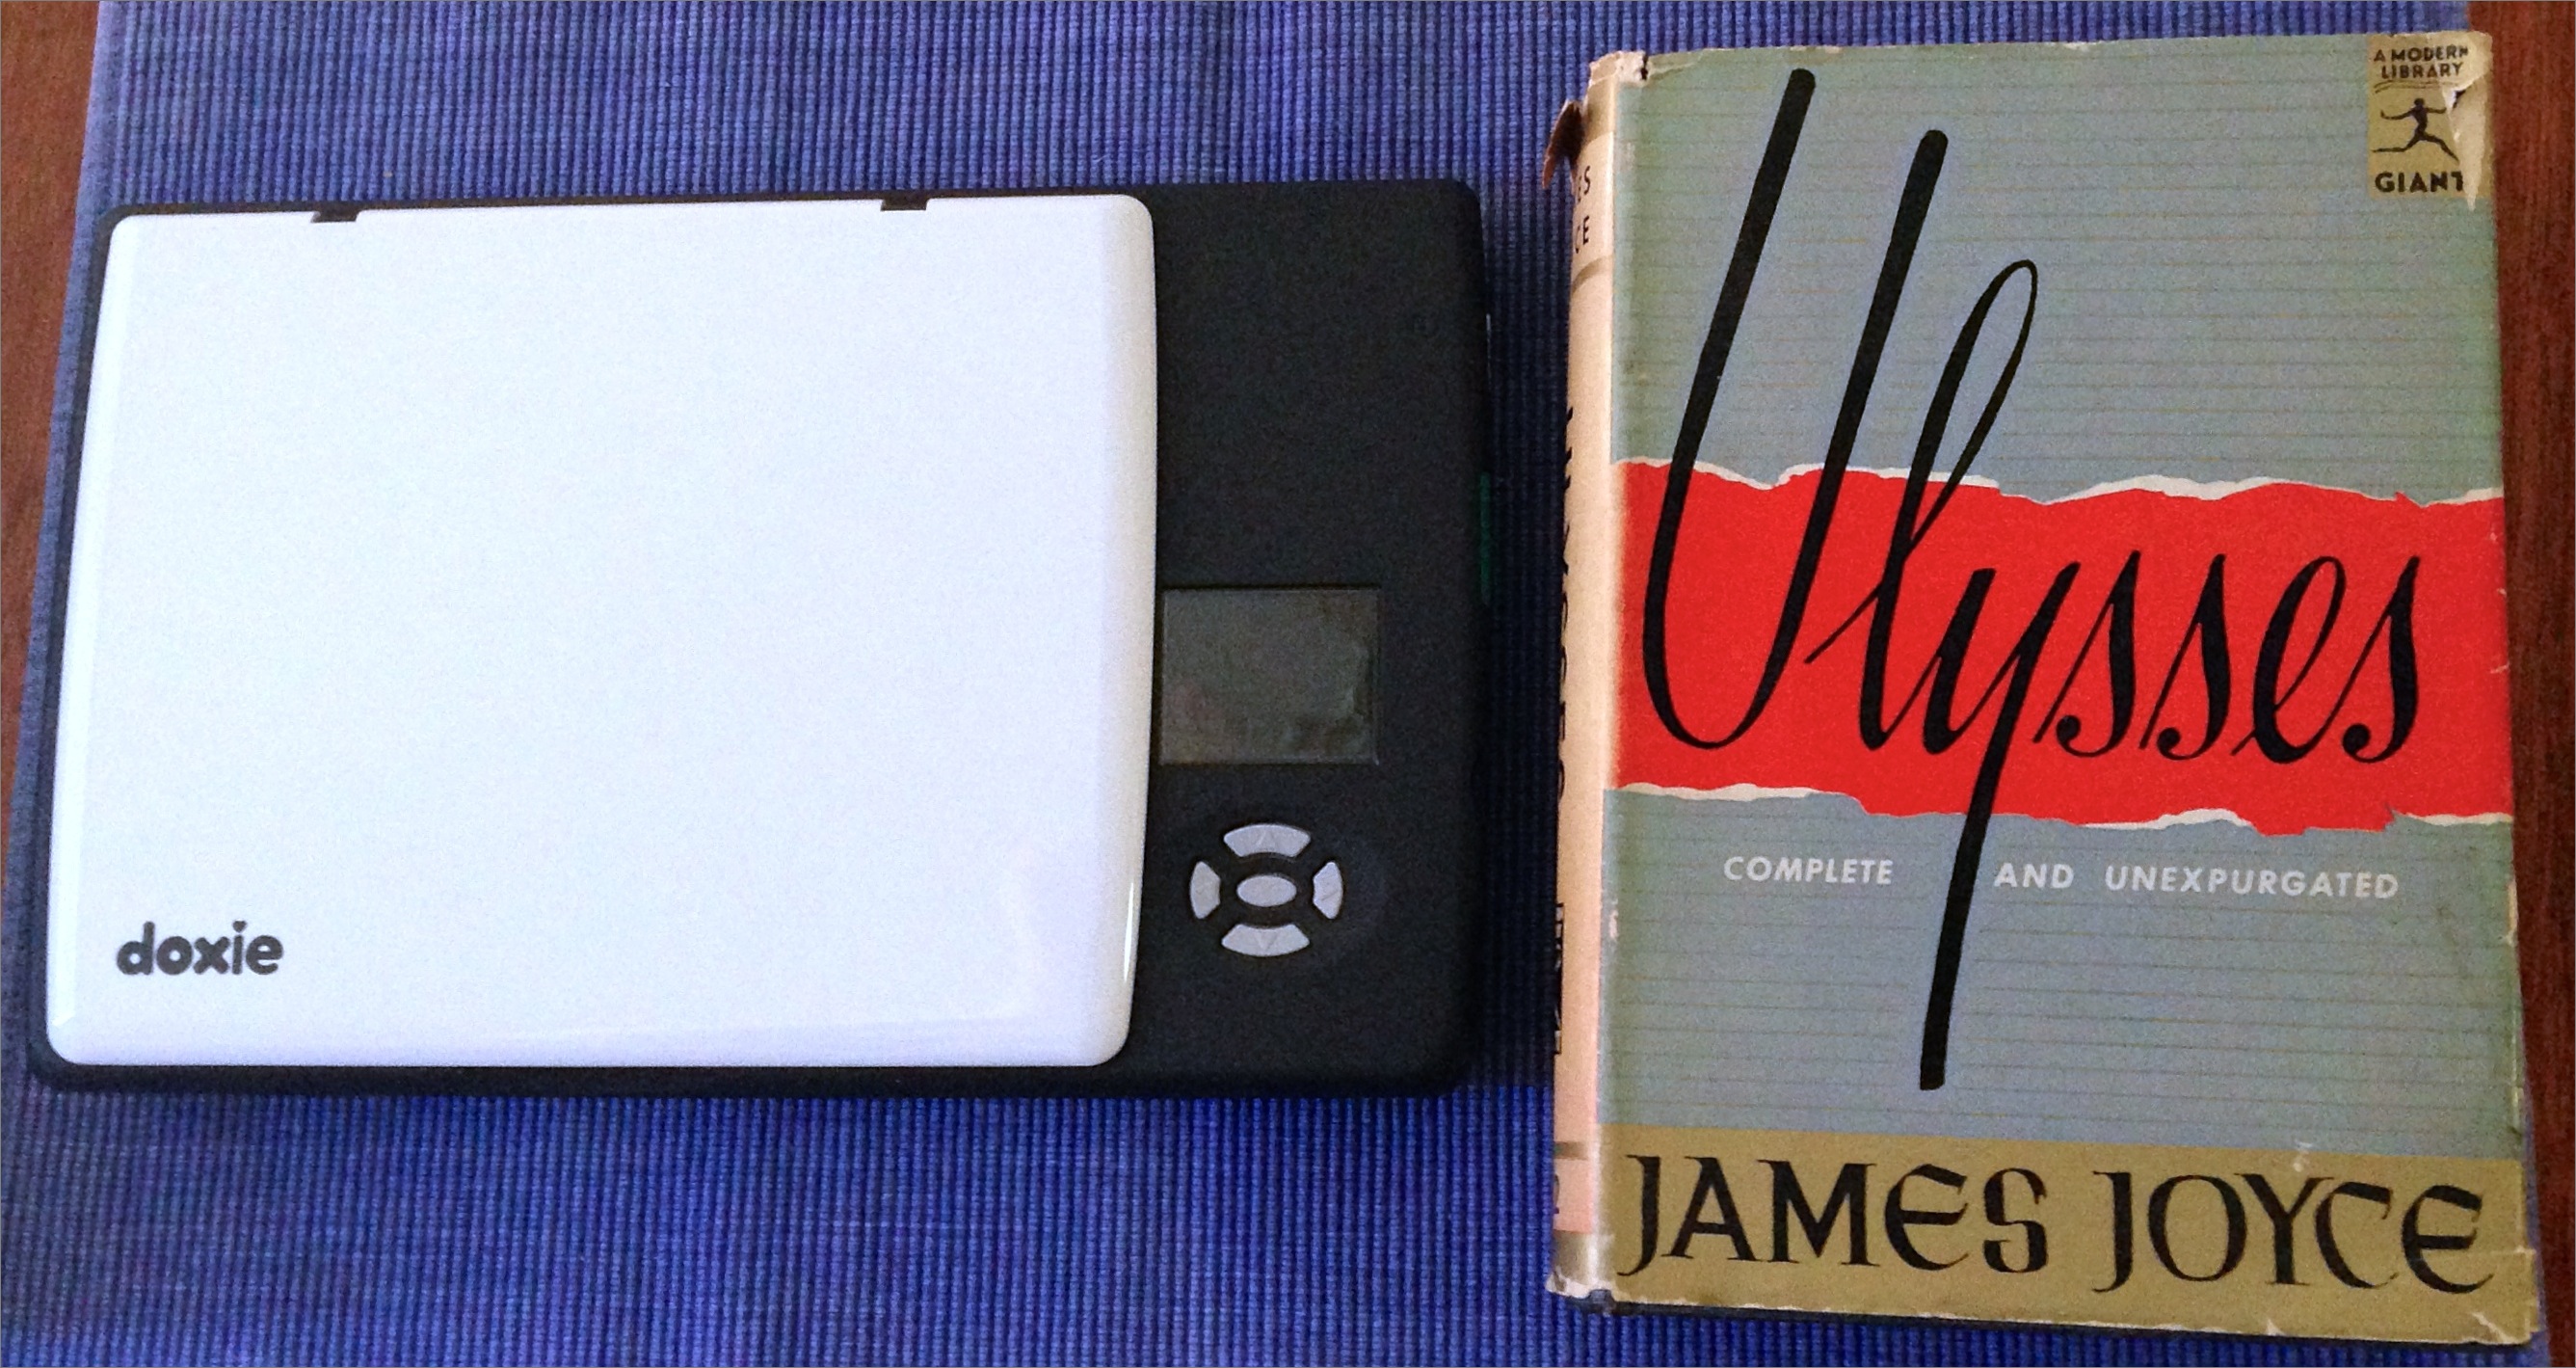
Inside, I found something that looks like a child’s toy version of a flatbed scanner, fabricated from white and black plastic with no sharp edges, and no bigger than a hardcover book. The scanner bed itself is only 4 x 6 inches (10.2 x 15.2 cm), less than half the size of a grown-up flatbed scanner. And, like a toy, it even runs on four AA batteries (but you know it’s for adults, though, because the batteries were included).
I sent a rather curmudgeonly email message to my TidBITS colleagues: “For the life of me, I can’t figure out a single practical use case for it: it’s not great for scanning bills and forms (they’re too big), or business cards (overkill: the scanner is too big). Anybody have an idea why someone would want such a thing? I’m baffled. I suppose it could scan one’s grandmother’s collection of recipes on 3-by-5 cards, but beyond that…”
Fortunately, the universe delights in making me feel like an idiot (thanks, universe!). Less than an hour after writing that message, I got a call from a less-than-tech-savvy friend of mine: he needed help organizing the various medications he needed to give his ailing wife and was buried under a bunch of handwritten notes that needed to be transcribed into a word processing document and set into some sort of order. I thought, “What the heck?,” packed the Doxie Flip into the optional lightweight carrying case that had been shipped with the review unit, and drove up into the hills where he lived. Within a few minutes I had scanned all his notes: no computer necessary, since the Flip comes with a 4 GB SD card, suitable for capturing
over 2,000 scans at 300 DPI resolution.
Back at home, I popped the SD card from the scanner into my iMac, downloaded the Doxie software, and imported the scans. A half hour later, I had transcribed his handwritten notes into a convenient set of tables and sent them back to him via email.
Then, another friend, who was planning her Thanksgivukkah feast (an occurrence that reportedly won’t roll around again for another 77,000 years), wrote me to ask if I could send her a latke recipe from a battered 50-year-old paperback cookbook of mine, Sara Kasdan’s “Love and Knishes.” Instead of taking a photo, I flipped the Doxie over and laid it on the page in question: you can pop the scanner cover
off, lay the scanner bed right on the thing you want to scan, and adjust the alignment by looking right at it through the clear plastic window on the bottom of the Flip — it even has alignment guides embossed in the window.
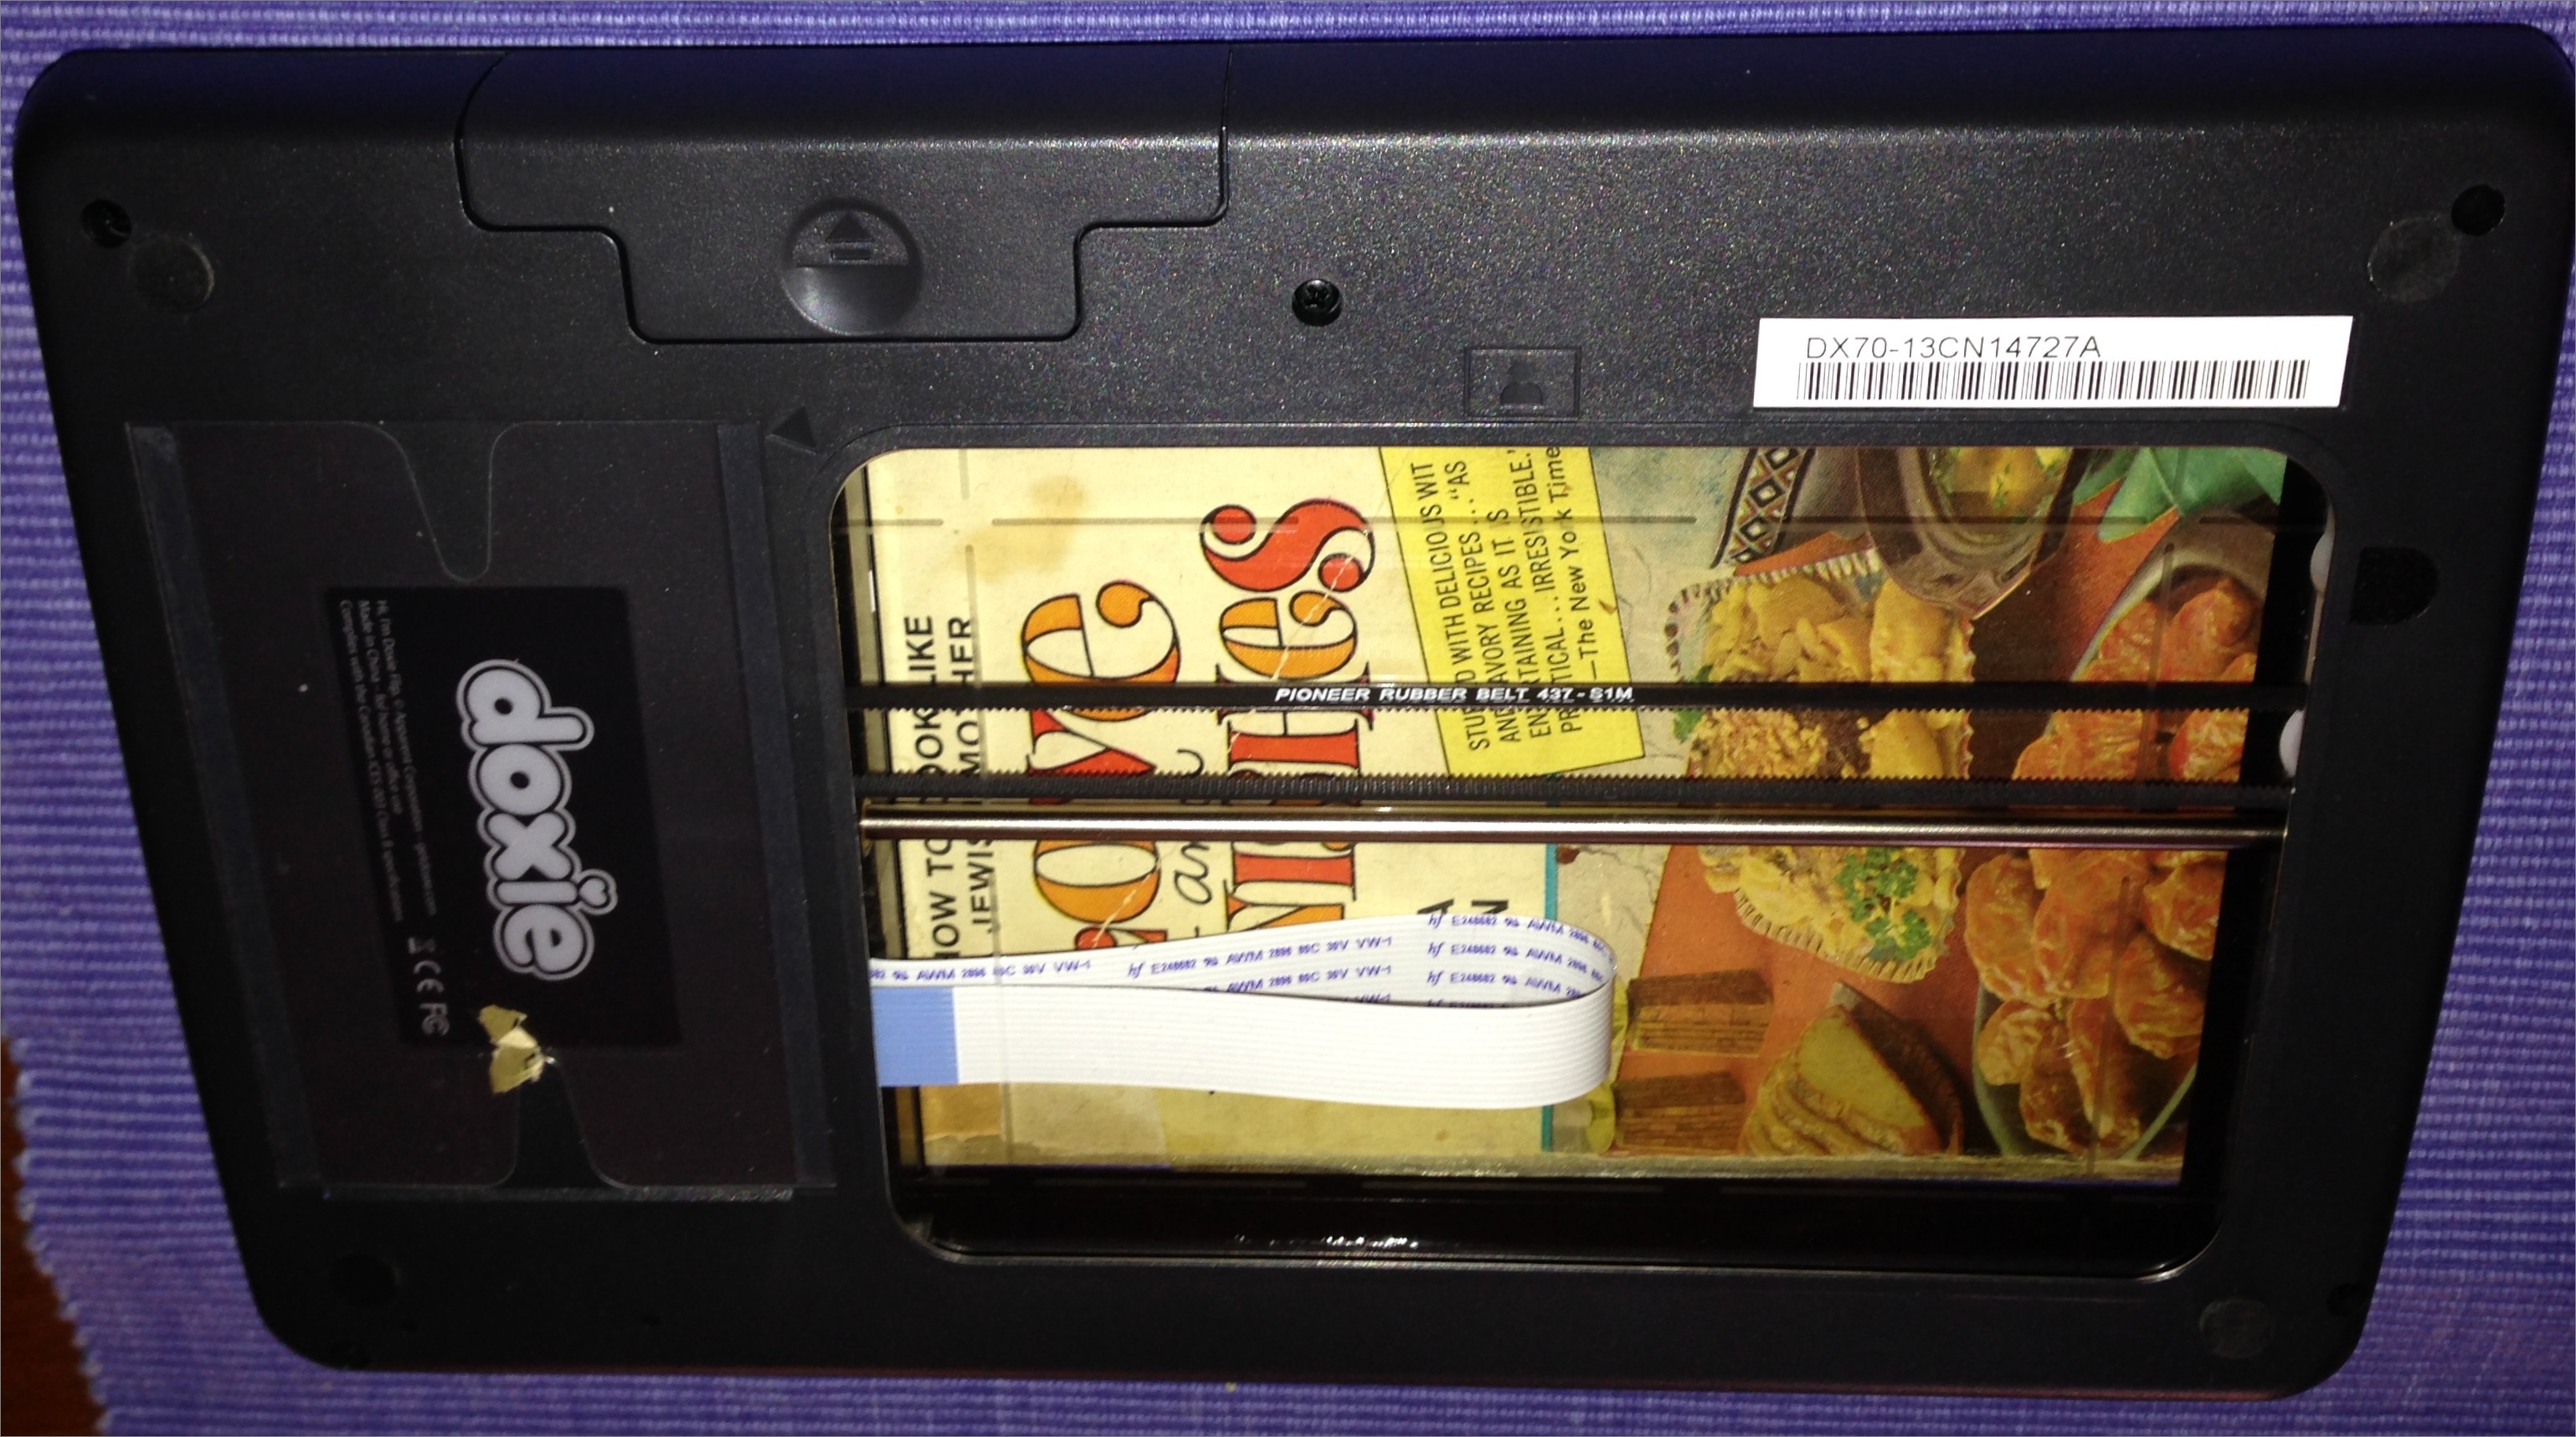
The resulting scan was clear and sharp, much better than I could have achieved by holding a brittle paperback open with one hand and snapping an iPhone shot of it with the other.
The scanner itself, as you might have surmised from the tale above, is light: without batteries, it weighs only 1.27 pounds (576 grams), less than the first Retina display iPad. Even though it is not as slim as an iPad, it can easily fit into most backpacks and equipment bags if you need to take it with you.
The SD card that comes with the Doxie Flip fits right into the SD card slot of those Macs that have such a slot — but no worries if your Mac doesn’t, because the Flip also comes with a tiny USB SD card reader.
The scanning options, accessible from controls on the top of the scanner and visible in a teensy LCD display, are sparse: you can scan at 300 DPI or 600 DPI. That’s it. No other options. At 300 DPI, it can scan a page in about 7 seconds.
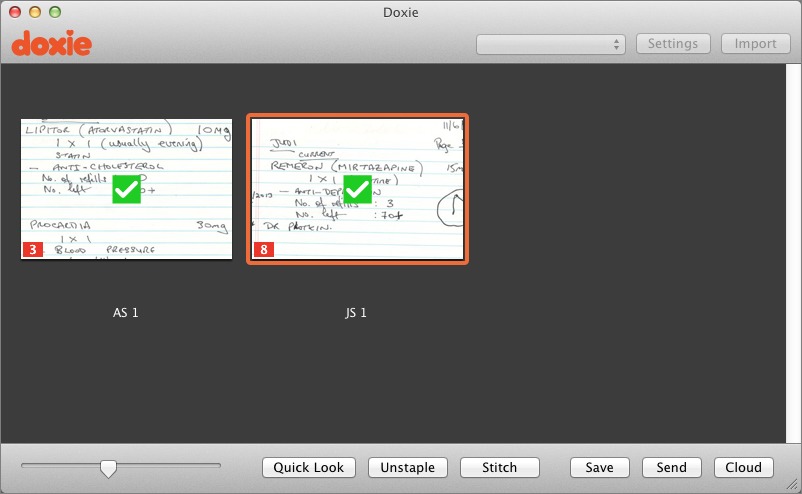
The software is easy to use, but not fully featured. One big feature promised by the Doxie Flip manual is AutoStitch, which supposedly can assemble a large image from overlapping scans, but when you click the Stitch button in the current Doxie software you get a message that amounts to “Stay tuned: it’s coming next month.” Similarly, the software’s Export function lists OCR PDFs as options, but that feature also is not yet implemented for the Flip.
Doxie’s $149 Flip scanner is not for everyone. It’s certainly not for anyone looking for a high-duty-cycle sheet-fed scanner for implementing a paperless office. On the other hand, it is handy for those odd little scanning jobs that you might, if you had steady enough hands, try to pull off with an iPhone camera. I can’t, in fact, give you a good use case for this device, but you’ll know one when you see it. I did. Twice in one day, showing that this toy-like scanner for which I couldn’t figure out a use can prove surprisingly useful.
All about Tagging in the Mavericks Finder
Tags have been popular since the dawn of “Web 2.0,” but I never quite wrapped my head around them. So when file tagging was announced as a feature of OS X 10.9 Mavericks, I wasn’t terribly excited. But after playing with the feature for a few weeks, my eyes have been opened to just how powerful tagging is.
For those not in the know, tags are a form of metadata that enables non-hierarchical grouping. In plain English, that means that you can collect files together without using folders, and do so in a way that’s easier and more flexible than working with aliases.
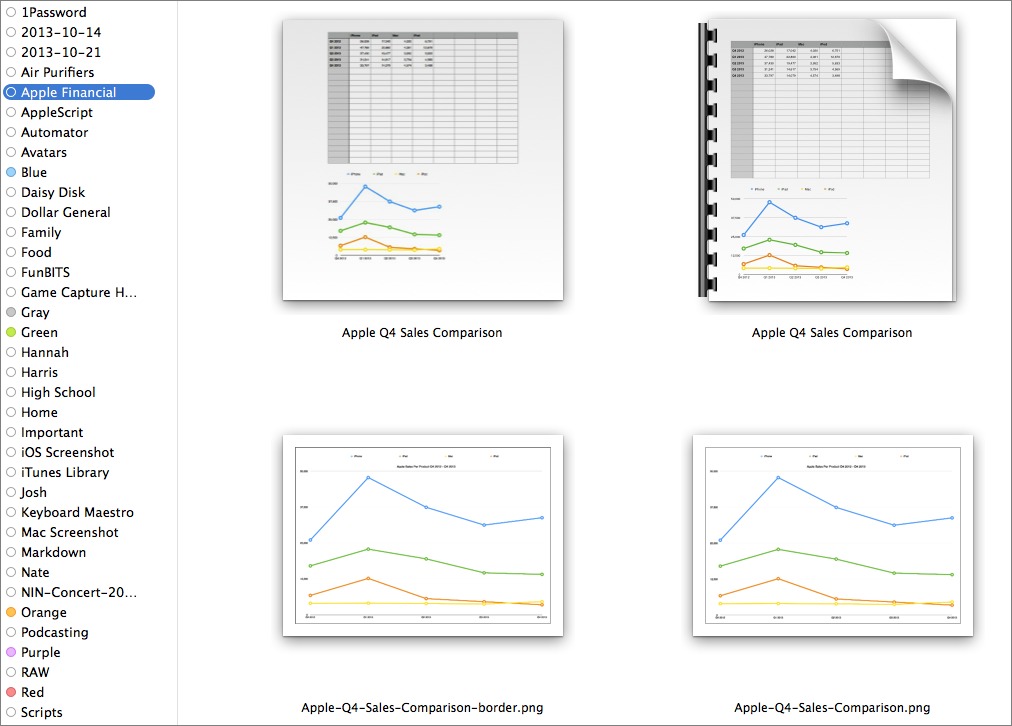
Why would you want to do this? Let’s say that you have a project that involves different kinds of files: spreadsheets, images, and documents. A recent example is a chart I prepared to compare Apple’s product sales over time. I compiled the data and chart in Numbers, which I saved into iCloud in case I needed to collaborate on it with the editorial staff. Next, I exported the chart as a PDF, which I saved in my Documents folder. Then, I converted the PDF to a PNG in Preview, and dropped that file into my Pictures folder, which the automation utility Hazel subsequently organized into my TidBITS Screenshots folder.
I tagged each of these files as “Apple Financial,” so despite being scattered all around my hard drive, I can easily group them in one place. Admittedly, that could be accomplished with aliases, but tags make it so the document I stored in iCloud appears with all the rest, something that’s not possible with aliases.
“But why not just keep them all in the same folder,” you may ask. Well, a file can live in only one directory at a time. What if a file falls into different categories that make choosing a single location difficult? For example, I have a lovely engagement picture of my wife and me that makes for a good Desktop background. With tags, I can tag it with (Josh) (Hannah) (Wallpapers) (Engagement), and then store it in a folder of photos named for the month in which they were taken.
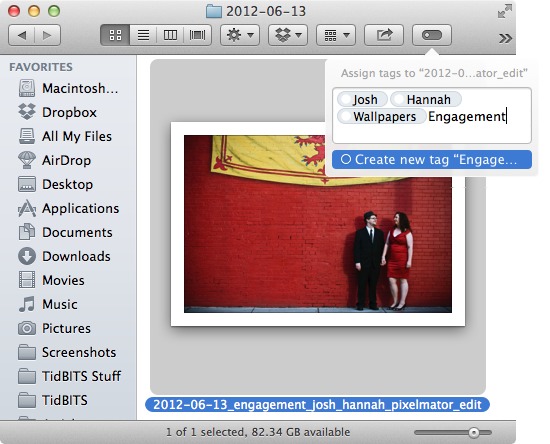
What’s most important, though, is that the tags make it easier for me to find that photo later, since I don’t have to remember exactly when it was taken. Instead, I can look under any of those tags to find it, along with other files that share the same tags.
In short, grouping files with tags makes them much easier to organize. You can also group folders together with tags. As another example, take what Adam Engst has done with Take Control. Each ebook’s files exist in a variety of folders, one for the Dropbox folder used by Leanpub, another shared Dropbox folder for the cover graphics, a folder on his local file server for the final production files, and a series of folders for each distribution format. With appropriate tags, he could collect all the folders for a particular book together, despite the many places in which they must live.
Let’s examine how you can use tags in Mavericks, from creating and applying your own tags to finding and working with tagged files and folders.
Create, Apply, and Remove Tags — Adding tags to an existing file is easy, which is essential, because if tagging takes too much time, you won’t bother. Equally important, for tagging to be useful, you must be consistent in your tagging efforts.
To start, let’s look at tagging files and folders in the Finder, since you’ll probably want to tag a bunch of the existing items with which you’re working.
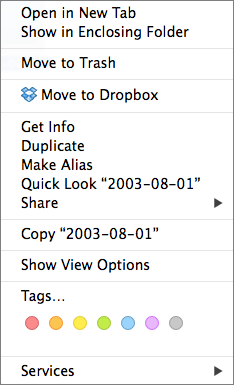
The most obvious way to assign tags to files and folders in the Finder is by using the sidebar in Finder windows, which displays your tags. Drag one or more items in the Finder to a tag in the sidebar to assign that tag to the dragged files and folders. (As far as I can see, holding down a modifier key while dragging a file to a tag makes no difference.)
Otherwise, you’ll work in the tag editor, a popover with a text entry field and a list of existing tags. In it, you can:
- Click a tag in the list to add it to the field. The list shows 12 tags; if you have more, a Show All item at the end gives you a scrollbar to see the rest. (I’ll explain how to control which 12 appear here shortly.)
-
Type a few characters from a tag’s name; Mavericks suggests auto-completions that you can choose from with the arrow keys and select by pressing either Tab or Return. Clicking a suggestion also works.
-
Create a new tag by typing its name and pressing Tab or Return or comma. Tags can have spaces in their names. Press Escape if you start creating a tag and want to back out without doing anything.
-
Remove a tag from the file by clicking it in the text field and pressing Delete or Forward Delete. In fact, tags work just like any normal text character, so you can arrow between them, select them with Shift-arrows, and so on.
The tag editor appears in a variety of places in the Finder, but works similarly in all of them. You can invoke it in the following ways after selecting the items you want to tag:
- In a Finder window, click the Edit Tags button in the toolbar.
-
Control- or right-click, and choose Tags from the contextual menu that appears.
-
Choose File > Tags.
-
Select an item, choose File > Get Info (Command-I), and in the Info window, click in the Add Tags field at the top.
In two of these cases — when you Control- or right-click an item in the Finder, and when you drop the File menu — you’ll also see seven favorite tags that you can click directly within the menu to add or remove, without having to choose Tags. You can apply or remove only a single favorite tag at a time, so if you want to work with multiple tags, bring up the full tag editor instead. More on how to set favorite tags in a bit.
If you want to tag files even faster with a keyboard shortcut, try this tip from our pal Brett Terpstra.
- Open the Keyboard pane of System Preferences, click Shortcuts at the top, and click App Shortcuts in the left column.
-
Click the plus button to create a new shortcut, and choose Finder from the Application pop-up menu.
-
In the Menu Title field, enter
Tags…(the ellipsis character is necessary; get it by pressing Option-;). -
In the Keyboard Shortcut field, enter your desired key combination — a safe one that doesn’t conflict with any Finder defaults is Control-Shift-T — and click the Add button to finish.
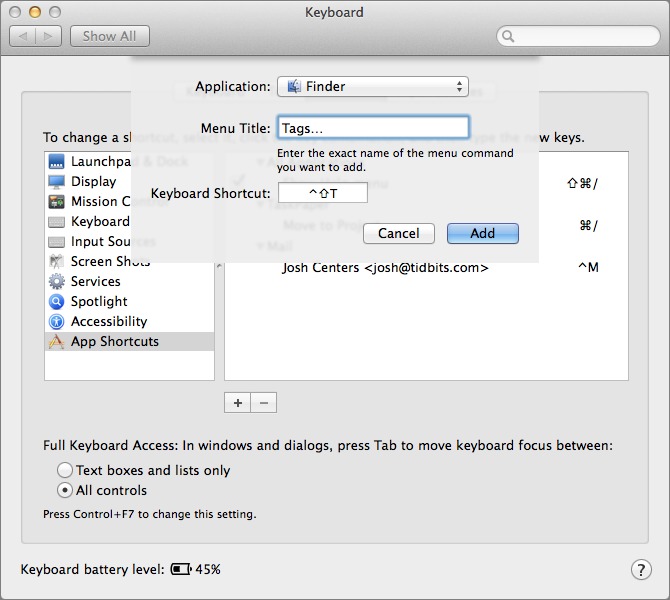
Now you can select items in the Finder and pull up the tag editor with a quick key press.
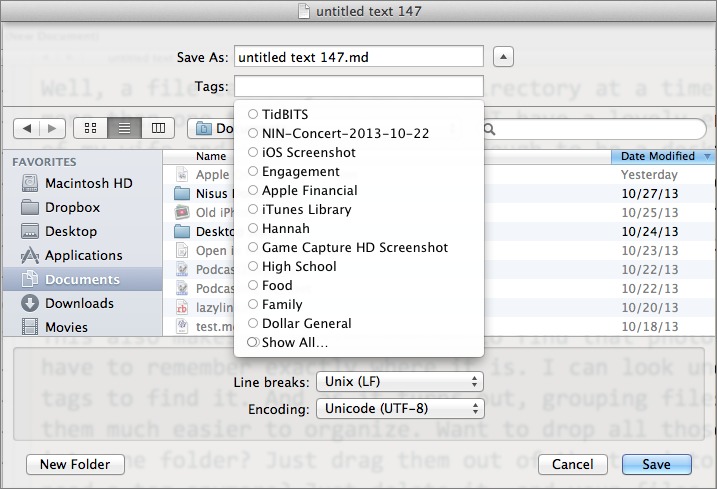
You don’t have to wait to add tags to a document you’re working on, since a Tags field also now appears below the Save As field (where you enter your file’s name) when you save a document. Click it to bring up the now-familiar tag editor.
If you’re working in an application that supports Apple’s Modern Document Model, you can bring up the tag editor for that document by clicking the arrow to the right of the file name in the title bar and then clicking in the Tags field.
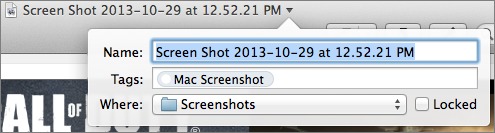
The presence of that arrow when you mouse over the name of a document in the title bar is the best indication of an app that supports the Modern Document Model; Apple apps like Pages, Keynote, Numbers, and TextEdit do, whereas apps with a longer lineage (and less reason to toe the party line) like Microsoft Word, Excel, and PowerPoint, along with BBEdit and Nisus Writer Pro, tend not to.
Find Tagged Files and Folders — Now that you’ve tagged some items, it’s time to put your tags to use. The main place where you interact with tags is in the Finder, specifically within the sidebar of Finder windows. (You can manage your tags in numerous ways within Finder windows too; I’ll get to that shortly.)
Most notably, click a tag in the sidebar to display all the files and folders to which that tag has been assigned. If you’re using tabs in the Finder, you can Command-click a tab in the sidebar to open it in a new tab (for full details about tabs, see “Using Tabs in the Mavericks Finder,” 31 October 2013).
The only problem with using the Finder sidebar to bring together tagged files and folders is that you could easily end up with too many items sharing the same tag, rendering the grouping useless. There’s no way to perform a more complex selection from the sidebar, such as selecting items that have the Red tag but don’t also have the Blue tag.
However, you can bring Spotlight to bear on the problem in two ways. First, if you click a tag in the sidebar and then run a Spotlight search in that window, it’s limited to items with that tag. That makes it easy to find specific files. Second, when you’re typing in the Spotlight search field, if you enter the first few characters of a tag name, you can select the Tag label to include that in a search that also includes filename or data criteria, for instance. As a tip, to search for a tag directly, it can be easiest to start your search with tag: and then a few characters of the tag name.
You can even search for multiple tags, as in tag:Red tag:Blue. Unfortunately, Apple’s support for tags in Spotlight doesn’t seem to include Boolean operators, so you can’t insert NOT or OR between two tags in the search field for more interesting searches, such as Sharon Zardetto describes in her comprehensive “Take Control of Spotlight for Finding Anything on Your Mac.” Nor can you find untagged files.
One last thing. Say you’ve identified a file by clicking an associated tag in a Finder window’s sidebar. What if you want to see what other files are in its actual folder? Or perhaps you want to compress it or burn it to a disc? (Those commands disappear from the contextual menu because they don’t make sense on a file that has no apparent location — the same is true of the results of a Spotlight search.) To trace back to a tagged file’s actual location on disk, choose File > Show in Enclosing Folder (Command-R) or the same command from the contextual menu. And, as our own Michael Cohen pointed out, you can also find the actual location by enabling the Path Bar in View > Show Path Bar (Command-Option-P). Note that you can
double-click any folder in the Path Bar to open it.
Manage Tags — The sidebar of Finder windows provides direct access to numerous tag management capabilities, and the few things you can’t do from the sidebar are exposed in the Tags pane of the Finder Preferences window. In the sidebar, you can:
- Drag a tag within the sidebar to rearrange the order. The first 12 appear in the tag editor directly; the rest can be revealed by clicking Show All in the tag editor.
-
Drag a tag off the sidebar to remove it from the sidebar; you can also Control- or right-click it and choose Remove from Sidebar. This does not delete the tag or affect any files with that tag.
-
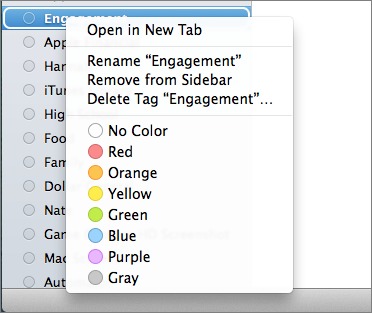
Control- or right-click a tag to access two other important commands: Rename and Delete. The former selects the tag’s name for editing; the latter deletes the tag and removes that tag from all items to which it has been assigned.
-
When you Control- or right-click a tag, you can also choose a color (or no color) for it from the seven available.
-
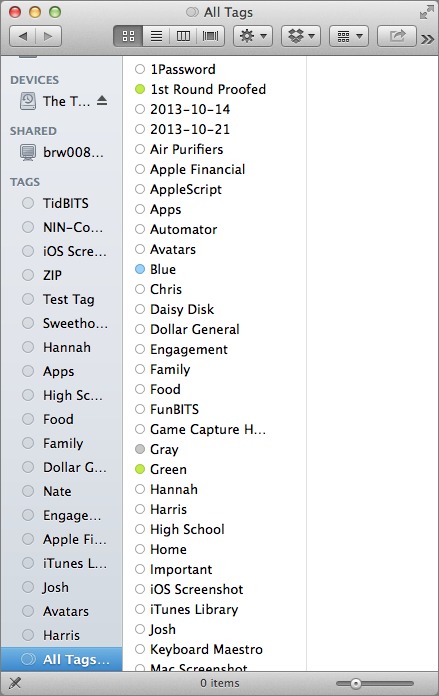
The final item in the Finder window’s sidebar is always All Tags. Clicking it displays yet another sidebar within the window that lists all your tags, in alphabetical order. It’s a good way to access little-used tags that you normally don’t want to see on the main sidebar. You can use the tags in this secondary sidebar exactly as you would in the main sidebar, though you can’t rearrange them or remove them from the sidebar. (It would be logically consistent if Control- or right-clicking a tag that had been removed from the main sidebar provided an Add to Sidebar command.)
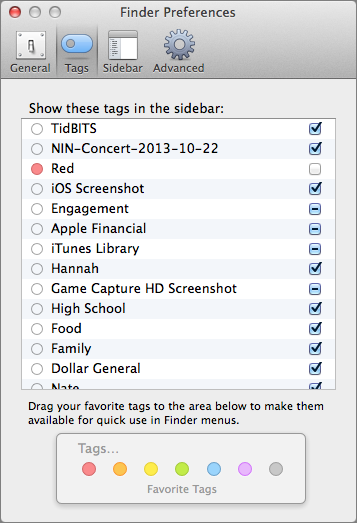
So how would you add a removed tag back to the Finder window’s main sidebar? For that, turn to the Tags pane of the Finder Preferences window; choose Finder > Preferences > Tags. In it, you can perform the following tasks:
-
Control sidebar visibility with the checkbox to the right of the tag’s name. Selected tags appear in the sidebar; deselected tags don’t. But what are those “partially selected” minus signs in the checkbox? They’re applied to newly created tags that you haven’t explicitly acted on in the Tags preference pane. If you move the tag, it becomes selected. John Siracusa’s description of this feature doesn’t entirely match with our tests, but we still agree with John that it’s a lousy interface.
-
Drag tags within the list to rearrange the order in which they appear in the sidebar. Again, the first 12 appear in the tag editor.
-
Rename a tag by clicking its name and giving it a new one. The only reserved character that you can’t use, not surprisingly, is the comma.
-
Change a tag’s color by clicking the colored dot to the left of its name and choosing a new color from the pop-up menu. You can’t modify the list of colors or the colors themselves.
-
Control- or right-click a tag if you want to delete the tag; the contextual menu also shows the familiar Rename command and lets you pick a color for the tag.
-
To set a tag as a favorite, for quick access in the Finder’s File and contextual menus, drag it to a particular position in the Favorite Tags area at the bottom of the window. Since favorite tags display their names in Finder menus only when you hover the pointer over them, assign their colors carefully. By default, these are set to what used to be Finder labels.
Speaking of the previous Finder labels, they live on as tags, and the ones you’ve always used are still there, although you may need to put them back in the order you expect after upgrading to Mavericks. If you’re sharing files with a previous version of Mac OS X, tagged files will appear to be labeled with the last (in the Get Info window’s tag list) tag that has a color assigned to it.
Sharing Tags, for Good and Ill — So what happens if you share a file via email, Messages, file server, Dropbox, or the like? It depends on whether metadata is preserved in the process, so tags are lost when sending a tagged file via email or Messages, but are retained when sharing via a local file server, Dropbox, or external storage devices like hard disks and USB flash drives, even those formatted as FAT32. There’s one way to prevent tags from being lost, no matter what transfer or storage method you choose. If you compress a tagged file in the Finder and send the Zip archive to a Mavericks user, the tags are preserved and will appear on the other end.
As a result, it’s entirely likely that you’ll end up with a cornucopia of unfamiliar tags that have wormed their way into your system via shared files and compressed email attachments. But be careful when deleting unfamiliar tags, because if a tag has come in via a shared Dropbox folder, for instance, deleting it will remove it from all those shared files, which might prove problematic for someone else’s workflow.
Fortunately, tags that come in via shared files are not displayed in your sidebar by default, so you don’t have to worry about colleagues adding prank tags.
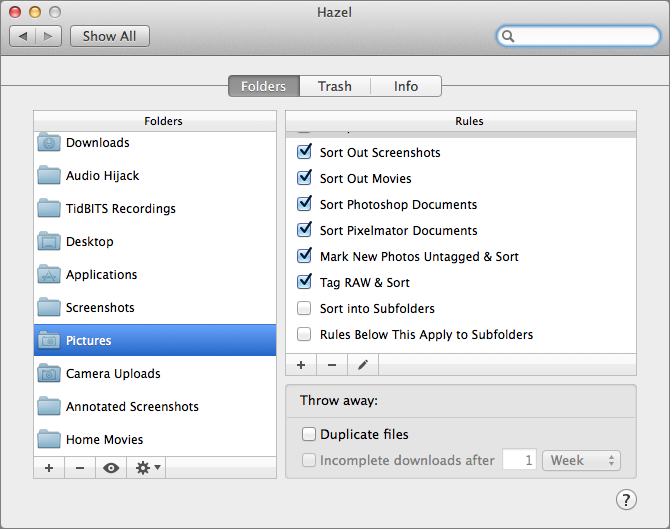
Tagging It to the Next Level — Once you get the hang of applying tags and managing files using them, you can automate the process, using the recently updated Hazel from Noodlesoft ($28). Hazel watches folders you specify, and when files in them match criteria you’ve set, it performs actions on those files. The latest version of Hazel supports tags, so you can both perform actions based on the tags applied to files, and create rules that add and remove tags from files.
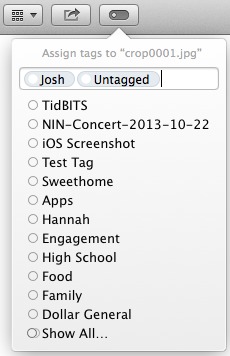
For instance, I have a Hazel rule that moves photos and screenshots from my Dropbox Camera Uploads folder and my Desktop into my Pictures folder. It then sorts PNGs into my Screenshots folder and JPEGs into a dated folder. It also tags photos as Untagged and screenshots as either iOS Screenshot or Mac Screenshot, depending on the file name. I can then easily find screenshots for either platform by viewing the associated tag in the Finder. As for photos, I can see which have the Untagged tag and apply more appropriate tags based on where the photos were taken or who is in them.
Every day, I figure out a new use for tags — using them to organize my photo collection, separate my screenshots, group projects, and even identify photos for later categorization. For me, tagging has proven a faster and more effective way of organizing files than stuffing them into folders, and hopefully I’ve given you some ideas on how to put them to work. But I’m sure everyone has their own ideas about how best to use tags — let us know what yours are in the comments!
FunBITS: What the Heck Are Bitstrips?
When I first heard of Bitstrips, I thought that it was some kind of credit card for the Bitcoin digital currency. OK, maybe I’m getting old. Bitstrips is actually one of the most popular free iPhone apps on the App Store (Web and Android versions are also available), and it lets you easily create customized comics to share with your Facebook friends. (Bitstrips currently requires a Facebook account, but the developers promise a non-Facebook option soon.)
Once you log in with your Facebook account, you’ll be prompted to create a custom avatar. You can adjust most every aspect of your avatar, including face shape, hairstyle, hair color, eye color, etc. What you can’t seem to adjust is facial hair color, which is annoying, because the Bitstrips version of me has a beard that’s a different color than his head. Other than that, I think I managed to create a pretty good representation of myself.
![]()
Once you’ve defined your cartoon self, you can insert it into a number of pre-drawn comics. This is the part that disappointed me, since I had thought you could rearrange screen elements for more customization. Sadly, that’s not the case. Other than word bubbles, captions, and, in some comics, the option of adding a friend as a “costar,” there’s not much you can change.
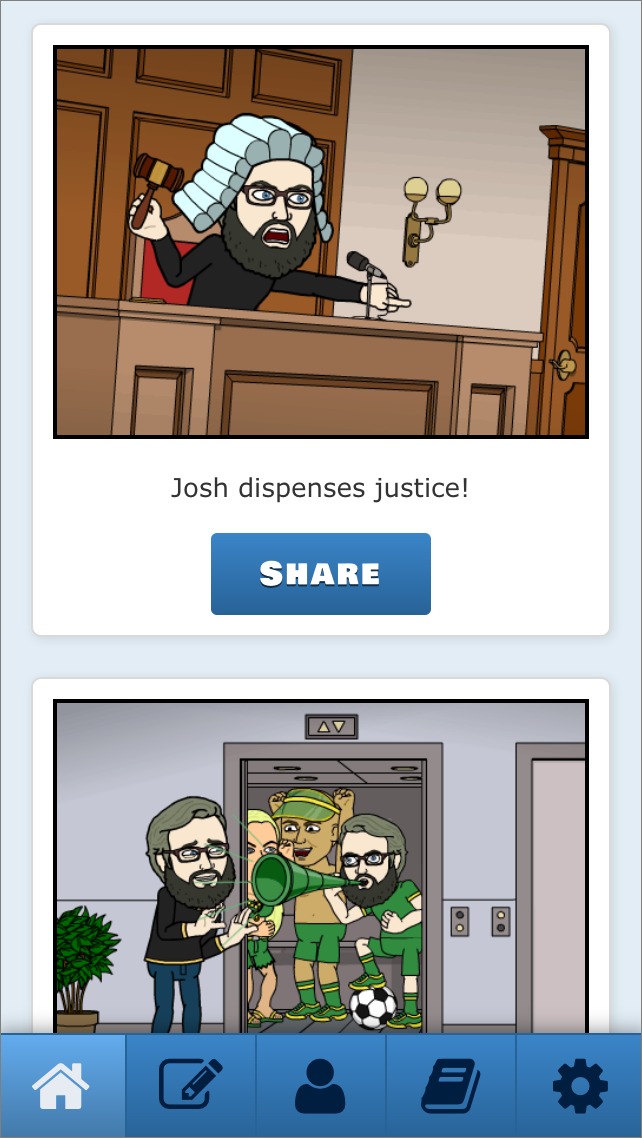
It would be different if the built-in comics were better. Most are either bland or disgusting. A number of them include vomit, which as humorous bodily functions go, seems an odd choice, especially the one where my cartoon avatar is regurgitating rainbows into a toilet. Is that supposed to be an expression of elation or anguish? I am apparently aging by the minute.
Unfortunately, the Bitstrips app itself doesn’t work much better. It’s slow, clumsily laid out, and buggy. Many of the built-in comics don’t even load. Sometimes I can’t log in at all. I actually had decided to write about Bitstrips a few weeks ago, but it consistently crashed on launch. As of this writing, it has 2 stars on the App Store, so I’m not alone in finding the app problematic.
The good news is that, if you’ve grown irritated with seeing Bitstrips on Facebook, they’re easy to block. Click the gear icon in the upper-right of the Facebook page, choose Settings, and then select Blocking from the left sidebar. Under Block Apps, enter in the name of the app you wish to block, which should auto-complete. Select it, and the app won’t bother you again.

Despite the problems, Bitstrips remains the number two free app in the App Store, so there’s clearly demand for the concept. It’s not hard to see why. Even as a professional writer, I sometimes find myself struggling to convey my emotions in words effectively. A comic of myself drop-kicking the iPhoto icon out of a window might be a more effective demonstration of my frustrations than whatever text I could come up with, especially if I’m limited to Twitter’s 140 characters. I’m hoping another developer takes the idea of
user-generated comics and makes it truly compelling. There are others out there, but none seem to have captured the public’s imagination like Bitstrips, perhaps because of its Facebook integration.
(Note to Larry Page: We all know how much you want Google+ to succeed. Comics could be a killer feature, and with the visual effects in Google Hangouts, we know Google has the technology to make it happen.)
TidBITS Watchlist: Notable Software Updates for 18 November 2013
Mellel 3.2.7 — Smoothing out the rough spots, RedleX has released Mellel 3.2.7 with several fixes to improve stability and performance. The word processor gets a fix for a crash that occurred with the Spotlight plug-in when trying to index template files, adds support for small caps in formatted citations and bibliographies, fixes a problem with non-functioning smart quotes in OS X 10.9 Mavericks using the Hebrew keyboard layout, avoids a crash when Mellel scanned documents containing empty citations, and fixes a problem with Bookends 12.0.6 that prevented live bibliographies from functioning correctly. As of this writing,
the Mac App Store version remains at version 3.2.6. ($39 new from RedleX and the Mac App Store, free update, 97.7 MB, release notes)
Read/post comments about Mellel 3.2.7.
Keyboard Maestro 6.3 — Stairways Software has released Keyboard Maestro 6.3 with nearly 50 small enhancements and fixes in the automation utility. The update adds a delay before and after dragging in the drag mouse action, adds a number of Typed String trigger options, promises vast improvement in the performance of actions that write named clipboard entries, allows more use of shortcut letters in switchers with non-English keyboards, utilizes a “more modern method” of hardware key simulation to resolve issues with the Volume Control action, and adds support for displaying time saved in days, months, or years. A newly
discovered bug can result in Keyboard Maestro-mediated clipboard text being messed up in some applications; look for 6.3.1 to appear shortly. ($36 new with a 20 percent discount for TidBITS members, free update, 24.1 MB, release notes)
Read/post comments about Keyboard Maestro 6.3.
ExtraBITS for 18 November 2013
This week, Apple quietly released the iPad mini with Retina display, we find out how long hard drives last, and, in a pair of podcasts, Sharon Zardetto, author of “Take Control of iBooks,” joins host Chuck Joiner on MacVoices and Adam Engst talks about Mavericks with host Gene Steinberg on the Tech Night Owl Live.
Adam Engst Delves into Mavericks on the Tech Night Owl Live — On the Tech Night Owl Live podcast, Adam Engst joins host Gene Steinberg to work through a number of the problems in OS X 10.9 Mavericks, including issues with large external hard drives and Apple Mail. He also discusses the tenth anniversary of Take Control Books.
Sharon Zardetto Discusses iBooks on MacVoices — “Take Control of iBooks” author Sharon Zardetto joined MacVoices host Chuck Joiner to discuss her new book, iBooks for the Mac, and where paper books fit in a digital world.
Apple Quietly Releases iPad mini with Retina Display — With little fanfare, Apple began selling the new iPad mini with Retina display on 12 November 2013. Currently, your best bet seems to be to order online and wait 1–10 days for shipping, but Apple is also offering in-store pickup for Wi-Fi models. (One interesting note: while the new iPad mini uses the same A7 processor as the iPhone 5s and iPad Air, it appears to be clocked at 1.27 GHz like the iPhone 5s, instead of the iPad Air’s 1.39 GHz.)
How Long Do Hard Drives Last? — Just how long will your hard drive last? Cloud backup service Backblaze, which relies upon consumer-grade hard drives, performed a study of 25,000 hard drives over four years. The good news is that 74 percent of the drives survived four years. The drives had a 5.1 percent annual failure rate in the first 1.5 years, which dropped to 1.4 percent in the next 1.5 years, then spiked to 11.8 percent after that. Backblaze expects that over half the drives will last six years. Regardless, all drives die eventually, so backups are still a must.