TidBITS#1338/19-Sep-2016
Apple has released iOS 10, watchOS 3, and tvOS 10 — we have highlights and tips for all three operating systems, plus three Take Control titles covering iOS 10 and macOS 10.12 Sierra. Sierra is due to drop tomorrow, and Adam Engst prepares you for its Optimized Storage features, telling you which to enable and which to avoid. Finally, Apple has lowered its screen replacement costs, making AppleCare+ a better deal for those of us who punish our iPhones. Notable software releases this week include Carbon Copy Cloner 4.1.10, VMware Fusion 8.5, BusyContacts 1.1.2, SuperDuper 2.9.1, PDFpen and PDFpenPro 8.1, Keyboard Maestro 7.3, Boom 2 v1.5, BusyCal 3.0.6, and iTunes 12.5.1.
Three Take Control Books Document Sierra and iOS 10
Apple released iOS 10 last week, and macOS 10.12 Sierra is due this week. We have three Take Control books about Apple’s new operating systems available now so you can have guides by your side as you install the updates and explore the new features. (We’re also working on hard on updates to our books about Photos, iCloud, Apple TV, Apple Watch, and more.)
Joe Kissell helps you perform a trouble-free upgrade to Sierra in “Take Control of Upgrading to Sierra” (98 pages, $10), Scholle McFarland covers what’s new in Sierra (and much else) in “Sierra: A Take Control Crash Course” (100 pages with more coming shortly, $15), and Josh Centers rounds out the set with his comprehensive “iOS 10: A Take Control Crash Course” (143 pages, $15). The titles of these books are pretty much self-explanatory, and their Web pages provide full details about what each book covers.
Each book is available on its own, but since Apple is integrating macOS and iOS ever more tightly with Siri, the Universal Clipboard, and Desktop and Documents folder syncing, we’d encourage you to collect ‘em all with 30 percent off bundle discounts. You can:
Thanks for your support, since the success of Take Control books directly impacts the health of TidBITS! I’d also like to thank Joe, Scholle, and Josh for their extraordinary efforts in exploring the betas of Sierra and iOS 10 and in writing these books under deadline pressure. We’ve all been burning the midnight electrons to get you these books when they’re most relevant to you, and we hope our efforts help you make significantly better use of Sierra and iOS 10!

Apple Lowers iPhone Screen Replacement Costs
Alongside the rollout of the iPhone 7, Apple has made its AppleCare+ extended warranty program a better deal.
Originally, AppleCare+ cost $99, and the accidental damage fee to replace a cracked screen, for instance, was an additional $79. With the release of the iPhone 6s last year, Apple increased both prices, raising AppleCare+ to $129 and the accidental damage fee to $99. (See “Comparing U.S. iPhone Plan Costs in a Contract-Free World,” 11 September 2015.)
The base AppleCare+ fee remains at $129 this year, but Apple is now being more generous toward its AppleCare+ customers, offering screen repairs for only $29. The new price applies to every iPhone from the iPhone 5 all the way to the iPhone 7 Plus. That seems much more reasonable given the cost of third-party screen replacement options. If you’ve damaged your iPhone beyond just cracking the screen, the AppleCare+ repair cost will be $99, or $49 for an iPhone 5.
If you don’t have AppleCare+, the screen replacement fee is $149 for Plus-sized iPhones and $129 for smaller models. For just screen replacement for one of Apple’s smaller iPhone models, then, the price is essentially the same regardless of whether or not you have AppleCare+. Repairing the screen on a Plus-sized iPhone is a bit more expensive without AppleCare+, and out-of-warranty repair costs for additional damage are higher yet, ranging from $269 to $349. They’re still significantly cheaper than a brand-new iPhone.
Whether or not AppleCare+ is worthwhile depends on how you treat your iPhone. I tend to be hard on my phones, so I opted for AppleCare+ with my iPhone 7 Plus. I also didn’t have much choice, since I signed up for the iPhone Upgrade Program, which has AppleCare+ rolled in. However, if you’re not as clumsy as I am and don’t have a small child occasionally using your iPhone, the out-of-warranty screen replacement costs are low enough that it may not be worth paying for AppleCare+.
tvOS 10 Adds Dark Mode and More
Apple has released tvOS 10, which you can install on your fourth-generation Apple TV by navigating to Settings > System > Software Updates > Update Software.
tvOS 10 doesn’t offer any earth-shattering changes, but it does include a few niceties.
Automatic App Downloads — When you first install tvOS 10, it asks if you want to install apps automatically. When you enable this option, tvOS automatically installs any tvOS app for which you already own the corresponding iOS app. This also works in reverse, so if you have automatic app downloads enabled on your iOS devices, iOS apps whose TV versions you have installed in tvOS will appear there. You can turn this feature on or off later in Settings > Apps.
Dark Mode — Those of us blinded by the bright-white look of tvOS 9 will appreciate tvOS 10’s new Dark mode, which you can enable in Settings > General > Appearance. Dark mode not only turns the Home screen dark, but also darkens the user interface elements of many apps.

Siri — tvOS 10 includes some new Siri tricks. You can now search for movies by topic, and you can combine search criteria, so you can tell Siri to “Show me movies about time travel” or “Show me boxing movies from the ’80s.”
Siri can also now search YouTube. Say “Search YouTube” and then your query, like so: “Search YouTube for iPhone 7 videos.” After processing your request, Siri takes you to the YouTube app’s search screen with your query. Given the difficulty of entering text into tvOS search fields and the importance of search with YouTube, this Siri improvement should be particularly welcome.

HomeKit — tvOS 10 brings some support for HomeKit to the Apple TV, but only in the form of Siri commands so far. As long as your Apple TV is signed into the same iCloud account that you linked to your HomeKit devices, the same Siri commands you use on iOS and watchOS should work on your Apple TV, like “Dim my Living Room Lights” and “Set scene Movie Mode.” It may take a little time after you install the tvOS update for everything to sync. (If you’re interested in HomeKit, I recommend the Philips Hue system — see “Getting Started with the Philips Hue Smart Light Bulbs,” 1 August 2016)
Even though the tvOS-HomeKit combination has a lot of potential, HomeKit on tvOS is currently disappointing. It’s faster and easier to use it in iOS 10 on an iPhone, which now features a Home app and a Control Center panel. But there may be more interesting integrations in the future: for instance, there are iOS apps that can change the color of Hue bulbs based on the dominant color on your TV, but these apps require your device’s camera to be pointed at your TV. In theory, the Apple TV could have this functionality built in.
Photos — tvOS’s Photos app is largely unchanged, but it gains the Memories feature from iOS 10. Memories are automated collections of photos based on date and location. Photos adds new Memories regularly, so be sure to check back often. (Unfortunately, you can’t set them as screensavers.)

Music — Apple redesigned the Music app in tvOS 10 to look like the refreshed version in iOS 10. It looks good and is a notable improvement.

The new Music app also offers two new rotating playlists for Apple Music members: My New Music Mix and My Favorites Mix. Apple updates My New Music Mix every Friday with new songs that Apple Music’s algorithms think you’ll enjoy. My Favorites Mix is a mix of older songs that Apple knows you like, and it updates every Wednesday. I’ve enjoyed both playlists, although I’ve heard all the songs in My Favorites Mix thousands of times. I think of it more like the new Memories feature in Photos, in that it helps me revisit content I may have
forgotten about.
Gaming — Developers can now create apps that require a dedicated game controller. That change may lead to more complex Apple TV games, at the cost of alienating users who don’t have the requisite controller.
Single Sign-On? — Many tvOS apps require authentication with a TV provider, and you have to activate each app individually. The good news is that Apple is introducing Single Sign-On for those authentications.
The bad news is that it appears that Single Sign-On didn’t ship with tvOS 10. Apple still lists the feature as “coming soon,” and developers have reported to me that the API hasn’t shipped yet.
Here’s the worse news: based on my reading of Apple’s developer documentation, this capability is technically called the Video Subscriber Account framework, and it must be implemented by the app developer. What this likely means in the real world is that if you activate an app from A&E Networks, like the History Channel app, then A&E’s Lifetime app will also be activated, assuming you subscribe to both. However, an app developed by Viacom, such as Comedy Central, would still need separate activation. (These examples assume that these companies will update their apps to use the Video Subscriber Account framework; I have no inside knowledge that they plan to do so.)
So Single Sign-On has the potential to improve things a bit, but I wonder when it will ship and how quickly developers will take advantage of it. Perhaps it was delayed because Apple is working with app developers and TV providers to ensure a smooth rollout.
To be honest, the tvOS 10 update is relatively unimpressive, even if it does include a few welcome additions. We can hope that Apple gives the Apple TV more attention in future releases.
Three Tips for watchOS 3
Look at the time — watchOS 3 has arrived! You can install the 561 MB update by opening the Watch app on your iPhone and navigating to My Watch > General > Software Update. To install the update, the Apple Watch must be near the iPhone, the iPhone must be connected to Wi-Fi, and the Apple Watch must be connected to its charger and have at least a 50 percent charge. You also must have iOS 10 installed to perform the update. Note that in our testing, the update took a very long time — perhaps start it before bed. We’ve also heard that you may need to unlock the watch manually to complete the update.
We covered the new features of watchOS in “Why watchOS 3 Will Be Nimble and Nifty” (13 June 2016), but here are the high points for the update:
- Glances are gone. Swiping up from the bottom of the screen now reveals Control Center.
- The Friends view has been replaced by an app Dock. Apps placed in the Dock load almost instantly.
-
You can switch between faces by swiping from the left or right edge of the watch screen.
-
The new Breathe app reminds you to take a short meditation break during the day.
-
The Messages app offers some new features; most notably, the new Scribble option, which lets you enter a message manually by drawing one letter a time.
-
You can press and hold the side button to initiate an emergency call — 911 in the United States.
-
Beyond Breathe, watchOS 3 comes with a few new built-in apps: Reminders, Home, and Heart Rate. The Heart Rate app replaces the equivalent glance in watchOS 2.
-
Watch faces can display new complications, such as Weather Conditions, Home, and Remote.
Overall, we’ve appreciated Apple’s changes in watchOS 3, which significantly refine what was previously a rather rough experience. Annoyances remain — for instance, the app cloud is nearly impenetrable for those who don’t interpret icons well or whose vision isn’t perfect. Here are three quick tips for using watchOS 3 effectively:
Set Up Faces — In watchOS 3, you can easily switch between watch faces, each with its own set of complications. With a bit of thought, you can set up a few favorite faces for different uses. Here’s what Josh Centers is experimenting with:
- One face for business, with the Modular face and date, Calendar, Mail, Reminders, and Messages complications.
-
A Mickey Mouse face for chilling on the couch, with Home, Remote, and battery life complications. In Apple’s ongoing quest for diversity, watchOS also now features a Minnie Mouse face!
(A tip: Once you’ve added the Mickey or Minnie face via the iPhone Watch app’s Face Gallery, tap the face in My Watch > My Faces, scroll down and enable Tap to Speak Time. Then, as long as your Apple Watch isn’t in silent mode, tapping Mickey’s or Minnie’s nose will cause them to speak the time out loud.)
-
An Activity Digital face, with Heart Rate, Workout, and Apple Music complications.
-
A Utility outdoor face, with complications for moon phase and weather.
-
A Simple watch face for nights out on the town, with complications for weather conditions, weather, Messages, and Maps.

Don’t worry about removing faces that you don’t use, since you can add any of them back from the Face Gallery in the iPhone’s Watch app.
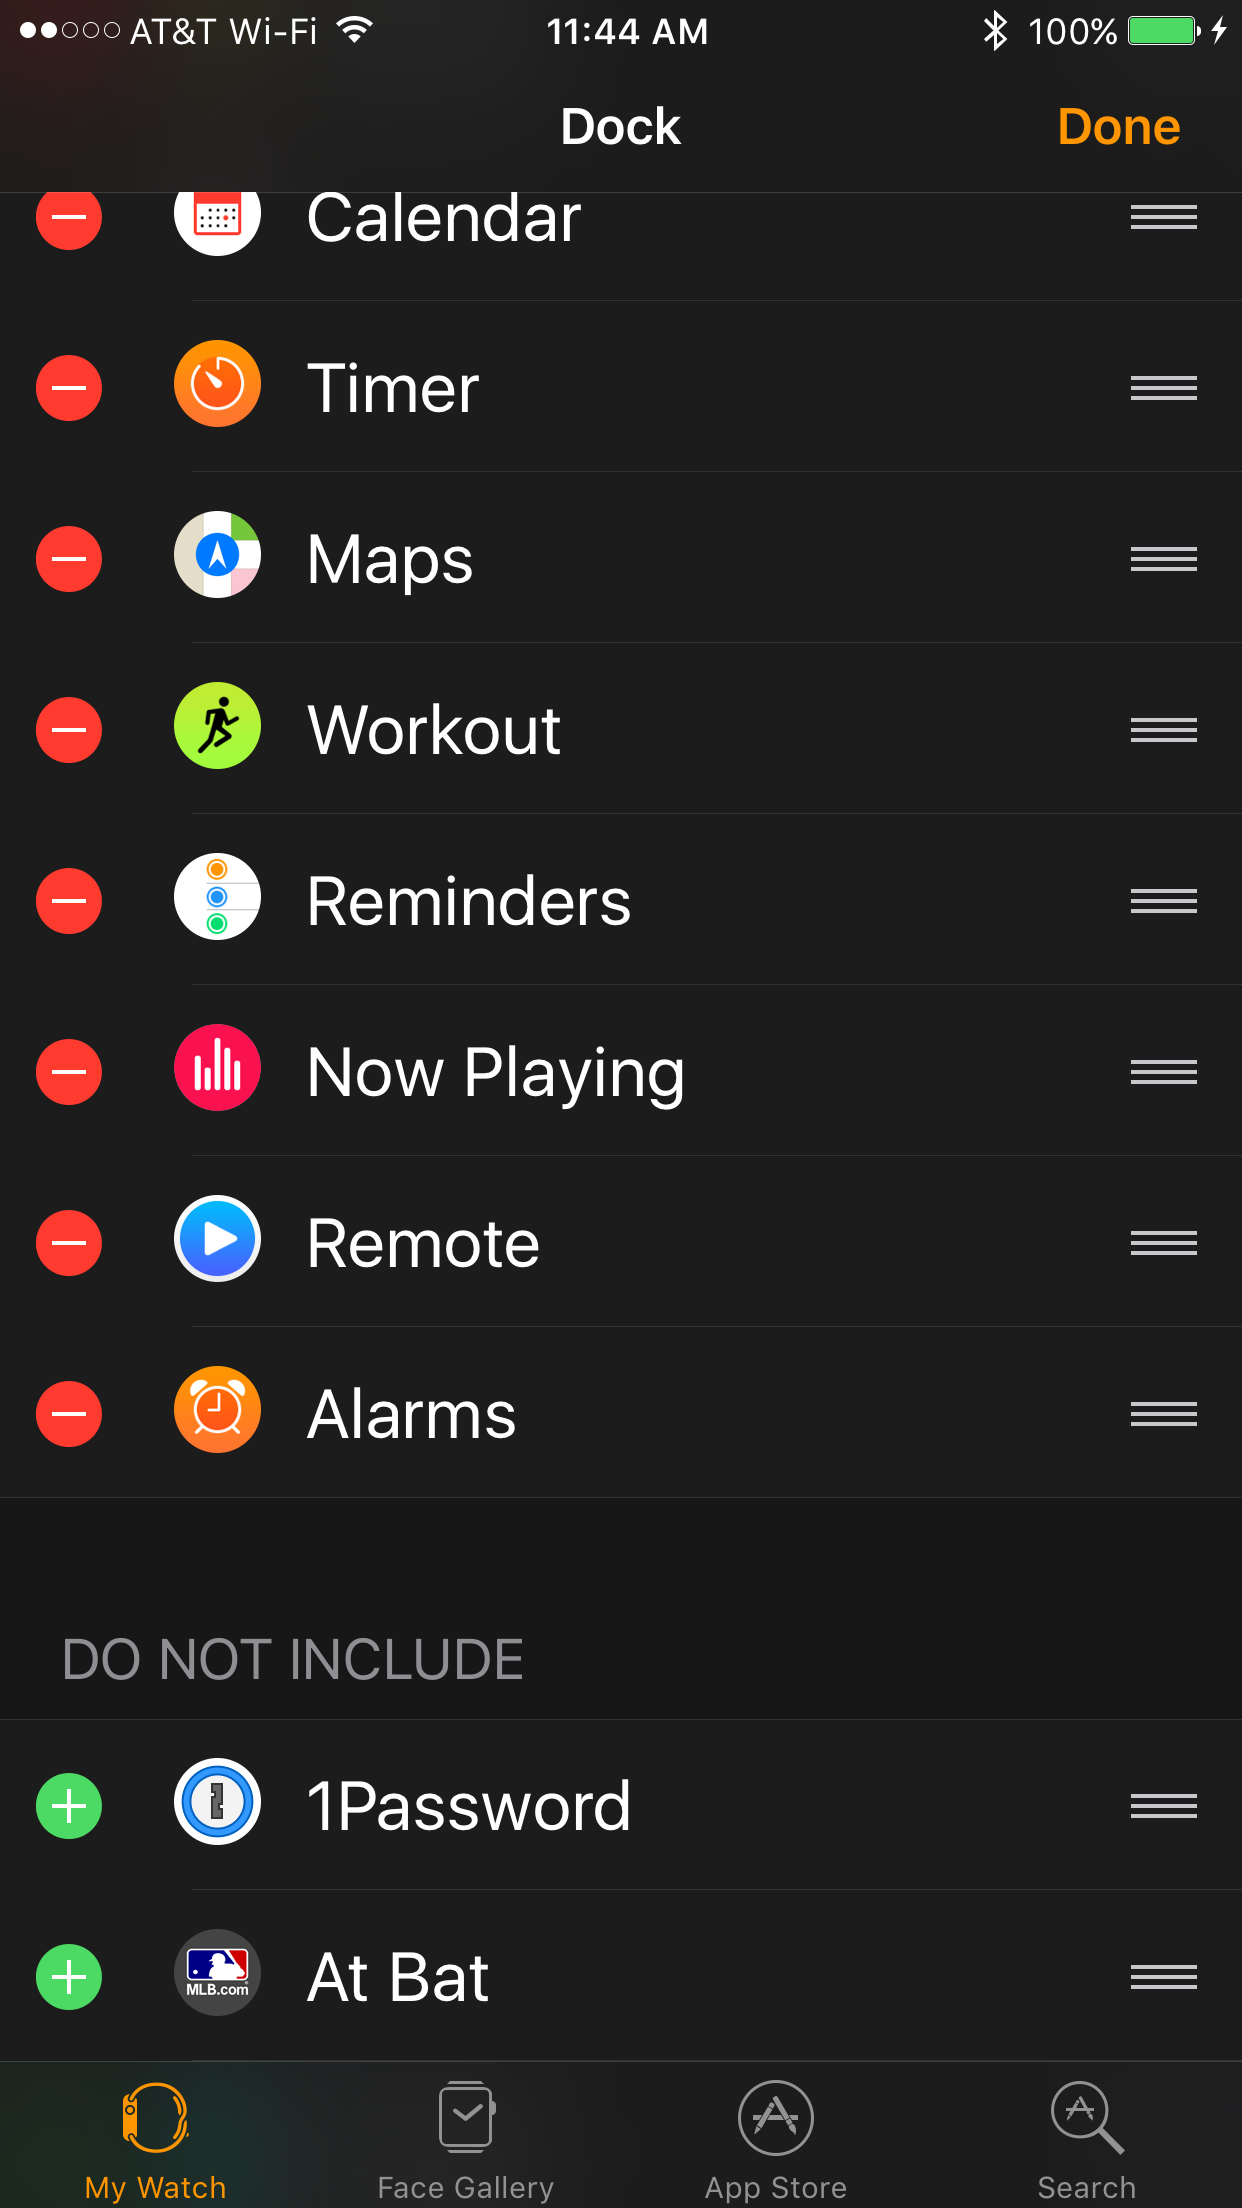
Tweak Your Dock — The new Dock that replaces the circle of friends formerly available from the side button is great, as it holds up to ten of your most commonly used apps, ready to run. You should see less lag when loading apps in watchOS 3 generally, and even fewer delays when you load them from the Dock.
To use a Dock app, press the side button, swipe left or right to the app of your choice, and then tap the app thumbnail. Any app you launch that isn’t already in the Dock gets added to the end… as long as you haven’t reached the maximum of ten docked apps. To remove an app from the Dock, swipe to it, and then swipe up to reveal a remove button.

If you want to make wholesale changes to your watch’s Dock, you can do so more easily in the Watch app: My Watch > Dock takes you to an editing screen where you can quickly choose, rearrange, and delete apps from the Dock. Just tap Edit and fiddle to your heart’s content!
Get Fit Without Extra Complications — Among the additions to the new faces provided by watchOS 3 are a set of Activity faces. If you’ve felt limited by having to devote a precious complication slot on a watch face to your Activity rings, one of these faces may be for you. The complete gallery includes both Analog and Digital face versions that include the Activity rings as part of the faces. For example, you can have an analog face with three separate rings included, along with slots for three complications.
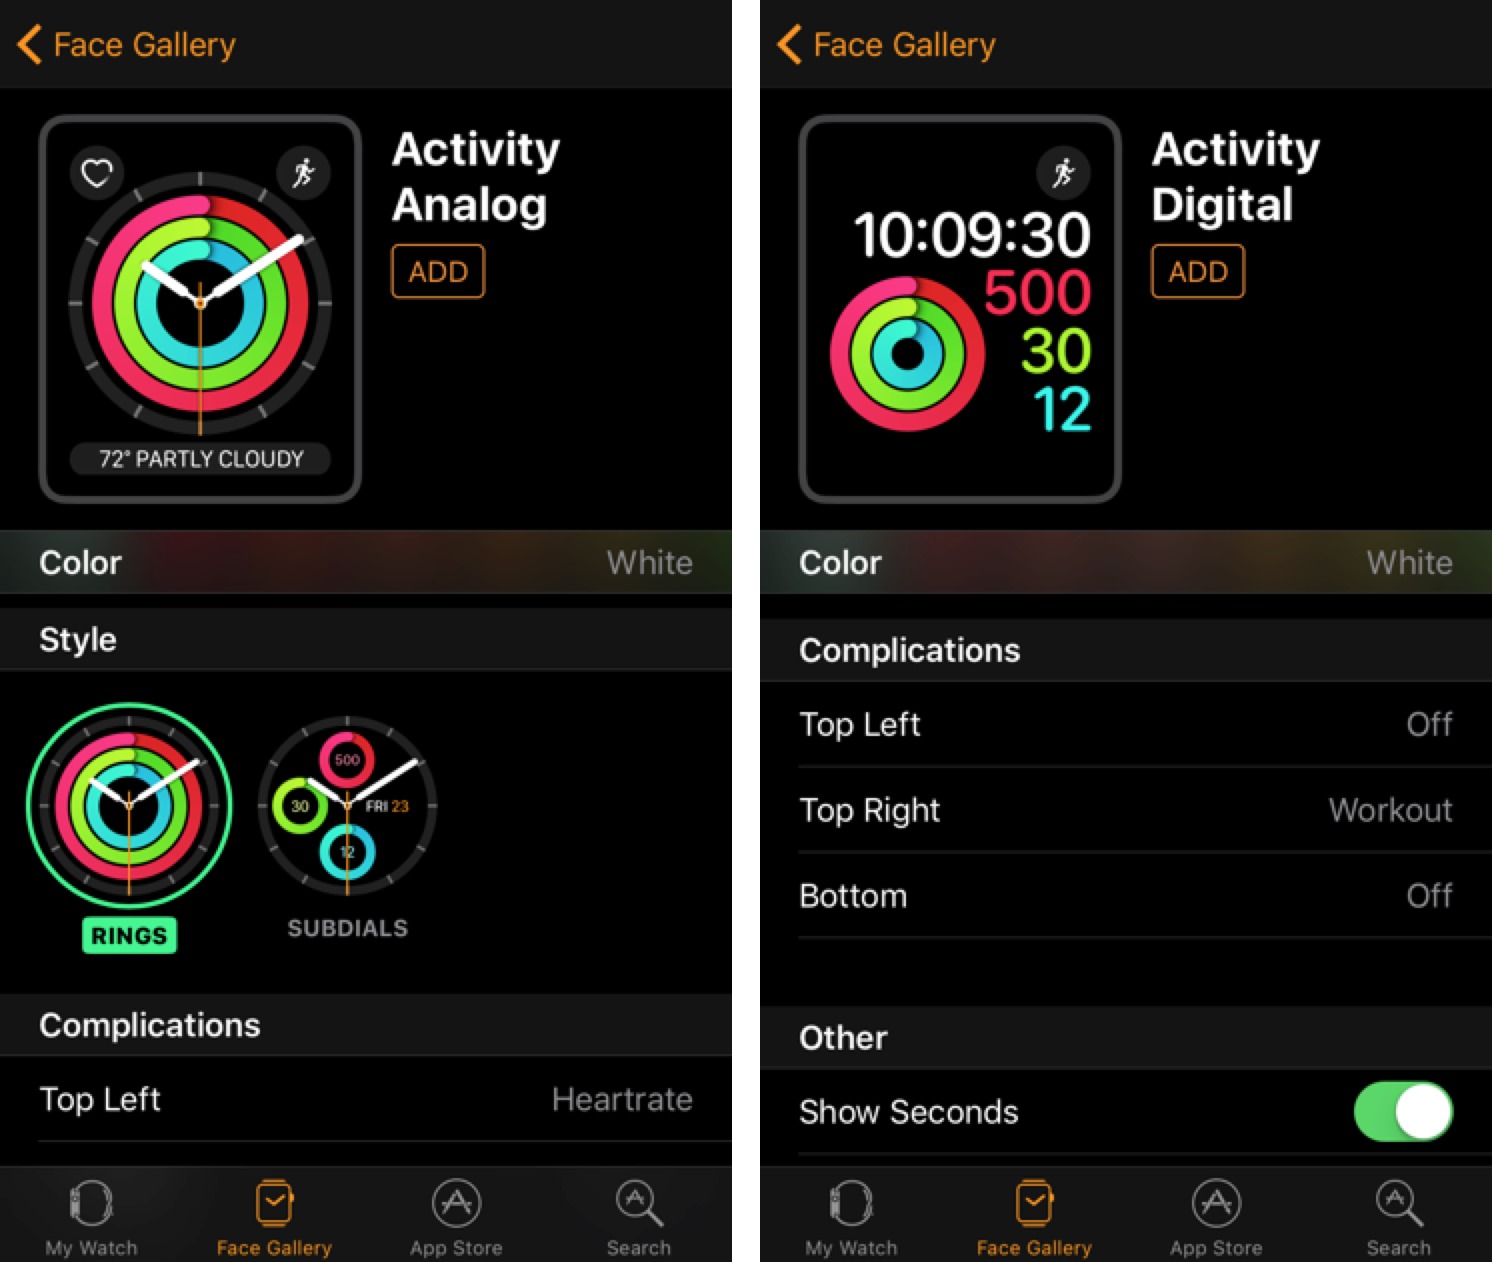
Or, if you want a large, easily readable digital face, you might want to try the large print digital version. This face also has three complication slots in addition to the rings that are incorporated into the face.
For added exercise efficiency, you can add a Workout complication to the face so that, with a single tap, you can launch the Workout app. And, as an added bonus, the Workout app lets you specify one of your workouts as a “Quick Start” workout so you can get moving quickly.
Talk to the Wrist — It’s telling that Apple dumped glances and the friend circle unceremoniously, presumably in response to research showing that they were either little used or simply not helpful in the wearable context. We’ve never seen Apple change interface gears so radically before.
With the new approaches in watchOS 3, Apple has significantly improved the response time and usability of the Apple Watch. We’ll see if these changes stick, or if watchOS 4 brings yet another new paradigm.
Regardless, whether you have an original Apple Watch or plan to purchase one of the new Apple Watch Series 2 models (see “Apple Watch Series 2 Offers GPS, Water Resistance, and More Power,” 7 September 2016), watchOS 3 is welcome.
Ten Highlights of iOS 10
iOS 10 is here. The nearly 2 GB update is available via Settings > General > Software Update or through iTunes. See “iOS 10 Promises New Lock Screen, Open Siri, and More” (13 June 2016) for an overview of the major new features.
There was an initial issue that caused the over-the-air update to brick iOS devices, which is now fixed. If you did brick your device, update iTunes to the latest version and use it to restore your device.
iOS 10 can run on the iPhone 5, iPad mini 2, iPad Air, iPad Pro, and sixth-generation iPod touch or later. Yes, the venerable iPad 2 and iPad mini have finally been dropped, as has the iPhone 4 series, so people with those older devices will have to stick with iOS 9 or earlier.
I’ve spent all summer exploring iOS 10 while working on “iOS 10: A Take Control Crash Course,” and I’d like to share ten of the most useful and relevant highlights to help you make the most of iOS 10.
How Do I Unlock It? — The first major change you’ll notice with iOS 10 is that Swipe to Unlock, a trademark of the iPhone since the beginning, is gone. Also, you can’t unlock your Touch ID-equipped device by merely resting your finger on the Home button; there is a setting to return to the old Touch ID behavior, but first let me explain why Apple made this sure-to-be-controversial change.
There are now two ways to unlock your device from the Lock screen:
- Touch ID: Place your finger on the Touch ID sensor. Notice how the lock icon at the top of the screen first says Unlocked and then vanishes. You can now press the Home button to get to the Home screen.
With a bit of practice, you can master the art of “press, release, and linger” to unlock your Touch ID device and jump instantly to the Home screen (But keep reading, because you may not always want to do this). Just make sure that you don’t press and hold the Home button, because that summons Siri.
- Passcode: Press the Home button and then enter your passcode to reach the Home screen.
So why is the venerable Slide to Unlock gone? Because when you swipe from left to right on the Lock screen now, you’re taken to the new Widgets screen. That’s right, widgets are no longer confined to Notification Center — they are now accessible from the Lock and Home screens as well.

There’s also a new way to access the Camera app from the Lock screen: swipe from right to left. Press Home to return to the Lock screen from Camera.
That explains Slide to Unlock, but why is it harder to unlock the device with Touch ID? Because, for security reasons, some widgets require authentication before you can use them. In the past, Touch ID would have taken you straight to the Home screen, defeating the purpose of making widgets accessible on the Lock screen.
Also, notifications are smarter in iOS 10. Swipe one from right to left and tap View to see a list of actions, or 3D Touch the notification. These action lists will grow as developers take more advantage of iOS 10’s new notification tools, such as live notifications, which allow photos and even videos to be embedded in notifications. Again, in the past, unlocking meant going straight to the Home screen, dismissing all notifications, sometimes before you’d had a chance to see them.
Now, with iOS 10, you can easily work on the Lock screen without unlocking and going to the Home screen. Wake up the phone by pressing and releasing the Home or Sleep/Wake buttons. If you need to authenticate to perform an action on the Lock screen, you can scan your fingerprint or enter your passcode without pressing the Home button and unlocking the device.
Here’s an example of where this is useful: on the Lock screen, swipe from left to right to enter the Widgets screen. Scroll down and tap Edit. You’ll be prompted to use Touch ID or enter a passcode. If you have a device with Touch ID, now you can scan your finger without getting dumped into the Home screen.
Also, if you have a newer iPhone — iPhone 6s or later — you can merely raise your phone to wake the screen, much like the Apple Watch. It’s a nice touch, but if you dislike it, disable Raise to Wake in Settings > Display & Brightness.
These changes make the Lock screen far more powerful — you may not have to unlock your iOS device nearly as often!
However, if you have trouble with the new Touch ID unlock behavior after trying it for a while, you can change it back in Settings > General > Accessibility > Home Button by enabling Rest Finger to Open.
3D Touch Everything — If you don’t have an iPhone 6s or later, skip this tip. But if you do have one, you’ll be happy to see how many apps now support 3D Touch in interesting ways. In particular:
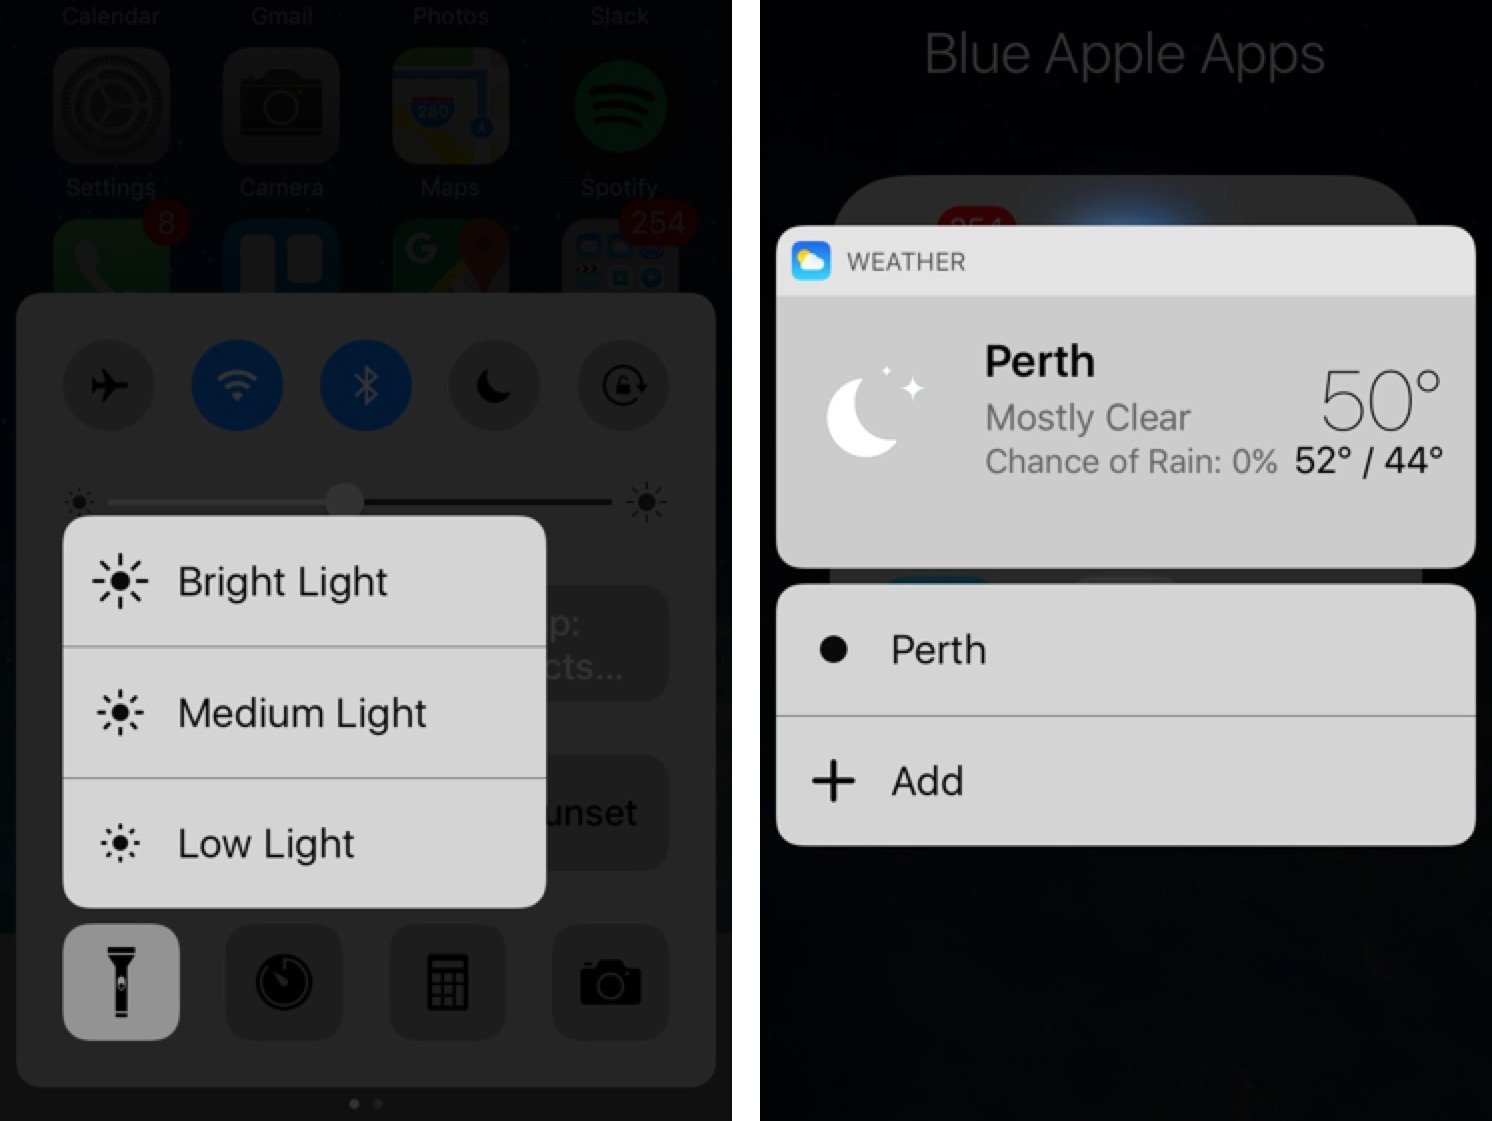
- If you 3D Touch an app icon that has an accompanying widget, iOS displays that widget in a popover. Seriously, try 3D Touching all the apps you use regularly for interesting shortcuts.
-
3D Touch the flashlight button in Control Center to set the intensity of the flashlight. Also, you can 3D Touch the timer button to choose a preset interval.
If you have an iPhone 6s or later, but haven’t been enthused with 3D Touch, give it another try!
Check Your Memories — iOS 10 has revved up its artificial intelligence engine to make the Photos app a lot smarter with facial and object recognition. Try searching for “trees” or “dogs” and you might find that Photos shows separate results for different types of dogs and trees. You can even ask Siri to “search for photos of oak trees,” for instance.
Apple also uses this new intelligence in a new view, called Memories. Memories are automated collections of photos and videos, collected by location, date, or even people in the photo.

Here’s the problem Memories solves: you take thousands of pictures with your iPhone, but you rarely go back to look at them — there are just too many! Disciplined photographers sort their photos into albums, but most people don’t have time for that.
Memories may take a while to generate after you install iOS 10, but since they’re added frequently, check back regularly. I’ve been enjoying them greatly.
When you view Memories, you’ll notice that the header is a video. It takes a bit to generate once you tap play, but once it does, you’ll get a full slideshow with a soundtrack.
You can edit those videos, and I explain how in “iOS 10: A Take Control Crash Course,” but the bigger problem is that Photos can generate collections of photos you don’t want to see. To get rid of a shabby memory, view it, scroll down, and tap Delete Memory. You can also tap Add to Favorite Memories to save the memory in the list.
My recommendation is to check your Memories regularly, delete the ones you don’t want, and favorite those you like. It’s an easy way to build an archive of pleasant memories without sorting through thousands of photos.
Filter Your Mail — My favorite feature in iOS 10 Mail is that threads now display your own messages. That’s been my top iOS pet peeve for years, and it’s great to see Apple finally agreeing with me. Mail also offers two additional new features for making your inbox a saner, happier place.
First, you can now filter mail in iOS. Filters aren’t like rules in Mail in macOS; they’re just a way to narrow what you see in a particular mailbox. Tap the new filter button in the lower left to apply a filter. If you look at the bottom-center of Mail, you see a Filtered By line. Tap that to adjust the filter.

Second, Mail simplifies the task of unsubscribing from mailing lists. Open such a message from a mailing list, and you’ll see a banner at the top that says “This message is from a mailing list,” followed by an Unsubscribe link. Tap that, and then tap Unsubscribe again at the prompt to unsubscribe from that mailing list. Or dismiss the banner by tapping the X button to the side, which also prevents the banner from appearing on future messages from that list.

Delete Stickers in Messages — Messages includes a number of features that you’ll either find fun or annoying — or both. Press and hold the send button to see bubble and screen effects; tap the heart icon to see Digital Touch effects, or tap the App Store icon to see a wide variety of Messages apps.
There’s so much new in Messages that I dedicated an entire chapter of “iOS 10: A Take Control Crash Course” to them. But one feature that I guarantee everyone will be talking about is stickers. Stickers are one of the many new app types in iOS 10 messages. You can tap one to insert it into a message, or press, hold, and drag a sticker to slap it on top of an existing message bubble.
Stickers can be fun, but they can also be obnoxious. There’s no limit to the number of stickers that can be slapped on a message, which means that an annoying friend could obscure your entire conversation.
When you receive a message bubble, press and hold it to see additional new options, including Sticker Details. Tap that to reveal a list of stickers in the conversation. Swipe a listing from right to left to reveal a delete button, which removes that sticker.

Hopefully Apple will improve this interface throughout iOS 10’s lifespan, but this should help maintain your sanity for now. (Adam can’t figure out why anyone would put up with someone who would spam stickers; it’s easier to ignore or block someone with such annoying communication habits.)
By the way, if you find the new bubble and screen effects irritating, you can reduce their effects by enabling Reduce Motion in Settings > General > Accessibility > Reduce Motion.
Set News Notifications — In iOS 10, the News app features a fresh, bold design. Notably, those whose vision isn’t perfect will appreciate the darker text and headlines. The app is also faster than before, and in the For You view, it adds new headers such as Top Stories, Trending Stories, Politics, Sports, and more to help you sort through the day’s news.

What I’ve found the most useful are the new notifications you can enable in News. Go to the Favorites view and tap the bell in the upper left. On the Notifications screen, you can choose which of your favorite sources can send you notifications — all are disabled by default, but you may receive notifications when a favorite news source adds the notification feature.

News also includes two Apple-provided notification sources: News Editors’ Picks and News Top Stories. I’m a fan of News Top Stories, which has so far sent me very few notifications and only for important news stories, unlike some other news apps that send “BREAKING!” notifications for the tiniest bit of trivia (cough CNN cough).
Baby, You Can Find My Car — Here’s an everyday problem: you park in a mall or a megastore with a sprawling parking lot, spend some time shopping, walk out, and… can’t remember where you parked. I do this all the time, and I always feel stupid wandering around the parking lot looking for my car.
Maps in iOS 10 can solve your problem, but only if you have some sort of Bluetooth or CarPlay connection in your car, such as the manufacturer’s audio system, a third-party stereo, or something like a Bluetooth FM transmitter. (I’ve heard reports that this feature requires a manufacturer Bluetooth stereo. If you know otherwise, let me know in the comments!)
If you have the appropriate equipment, check Settings > Maps and make sure that Show Parked Location is enabled — it should be on by default.
After that, when you get out of your car, you should receive a notification on your iPhone telling you where you parked your car. When it’s time to find your car, you can either open that notification or ask Siri where your car is to get directions back to it.

Collaborate with Notes — The Notes app saw a lot of love from Apple in iOS 9, and it receives even more Apple affection in iOS 10 with the addition of note collaboration.
Here is how to use it: in a note, tap the people icon, tap Add People, choose a contact method (in my testing, Messages worked best), and send an invite. Multiple people can collaborate on a note, and once they accept the invite, they can start making changes to the note. You can stop sharing by tapping the people icon again, and then either swiping a person from right to left or tapping Stop Sharing.

Unfortunately, like iWork for iCloud, collaboration is rudimentary. You can’t see who’s currently in the document or who has made edits. However, for sharing simple lists and other things, it’s a handy way to collaborate with friends and family.
Remove Tips — Here’s a tip: you can now remove the Tips app, as well as many other bundled “junk” apps on iOS. Of course, one person’s trash is another’s treasure, but here’s the surprisingly large list of bundled apps you can remove:
- Calculator
- Calendar
- Compass
- Contacts
- FaceTime
- Find My Friends
- Home
- iBooks
- iCloud Drive
- iTunes Store
- Maps
- Music
- News
- Notes
- Podcasts
- Reminders
- Stocks
- Tips
- Videos
- Voice Memos
- Watch
- Weather
Note that “removing” an app doesn’t actually delete it from your device — iOS merely takes it off your Home screen. However, deleting the app will delete the data contained in the app. If you want to bring the app back again, search for it in the App Store and “reinstall” it.

Read the Fine Print — In “New Accessibility Features Coming to Apple’s Ecosystem” (11 August 2016), Steven Aquino wrote about the new Magnifier feature, which turns your iOS device into a magnifying glass. This capability has been offered by third-party apps for a while (see “Lumin Turns Your iPhone into an Illuminated Magnifier,” 4 January 2012), but in iOS 10, it’s available with a quick triple-press of the Home button. Enable it in General > Accessibility > Magnifier.
The Magnifier looks remarkably similar to the Camera app. Use the slider to zoom in or out. Tap the shutter button to freeze the image in place — another quick tap on the viewfinder sharpens the image, which is useful if your hands were shaking. Other buttons turn on the flash, lock the focus, and add color filters.
Even if you don’t have significant visual impairments, the Magnifier is super handy for checking the fine print on any document or reading tiny serial numbers.

Bonus Tips — iOS 10 has so many great features that I had trouble focusing on just ten. Here are a few more things to note:
- The Music app is a lot better now, and Apple Music now features two regularly updated playlists: My Favorites Mix, updated every Wednesday with your favorite tunes, and My New Music Mix, updated every Friday with new music that Apple’s algorithms think you’ll like.
-
The new Home app is awesome. If you’ve been considering purchasing some HomeKit accessories, now is the time. I recommend the Philips Hue smart lightbulb system (see “Getting Started with the Philips Hue Smart Light Bulbs,” 1 August 2016).
-
The Phone app now automatically transcribes your voicemails, at least in theory. Neither I nor most other TidBITS contributors yet see this feature, which Apple still labels as being in beta, so don’t worry if you aren’t getting transcripts either.
-
Mail, Contacts, and Calendars are now three separate entries in the Settings app, which fixes another one of my iOS pet peeves.
-
The keyboard click sound has been redesigned, and is surprisingly pleasant. If you usually leave Keyboard Clicks off in Settings > Sounds, try turning it on.
-
Safari no longer limits the number of open tabs. Press and hold the Pages icon to see an option to close all tabs.
There is so, so much more to iOS 10, and I’m speaking with some confidence about that, given that I just wrote a 143-page book about it. For complete coverage, check out “iOS 10: A Take Control Crash Course,” which covers every new feature in iOS 10, including a full chapter dedicated to HomeKit and the Home app.
Explaining Sierra’s Optimized Storage
One of the marquee features of macOS 10.12 Sierra is Optimized Storage, a marketing term that Apple’s SVP of Software Engineering Craig Federighi introduced during the Worldwide Developer Conference in June (see “macOS 10.12 Sierra to Succeed OS X 10.11 El Capitan,” 13 June 2016). He described Optimized Storage as having two core functions, making room for new files by keeping old ones in the cloud and getting rid of files you’ll never need again.
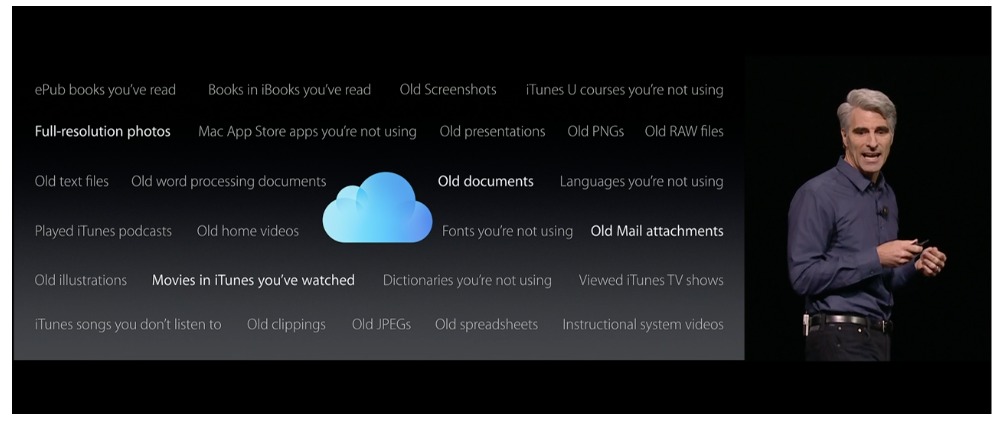
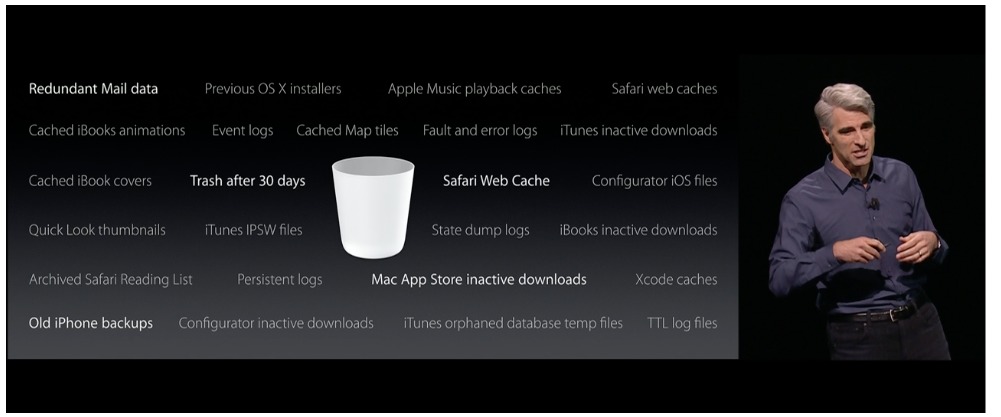
Federighi claimed that Apple took a representative Mac with 20 GB free on a 250 GB drive and “turned on all the switches” to clean out another 130 GB of space. For those struggling to free up space, particularly on a notebook Mac with relatively little internal flash storage,
Optimized Storage sounded great, at least if you don’t mind paying for online storage in iCloud Drive. And while it could be a great boon for such people, it turns out to be a somewhat confusing collection of seemingly unrelated features, burdened by one of the stranger interfaces that Apple has produced in recent years.
Plus, although we haven’t had time to test all the possibilities, I recommend care when it comes to Optimized Storage in general, and extreme caution with one of its settings. That isn’t to say you shouldn’t enable all its features, but that you should understand the possible implications before doing so.
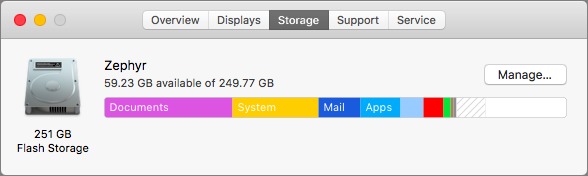
Accessing Storage Management — Before I get into the specifics of what comprises Optimized Storage, since you won’t find that exact term anywhere in Sierra’s user interface, let’s look at how you access it. Choose > About This Mac, and click the Storage button. You’ll see a stacked bar graph for each of your drives showing how much data of each type is on each drive — the categories include items like Apps, Documents, GarageBand, iBooks, iCloud Drive, iOS Files, Mail, System, Photos, and Other. At the end of the chart, you may see a hashed area that Sierra labels as Purgeable. Apple doesn’t clarify what’s included in Purgeable, but I suspect it
comprises things like logs, cache files, and the contents of the Trash. Also new in this window is a Manage button.
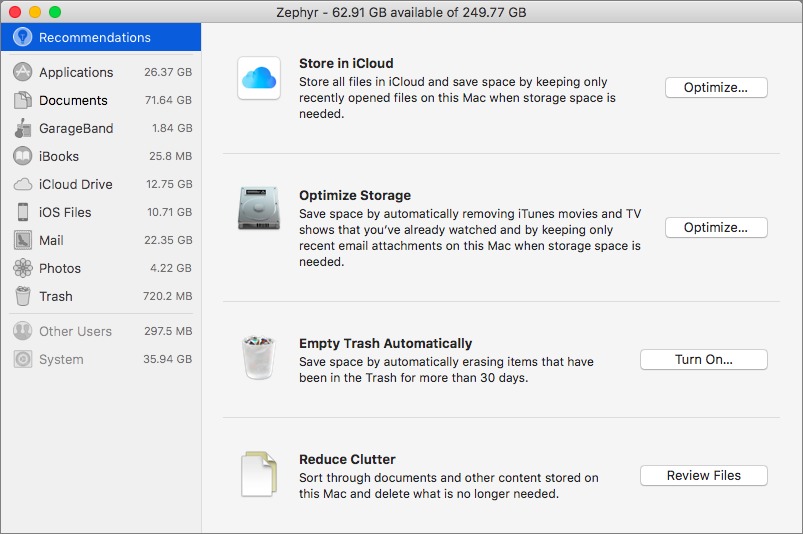
Click Manage to bring up the centralized dashboard for Optimized Storage. In a truly odd interface decision, Apple chose to let you turn on Optimized Storage features from within the System Information app, rather than a pane of System Preferences, where nearly every other system-level setting resides. You can also bring up this window directly within System Information by choosing Window > Storage Management. The main thing to realize about the Storage Management window is that it’s more of an
assistant than a control panel — you can enable Optimized Storage’s settings here, but what you see depends on what other settings you’ve selected, and you can’t turn off or adjust any settings here. You do that in completely different parts of Sierra’s interface.
Managing Files Manually — The Storage Management window presents a familiar interface with a left-hand sidebar and large pane on the right that changes based on what you select in the sidebar. The top item, Recommendations, is where the most interesting stuff happens, and I’ll explain its contents in a moment. But first, notice all the other entries in the sidebar, which correspond to the blocks of color in the About This Mac dialog’s Storage view. For some app-based items, like GarageBand, Mail, and Photos, the Storage Management window merely gives you a button to open the app so you can manage its contents from within the app itself.
For a few app-based items like iBooks, and folder-based items like Applications, Documents, iOS Files, and Trash, Storage Management instead provides a Finder-like list view that shows each file’s name, size, and last accessed date, along with kind for apps and documents. Click the column headers to change the sort, so you can focus on versions of similarly named files, see which files you haven’t touched in years, or just look at them sorted by size.

Hover over any item and you see an X button for deleting the file and a magnifying glass button that reveals the file in the Finder. With these tools, Apple is trying to make it easier for you to delete large files you no longer need. You don’t need to delete files one by one, either — just Command-click or Shift-click to select multiple files and press the Delete key to remove them all at once. You’re given the combined size of all the selected files and warned before they’re deleted, so you can
use this technique to preview how much space a multi-file deletion will save.
The Documents view of Storage Management has three sub-views that help you focus on the task of clearing out unnecessary files, starting with the largest:
- Large Files, which on my MacBook Air lists files larger than 50 MB
-
Downloads, which shows the contents of the Downloads folder
-
File Browser, which provides a column view that’s sorted by folder size and shows file sizes as well
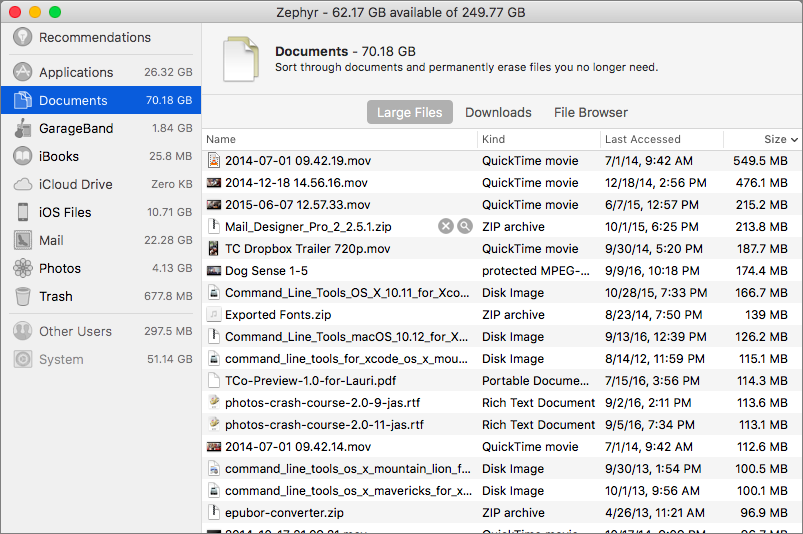
Other nice touches abound. In the Applications item, the Kind column shows you which apps came from the Mac App Store, which didn’t, and which are older versions or duplicates that you can probably delete. I was surprised to find nearly 1.4 GB of old and duplicate apps on my MacBook Air. Notice too that different screens have different buttons, so Applications has a button to open the associated folder and Trash has an Empty Trash button. One thing you won’t find is a graphical view like what GrandPerspective provides; nonetheless, I suspect that Apple’s Storage Management interface will put a significant dent in the demand for utilities like CleanMyMac and Onyx.
But let’s move on to the meat of Optimized Storage, as represented by the sections in Recommendations view: Store in iCloud, Optimize Storage, Empty Trash Automatically, and Reduce Clutter. I’ll explain these in order of increasing complexity. Note that the wording (and even the icons) in this section changes depending on what options you may have already set. I’ve even seen it change multiple times as I’m watching, which is a horrible user experience. If it doesn’t reflect what you believe it should, quit and relaunch System Information, open the Storage Management window again, and let it sit for a few minutes.
Reduce Clutter — I hesitate even to give this section a subhead since it’s merely interface sleight of hand. All clicking the Review Files button here does is switch you to the Documents view so you can sort through and remove unnecessary files manually, as I discussed above.
Empty Trash Automatically — Moving up, the next section is Empty Trash Automatically, which is easy to understand. As it says, once a file has moldered in the Trash for 30 days, the Finder deletes it automatically, much like Photos automatically removes unwanted photos in its Recently Deleted folder after 40 days. Before this, files accumulated in the Trash until you emptied it manually, even if you ran out of drive space. I don’t yet know if Sierra’s Finder will offer to empty the Trash if you run very low on space.
![]()
Amusingly, Microsoft Windows has been capable of automatically deleting files from its Recycle Bin at least since Windows 98, although back then it deleted older files when adding a newer file to the Recycle Bin caused it to exceed a user-specified size. I’m surprised it took Apple this long to get to the point of taking the trash out for the user.
Whether or not you choose to enable this setting depends on what sort of person you are. If you can’t stand the concept of wasting space — even space you don’t need — on the contents of the Trash, you’re probably emptying it manually all the time now. Automatic deletion of trashed items after 30 days likely won’t scratch that itch for you. However, if you, like me, almost never empty the Trash unless you start to run low on drive space, I recommend turning on Empty Trash Automatically to help keep your Mac’s drive from getting too full. It’s a bad idea to let your drive fill up since that can cause crashes, corrupted files, and even directory corruption.
This setting also appears in Finder > Preferences > Advanced as the “Remove items from the Trash after 30 days” checkbox.
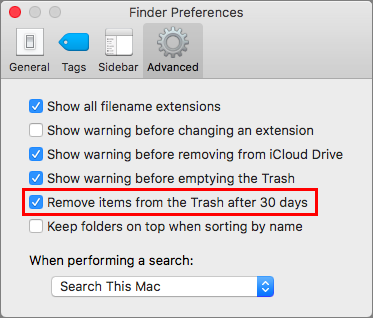
Should you ever wish to turn it off, you’ll need to do that in the Finder Preferences, since enabling it in the Storage Management window replaces the Turn On button with a green Completed checkmark icon.
Optimize Storage — Now we’re getting into the confusing bits, starting with the fact that this aspect of Optimized Storage is called Optimize Storage (notice the missing “d”?). Clicking the Optimize button provides two options, one to automatically remove watched movies and TV shows and another to keep either only recent email attachments or no email attachments.
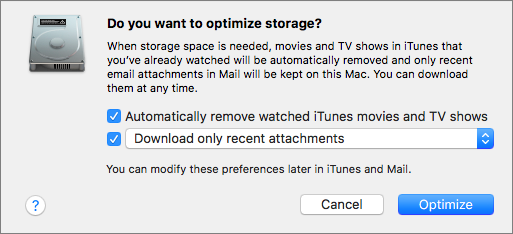
Although I haven’t been able to verify this for certain, I believe the Optimize Storage button affects only movies and TV shows purchased from the iTunes Store. When enabled, iTunes deletes watched movies and TV shows automatically, which is likely a good way to save a lot of space quickly, given the size of most video files.
Again, the Storage Management window of System Information only allows you to enable the Optimize Storage feature. To enable it directly within iTunes, or to turn it off if you want to make sure you can hold onto an already watched movie or TV show, go to iTunes > Preferences > Advanced, where you’ll find a checkbox called “Automatically delete watched movies and TV shows.”

Of course, you can always retrieve a deleted video in iTunes by choosing Movies or TV Shows from the Media Picker, clicking the Library button in the navigation bar, and clicking the Download button that looks like a cloud with an arrow coming out of it.
In an earlier incarnation of this article, I said that the email attachment feature had been removed in a late beta. That was wrong; the Storage Management window initially failed to present it to me, and to others, as an option, but after tweaking the feature in Mail manually, it returned. To find that setting, open Mail > Preferences > Accounts > acccount-name > Account Information. There’s a pop-up menu for Download Attachments that can be set to All, Recently, or None. The Optimize button in Storage Management gives you the choice of setting that menu to Recently or None for all your accounts; once set there, you can change it only in Mail’s preferences.
There isn’t that much new here; Mail has long had the option to not download attachments automatically (the Recently option is new). When you read a message with an attachment that’s not downloaded, you can click its icon in the message to retrieve it. Apple hasn’t said at what point Mail will consider an attachment no longer “recent,” but I presume that it will at some point delete older attachments from the local mail archive such that you’d need to retrieve them again from the server.
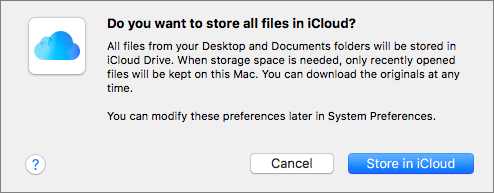
Store in iCloud — The most confusing aspect of Optimized Storage comes in the first section of the Storage Management window, which is called Store In iCloud. The controls available in this section encapsulate two entirely separate features in Sierra, and worse, even the wording and checkboxes change depending on what you’ve already done.
On a Mac that doesn’t have iCloud Photo Library enabled, when you click Store In iCloud, you get a dialog that gives you two checkboxes, one that lets you turn on syncing for your Desktop and Documents folders and another that enables you to turn on iCloud Photo Library. If either of those features is already on, the dialog changes (in the second dialog, I have iCloud Photo Library enabled, so it focuses on Desktop and Documents folder syncing).

At this point, I need to explain Desktop and Documents folder syncing, a new feature in Sierra that’s only peripherally associated with Optimized Storage. When enabled via the Storage Management window of System Information or the master switch at System Preferences >
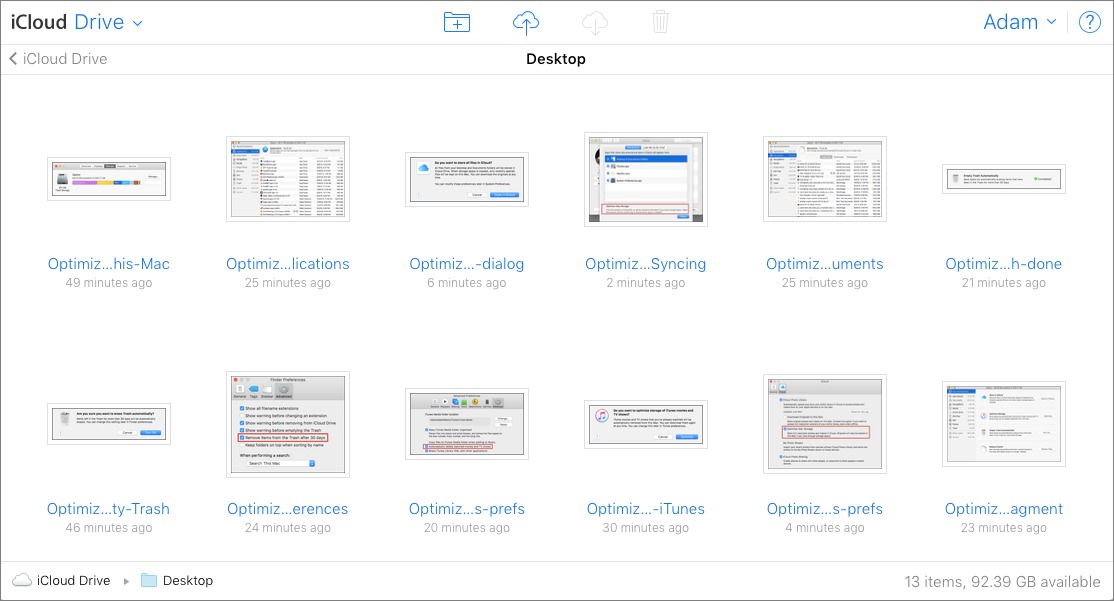
iCloud > iCloud Drive > Options, this feature moves your Desktop and Documents folders from your home folder to iCloud Drive (itself a chimerical folder/volume). Don’t look for them in your home folder because they’re gone — I can’t imagine why Apple didn’t make symbolic or hard links to them in the spot where every user has been trained to look for them for the last 16 years. You can still access them from the sidebar in Finder windows, from the Finder’s Go menu, or from within iCloud Drive.
The beauty of Desktop and Documents folder syncing is that as you enable it on other Macs using the same iCloud account, the contents of those folders on other Macs are merged via iCloud, so you end up with a single unified folder for Desktop and another for Documents. Even better, you can access the full contents of those folders via the iCloud Drive app on any iOS device signed in to the same iCloud account. It works well from what we’ve seen, but it may take some getting used to for those who have long maintained very different systems. I’m looking forward to using it to transfer screenshots made on one Mac to another automatically, since the Mac saves screenshots to the Desktop.
I have two warnings surrounding Desktop and Documents folder syncing. First, if you have gigabytes of data in one or both of these folders, you may have to start paying, or pay more, for storage space on iCloud Drive. The first 5 GB is free, and after that Apple offers several tiers from 50 GB to 2 TB. The storage space is shared with iCloud Photo Library, so if you’re already paying for more to sync photos, you may have enough. But if you are going to start paying, it might be worth getting enough to use both Desktop and Documents folder syncing and iCloud Photo Library.
My second warning is that turning off Desktop and Documents folder syncing is stressful. When you do this, in System Preferences > iCloud > iCloud Drive > Options, Sierra tells you that all your files will be available only in iCloud, which seems wrong: if you’re turning off syncing, you’re doing so because you want them locally. However, that dialog is followed immediately by another that tells you that you can recover your files from iCloud Drive.
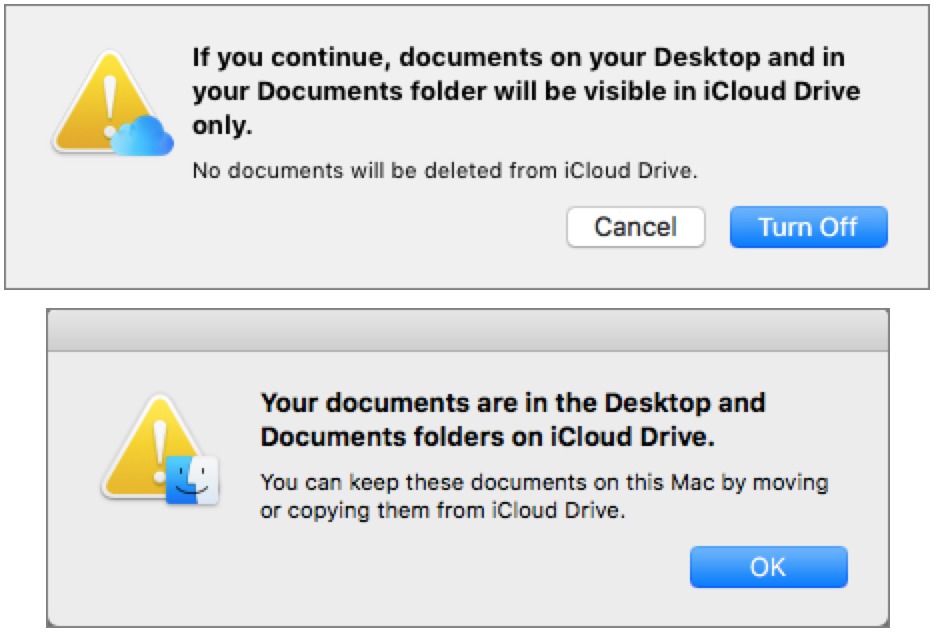
In fact, what happens when you turn off that feature is that Sierra recreates empty Desktop and Documents folders in your home folder. You can’t replace those, so you can’t drag the old Desktop and Documents folders from iCloud Drive to your home folder; instead, you must open each folder in iCloud Drive and move (Command-drag) its contents to the local Desktop and Documents folders in your home folder. You can try to delete the now-empty Desktop and Documents folders from iCloud Drive, but in my
experience, iCloud keeps recreating at least the Desktop folder.
In general, if you ever turn off an iCloud Drive feature and seem to be missing files, restart your Mac and wait a bit. You can also check for the files on iCloud.com itself.
Trust in iCloud? — Now that you understand Desktop and Documents folder syncing, we can return to what happens when you enable the checkboxes that you get in the Storage Management window when you click Store In iCloud. The effect of clicking these checkboxes goes beyond just turning on Desktop and Documents folder syncing and iCloud Photo Library, and this is where Optimized Storage comes in again:
- With Desktop and Documents folder syncing, when you open System Preferences > iCloud > iCloud Drive > Options, there’s a checkbox called Optimize Mac Storage. When selected, it allows Sierra to delete old, large files from your local drive to save space, leaving just a copy in iCloud Drive — you’ll still see the icon in your Finder, but it will have a cloud badge on it, indicating that it’s not stored locally. If that gives you the willies, you’re not alone.
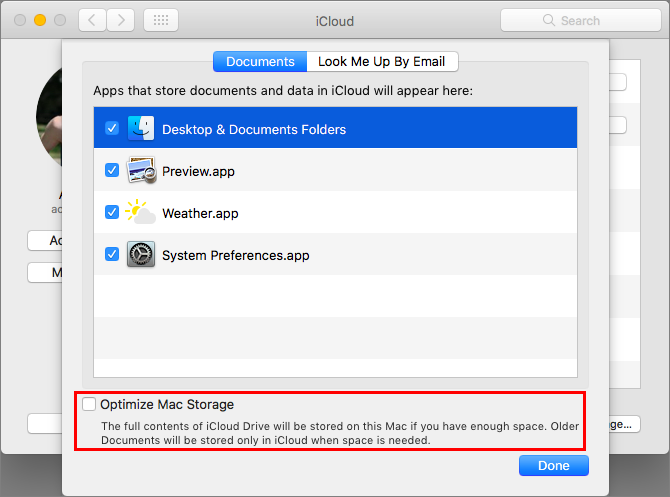
The question here revolves around backup. Let’s say you turn on this feature, and it copies the contents of your Desktop and Documents folder to iCloud Drive. Time passes, and some old, large files in your Documents folder are deleted from the local drive to free up space. They still exist in iCloud Drive, appear on your local drive as stubs that you can click to download, and in any local backups created before they disappeared from your local drive. Now imagine that your backup drive dies, and you need to
create a new backup. Will those old, large files be downloaded from iCloud Drive and backed up? Or will the version in iCloud Drive be the only extant copy?I cannot currently recommend selecting this Optimize Mac Storage checkbox. It will take time to test what happens with backup strategies when Optimized Storage starts deleting files, and since you presumably have sufficient space on your Mac now, it’s better to be safe than sorry.
-
With iCloud Photo Library, selecting the checkbox in Store in iCloud also selects an Optimize Mac Storage radio button in Photos > Preferences > iCloud. That has the effect of storing full-resolution photos and videos in iCloud and only keeping them on the Mac if there’s space. (When you work with an item whose full-resolution original is in iCloud, Photos downloads it first.)
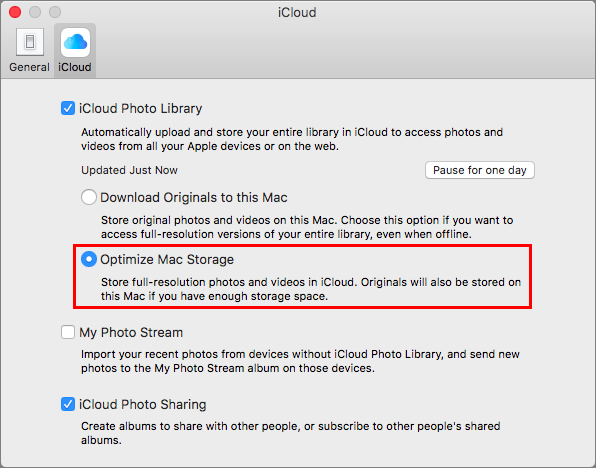
There’s nothing new about this iCloud Photo Library setting; it has been in Photos since the launch of iCloud Photo Library. In the past, however, you had to enable Optimize Mac Storage manually, and we have firmly recommended that you never enable it on your primary Mac, where you presumably have sufficient drive space for your entire photo library. Optimize Mac Storage is great for a MacBook Air that lacks room for all your photos, but in our view, you should always have a full local copy of
all your photos, backed up on local storage.
In the end, the question comes down to whether or not you trust iCloud, because once you enable these features, iCloud becomes the “truth,” in the lingo of syncing. That’s fine if you have local copies and local backups to restore from should something horrible happen to iCloud or your account, but in both of these cases, it seems theoretically possible that you could end up with no local copies at all. If you’re not all that attached to your data, or if you’re willing to cede all responsibility for your data to Apple, that may be acceptable. Personally, I want to know that I have a copy of every document and photo stored locally on at least one Mac and backed up locally in at least one spot.
During WWDC, Craig Federighi said that Apple has over 10 billion documents in iCloud today, although I wonder if that number includes photos or reflects mostly iOS storage, given how few people I see using iCloud Drive to store Mac documents. The problem is that I’ve heard too many stories about people experiencing problems with data stored in iCloud to trust it implicitly. I’m not perturbed about iCloud security in particular; Apple makes all the right noises about iCloud security and privacy. But there’s a big difference between having the right intentions and eliminating all bugs. iCloud is usually fine as a syncing service, but that’s a far stretch from trusting it with
the only copy of valuable data.
TidBITS Watchlist: Notable Software Updates for 19 September 2016
Carbon Copy Cloner 4.1.10 — Bombich Software issued Carbon Copy Cloner 4.1.10 (CCC), which is now officially compatible with macOS 10.12 Sierra. The backup utility works around a bug in Sierra in which FileVault could not be enabled on the destination volume, creates RSA key pairs for use with the Remote Macintosh option (to accommodate changes in Sierra), enables creating and mounting sparse bundle disk images on SMB sharepoints, and resolves issues related to updating the password for a NAS volume associated with a particular task. ($39.99 new, 12.4 MB, release notes, 10.8+)
Read/post comments about Carbon Copy Cloner 4.1.10.
VMware Fusion 8.5 — VMware has updated the standard and Pro editions of its virtualization package to version 8.5. The update resolves an issue that prevented a Windows virtual machine from opening an attachment in the mail application on the Mac, fixes a crash with opening an imported Parallels 11 virtual machine, and sorts out a problem with successfully dragging and dropping files between a host and a Mac OS virtual machine. The release notes also call out several known issues when running VMware Fusion in macOS 10.12 Sierra, including crashes that
occur when grabbing keyboard or mouse input from the host and a problem with using Full Screen mode when operating more than one monitor. ($79.99/$199.99 new, free update, 369 MB, release notes, 10.9+)
Read/post comments about VMware Fusion 8.5.
BusyContacts 1.1.2 — BusyMac has released BusyContacts 1.1.2, adding compatibility with macOS 10.12 Sierra. The contact manager app also adds photos to Inbox change notifications, fixes an iCloud sync error for vCards containing social profile links, resolves a sync error that occurred when creating a contact on Exchange via Quick Entry, fixes a bug with the text size menu commands and preferences, and resolves an issue with URLs that contain a # character. ($49.99 new from BusyMac or the Mac App Store, free update, 5.6 MB, release notes, 10.9+)
Read/post comments about BusyContacts 1.1.2.
SuperDuper 2.9.1 — Shirt Pocket released SuperDuper 2.9, improving bootability of RAID clones and adding a preference to ignore copy errors induced by antivirus programs (which could cause SuperDuper to stop copying files; learn more at this Shirt Pocket blog post). The drive-cloning and backup app also preserves the Scheduled Copies window sort order between launches, fixes intermittent beach balls while the app is opening, and fixes a long-standing upgrade animation bug
that prevented full update text from being visible.
Shortly after this release, Shirt Pocket updated SuperDuper to version 2.9.1 with official macOS 10.12 Sierra compatibility and improved quit speed when shutting down or restarting. The app now also requires 10.8 Mountain Lion or later, though version 2.8 (compatible with 10.7 Lion) is still available from the Shirt Pocket Web site. (Free for basic functionality, $27.95 for additional features, free update, 2.9 MB, 10.8+)
Read/post comments about SuperDuper 2.9.1.
PDFpen and PDFpenPro 8.1 — Smile has pushed out version 8.1 of PDFpen and PDFpenPro, which adds visible snap-to guides that help you more precisely place images, shapes, text boxes, and other objects. The PDF editing apps now display an email address for a self-signed certificate (instead of the issuer), retain size-to-fit font in appearance for form fields, resolve a hang when performing a Save As for forms with required fields, work around a drag-and-drop issue in the sidebar in macOS 10.12 Sierra, and avoid converting grayscale images to RGB after opening.
($74.95/$124.95 new with a 20 percent discount for TidBITS members, $30 upgrade, free update from version 8.0, 70.3/71 MB, release notes, 10.10+)
Read/post comments about PDFpen and PDFpenPro 8.1.
Keyboard Maestro 7.3 — Peter Lewis of Stairways Software has released Keyboard Maestro 7.3 with refinements for the powerful automation and clipboard utility. The update fixes a code signing issue for macOS 10.12 Sierra, adds a Set Image DPI action that can resize or crop clipboard images, remembers the scroll position of recently edited macros, and adds a Timeout option to various Safari and Chrome actions. ($36 new with a 20 percent discount for TidBITS members, free update, 19.6 MB, release notes,
10.10+)
Read/post comments about Keyboard Maestro 7.3.
Boom 2 v1.5 — Global Delight has released version 1.5 of its Boom 2 volume booster and equalizer app with a more robust equalizer and a few user interface refinements. The update introduces the Controlled Boost feature, which intelligently controls the system’s audio for optimal output while avoiding excessively high volume. Additionally, Boom 2 recalibrates audio to enhance the default speakers on your Mac with crisper sound. Earlier this year, Global Delight released Boom for iOS with features like 3D Surround Sound,
Equalizer Presets, and an Audio Intensity Slider; Global Delight has now updated it for iOS 10. ($14.99 new from Global Delight with a 25 percent discount for TidBITS members, free update, 11.7 MB, 10.10+)
Read/post comments about Boom 2 v1.5.
BusyCal 3.0.6 — BusyMac has released BusyCal 3.0.6 with support for macOS 10.12 Sierra, along with improvements and fixes for the calendar app (see “BusyCal Updates Mac Calendar Alternative, Expands to iOS,” 1 July 2016). The update adds a menu command for choosing the starting location for travel time, fixes a bug that caused time zones to appear on Exchange events, adds an option to display a second time zone column in Week View, enables you to click URLs in the Location field, resolves an issue that prevented the Send Update button from appearing for Exchange users, and
adds an Email All Participants command to the event contextual menu. ($49.99 new, $29.99 upgrade, 11.2 MB, release notes, 10.11+)
Read/post comments about BusyCal 3.0.6.
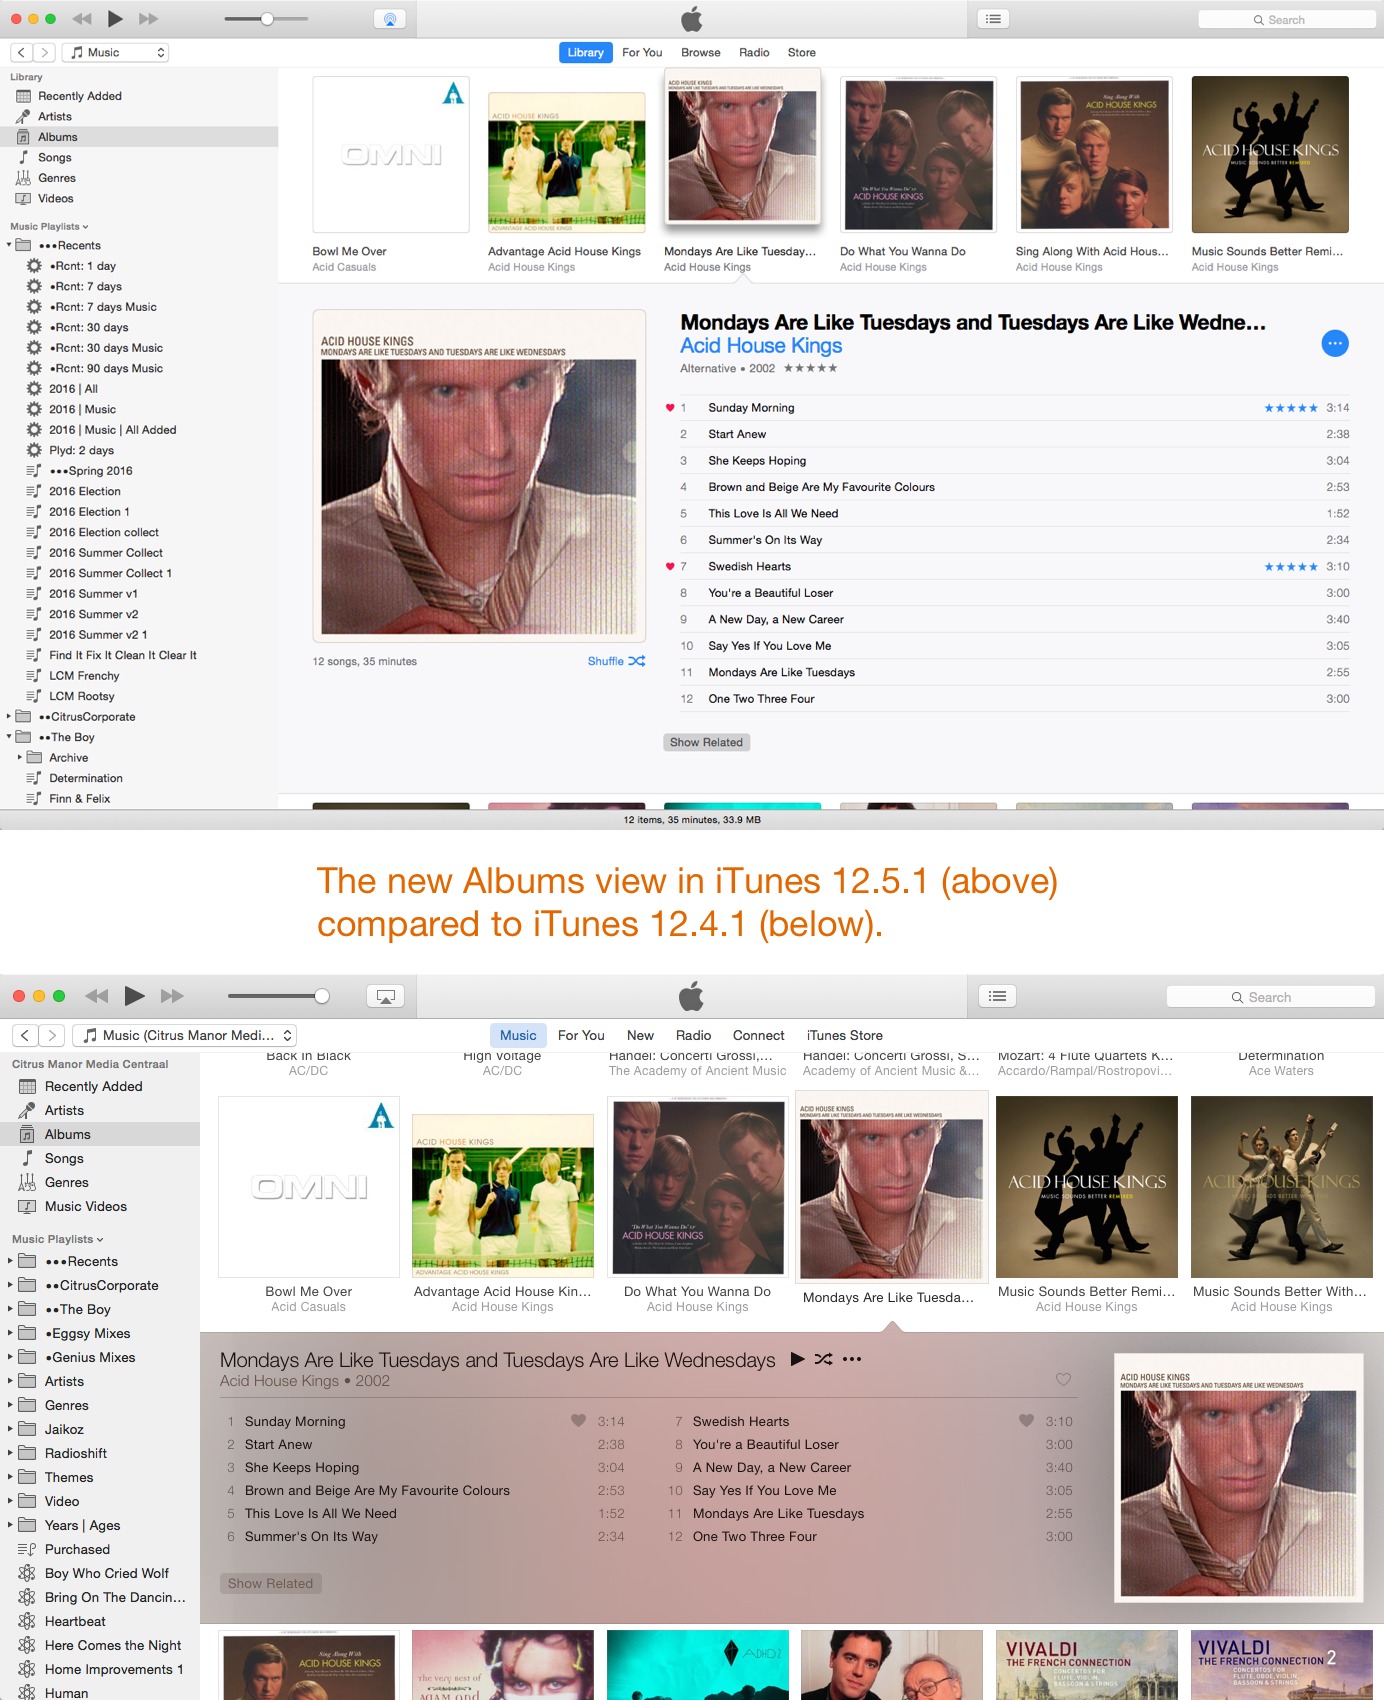
iTunes 12.5.1 — Apple has released iTunes 12.5.1 with a redesigned Apple Music section, user interface refinements that bring a cleaner look to the app (check out the Albums and Artists views), and support for iOS 10. It also adds a couple of new features that are exclusive to macOS 10.12 Sierra, including support for using Siri to play music from your iTunes library and Picture-in-Picture, which enables you to float a resizable video window in any corner of your screen. iTunes now requires 10.9.5 Mavericks or later. (Free, 262 MB via direct download or Software Update, release
notes, 10.9.5+)
Read/post comments about iTunes 12.5.1.
ExtraBITS for 19 September 2016
In ExtraBITS this week, Ars Technica profiles users who cling to Mac OS 9, Peter Cohen has a fix for T-Mobile users on iOS 10, Brett Terpstra provides the ultimate guide to iOS text editors, and TechHive’s Jared Newman offers a cord-cutter’s guide to watching the NFL.
Mac OS Users Who Are Keeping It Classic — Forget macOS, there are a number of Mac users who still haven’t made the leap to Mac OS X. Ars Technica profiles the people who stick to the 16-year-old Mac OS 9 and reveals some fascinating reasons for why they persist with such a hoary operating system. For some, it’s a matter of cost, but for others, the classic Mac OS actually maintains technical advantages. In particular, some audio professionals prefer Mac OS 9 for its low latency, high speed, and bevy of free production software.
Solving “No Carrier” Problems with T-Mobile in iOS 10 — Peter Cohen reports that many T-Mobile customers who updated an iPhone 6, iPhone 6 Plus, or iPhone SE to iOS 10 suddenly had trouble getting cell service on their phones. Power cycling the iPhone fixed the problem temporarily, but if you’re suffering from this bug, you can now eliminate the error permanently with a carrier update from T-Mobile. Apply it by going to Settings > General > About.
Massive iOS Text Editor Comparison Chart — How many iOS text editors are there? We’re not sure, but the number certainly exceeds 100. We know this because text maven Brett Terpstra has, with the help of a number of contributors, compiled a list of more than a hundred such apps, presented in an extensive dynamic chart that lists several dozen features and characteristics of each app. If you’re looking for an iPhone writing tool that can export PDF, costs less than $3, and supports Markdown, Brett Terpstra’s chart is the place to go.
A Cord Cutter’s Guide to the 2016 NFL Season — If you love watching football but hate paying for cable TV, Jared Newman of TechHive has compiled an excellent guide to watching NFL games without a cable or satellite subscription. We have one update: Twitter now has an Apple TV app that you can use to watch Thursday Night Football games for free.