TidBITS#1356/13-Feb-2017
TidBITS is expanding — Adam Engst introduces our new TidBITS Content Network, a syndicated content service designed to help Apple consultants, resellers, and other professionals populate their blogs, newsletters, and social media streams. Wireless carriers are coming full circle, as Verizon Wireless reintroduces an “unlimited” data plan at a reasonable price. QR codes, which make it easy to share URLs and other bits of data in the physical world, have never quite caught on. Google hopes to change that by including a QR code scanner in the iOS version of its Google Chrome Web browser. We welcome a new sponsor this week: Squarespace, which makes creating and hosting beautiful Web sites fast and easy. Josh Centers is a longtime customer, and he gives a few usage tips and tells you how you can save 10 percent on your first purchase. Finally, Josh dives back into his “A Prairie HomeKit Companion” series with a look at Automations. Notable software releases this week include Alfred 3.3 and TextExpander 6.1.5.
Introducing the TidBITS Content Network for Apple Consultants
Apple consultants are some of our favorite people because they share our desire to help everyday users solve problems and work more efficiently with their Macs and iOS devices. That’s one of the reasons we like diving into technical topics in TidBITS — we know that consultants will be able to translate our knowledge into real-world solutions for their clients.
We’ve now come up with a new service to help consultants, resellers, and other businesses who need to communicate with Apple users. As a bonus, it will also expand our capacity to teach normal home and office users how to make better use of their Macs, iPhones, and iPads. We call it the TidBITS Content Network, or TCN for short.
We designed TCN to provide content that Apple pros can use to stay in touch with their clients. Consulting — and business in general — is often as much about maintaining relationships as it is about providing a service. But in today’s hectic world, the best way to maintain contact is with practical, helpful information.
Each month, TCN provides professionally written, edited, and illustrated tips and articles that its members can use to update their blogs, create a vibrant social media presence, and power email newsletters that people will actually read. To be specific, TCN publishes four short tips and four 400- to 600-word articles each month, complete with featured image photos, carefully composed screenshots, and Facebook and Twitter teasers for each article. Everything we write for TCN is targeted to the everyday Apple user and focused on providing useful guidance.
The key to TCN is that it’s syndicated content, so everyone who subscribes to TCN gets the same tips and articles. That works because almost no consultants have overlapping audiences. If a TCN member sends an email newsletter with one of our articles to her clients in Boise, there’s little chance that people who work with another TCN-subscribing consultant in Tampa would ever see the same article. It’s like the Doonesbury comic strip — it’s the same in every newspaper, but few readers ever see it in multiple places.
Unlike Doonesbury, though, TCN members are welcome to modify the tips and articles however they wish to add a personal touch. Or, if they want, they can publish them unchanged as a guest post.
If you work in a field where you’d benefit from publishing Apple-specific tips and articles for your clients or customers, check out the TidBITS Content Network site, which has pricing details, sample content, frequently asked questions, and an introductory video. And if you’re more on the user end of things but know any Apple consultants, resellers, or techs who could use TCN content, I’d appreciate you passing on the news. After all, if your consultant subscribes to TCN and publishes our content, you’ll get to read it! Thanks!
Verizon Wireless Brings Back “Unlimited” Data
In the early days of the iPhone, mobile data was unlimited, and voice calls and text messages were rationed. That flipped as usage evolved: now data is metered while carriers practically give away text messages and voice minutes. But thanks largely to Sprint and T-Mobile (see “T-Mobile and Sprint Announce Unlimited Data (for Higher Prices),” 19 August 2016), unlimited data is making a comeback, with Verizon now announcing its own “unlimited” data plan. (AT&T offers an unlimited data plan too, but only to customers who
have AT&T wireless and DirecTV or U-verse TV residential service.)
I put “unlimited” in quotes because there is still a limit, but it’s not onerous. After you’ve used 22 GB of data in a month, Verizon may prioritize other users’ connections over yours, effectively throttling your speed. However, Verizon said that it doesn’t expect to do that often. There are also a couple of other minor catches: you must agree to paperless billing and enroll in auto pay.
Pricing for Verizon’s unlimited data plan is reasonable, starting at $80 per month, including unlimited talk and text. Here’s how that works for multiple lines:
- 1 line: $80 per month
- 2 lines: $70 per month per line, for a total of $140 per month
- 3 lines: $54 per month per line, for a total of $162 per month
- 4 lines: $45 per month per line, for a total of $180 per month
Verizon’s unlimited plan also includes HD video streaming, mobile hotspot functionality, calling and texting to and from Canada and Mexico, and up to 500 MB per day of 4G LTE roaming data in Canada and Mexico.
Given that Verizon is typically the most expensive network and the slowest to compete with its rivals on plans and price, the fact that Verizon is bringing back unlimited data at a reasonable cost is a big deal and a testament to the power of market competition. Would this have happened if AT&T had successfully purchased T-Mobile (see “The Impact of AT&T Buying T-Mobile,” 21 March 2011)?
Squarespace Sponsoring TidBITS
Apple abandoned iWeb in 2011, and to this day we still receive requests for another tool that makes Web site creation as easy. That’s why we’re so pleased to welcome Squarespace as our latest sponsor. Squarespace makes it easy to create and host a beautiful Web site with no additional software necessary.
I’ve been a happy Squarespace customer for four years. I got my start in tech writing on my Squarespace-hosted blog. Sure, I could have chosen a free tool like Google’s Blogger, but their designs look painfully dated. Or I could have created a WordPress blog with a cheaper host, but the reliability of those discount hosts is questionable, and WordPress can be a pain to maintain. Squarespace is great-looking, quick, reliable, and — best of all — easy. I could have spent months or years fooling with HTML and CSS, but Squarespace let me start writing right away without stressing about design.
How dedicated is Squarespace to reliability? When Hurricane Sandy flooded their New York City data center, CEO Anthony Casalena helped haul fuel up seven stories to keep the servers online. Now that’s dedication!
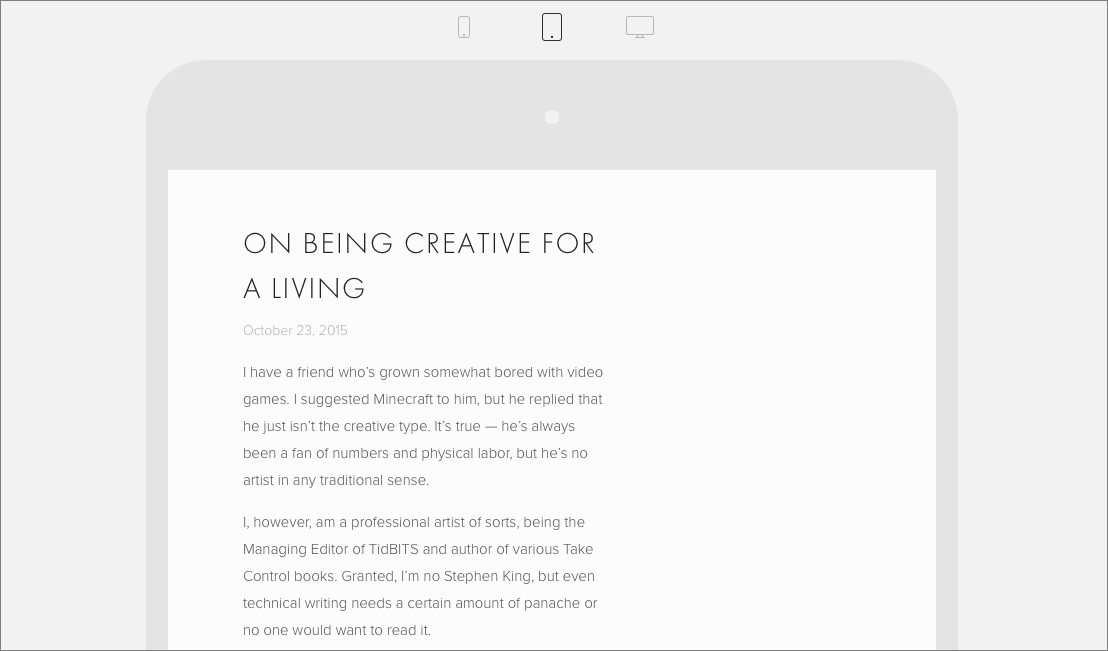
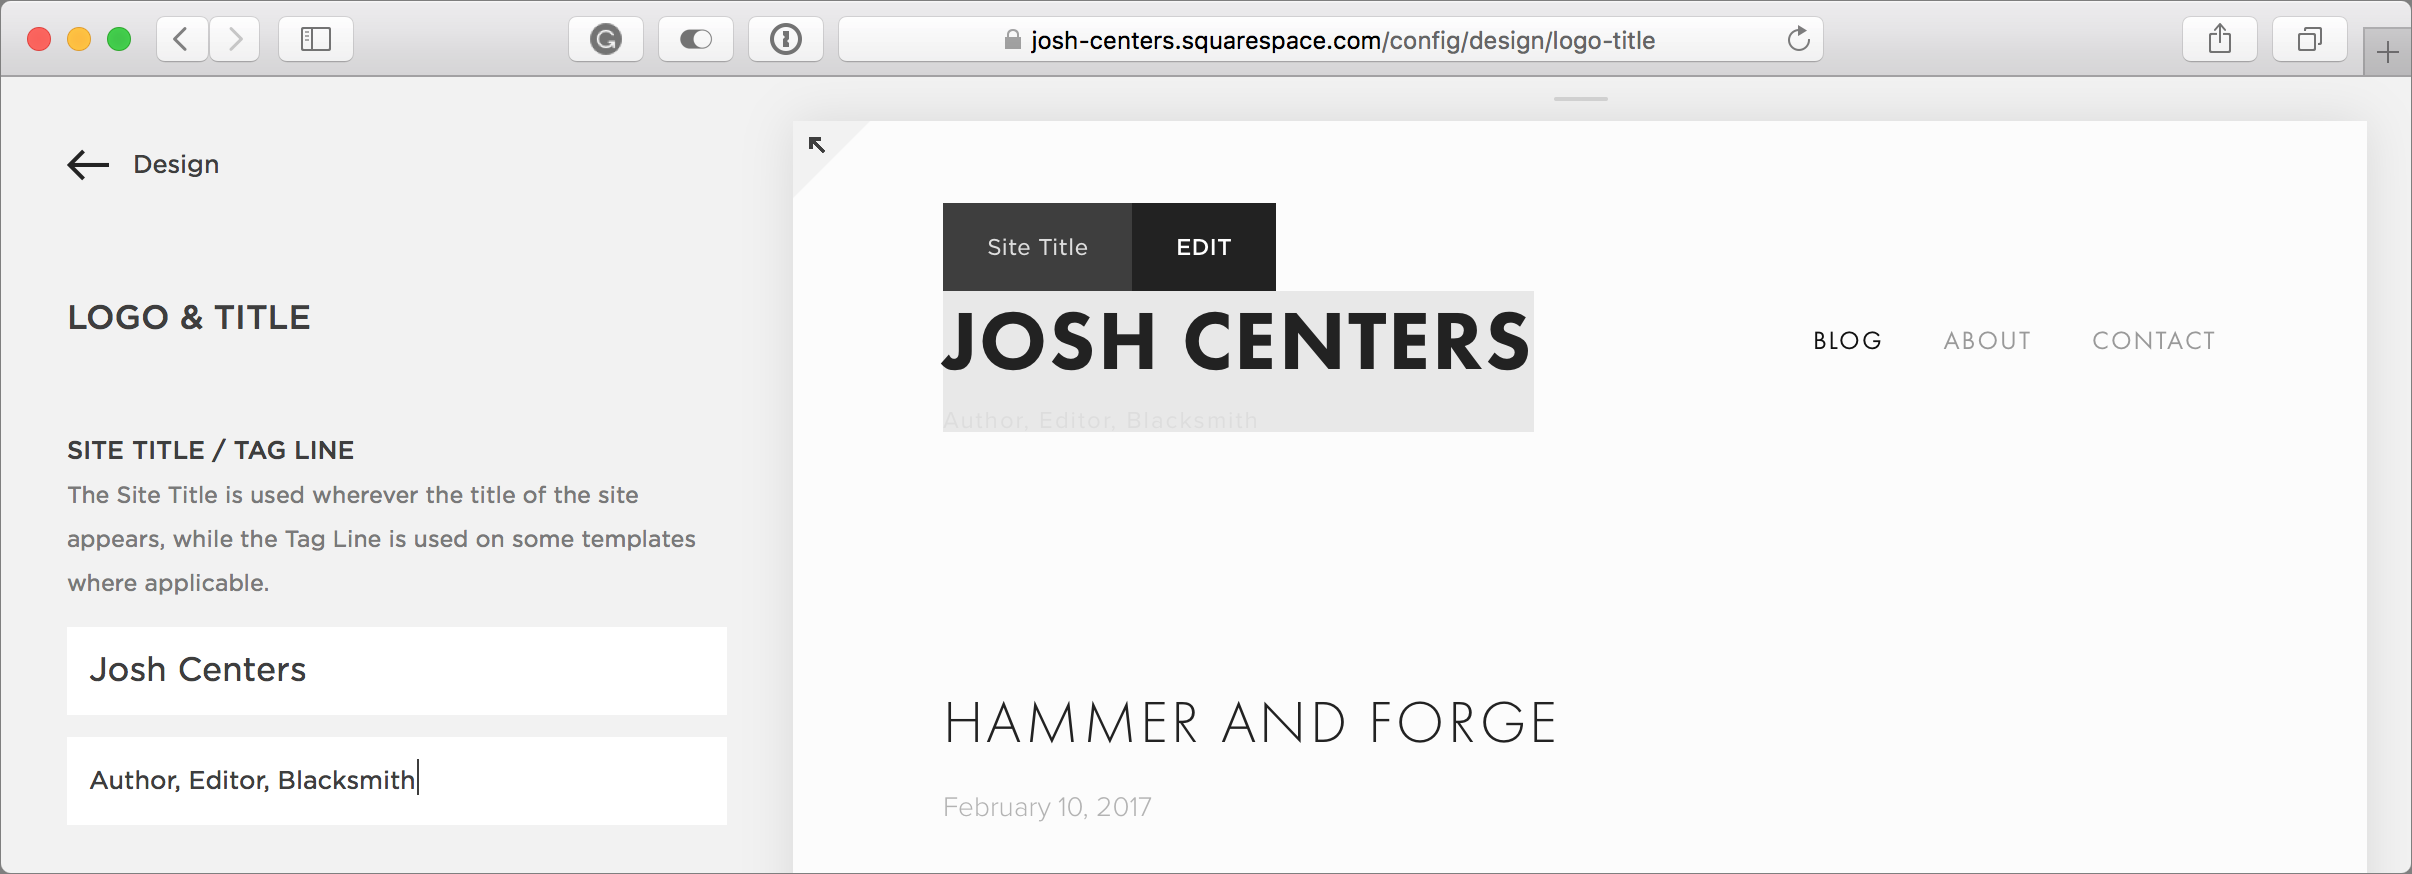
TidBITS and Take Control absorb most of my computer time now, so it has been a while since I’ve updated my personal site. I decided to take this opportunity to freshen it up a bit to show you how easy Squarespace is. (The screenshot below shows how my site looked for years.)

First, I wanted a new look. That’s as easy as going into Squarespace’s configuration and choosing Design. From there, I could preview new templates to see how they look.
All of Squarespace’s designs are responsive, which means that they scale to look good on any screen size, from an iPhone to a 27-inch iMac. You can even preview your site with different screen sizes to see how it’ll look.
Historically, my site mostly contained text, so I had been using the Native template. To focus on some photos I’ve been taking, I decided to try another template called Avenue that’s targeted more at photographers and illustrators. If you browse the customer gallery, you can see all that’s possible with Squarespace designs.
Once I installed the new template, I just had to delete its included demo pages and bring in my content, which is all done via drag-and-drop.

You can use the Style settings to change the template’s look, and if you’re familiar with CSS, you can use it to further customize your site’s design. Even if you later switch to another template, Squarespace saves your settings for the previous template, so there’s no risk to trying out new templates.
Adding fresh content to a blog is easy — just hover over the blog block and click Add Post. Squarespace posts can contain Markdown, images, galleries, audio, video, or just about anything else you like. I’ve been taking blacksmithing classes for a few months, so I decided to post some pictures of the shop and my projects.

With a few clicks, my gallery was live! It took only a couple of minutes — much easier than beating and twisting a piece of steel into a letter opener. Though I do like the hammering.
Changing elements on the page is as simple as mousing over an item and choosing options from the menus that pop up. I wanted to update my site’s subtitle, which required merely pointing at it and clicking Edit.
Have you ever thought about hosting a podcast? Squarespace makes it easy. Want to start an ecommerce site? Squarespace makes that easy, too. Squarespace also integrates with Disqus comments and Apple News. You could even set up a site for a non-profit that would be simple to maintain and could accept donations.
Squarespace is reasonably priced: as low as $12 per month for a personal site and $18 per month for a business site. If you want a custom domain, you can supply your own, or Squarespace will include one for free if you pay for a year of service up front.
Squarespace is a good company with a superb service, and we’re proud to have them as a sponsor. If you need a Web site, and particularly if you’re still limping along with iWeb, give them a shot with a 14-day free trial, no credit card required. And if you do decide to sign up, you can save 10 percent on your first purchase with offer code TIDBITS.
Chrome for iOS Gains QR Code and Barcode Scanning
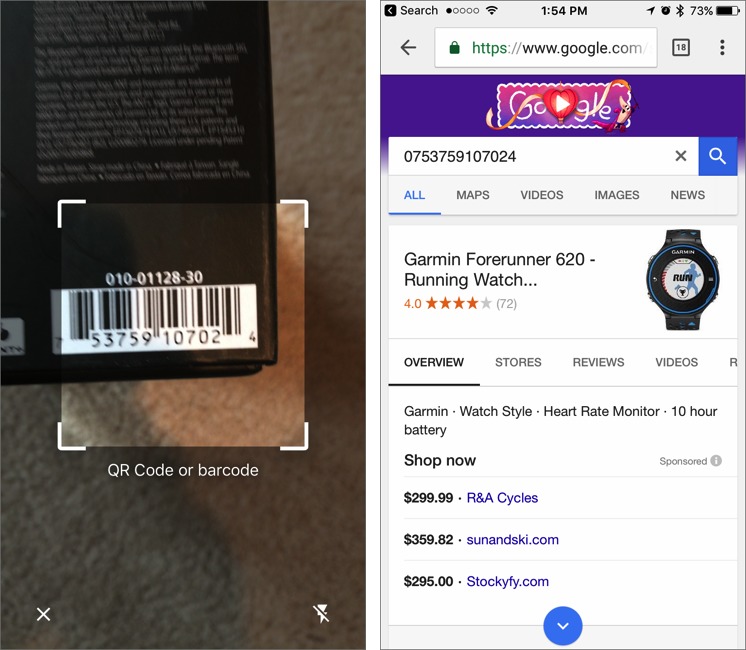
I was playing around on my iPhone the other day and happened to use 3D Touch on the icon for the Google Chrome Web browser. Imagine my surprise when one of the “quick actions” that Chrome presented was Scan QR Code. And indeed, tapping it brought up a QR code scanning screen. It turns out that QR code and barcode scanning are new to version 56 of Chrome for iOS, which Google updated on 1 February 2017.
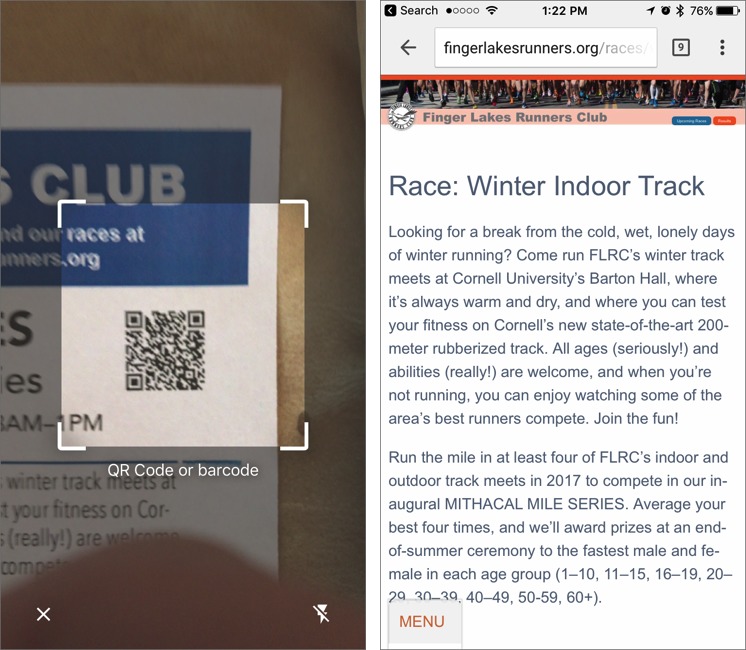
For those who aren’t aware, a QR code uses regions of rectangles within a square to encode data, most commonly a URL to a Web page. QR codes are used in advertising, publishing, product tracking, and other fields where it’s helpful to have a graphical element stand in for a URL that would likely be impossible to remember or difficult to type, as I’ve done in the TCN screenshot below. QR codes are also used to seed two-factor authentication systems (see “Authy Protects Your Two-Factor Authentication Tokens,” 6 November 2014), and some companies even use the technology in payment systems — see “Walmart Pay Is Better Than You Might
Expect,” 18 July 2016. Various apps and Web sites can create QR codes for you, and any designer using Adobe InDesign can insert one into a document merely by choosing Object > Generate QR Code.

Although QR codes have been around since 1994 and in common use since 2009, they’ve never really taken off. That’s likely because Apple never built a general-purpose QR code scanner into the iPhone’s Camera app. (The Wallet app can scan QR codes, but it only understands QR codes associated with Wallet passes.) Glenn Fleishman bemoaned this lack almost five years ago in “Apple Could Make QR Codes Work with a Simple Tweak” (2 July 2012).
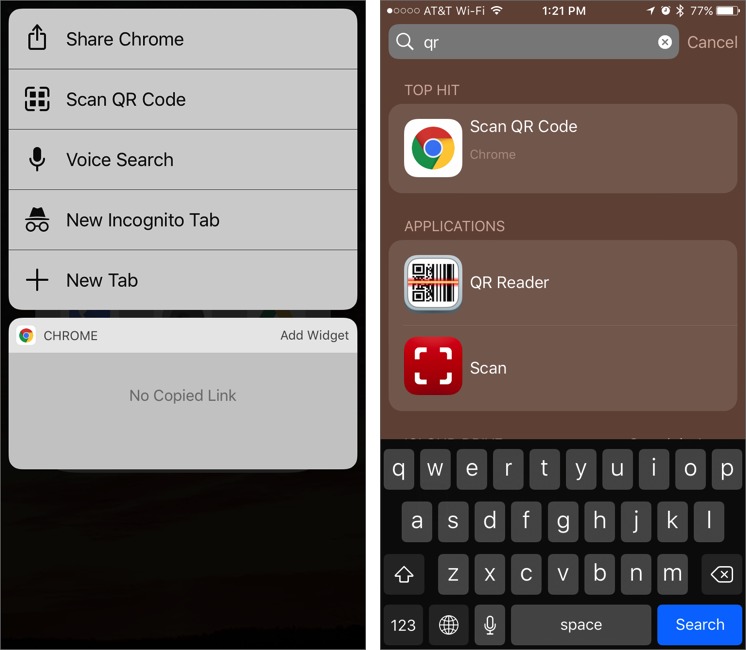
With Chrome, scanning a QR code is easy, but you likely wouldn’t figure it out on your own because there is absolutely no indication of the feature within the app itself. Instead, you must either 3D Touch the app (if you have a compatible iPhone) and then tap Scan QR Code or search in Spotlight on “QR” and then tap a Scan QR Code search result.
Then, center the QR code you want to scan in the camera’s viewfinder. Chrome scans nearly instantly (so much so that capturing the screenshots was hard), and puts the URL associated with the QR code into the address field so you can preview it — just tap the Go button to load the page.
Chrome can also scan traditional barcodes, which it feeds directly into Google’s search engine to find product pages and the like. In the screenshot below, I’ve scanned the barcode on the bottom of my Garmin Forerunner 620 GPS watch box, and Google promptly displayed related information.
If you have a dedicated QR code scanning app that you use regularly, you may prefer to stick with it. In particular, I found it clumsy to invoke Chrome’s scanner repeatedly, so a dedicated app may work better in such situations. But if, like me, you have to do a Spotlight search to find your QR code scanner anyway, it’s faster and easier to use Chrome from the Spotlight results screen.
A Prairie HomeKit Companion: Automating Your Home
At this point in our “A Prairie HomeKit Companion” series, you should be up and running with HomeKit home control. We first covered installing and setting up your Accessories and then discussed how you could control them individually and create Scenes to control them in groups. In this installment, I’m going to show you how to use Automations to toggle Accessories or Scenes when certain triggers fire.
Before you can automate HomeKit, you must have a device that can act as a hub: either a fourth-generation Apple TV or an iPad running iOS 10. The hub is necessary because something in the house has to be present to trigger Automations. Setting up a HomeKit hub confers an additional advantage: it lets you control your Accessories while you’re away from home.
The Hubbub About Hubs — Why can only Apple TVs and iPads work as HomeKit hubs? Why not AirPort base stations, which are already hubs of a sort? The reason is likely that the Apple TV and iPad both support Bluetooth, which controls many HomeKit devices. Why can’t you use a Mac as a hub? Your guess is as good as mine.
An iPad is slightly easier than an Apple TV to set up as a hub, and chances are better that you have one, so I’ll start there:
- In Settings > iCloud, make sure that you’re signed into your primary iCloud account.
- Also under Settings > iCloud, make sure that iCloud Keychain and Home are enabled.
-
Go to Settings > Home and enable Use this iPad as a Home Hub.

It’s that simple! But here’s the trick: if you want your Automations to work while you’re out and about, your iPad must stay home! If you take your iPad hub with you, the Automations won’t work, because your hub isn’t connected to your home Wi-Fi network.
Therefore, if you own a fourth-generation Apple TV, it makes a better hub than the iPad, because it’s unlikely that you’ll take it out of the house. However, the trick here is that two-factor authentication must be enabled on your iCloud account. Note that this is different than Apple’s older two-step verification scheme, and if you have that enabled, you’ll have to disable it first to enable two-factor authentication. Apple explains this process in a support article, and I give easy, concise directions in “iOS 10: A Take Control Crash Course.”
Once you’re past that hurdle, using your Apple TV as a HomeKit hub is as simple as making sure that you’re signed in to your primary iCloud account under Settings > Accounts. You also need to have iCloud Keychain enabled on an iOS device or Mac.
Then, under Settings > Accounts > iCloud, you should see a HomeKit header, and under that, you should see Home: Connected. If you don’t, make sure everything is signed in properly.

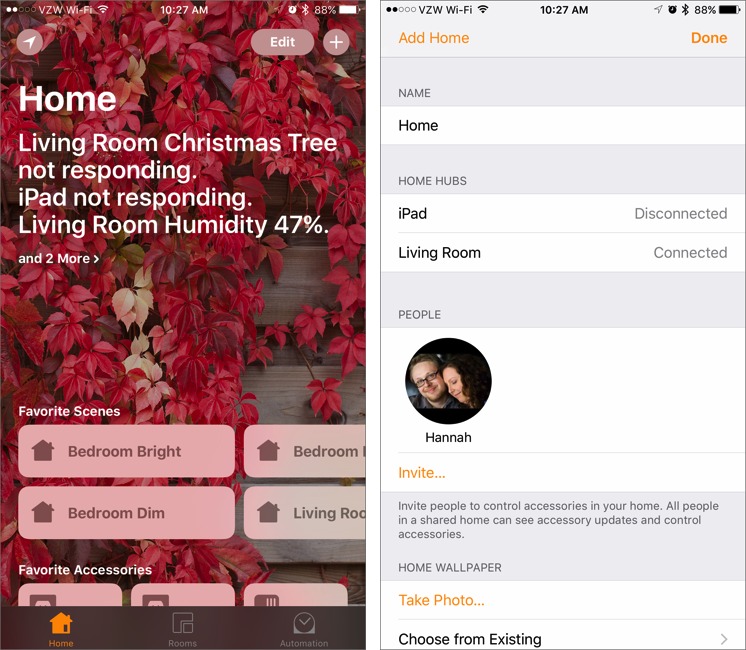
The other way to check on your hubs is via the iOS Home app. First, if a hub isn’t responding, you’ll see that in the status messages on the Home screen. To see the status of all your hubs, tap the arrow in the upper left. Under Home Hubs, you’ll see your hubs and their statuses.
To test if your hubs will work as you expect while you’re away from home, turn off Wi-Fi on your iPhone temporarily. Then, while you’re connected just via cellular data, try controlling your HomeKit Accessories. If your hubs are working properly, everything should work just as it does when you’re connected to Wi-Fi.
Finally, note that when it comes to HomeKit reliability, the more hubs, the better. I recommend setting up as many as you can, because if one disconnects or flakes out for some reason, you’ll have backups to ensure your Automations keep running. I’ve found HomeKit to be much more reliable since I added a second hub.
Once your hubs are set up, you can control your HomeKit devices from anywhere in the world! That works exactly the same as it does when you control HomeKit devices inside your home. You can also set up Automations because the hub will always be available to invoke them.
Automatic for the Home — The hardest part of setting up HomeKit Automation is getting the hubs in place. Then it comes down to figuring out what you want to do.
Just as with other aspects of home automation, be sure to communicate with your housemates and proceed carefully. If you set up an Automation to turn off the lights when you leave the house, you could leave your spouse and kids in the dark when you run to get ice cream.
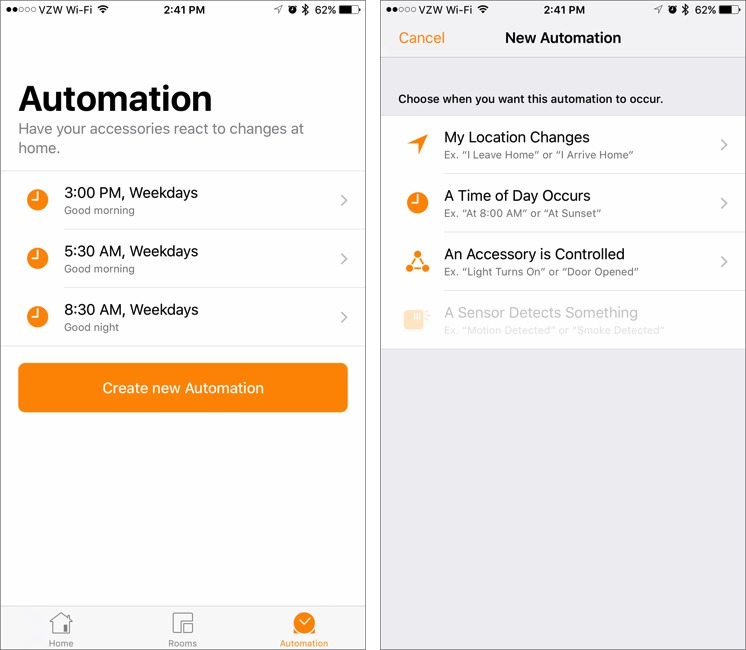
It’s easy to go overboard on Automations, so I recommend keeping them simple. My wife wakes up at 5:30 AM, so I have my Good Morning scene set to light up the house for her. I then have my Good Night scene set to trigger at 8:30 AM, because I don’t need the lights by that point. And then at 3:00 PM, Good Morning comes on again, so the house is lit up when she comes home from school.
I’d like to set up an Automation to turn outside lights on and off at appropriate times of day. We like to keep our exterior lights on at night for security reasons, but I often forget to turn them off during the day, which wastes power and reduces bulb lifespan. Our encased porch light could probably hold a Hue bulb safely, but Philips doesn’t make outdoor flood lights like we have on the side of the house, so I’d need to install something like Elgato’s Eve Light Switch to automate those lights.
If you had a HomeKit-compatible thermostat, you could also create an Automation to set the temperature down when you drive away in the morning and back up when you leave work.
That should give you a few ideas for useful Automations. What you want to avoid is making it seem like your house is haunted — lights turning off or on at seemingly random times, spooking everyone in the house.
Setting Up Automations — Once you set up a hub, the Automation screen in Home becomes available. In it, you can see existing Automations and set up four different Automation types: My Location Changes, A Time of Day Occurs, An Accessory Is Controlled, and A Sensor Detects Something. The steps for configuring them are roughly similar.
First, you tap Create New Automation in the Automation tab and then configure the trigger — the conditions that will cause the Automation to be invoked. Then you choose which Accessories and Scenes to turn on or off.
- My Location Changes: I’m not wild about geofence triggers that go off when you arrive at or leave a specified location. They’re fine if you live alone, but if you share your house with others, they can create all sorts of problems unless everyone has the same schedule. For instance, there’s no way to configure the lights to turn off only if my wife and I both leave the house.
However, geofence triggers do have their uses. For instance, you could set up your outdoor lights to turn on when you approach your house. If you had a HomeKit-enabled garage door, you could even have it open automatically as you drive up.
To set up a location Automation, tap Create New Automation in the Automation tab and then My Location Changes.
At the Location Automation screen, first choose a triggering location. This can be your home, a recently accessed Maps location, or a location you find in a search. Then choose whether to trigger the automation when you arrive at or leave the location. Finally, the map lets you adjust the trigger’s sensitivity. The red pushpin marks the spot, and you can drag the blue dot to adjust the trigger radius around the spot. Tap Next when you’re satisfied.
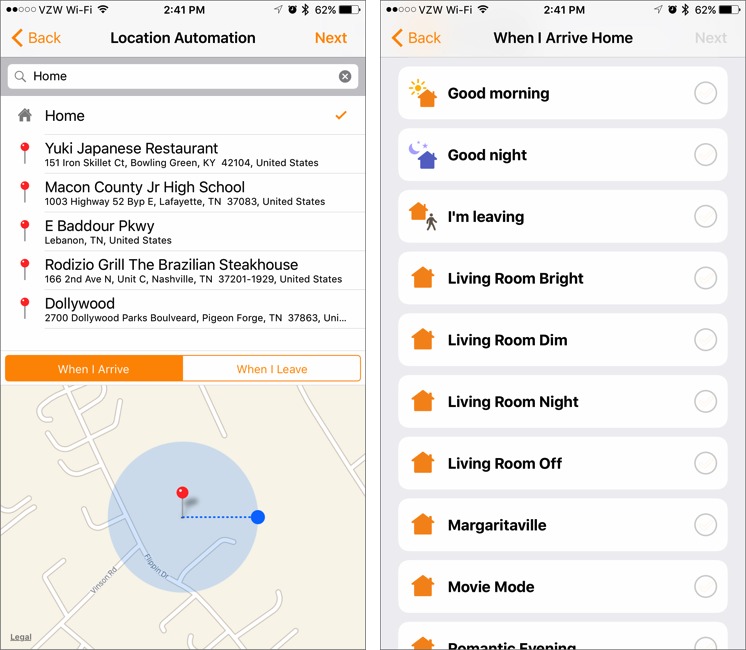
Once you’ve defined the location, choose Scenes and Accessories to activate. Tap Next.
The final screen lets you review your options and offers a few more tweaks. You can set the location trigger to work only after sunset. If you added any Accessories to the Automation, you can choose whether to turn them on or off; you can also press and hold on the Accessory button to make adjustments like brightness and temperature, just as you normally would when controlling it.
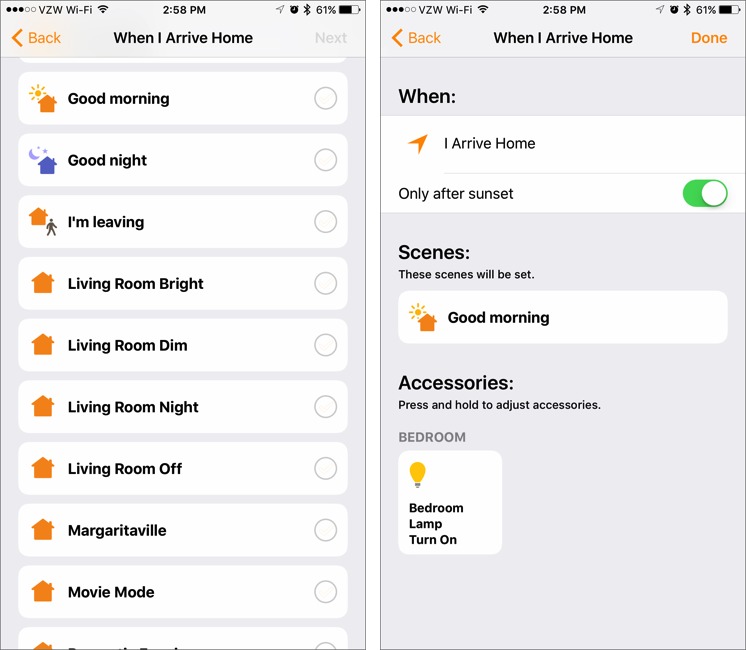
If you’re unhappy with any of the settings, tap Back to go back in the process and change things. If you’re satisfied, tap Done to finish.
-
A Time of Day Occurs: Setting a Time Automation works almost the same way, except at the Time Automation screen you choose the days and times when the trigger should go off. Two time options are sunrise and sunset, which are determined automatically based on where you live.
-
An Accessory Is Controlled: With this option, you can set HomeKit to activate something when you control an Accessory. For instance, if you turn on a light bulb, you could set smart plugs in the room to turn on lamps as well. I haven’t found a use for this option yet, but you might.
You start by choosing one Accessory that will trigger the automation. Next, choose whether to trigger the automation when the Accessory turns on or off. Then, choose Accessories and Scenes to activate with the trigger, and proceed as normal.
-
A Sensor Detects Something: In theory, you could set this to trigger actions when say, a smoke alarm or water detector is activated. However, even though I have an Elgato Eve Room sensor, which monitors air quality, temperature, and humidity, this option is grayed out. That’s unfortunate, because it would be great to use these sensors alongside a HomeKit thermostat to balance the temperature in my house better. If you know of a sensor that works with this trigger, let me know!
Editing Automations — Once your Automations are set up, you can view them from the Automations screen in Home. Tap one to see its settings.
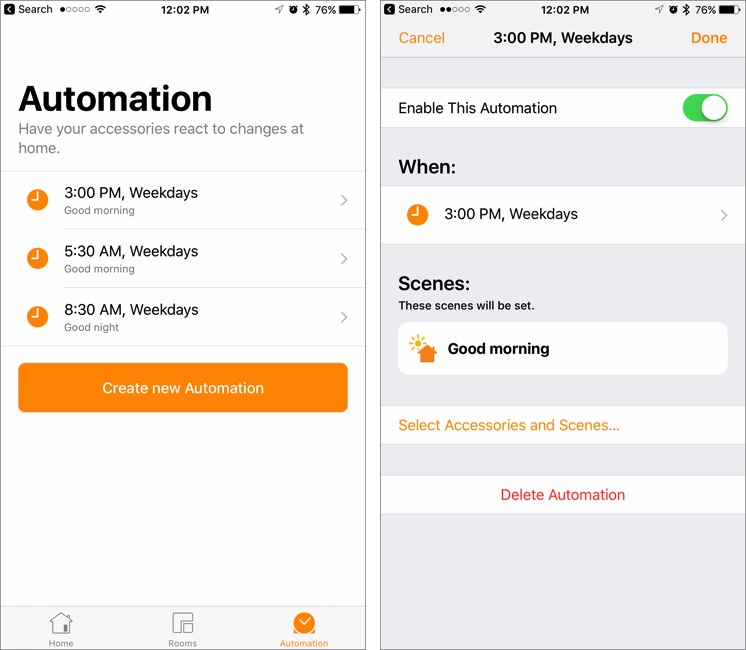
It’s important to see how to disable an Automation, which is the first switch on the Automation settings screen. If you have a day off or know that you’ll be too sick to go to work the next day, you probably don’t want your lights coming on at 5:30 in the morning.
You can also change the triggers for the Automation and what Scenes and Accessories will be set by the automation.
Finally, there’s an option to delete the Automation. I seldom do this unless I’m just playing with test Automations that I don’t intend to keep. Instead, disable an unwanted Automation first, and then delete it later if you don’t miss it.
HomeKit home automation is incredibly powerful, and it’s even better when you configure it to be truly automated. But as always, with great power comes great responsibility, so be careful what you set, discuss your Automations with other family members, and keep things simple so they’re easy to manage.
This concludes our coverage of the Home app, but we’re not done with HomeKit. Next time, I’ll tell you about a more powerful HomeKit app that gives you additional control over your devices.
TidBITS Watchlist: Notable Software Updates for 13 February 2017
Alfred 3.3 — Running with Crayons has issued Alfred 3.3 with a new clipboard placeholder that enables you to grab items from Alfred’s clipboard history, as you might want to do when creating a dynamic snippet that includes the last three items you copied or adding recently copied items as variables in your workflow. For more on this new feature, see this Alfred blog post. The keyboard-driven launcher also provides more efficient pre-processing of snippet results when using snip keywords, adds new icons for workflow objects, improves
support for 1Password vaults (including the capability to hide particular vaults from Alfred’s results), and adds new system volume control to System Commands. (Free for basic functionality, £17 for Powerpack, 2.6 MB, release notes, 10.9+)
Read/post comments about Alfred 3.3.
TextExpander 6.1.5 — Smile has released TextExpander 6.1.5, adding support for importing TextExpander 5 settings and backup files. The text-expansion utility also removes the Show Tab Bar entry from the View menu, adds a VoiceOver label for Touch Bar buttons on the 2016 MacBook Pro, and resolves a bug where some script snippets could execute even if Run Script Snippets had been turned off. The update also adds support for synchronizing some preferences (including playing sound at expansion, run scripts snippets, default format and abbreviation mode, and update checking) with the newly released TextExpander for Windows (see this blog entry from the TextExpander Web site for more information)
TextExpander 6.1.5 is available via a monthly or annual subscription, and Smile continues to offer TextExpander 5 as a standalone app for $44.95 (TidBITS members receive a 20 percent discount only on the purchase of version 5). ($40 annual subscription, $20 upgrade subscription, free update from version 6, 6.4 MB, release notes, 10.10+)
Read/post comments about TextExpander 6.1.5.
ExtraBITS for 13 February 2017
We have a slew of ExtraBITS for you this week! Apple pulls the LG UltraFine 5K Display from its stores, some app makers find that they make more money after leaving the Mac App Store, Verizon Wireless offers same-day screen repair in some cities, Apple prepares to launch its new “spaceship” campus, Backblaze shares the latest hard drive reliability statistics, and programming author Daniel Steinberg laments Apple’s seeming apathy toward iBooks.
Apple Pulls LG UltraFine 5K Display from Retail Stores — In the wake of various problems with the LG UltraFine 5K Display, 9to5Mac reports that physical Apple Stores have stopped carrying the Apple-approved monitors. They’re still available to order online but with a wait time of 5 to 6 weeks and no option to ship to a store. Perhaps Apple should reconsider making its own displays.
Some Apps Making More Outside the Mac App Store — After Apple removed the code snippet manager Dash from the Mac App Store, its developers found that they actually made more money afterward, but that was likely due to the increased media coverage. In a less biased test, Rogue Amoeba also decided to stop selling its audio recording app Piezo on the Mac App Store due to Apple’s onerous restrictions. Even though the Mac App Store accounted for about half of Piezo’s sales before being removed, Rogue Amoeba found that nearly all customers shifted to direct sales — in other words,
the Mac App Store wasn’t contributing much to product discovery. Plus, thanks to direct sale transaction fees of just a few percent, versus Apple’s 30 percent, Rogue Amoeba made almost $5 more per copy of Piezo and more overall revenues after pulling it from the Mac App Store. Although results would undoubtedly vary from case to case, Rogue Amoeba’s experience shows that the Mac App Store may not be worthwhile for many developers.
Verizon Offering Same-Day Screen Repair in Some Cities — Verizon Wireless is offering a new service for members of its $11-per-month Total Mobile Protection smartphone insurance: $79 same-day screen repair right in your home or office (or at one of 220+ repair locations). However, the on-site service is available only in certain cities — see Verizon’s Web site for a full list. And, oddly, it covers only the iPhone SE, 5c, 5s, 6, 6 Plus, 6s, and 6s Plus, but not the iPhone 7 or 7 Plus. In our experience, AppleCare+ is a better
deal, but Verizon’s option could be more convenient.
Apple Preparing to Move into “Spaceship” Campus — Reuters reports that, after years of delays and an estimated $5 billion price tag, Apple hopes to start moving into its new “spaceship” campus in a few months. One of Steve Jobs’s final initiatives, the round glass building was projected to be finished in 2015 but was held up by a lengthy city approval process and insane attention to detail. Although it looks (and sounds) impressive, some architects wonder if the building is an example of form over function. Louise Mozingo, chair of the Department of Landscape Architecture and
Environmental Planning at U.C. Berkeley, told Reuters that the building could be tough to navigate. Other sources have said that the building has been a tremendous drain on Apple; we can hope that completing it will help the company devote more time, attention, and resources to its core products and services.
Backblaze Publishes 2016 Hard Drive Reliability Statistics — Online backup service Backblaze has posted its hard drive reliability statistics for 2016, based on nearly 72,000 drives and almost 23 million drive-days. At the end of last year, overall failure rates were 1.95 percent, which is down 0.52 percent from last year. The most reliable drive maker was HGST, with a failure rate of just 0.60 percent, whereas HGST’s owner Western Digital brought up the rear, with 3.88 percent of its drives dying. Backblaze uses more drives from Seagate than any other manufacturer, and while Seagate’s new
8 TB drives proved quite reliable, the company’s 4 TB drives remain problematic. Backblaze’s most heavily used Seagate 4 TB model posted an above-average failure rate of 2.77 percent, and another model stumbled in with an abysmal 13.57 percent failure rate. The moral of the story: pay close attention to manufacturer and model when buying drives.
Daniel Steinberg on Apple’s Lack of Passion for Books — What happens when Apple isn’t passionate about a product line or service? Look no further than iBooks, iBooks Author, and the iBooks Store. After an initial burst of enthusiasm, both iBooks and iBooks Author have languished, iCloud Drive’s integration with iBooks is flaky, and the iBooks Store never recovered momentum after Apple was found guilty of ebook price fixing back in 2013. In a blog post, well-known programming author and speaker Daniel Steinberg emotes about Apple’s lack of passion for books and his frustrations with
the iBooks Store, which we’ve experienced as well. “It’s a shame,” he concludes, “that there isn’t a nexus of passion about books and education at Apple like there is about health and music.”