TidBITS#1385/11-Sep-2017
On the eve of Apple’s September 2017 special event, Adam Engst discusses significant changes in macOS 10.13 High Sierra that consultants, IT admins, and those who care about the behind-the-scenes details need to know. Jefferey Battersby joins us this week to review the Yoink drag-and-drop utility for the Mac, and Josh Centers returns to the Touch Bar to reveal some interesting uses for it. And we’re pleased, in the wake of CrashPlan’s withdrawal from consumer backup, to welcome Backblaze as our latest long-term sponsor. Finally, Julio Ojeda-Zapata takes a look at HomeKit devices that you can use to secure your home. The only notable software release this week was Retrospect 14.5.
Backblaze Now Sponsoring TidBITS
I’m thrilled to welcome Backblaze as our latest long-term sponsor. Backblaze has been my online backup service of choice for the past few years, and I’m more than happy to recommend the company, especially if you need an alternative to CrashPlan (see “CrashPlan Discontinues Consumer Backups,” 22 August 2017).
![]()
I spent a year with CrashPlan, but I was never happy with the service. I found its Java-based client slow and unresponsive, backup speeds unimpressive, and worst of all, it appeared to hurt my entire system’s performance. After trying Backblaze for a week, I was a convert, and I’ve been a paying customer ever since.
I’m not the only one. I first heard of Backblaze from Marco Arment, who found it faster and more reliable than CrashPlan. Likewise, Glenn Fleishman often found himself turning to Backblaze, despite having already paid for CrashPlan, because Backblaze was that much better. And Joe Kissell, long a champion of CrashPlan, now unequivocally recommends Backblaze.
But maybe you didn’t use CrashPlan at all? Maybe you don’t use any online backup! Or just as bad, you only use online backup! You need to fix that! We recommend Mac users maintain three types of backups:
- A constantly updated Time Machine backup. It’s built into macOS and is useful for retaining previous versions of every file you modify.
- A nightly bootable duplicate of your primary drive, which you can make with Carbon Copy Cloner or Super Duper, among others. A bootable duplicate is essential if your system drive dies because you can use it to get right back to work.
-
A regularly updated offsite backup, which you can maintain manually or hand off to a cloud backup service like Backblaze. With an offsite backup, if a hurricane flattens or floods your house or if thieves steal your backup drive along with your Mac, you can still recover your data.
If you store unique data on external drives, don’t forget to back those up as well! Fortunately, Backblaze can back up external drives too. (That said, Backblaze cannot back up network drives, remotely mounted computers, or shared volumes.)
Why do I prefer Backblaze over the alternatives?
- It provides speedy Mac client software with an elegant interface.
-
It gives you the option to maintain your private key so only you can see your data.
-
Restore by Mail! That’s right, Backblaze will send you your data on a backup drive via FedEx, which will be much faster than restoring everything via the Internet. You get your $99 (128 GB) or $189 (up to 4 TB) deposit back if you return the drive within 30 days.
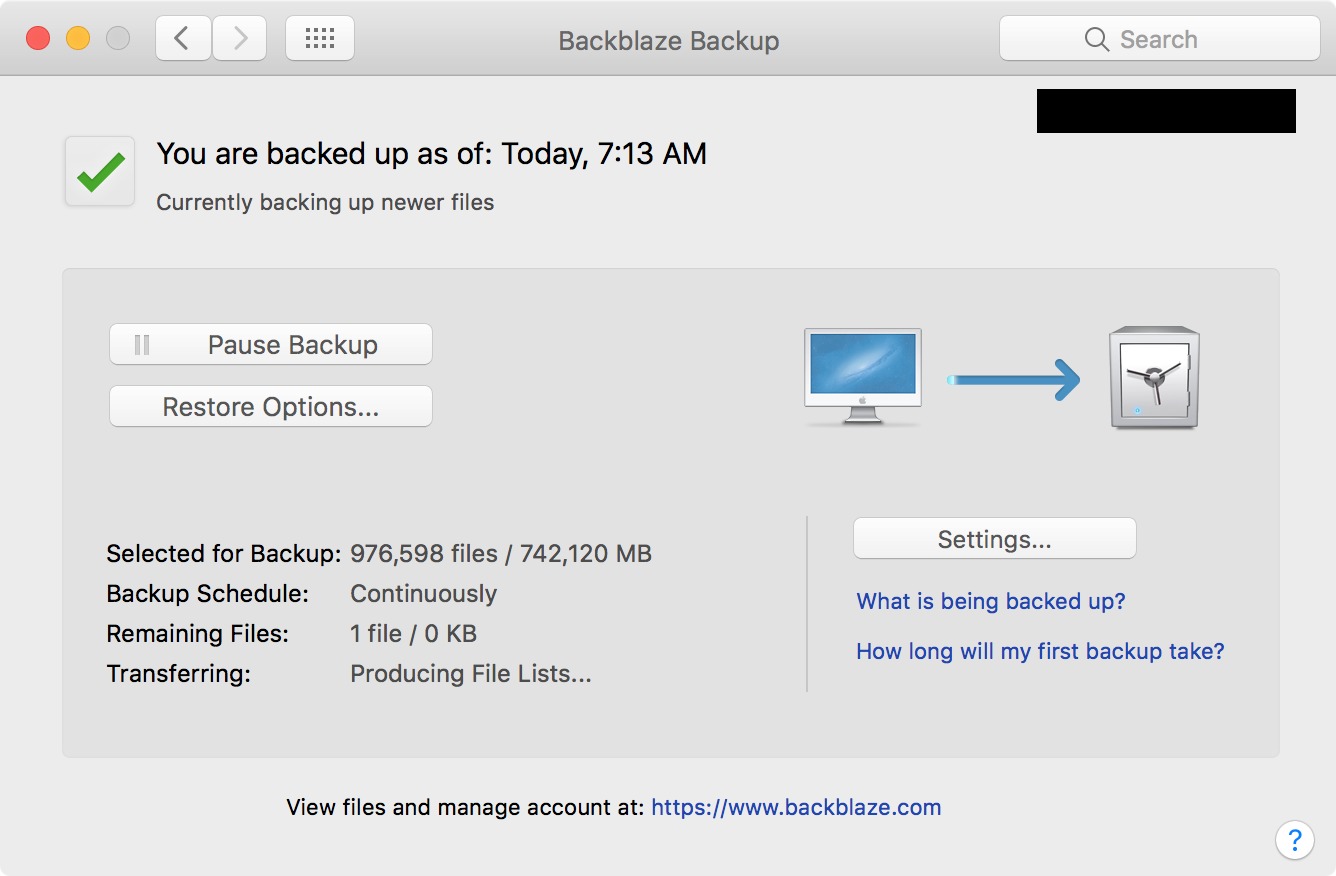
Backblaze is everything online backup should be: simple, secure, and affordable. Try a 15-day free trial today and see if you agree. If you stick with Backblaze, it’s only $50 per year per computer for unlimited backup, including your external drives.
Yoink Takes Mac Drag and Drop to the Next Level
Eternal Storms Software’s Yoink is a powerful enhancement to the standard drag-and-drop experience on the Mac that you don’t realize you need until you’ve spent an hour or two using it. Then you wish you had been using it for a lot longer than that.
In short, Yoink acts as a temporary holding spot for items you drag and drop from the Finder or any other app, letting you store them for use later in other applications.
Think of Yoink like a virtual shelf for your Mac. Drag files or other items to it and they sit there, right at hand, until you’re ready to drag them off the shelf and into another app or folder.
The first time you open Yoink, it walks you through a brief tutorial explaining how the app works and what kinds of files it accepts. Close the tutorial window and the only thing letting you know that Yoink is running is its icon in your menu bar. You can use the menu bar menu to change settings, but you don’t need it to use the Yoink app. Instead, Yoink activates as soon as you start dragging anything on your Mac, displaying a small drawer into which you can drop whatever it is you’re dragging.

Yoink can handle most anything you drag to it. I added text from a word processing document, images dragged from Web pages, pictures from Photos, entire Web pages, and files from the Finder. I didn’t find anything Yoink couldn’t collect.
By default, Yoink displays only the last three items you’ve dropped on it. Using either the menu bar or a pop-up menu that appears when you click the gear button in the app, you can customize Yoink so its window expands until it reaches the top and bottom of your screen with each added item. Regardless of window size, you can continue adding items, you’ll just have to scroll up or down in the drawer to find the one you want to use.

Unfortunately, Yoink lacks some way of letting you know that there are more files in the window than you can see. This is in part because macOS doesn’t display scroll bars by default, but Yoink would benefit from something that lets you know there’s more in the drawer than meets the eye.
Yoink’s drawer remains visible as long as there’s something in it, and you can choose whether it appears on the left or right edge of your screen, aligned to the top, center, or bottom of that edge.
Yoink works with multiple screens, but exactly how depends on the “Displays have separate Spaces” checkbox in System Preferences > Mission Control. If that checkbox isn’t selected, Yoink’s drawer appears only on the primary screen, which can result in some tedious dragging across long distances. However, if you select that checkbox, Yoink can put its drawer in any of its six positions on any screen. The trick is to access the necessary Window Position menu from the menu bar icon located on the desired screen.
Regardless, those with large Desktops might prefer to use Yoink’s option to display its drawer right under the pointer’s position when you start a drag.
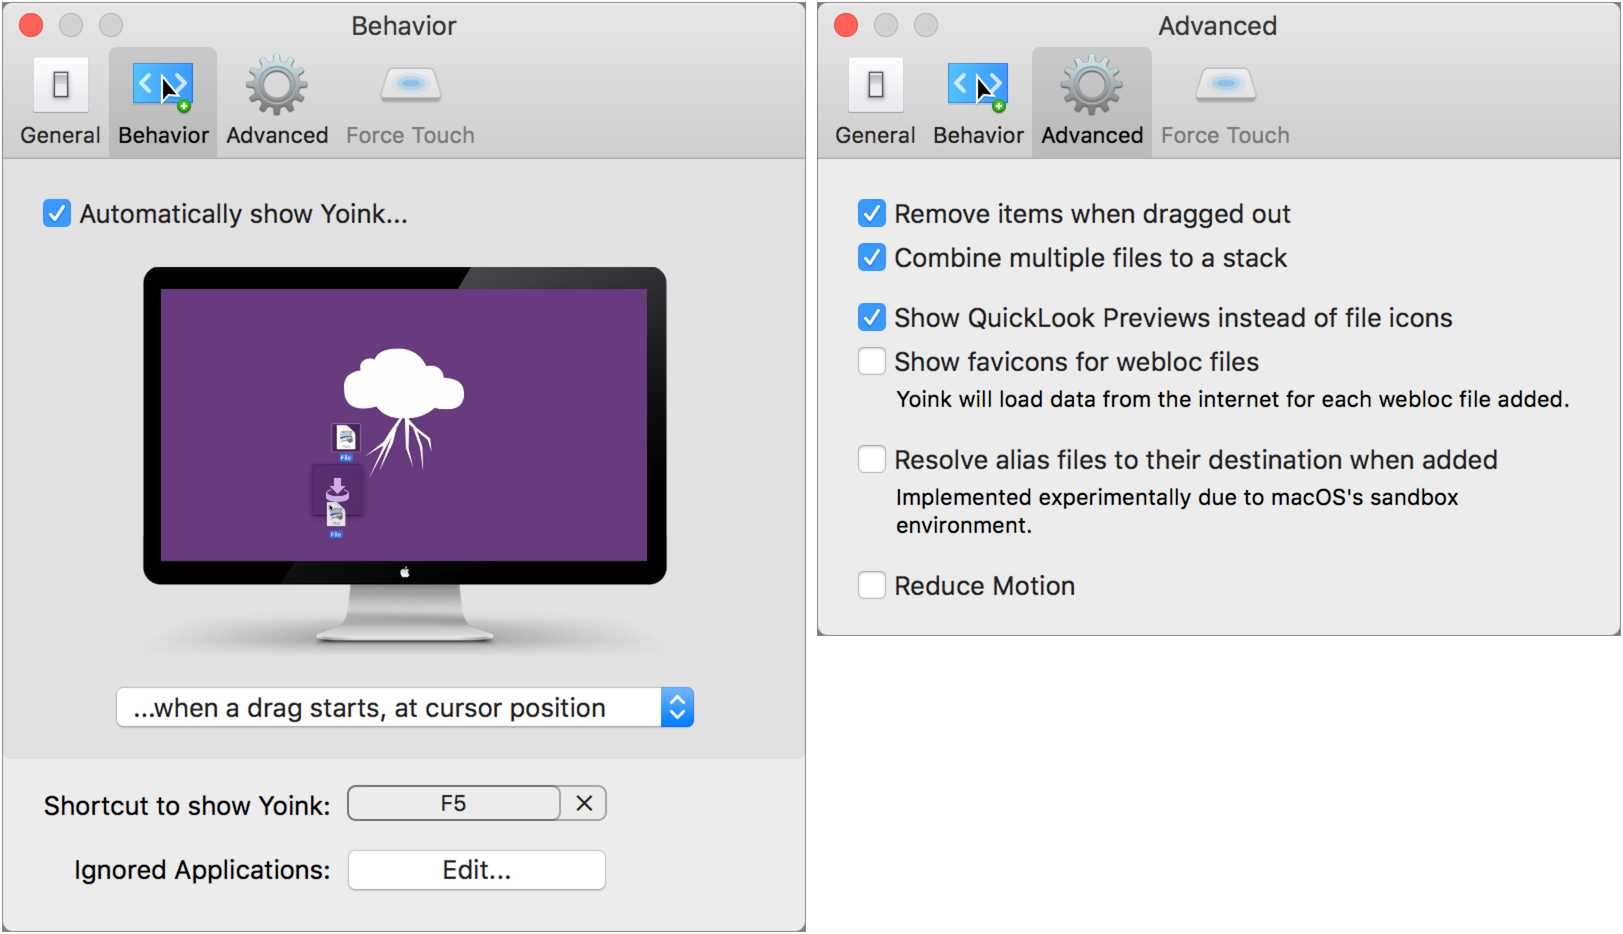
Also, Yoink sits on top of everything else on your Desktop, so if you find that it’s in your way, press F5 (you can change the key) to make it hide or reappear. If you’ve set Yoink to appear at the pointer position, another press or two of F5 brings up it at the pointer, making it easy to drag items to Yoink without looking for the drawer.
Using items you’ve added to Yoink is easy. All you need to do is drag them from Yoink’s drawer to the app, folder, or document where you want to use them. By default, when you drag something out of Yoink, it disappears from the Yoink drawer. But you can also lock items so they remain in Yoink after you’ve dragged them, which might be useful for frequently used bits of text or graphics.
Yoink can display either file icons or Quick Look previews in its drawer, and you can click an eye button to peek at the contents of any item in the drawer. You can also share any item in Yoink to available apps.
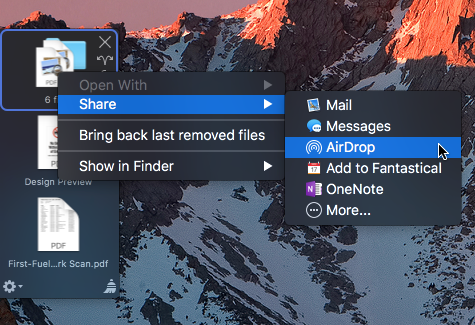
It’s important to note that files dragged from Yoink to anything, whether it’s an app or a Finder folder, behave the same way they would if you were dragging normally without Yoink as an intermediary. So, drag a document from Yoink to Apple Mail and Mail attaches a copy of the original to the current message. Drag a file in Yoink’s drawer to a folder in the Finder and that item will be moved from its original Finder location to the location where you dragged it. Drag that same item to a server or external drive and it will be copied
to that new location.
A click of the broom button in Yoink’s drawer empties any items in it, but if you accidentally sweep Yoink clean, the Yoink menu includes an option to “Bring back last removed files,” which will restore your dragged items.
<
p class=”inflow_image”>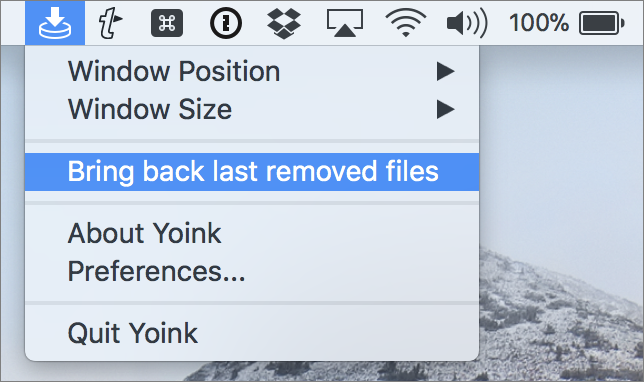
On the Yoink support site, Eternal Storms provides several tutorials and a variety of blog posts on how to make the most of Yoink. One of my favorites was about how to use Automator to create a macOS Service that automatically sends screenshots to Yoink. Another tip explains how you can add files to Yoink with a
keyboard shortcut.
If you frequently find yourself dragging things around your Mac, and particularly if you find that task onerous or prone to error, Yoink can enhance your day-to-day Mac experience. I recommend that you give it a go today. Yoink costs $6.99 from the Mac App Store, and the company provides a separate demo because the Mac App Store doesn’t allow demos. It requires Mac OS X 10.7.3 Lion or later.
Making Better Use of the Touch Bar
I seem to have touched a nerve with “What’s Wrong with the Touch Bar” (4 August 2017), sparking a number of blog posts and commentaries, such as Chuq Von Rospach’s “The Life and Death of the Touch Bar” and “More Thoughts on the Future of the Touch Bar and Apple ID.” By and large, people agreed with my analysis, but a few folks pointed out neat uses of the Touch Bar that I had missed.
Overlooked Touch Bar Uses — Many users of Final Cut Pro X and Logic Pro X were quick to point out how useful the Touch Bar is for editing media, such as Chuck Joiner when we discussed the Touch Bar on MacVoices. Considering that Final Cut Pro X costs $300, Logic Pro X runs $200, and you paid a premium of about $300 for the Touch Bar, I should hope that you’re getting your money’s worth!
However, for the rest of us, I found or was alerted to a couple of built-in functions that are genuinely useful:
- In QuickTime, the Touch Bar offers a Record button, and it lets you quickly select a camera and audio source. Since selecting sources in QuickTime requires clicking a drop-down menu, the Touch Bar saves time here.
-
Preview offers some interesting and useful Touch Bar shortcuts, such as rotating images, underlining text, and quickly accessing markup tools. But the one that stands out to me is fast highlighting of text. Select some text in a PDF and tap a color on the Touch Bar to highlight the text with that color. Useful and time-saving!


I found one Touch Bar function that may legitimately be game-changing. When you press Command-Shift-4 to take a screenshot of a selected portion of the screen, the Touch Bar lets you choose which type of screenshot to take: Selected Portion, Window, or Entire Screen. Even better, you can choose where to save that screenshot! By default, macOS saves screenshots to the Desktop, but via the Touch Bar you can instead choose the Documents folder, you can send it to the clipboard, or you can open the
screenshot in Preview, Mail, or Messages.
What’s wild is that your chosen screenshot destination will become the default for all subsequent screenshots — it’s not just a one-time selection. Of course, you can change this at any time with the Touch Bar. As far as I know, this is the first time macOS has let you modify the screenshot destination (apart from copying to the clipboard by adding the Control key to Command-Shift-3 or Command-Shift-4) without using Terminal.
But the big thing I want to share is something that I didn’t think was possible before: invoking Keyboard Maestro macros with the Touch Bar.
Keyboard Maestro with the Touch Bar — In “What’s Wrong with the Touch Bar,” I said:
If background apps could present Touch Bar icons, automation utilities like Keyboard Maestro could allow users to trigger custom macros from the Touch Bar without requiring a potentially obscure key combination.
Well, it turns out that is true, although there’s no “official” way to do this. But I stumbled across a hack that makes it possible.
BetterTouchTool has long been one of my favorite Mac power-user apps, since it lets you configure all manner of keyboard, mouse, and trackpad shortcuts. It lets you create custom Touch Bar buttons and macros, but it’s not nearly as advanced as Keyboard Maestro. However, it can work as a bridge between Keyboard Maestro and the Touch Bar.
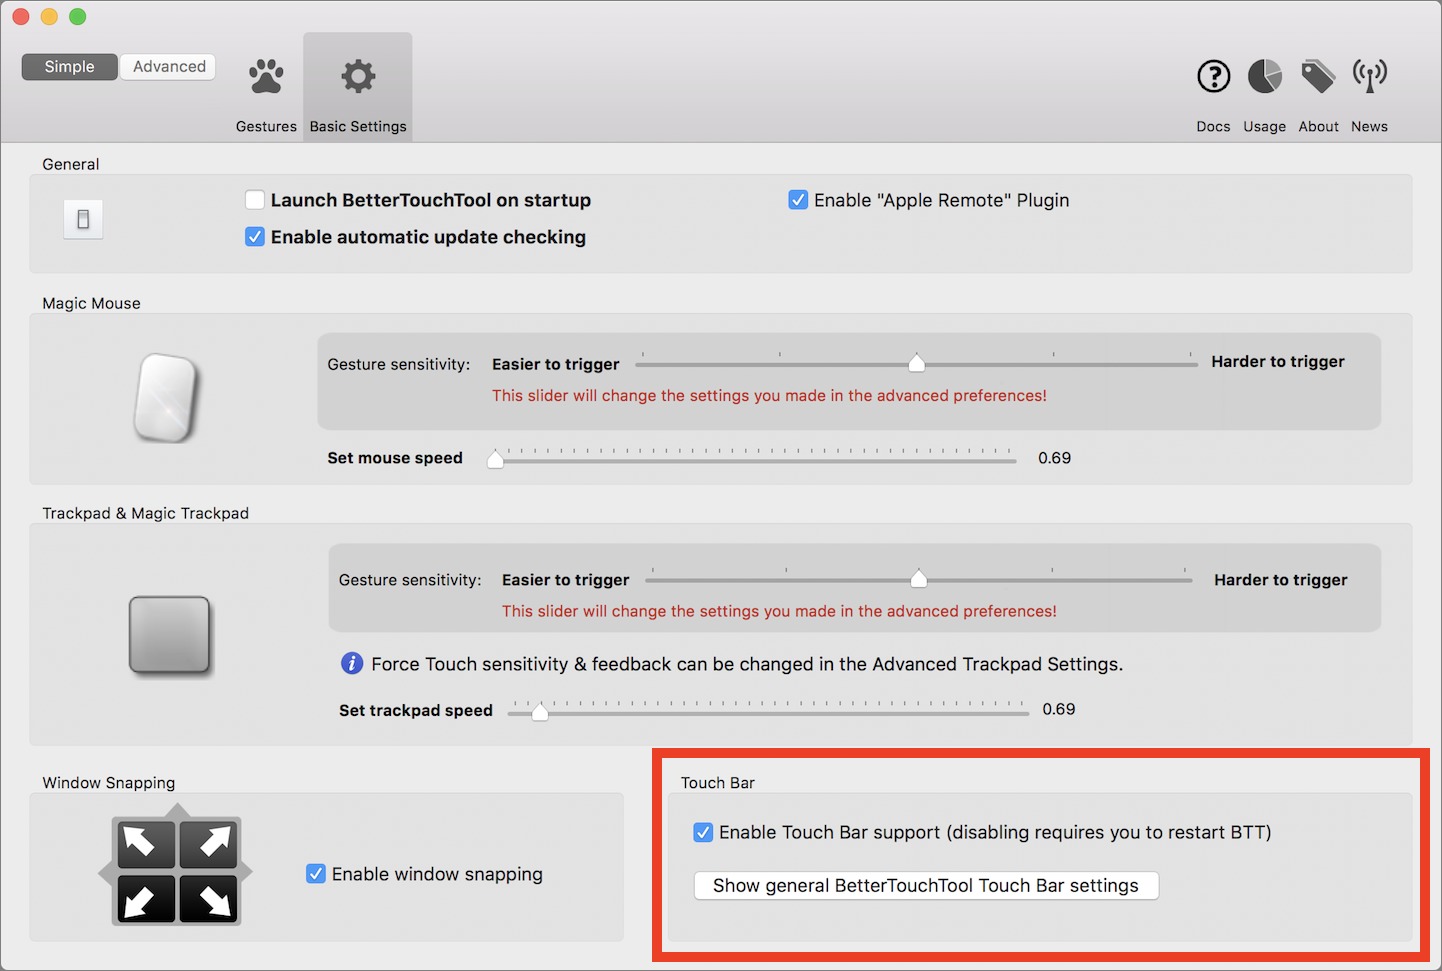
- Open BetterTouchTool Preferences and click Basic Settings. Make sure that Enable Touch Bar Support is enabled.
-
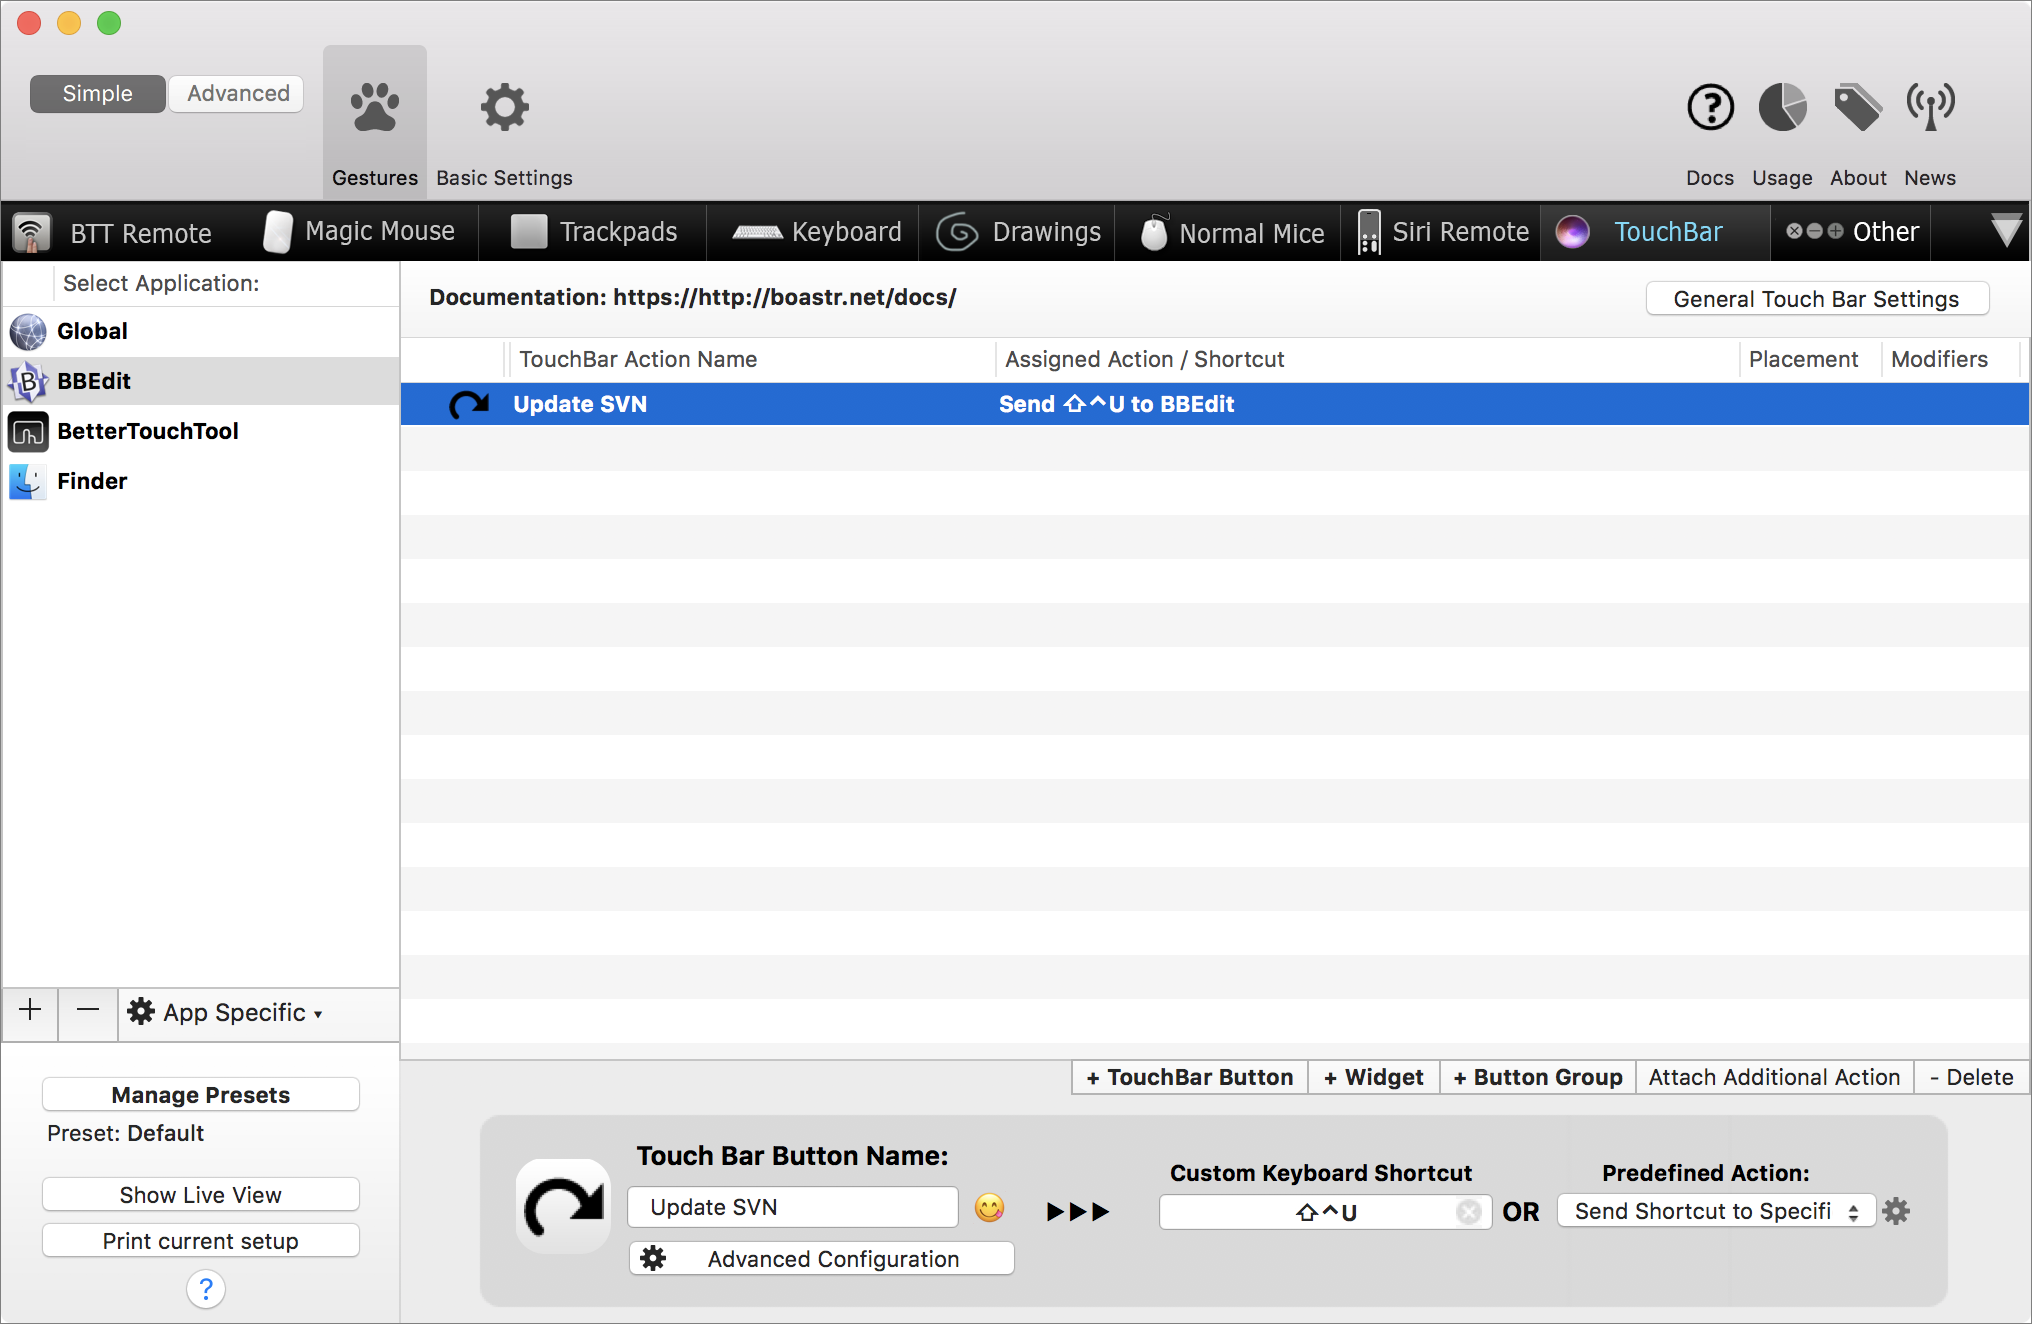
Back on the Gestures screen, choose the application you want the Touch Bar button to appear under in the Select Application column — click the + button to add an app if you don’t see it. Global will show the virtual key in all apps — that may be the most common choice.
-
Click + TouchBar Button to create a custom Touch Bar button. Enter a name, and, if you wish, choose an icon.
-
Here’s the trick: when you create a TouchBar Button, you can also enter a custom keyboard shortcut, so press the key combination for the macro you wish to trigger.
-
Try out your new custom button and make sure it does what you expect.
BetterTouchTool also offers predefined actions you can trigger. It’s not quite as powerful as Keyboard Maestro, so I’m just focusing on demonstrating how to trigger Keyboard Maestro macros here.
Once set up, you can hide or show your custom buttons with the BetterTouchTool button grafted onto the Touch Bar’s Control Strip. Activating a macro is as simple as tapping the button on the Touch Bar.

Even without diving into the details of BetterTouchTool macros, you can use this trick to trigger any action in macOS that can be invoked via a keyboard shortcut.
I hope these tips make the Touch Bar a bit more useful for you!
Important High Sierra Changes for IT Admins
For most individual users, upgrading to macOS 10.13 High Sierra won’t require much more than going through the steps in Joe Kissell’s “Take Control of Upgrading to High Sierra.” But for those of you who manage Macs for an organization (or are just interested in how things work behind the scenes), there are some important changes that you should know.
First, I want to reiterate that our recommendation for High Sierra is that most everyday Mac users don’t upgrade immediately, but instead wait for 10.13.1 or even 10.13.2. Although we’re not hearing of major software compatibility issues, the move to APFS is a very big deal, and it’s entirely possible that some problematic scenarios won’t have been anticipated by Apple or revealed by the public beta test. There’s no penalty for caution, and be absolutely certain that Macs are backed up before upgrading them once Apple’s initial bug fixes are out.
Firmware Updates via the Cloud — With High Sierra, Apple is re-emphasizing how Macs get firmware updates over the Internet. The company claims you must be connected to the Internet when upgrading macOS, and the macOS Installer uses the model number of your Mac to identify and download a firmware update specific to that Mac to enable it to recognize APFS. This requirement has various implications:
- Only the macOS Installer can download and install firmware updates. This isn’t new, but is more important because of APFS.
- You cannot install High Sierra on a Mac that’s connected via Target Disk Mode.
-
Firmware updates can’t be done on external devices connected via Thunderbolt, USB, or Firewire.
You can install High Sierra via the macOS Installer, by creating a bootable installer, from within macOS Recovery, and via a NetInstall image created by System Image Utility (available with macOS Server).
More generally, this new approach to firmware updates means that you can’t use monolithic system imaging to upgrade a Mac to a new version of macOS.
Monolithic System Imaging Changes — Historically, many organizations have long relied on imaging as a way of setting up new Macs. Imaging, or more specifically, monolithic system imaging, involves creating a disk image of the canonical Mac, complete with site-specific settings and apps, and then restoring that image onto the boot drive of a new Mac. Periodically, that monolithic image would be updated for new versions of macOS and apps, and then used going forward for new Macs and clean reinstalls.
Apple is now explicitly warning against using monolithic system imaging when upgrading or updating macOS High Sierra. Without the macOS Installer being able to download necessary firmware updates during installation, any given Mac could end up in an unsupported and potentially unstable state.

That said, you may still use monolithic system imaging to reinstall the same version of macOS on a particular Mac model. For instance, if you have a lab of identical 27-inch iMacs, there’s no problem with using a monolithic system image to restore them to a clean state after a workshop.
Of course, High Sierra also brings with it the new APFS file system, and Apple recommends using only Disk Utility, System Image Utility, or the diskutil command to create images of APFS containers. Also, if you’re using macOS Server to restore client computers with flash storage via a NetRestore image, Apple recommends creating the image source from a Mac running High Sierra connected via Target Disk Mode, rather than from the macOS Installer.
The recommended way to deploy new Macs and handle updates is via a Mobile Device Management (MDM) solution, such as Jamf Pro or Jamf Now. With a managed Mac, admins can issue MDM commands to download and install updates.
Speaking of Jamf Pro, Jamf tells me that the just-released version 9.101 has full compatibility with High Sierra, iOS 11, and tvOS 11 (as does Jamf Now), and it includes new features for Apple’s latest MDM capabilities on the Mac, including:
- Zero-touch provisioning of Macs with APFS
- Support for Cisco Fast Lane QoS support for apps
- The capability to defer software updates for up to 90 days
APFS-related Changes — Apple’s new APFS file system is a significant change for Macs, although the fact that it has been successfully installed on hundreds of millions of iOS devices (running iOS 10.3), Apple Watches, and Apple TVs suggests that Apple has the conversion process under control. Nevertheless, the Mac world is far more variable, and there are a few implications that IT admins should know:
- The macOS Installer automatically converts the drives of SSD-based Macs to APFS during installation of High Sierra. You cannot opt out of APFS in this situation.
-
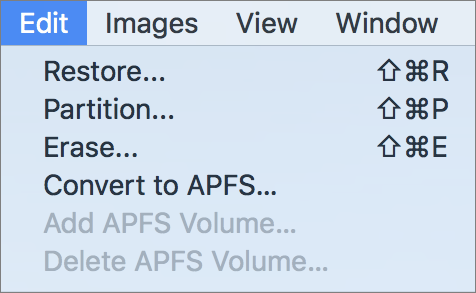
Macs with hard disk drives and Fusion Drives are not automatically converted to APFS during the High Sierra upgrade. I anticipate that will change at a later date. You can convert them manually using Edit > Convert to APFS in Disk Utility, although there’s no inherent reason to do so immediately.
-
Drives formatted as Mac OS Extended (HFS+) can be read from and written to by Macs whose drives are formatted as APFS.
-
Drives formatted as APFS can be read from and written to by Macs whose drives are formatted as APFS, or HFS+, if the Mac is running High Sierra in the latter case. However, APFS-formatted drives, such as external hard disks and USB flash drives, cannot be read by Macs running older versions of macOS, even 10.12 Sierra.
-
FileVault volumes are converted from HFS+ to APFS just like unencrypted volumes.
-
Although Apple’s Boot Camp Windows environment is compatible with High Sierra, it cannot read from or write to APFS-formatted volumes.
-
If you’re sharing a volume formatted as APFS over the network, you must use SMB or NFS, not the increasingly deprecated AFP. (SMB has been the preferred file sharing protocol for several versions of macOS now.) That applies to Time Machine share points as well.
Jamf offers a useful white paper that covers many of the APFS-related changes for admins.
Kernel Extension Changes — To improve security, kernel extensions installed with or after the installation of High Sierra require user consent to load, a system Apple calls User Approved Kernel Extension Loading. (Kernel extensions that were on the Mac before upgrading to High Sierra, as well as those that are replacing previously approved kernel extensions will not require user consent.)
Any user can approve a kernel extension — administrator privileges are not necessary — but the prompt could confuse a non-technical user.
If you want to disable User Approved Kernel Extension Loading, you can do so by booting into macOS Recovery, launching Terminal, and using the spctl command (run it by itself for instructions). That setting is stored in NVRAM, so resetting NVRAM will cause it to revert to the default prompting.
Also, enrolling a Mac in an MDM solution like Jamf Pro automatically disables User Approved Kernel Extension Loading. Apple says that a future update to High Sierra will expose MDM control of the setting and allow management of the list of kernel extensions that are allowed to load without user consent.
Content Caching Changes — Previously, you needed macOS Server for caching services — the capability to serve software updates and other Apple-served content from a local server rather than every device going out to Apple’s server over the Internet. In High Sierra, Apple has moved content caching into the Sharing pane of System Preferences, so you can designate any Mac as a caching server and have other devices look to it for updates. The new Content Caching approach also works with iOS devices connected via a USB hub for use with classroom devices hosted on a cart.

Additional changes of interest to the IT community will no doubt be discovered after High Sierra ships, but even this collection should give you plenty to ponder as you develop your organization’s High Sierra upgrade policies.
A Prairie HomeKit Companion: HomeKit Security Provides Peace of Mind
I am a bit paranoid by nature, and those tendencies dial up to 11 when I travel. Although I have never experienced a burglary, I’m convinced intruders will clean out the house sooner or later.
So before a recent trip, I took a major precautionary measure to assuage my simmering insecurities. I set up Internet-connected video cameras, motion sensors, and smart outlets so I could control and monitor my home from afar.
This was an opportunity to play with Apple’s HomeKit technology, which lets iOS devices manage a variety of home-automation products from other companies. (Be sure to read earlier installments in this “A Prairie HomeKit Companion” series, a name I love since I live in Lake Wobegon country, aka Minnesota.)
Unable to achieve all my monitoring goals with the HomeKit devices available to me, though, I searched farther afield for other home-security gear that also works with Apple devices – albeit outside the HomeKit ecosystem.
I ended up with a motley assortment of security gadgets and related apps, but it served my needs nicely once I had everything set up. My gadget collection went a long way to soothing my jitters when I was away, and getting it working was a lot of fun, too.
Of course, I had to make this happen on my own – which is a far cry from hiring a security company to install a comparable system while you relax with a latte.
The latter course is tempting. As a Comcast subscriber, it would be easy to have Xfinity Home Security added to my cable, Internet, and phone bill. As an AT&T wireless subscriber, it would also be simple to sign up for AT&T’s Digital Life security services. There are numerous other home-security service providers for hire.
But I’m a geek who loves to tinker and a cheapskate who wants to avoid monthly fees. I didn’t find the necessary setup tasks to be onerous, so the do-it-yourself approach is worth considering even if you’re not a penny-pinching tech dweeb like me.
A variety of companies stand ready to assist. Verizon Wireless, for example, doesn’t offer home-security services like those of AT&T, but it does sell a curated line of third-party security products. Verizon loaned me the Belkin and Canary products reviewed here.
Security Goals — HomeKit features rule-composing capabilities and other automation features, but I lacked the time and patience to bother with most of them amid my frantic travel prep. I had a few simple goals:
- I wanted to turn lights on and off manually whenever I liked by picking up my iPhone and tapping on-screen buttons. I hoped this would fool wannabe burglars into thinking my house was occupied.
- I craved the ability to peer into my home’s common areas, like the living room and kitchen, mostly to set my mind at ease that nothing was amiss.
- I wanted my iPhone and Apple Watch to alert me if motion was detected in the common areas and other parts of my house.
First Up, HomeKit — I initially hoped my security system could rely only on HomeKit-compatible devices. I largely, if not entirely, achieved that goal.
In my experiments with HomeKit products from a variety of vendors, I had the best luck with Elgato equipment. This isn’t surprising: Elgato’s devices have never let me down in any major way.
Elgato has collected its growing assortment of HomeKit devices under the Eve brand. They include environmental sensors, smart outlets, light switches, and motion detectors. Elgato has announced even more Eve gizmos, like smart door locks, smoke detectors, window-movement sensors, and even irrigation controllers and thermostatic radiator valves.
For my custom security system, I focused on the Eve Energy smart outlet and Eve Motion sensor, which cost $49.95 each. Both have the virtue of being deployable without time-wasting installation. Devices that require drilling and so on for setup are a hard sell for my Luddite wife, who doesn’t want an endless succession of shiny doodads eating their way into our walls.
Both Elgato products easily integrated into my HomeKit network via app scanning of numeric codes on the gizmos (see “A Prairie HomeKit Companion: Setting Up Accessories and Rooms,” 16 January 2017).
I installed the Eve Energy devices into electrical outlets throughout my home, with lamps plugged into each one and turned on.

I then deployed the battery-powered Eve Motion sensors in key spots: my garage beside a door that could be a burglar’s entry point; at the top of a staircase that intruders would use to infiltrate second-floor rooms; and in my home-office Fortress of Solitude, or, if you are more of a Marvel persuasion, Sanctum Sanctorum.

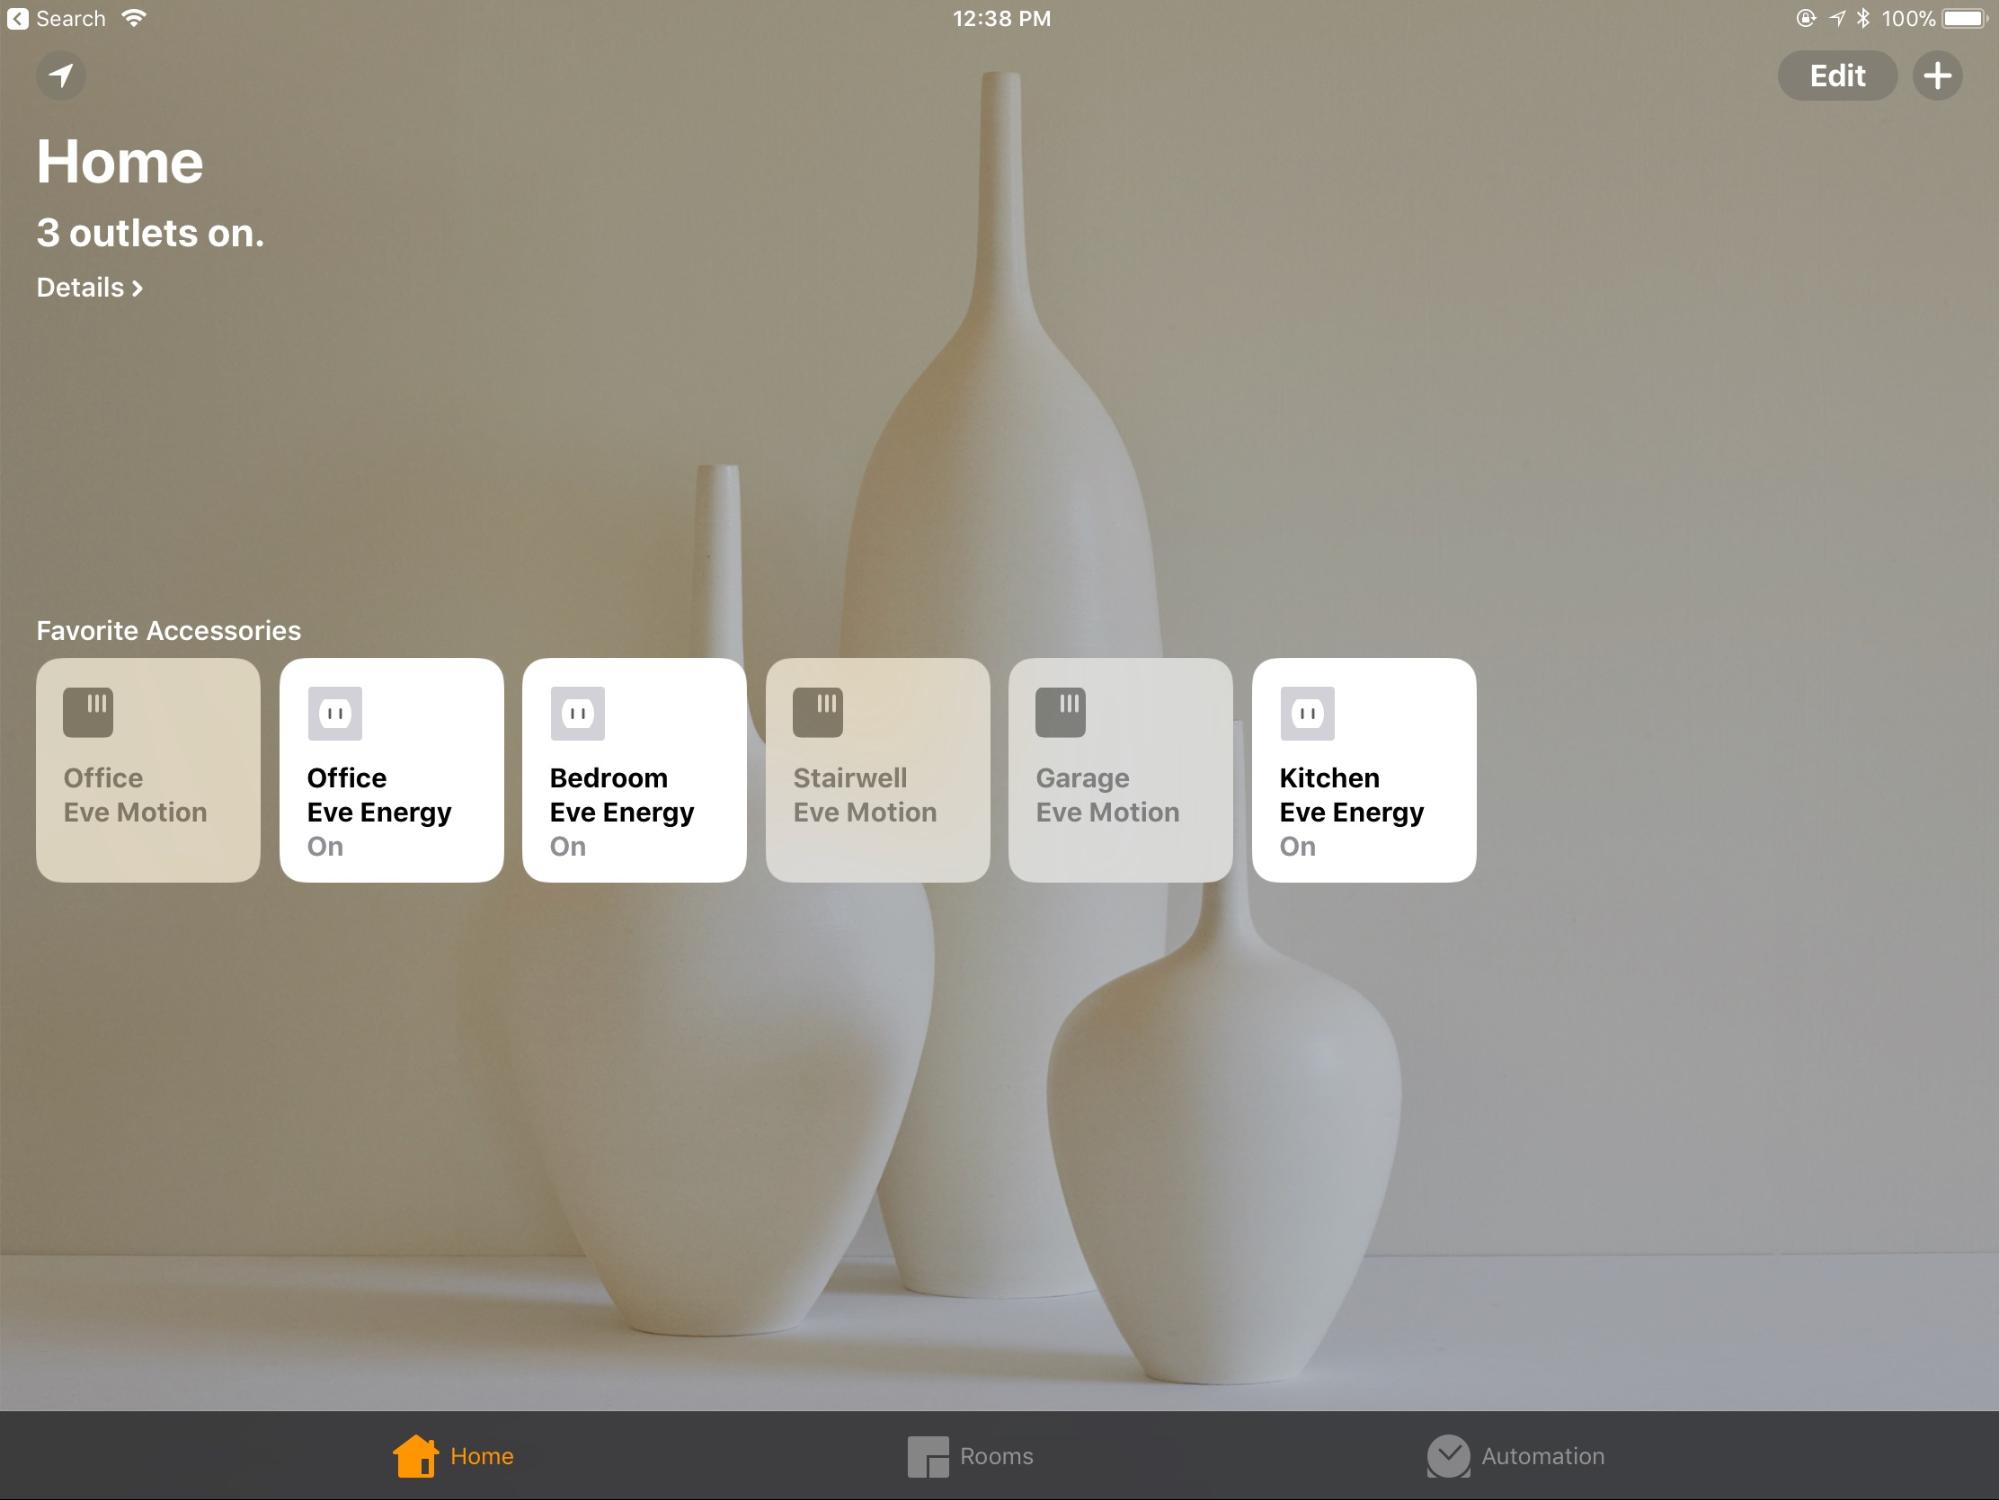
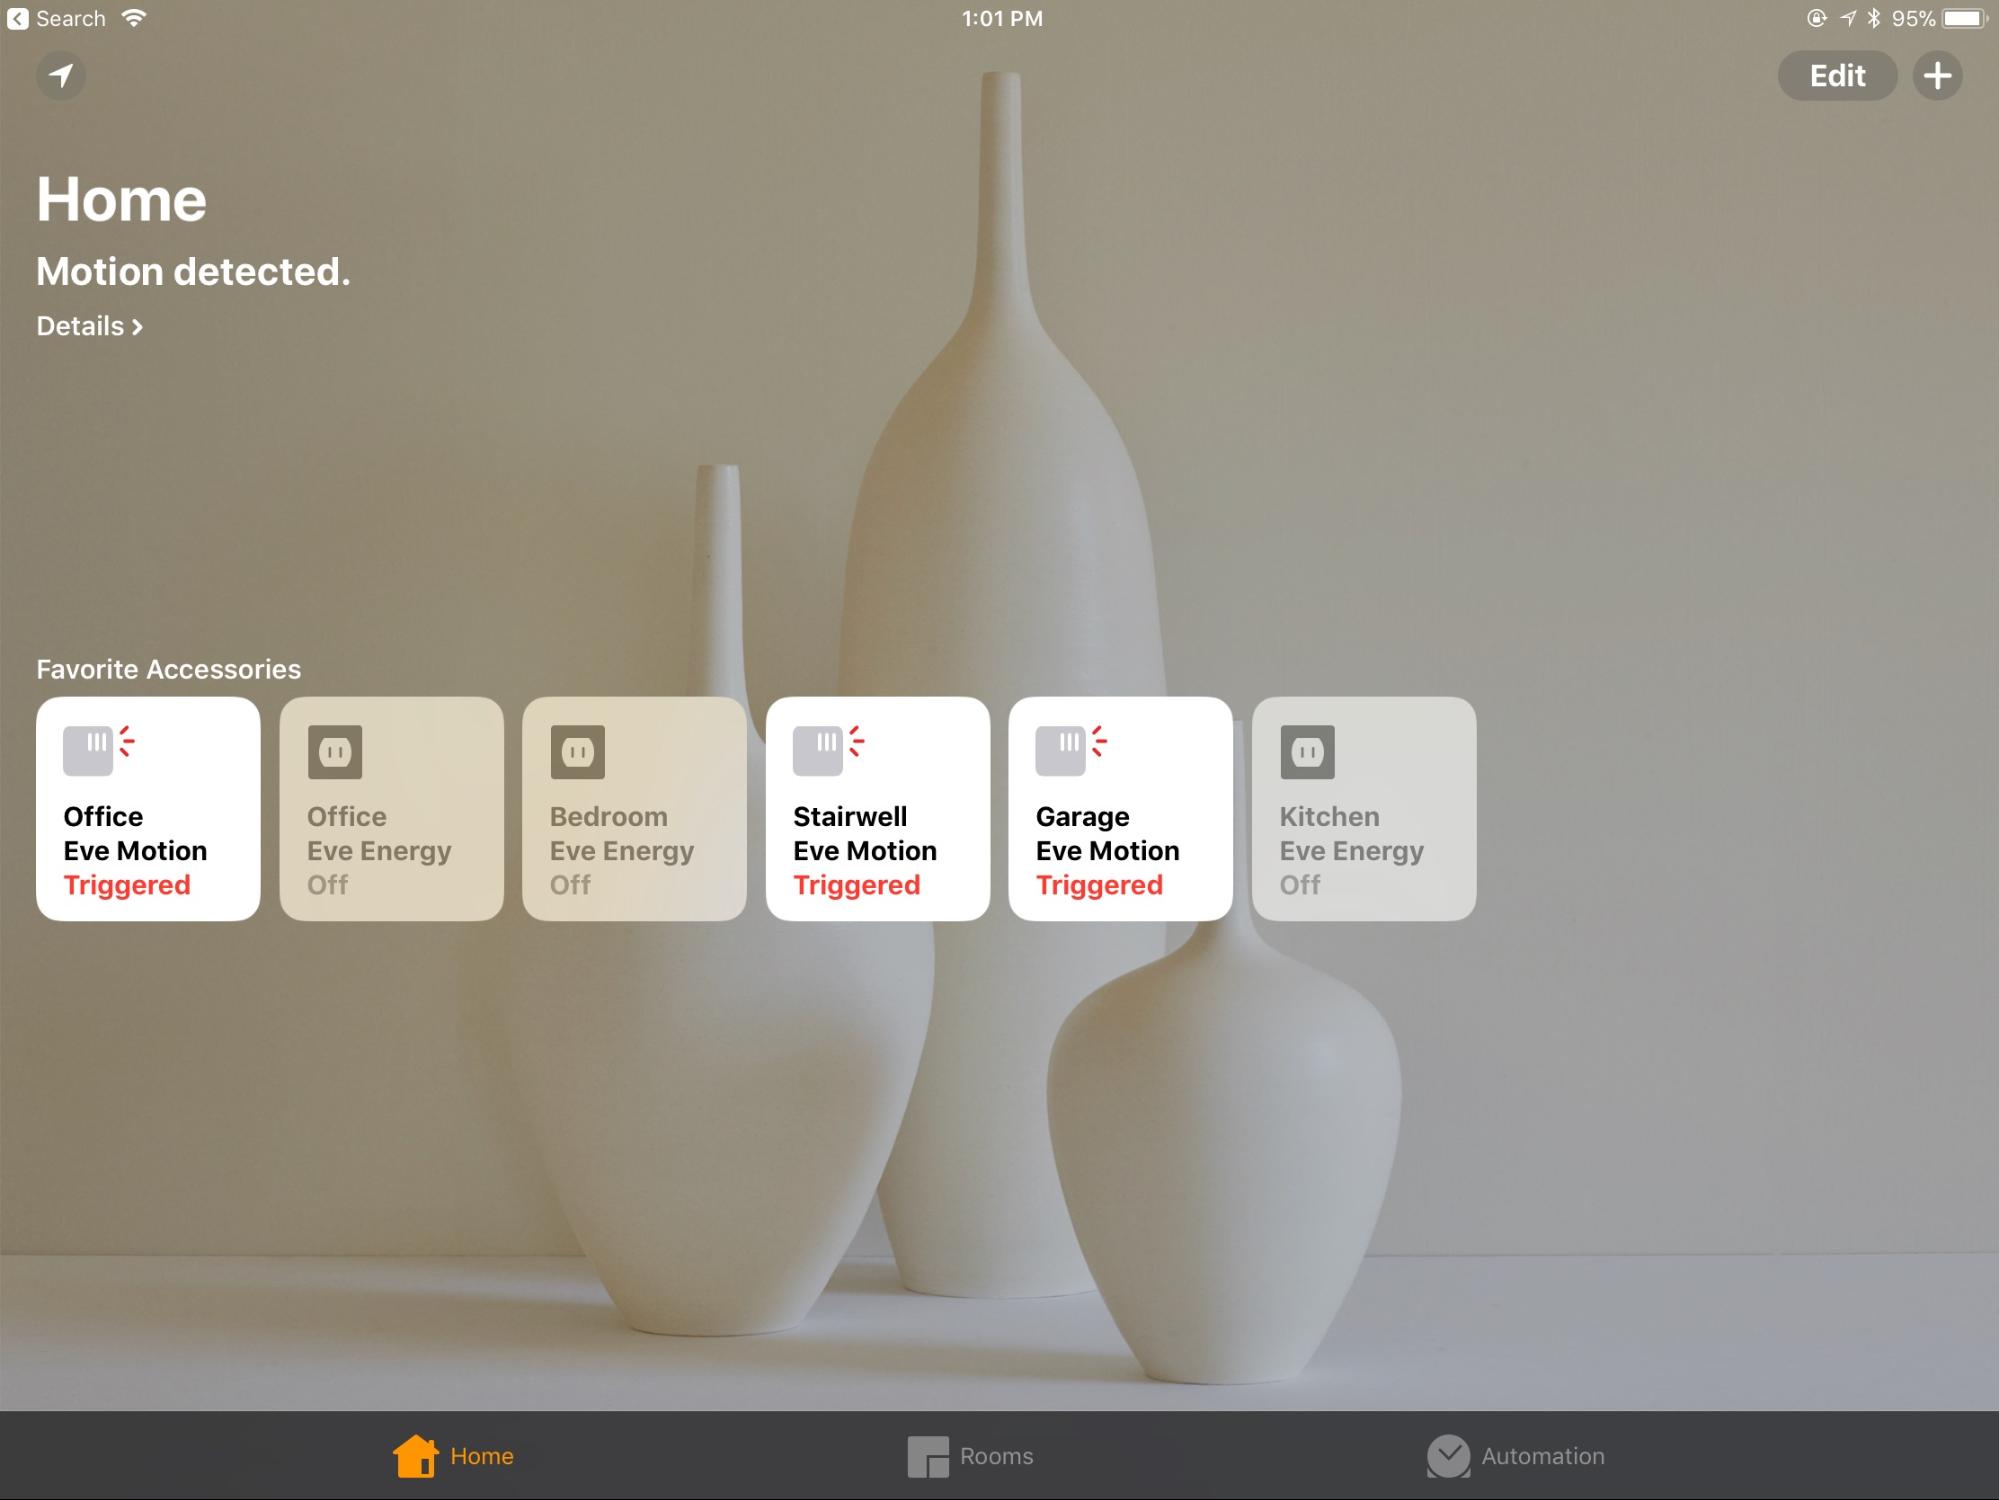
After just a bit of fiddling in Apple’s Home app on my iPhone, I was able to set up buttons corresponding to each of the devices as favorite accessories on the main screen (see “A Prairie HomeKit Companion: Setting Up Accessories and Rooms,” 16 January 2017). This had two purposes.
The Eve Energy buttons provided a handy way to turn the lamps on and off in the Home app. This worked at my home via Wi-Fi, since all the gadgetry used the same wireless network, and also from afar, since I had set up my Apple TV as a HomeKit hub for remote access (see “A Prairie HomeKit Companion: Automating Your Home,” 10 February 2017).
I could also accomplish this via Elgato’s Eve app (see “A Prairie HomeKit Companion: The Elgato Eve Room,” 19 June 2017), but I prefer the Home app’s cleaner, more elegant presentation.

The Eve Motion buttons in the Home app had a different purpose: alerting me when motion was detected. I was certain to miss such visual cues since I wouldn’t constantly be staring at the Home app, of course, so I switched on alerts. That involved flipping a software toggle in the Home app for each sensor, and checking in Settings > Notifications that notifications for the Home app were enabled.
Once I’d done all this, the sensors began to send alerts to my iPhone – and, by extension, my Apple Watch. No burglar triggered them, but I did verify that they worked reliably when a neighbor popped in a couple of times to handle a few chores during my absence.
Elgato’s devices performed spotlessly in every way. I emphasize this because it was not the case with some other HomeKit devices – including smart outlets and motion sensors – from other companies. Difficulties I encountered with other devices included set-up snafus as well as show-stopping failures during testing.
I won’t name the other vendors since I don’t feel I did my due diligence in trying to resolve technical issues amid my rush to prepare for my journey (even though, in some cases, I burned hours trying to figure out what was wrong). At the same time, I wanted confidence in the gear I had tasked with protecting my kingdom, and only Elgato’s devices provided that for me.
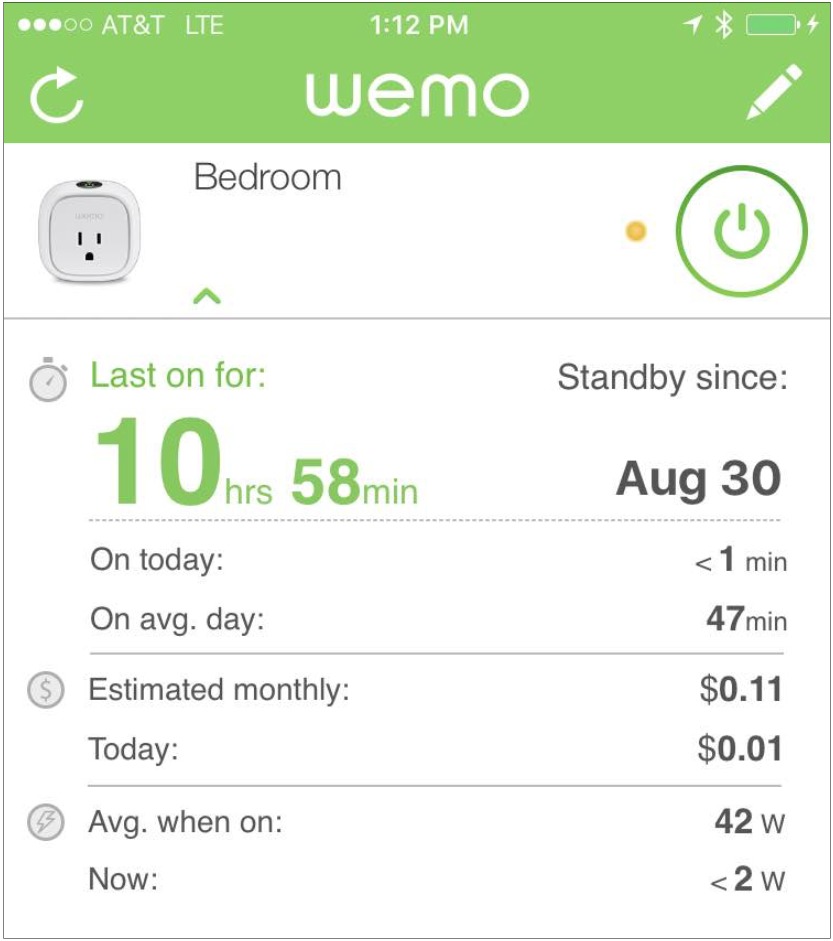
Another Smart Outlet — For giggles, I threw in another smart outlet that is not — at least right now — compatible with HomeKit but has reasonably good Apple compatibility. Belkin’s $49.99 Insight Smart Plug, part of its Wemo line of home-automation products, works much like Eve Energy.

Setup was straightforward, starting by detecting a Wi-Fi signal from the plug and then completing the process in the iOS Wemo app. From then on, the Insight Smart Plug performed splendidly.
In the Wemo app, an image of the plug had a round power-like button next to it, and tapping it never failed to turn a bedside lamp on or off. This worked at home on Wi-Fi and from afar, with no Apple TV-like hub device required.
The Insight Smart Plug now functions within a couple of home-control ecosystems: Amazon Echo, with its Alexa assistant and Google Home, with Google Assistant. You also can link it to the IFTTT – If This, Then That – automation service.
So what about HomeKit? Belkin, which has been flirting with the Apple technology for a couple of years with no follow-through, finally said in May 2017 that it would release a Wemo Bridge to bring its Wemo devices into the HomeKit fold. It’s a somewhat awkward arrangement given that you have to deploy extra hardware to access existing Wemo devices via HomeKit, but it’s better than nothing. The Wemo Bridge is due before the end of the year, but Belkin hasn’t announced pricing yet.

Adding Security Cameras — Internet-accessible security cameras were another must-have item on my home-security checklist, and here is where I ran into difficulty staying within the HomeKit ecosystem.
There just aren’t many HomeKit-compatible video cameras out there. In fact, on Apple’s HomeKit accessory page, there’s only one — D-Link’s $149.95 Omna 180 Cam HD. I repeatedly tried and failed to get an Omna review unit, so I can’t speak to its reliability.
So I had to venture beyond the HomeKit universe for a security camera. There are tons of options, and I narrowed my search to cameras from Canary and Netgear. Apple compatibility is reasonably good in both cases, since both companies provide iOS apps. Canary even extends this to the Apple Watch.
Netgear sent me a couple of its Arlo Pro security cameras, which worked out nicely. The compact cameras are cordless, working off rechargeable batteries. They are weatherproof and can be used indoors or outdoors; I opted for indoor use so I wouldn’t have to spend time installing them on the side of my house while simultaneously annoying my wife.

My setup was the height of simplicity – I placed one on each of my home’s stairwells, with one camera pointed at the back door and another aimed at the front door. I hoped that anyone who came in would trip the cameras’ motion sensors – nothing gets past these things – and trigger the recording of a video snippet to document the incident.
You can set the duration of videos between 10 seconds and 5 minutes once motion sensing is triggered, or you can set the camera to record only as long as motion is being sensed. Netgear offers free cloud storage for recent recordings (going back a week), unlike other camera vendors that charge fees for online archiving.
The camera also has a siren that can be activated to spook burglars. I had to be careful when testing this feature; at 100+ decibels, it’s so loud that it can damage hearing.
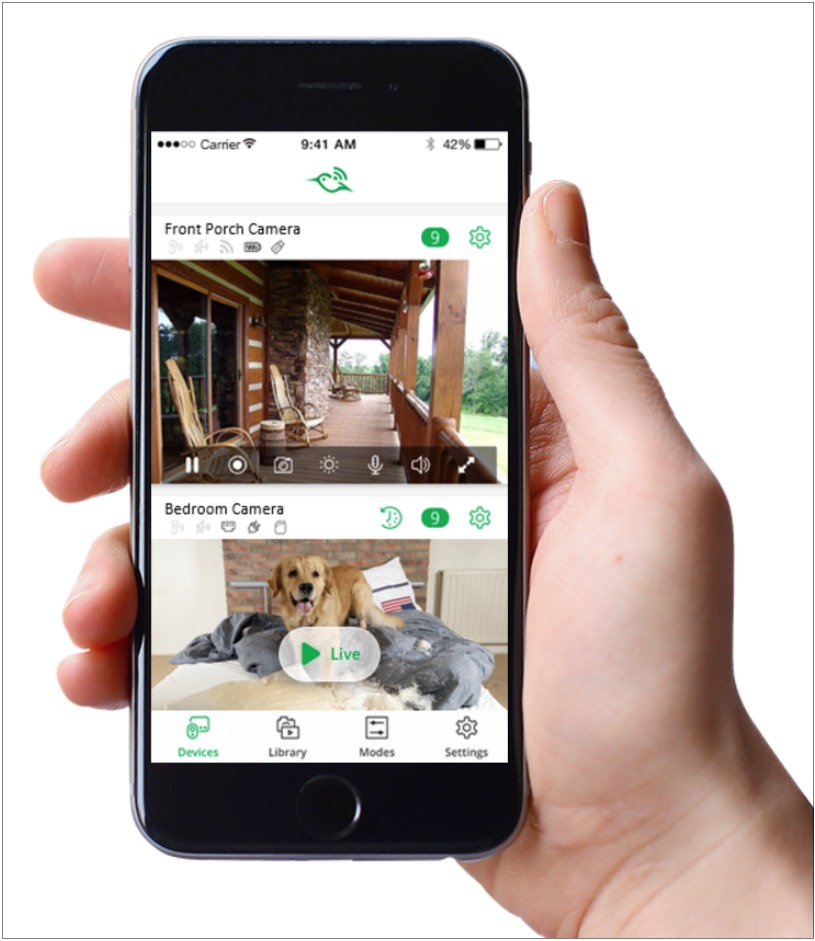
The Arlo app is nicely designed, with a live-feed page (tap to see live video), a library showing motion events in reverse chronological order, and a “mode” section to manually arm or disarm the cameras, put them on a schedule, or set up geofencing so behavior changes depending on the whereabouts of authorized users. I did not bother with most of these features; I just wanted to be alerted via my Apple Watch about motion events with corresponding mini-recordings – and I was.
The Arlo cameras have a few annoying characteristics. Much like the forthcoming Wemo Bridge, they require the use of a large hub-like device that connects physically to your broadband router. Such an approach isn’t a big deal but further clutters the already crowded space around my router.

(Note that Netgear sells the Arlo cameras as kits, with two or more of the cameras along with the hub. I tested a $419.99 kit with two cameras along with the hub.)
More irksome is the Arlo camera’s inability to charge, via its Micro-USB port, with anything but the power adapter Netgear provides. I cursed at one point when I could not find that charger and tried a bunch of others; all were summarily rejected. Not cool, Netgear.
The company has been rumored to be working on HomeKit support but had nothing to announce as I wrote this.
Canary has a different approach to home-video security. Its flagship product, the $149 Canary, is a stylish, self-contained cylinder that sits on a bookshelf or other flat surface to provide a wide-angle view of your home’s interior (the Arlo Pro’s view is a bit tighter).

Like the Arlo, the Canary detects motion and records corresponding bits of video. By default, these clips last only 10 seconds and go back only a day, but for $10 a month, you can access full-length videos going back 30 days. The Canary also has a 90+ decibel siren. Unlike the Arlo, it monitors air quality, humidity, and temperature, so if there is flooding or a fire, it can alert you.
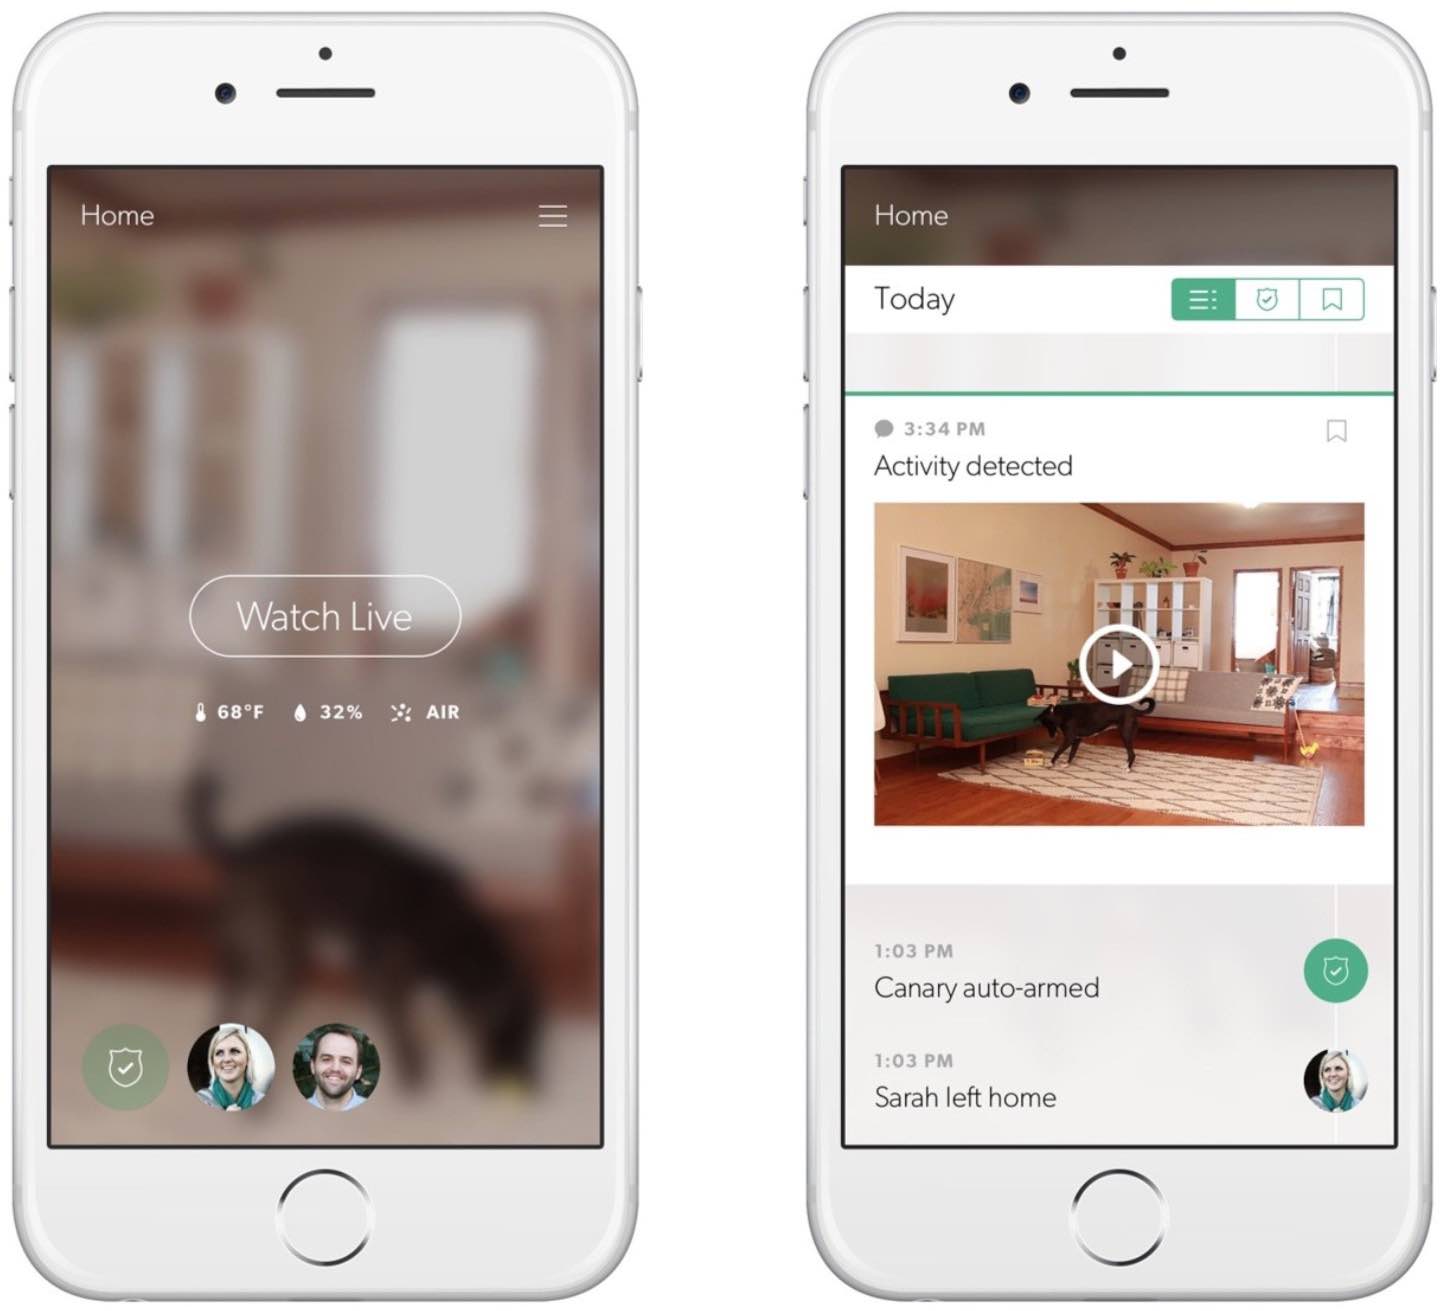
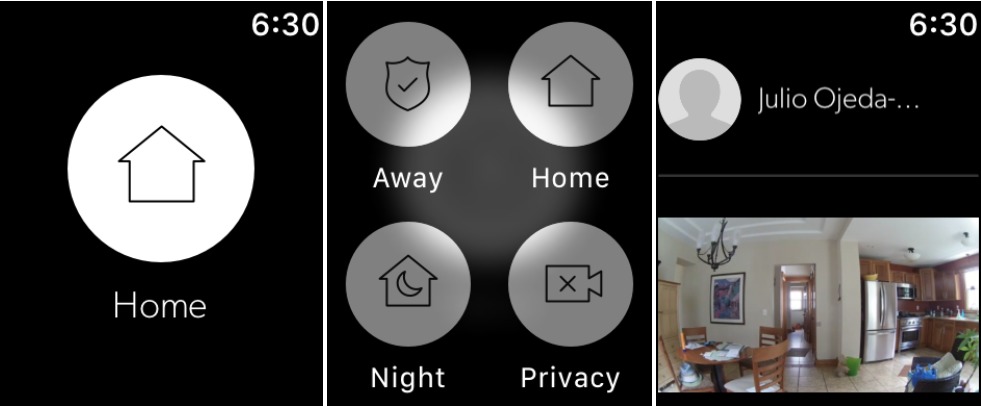
The Canary’s iOS app is a beauty. The camera’s viewpoint is stylishly blurred with an overlaid Watch Live button to bring the view into focus. If you have more than one camera, you can swipe right or left to go from unit to unit. Buttons along the bottom let you set modes (Away, Home, and Night) to alter its behavior based on whereabouts or sleeping status of authorized users. You can easily add more authorized users.
The Canary’s Apple Watch app has one primary purpose, mode switching, which includes a privacy mode if you want to suspend surveillance for a time. The Apple Watch app is attractive, with a single big white button showing the current mode (force-press for a four-button grid to switch modes). You can also scroll down to see recent motion events, shown as thumbnails.
Canary also has a pretty good Apple TV app, but that obviously was of no use to me while I was traveling.
Of course, using both the Arlo and Canary for indoor monitoring was redundant. If I were to do this all over, I would put the Arlos outside, one in the front of my house, and one over the back patio, while relying on the Canary for indoor monitoring.
Canary also has an Arlo equivalent, the $179 Canary Flex, which can be deployed outdoors as well as indoors. I had a Flex unit to test, as well, and I placed it in the living room, with the primary Canary unit in my kitchen. In hindsight, I should have used the Flex outside along with the Arlos for comprehensive outdoor surveillance.

As for HomeKit integration, Canary has confirmed it is coming but won’t be supported with existing products. The company has announced a Canary Plus – essentially a successor to its current Canary product – that will support HomeKit. However, Canary says that once you have at least one Canary Plus deployed, any older Canary devices on the same network will be HomeKit-ready by extension.
The Upshot — My grand home-security experiment was a success in granting me the peace of mind that had eluded me on past trips, when I fretted about potential home break-ins.
In fact, I so enjoyed deploying and using the security devices that I almost wanted a burglary attempt to have transpired so I could have responded from a distance. It would certainly have made for a dramatic article.
To fantasize for a second: How would I have responded to a break-in? For starters, I would have been gleeful in activating the ridiculously loud sirens on the Canary and the Arlo cameras, which would have likely sufficed to scare away intruders. As an alternative, I could have given them a severe talking-to via speakers built into the cameras. In addition, the Canary camera has built-in options to summon police, paramedics, and firefighter crews, so sending the cops to my house would have been a cinch.
Realistically, the entire experience probably would have been pretty scary, though, and we likely would have worried about it afterward, so I guess I’m glad it didn’t happen.
My only big regret during this home-security experiment was not being able to stay within HomeKit, as I had intended.
Were I to do a version of this article a year from now, though, it would likely read differently. Suppliers of home-automation products seem to be edging slowly but surely toward HomeKit.
Indeed, as I was putting the finishing touches on this article, Logitech announced HomeKit support via a firmware update for the Circle 2, its compact, corded security camera for use indoors and outdoors. Logitech sent me one to try out, and I am putting it through its paces now.

At the same time, Apple is reportedly making it easier for device makers to add HomeKit compatibility (see “A Prairie HomeKit Companion: What’s Coming in iOS 11,” 7 July 2017). This is all terrific news as Apple goes up against the likes of Amazon and Google in the home-automation space.
TidBITS Watchlist: Notable Software Updates for 11 September 2017
Retrospect 14.5 — Retrospect, Inc. has released Retrospect 14.5 with support for MySQL, PostgreSQL, and MongoDB database protection via script hooks. The backup software also adds support for macOS 10.13 High Sierra and APFS, makes the Backup Report available as a daily email message, certifies integration with the Wasabi cloud storage solution, resolves an issue with Configuration Import where long names or certain characters led to application crash, and fixes a bug where the client’s History tab failed to populate after the engine had been restarted. You can download a free 45-day trial of
Retrospect, and the company is offering a 15 percent discount in response to the recent announcement that CrashPlan for Home will be discontinued (see “CrashPlan Discontinues Consumer Backups,” 22 August 2017). ($119 new, 178 MB, release notes, 10.6.8+)
Read/post comments about Retrospect 14.5.
ExtraBITS for 11 September 2017
In ExtraBITS this week, it turns out that streaming services are helping the music industry, we get a look at Siri’s past challenges and upcoming improvements, T-Mobile is offering a free Netflix subscription to subscribers, we learn some secrets of the new Steve Jobs Theater, Tim Cook has pledged to support Apple’s DACA employees, Pixelmator is planning a professional version, and Apple is ending the Apple Music Festival after a decade of concerts.
Streaming Services Not Killing the Music Industry — Buried inside a Bloomberg article about Apple renegotiating Apple Music streaming rights with Warner Music Group is this interesting tidbit: streaming services aren’t killing the music industry, which had been in decline for nearly two decades, but are actually reviving it. Global music sales grew 5.9 percent to $15.7 billion in 2016. Also interesting is the fact that Apple negotiated a smaller payout than it paid previously — an estimated 55 percent (or less if subscriber numbers increase),
down from 58 percent. When Apple launched Apple Music, it made a big deal about how much more it paid artists than Spotify, but from the article, it appears that rates are based more on subscriber figures than any sense of artistic patronage.
How Siri Is Getting Its Groove Back — Siri was groundbreaking when it debuted, but rivals from Amazon and Google have since overshadowed it. Wired spoke with Alex Acero, the Apple executive responsible for Siri, and Greg “Joz” Joswiak, Apple’s VP of product marketing, who explained some of Siri’s past challenges and upcoming improvements, such as improved voice recognition and iOS 11’s more natural voices. It’s interesting to hear the executives say that Apple has always wanted Siri to be able to perform tasks, not merely answer demo-friendly trivia questions that are
unsatisfying in the real world. Joswiak noted, “We didn’t engineer this thing to be Trivial Pursuit!” Now Apple has to deal with the fact that it’s hard to change users’ Siri habits — if Siri failed you in the past, you probably won’t try that command again even if Siri could now handle it.
T-Mobile to Include Netflix for Free on Family Plans — T-Mobile has announced that, starting 12 September 2017, customers with two or more lines will get Netflix Standard for free — a $9.99 per month value. The Netflix Standard plan lets you stream on up to two devices at once in HD resolution. Is there any limit to T-Mobile’s aggressive pricing? In any case, the fierce competition that CEO John Legere is bringing to the mobile space continues to be fun to watch.
Secrets of the Steve Jobs Theater — The first event at the Steve Jobs Theater on Apple’s new campus is set for 12 September 2017, and Bloomberg has a look at the room’s impressive gadgetry. The theater includes two elevators that rotate so that visitors will enter and exit from the same side. It also features retracting walls that hide a demonstration room where journalists can sample Apple’s latest wares after the presentation. All it needs is a shark tank underneath the stage to double as the lair of a James Bond villain. Just imagine Tim Cook pushing a button
while intoning, “I’m sorry, Mr. Nadella, but we won’t be needing Microsoft Office anymore.”
Tim Cook Promises Support for Apple’s DACA Employees — After President Trump announced that he is ending the Obama-era Deferred Action for Childhood Arrivals (DACA) program, Tim Cook penned an email to Apple employees voicing his disapproval. Cook added that Apple would be working on behalf of its 250 DACA employees both in Congress and the courts to keep them from being deported. Trump is waiting six months before ending the program and has called on Congress to legislate a replacement.
Pixelmator Plans to Go Pro — The developers of the popular Pixelmator image-editing app have announced a follow-up app, due later this year. Pixelmator Pro will be sold in the Mac App Store alongside the original Pixelmator, and it will feature a streamlined single-window interface, advanced layout tools, an overhauled painting system, machine learning, and more. Many of us at TidBITS have long been fans of Pixelmator because it offers most of what we need from Photoshop at a fraction of the price, so we’re looking forward to trying Pixelmator Pro’s new features.
Apple Ends the Apple Music Festival — After 10 years, Apple is putting a stop to the Apple Music Festival, previously known as the iTunes Music Festival. Over the years, numerous big-name acts played at the London-based show, including Adele, Beck, Elton John, Lady Gaga, Paul Simon, and Soundgarden. While it’s sad to see the annual series of concerts go, perhaps Apple is hoping to convince Apple Music Festival alumni to appear on “Carpool Karaoke.”