TidBITS#1282/27-Jul-2015
In this issue of TidBITS, we’re happy to announce “one more thing” — Joe Kissell’s latest book, “Take Control of Keynote,” which walks you through planning, creating, and delivering a killer presentation. Strong iPhone sales helped Apple break financial records in Q3 2015 again, despite iPad sales volume continuing to decline. Moving on from the news, Josh Centers takes a look at BeardedSpice, which lets you control Web media players with your Mac’s media keys, and shows you how to replace an iPhone 5c screen with the Screasy repair kit. Adam Engst reviews TripMode, which helps prevent data overages when tethering your Mac to your iPhone, and in FunBITS, Michael Cohen takes you on a trip though time, space, and music with Lightyear.fm. Notable software releases this week include Mellel 3.4.2, Microsoft Office 2011 14.5.3, MacBook Pro Flash Storage Firmware Update 1.0, Default Folder X 4.7.3, and TextExpander 5.1.
Give Better Presentations with “Take Control of Keynote”
Little is more stressful than giving a major presentation, whether it’s for the big boss, a hiring committee, or the city council. Proper preparation is essential, which is why Joe Kissell’s latest book, “Take Control of Keynote,” walks you through every step of the process: planning what you want to say, creating attractive slides that support your points, and delivering a successful talk. The 168-page book is ideal for beginners, but also has plenty of tips and documentation of subtle features for long-time Keynote users. It’s $15 and is available now.
Building on his years of public speaking at Macworld Expo, MacMania cruises, and innumerable Mac user groups, Joe starts by explaining how to plan your presentation even before you launch Keynote. He then helps you choose the right theme in Keynote, and explains how to create slides by filling in placeholders, adding objects (images, movies, sounds, tables, and charts), and inserting and styling text. You’ll also learn how to add builds and transitions to disclose information progressively, highlight particular objects or text as you speak, and call attention to topic changes. Lastly, Joe offers real-world advice about how to deliver a successful talk, including tips on making presenter notes, customizing
the presenter display, rehearsing your talk, setting up the projector or screen, and controlling your presentation.
Not all presentations are meant to be given in person, and Joe also explains how to deliver remote presentations over the Internet, make self-playing presentations for kiosks, and create presentations with recorded narration. The book covers Keynote for the Mac, but includes an appendix that discusses what’s similar and different in Keynote for iOS and Keynote for iCloud.
Early reader Michael Durrant, a mental health and corporate trainer, wrote to us, “As someone whose life (and income) is doing training presentations, this ebook is the most useful I have ever bought. I know Keynote well and have used it since its first release; however, Joe’s ebook has both challenged me to think about the way I structure my presentations and has taught me stuff about Keynote I didn’t know.”
“Take Control of Keynote” rounds out our coverage of Apple’s iWork suite, joining Michael E. Cohen’s “Take Control of Pages” and Sharon Zardetto’s “Take Control of Numbers.” All three rank among our most comprehensive titles, so if you’ve replaced Microsoft Office with iWork, we now have complete documentation for you. All three books are available separately, or you can buy the full 750-page collection for 30 percent off, dropping the $55 cover price to $38.50.
Apple Posts Record Financials for Q3 2015
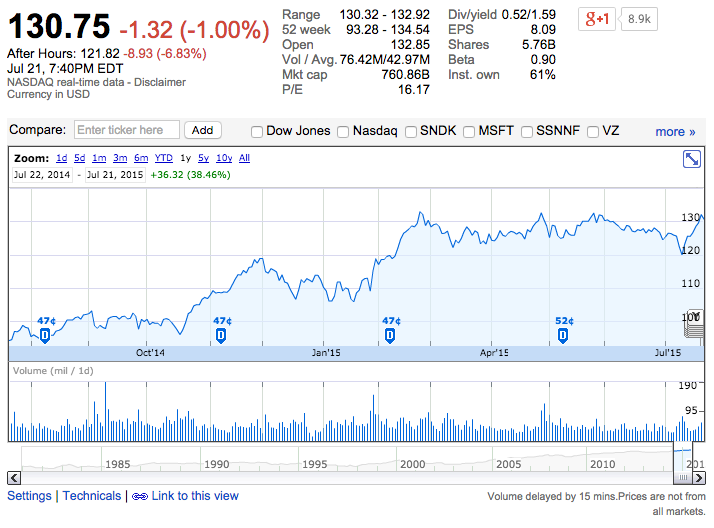
Reporting on its fiscal 2015 third quarter financial results, Apple has announced net profits of $10.7 billion ($1.85 per diluted share) on revenues of $49.6 billion, exceeding the analyst consensus estimate of $1.81 per share in earnings. The company’s revenues are up 33 percent (an increase of $12.3 billion) compared to the year-ago quarter, the fastest growth rate in three years (see “Apple Q3 2014 Results Show Highest EPS in Seven Quarters,” 22 July 2014). Apple realized 64 percent of its revenues from international sales.
Despite these impressive financial results, Apple’s stock price fell over 8 percent in after-hours trading (but is still near its all-time high). Apple certainly shouldn’t be worried about what the market thinks in the short-term — the company now boasts over $202 billion in its money pit. Apple’s stack of cash is almost equal to Greece’s GDP.
Apple continues to be cagey about Apple Watch sales figures, burying them in the miscellaneous Other Products category, which had total revenues of $2.6 billion, but CEO Tim Cook maintains that the Apple Watch is off to “a great start.” Revenue in Other Products was up by 49.5 percent year-over-year, and CFO Luca Maestri said that Apple Watch was responsible for over 100 percent of the category’s growth, but that’s comparing apples and oranges, since the Other Products category didn’t include iPod sales
until Q1 2015 (see “Big iPhones Mean a Big Q1 2015 for Apple; Apple Watch Date Revealed,” 27 January 2015). Maestri said that Apple is choosing not to share specific Apple Watch numbers so as to not help competitors, though it’s unclear why that would be important for the Apple Watch but not, say, the iPhone or iPad.
Nonetheless, Cook gently contradicted reports that Apple Watch demand is declining, stating that June sales of the watch were higher than those in April and May. In fact, Cook said that so far, the Apple Watch is outselling both the original iPhone and the original iPad at the same point in their lifetimes. He did, however, emphasize that Apple is less focused on initial sales, and is choosing instead to focus on a great customer experience. “It’s such a rare privilege to launch a new platform with such potential,” Cook said.
As has become commonplace, iPhone sales continue to skyrocket, with a year-over-year revenue increase of 58.8 percent. Cook bragged that the iPhone is seeing the “highest switcher rate from Android ever measured.” He said that 86 percent of customers planned to buy another iPhone, compared with 50 percent for the next highest brand measured. The iPhone saw an 87 percent unit growth in China, compared to IDC estimates of a 5 percent unit growth for the entire Chinese smartphone market.
The Mac continues to climb the charts, with year-over-year revenues increasing by 9 percent — this in the face of IDC estimates that the overall PC market had contracted by 12 percent in the third quarter. Mac sales grew by a whopping 33 percent in China.
However, the iPad sales volume continues to decline, with a year-over-year revenue decrease of 22.9 percent. Cook said that he’s still bullish on the iPad, citing both the new iOS 9 feature enhancements and increasing enterprise adoption. Helping spur that adoption, Maestri said, was the success of the IBM partnership, with some 35 enterprise apps already released, and with 100 scheduled to be available by year’s end. Cook also noted that iPad usage is more than six times that of competing products, which bodes well for eventual upgrade sales. Maestri remarked that, of those surveyed, over half who intend to purchase a tablet in the next 90 days are choosing the iPad, and over 70 percent of enterprise purchasers are also going with
the iPad. He added that Apple doesn’t compete in the sub-$200 end of the tablet market, but has a 96 percent share of tablets outside that price range.

Apple raked in over $5 billion in services, a new all-time high, up 12 percent year-over-year. App Store revenue grew by 24 percent in the quarter. Apple Pay seems to be doing well, with a quarter-million locations for last week’s UK launch, Square Reader support in the fall, and upcoming Apple Pay support at over 700 colleges and universities, including Auburn, Colorado State, the University of Kentucky, the University of Oklahoma, and UC Irvine. American Express will also be adding Apple Pay support for corporate
cards next month.
While the Apple Watch sales volume remains a mystery and iPad sales are flagging, Tim Cook’s Apple is still going strong. Apple can’t possibly maintain its stratospheric growth forever, but it shows little sign of slowing down anytime soon.
BeardedSpice Gives You Control of Your Mac’s Media Keys
With Instacast gone, (see “Farewell Instacast,” 16 June 2015), the only other dedicated Mac-native podcast player is Downcast. Well, there’s iTunes, but it’s a pain to use for podcasts because it lacks 30-second skip buttons. And, well, it’s iTunes, which provokes vitriol whenever it’s mentioned.
As Julio Ojeda-Zapata pointed out in “Mac Podcast Client Showdown: Native Clients vs. Web Apps” (5 January 2015), many of the best podcast players are now Web-based. But one problem with Web-based media players is that you can’t control them with the media keys on your Mac’s keyboard. Or can you? (And if you’re not sure what I’m talking about here, the media keys are usually F7 through F12, with functions for play/pause, rewind, fast-forward, mute, and volume up/down — look at the keycap labels for specific key assignments.)
Enter the oddly named but free BeardedSpice menu bar utility. From its menu, BeardedSpice lets you choose which media players your media keys control, including Web-based players in Safari and Google Chrome. This not only solves the problem of not being able to control Web-based media players, but also lets you specify which native apps get to use the media keys so you don’t have conflicts. I can set whether my keyboard media keys are controlling iTunes, Overcast.fm, Spotify, or YouTube. (For some reason, BeardedSpice always lists “No Track” for iTunes, though that’s not a particularly worrisome bug.)

BeardedSpice can’t control every Web-based media player, but it’s likely compatible with your favorites, including Amazon Music, Google Music, Last.fm, Overcast.fm, Pandora, Pocket Casts, Rdio, Slacker, Songza, Tidal, Vimeo, and YouTube, among others. And if you run across a player that doesn’t work, you can always ask for it to be supported.
Unfortunately, while BeardedSpice recognizes media players in site-specific browsers created with Epichrome (formerly known as Make Chrome SSB; see “Make Site-Specific Browsers with Google Chrome” 6 March 2015), it doesn’t seem to be able to control them.
Regardless, BeardedSpice is a free, simple way to regain keyboard control of your various media players. Give it a try!
TripMode Prevents Unwanted Internet Data Usage on a Tethered Mac
As I write this, I’m sitting in the car while Tristan runs cross-country practice from 8 AM to 10 AM, something that happens several times each week during the summer. The car isn’t my preferred working environment, but since it’s a 15 minute drive to and from the school, staying put lets me avoid wasting another 30 minutes on driving. The saving grace? The school’s Wi-Fi network reaches to where I park, so I can be entirely productive on my MacBook Air. But not all locations have Wi-Fi, and when I’m forced to wait elsewhere, I rely instead on the Personal Hotspot feature of iOS 8 on my iPhone. It’s supported by the AT&T MobileShare plan we use, which includes 2 GB of shared cellular data.
2 GB is more than enough for Tonya, Tristan, and me to share for iPhone usage — we don’t do any media streaming over cellular — but my MacBook Air could chew through that in no time, thanks to Dropbox syncing, CrashPlan backups, Photos bringing new images down from iCloud Photo Library, and more. In the past, I’ve always tried to reduce my data usage manually by pausing Dropbox and CrashPlan, avoiding streaming media apps like Rdio, and hoping that iCloud-based services like iCloud Photo Library don’t go haywire on me.
A more elegant solution has now arrived in the form of TripMode, designed by three Swiss entrepreneurs. Whenever it’s running, TripMode watches as apps attempt to make network connections and allows only those apps you specify, preventing all others from accessing the Internet. That way you can ensure that low-bandwidth apps like Messages and Mail work normally over your tethered Internet connection, while making unpredictable bandwidth users like Dropbox think you’re not connected to the Internet at all. TripMode costs $7.99, offers a 7-day free trial, and even after the trial ends, will work for 15 minutes per day for free. It requires OS X 10.10 Yosemite.
You might think TripMode would require a low-level kernel extension to work its magic, and you’d be right. Despite that, it’s an entirely self-contained app in the Applications folder, with its kernel extension hidden inside. So when you turn TripMode off, or uninstall it by dragging it to the trash, you don’t have to worry about a kernel extension remaining on your system and potentially causing instability.
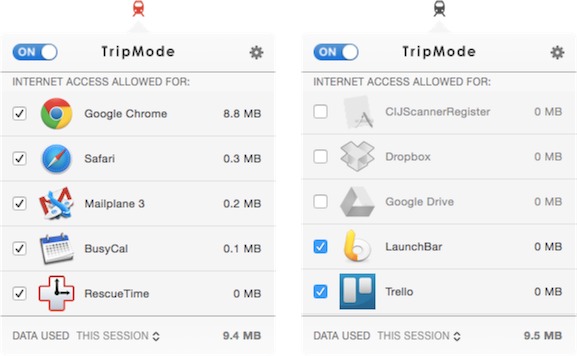
Once installed, TripMode adds itself to your Login Items and puts a train icon in your menu bar; click it to see all the applications that are trying to access the Internet. The list is populated dynamically, so you won’t see an app appear until it tries to connect (which causes TripMode’s icon to turn red by default), meaning that you may want to check back every so often. Because many apps rely on background processes, you may see entries you don’t recognize — I get CIJScannerRegister, which some research showed that I should probably delete. If you don’t want the icon flashing red or TripMode to launch automatically at startup, you can disable those options in its
settings.
To whitelist an app so it can access the Internet, select its checkbox in the TripMode popover. To keep an app thinking you’re offline, simply leave it deselected. That’s all you have to do — TripMode remembers your choices from one session to another. It also reports on how much data each app has transferred, and can even display how much data you’ve used in the session, in the day, and in the current month — all very helpful for staying under your data cap.
TripMode automatically detects mobile hotspots and enables itself for such networks, disabling itself when back on a regular Wi-Fi network. You can also control it manually via an On/Off switch, if you want to prevent excessive data consumption on any type of network — satellite Internet users or those relying on dialup in remote parts of the world might particularly like this option.
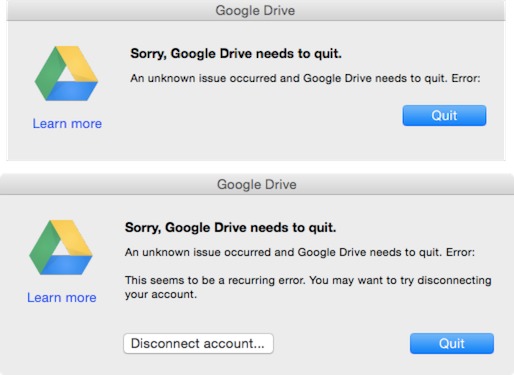
Unlike in iOS, which never assumes that Internet connectivity is a guarantee, OS X and Mac apps in general take an Internet connection as a given, and some may react poorly to being locked out by TripMode. For instance, Dropbox didn’t put up a fuss, but Google Drive was unhappy with being blocked, throwing one error and then another when I relaunched it. That’s not TripMode’s fault, and is worth reporting to the developer of any app that has trouble.
TripMode’s designers have put a great deal of thought into focusing its interface and functionality on the essentials, so there’s no way to create different sets of allowed applications for different networks, for instance, nor does the data usage report differentiate between networks. Most people will use TripMode to access just their own mobile hotspot, and per-network control or reporting would clutter the interface. That said, I could imagine a Pro version that would add such features, or might even support
throttling of specific apps, so you could prevent Photos from sucking all your bandwidth, for instance (which would be better than the Network Link Conditioner solution I mentioned in “How to Throttle iCloud Photo Library Uploads,” 20 May 2015).
Regardless, TripMode is here now, it works well, and it’s less expensive than even a single overage fee, which is generally about $15. If you connect your Mac to the Internet via a mobile hotspot with overage charges, TripMode is a no-brainer.
How to Replace a Cracked iPhone 5c Screen with Screasy
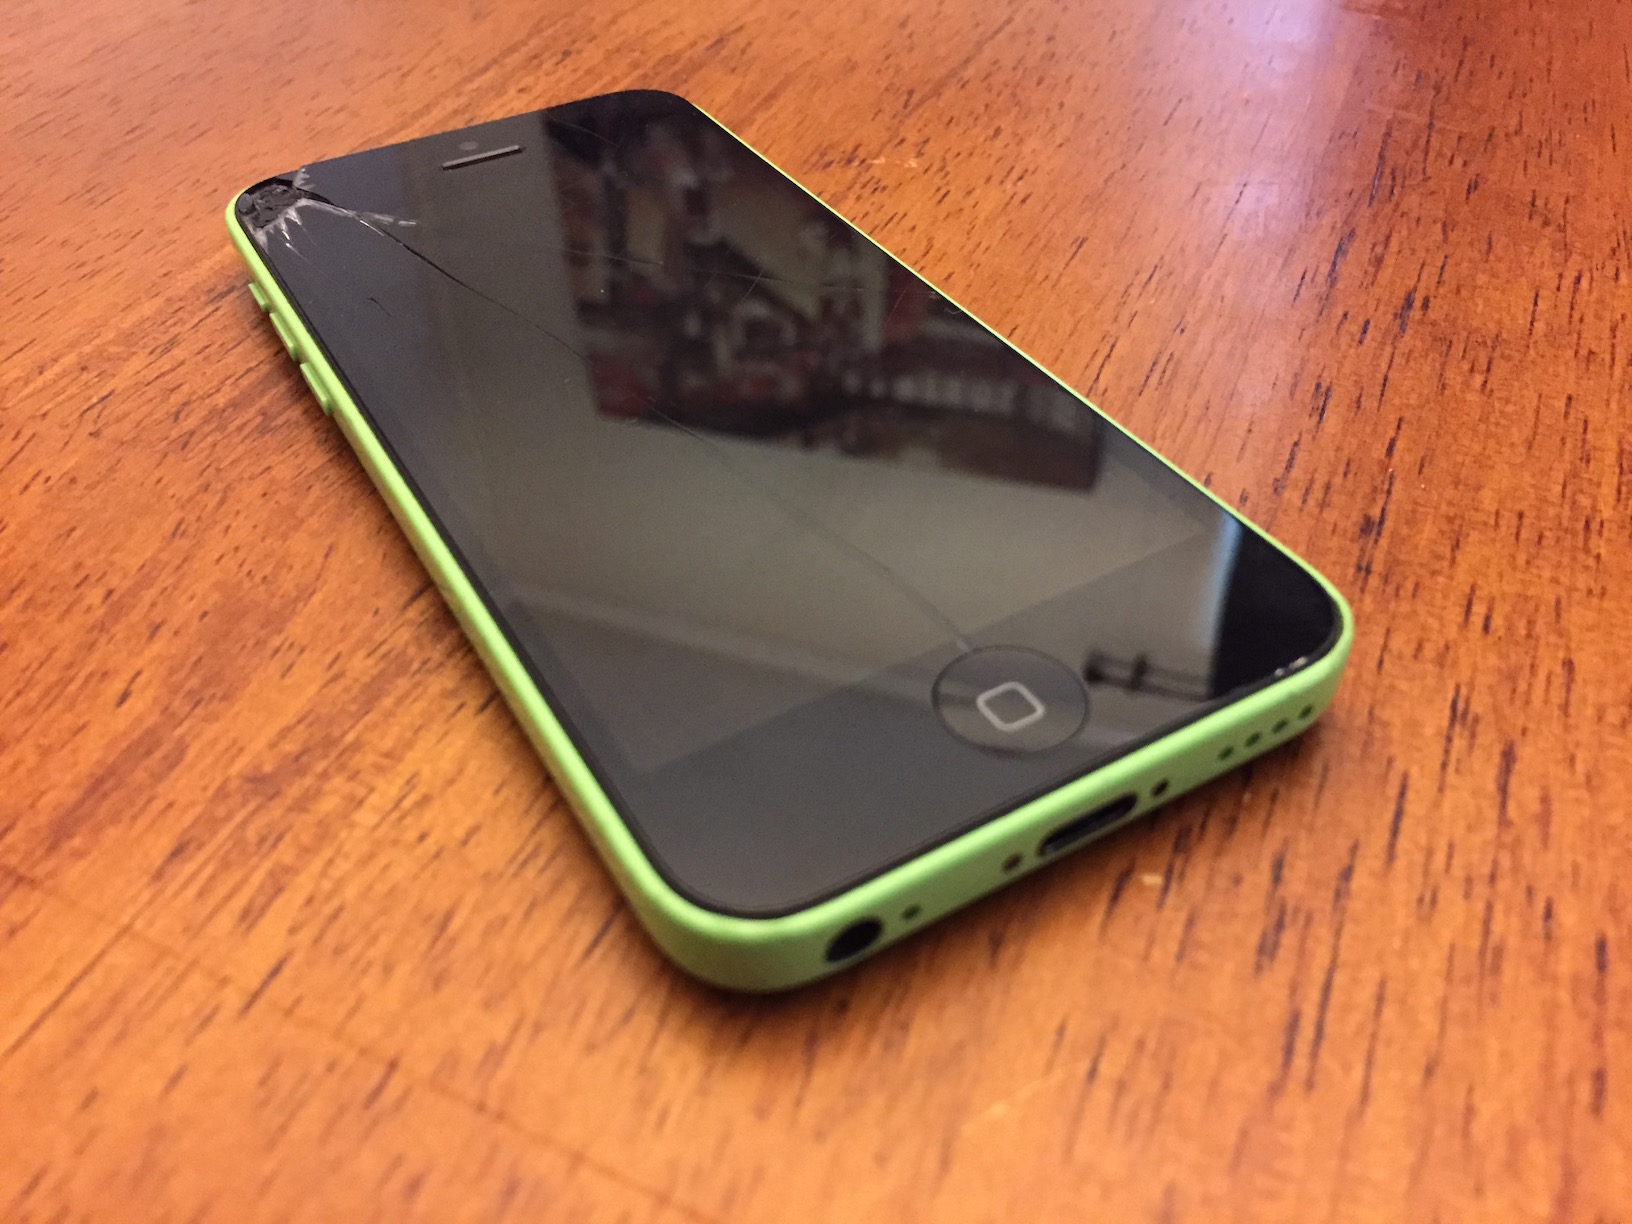
My wife’s iPhone 5c is only a little over a year old, but it’s already a wreck. We tried protecting it from our toddler with a Lifeproof case, but since our Amazon-branded Lightning cables weren’t compatible with the case, my wife would often remove it to charge her iPhone. One thing led to another, and before long, she had a screen that was not only cracked, but had a chunk missing from one corner.
As a tech writer, I get tons of press releases from companies, many of which are completely uninteresting (no, sorry, I don’t cover “past life regression therapy,” self-help books for teenagers, or anything to do with the zodiac). But I received one that caught my eye from Corey Schard, co-founder of Screasy, which sells all-in-one screen replacement kits for every iPhone model from the iPhone 5 to the iPhone 6 Plus. I told him about my wife’s iPhone, and he graciously agreed to send me
a kit to test it out. (Besides, I wanted to see how things had changed in the six years since Jeff Carlson wrote “How to Replace a Cracked iPhone 3G Screen,” 30 June 2009.)
Getting Started with the Screasy Kit — Screasy claims that most repairs are completed within 15 minutes or less. I don’t doubt that, because if everything had gone well, that’s all the time I would have needed. Unfortunately, not everything went according to plan, and amusingly, in roughly the same way Jeff had problems back in 2009 with a completely different iPhone.
But before we get to that, here’s what the kit includes:
- 1 replacement screen, with front-facing camera and Home button
- 1 #000 Phillips screwdriver
- 1 pentalobe screwdriver
- 1 flat-head screwdriver
- 2 plastic spudgers
- 1 iSesamo opening tool (for our review, see “iSesamo: Building a Better Spudger,” 16 January 2012)
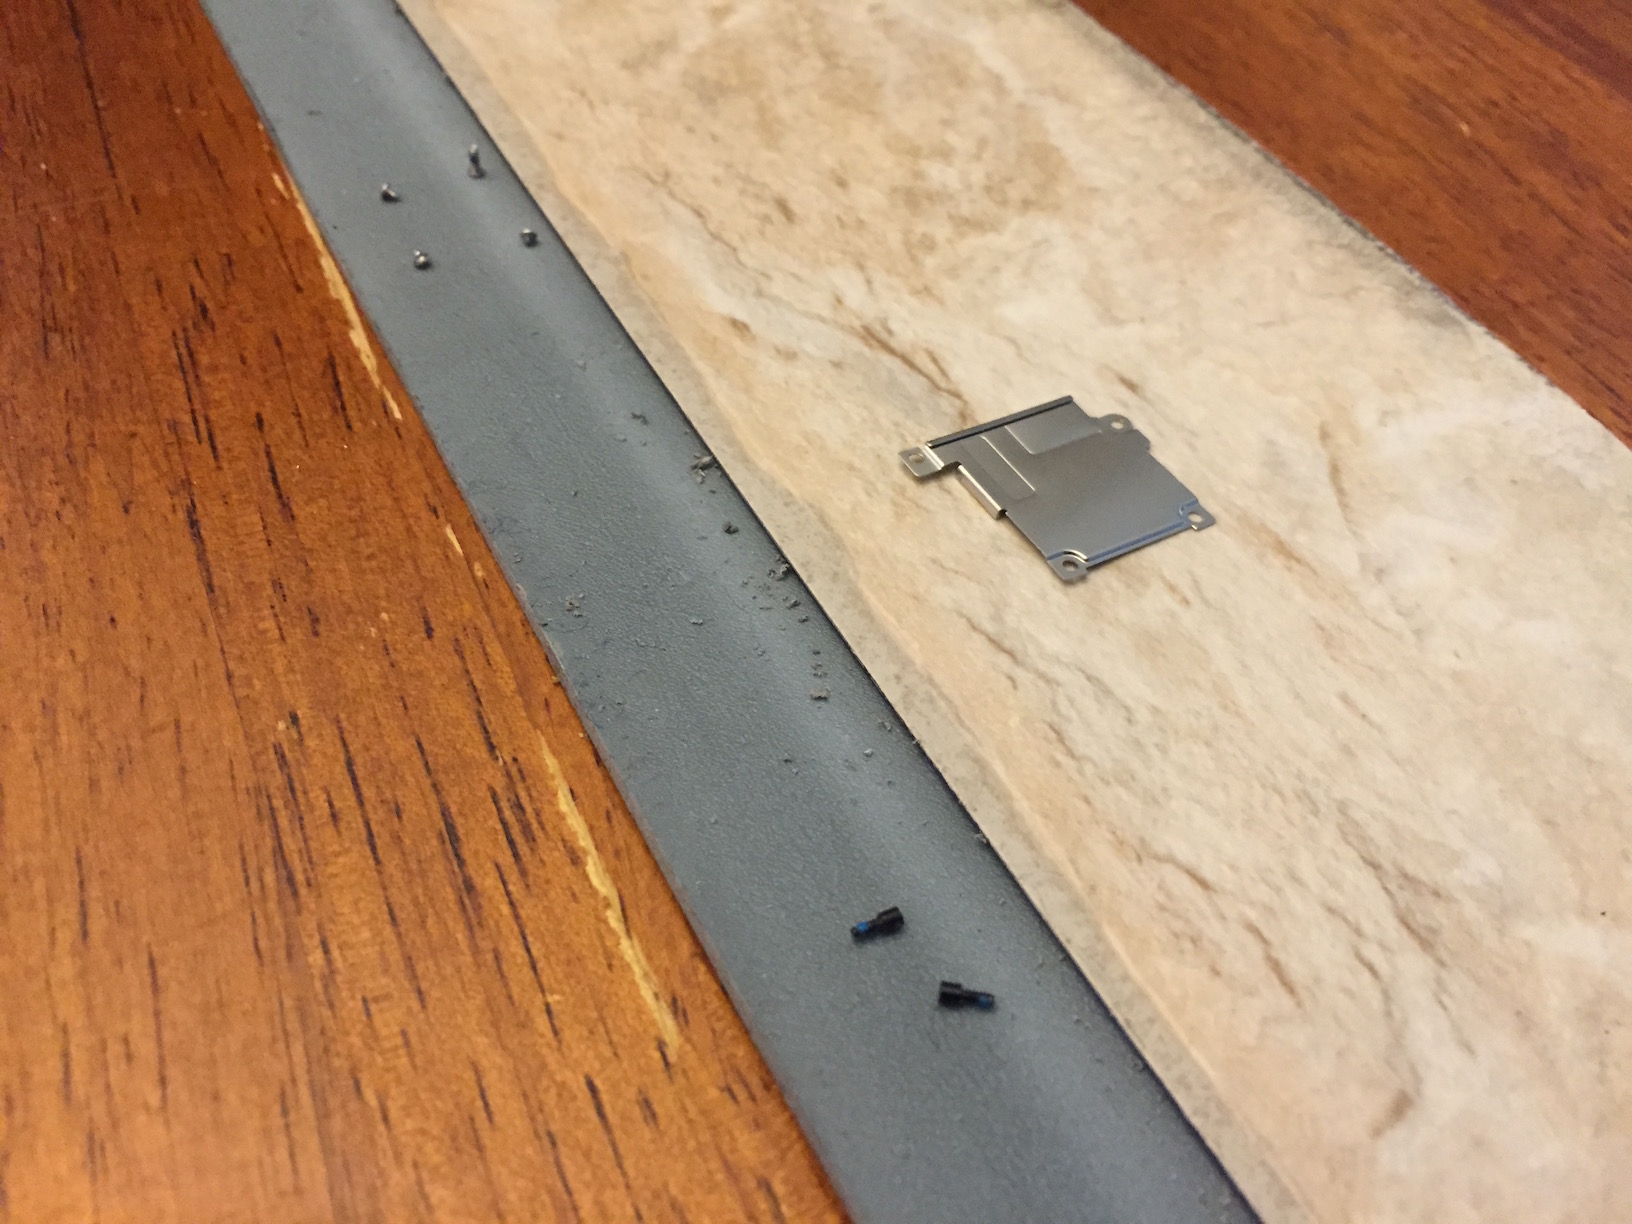
In theory, the Screasy kit includes everything you need to replace the screen. However, I recommend a few more things: a good pair of tweezers, a powerful flashlight or headlamp (I used this $4.99 UltraFire LED flashlight), and maybe another #000 Phillips screwdriver for stubborn screws. Also, you’ll want something that can keep the tiny screws from getting lost. Fortunately, I had recently installed Allure flooring in our bathroom, so I had some scrap pieces laying around — the adhesive strip was a perfect storage medium. You could instead use double-sided tape or a segmented container, but you want something that can hold the screws in a set pattern.
Before you start, enable AssistiveTouch in Settings > General > Accessibility. As I explained in “Work Around a Broken iPhone Button with AssistiveTouch” (24 July 2013), this feature is handy if a button on your iPhone stops working, and in this case, it saved me a lot of trouble later.
Screasy also offers video instructions. However, there are lots of little details they don’t mention, so I recommend also studying the screen-replacement instructions for your iPhone from iFixit.
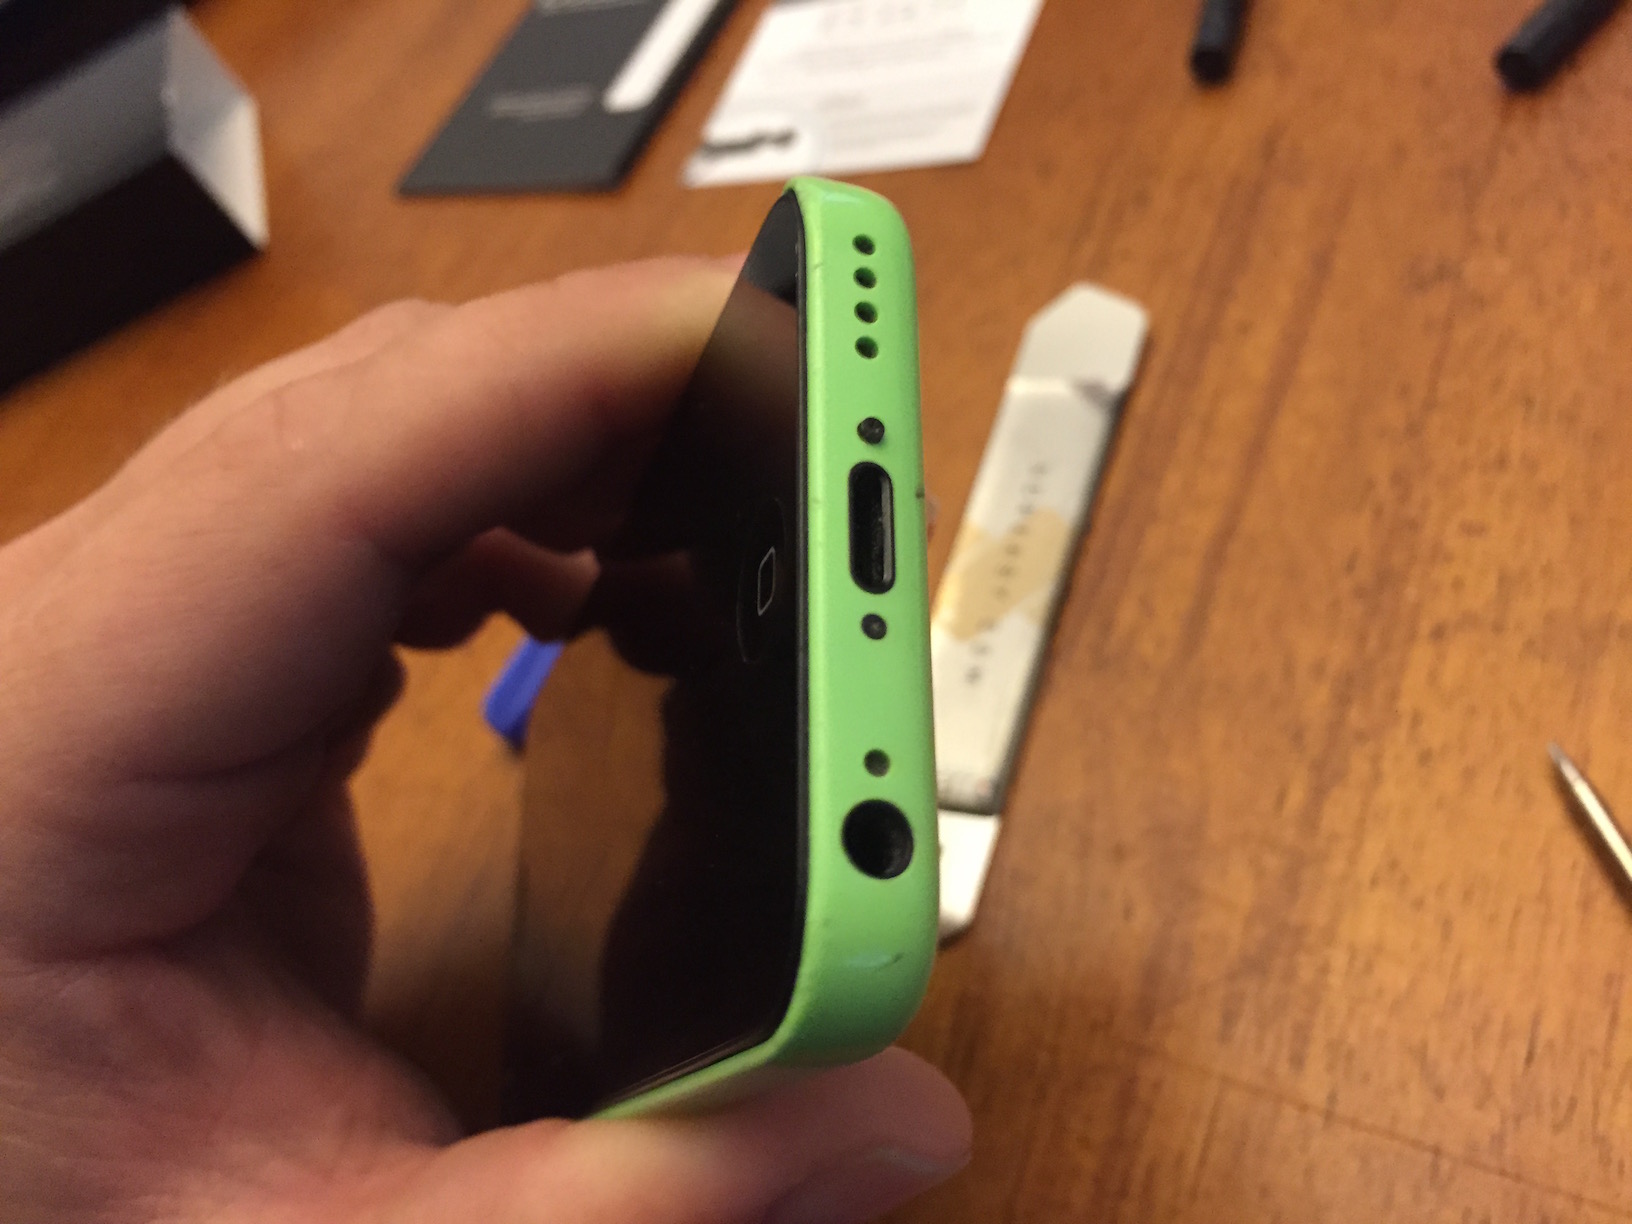
Disassembling the iPhone 5c — First, power off your iPhone 5c by holding the Sleep/Wake button, and then sliding the Slide to Power Off switch to the right.
Next, remove the two pentalobe screws on the bottom of the iPhone, which are on each side of the Lightning connector. Although the included pentalobe screwdriver is magnetized, you may have to pull the screws out with your thumbnails or tweezers.
Unfortunately, I wasn’t careful enough, as one of the screws popped out of my fingernails and went flying onto the floor. Finding a dark screw on a dark floor was not easy, and the flashlight was especially handy. After a few minutes of careful searching — a magnet might have helped too — I recovered the screw.
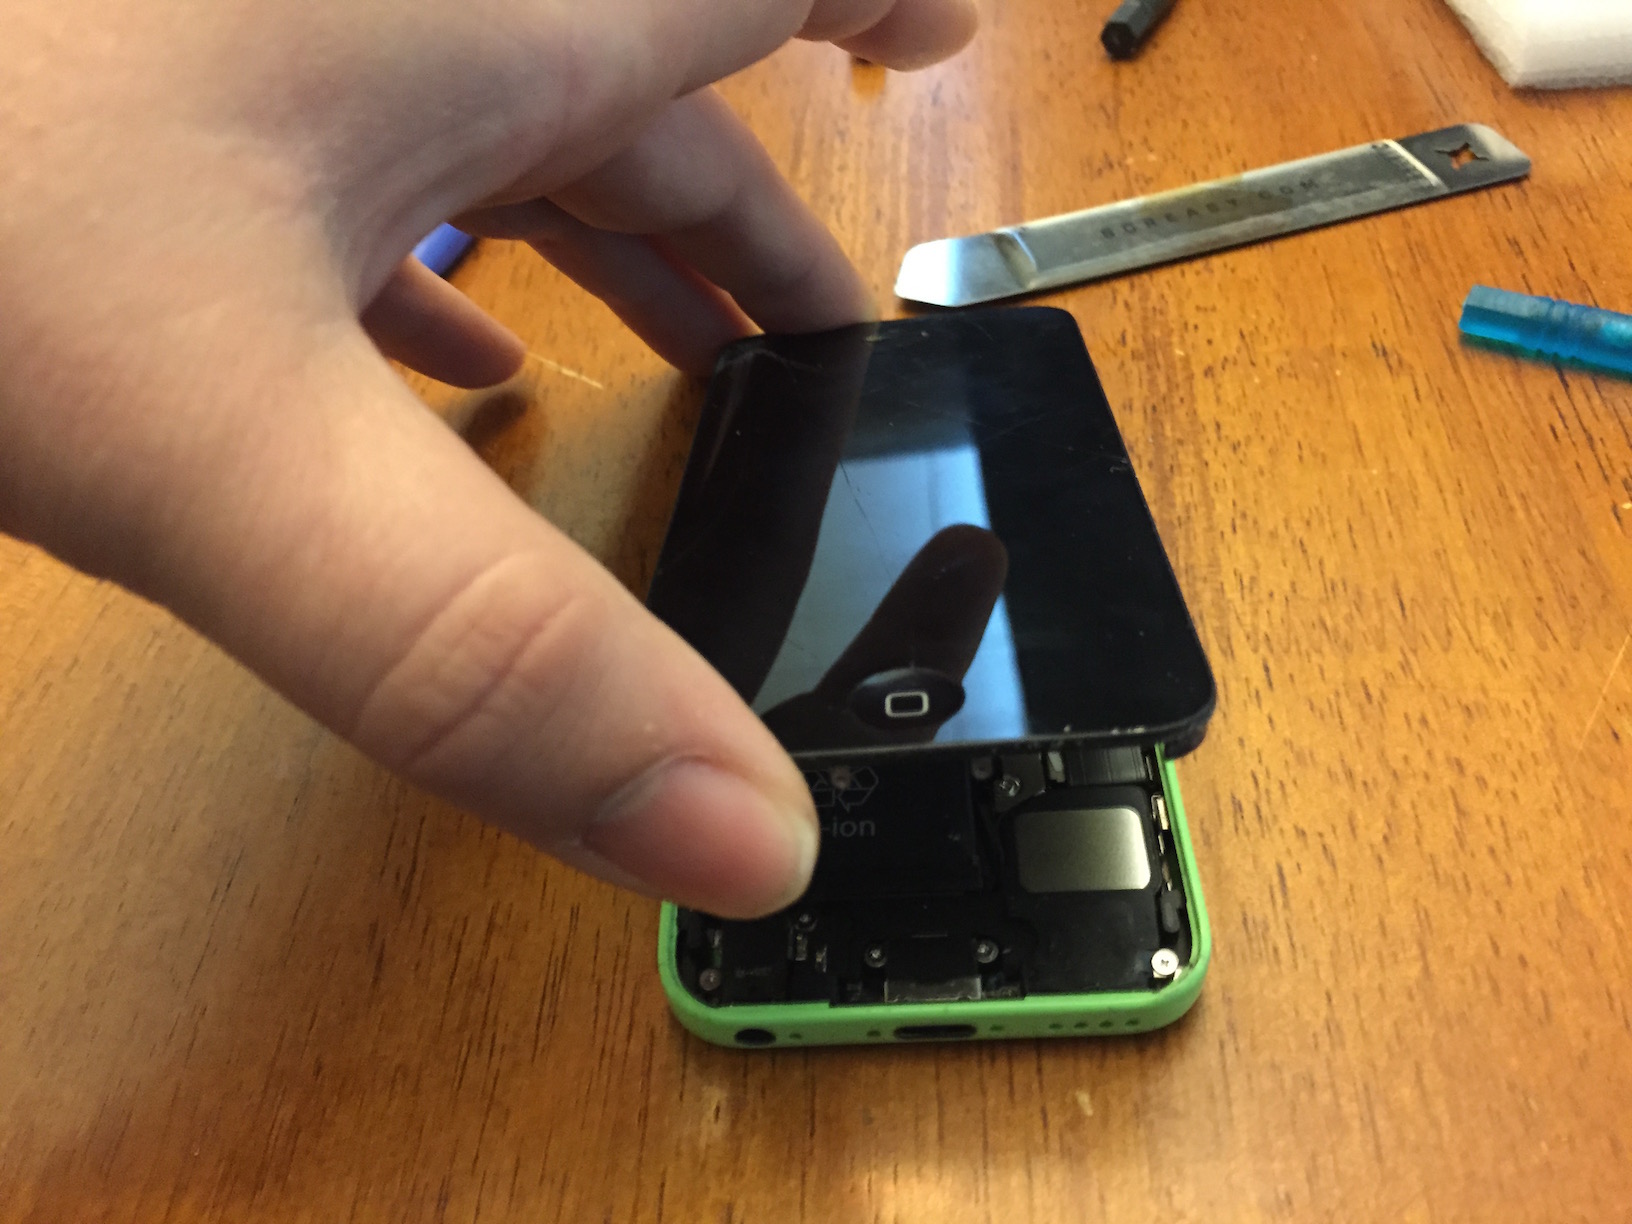
Next, you need to carefully separate the screen from the case. Take the iSesamo tool, and gently insert the pointy end in the gap between the bottom of the screen and the casing. Pry up gently, and then steadily work around the screen, prying until you’ve freed it.
You now need to lift the screen up from the bottom. Don’t raise it more than 90 degrees from the case, as that could damage the ribbon cable that attaches the top of the screen to the body of the iPhone.
Now look inside your iPhone. There are two spots to be aware of. The first is a metal square in the bottom right — this is magnetized and Screasy recommends using it to magnetize your Phillips screwdriver, by gently rubbing the tip over the square (the square is visible in the above picture). If you’re uncomfortable with that, another magnet of sufficient strength should work. The second spot is where the real work will happen: in the upper right there is a metal shield with four screws.
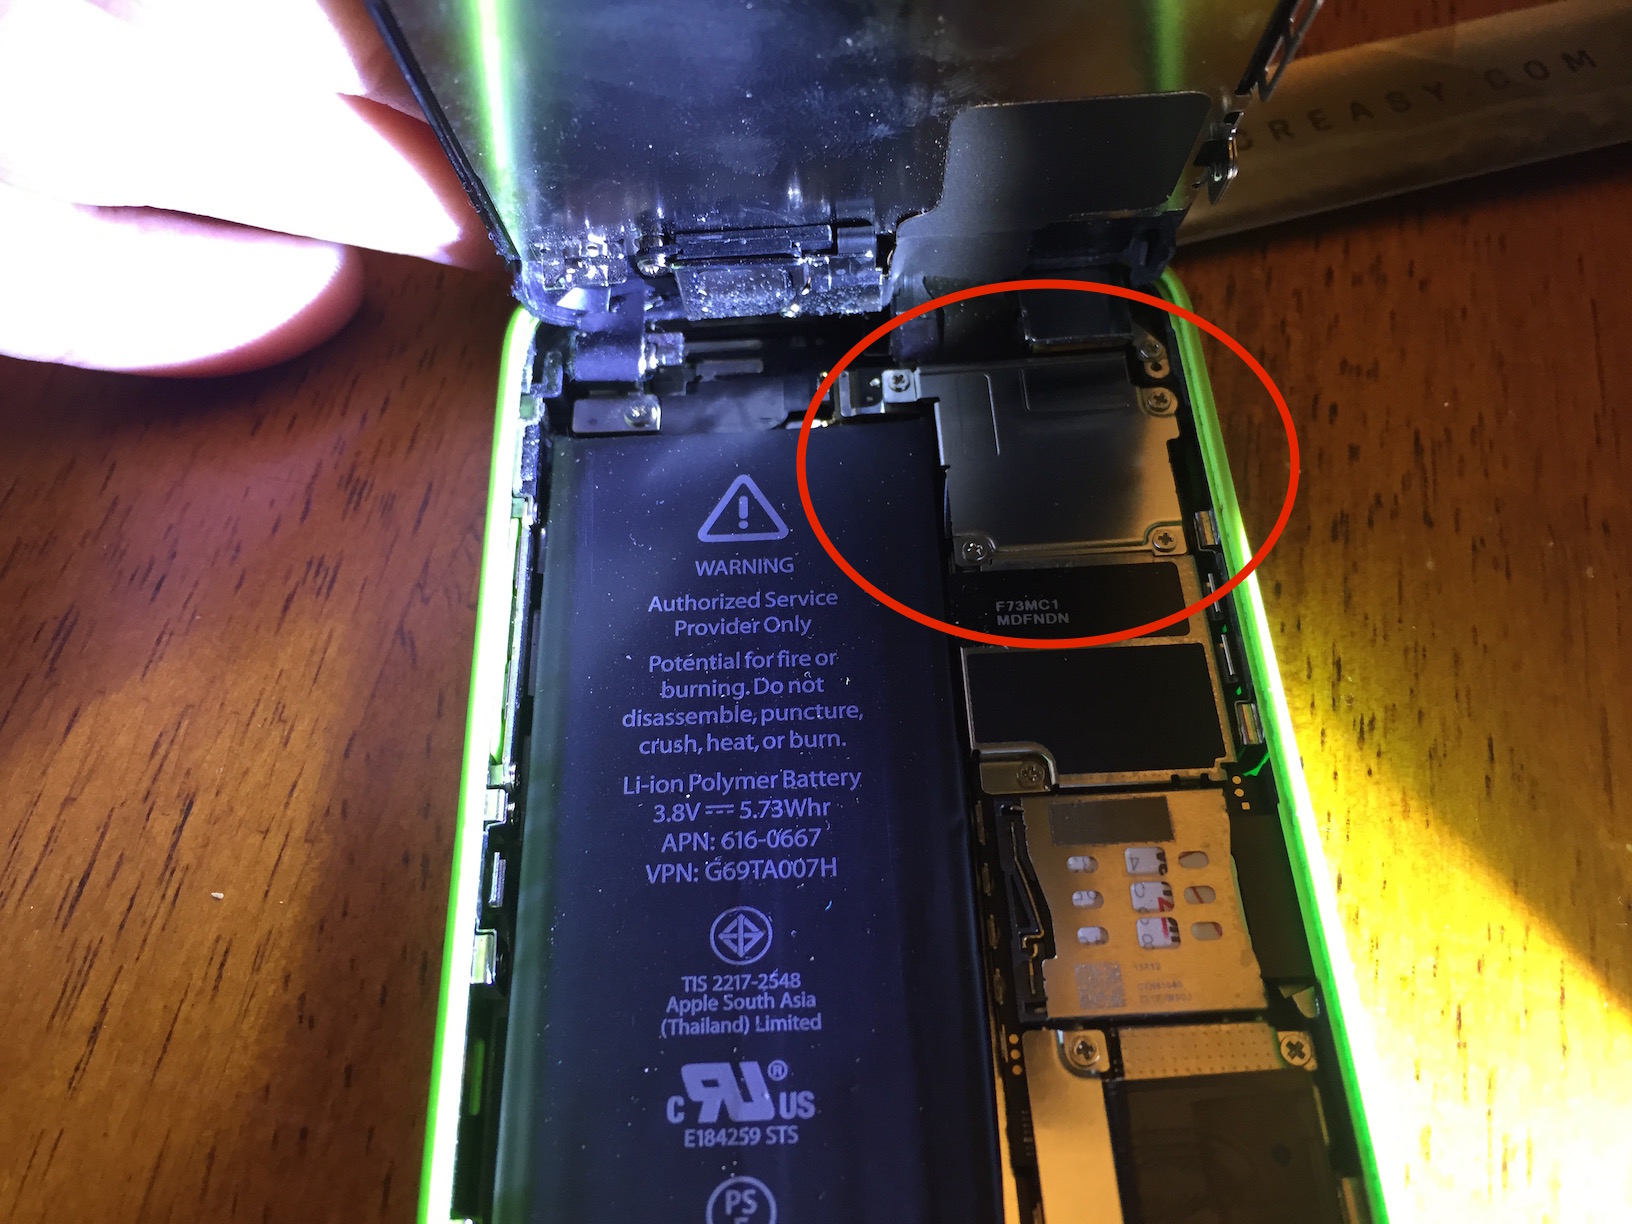
Begin removing the screws from the shield, but be aware that the screws are all different lengths, so you need to keep them arranged in the proper order once they’re out. I recommend starting with the upper-left screw and working counter-clockwise. The upper-right screw, which is the longest, is not magnetized, so it can be trickier to remove. Use tweezers if necessary.
With the screws removed, you should be able to lift the shield out of the iPhone and set it aside. Be sure to maintain its original orientation.
Now you’re looking at the connectors that attach the screen to the body of the iPhone — they’re small black rectangles. There are three that connect to the iPhone, and the ribbons overlap the connectors, so you have to remove them in order. Note that there is a fourth connector, on the bottom left, that attaches to the battery — you don’t want to remove it.
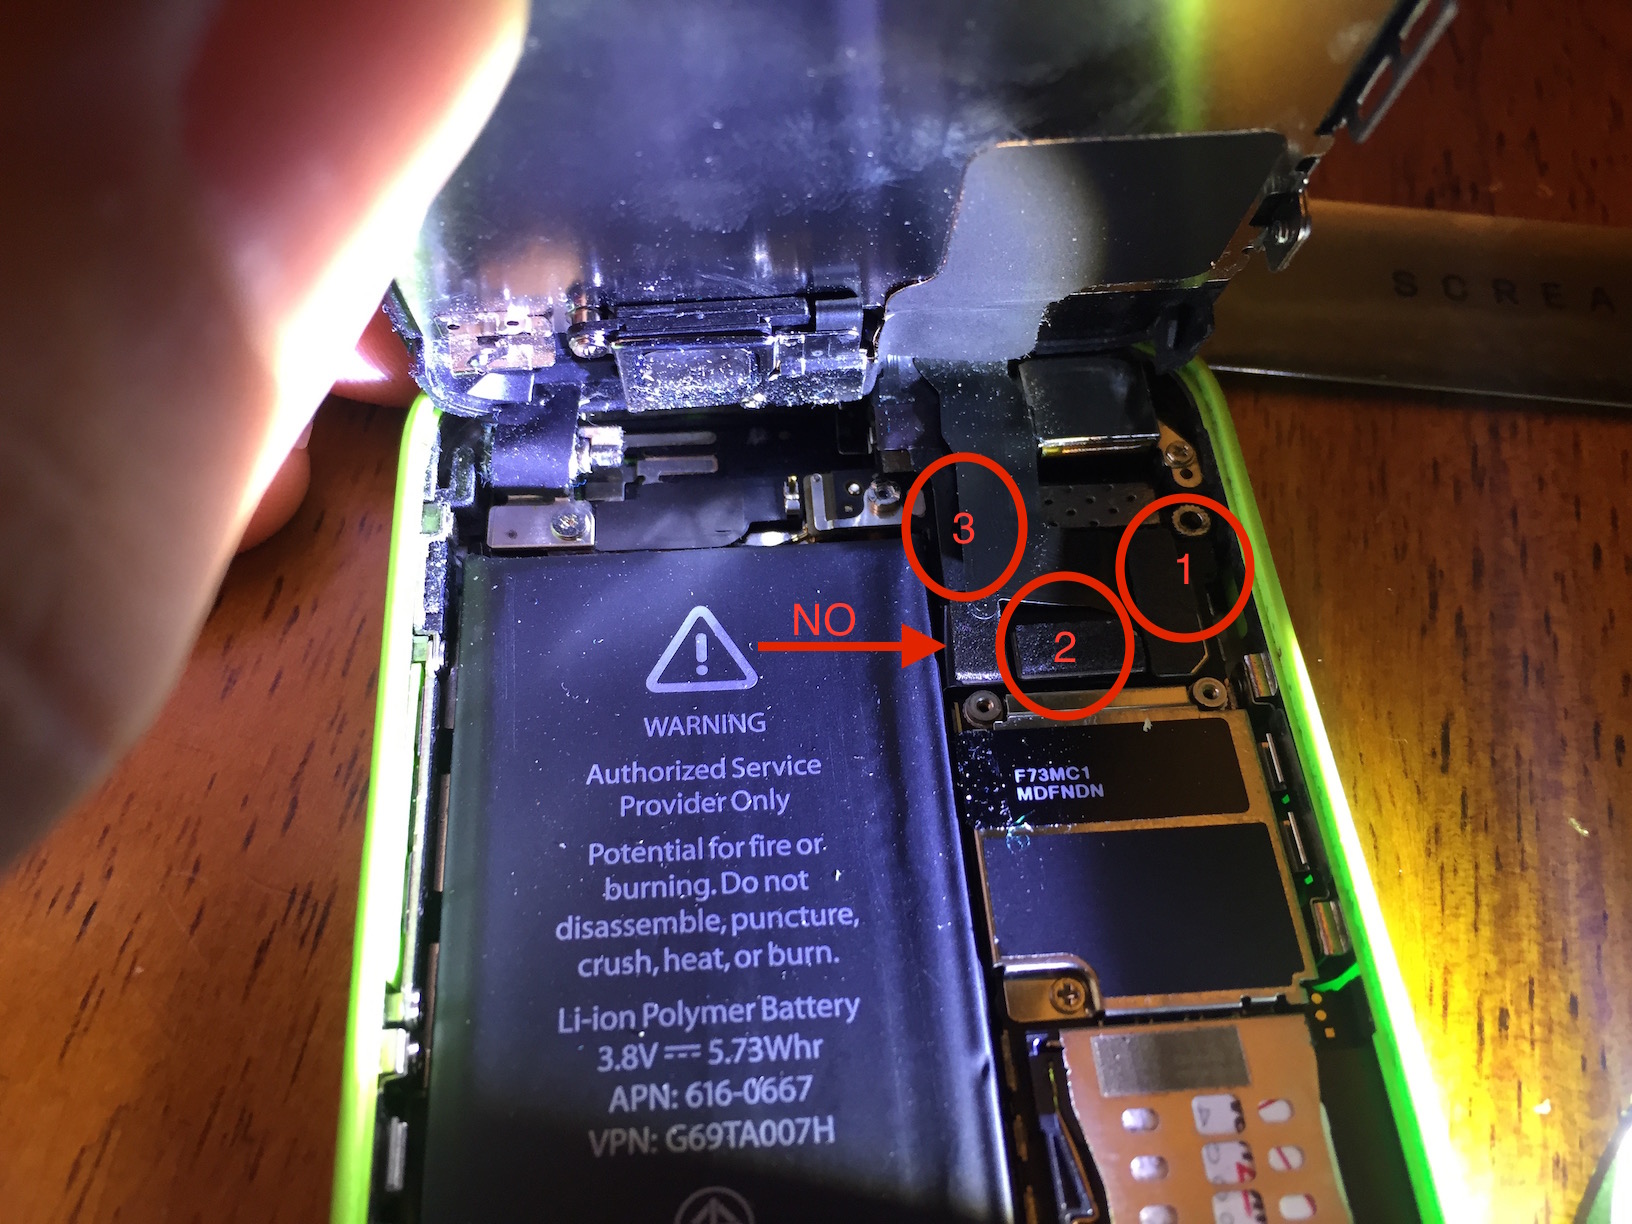
Take the plastic spudger and use the hooked end to gently pry the connectors up, one at a time, starting with the right-most connector, then the middle connector, and finally the upper-left connector, making sure to skip the battery connector. After the third is free, your display will be completely disconnected from the iPhone. The easy part is over. Yes, that’s the easy part.

Reassembling the iPhone 5c — Now, remove the new display from its styrofoam container, making sure to pull away any adhesive residue that may be left behind.
Now you’re going to reverse the previous instructions. Begin by attaching the upper-left ribbon connector, followed by the middle, and finally the right-hand connector. It can be tricky to line these up. What I did was place my finger over the connecter and sort of rub it into place, pressing down gently until I felt a click. Once the connector is engaged, gently apply pressure to all parts of the connector to ensure a full connection.
Then you need to replace the shield and screw it back into place. Start with the magnetic screws, attaching them to the magnetized Phillips screwdriver head and carefully inserting them into place. For the non-magnetic upper-right screw, put the head into your tweezers and slip it into the hole, and then screw it down. If you drop a screw inside the chassis, pick up both halves of the iPhone, hold them upside down over the table, and gently shake them to drop the screw. A loose screw inside the case could cause an electrical short.
With the shield back in place, it’s time to test things out before you finish reassembling the iPhone. Carefully lower the screen onto the body, so as to protect the innards, and then press the Sleep/Wake button to turn the iPhone on. Give it time to boot up, and ensure that the screen looks good, the touchscreen works, the front-facing camera works, and the front speaker plays audio. This is where AssistiveTouch comes in handy, since you can tap the on-screen button to activate the Home button while it’s disconnected.
Your Home button won’t work at this point, because when you press it on the front half of the iPhone, it pushes contacts onto two gold pins on the back half. If you want to make sure that the Home button is connected upstream, you can bridge these two gold pins with a screwdriver — the iPhone should act as if you pressed the Home button.
If you see lines on your screen or if something doesn’t work, turn the iPhone back off, remove the shield, pull up the connectors, and reseat them.
As you fumble around with your iPhone, you may wonder why the shield is necessary. It protects the screen from electronic interference from other components. Without it, you’ll see lines on the screen, which could lead you to think that something isn’t connected properly.
When you’re satisfied that everything is working, it’s time to reassemble the iPhone. Starting at the top, gently press the screen back into the case. Be very careful here, because if you’re not, you could pop one of the ribbon connectors loose, or worse, damage it.
Once the screen is back inside the case and seated properly, before replacing the pentalobe screws, test the Home button to see if it works. If yours does, great, reinstall those pentalobe screws and you’re done. But my Home button didn’t, so I had some more work to do.
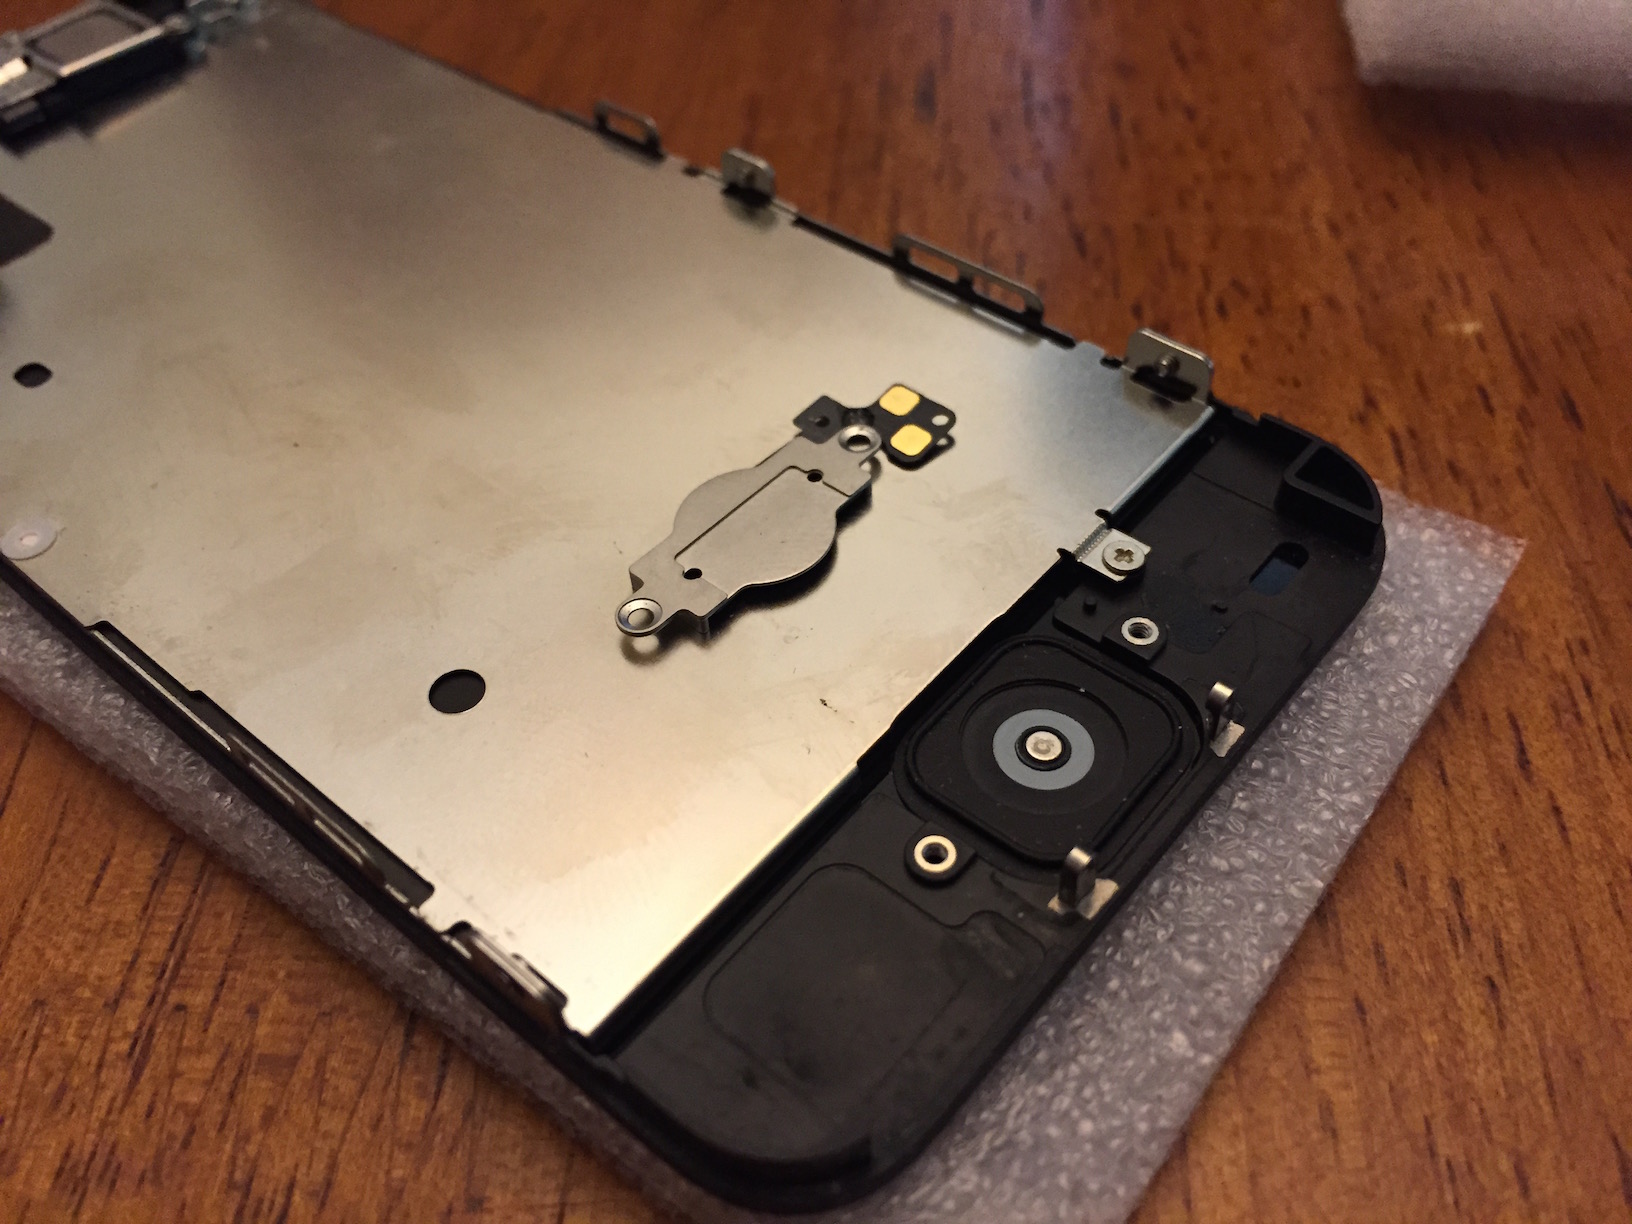
Fixing the Home Button — I knew that the ribbon cables were attached correctly, because I could bridge the two gold pins to activate the Home button functionality. I decided to contact Screasy to see what they would recommend.
Screasy’s Corey Schard responded promptly with two options: replace the Home button bracket with the one from the original screen, or send the screen back for a replacement. I decided to try the former, given that the Home button on the original screen still worked fine.
To remove the Home button bracket from the original display assembly, I first had to remove the two Phillips screws holding it in. The right-hand one came out with no problem, but the left-hand one wouldn’t budge. Thankfully, I had a slightly larger #000 Phillips screwdriver that managed to break it free.
Next, I had to pry the Home button cable loose from the display assembly. Screasy recommended using the flat-head screwdriver for this, but I found that the iSesamo worked better. I gently slid the iSesamo’s tip under the edge of the cable and carefully pried it from the assembly. Once that was done, the bracket was free.

I then had to repeat the process with the new display to remove the bum bracket. The recommended approach would be to disconnect the display completely, but I just flipped the whole thing over and held the iPhone body in my hand as I worked on the back of the new display assembly.
Once the old Home button bracket was off the new display, I slipped the new one in and screwed it into place. Unfortunately, I dropped one of the screws while I was doing this, and I had only one hand free, as the other was holding the back of the iPhone. Luckily, I had two spare screws from the original display that I had attached to my adhesive strip. I picked another one up with the magnetized screwdriver and dropped it into the hole.
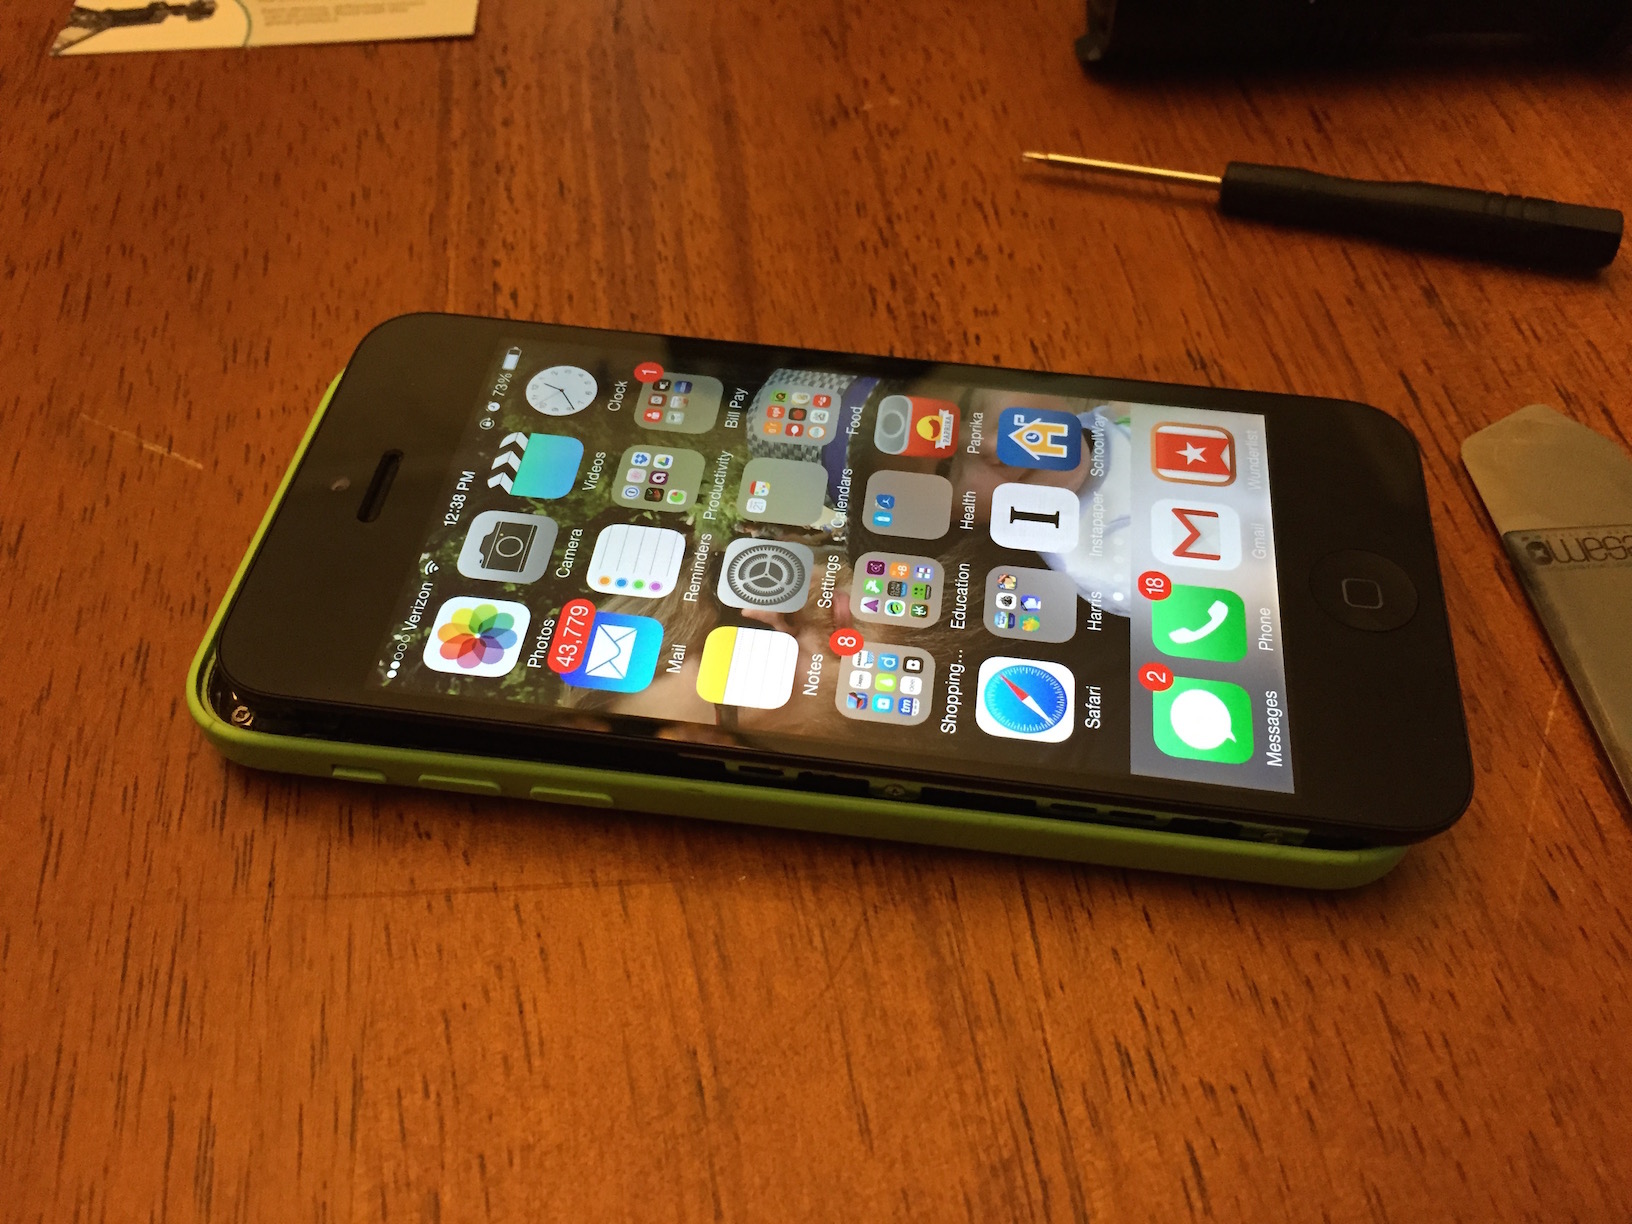
This time, when I put the two halves back together — Siri, play a drumroll — I had a fully functioning iPhone 5c again! A few quick turns on the pentalobe screws and I was done.
Recommendations — Would I recommend that you attempt to replace your iPhone screen? No. I have decades of experience building and modifying electronics, assembling computers, and even cracking open an iPhone or two, but even with the best preparations, this project was challenging for me. You’d likely be better off taking it to a professional repairer or an Apple Store. Adam Engst came to much the same conclusion when he replaced the battery in his iPhone 5 (see “Replace a Dying iPhone 5 Battery,” 5 March 2014). Repairing modern-day iPhones isn’t for the faint-of-heart.
The Apple Store charges $99–129 for a screen replacement, or just $49–79 if you have AppleCare+, and as former Apple Genius Scotty Loveless points out, Apple will not touch a device that you’ve repaired yourself. The extra cost for labor and peace of mind is well worth it. (However, I will point out that my iPhone 5’s rear camera stopped working shortly after the Genius Bar replaced the battery — whether that was consequence or coincidence, I can’t say. See “Replace a Dying iPhone 5 Battery: Take Two,” 28 August 2014, for my other tale of iPhone-related woe.)
But if you insist on replacing your own screen, would I recommend the Screasy kit? Yes, with some caveats. Their iPhone 5c screen repair kit costs $64.99, about $5 less than a comparable kit from iFixit, and with more tools than the iFixit kit, including the iSesamo, which is about a $10 value on its own. So if an Apple Store isn’t handy, or you want the least expensive fix, the Screasy kit is worthwhile.
As for the screen itself, the quality is outstanding. It’s virtually indistinguishable from the original. Many aftermarket screen replacements are inferior, with unwanted tints and telltale digitizer grids. As far as screen quality goes, Screasy offers a high-end replacement.
But I was disappointed that Screasy’s Home button assembly did not work. I was also unhappy with the Phillips screwdriver included, as the head was not pre-magnetized and it didn’t offer enough torque to remove one of the Home button bracket screws. However, Screasy earned points back with responsive support that helped me resolve my Home button issue quickly.
That said, my wife now has a good-as-new iPhone, protected by a new OtterBox case that accommodates our third-party cables and that will hopefully stand up to toddler abuse. So even though I’m not sure I ever want to go through this again, it was worth it in the end. We’ll be purchasing AppleCare+ with her next iPhone.
FunBITS: Music in Time and Space
One thing we all learned from the recent New Horizons fly-by of the dwarf planet Pluto and its assorted satellites is that, as Douglas Adams said, “Space is big. Really big. You just won’t believe how vastly, hugely, mind-bogglingly big it is.” You can, however, get a hint of how big it is by realizing that to send a signal to the New Horizons probe, and then confirm that the signal was received, takes well over 9 hours at the speed of light (186,000 miles per second). And Pluto is, compared to the rest of the universe, right down the street! To send a signal to the nearest star outside our solar system would
take more than 4 years.
This means that any of our nearest celestial neighbors who intercept our radio transmissions are just now hearing our golden oldies. However, there’s no need to hunt up back issues of Billboard to find out what the folk around Arcturus (36.67 light-years away) are hearing: Lightyear.fm can do it for you.
This site has leveraged the statistics compiled by the Whitburn Project to find which songs were popular during the entire history of radio transmissions from Earth. It then uses that information to take you on a tour of space, starting from Earth orbit, playing snippets of the most recent music that you could hear broadcast at that distance.

As you travel farther from Earth, you hear bits of tunes that get increasingly older the longer you listen. Unlike real space travelers who, like our transmissions to Pluto, are limited by light speed, you travel much faster. For example, after you listen for slightly more than 30 seconds, the site has taken you as far from Earth as New Horizons currently is (which, by the way, took more than 9 years to get where it is at the moment): about 4.5 light-hours away. Of course at that distance you’re still hearing stuff that
is popular right now.

But keep listening. Like Han Solo putting the pedal to the metal in the Millennium Falcon, you pick up speed quickly. After 90 seconds you are more than halfway to the nearest star and can rock out to the stylings of Macklemore as heard in 2013. After listening for 5 minutes, you find yourself getting broadcasts from 2007.

If patience is not one of your particular virtues, though, you don’t have to remain a passive passenger: the time-line at the side of the page is live — click a point anywhere on it, and you are instantly that many light-years from home. For example, click near the 36-year point to discover what our Arcturian neighbors are enjoying. Sing it, Rod.

So if you simply can’t find anything of interest in Apple Music’s For You offerings, and if Pandora and Spotify have begun giving you the same-old-same-old, you might want to take a trip with Lightyear.fm for some listening recommendations. Remember, it may be old, but if you’ve never heard it before, it’s new to you!
TidBITS Watchlist: Notable Software Updates for 27 July 2015
Mellel 3.4.2 — RedleX issued Mellel 3.4.1 with a number of fixes for the word processing app, including a bug that caused the app to fail to launch in 64-bit mode on Mac OS X 10.6 Snow Leopard, an issue that prevented certain older .mell files from being opened, a problem that caused arrow keys to move incorrectly when editing annotations, and a crash caused by some font configurations. Shortly afterwards, RedleX released version 3.4.2 to fix a bug that caused Mellel to save files without their Style set. It also further addressed the problem with failure to open older .mell files (which were also being converted into un-openable .mellel files). Note that as of this writing, the Mac App Store edition of Mellel remains stalled at version 3.4.0. ($39 new from RedleX and the Mac App Store, free update, 93.4 MB, release notes, 10.6+)
Read/post comments about Mellel 3.4.2.
Microsoft Office 2011 14.5.3 — Microsoft has issued version 14.5.3 of its Office 2011 suite to fix critical security issues. According to this Microsoft Security Bulletin, the update patches vulnerabilities that could allow remote code execution if a user opens a specially crafted file by correcting how Office handles files in memory, how Excel handles the loading of certain specially crafted binaries, and how memory information is disclosed. (Free update from the Microsoft
Download Center or through Microsoft AutoUpdate, 113 MB, 10.5.8+)
Read/post comments about Microsoft Office 2011 14.5.3.
MacBook Pro Flash Storage Firmware Update 1.0 — Apple has issued MacBook Pro Flash Storage Firmware Update 1.0 for the 15-inch MacBook Pro with Retina display released in May 2015 (see “Apple Releases Updated MacBook Pro, iMac, and iPhone Dock,” 19 May 2015). The update fixes a vulnerability with the MacBook Pro’s internal SSD firmware that could cause data corruption in rare cases. As with other firmware updates, it’s best to rely on Software Update to ensure you get the right update for your specific model. Also, take care not to interrupt the update process. (Free,
1.9 MB)
Read/post comments about MacBook Pro Flash Storage Firmware Update 1.0.
Default Folder X 4.7.3 — St. Clair Software has released Default Folder X 4.7.3 with fixes for compatibility issues when running the public beta of OS X 10.11 El Capitan (see “Apple Opens Public Betas of OS X 10.11 El Capitan and iOS 9,” 13 July 2015). Note that to run Default Folder X on El Capitan, you must first disable System Integrity Protection (to learn more about SIP, check out Glenn Fleishman’s recent Macworld
article). The Open and Save dialog enhancement utility also fixes a bug that refused to let Carbon apps specify the starting folder for a file dialog and corrects an issue that mistakenly selected a folder when the previously selected file was no longer there. ($34.95 new, $10 off for TidBITS members, free update, 11.1 MB, release notes, 10.6+)
Read/post comments about Default Folder X 4.7.3.
TextExpander 5.1 — Smile has released TextExpander 5.1 with refinements to the new snippet suggestions feature that was introduced with recent update to version 5.0 (see “TextExpander 5 for Mac Makes Snippet Suggestions,” 28 May 2015). The text expansion app now excludes most single dictionary words when suggesting snippets, and it adds a new preference for receiving notifications about snippet suggestions (toggle it at Preferences > Suggestions > Notify Me about Snippet Suggestions). The update also fixes secure input notifications that popped up in the Google
Chrome Web browser, ensures that suggestions containing Tab or Return are rejected, opens links in fill-in windows in your default Web browser, improves French and German localizations, and adds Korean language support for Create Snippet from Selection. If you previously purchased a TextExpander license, you can upgrade to TextExpander 5.1 for $19.95. If you purchased TextExpander 4 this year, you are eligible for a free upgrade. ($44.95 new with a 20 percent discount for TidBITS members, free update for version 5.0 licenses, 17.0 MB, release
notes, 10.10+)
Read/post comments about TextExpander 5.1.
ExtraBITS for 27 July 2015
This week’s ExtraBITS roundup features Josh Centers and the Tech Night Owl discussing Apple financials, Flickr bringing back Pro accounts, Jim Dalrymple losing and then recovering much of his music because of Apple Music confusions, and United Airlines’ push to install DRM on your computer.
Josh Centers Tackles Apple Finances with The Tech Night Owl — Managing Editor Josh Centers once again joined The Tech Night Owl podcast to discuss Apple’s latest quarterly results, the upcoming Windows 10, Jim Dalrymple’s Apple Music problems, and how Josh replaced his wife’s iPhone 5c screen.
Flickr Brings Back Pro Accounts — After two years, Flickr is bringing back paid Pro accounts for $49.99 per year. The new Flickr Pro includes better analytics, no ads, a “pro” badge on profiles, and discounts on photo products, such as Adobe’s Creative Cloud Photography plan. Those who had grandfathered Pro accounts will keep the same benefits they had plus gain the new ones.
Jim Dalrymple Quits Apple Music, Calling It a “Nightmare” — When longtime Apple journalist and fan Jim Dalrymple is angry with Apple, you know something’s wrong. Dalrymple has announced on his blog, The Loop, that he’s “done” with Apple Music after it wrecked his extensive iTunes library. The first problem arose when he tried to add songs from different albums that iTunes saw as duplicates and ignored. Later, it jumbled up his albums, refused to sync between devices, and when he disabled Apple Music, it took 4,700 of his songs with it. “I trusted my data to
Apple and they failed. I also failed by not backing up my library before installing Apple Music. I will not make either of those mistakes again,” Dalrymple said.
Jim Dalrymple Recovers Most of His Music — We previously reported that Jim Dalrymple of The Loop publicly quit Apple Music after it ate a good chunk of his collection. The good news is that, with Apple’s help, he was able to recover much of his music. The problem turned out to be an interaction with iTunes Match. According to Apple, iTunes Match now shows only your purchased content if you turn off Apple Music and iCloud Music Library. Unfortunately, Dalrymple thinks he accidentally deleted about two hundred songs that he won’t be able to recover.
Flying the Unfriendly Skies: United Pushes DRM — Mike Masnick of Techdirt reports on tech entrepreneur Brian Fitzpatrick’s close encounter with an unwanted DRM plug-in, courtesy of United Airlines. It seems the airline is beta-testing what it calls its “Personal Device Entertainment” option, by which passengers can use the in-flight Wi-Fi to view movies on their own devices. However, Fitzpatrick learned that the option requires the installation of both a DRM plug-in and Flash on personal computers, and the
required plug-in is considered dangerous enough that Google Chrome does not support it for security reasons. Maybe Fitzpatrick should have just rented headphones and purchased an alcoholic beverage.