TidBITS#1318/25-Apr-2016
In this week’s issue of TidBITS, we share the dates of this year’s WWDC, which should feature exciting announcements about the future of OS X, iOS, watchOS, and tvOS. Apple has updated the 12-inch MacBook, but if you’re expecting major changes, prepare to be disappointed. Michael Cohen explains how to use your iPhone to make and receive calls on your Mac, and we once again delve into the power of Preview, this time exploring advanced and overlooked editing features. Finally, Chapter 8 of Glenn Fleishman’s “Take Control of Slack Basics” is available for TidBITS members, in which Glenn explains everything you need to know to tame Slack notifications. Notable software releases this week include VMware Fusion 8.1.1, OmniFocus 2.5.1, BBEdit 11.5.2, Typinator 6.9, and Mellel 3.4.5.
WWDC 2016 Dates Announced
Apple has announced dates for the 2016 installment of its Worldwide Developers Conference (WWDC), which will be held from June 13th through 17th in San Francisco. WWDC remains the premiere annual event for Apple developers, and we expect to learn about the next versions of OS X (rumored to be redubbed MacOS), iOS, watchOS, and tvOS during its opening keynote address. Interestingly, the much-anticipated keynote won’t be held in the Moscone West conference center, but instead at the nearby Bill Graham Civic Auditorium, which has more seats than the main auditorium at Moscone West. However, the more than 100 technical sessions and labs will be held at Moscone West. Developers lucky enough
to have scored a WWDC golden ticket in Apple’s lottery will also be able to have one-on-one consultations with Apple experts, and enjoy a bash on June 16th with music, food, and drink.
Unfortunately, WWDC registration is now closed, but if you entered the lottery, you should soon have notice in your email inbox informing you of whether you secured a ticket or not.
Students and participating STEM organizations still have a chance to attend, as registration for WWDC scholarships remains open until 1 May 2016 at 5:00 PM PDT.
Even if you can’t make the trip — or didn’t get a ticket in the lottery — you’ll still be able to stream the keynote and many of the sessions. And WWDC is far from the only Apple conference being held in 2016, or even the only Apple conference being held in San Francisco that week — see “31 Conferences for Mac and iOS Professionals in 2016” (6 January 2016) for information on the wide world of Apple-focused events.
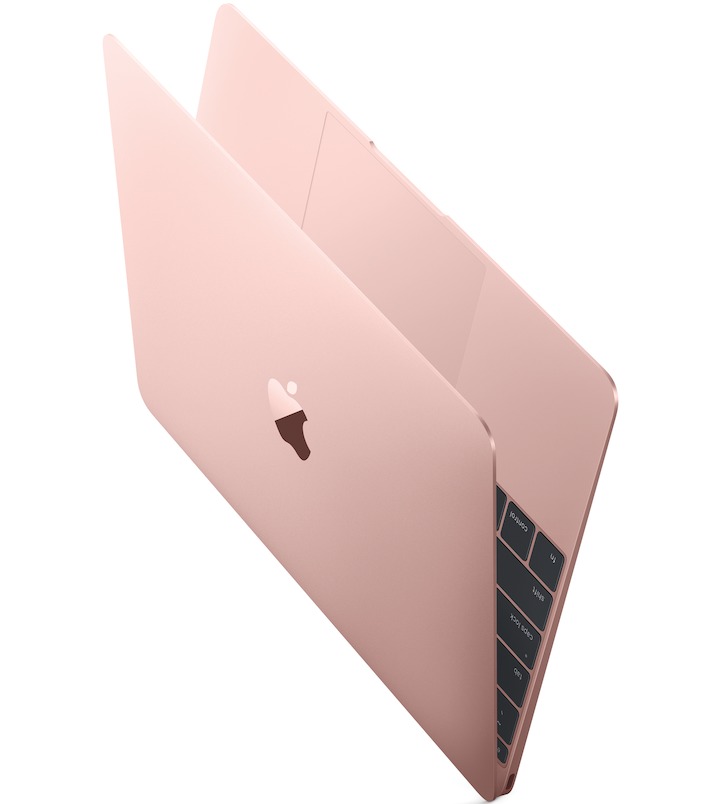
Apple Updates 12-inch MacBook, Bumps MacBook Air RAM
Over a year after its introduction (see “New 12-inch MacBook Joins Updated MacBook Air and MacBook Pro,” 9 March 2015), Apple has updated the 12-inch MacBook with new Intel Skylake processors, better graphics performance, faster flash storage, and an extra hour of battery life. A new rose gold finish joins the existing gold, silver, and space gray color options. The price still starts at $1299, and it remains limited to 8 GB of RAM and a single USB-C port.
If the 12-inch MacBook doesn’t meet your needs, Apple also announced that the 13-inch MacBook Air now comes with 8 GB of RAM standard, as opposed to the previous 4 GB in the base model.
The updated 12-inch MacBook maintains the same weight and measurements as last year’s model, remaining the lightest and thinnest MacBook in the lineup, at only 2.03 pounds (0.92 kg), and ranging from 0.14 (3.5 mm) to 0.52 inches (13.1 mm) in thickness. It also maintains the same 11.04 inch width (28.05 cm) and 7.74 inch (19.65 cm) depth as the previous model.
Like its predecessor, the MacBook comes in two configurations: a $1299 model with a 1.1 GHz dual-core Intel Core m3 processor (Turbo Boost up to 2.2 GHz, which is slightly slower than last year’s 2.4 GHz Turbo Boost speed) and 256 GB of PCIe flash storage, and a $1599 model with a 1.2 GHz dual-core Intel Core m5 processor (Turbo Boost up to 2.7 GHz, which is slightly faster than last year’s 2.6 GHz Turbo Boost speed) and 512 GB of PCIe flash storage. Both the m3 and m5 processors are equipped with 4 MB of L3 cache.
Both models can be upgraded to a 1.3 GHz dual-core Intel Core m7, with Turbo Boost speeds of up to 3.1 GHz. For the $1299 model, the upgrade cost is $250, while it’s only $150 for the $1599 model.
Regardless of which MacBook you choose, you’re stuck with 8 GB of RAM, but it’s clocked at 1866 MHz this year, as opposed to last year’s 1600 MHz speed.
While storage capacities are the same as last year, Apple claims that the speed of the flash-based storage has increased, though it doesn’t specify by how much. In The Verge’s testing, write speeds are 80 to 90 percent faster, though read speeds aren’t appreciably better than last year’s model.
Both 12-inch MacBooks have been upgraded to Intel HD Graphics 515, which Apple claims is up to 25 percent faster than the Intel HD Graphics 5300 used in last year’s models. The built-in Retina display is the same as last year, supporting resolutions of up to 2304 by 1440 at 226 pixels per inch.
Apple promises better battery life in both models, with up to 10 hours of “wireless Web” (up from 9 hours last year) and 11 hours of “iTunes movie playback” (up from 10 last year). The battery upgrade gives the 12-inch MacBook an extra hour of life over the 11-inch MacBook Air, but it still has up to two hours less battery life than the 13-inch MacBook Air.
Unfortunately, the new 12-inch MacBook is stuck with the same paltry 480p FaceTime camera as last year’s model, notably worse than the 720p FaceTime HD cameras in Apple’s other laptops.
We still find the 12-inch MacBook to be a perplexing product. While we were willing to categorize last year’s model as a design experiment, much like the original MacBook Air, the 2016 model doesn’t address many of the fundamental complaints about the original — namely, the single USB-C port that even our portable pro, Julio Ojeda-Zapata, finds frustrating (see “MacBook Accessories Reduce Single USB-C Port Inconvenience,” 10 March 2016). To add to that frustration, USB-C accessories are limited, and if you plug in a poorly designed cable, it could fry your computer.
The 12-inch MacBook doesn’t make a lot of sense unless you’re looking for the utmost portability, combined with a Retina display, and no other details are particularly important to you. The 11-inch and 13-inch MacBook Air models may lack Retina displays but they are cheaper, just as portable, and somewhat more powerful, and the 13-inch model offers more battery life. The 13-inch MacBook Pro with Retina display offers a lot more power and the same battery life for the same price, with the tradeoff being extra weight.
We had anticipated that Apple might retire the MacBook Air line in favor of the MacBook, but without the MacBook’s price coming down significantly, that seems unlikely. The other option would seem to be adding a Retina display to the MacBook Air line, but perhaps that would increase the price too much. We’ll just have to wait to see if the next set of updates indicates what Apple might be planning.
Phoning It in on Your Mac
These days, when someone calls me on the phone when I’m at my desk, chances are I’ll take the call on my speakerphone, which happens to have a 27-inch Retina display and stereo speakers: in other words, my iMac. If you have a Mac running OS X 10.10 Yosemite or later, and an iPhone running iOS 8 or later, you can set them up to do the same as long as both devices are on the same Wi-Fi network.
The first thing you need to do is to make sure your iPhone and your Mac are both signed into iCloud with the same Apple ID. On your Mac, you do this in System Preferences > iCloud; on your iPhone, you do it in Settings > iCloud.
Next, on your iPhone, go to Settings > Phone > Calls on Other Devices and turn that switch on. Then turn on the switch for your Mac, which appears on the same Settings screen; if you have other devices that also use the same Apple ID for iCloud, and you want to make calls with them, you can enable those devices as well.
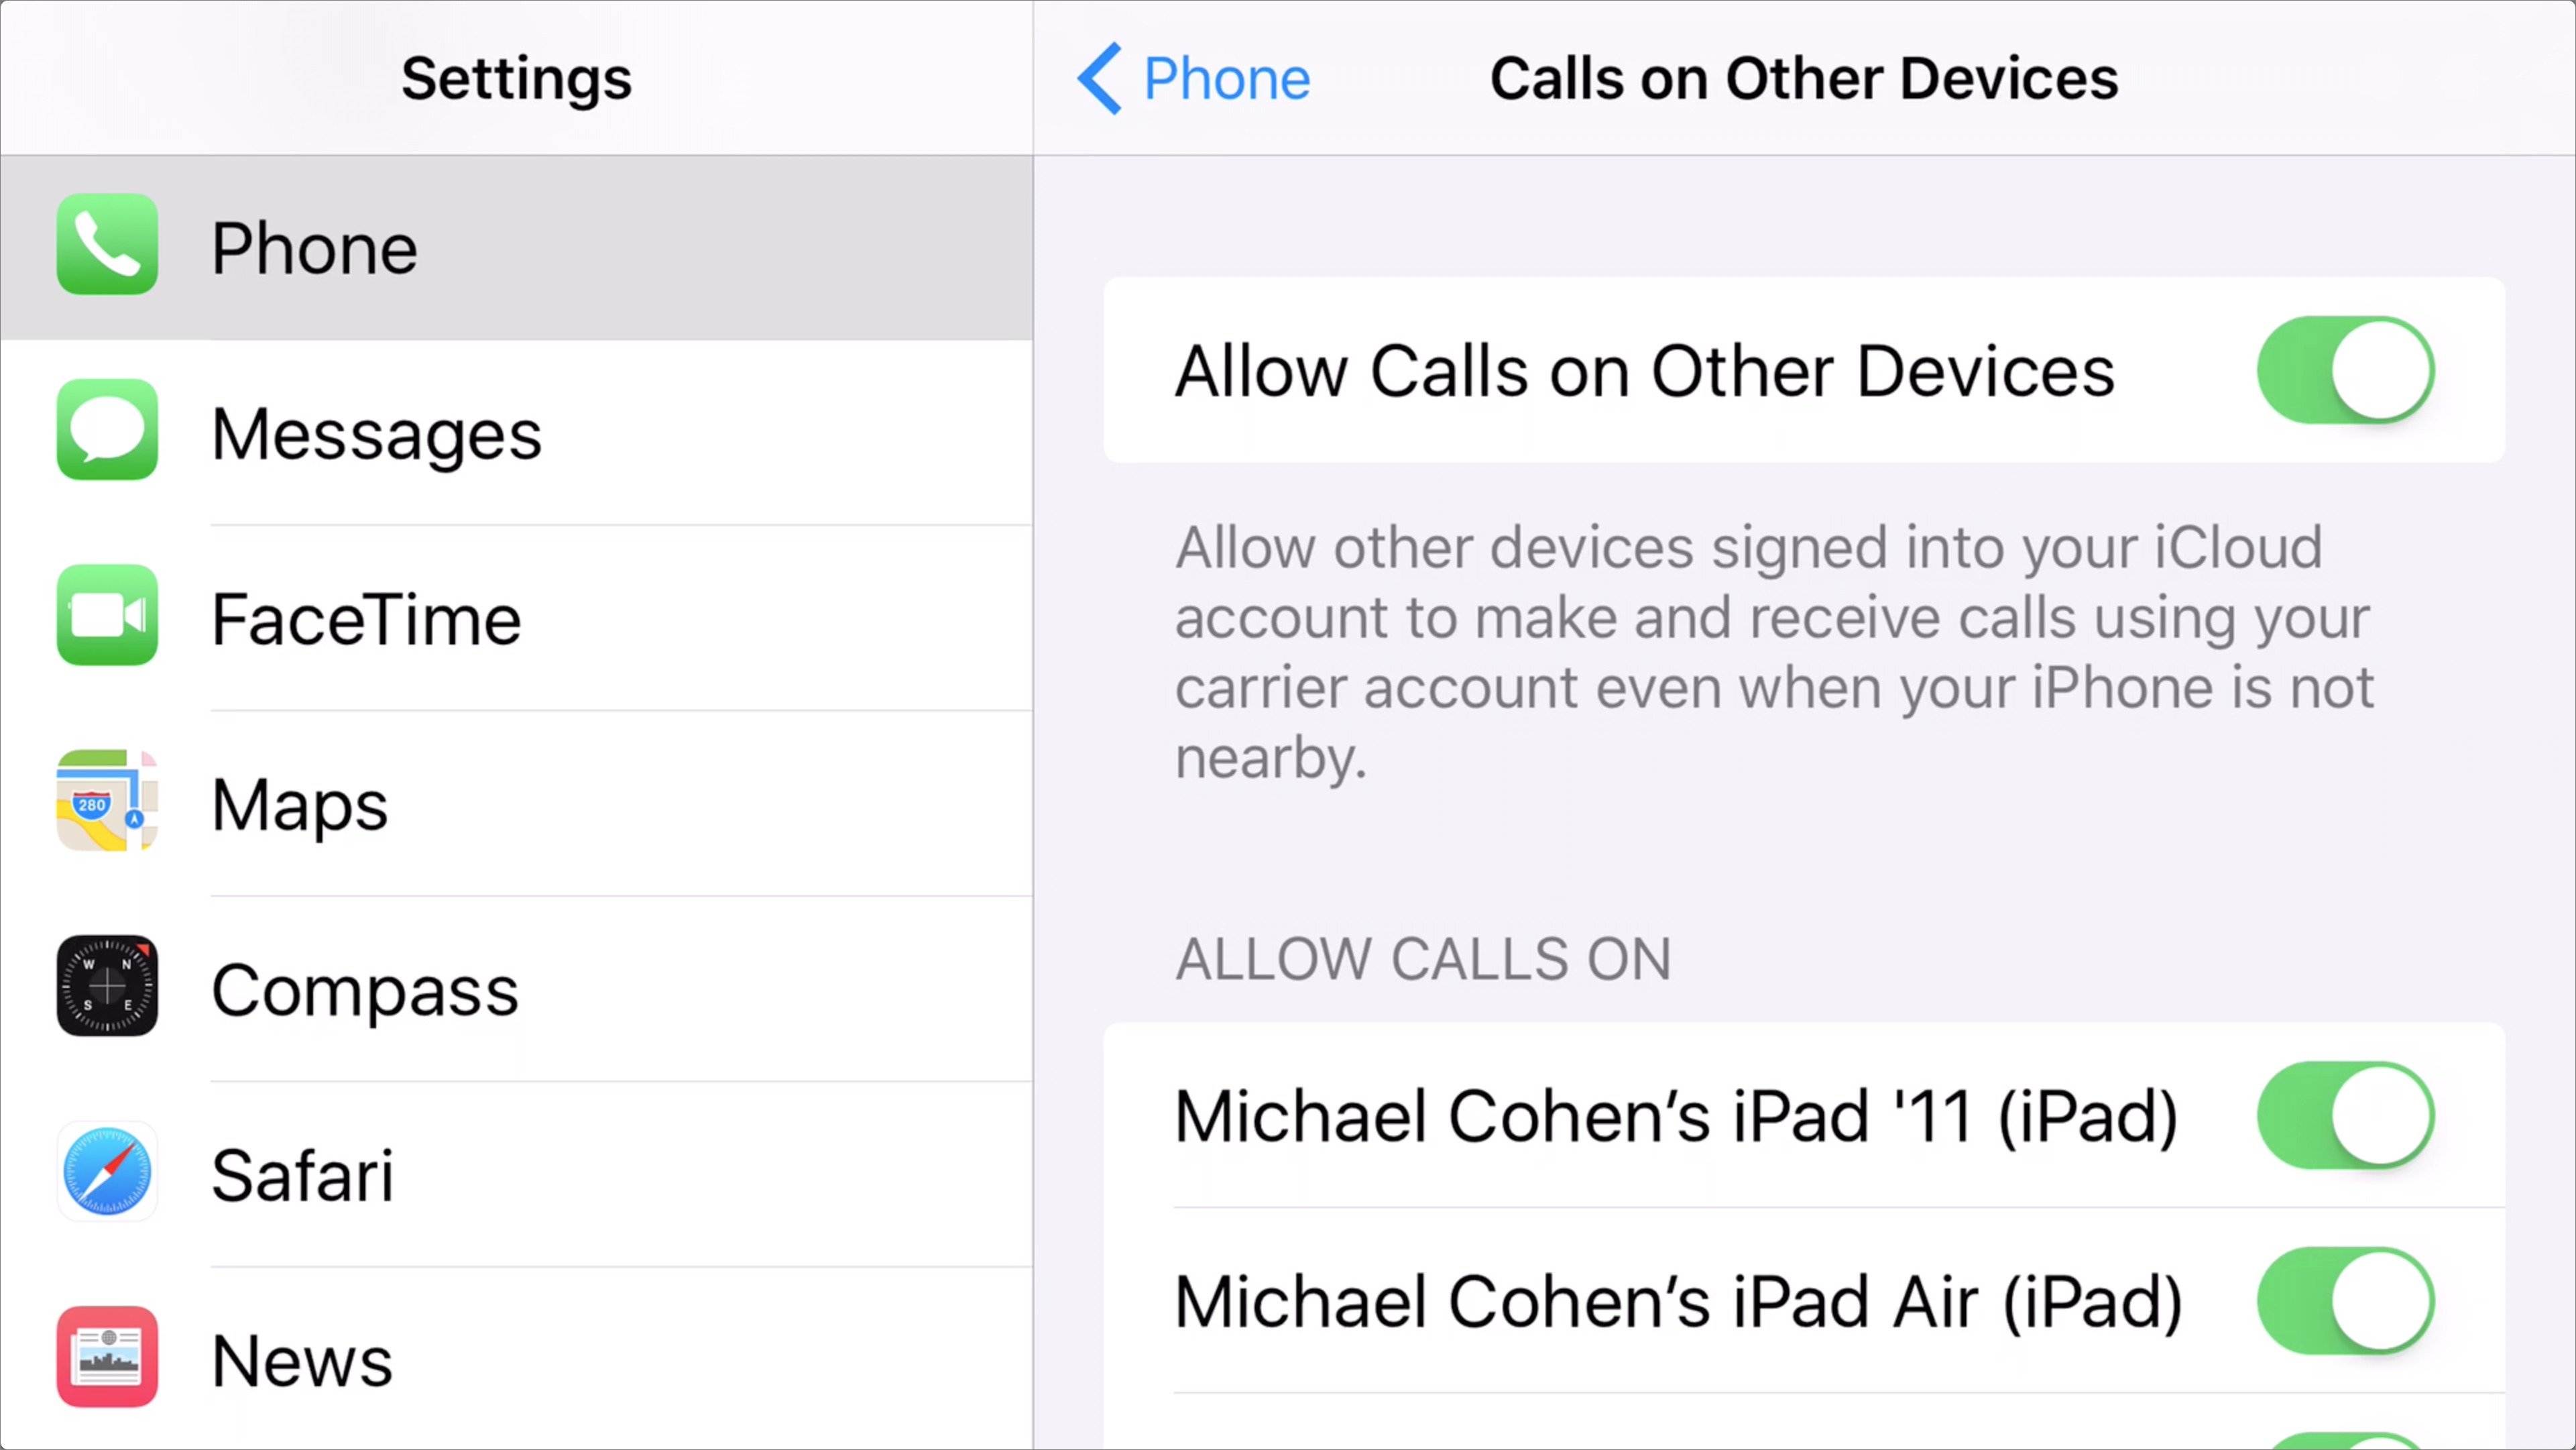
With that out of the way, it’s time to make your Mac phone-friendly, and the key to that is FaceTime. Open the FaceTime app in the Applications folder and go to FaceTime > Preferences (Command-,) and enable Calls from iPhone. You may be asked to verify an emergency address for things like 911 calls; if so, go ahead.
If all goes well, that’s it. Your Mac and your iPhone are now buddies as long as both are on the same Wi-Fi network: any calls to your iPhone’s number will also ring on your Mac — as well as on any other devices you have enabled to receive calls from your iPhone. In my case, any call to my iPhone also rings on my Mac, two iPads, and my Apple Watch, so I have a wide choice of answering options! When a call comes into my iPhone, a notification appears on my Mac from which I can answer the call, decline it, or send it to voicemail using the pop-up menu attached to the notification’s Decline button.

Note, though, for the Mac to receive calls, your iPhone has to be on (it can be sleeping) and within Bluetooth range of your Mac; that is, unless you have also enabled Wi-Fi Calling on your iPhone (Settings > Phone) and in FaceTime on your Mac (FaceTime > Preferences). Wi-Fi Calling works on any 2012 or later Mac running OS X 10.11 El Capitan, with the exception of the mid-2012 “cheese grater” Mac Pro, and an iPhone running iOS 9. In the United States, Wi-Fi Calling now
works with all four major carriers: AT&T, Sprint, T-Mobile, and Verizon. For more on Wi-Fi Calling, see “Turn on Wi-Fi Calling in iOS 9” (28 October 2015).
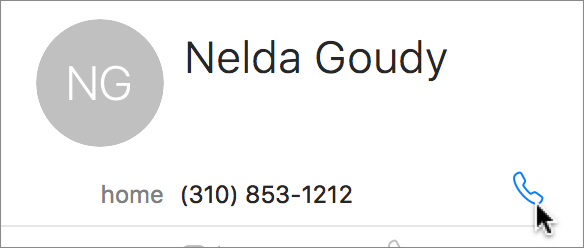
So much for receiving calls. To make a call from your Mac, you have several options. One of the easiest is to use the Contacts app: go to the contact you want to call and then hover your pointer over the phone number. A blue phone icon appears to the right of the number. Click the icon and your Mac calls that number.
If you see a phone number in an email message in Mail, a Web page in Safari, or a note in Notes, you can also use that number to make a call. Hover your pointer over the number, click to see the pop-up menu, and then choose the Call item.

For those who are old-school and like to dial phone numbers manually, you can do that as well. Launch FaceTime and type the phone number into the FaceTime search field. The phone number appears below the search field with a phone icon to its right: click the icon and choose the number shown in the menu.

FaceTime shows a notification as it attempts to make the call. Once the call connects, you can mute the call or end it from the notification, which stays on the screen as long as the call is in progress.

And what if the number you call is an automated phone system that requires you to enter numbers (“Press ‘1’ for more…”)? Not a problem: make sure the FaceTime notification is selected and then enter numbers using the number keys on your Mac’s keyboard.
So the next time you’re working at your Mac and your iPhone rings in your pocket, don’t fumble around for it: take the call on the big screen.
Chapter 8 of “Take Control of Slack Basics” Available
Notifications are crucial in any messaging system, especially a collaborative, multi-user system like Slack. Set notifications too liberally, and you might be overwhelmed by trivial chatter. Set them too conservatively, or turn them off entirely, and you may miss important discussions, defeating the entire purpose of Slack!
Slack provides a rich tapestry of notification settings, and Glenn Fleishman covers them all in Chapter 8, “Configure Notifications,” of his serialized “Take Control of Slack Basics” book. He teaches you how to let others know whether you’re available, determine if others are available, and tame your notifications to get just the ones you need.
Everyone can read the first two chapters of “Take Control of Slack Basics” in its current serialized form, but Chapter 3 and the rest are limited to TidBITS members, so if you’re not currently a member, we hope that early access is incentive to join!. TidBITS members receive other benefits too (like a full-text version of our RSS feed), but what’s most important is that TidBITS members provide vital support for getting our work into your inbox every week. If you’re already a TidBITS member, to read these chapters, log in to the TidBITS site using the email address from which you joined.
The full ebook of “Take Control of Slack Basics” will be available for purchase by everyone in PDF, EPUB, and Mobipocket (Kindle) formats once it’s complete, along with the administrator-focused “Take Control of Slack Admin.” We’re also planning to make the final books available as discounted bulk buys for entire Slack teams, so if you’re interested in that, let us know.
The Power of Preview: Advanced Editing Techniques
In “The Power of Preview: Cropping and Resizing Images” (18 March 2016) and “The Power of Preview: Annotating Documents and Images” (2 April 2016), we explored editing and annotation tasks with Preview, OS X’s built-in document and image powerhouse. This week, we’ll go deeper with some advanced editing techniques, and double back for a few tidbits we skipped in previous articles.
Advanced Selection Tools for Images — In “The Power of Preview: Cropping and Resizing Images,” we discussed using the Rectangular Selection tool. However, when working with images, several other selection tools offer more variety and control. You find them in the Markup Toolbar, which you display by choosing View > Show Markup Toolbar (Command-Shift-A). The selection tools are accessed via the first button at the left.
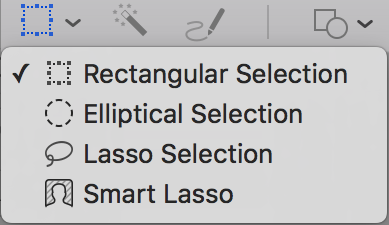
Elliptical Selection is the second choice on the selection tools pop-up menu. It works just like the Rectangular Selection tool, except that it selects elliptical rather than rectangular areas. As with the Rectangular Selection tool and the shape tools, you can press Option while making the original selection to size it from the center, and pressing Shift gives you a perfect circle.
After dragging out an elliptical selection, you get the usual drag handles. The handles attached to the selection ellipse itself adjust one dimension at a time, whereas those on the corners of the rectangle that encloses the ellipse can adjust two dimensions at once.
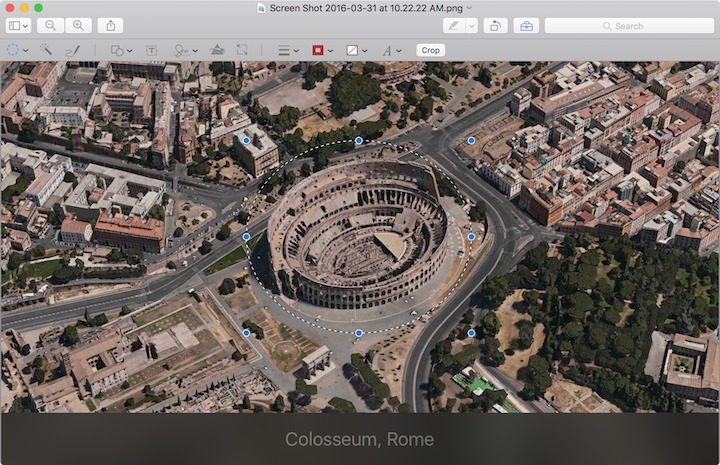
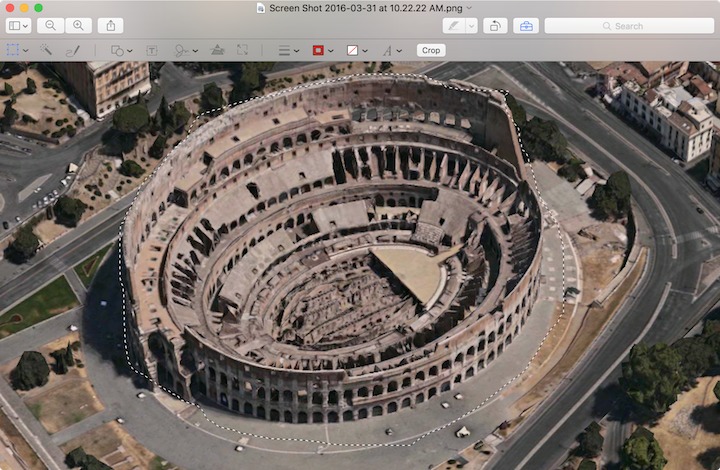
The next selection tool is Lasso Selection, which Bill Atkinson first invented for MacPaint in 1983. The Rectangular Selection and Elliptical Selection tools fall down when you need to select an irregularly shaped object or portion of a graphic. But with the Lasso Selection tool, you can hand-draw a selection around any object. The hard part of this is that you have to do it in a single click-and-drag motion. Since the Lasso
Selection has to form a closed shape, if you don’t close it yourself by ending your drawing back on the starting point, the selection closes itself with a straight line. Once you’ve finished making a selection, you can drag the selection — not the underlying image, but the dashed line selection — around with the pointer, or nudge it with the arrow keys.
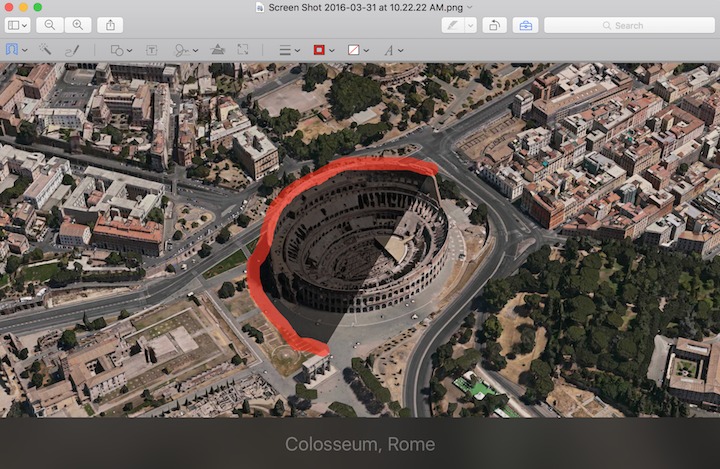
The Lasso Selection tool works well when the irregularly shaped object you want is well separated from other parts of the image. But in a photograph, for instance, you’re unlikely to be so lucky. For such situations, Preview offers the Smart Lasso tool, which offers some assistance. When you drag, you see a thick red line instead of a thin white line — draw that around the object you want to select and Preview tries to construct the selection intelligently. It will take some experimentation to get the desired results. Oddly, you
can’t move a Smart Lasso selection afterwards with the pointer, but you can nudge it with the arrow keys.
Once you’ve selected something with one of these tools, you have a few options:
- Choose Edit > Invert Selection (Command-Shift-I) to select everything other than what you just selected. It’s handy at times!
- Press Delete to remove it from the image, leaving a hole.
-
Use Command-C to copy the selection, so you can paste a copy into this or another image. Remember that you can also choose File > New from Clipboard to create a new file with the copied selection.
-
Once you have a copy, you can move and resize it to your heart’s content, although it will always be essentially rectangular in Preview’s eyes, no matter how irregular it was to start. One technique we frequently employ is obscuring part of a screenshot by copying a chunk of its background color and pasting it over the part of the image we want to cover up.
Honestly, there aren’t that many uses for the Elliptical Selection tool, and both of the lasso tools are finicky, so we use them only occasionally. Let us know if you’ve found good uses for these tools, but if you’re just trying to remove a background from an image, the Instant Alpha tool is a better choice.
Instant Alpha — No, Instant Alpha won’t make you leader of the pack. Rather, it’s a color-based selection tool, similar to magic wand tools in other image manipulation apps. It’s best used to strip solid-colored backgrounds from images (replacing them with transparency, which doesn’t obscure the background color on a Web page, for instance).
The Instant Alpha tool is the second button in the Markup Toolbar. Click it, and then click and hold on the colored area you wish to select. The selected area turns red; you can then drag the pointer to adjust the tool’s sensitivity to include the colors you drag over. Once you’re happy with the selection, lift your finger from the mouse or trackpad to finalize your selection.
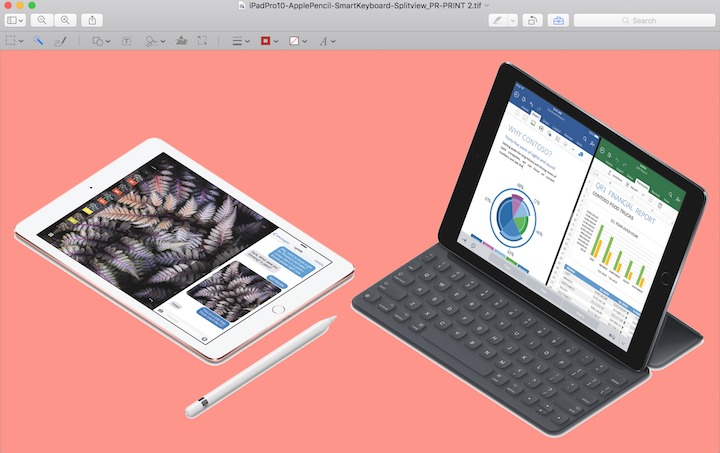
As you’d expect, you can press Delete to delete the selection. In the screenshot below, I first used Instant Alpha to select the background, which I deleted.
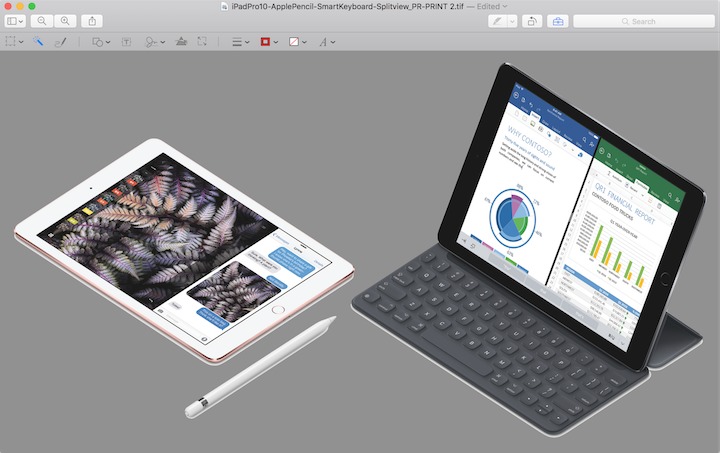
Then I undid that, selected the background again, inverted it with Edit > Invert Selection, and deleted the iPads and Apple Pencil, making for a neat silhouette effect.

Realistically, though, the main time we use the Instant Alpha tool is when we’re working on a button or logo for a Web site, and the original image has a white or colored background instead of a transparent background. A few quick clicks and the background is history.
Adjust Colors — For the most part, we’ve been talking about editing images that someone created from scratch in a graphics app, rather than photographs. However, if you do find yourself needing to edit a photograph, Preview provides some surprisingly robust image adjustment tools when you choose Tools > Adjust Color (Command-Option-C). These tools are essentially identical to those that first appeared in iPhoto many years ago.

At the top of the Adjust Colors window is a histogram with three drag handles with which you can adjust the image’s white point, black point, and midtone. Click the Auto Levels button to get a suggestion of how to reset the white and black points. Then play with each of the sliders to get a feel for how they lighten or darken the image; if you don’t like how things turn out, you can reset all of your changes with the Reset All button at the bottom of the window.
The rest of the sliders are at least labeled, but we still recommend experimentation to see how each affects a given image. Remember, you can undo your adjustments at any time with Reset All. Here’s what they do:
- Exposure: If a photograph is too dark or too light due to being under-exposed or over-exposed, this slider will let you fix that. It’s mostly helpful in a small way to brighten photos that were dimly lit.
-
Contrast: This slider lets you control the difference between the lightest and darkest areas in a photo. It’s seldom worth messing with much, though increasing contrast a little bit can make an image look crisper and more detailed.
-
Highlights: This slider reveals detail in the brightest points of a photograph, which can be useful for making clouds more visible, for instance.
-
Shadows: More generally useful than the previous one, the Shadows slider throws light on the darker parts of a photo, revealing detail that was previously hard to see. Since you’re most likely to use it on a dark photo, it will probably lighten the entire photo as well.
-
Saturation: Use this slider to adjust how saturated the colors are. Moving the Saturation slider all the way to the left makes the image grayscale, which can be a useful effect, while sliding it to the right makes colors practically explode off the screen. If an image seems a little dull, try increasing saturation just a bit.
-
Temperature: With this slider, you can make the image cooler (more blue) or warmer (more yellow). This isn’t terribly useful, but if the photo was taken in unkind fluorescent lighting, the Temperature slider might improve it a bit.
-
Tint: While the Temperature slider lets you make an image more blue or more yellow, the Tint slider does the same with green and red. To make it easier to use, Apple provides a dropper next to it; select it and then click a part of the image that should be a neutral gray or white. That sets the Tint slider automatically. Click the dropper in a few different spots to see how they differ; the best way to evaluate how well it has worked is to look at some skin tones.
-
Sepia: This slider is a one-trick pony; it reduces the saturation of the photo using sepia tones instead of grayscale. Crank it all the way up to give your image an “old-timey” feel.
-
Sharpness: This slider can make your image blurrier or sharper. Blurrier might be helpful with an almost abstract sunset, but mostly you’ll want to sharpen photos to bring out more detail. Don’t go too far, though, since excessive sharpness can make the image look grainy.
To give an example of what these controls can do for your photos, here’s a photo Adam took recently at Cornell University’s Dragon Day. Unfortunately, because it was an overcast day, it looks less like a celebration and more like a funeral procession. Let’s see if we can brighten things up a bit.

First, I clicked Auto Levels to establish a baseline, and then I moved exposure up a bit to brighten the image. But increasing exposure blew out some of the clouds, so I darkened the highlights to make it look more natural, while also lightening shadows a bit to add more brightness. Then I upped the saturation to make the bright colors in the photo more vibrant. Finally, I bumped up temperature, tint, saturation, and sharpness just a bit to round things out.
The end result is a brighter, clearer photo. Now there’s a celebration!

One last note about color. Preview supports color profiles, which define how different displays or printers can output color. In View > Soft Proof with Profile, you can choose a color profile with which to preview the image, and if you want to assign a particular profile, choose Tools > Assign Profile and pick a profile from the pop-up menu in the dialog that appears. These features could be useful for graphics professionals who care deeply about color reproduction, although we suspect they’re using different tools.
Rotate Photos and Pages — Every now and then, you end up with an image which isn’t rotated the way you want. Happily, Preview makes it easy to rotate images: choose either Tools > Rotate Left (Command-L) or Tools > Rotate Right (Command-R).
Less commonly useful than the Rotate commands are the next two in the Tools menu: Flip Horizontal and Flip Vertical. They rotate the image too, but around a horizontal or vertical center line. For example, Flip Horizontal can be helpful if you need a person’s headshot to face a different direction. Flip Vertical is useful when you need to flip a photo upside-down.
Preview can also rotate PDF pages, which is only very occasionally necessary. When you rotate a PDF page, Preview rotates just the currently selected page, which probably isn’t what you want. To instead rotate all pages, display thumbnails in the sidebar by choosing View > Thumbnails, select a page in the sidebar, choose Edit > Select All (Command-A) to select all pages, and then use the rotation commands. You can of course rotate just a subset of pages, if you want.
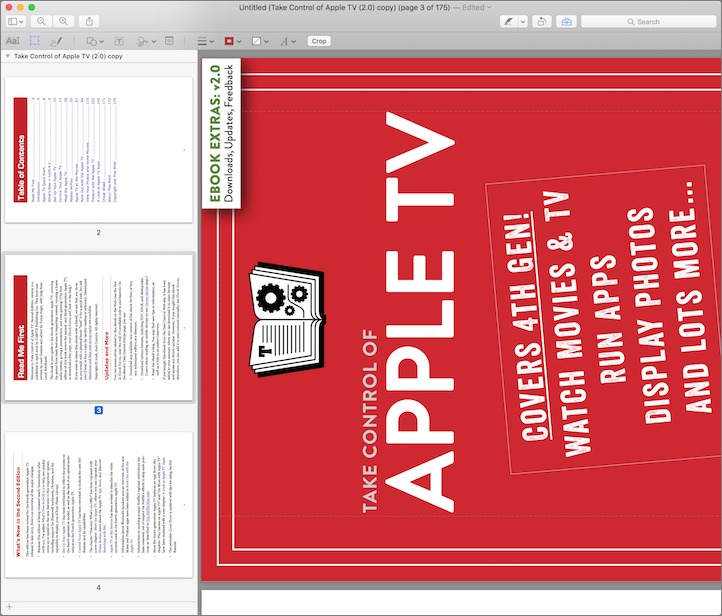
Crop Multiple Pages in PDFs — In “The Power of Preview: Cropping and Resizing Images,” we said, “Preview crops only a single page at a time”. It turns out that’s not entirely true.
To crop multiple PDF pages, reveal the sidebar thumbnails as explained above and then use the Rectangular Selection tool on the page to select the area to which you want to crop (in the screenshot below, we’re eliminating the white page margins). Once you’ve made your selection, click the current page in the sidebar and choose Edit > Select All (Command-A) to select all the pages. Finally, choose Tools > Crop (Command-K) to crop every page in the document to the selected dimensions.

Unfortunately, this still isn’t all that useful, because Preview only hides content instead of deleting it, and there’s no guarantee that other PDF viewers will honor the crop. It’s probably most useful if you’re trying, for instance, to make a bunch of postcards scanned as full pages into something more viewable.
Edit and Rearrange PDFs — As you’re probably coming to realize, Preview gives you complete control over the individual pages in a PDF from the thumbnail sidebar view. Here’s what you can do:
- Rearrange pages: Click and drag a thumbnail in a sidebar and move the page to where you want it in the document.
-
Delete pages: Select one or more thumbnails (by Shift-clicking for a contiguous selection or Command-clicking for a discontiguous selection) in the sidebar and press Delete.
-
Combine PDFs: You can drag thumbnails from one document’s sidebar into the sidebar of another to copy pages between documents. Likewise, you can select all the thumbnails in a document’s sidebar and drag them into another document to combine the two. This is particularly handy for combining scanned single-page PDFs into a single file.
At this point, it might seem as though we’ve covered everything Preview can do, but we have more in the wings! Stay tuned to TidBITS to learn more about the power of Preview.
TidBITS Watchlist: Notable Software Updates for 25 April 2016
VMware Fusion 8.1.1 — VMware has updated the standard and Pro editions of its popular virtualization package to version 8.1.1. The update fixes a crash related to running graphics and gaming software with Multisample anti-aliasing (MSAA) enabled in a Windows virtual machine, resolves a host-system memory leak that was caused by resizing the window of a running virtual machine, solves a problem with network address translation (NAT) breaking when port forwarding is enabled, and fixes problems with connecting a scanner or flash drive through a USB 3.0
controller. ($79.99/$199.99 new, free update, 363 MB, release notes, 10.9+)
Read/post comments about VMware Fusion 8.1.1.
OmniFocus 2.5.1 — The Omni Group has released OmniFocus 2.5.1 with several bug fixes for the Getting Things Done-inspired task management app. The update ensures that changes to the “Correct spelling automatically” preference are implemented, fixes a crash that occurred when switching font collections while a note field was open for editing, resolves an errant horizontal line in the sidebar, rectifies a problem with notes not being updated on theme changes, and improves performance when completing a large number of items in a given container. ($39.99 new for Standard edition and $79.99 for Pro edition from
The Omni Group Web site, $39.99 for Standard edition from Mac App Store (with in-app purchase option to upgrade to Pro), 27.8 MB, release notes, 10.10+)
Read/post comments about OmniFocus 2.5.1.
BBEdit 11.5.2 — Bare Bones Software has released BBEdit 11.5.2, a maintenance release focused on fixing bugs. The venerable text editor resolves an issue where an unintentional drag of the mouse could occur when clicking on draggable objects, reduces the transient memory requirements when performing a non-grep Replace All operation using a long replace string, fixes a bug that cleared a document’s Undo history when using Move to New Window from the project sidebar popup or contextual menu, improves the performance of “Strip trailing whitespace,” improves saving the document state when closing a document, and
fixes several crashes. ($49.99, free update, 12.0 MB, release notes, 10.9.5+)
Read/post comments about BBEdit 11.5.2.
Typinator 6.9 — Ergonis has released Typinator 6.9, with improved support for importing TextExpander snippets, including import from TextExpander’s “textexpandersettings” file format and correct conversion of certain types of fill-ins as well as nested snippet invocations. The text expansion tool adds an extended predefined DOuble CAps exceptions set, improves handling of delays when sending event sequences to applications, adds a new script command for extracting a set’s rules in table format, and improves compatibility with third-party applications such as RootsMagic, Wine, LibreOffice, and Slack.
(€24.99 new with a 25 percent discount for TidBITS members, free update, 7.1 MB, release notes, 10.6.8+)
Read/post comments about Typinator 6.9.
Mellel 3.4.5 — RedleX has released Mellel 3.4.5 with the addition of several keyboard shortcuts to the Dialogue box text editor, including Command-I, -B, and -U (italic, bold, and underline) plus Command-L and Command-Shift-L to switch between languages. The word processor also improves font substitution with OS X 10.11 El Capitan for Ethiopic, Georgian, Syriac and Thaana scripts, improves rendering of Arabic text, fixes a bug that caused a selection to disappear when extending the selection via Shift-Arrow from one table cell to an adjacent cell, adds an option to block exporting language tags in RTF and DOC formats, and fixes a
couple of Spanish localization issues. ($39 new from RedleX and the Mac App Store, free update, 93.2 MB, release notes, 10.6+)
Read/post comments about Mellel 3.4.5.
ExtraBITS for 25 April 2016
In ExtraBITS this week, the FBI backed out of its New York iPhone case… just before getting smacked down by the court. China has shut down the iBooks Store and iTunes Movies services shortly after their debut, developer Craig Hockenberry explains why color is the future of displays, security consultant Rich Mogull gives a big thumbs-up to iMessage security, we explain why you should uninstall QuickTime 7 for Windows, analyst Ben Thompson offers an explanation of why Apple is bad at online services, and Apple criticizes a proposed anti-encryption bill.
iBooks Store and iTunes Movies Shut Down in China — Apple has had a smoother time rolling out its online services in China than other tech giants, but that may be coming to an end. Only six months after being introduced in the country, the Chinese government has shut down the iBooks Store and iTunes Movies services. The shutdown is thought to be due to the government’s desire to keep the Chinese people away from Western culture. “We hope to make books and movies available again to our customers in China as soon as possible,” said an Apple
spokeswoman.
U.S. Government Drops iPhone Fight in New York — Last Friday, the U.S. Department of Justice dropped its legal bid to force Apple to unlock an iPhone linked to a New York drug case. The FBI said that it had managed to get the iPhone’s passcode, making a court order unnecessary, but on Monday another reason came to light: the New York court had denied the government’s request. It’s starting to look like the government is using iPhones it already has access to in order to seek out precedent-setting court rulings, but dropping the cases when the chances of winning look slim.
The Colorful Future of Displays — Developer Craig Hockenberry argues that since displays are now essentially free of visible pixels, the next frontier is in expanding the number of onscreen colors. For years, computers have supported the sRGB color profile, but the late-2015 iMac and the 9.7-inch iPad Pro support the newer DCI-P3 standard, which displays a wider range of color and is now standard in filmmaking. If you have one of those Apple products, Hockenberry has made a tool to see the difference between sRGB and DCI-P3, with photos by our own Jeff Carlson as examples. However, Hockenberry warns
that this transition will make things more complicated for developers, and he advises them to start reading up on how to use color profiles.
The iMessage Cone of Silence — Our own Rich Mogull recently had the opportunity to sit down with senior members of Apple’s engineering and security teams, and he discovered that iMessage is even more secure than previously thought. In essence, every iMessage is encrypted from end to end, messages are encrypted using keys that exist only on your devices and are not stored with Apple, and messages are encrypted multiple times to maximize security. In addition, iMessage’s registration system is designed to inherently distrust Apple’s own servers, thereby making it
extremely difficult for anyone to compromise iMessage’s security with so-called “phantom devices” that could be used to tap conversations. “Overall [iMessage is] a solid balance of convenience and security,” Mogull said.
Apple Drops QuickTime 7 for Windows — Apple has announced that it’s no longer supporting QuickTime 7 for Windows. If you no longer need it, you should uninstall it immediately, because the U.S. Department of Homeland Security warns: “Exploitation of QuickTime for Windows vulnerabilities could allow remote attackers to take control of affected systems.”
Why Apple Stinks at Services — Analyst Ben Thompson takes a hard look at Apple’s organizational structure to explain why the company excels at hardware but performs poorly with services. Using DuPont’s shaky pivot from gunpowder to paint, Thompson illustrates why it will take a major organizational shakeup for Apple to succeed in services. With its executives indicating that they believe services are important to the future of the company, Apple may have no other choice than to create a new division with a corporate structure better suited for online services, while separately maintaining
the existing structure that has been so successful with hardware.
Apple Joins Tech Giants to Call Anti-Encryption Bill “Unworkable” — Senators Richard Burr (R-NC) and Diane Feinstein (D-CA) have proposed a bill that would punish companies like Apple that refuse to comply with decryption orders. Now the Reform Government Surveillance Coalition, which includes Apple, Dropbox, Facebook, Google, Microsoft, and Twitter, has published an open letter calling the proposed legislation “unworkable,” saying that it would “weaken the very defenses we need to protect us from people who want to cause economic and physical harm.” So far,
there isn’t much cause for alarm, because the bill is only a draft; it’s still a long way from coming to a vote, much less becoming law. Senator Ron Wyden (D-OR) has vowed to filibuster the bill if it reaches the Senate floor.